snow chains AUDI S8 2011 Owners Manual
[x] Cancel search | Manufacturer: AUDI, Model Year: 2011, Model line: S8, Model: AUDI S8 2011Pages: 302, PDF Size: 76.07 MB
Page 121 of 302
Rea r vi ew camer a coverag e area
The MM I display shows the area covered by
the rear view camera ¢
fig. 126 (D. Objects
that are not in the area covered @are not
shown on the MMI display.
We recommend that yo u practice parking with
the rear view camera in a traffic -free location
or parking lot to become familiar with the sys
tem, the orientation lines, and their function.
When do ing th is, there should be good light
and weather conditions.
I n the MMI disp lay, objects or vehicles appear
closer or further away if:
- you are driving in reverse gear from a level
surface onto an incline, or a downward
s lope,
- yo u are driving in reverse gear toward pro
truding objects,
- the vehicle is carrying too much load in the
rear .
The accuracy of the or ientat ion lines and blue
surfaces d imin ishes if:
- the adapt ive air suspension/sport* is faulty,
the vehicle is lifted or dynamic mode is se
lected
¢page 106,
- the rear view camera does not prov ide a reli
able image, for examp le, in poor visibility
condit ions or if the lens is dirty,
- the image on the screen is not visible due to
sun g lare and reflect ion.
Car ing for the rear view came ra len s
The rear view camera is located above the rear
license plate bracket . For the parking system
to operate, the lens¢
fig. 12 7 must be kept
clean:
- Dampen the lens with a household alcoho l
based glass cleaner, and then wipe the lens
clean with a dry cloth ¢CI).
- Remove snow with a hand brush and ice
preferably with a de-icing spray ¢(D.
A WARNING
-Senso rs have blind spots in which objects
cannot be detected . Pay special attention
Ad vanced P arking S ystem 119
to small children and animals because
the sensors cannot always detect them.
- The parking system cannot replace the
driver's attention. The driver alone is re
sponsible for parking and similar driving maneuvers.
-Always keep your eyes on the vehicle's
surroundings, us ing the rear v iew mirror
as well.
- Do not allow yourself to be distracted
from traffic by the rear view camera p ic
tures .
- If the position and the installation angle
of the camera has changed, for example,
after a rear end collision, do not continue
to use the system for safety reasons.
Have it checked by a qualified dea le rship.
(D Note
- Low obstacles a lready s ignaled by a
warning can disappear from the system's
detect ion range as they are approached
and w ill not continue to be s ignaled. Ob
jects such as ba rr ie r chains, trai le r d raw
bars, thin painted vert ica l poles or fen
ces may not be detected by the system,
posing r isk of damage .
- Never use warm or hot wate r to remove
snow or ice from the rear view camera
lens - this could cause the lens to crack!
- When cleaning the lens, never use prod
ucts that are ab rasive.
Page 196 of 302
194 Intelligent technology
been damaged, the brake pedal must be
pressed considerably harder to make up
for the lack of booster assistance.
Servotronic ® -
advanced power
steering system
The power steering systems use the power of
the running engine to allow precise steering
with little effort .
The advanced Servotronic® power steering
system senses the road speed and e lectroni
cally adjusts power assistance to prov ide com
fortable and safe steering response exactly
matched to the veh icle speed.
Power steering w ill not work if the eng ine is
off . As a result, the steering whee l wi ll be hard
to turn.
The power steering fluid level is checked dur
ing the scheduled maintenance serv ices.
([) Note
If there is an electronic malfun ct ion, ser
votronic
w ill still f unction like a conven
tional power steer ing system, providing a
constant steering support force that is no
longer proportionate to the vehicle speed.
This is most noticeab le when turning the
steer ing whee l at low speeds (for examp le
when parking), - more effo rt will be re
qui red than usua l.
- Be aware of the different than usual
stee ring response and adjust yo ur stee r
i ng fo rce accord ingly.
- Have the p roblem checked and set rig ht
by an Aud i deale r as soon as possib le.
(D Tips
- When the engine is runn ing, never hold
t h e steer ing whee l turned all the way to
the right or to the left for longer than 15
se conds. The power steer ing p ump w ill
ove rhe at the hydr aulic flu id if you keep
ho ld ing the steering whee l turned all the way
. This is likely to damage the power
steering system .
- If the powe r steering system sho uld fai l
entirely, o r if the engine is not runn ing
(for examp le, whi le being towed), you
w ill sti ll be able to steer the veh icle.
However,
considerably more effort will
be required to do so.
- If the power steering system sho uld
have a leak, or is not functioning proper
ly, contact your author ized Audi dealer
immed iately.
- The power steering system requ ires a
specially fo rmu lated hydraulic fluid. The
powe r stee ring fluid reservoir is locat ed
in the engine compartment
Q page 224.
T he corre ct fl uid level i n the reservoir is
impo rta nt fo r proper fu nctioning of the
powe r stee ring .
Driving with your
quattro ®
With All Wheel Drive, all four wheels are driv
en .
Gen eral information
With A ll W heel Drive, power is distributed to
all four wheels. This happens automatically
depending on your driving style and the road
condit ions at the time. See also
Q page 190.
With the sport different ial*, powe r distribu
tion to the rear wheels is variable and can be
adjusted with Audi drive select*
Q page 106 .
Winter tires
When driving in the winter, yo ur vehicle with
All Wheel D rive has an advantage, even w ith
r egular tires . In wi nter road conditions it may
be advisable to mount winter tires (or all-sea
son tires) for improved driveability and brak
i ng : these tires must be mo unted o n
all four
wheel s. See also q page 253, Winter tires.
Tire chains
Where tire chains are mandatory on certa in
roads, this no rma lly also app lies to veh icles
with All Wheel D rive
q page 254, Snow
chains .
Page 256 of 302

254 Tir es and whe els
The s peed ra ting le tter code( ¢ page 24 0) is
on the side wall of the tire¢ page
249.
A WARNING
Winter tires have maximum s peed limits
that may be lower t han your vehicle's max
imum speed . Always know the maximum
speed before driving off . Never drive faster
than the speed permitted for your specific
w inter t ires. This will cause damage to the
tires leading to an accident and serious
pe rsonal inj ury to you and your passen
gers .
A WARNING I>=
Driving faster than the maximum speed
for which the winter tires on your vehicle
were designed can cause tire fai lure in
cluding a blowout and sudden deflat ion,
loss of control, crashes and serious per
sonal injuries. Have worn or damaged tires
rep laced immed iate ly .
- Winter tires have maximum speed rat ing
that may be lower than your veh icle's
maximum speed .
- Never drive faster than the speed for
w hich the winter or other tires installed
on your vehicle are rated.
A WARNING
Always adjust your d rivi ng to the road and
tr affic conditions. Neve r let the good ac
celeration of the wi nte r t ir es and all-whee l
dr ive temp t you in to taking extr a ris ks . A l
ways remember :
- Whe n bra ki ng , an a ll-wheel d rive vehicle
hand les in the s ame way as a front drive
vehicle.
- Drive caref ully and reduce your speed on
icy and slippery roads, even winter tires
cannot he lp under black ice conditions.
@) For the sake of the environment
Use summe r ti res when weathe r cond i
tions perm it. They are quieter, do not we ar
as quickly and red uce fue l consumption.
Snow chains
S now cha ins may be fitted only to the front
whee ls, and o nly to cer tain ti re si zes . As k your
a uthorized Aud i dea ler on whi ch tire sizes
snow chains can be used.
If you a re go ing to use snow cha ins, then you
mus t install t hem on the front whee ls a t
l east.
T he snow chains must have low-p rofile links
and mus t not be t hicker than 0.4 inch
(10,S mm) , in cl ud ing t he loc k.
Remove whee l center cove rs and trim discs
before putt ing snow chains on your vehicle
¢ (!) . For safety reasons cove r caps must then
be fi tted over the wheel bo lts. These are ava il
able from authorized Aud i dea lers .
A WARNING
=
Using the wrong snow chains for your vehi -
cle or insta lling them incorrect ly can in
crease the risk of loss of contro l leading to
serious pe rsonal injury.
- Snow chains are available in different
sizes . Always make sure to follow the in
structions prov ided by the snow chain
manufacturer .
- W hen driving with snow cha ins never
drive faster than the speed permitted for
your specific snow chains.
- Always observe local regulations.
(D Note
- Remove snow chains before dr iving on
roads not covered with snow to avoid
damaging tires and wearing the snow
chains down unnecessarily .
- Snow chains, which come into direct con
tact with the whee l rim, ca n scratch or
damage it. Therefore, make sure that the
snow chains are s uitably covered. Check
the pos ition of the snow chains afte r
dr iving a few yards and co rrect if necces
sary. Follow the inst ruct io ns from the
snow chain m an uf actur er when do ing so.
- If the Ada ptive Ai r Suspe nsio n should
m alfu nction, do not mount o r use snow
11-
Page 257 of 302
chains because t he vehicle will be ex
tremely low. If you do drive with snow
chains on while the vehicle is at this lev
el, the snow chains might severe ly dam
age the wheelhouse and other parts of
the veh icle.
@ Tips
Where snow cha ins are mandatory oncer
tain roads, this normally also applies to ve
hicles with All Wheel Drive.
Wheel bolts
Wheel bolts must always be tightened to the
correct torque .
The design of whee l bolts is matched to the
factory installed r ims. If different rims are fit
ted, the correct wheel bolts with the right length and correctly shaped bolt heads must
be used . This ensures that wheels are fitted
secure ly and that the brake system f unctions
correctly .
In certain circumstances, you may not use
wheel bolts from a d iffe rent vehicle -even if it
i s the same mode l
¢page 285.
A WARNING
Imprope rly tig hte ned or maintained whee l
bolts can be come loose causing loss of
contro l, a co llision and serious persona l in
jury .
- Alw ays keep the w heel bolts and the
th reads in the wheel hubs clea n so the
wheel bolts can turn easily and be prop
er ly tightened .
- Never grease or oil the wheel bo lts and
the threads in the w heel h ubs. They can
become loose wh ile driving if greased or
o iled, even if tightened to the specif ied
torque.
- Only use wheel bolts that belong to the
rim being installed.
- Never use different whee ls bolts on your
vehicle.
- Always maintai n the co rrect tightening
torq ue for the wheel bo lts to reduce the
Tire s an d wheel s 255
risk of a wheel loss. If the tightening tor
que of t he wheel bolts is too low, they
can loosen and come out when the vehi
cle is mov ing. If the tighte ning torque is
too h igh, the wheel bol ts and threads
can be damaged and the whee l can be
come loose.
(I) Note
The specified torque for the whee l bolts is
90 ft lb ( 120 Nm) wi th a tole rance of± 7,4
ft lb(± 10 Nm). Torq ue whee l bolts diago
nally. Afte r cha nging a whee l, the torq ue
must be checked as soon as possible wi th a
torque w rench -prefe rably by an au thor
ized Audi dealer or qualif ied workshop .
Low aspect ratio tires
Your Audi is facto ry-eq uipped with low aspect
ratio tires. These tires have been thoro ughly
tested and been se lected specifically for your
model for their superb performance, road fee l
and handling u nder a variety of driving cond i
tions . Ask your authorized Audi dealer for
more details.
The low aspect ratio of these t ires is ind icated
by a numeral of
55 or less in the tire's size
designation . The numeral rep resents the ratio
of the t ire's sidewall height in relation to its
t read width ex pressed in pe rce ntage. Conven
tiona l tires have a he igh t/w idth ratio of 60 or
more.
The performance of low-aspe ct-ratio tire s is
particularly sensitiv e to improper infla tion
pres sure. It is therefore important that low
a spect ratio tires are inflated to the specified
pre ssure and that the inflation pressure i s
regularly checked and maintained. Tire pre s·
sures should be checked at least once a
month and always befo re a long trip
¢ page 244, Checking tire pressure.
What you can d o to avoid tire and rim
damage
Low aspect ratio tires can be damaged more
easily by impact w it h potholes , curbs, gul lies ..,.
•
•
Page 260 of 302

258 Tires and wheels
pressure label~ page 242 . Driving on a
significantly under-inflated tire causes
the tire to overheat and can lead to tire
failure. Under-inflation also is likely to
impair the vehicle's handling and stop
ping ability.
- The driver is responsible for maintaining
the correct tire pressures. You must
check the tire pressures regularly.
- Under certain cond itions (such as a spor
ty driving style, winter condit ions or un
paved roads), the pressure monitor indi
cator may be delayed.
- Ask your author ized Audi dealer if run
flat tires may be used on your veh icle.
Your vehicle registration becomes invalid
if you use these tires when not permit
ted. Damage to your vehicle or accidents
cou ld also result.
(D Tips
- The tire pressure monitoring system
stops working when there is an ESP/ABS
malfunction.
- Using snow chains may result in a system
malfunction.
- To ensure a proper TPMS function use
AUDI Original Tires which are marked
with "AO" or "RO" on the tire sidewall.
~p age 249.
- The tire pressure monitoring system on
your Audi was syntonized using tires with
the "AO" or "RO" identification. We rec
ommend using these tires.
Reset tire pressure monitoring system
App lies to vehicles: with tire pressure monitoring system
If the tire pressure is adjusted, wheels are ro
tated or changed, the TPMS must be reset via
MMI .
.. Switch on the ignition .
.. Se lect in the MMI: !CAR !function button>
Car systems contro l button > Servicing &
checks > Tire pressure monitoring > Store
tire pressures > Yes, store now.
(D Tips
Before resetting the TPMS, the current
pressures of all four tires must correspond
to the specif ied values. Adjust the tire
pressure and reset the pressure in the tire
pressure monitoring system according to
the load you are carrying~ page 242.
- Do not store the tire pressures if you are
dr iving with snow chains. Otherwise, a
system malfunction may occur.
Page 263 of 302
Space-saving spare tire (compact spare
tire)*
A pplies to vehicles: with space-sav ing spa re tire
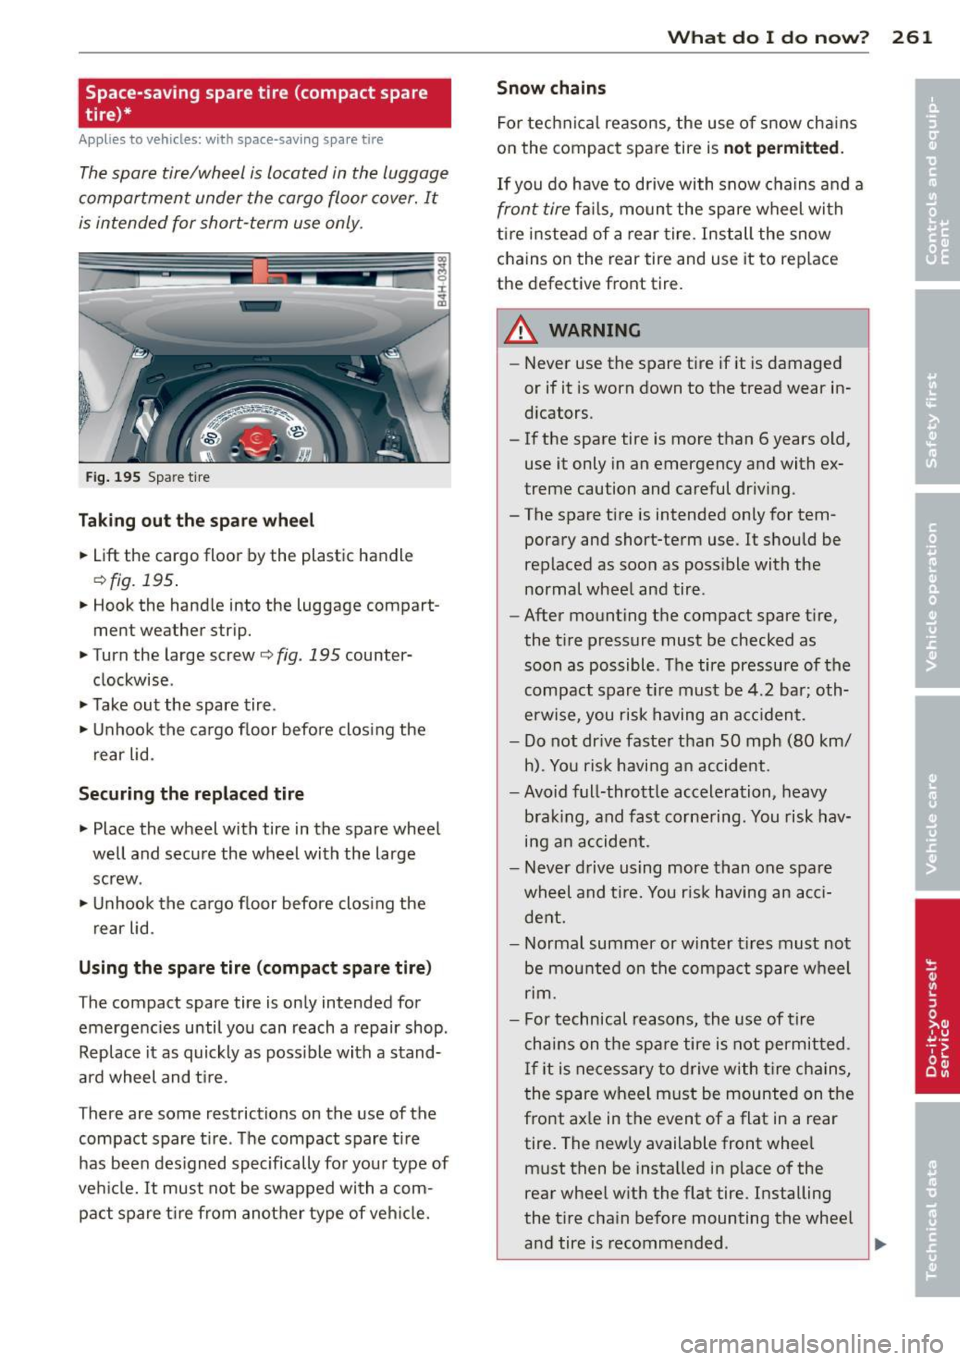
The spare tire/wheel is located in the luggage
compartment under the cargo floor cover. It
is intended for short-term use only.
F ig . 195 Spare t ire
Tak ing ou t the sp ar e whee l
.. Lift the cargo floor by the plast ic handle
¢ fig. 195.
.. Hook the hand le into the luggage compart
ment weather strip.
.. Turn the large screw
¢fig. 195 counter
clockwise .
.,. Take out the spare tire.
.,. Unhook the ca rgo floor before clos ing the
rear lid.
Securing the repl aced tire
.. Place the wheel with tire in the spare wheel
well and secure the wheel with the large
screw .
.,. Unhook the ca rgo f loor before clos ing the
rear lid.
Using the spare tire (compact spare tir e)
The compact spare tire is only intended for
emergenc ies until you can reach a repair shop .
Replace it as quickly as poss ible with a stand
ard wheel and t ire.
There are some restrictions on the use of the
compact spare t ire . The compact spare t ire
has been des igned specifically fo r your type of
ve hicl e. It must not be swapped with a com
pact spare t ire from another type of veh icle.
What do I d o now ? 261
Snow chains
For technical reasons, the use of snow cha ins
o n the compact spare tire is
not permitted .
If you do have to drive with snow chains and a
front tire fails, moun t the spare wheel wi th
ti re i nste ad of a rear tire. Install the snow
chains on the rear tire and use it to replace
the defective front tire .
A WARNING
-Never use the spare tire if it is damaged
or if it is worn down to the tread wear in
dicators.
- If the spare tire is more than 6 years old,
use it only in an emergency and with ex
treme caution and careful driv ing.
- The spare tire is intended only for tem
porary and short-term use. It s hould be
replaced as soon as poss ible with the
normal whee l and tire .
- After mounting the compact spare tire,
the t ire pressure must be checked as
soon as possible . T he tire pressu re of the
compact spare t ire must be
4.2 ba r; oth
erwise, you risk having an a ccident.
- Do not dr ive faste r than
SO mph (80 km/
h). You ris k having a n accide nt.
- Avoid full-throttle acceleration, heavy
brak ing, and fast corne ring . You risk hav
i n g an accident .
- Never d rive using more than one spare
wheel and t ire. You r is k having an acci
dent.
- Normal summer or winter t ires must not
be mou nted on the compact spare w heel
nm.
- For t echnical reasons, the use of tir e
chains on the spa re tire is not permit ted .
I f it is ne cessary to drive with t ire chains,
the spare wheel must be mounte d on the
fro nt ax le in the event of a flat in a rear
tire. The newly available front whee l
must then be insta lled in place of the
rear whee l w ith the flat tire . Installing
the t ire cha in before mounting the whee l
and tire is recomme nded .
Page 298 of 302
296 Index
Servotronic (power steering system) ... . 194
Shiftpaddles . ... ... ...... ... .. .. .. . 115
Ship (transporting your vehicle) . .. ..... 277
Side airbags
Description ............... ... .... . 163
How they work ............ ... .... . 164
Side assist Activating and deactivating . . . . . . . . . . . 98
C leaning sensors ....... .... .. .. .. . 208
Description ............... ... .... .. 98
Informational and alert stage signals . 100
Messages in instrument cluster display 104
MMI settings ................ ..... 103
Operation . . . . . . . . . . . . . . . . . . . . . . . . . 99
Safety tips ................ .. .. .. . 104
Sensor detection area . . . . . . . . . . . . . . . 99
Side curtain airbags ................. 166
Descript ion ................ .. .... . 166
How they work ........... .... ..... 167
Safety instructions ........ .... .... . 167
Ski sack
refer to Pass-through with ski sack ... .. 66
Sliding/tilting sunroof Emergency closing .......... .. .. .. .. 41
Emergency operation ...... .... .. .. .. 42
Opening and closing ....... ... .. ... . 40
Panoramic sunroof ............ .... .. 41
Snow chains ... ........... .. .. .. .. . 254
Sockets . . . . . . . . . . . . . . . . . . . . . . . . 63, 69
Solar operation (automatic climate con-
trol) . . . . . . . . . . . . . . . . . . . . . . . . . . . . . . . 77
Sources of information about child re-
straints and their use ......... .. .... . 187
Space-saving spare tire ........ .. .... . 261
Spare wheel ............... ... .... . 262
Speedometer . . . . . . . . . . . . . . . . . . . . . . . 26
Speed rating letter code ....... .. .... . 250
Speed warn ing system ...... .. .. ...... 83
Sport differential . .......... ... .. .. . 106
Ind icator light . . . . . . . . . . . . . . . . . . . . . 22
START ENGINE STOP button ....... .. .. 79
Starting from rest . . . . . . . . . . . . . . . . . . . . 82
Starting off with a trailer .. .. .... .. .. . . 82
Starting the engine .................. 79 Steering wheel
Adjusting steering column ....... ... . 78
Easy entry feature . . . . . . . . . . . . . . . . . . 78
Indicator light . . . . . . . . . . . . . . . . . 17, 22
Shift paddles .... ............. .... llS
Steering wheel heating ............ .. 77
Steps for determining correct load limit . 247
Stopping the eng ine ... .......... .. .. . 80
Storage .. .. .. .. .. ............. .. .. . 70
Sunroof ........ .. .. .............. .. 40
Sun shades Emergency closing (roof) ......... ... . 42
Panoramic sunroof ............. .. .. . 42
Rear window ... .. ... .......... .. .. . 47
Side doors ..... .. .. .............. .. 47
Sun visors .. .. .. .. .. ..... ...... .. .. . 47
Symbols
refer to Warning/Indicator lights . .. .. . 11
T
Tachometer ..... .. .. ............ 11, 23
Technical modifications .......... .. .. 286
Temperature di splay .................. 23
T ether anchors .... ................ . 18S
Tether strap .. .. .. .. ..... ...... .. .. 185
The first 1,000 miles (1,500 km) and after-
wards ...... .. .. .. .. ........... .... 197
Tie-downs . . . . . . . . . . . . . . . . . . . . . 65, 134
Tips for the environment Sav ing fuel .. .. .. .. ... ....... ... .. . 68
tiptronic (automatic transmission) . .... 112
T ire pressure .... .. ............. .... 244
Tire pressure monitoring system ....... 256
Loss of air pressure ............. ... 25 7
Malfunction ..... ................ . 257
Resetting tire pressures ......... .. .. 258
Tires ..... .. .. .. .. .. ............. .. 238
Serv ice life . . . . . . . . . . . . . . . . . . . . . . . 248
speed rating letter code ......... ... 250
Tire manufacturing date ......... ... 250
T ire specifications ... .......... .. .. 250
T read depth . .. .. ............. .. .. 248
Uniform tire quality grading ......... 252
Winter tires ..... ................ . 253
Tires and veh icle load limits ........... 246
Page 299 of 302
Index 297
Tires and whee ls
Unlocking
Checking tire pressure .. ... .. .. .. .. . 244 Power locking switch .
... .... ... .. .. . 34
•
Cold tire inflat ion pressure ... .. .. .. . 242 Rea r lid . . . . . . . . . . . . . . . . . . . . . . . . . . . 35 •
Dimensions . ............. .... .. ... 249 Remote contro l .. ................. . 32
General notes ............ .... .. ... 238 Using the key .. .. .... ............. . 34
Glossary of t ire and load ing termino lo -
gy .. .. .. .. .. ........ ... .. ... ... . 239
V
Low aspect ratio t ires ......... .... .. 255
New tires and wheels ...... .. .. .. .. . 24 9 Valet parking
.. .. .. ................. . 40
Replacing .. ............. .... .. ... 2 50 Vanity mirro
rs . . . . . . . . . . . . . . . . . . . 47 , 48
Snow chains . ... ...... ... .. .. .. ... 254 Vehicle-care products
.... ....... .... . 206
Tires and vehicle load limits . ... .. .. . 24 6 Vehicle e
lectrical system . ..... ... .. .. . 16
Wheel bolts . ... .. .... ... .. .. .. ... 255
Vehicle identification label . ....... .. .. 279
W inter t ires .. ........... .. .. .. ... 253
Vehicle Ident ificat ion Number (VIN) .. .. 279
T ire se rv ice life ............ .. .. .. ... 248
Vehicle ja ck . . . . . . . . . . . . . . . . . . . 260, 265
T ools ..... ... ............. ...... .. 260
Vehicle literatu re .. .. ... ....... .... ... 5
Torn or frayed safety belts ... .. .. .. .. . 140
Vehicle transport .. .. . ... ...... ... .. 277
Touch-up paint . .. .. .... ... .. .. .. .. . 210
Ventilation . . . . . . . . . . . . . . . . . . . . . . . . . 7 4
Towing
Tow truck procedures ...... .. .. .. .. . 275
W
TPMS
Tire pressure monitoring system . ... . 257
Trailer towing ............. .... .. .. . 20 2
O pera ting ins truc tion s ..... .. .. .. .. . 20 2
Tec hnical req uirements . . . . . . . . 202, 2 03
T railer towing tips ..... ... .. .. .. .. . 204
T rain (transpo rting your vehicle) .. ... .. 277
T ransm ission ma lf u nct ion (ind icator
light) . .... .. .. .. ........... .. .. ... 115
T ransport Canada .. ..... ... .. .. .. ... 135
Transport ing your vehicle .... .. .. .. .. . 277
T read Wear Indicato r (TWI) .. .. .. .. .. . 24 8
T rip odomete r . . . . . . . . . . . . . . . . . . . . . . . 26
What does it mean whe n DEF appea rs in
the trip odometer d isplay? ... .. .. .. .. 26
Trunk
r efer to Rear lid .......... .... .. .... 35
Trunk escape handle ........ .. .. .. .. . 259
T u rn signa ls .. .. ... ..... ... .. .. .. .... 4 5
War ning/indicator lights ... .. .. .. .. .. 22
u
Unde rcoat ing ............. .... .. ... 2 12
Unfasten ing safety be lts ..... ... ... ..
142
Unid irect io na l tires . ..... ... .. .. .. ... 238
Uniform t ire q uality g rading . .. .. .. .. . 25 2 Warning/ind
icator lights . . . . . . . . . . . . . . 11
Airbag system . . . . . . . . . . . . . . . . . . . . . 18
An ti-lock braking system (A BS) ... .. .. . 19
Br ake system . . . . . . . . . . . . . . . . . . . . . . 14
Cruise cont ro l . . . . . . . . . . . . . . . . . . . . . . 22
E lectromechanica l pa rking brake ... .. . 15
E lectronic power contro l . . . . . . . . . . . . . 20
E lectronic stab ilizat ion program (ESP) . . 18
Generator ... .. ...... ............. . 16
Instrument cluster .. . .. .... .... .. .. . 10
Malfunction Ind icator Lamp (MIL) ..... 20
Safety be lt .. .. .. .. ... ....... ...... 16
T urn signals . .. .. ................. . 22
Warning/Indicator lights Airbag system ... .. ... ....... ..... 156
Dynam ic steering ................... 22
PASS ENGER A IR BAG OFF . .. ... ... .. 156
Warranty coverages .. ............... 283
Washe r reservo ir ...... ........... .. 236
Wash ing ... .. .. .. .. . .. .... .... .. .. 206
Automat ic car wash ............... . 207
by hand . .. .. .. .. .. . .. ....... ... .. 207
wi th a power was her ........... .. .. 208
Waxing ...... .. ...... ............. 209
Wea r indica to r .... .. . .. .. ..... ... .. 24 8
Weathe rst rips . .. .. .. . .. .... .... .. .. 211
Weights ...... .. ...... ............. 279