spare wheel AUDI S8 2011 Owners Manual
[x] Cancel search | Manufacturer: AUDI, Model Year: 2011, Model line: S8, Model: AUDI S8 2011Pages: 302, PDF Size: 76.07 MB
Page 247 of 302
Remember that the vehicle manufacturer, not
the tire manufacturer, determines the correct
tire pressure for the t ires on your vehicle.
It is impor tan t to check the tire pressu re when
the t ires a re cold .
- Read the requ ired ti re p ressure from the tire
pressure label. On USA veh icles, the t ire
pressure label is located on the drive r's side
B-pi llar . On Canada vehicles, the tire pres
sure label is located on the driver's side B
pillar.
- Turn the valve stem cap counter-clockwise
to remove it from the tire valve.
- Place the air pressure ga uge on the valve.
- T he tire pressures sho uld only be chec ked
and adjusted when the t ires are cold. The
s li ght ly raised pressures of warm tires must
not be reduced .
- Adjust the tire pressure to the load you are
ca rrying .
- Re insta ll the va lve stem cap on the valve.
When should I ch eck the tire pressur e?
The cor rect tire pressure is espec ially impor
tant at high speeds. The pressure should
therefo re be checked at least once a month
a nd a lways before start ing a journey. Do no t
forget to check the tire pressure for the spare
wheel
r:!> page 261 .
When should I adjust the tire pressures ?
Adjust the tire p ressure to the load you are
carry ing. Afte r changing a wheel
or replacing
wheels you have to adjust the tire pressures
on all wheels . In addition, you must then
store the new tire pressures i n the tire pres
sure monitoring system *
r:!> page 256.
A WARNING
Incorrect tire pressures and/or underinfla
tion can lead sudden tire failure, loss of contro l, col lision, ser ious persona l injury
or even death.
- When the warning symbo l
[I] appears in
the instrument cluster, stop and inspect
the tires .
Tires an d wheel s 245
-Inco rrect tire pressure and/or underinfla
tion can cause increased tire wear and
can affect the handli ng of the vehicle and
stopping ability .
- Incorrect tire pressures and/or underin
flation can a lso lead to sudden t ire fail
ure, including a blowout and sudden de
flation, caus ing loss of veh icle cont rol.
- The drive r is responsib le for the correct
tire pressures for all tires on the ve hicle.
The appli cable pressure values a re locat
ed on a sticke r o n the dr iver's s ide B -pil
lar.
- Onl y when all tir es on the vehicle are fil
led to the co rrect p ressu re, the t ire pres
sure mon itor ing* syste m can work cor
rectly.
- Th e use of incorrect tire p ress ure v alues
can lead to a cciden ts or o ther d amage.
T herefore it is essential that the drive r
observe the specified tire press ure va lues
for the tires and the correct pressures for
the function of the t i re p ress ure monito r
ing system*.
- Always inflate t ires to the recommended
and correct t ire pressure before dr iv ing
off.
- Driving with underinf lated tires bend
more, lett ing them get too hot resulting
in tread separation, sudden tire failure
a nd loss of cont rol.
- Excessive speed and/overloading can
cause heat build- up, sudden tire failure
a nd loss of cont rol.
- If the tire pressure is too low or too high,
the t ires will wear prematurely and the
veh icle w ill not handle well.
- If the tire is not flat and you do not have to change a wheel immediately, d rive at
red uced speed to t he nearest servic e sta
tion to che ck the t ire p ress ure and add
air as req uired.
0 Note
Driving w ithout valve stem caps can cause
damage to the tire valves. To prevent this,
a lways make sure that factory insta lled
•
•
Page 252 of 302

250 Tires and wheels
contribution to good road ho lding and safe
handling when in good condition and properly
inflated
¢ ,& .
We recommend that all work on tires and
wheels be performed by an authorized Audi
dealer. They are familiar with recommended
procedures and have the necessary spec ial
too ls and spare parts as well as the proper fa
cilities for disposing of the old tires.
Authorized Audi dealers have the necessary information about technical requ irements for
installing or changing tires and r ims.
Replacing tires and wheels
Tires shou ld be rep laced at least in pairs and
not individually (for example both front tires
or both rear tires together).
Be sure to read and heed the information to
the tire pressure monitoring system*
¢page 256.
Always buy rep lacement radial tires that have
the same specifications as the tires approved
for your vehicle by Audi. Replacement tires
must always have the same load rating speci
fication as the original equipment or approved optional tires listed in the table
¢page 242.
Audi-approved specification t ires are specially
matched to your vehicle and its load limits,
and can contribute to the important road hold
ing, driving characteristics, and safety of the
vehicle. The table(¢
page 242) lists specifica
tions of the tires approved for the Audi mod
els covered by your Owner's Literature .
The tire pressure label located on driver's side
B-pillar (
¢ page 242, fig. 185) lists the speci
fications of the orig inal equipment tires in
stalled on your veh icle at the time it was man
ufactured.
Federal law requires tir e manufacturers to
place standard ized information on the s ide
wall of all tires¢
fig. 188 . This information
identifies and describes the fundamental
characterist ics, the quality grade of the tire
and also provides a tire ident ificat ion number for
safety standard ce rtification and in case of
a reca ll.
Tire specifications
Knowledge of tire specificat ions makes it eas
ier to choose the correct tires. Radial tires
have the tire specifications marked on the
sidewa ll, for examp le:
255/45 R 19 104 H
This conta ins the following information:
P Indicates the t ire is for passenger cars
(where app licab le)
255 Nominal tire width in mm of the tire
from sidewall edge to sidewa ll edge. In
general, the larger the number, the wider
the tire
45 Height/w idth ratio in percent (aspect ra-
t io)
R Tire construction: Radial
19 Rim diameter code (in inches)
104 Loa d rating code
H Speed rat ing letter code
XL (or "xl", "EXTRA LOAD" or "RF") indicates
that the tir e is a "Reinforced" or an "Ext ra
Load" tire
M+S (or "M/S") Indicates that the tire has
some mud and snow capability
The tires could also have the information of
direction of rotation¢
page 238 .
Tire manufacturing date
The manufacturing date is also indicated on
the tire sidewall (possibly on ly on the
inner
side of the wheel):
"DOT ... 2211. .. " means, for example, the tire
was produced in the 22nd week of 2011.
Speed rating (letter code)
The speed rating letter code on the whee ls in
dicates the maximum permissible road speeds
¢ .&. in Winter tires on page 254.
P up to 93 mph (150 km/h)
Q up to 99 mph (158 km/h)
R up to 106 mph (170 km/h)
S up to 110 mph (180 km/h)
Page 254 of 302
252 Tir es and whe els
Driving with different tires reduces vehi
cle handling and can lead to a loss of
control.
- If the spare tire is not the same as the
tires that are mounted on the veh icle -
for example with winter tires - only use
the spare tire for a short period of time
and dr ive with extra care . Refit the nor
ma l road wheel as soon as safely possi
ble.
- Never drive faster than the maximum
speed for which the tires on your veh icle
are rated because ti res that a re driven
faster than their rated speed can fail
sudden ly .
- Overloading t ires cause heat build- up,
sudden tire failure, including a blowout
and sudden deflation and loss of control.
- T emperature grades app ly to tires that
are properly inflated and not over o r un
derinflated .
- For technical reasons it is not a lways
possible to use wheels from other vehi
cles -in some cases not even whee ls
from the same vehicle model.
- If you install wheel trim discs on the ve
hicle whee ls, make sure that the air f low
to the brakes is not blocked. Reduced air
flow to the brakes can them to overheat, increasing stopping distances and caus
ing a collision .
- Run flat t ires may only be used on vehi
cles that were equipped with them at the
factory . The vehicle must have a chassis
designed for run flat tires . Incorrect use
of run flat tires can lead to vehicle dam
age or acc idents. Check with an a uthor
ized Audi dea le r or tire specialist to see if
yo ur vehicle can be equipped with run
flat tires. If run f lat tires are used, they
must be insta lled on all four wheels. Mix
ing t ire types is not permitted .
- Fo r technical reasons , it is not genera lly
possib le to use the whee l rims from oth
er vehicles. This can ho ld true for wheels
of the same veh icle type. - If the spare tire is different from the
tires that yo u have mounted on your ve
hicle (for example winter tires or wide
profile tires), then use the spare tire for a
short period of time only and drive w ith
extra care. Replace the flat tire w ith the
tire matching the others on your vehicle
as soon as possib le .
- Never drive without the valve stern cap .
The valves cou ld get damaged .
@) For the sake of the environment
Dispose of o ld tires in accordance with the
local requirements .
Uniform tire quality grading
-Tread wear
- Traction AA AB C
- Tempe ra tu re ABC
Quality grades can be found whe re applicab le
on the tire sid e wall betw een tr ead shou ld er
a nd maximum section width
c> page 249,
fig. 188 .
For ex ample: Tread wear 200 , Tract ion AA ,
Temperatur e A.
All passenger car t ires must conform to Feder
al Safety Requirements in add ition to these
grades.
Tread wear
T he tread wear grade is a comparative rating
based on the wear rate of the t ire when tes ted
u nder contro lled cond itions on a specified
government test course .
For example, a tire graded 150 would wear
one and one ha lf (11/2) times as well on the
government course as a tire graded 100.
T he relative performance of tires depends
upon the actual conditions of thei r use, how
ever, and may depa rt s ignificantly from the
norm due to va riations in driving hab its, se rv
ice practices and differences in road character -
istics and cl imat e. ..,.
Page 255 of 302
Traction
The traction grades, from highest to lowest,
a re AA, A, Band
C. Those grades represent the
tire's ability to stop on wet pavement as
measured under controlled conditions on
specified government test surfaces of asphalt
and concrete . A tire marked C may have poor
traction performance¢ .&..
Te mp era tu re
The temperature grades are A (the h ighest),
B, and
C, representing the tire 's resistance to
the generat ion of heat and its ability to dissi
pate heat when tested under controlled condi
tions on a specified indoor laboratory test
wheel.
Sustained high temperature can cause the
material of the tire to degenerate and reduce
tire life, and excessive temperature can lead
to sudden tire failure ¢.&. .
The grade C corresponds to a level of perform
ance which all passenger car tires must meet
under the Federal Motor Veh icle Safety Stand
ard No. 109. Grades Band A represent higher
leve ls of performance on the laboratory test
wheel than the m inimum required by law.
_& WARNING
T he traction grade assigned to this t ire is
based on straight-ahead b raking t raction
tests, and does not include acceleration, cornering, hydrop laning or peak traction
character istics.
A WARNING
The temperature grade for this t ire is es
tablished for a t ire that is properly inflated
and not overloaded. Excessive speed, un
derinflation, or excessive loading, either
separately or in combination, can cause
heat buildup and possible tire fa ilure.
-
Tire s an d wheel s 253
Winter tires
Winter tires can improve vehicle handling on
snow and ice . At temperatures below 45 °F
(7 °C) we recommend changing to winter
tires.
In some heavy snow areas, local gove rnments
may require true w inter o r "snow" t ires, those
with very deeply cut t read. These tires should
o nl y be used in pairs and be installed o n all
f o ur wheels . Make sure you p urchase snow
tires that are the same size and cons truction
type as the other tires on yo ur vehicle .
If your veh icle is equipped w ith all-whee l
drive *, th is w ill improve trac tion d uring win ter
driv ing, even with the s tanda rd tires. Howev
er, we strongly recommend that you always
equip all four whee ls on your veh icle w ith cor
rect ly fitted winter tires or all-season t ires,
when winter road conditions are expected.
This also improves the veh icle 's b rak ing per
formance and reduces stoppi ng d ista nces .
Summer tires provide less grip on ice and
snow.
Winter tires (snow tires) must always be fitted
on all fo ur whee ls .
As k your au thori zed A udi dealer or qualified
workshop for permit ted
winter ti re size s. Use
on ly radial winter tires .
Win ter tires lose their effec tiveness whe n the
tread is worn down to a depth o f 0.1 57 inch
(4 mm) .
Only d rive w ith w inte r tir es under w inte r con
di tions. S umme r tir es handle bette r when
t h e re is no snow o r ice on the ro ads and the
temperature is above 45 °F (7 °C) .
If you have a flat t ire, see notes on spare
whee l¢
page 249.
Please a lways remember that winter tires may
have a lowe r speed rating than the tires o rigi
nally i nstalled on your veh icle at the time it
was ma nufactu red. P lease see¢
page 250,
Speed rating (letter code)
for a lis ting o f th e
speed rating letter codes and the max imum
speed at which the tires can be driven .
111>-
•
•
Page 258 of 302
256 Tires and wheels
or ridges on the road, particularly if the tire is
underinflated.
I n o rder to minim ize the occurrence of impact
damage to the tires of your vehicle, we recom
mend that you observe the following precau
tions:
- Always maintain recommended inflation
pressures. Check your tire pressure every
2,000 miles (3,000
km) and add air if neces
sary.
- Drive carefully on roads with potholes, deep
gullies or ridges. The impact from driving
through or over such obstacles can damage
your tires. Impact with a curb may also cause damage to your tires.
- After any impact, immediately inspect your
tires or have them inspected by the nearest
authorized Audi dealer. Replace a damaged
tire as soon as possible .
- Inspect your tires every 2,000 miles (3,000
km) for damage and wear . Damage is not al
ways easy to see. Damage can lead to loss of
air and underinflation, wh ich could eventu
ally cause tire failure . If you be lieve that a
t ir e may have been damaged, replace the
t ir e as soon as possible.
- T hese tires may wear mo re quick ly than oth
ers.
- Please also remember that, while these t ires
deliver respons ive handling, they may ride
less comfortably and make more no ise than
other choices.
Reduced performance in winter/cold
season conditions
All tires are designed for certain purposes.
The low aspect ratio, ultra high performance
tires originally installed on your vehicle are in
tended for maximum dry and wet road per
formance and handling. They are not suitable
for cold, snowy or icy weather condit ions. If
you drive under those circumstances, you should equip your vehicle with all -season or
winter tires, which offer better traction under
those cond it ions. We suggest you use the rec
ommended snow or all-season tires specified
for your vehicle, or their equivalent. Refer
to
q page 253 for more detailed infor
mation regarding winter tires.
Tire pressure monitoring system
(D General notes
Applies to veh icles: w ith tire pressure monitoring system
Each tire, including the spare ( if provided),
shou ld be checked monthly when co ld and in
flated to the inflation pressure recommended
by the veh icle manufacturer on the vehicle
placard or tire inflation pressure label. (If your
vehicle has tires of a different size than the
s ize indicated on the vehicle placard or tire in
flation pressure label, you should dete rmine
the proper tire inflation p ressure fo r those
t i res).
As an added safety feature, your veh icle has
been equipped with a tire pressure mon itoring
system (TPMS) that illuminates a low tire
pressure tel ltale when one or more of your
tires is significant ly under-inflated. According
ly, when the low tire pressure telltale illumi
nates, you should stop and check your tires as
soon as possible, and inflate them to the
proper pressure. Driving on a sign ificantly un
der-inflated t ire causes the tire to overheat
and can lead to tire failure . Under-inflation al
so reduces fuel efficiency and tire tread life,
and may affect the vehicle 's handling and
stopp ing ability.
Please note that the TPMS is not a substitute
for proper tire ma intenance, and it is the driv
er's respons ibility to maintain correct tire
pressure, even if under-inflation has not
reached the level to trigger illuminat ion of the
TPMS low tire pressu re tellta le .
Your vehicle has also been equipped with a
TPMS malfunction indicator to indicate when
the system is not operating properly. The
T PMS ma lfunction indicator is combined with
the low tire pressure telltale. When the sys
tem detects a malfunction, the telltale will
flash for approximately one minute and then ..,_
Page 262 of 302
260 What do I do now ?
Vehicle tool kit
Vehicle tool kit and jack
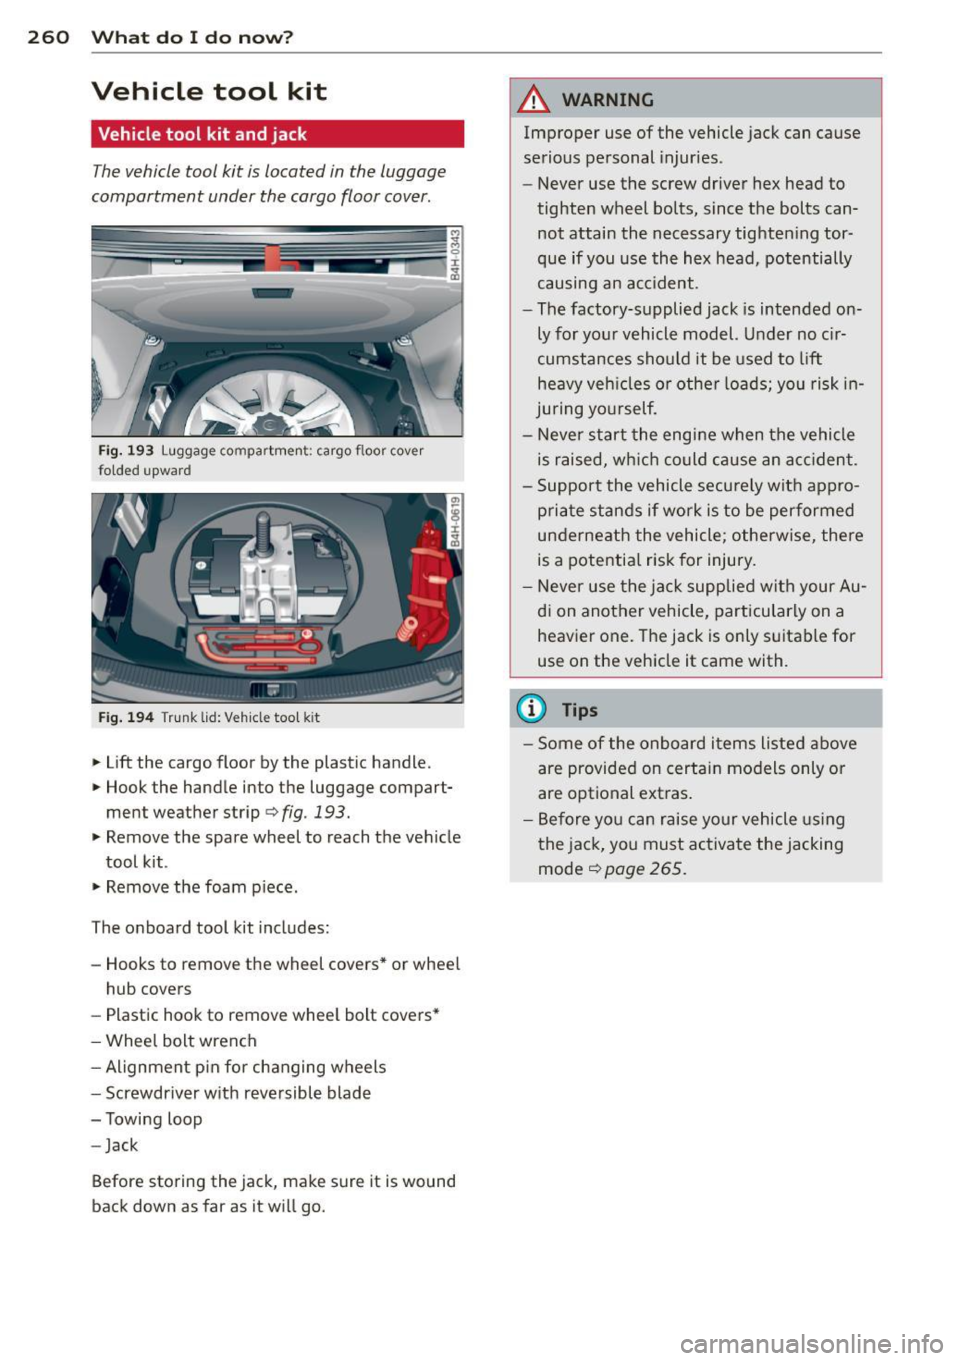
The vehicle tool kit is located in the luggage
compartment under the cargo floor cover .
Fig. 193 Luggage compartmen t: ca rgo floo r cover
folded upwar d
Fig. 194 Trunk lid: Vehicle tool k it
• Lift the cargo floor by the plastic handle.
• Hook the handle into the luggage compart
men t weather strip
c> fig . 193.
• Remove the spare wheel to reach the vehicle
tool kit .
• Remove the foam p iece .
The onboard tool kit includes:
- Hooks to remove the wheel covers* or whee l
hub covers
- Plastic hook to remove whee l bolt covers*
- Wheel bolt wrench
- Alignment p in for changing wheels
- Screwdriver with reversible blade
- Towing loop
- Jack
Before storing the jack, make sure it is wound
back down as fa r as it will go.
A WARNING
-Improper use of the vehicle jack can cause
serious personal injuries .
- Never use the screw driver hex head to
tighten wheel bolts, since the bolts can
not attain the necessary tighten ing tor
que if you use the hex head, potentially
causing an acc ident .
- The factory-supplied jack is intended on
ly for your vehicle model. Under no c ir
cumstances should it be used to lift
heavy veh icles or othe r loads; you risk in
ju ring yo urself.
- Never start the engine when the vehicle
is raised, wh ich could cause an ac ciden t.
- Support the vehicle securely with appro
priate stands if work is to be performed
underneath the vehicle; otherwise, there
is a potentia l risk for injury.
- Never use the ja ck supplied with your Au
di on another vehicle, particularly on a
heavier one. The jack is only suitable for
use on the vehicle it came with.
(D Tips
- Some of the onboard items listed above
are provided on certain models only or
are optional ext ras .
- Before yo u can raise your vehicle using
the jack, you must activate the jacking mode
c::> page 265 .
Page 263 of 302
Space-saving spare tire (compact spare
tire)*
A pplies to vehicles: with space-sav ing spa re tire
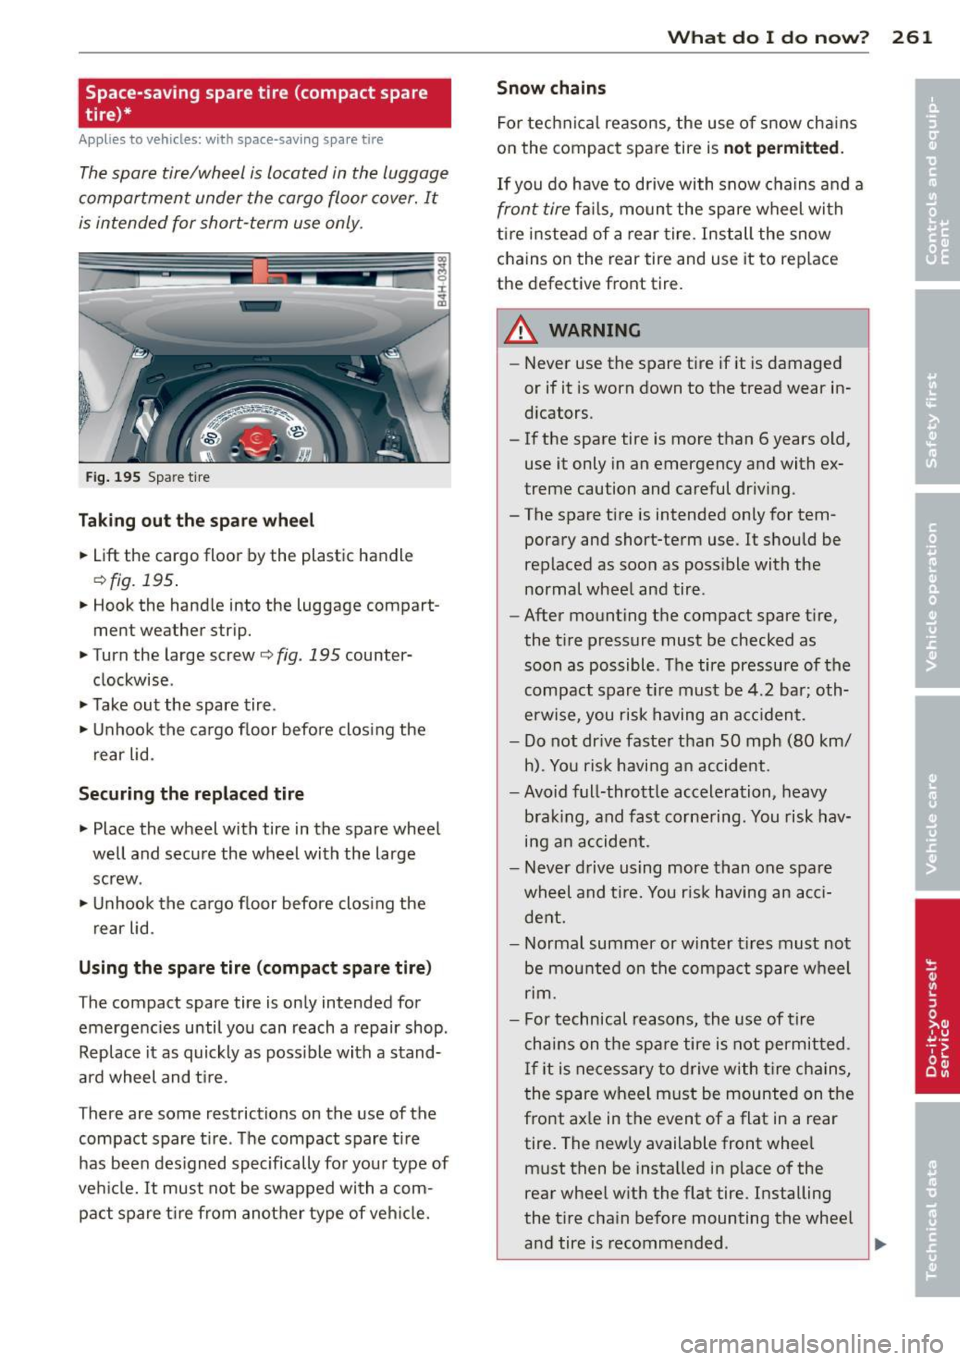
The spare tire/wheel is located in the luggage
compartment under the cargo floor cover. It
is intended for short-term use only.
F ig . 195 Spare t ire
Tak ing ou t the sp ar e whee l
.. Lift the cargo floor by the plast ic handle
¢ fig. 195.
.. Hook the hand le into the luggage compart
ment weather strip.
.. Turn the large screw
¢fig. 195 counter
clockwise .
.,. Take out the spare tire.
.,. Unhook the ca rgo floor before clos ing the
rear lid.
Securing the repl aced tire
.. Place the wheel with tire in the spare wheel
well and secure the wheel with the large
screw .
.,. Unhook the ca rgo f loor before clos ing the
rear lid.
Using the spare tire (compact spare tir e)
The compact spare tire is only intended for
emergenc ies until you can reach a repair shop .
Replace it as quickly as poss ible with a stand
ard wheel and t ire.
There are some restrictions on the use of the
compact spare t ire . The compact spare t ire
has been des igned specifically fo r your type of
ve hicl e. It must not be swapped with a com
pact spare t ire from another type of veh icle.
What do I d o now ? 261
Snow chains
For technical reasons, the use of snow cha ins
o n the compact spare tire is
not permitted .
If you do have to drive with snow chains and a
front tire fails, moun t the spare wheel wi th
ti re i nste ad of a rear tire. Install the snow
chains on the rear tire and use it to replace
the defective front tire .
A WARNING
-Never use the spare tire if it is damaged
or if it is worn down to the tread wear in
dicators.
- If the spare tire is more than 6 years old,
use it only in an emergency and with ex
treme caution and careful driv ing.
- The spare tire is intended only for tem
porary and short-term use. It s hould be
replaced as soon as poss ible with the
normal whee l and tire .
- After mounting the compact spare tire,
the t ire pressure must be checked as
soon as possible . T he tire pressu re of the
compact spare t ire must be
4.2 ba r; oth
erwise, you risk having an a ccident.
- Do not dr ive faste r than
SO mph (80 km/
h). You ris k having a n accide nt.
- Avoid full-throttle acceleration, heavy
brak ing, and fast corne ring . You risk hav
i n g an accident .
- Never d rive using more than one spare
wheel and t ire. You r is k having an acci
dent.
- Normal summer or winter t ires must not
be mou nted on the compact spare w heel
nm.
- For t echnical reasons, the use of tir e
chains on the spa re tire is not permit ted .
I f it is ne cessary to drive with t ire chains,
the spare wheel must be mounte d on the
fro nt ax le in the event of a flat in a rear
tire. The newly available front whee l
must then be insta lled in place of the
rear whee l w ith the flat tire . Installing
the t ire cha in before mounting the whee l
and tire is recomme nded .
Page 264 of 302

262 What do I do now ?
-Loose items in the passenger compar t
ment can cause serious personal inj ury
during hard braking or in an acc ident.
- Never store the inflatable spa re tire or
jack and tools in the passenger com
partment .
- Always s to re a ll jack ing equipmen t,
too ls, and the inflatab le spa re tire in
the l uggage compa rtment .
- Tighten the kn ur led retaining screw for
the inflatable spare tire sec urely.
Spare wheel
Applies to vehicles: with spare wheel
The spare wheel is stored in the wheel well
underneath the floor panel in the luggage
compartment.
Fi g. 1 96 Lu ggage co mp artm ent: spare whee l
Taking out the spa re wh eel
.. Lift the cargo floor by the plastic handle
¢ fig. 196 .
.. Hook the hand le into the luggage compart
men t wea ther s trip.
.. Tu rn the l arge screw
¢ fig. 196 coun ter
clockwise .
.. Take out the spare tire .
.,. Unhook the ca rgo floor before clos ing the
rear lid .
Securing the replaced tire
.. Place the wheel with tire in the sp are wheel
well and secure the wheel with the large
sc rew .
.,. Unhoo k the ca rgo f loor before clos ing the
r ear lid.
A WARNING
-Loose items in the passenger compart-
ment can cause serious persona l injury
d uring hard b rak ing o r in an accident .
- Never store the spa re wheel or jack and
too ls in the passenger compartment .
- Always store all jack ing equipment,
tools, and the spare wheel in the luggage
compa rtment .
- Tighten the knurled retaining screw for
the spare wheel securely .
@ Tips
Check the inflation pressure of the spare
tire periodically to keep the t ire ready for
use.
Changing a wheel
Before changing a wheel
Observe the following precautions for your
own and your passenger's safety when chang
ing a wheel.
.,. After you experience a t ire failur e, pull the
car we ll away from mov ing traffic and try to
re ach
level ground before you stop ¢ .&,.
.. All passengers should lea ve th e car and
move to a safe location (for instance, b ehind
the guardrail) ¢
_A .
.. Engage the pa rking brake to prevent your
ve hicle from rolling uninten tionally ¢
_A .
.. Move selecto r le ver to pos ition P ¢ _A .
.,. If you are towing a tra iler, unhitch the trailer
from your ve hicle .
.,. Ta ke the
jack a nd the spare tire out of the
luggage compartmen t¢
page 260,
¢ page 261.
A WARNING
You o r your passengers could be i nju red
while changing a wheel if you do not fo l
l ow these sa fety precaut ions:
- If you have a flat tire, move a safe dis
tance off the road. Turn off the engine,
turn the eme rgency flashers on and use
-
Page 265 of 302
other warning devices to alert other mo
torists.
- Make sure that passengers wait in a safe
place away from the vehicle and well
away from the road and traffic.
- To help prevent the vehicle from moving
suddenly and possibly slipping off the
jack, always fully set the parking brake
and block the wheel diagonally opposite
the wheel being changed. When one
front wheel is lifted off the ground, plac
ing the Automatic Transmission in "P"
(Park) will
not prevent the vehicle from
moving.
- Before you change a wheel, be sure the
ground is level and firm. If necessary,
use a sturdy board under the jack.
- After installing the spare wheel, make
sure that you replace the flat tire/wheel
in its storage area properly and tighten
the knurled retaining screw securely.
@ Tips
Before changing the wheel, you must acti·
vate the jacking mode, so that the auto
matic controls for the Adaptive Air Sus
pension do not make it more difficult to
lift the vehicle with the jack ¢
page 265.
Changing a wheel
When you change a wheel, follow these
quence described below step-by-step and in
exactly that order.
1. Activate the vehicle jack mode
¢ page 265.
2. Remove the decorative wheel cover*. For
more details see also¢
page 264, Deco
rative wheel covers
or ¢ page 264,
Wheels with wheel bolt caps.
3 . Loosen the wheel bolts¢ page 264 .
4. Locate the proper mounting point for the
jack and align the jack below that point
¢page 265.
5. Raise the car with the jack¢ page 265.
6. Remove the wheel with the flat tire and
then install
the spare ¢ page 266.
What do I do now? 263
7. Tighten all wheel bolts lightly.
8.
Lower the vehicle with the jack.
9. Use the wheel bolt wrench and
firmly
tighten all wheel bolts¢ page 264.
10. Replace the decorative wheel cover*.
11. Deactivate the vehicle jack mode in the
MMI:
ICARI function button > Car systems
control button > Servicing & checks> Air
susp.: jack mode> Off .
The vehicle jack mode switches off automati
cally at speeds above 10 km/h .
A WARNING
Always read and follow all WARNINGS and
information¢ .&
in Raising the vehicle on
page 265
and ¢ page 267.
After changing a wheel
A wheel change is not complete without the
doing the following.
.. Store and secure the wheel you replaced in
the spare wheel well.
.. Replace the tools and the jack in their prop
er location.
.. Check the
tire pressure on the spare wheel
immediately after mounting it.
.. As soon as possible, have the
tightening
torques
on all wheel bolts checked with a
torque wrench. The correct tightening tor
que is 90
ft lb (120 Nm).
.. Have the flat tire
replaced as soon as possi
ble .
(D Tips
-If you notice that the wheel bolts a re
corroded and difficult to turn while
changing a tire, they should be replaced
before you check the tightening torque.
- Drive at reduced speed until you have the
tightening torques checked.
•
•
Page 268 of 302
266 What do I do now ?
-Make sure that passengers wait in a
safe p lace away from the vehicle and
well away from the road and traffic.
- Make sure jack position is correct, ad
just as necessary and then continue to ra ise the jack.
- Changes in temperature or load can af
fect the height of the vehicle.
@ Tips
The vehicle jack mode switches off auto
matica lly at speeds above 10 km/h.
Taking the wheel off/installing the spare
Follo w thes e instruct ions st ep-by -step for
changing th e wh eel .
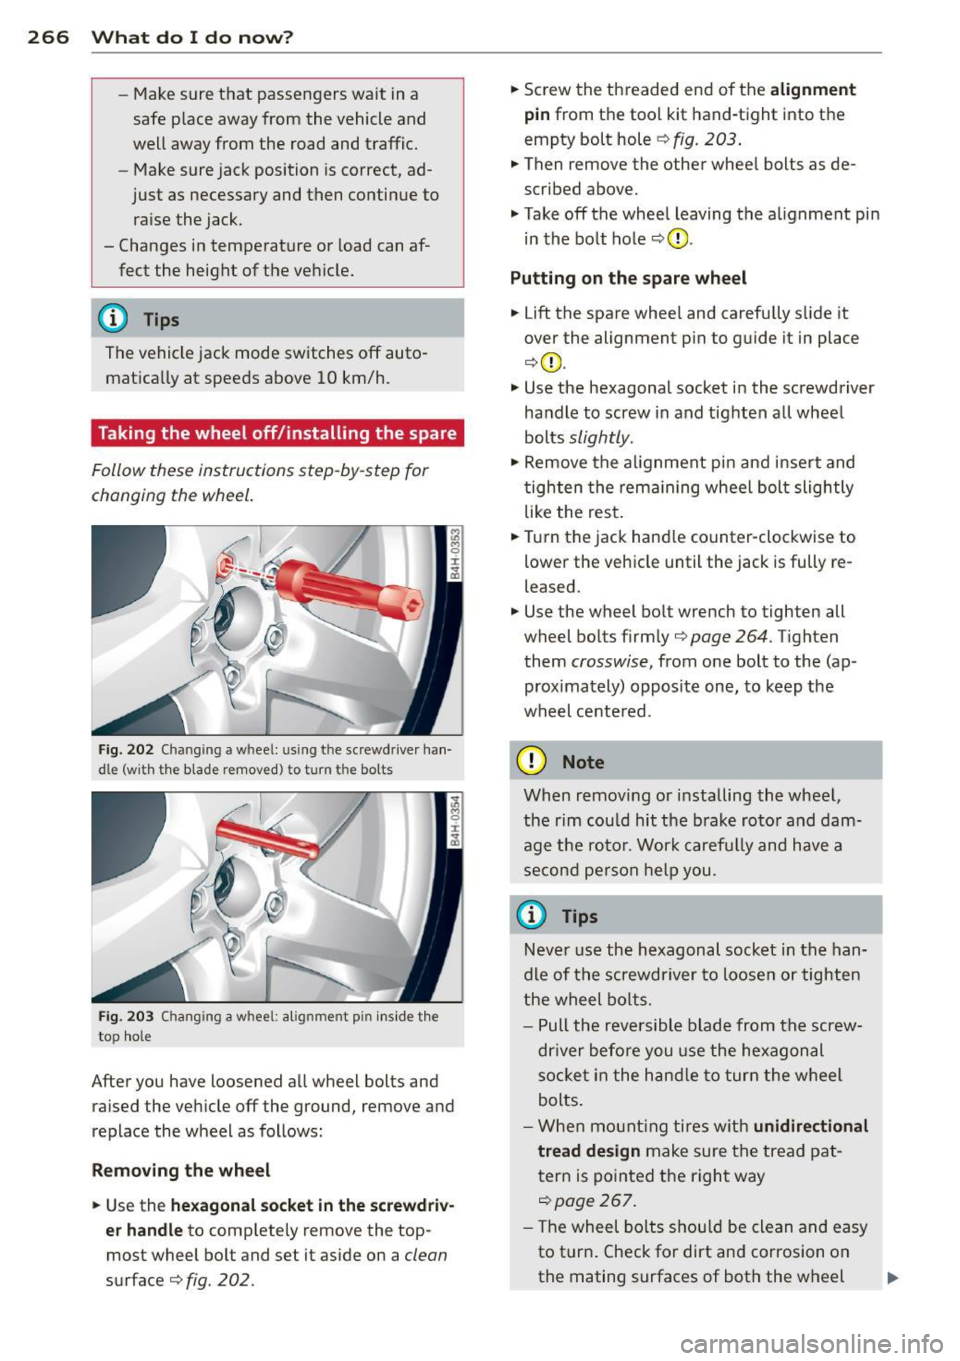
Fig. 2 02 Chan gin g a w hee l: u sing t he sc rewdr ive r ha n
dl e (w it h th e bla de r emoved ) to tu rn th e bolts
Fi g. 20 3 Changin g a w heel : a lignm en t pin inside th e
t o p hole
After you have loosened a ll wheel bolts and
ra ised the vehicle off the ground, remove and
replace the wheel as follows:
R emoving the wheel
• Use the hexagonal socket in the screwd riv
e r handle
to comp lete ly remove the top
most wheel bolt and set it aside on a
clean
surface ¢fig. 202.
• Sc rew the th readed end of the alignment
pin
from t he tool k it hand-tight into t he
empty bolt hole
r::;, fig . 203 .
• Then remove the other whee l bolts as de
scribed above.
• Takeoff the whee l leaving the a lignment pin
in the bo lt hole
r::;, (D .
Putting on the spare wheel
• Lift the spare whee l and carefu lly s lide it
over the alignment p in to g uide it in place
¢ (D .
.,. Use the hexagonal socket in the screwdriver
ha ndle to screw in and tighten a ll whee l
bolts
slightly .
.,. Remove the alignment pin and inse rt and
tighten the rem aining wheel bol t slightly
like the res t.
• Turn the jack hand le co unter-clockwise to
lower the veh icle until the jack is fully re
leased .
.,. Use the wheel bo lt wrench to tighten all
wheel bolt s firm ly
r::;, page 264 . Tigh ten
them
crosswise, from one bolt to the (ap
proximately) opposite one, to keep the
wheel cente red .
(D Note
When remov ing or installing the whe el,
the rim cou ld hit the b rake roto r and dam
age t he ro to r. Wor k caref ully and have a
s eco nd pers on h elp you.
{i) Tips
Neve r use the hexagonal socket in the han
dle of t he s crewdr iver to lo ose n or t igh ten
t he wheel bo lts .
- P ull the revers ible blade from the screw
dr iver be fore y ou use the hexagon al
so cket in the han dle to tur n the w heel
bolts.
- W he n m oun tin g ti res w ith
unidirectional
tread design
make sure t he trea d pat
t ern is poin ted t he righ t way
r::;, page267.
- T he wheel bolts shou ld be clean and easy
to t urn. Check for dirt an d corrosion on
the mating surfaces of both the w heel .,,.