trunk AUDI S8 2011 Owners Manual
[x] Cancel search | Manufacturer: AUDI, Model Year: 2011, Model line: S8, Model: AUDI S8 2011Pages: 302, PDF Size: 76.07 MB
Page 6 of 302

4 Table of content s
D o-it- yourself ser vice . . . . . . . . .
259
What do I do now? . . . . . . . . . . . . 259
Trunk escape hand le . . . . . . . . . . . . . . 259
Emergency warning triangle . . . . . . . . 259
Vehicle tool kit . . . . . . . . . . . . . . . . . . . 260
Changing a wheel . . . . . . . . . . . . . . . . . 262
Fuses and bulbs . . . . . . . . . . . . . . . 268
Fuses .. .... ..... ..... ...... ... .. 268
Bulbs . . . . . . . . . . . . . . . . . . . . . . . . . . . 272
Emergency situations . . . . . . . . . 273
General . . . . . . . . . . . . . . . . . . . . . . . . . 273
Starting by push ing or tow ing . . . . . . . 273
Starting with jumper cables . . . . . . . . 273
Use of jumper cab les . . . . . . . . . . . . . . 274
E mergency towing with commercial
tow truck . . . . . . . . . . . . . . . . . . . . . . . 275
Lifting vehicle . . . . . . . . . . . . . . . . . . . . 277
Techni cal d ata . . . . . . . . . . . . . . . . . 279
General information . . . . . . . . . . 279
Explanation of technical data . . . . . . . 279
Vehicle ident ification . . . . . . . . . . . . . . 279
Weights . . . . . . . . . . . . . . . . . . . . . . . . 279
Dimensions. . . . . . . . . . . . . . . . . . . . . . 280
Data . . . . . . . . . . . . . . . . . . . . . . . . . . . 282
372 hp, 8-cylinder engine, w ith all
wheel drive . . . . . . . . . . . . . . . . . . . . . . 282
Consumer Information . . . . . . . 283
Warranty coverages . . . . . . . . . . . . . . . 283
Operating your vehicle outside the U.S.A . or Canada . . . . . . . . . . . . . . . . . 283
Audi Service Repair Ma nuals and
L it erature . . . . . . . . . . . . . . . . . . . . . . . 283
M ain tenance . . . . . . . . . . . . . . . . . . . . . 283
Addit ional accessories , modifications
and parts replacement . . . . . . . . . . . . 285
Inde x . . . . . . . . . . . . . . . . . . . . . . . . . . 28 7
Page 34 of 302

32 Opening and clos ing
-When closing a door, make sure noth
ing can interfere w ith the door. This
could cause ser ious personal injury.
- You can stop the door from closing at
any time by pulling on the inside or
outside door handle.
(D Tips
- In the event of a crash with airbag de
ployment all locked doors will be auto
matically unlocked to give access to the
vehicle occupants from the outside.
- If the power locking system should ma l
function, you can lock the dr iver's door
using the mechanical key¢
page 35 .
-If the power lock ing system should fail,
you can st ill open the fuel tank flap in an
emergency ¢
page 221.
-You are well advised not to keep valua
bles inside an unattended vehicle, visib le
or not . Even a properly locked vehicle
ca nnot provide the sec urity of a safe .
- If the LED in the upper edge of the driv er's door panel comes on for abo ut 30
seconds after t he vehi cle is locked, there
i s a ma lf u nction in the power loc king or
t h e anti- theft warni ng sys tem. Have the
malfunction corrected by an authorized
A udi dealersh ip or q ua lified repair facili
ty .
Setting power locking
The driver can determine the functions for
power locking in the MMI.
,.. Se lect : I CAR I fu nction button > Car sy ste m s
control button > Vehicle setting s > Central
locking .
Unl ock door s -
You can decide if All doors or
on ly the
Driver should unlock . The rear lid al
so unlocks when
All is se lected. If you select
Dri ver in a vehicle with a convenience key *,
only the door whose handle you pull will un
l ock. If you se
lect
Dri ver , all the doors and rear lid
will unlock if you press them button on the re
mote control maste r key twice.
Loc k exterior trunk handle -If you se lec t On ,
the rear lid handle is locked . In this case the
rear lid can be opened with the b utton
cs on
the master key or with the
cs button * in the
driver's door . In veh icles with a convenience
key* , you can still open the rear lid using the
handle if an authorized master key is near the
proxim ity sensor .
Fold mir rors * -If you select On , the exterior
rearview mirrors fold in automatically w hen
you press the
ffi button on the remote control
master key or touch the sensor* in the ha ndle.
Lock when dr iving -If you select On, the vehi
cle locks automatically when driv ing. All of
the doors and rear lid lock .
Tone when locking -When you select On , a
confirmat ion tone sounds when you lock the
vehicle.
Locking and unlocking the vehicle with
the remote control
Fig . 18 Re mote co ntrol : f u nct ion buttons
Either the driver's door o nly or the entire vehi
cle w ill unlock when the unlock button mis
pressed once, depending on the settings in
the MMI
r=;,page32 .
.,. Press button 0 to unlock the vehicle
¢fig. 18.
,.. Press button ffi to lock the vehicle ¢ .& in
General description on page 31 .
,.. Press button cs briefly to un lock the rear
lid.
Page 261 of 302

What do I do now? Trunk escape handle
In case of an emergency, the rear lid can be
opened from the inside using the trunk es
cape handle .
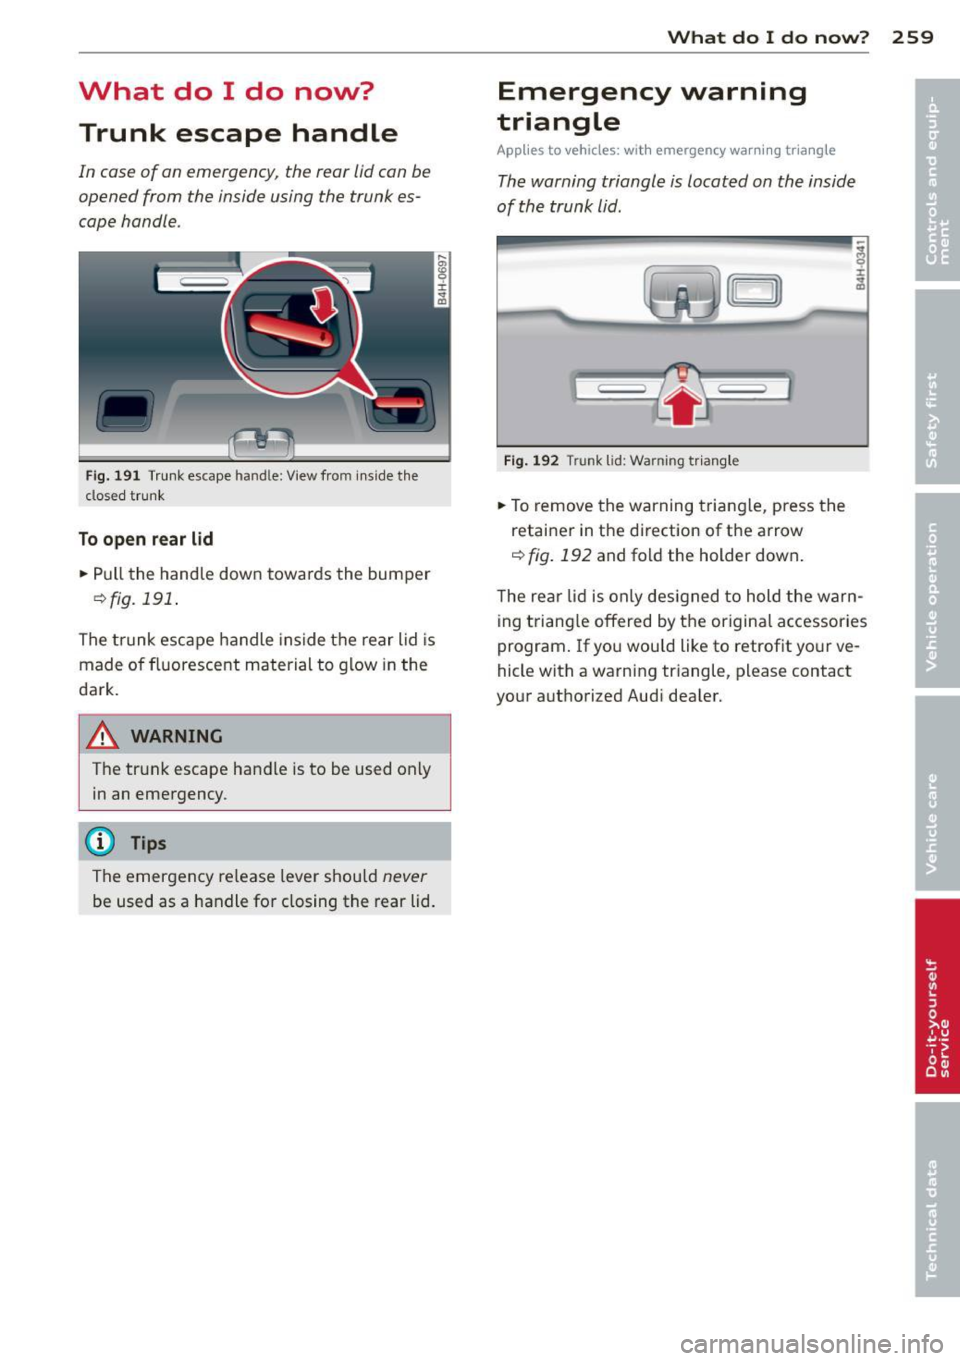
Fig. 191 Trunk escape hand le : View from inside the
closed trunk
To o pen r ear lid
.,. Pull the handle down towards the bumper
~fig. 191.
The trunk escape handle inside the rear lid is
made of fluorescent material to glow in the
dark.
A WARNING
The trunk escape handle is to be used only
in an emergency .
(D Tips
The emergency release lever should never
be used as a handle for closing the rear lid.
What do I d o now ? 259
Emergency warning
triangle
App lies to veh icles: w ith emergency wa rning tria ng le
The warning triangle is located on the inside
of the trunk lid.
Fig. 192 Trunk lid: Wa rning triangl e
.,. To remove the warning triangle, press the
retainer in the direction of the arrow
~ fig. 192 and fold the holder down .
The rear lid is only des igned to hold the warn
ing triang le offered by the original accessories
program. If you would like to retrofit your ve
hicle with a warning triangle, please contact
your authorized Audi dealer.
Page 262 of 302

260 What do I do now ?
Vehicle tool kit
Vehicle tool kit and jack
The vehicle tool kit is located in the luggage
compartment under the cargo floor cover .
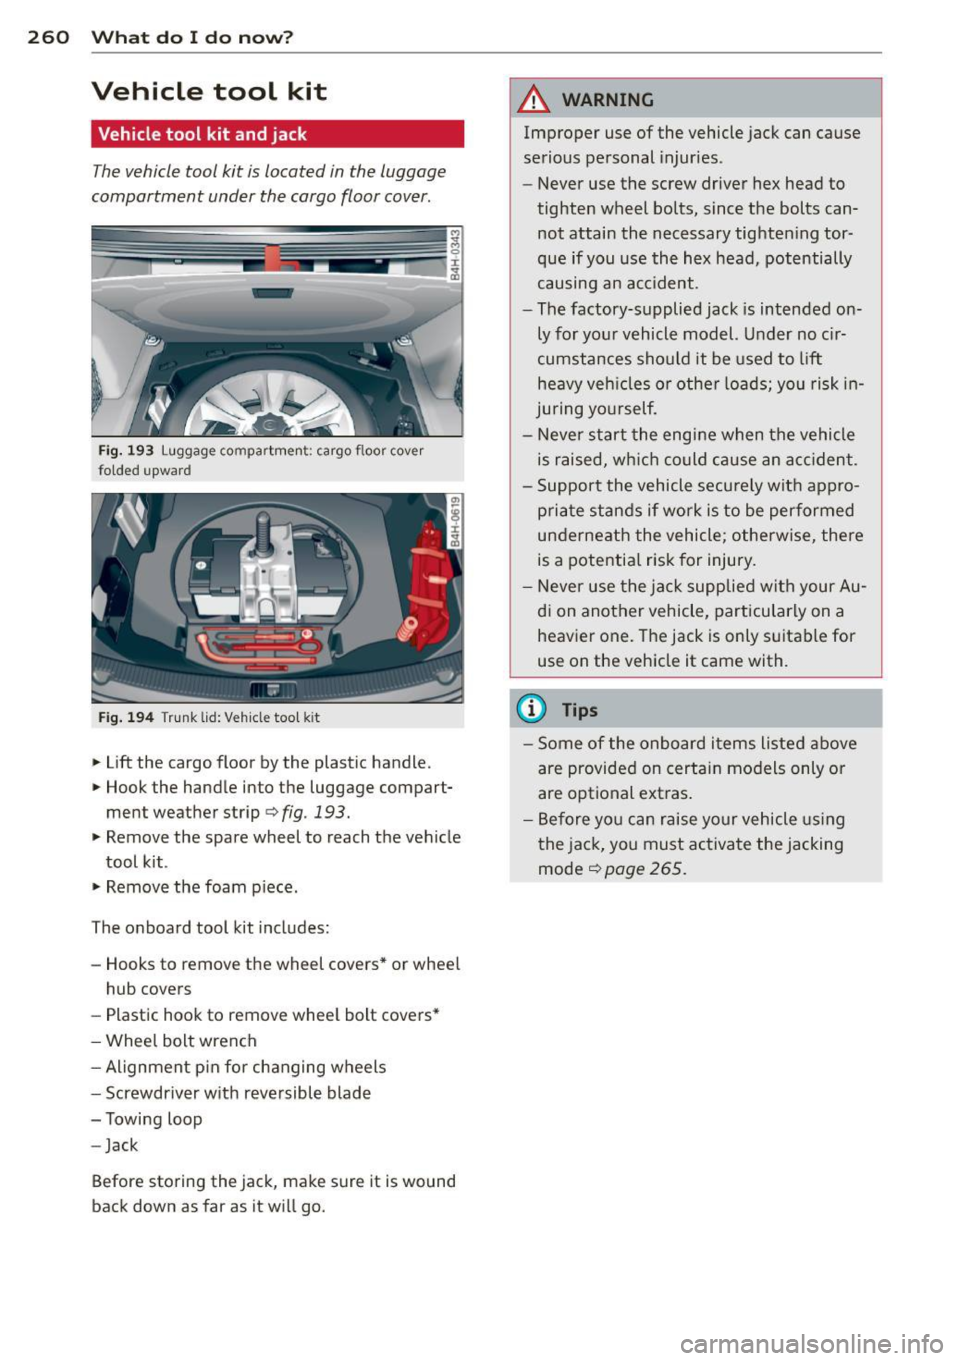
Fig. 193 Luggage compartmen t: ca rgo floo r cover
folded upwar d
Fig. 194 Trunk lid: Vehicle tool k it
• Lift the cargo floor by the plastic handle.
• Hook the handle into the luggage compart
men t weather strip
c> fig . 193.
• Remove the spare wheel to reach the vehicle
tool kit .
• Remove the foam p iece .
The onboard tool kit includes:
- Hooks to remove the wheel covers* or whee l
hub covers
- Plastic hook to remove whee l bolt covers*
- Wheel bolt wrench
- Alignment p in for changing wheels
- Screwdriver with reversible blade
- Towing loop
- Jack
Before storing the jack, make sure it is wound
back down as fa r as it will go.
A WARNING
-Improper use of the vehicle jack can cause
serious personal injuries .
- Never use the screw driver hex head to
tighten wheel bolts, since the bolts can
not attain the necessary tighten ing tor
que if you use the hex head, potentially
causing an acc ident .
- The factory-supplied jack is intended on
ly for your vehicle model. Under no c ir
cumstances should it be used to lift
heavy veh icles or othe r loads; you risk in
ju ring yo urself.
- Never start the engine when the vehicle
is raised, wh ich could cause an ac ciden t.
- Support the vehicle securely with appro
priate stands if work is to be performed
underneath the vehicle; otherwise, there
is a potentia l risk for injury.
- Never use the ja ck supplied with your Au
di on another vehicle, particularly on a
heavier one. The jack is only suitable for
use on the vehicle it came with.
(D Tips
- Some of the onboard items listed above
are provided on certain models only or
are optional ext ras .
- Before yo u can raise your vehicle using
the jack, you must activate the jacking mode
c::> page 265 .
Page 299 of 302

Index 297
Tires and whee ls
Unlocking
Checking tire pressure .. ... .. .. .. .. . 244 Power locking switch .
... .... ... .. .. . 34
•
Cold tire inflat ion pressure ... .. .. .. . 242 Rea r lid . . . . . . . . . . . . . . . . . . . . . . . . . . . 35 •
Dimensions . ............. .... .. ... 249 Remote contro l .. ................. . 32
General notes ............ .... .. ... 238 Using the key .. .. .... ............. . 34
Glossary of t ire and load ing termino lo -
gy .. .. .. .. .. ........ ... .. ... ... . 239
V
Low aspect ratio t ires ......... .... .. 255
New tires and wheels ...... .. .. .. .. . 24 9 Valet parking
.. .. .. ................. . 40
Replacing .. ............. .... .. ... 2 50 Vanity mirro
rs . . . . . . . . . . . . . . . . . . . 47 , 48
Snow chains . ... ...... ... .. .. .. ... 254 Vehicle-care products
.... ....... .... . 206
Tires and vehicle load limits . ... .. .. . 24 6 Vehicle e
lectrical system . ..... ... .. .. . 16
Wheel bolts . ... .. .... ... .. .. .. ... 255
Vehicle identification label . ....... .. .. 279
W inter t ires .. ........... .. .. .. ... 253
Vehicle Ident ificat ion Number (VIN) .. .. 279
T ire se rv ice life ............ .. .. .. ... 248
Vehicle ja ck . . . . . . . . . . . . . . . . . . . 260, 265
T ools ..... ... ............. ...... .. 260
Vehicle literatu re .. .. ... ....... .... ... 5
Torn or frayed safety belts ... .. .. .. .. . 140
Vehicle transport .. .. . ... ...... ... .. 277
Touch-up paint . .. .. .... ... .. .. .. .. . 210
Ventilation . . . . . . . . . . . . . . . . . . . . . . . . . 7 4
Towing
Tow truck procedures ...... .. .. .. .. . 275
W
TPMS
Tire pressure monitoring system . ... . 257
Trailer towing ............. .... .. .. . 20 2
O pera ting ins truc tion s ..... .. .. .. .. . 20 2
Tec hnical req uirements . . . . . . . . 202, 2 03
T railer towing tips ..... ... .. .. .. .. . 204
T rain (transpo rting your vehicle) .. ... .. 277
T ransm ission ma lf u nct ion (ind icator
light) . .... .. .. .. ........... .. .. ... 115
T ransport Canada .. ..... ... .. .. .. ... 135
Transport ing your vehicle .... .. .. .. .. . 277
T read Wear Indicato r (TWI) .. .. .. .. .. . 24 8
T rip odomete r . . . . . . . . . . . . . . . . . . . . . . . 26
What does it mean whe n DEF appea rs in
the trip odometer d isplay? ... .. .. .. .. 26
Trunk
r efer to Rear lid .......... .... .. .... 35
Trunk escape handle ........ .. .. .. .. . 259
T u rn signa ls .. .. ... ..... ... .. .. .. .... 4 5
War ning/indicator lights ... .. .. .. .. .. 22
u
Unde rcoat ing ............. .... .. ... 2 12
Unfasten ing safety be lts ..... ... ... ..
142
Unid irect io na l tires . ..... ... .. .. .. ... 238
Uniform t ire q uality g rading . .. .. .. .. . 25 2 Warning/ind
icator lights . . . . . . . . . . . . . . 11
Airbag system . . . . . . . . . . . . . . . . . . . . . 18
An ti-lock braking system (A BS) ... .. .. . 19
Br ake system . . . . . . . . . . . . . . . . . . . . . . 14
Cruise cont ro l . . . . . . . . . . . . . . . . . . . . . . 22
E lectromechanica l pa rking brake ... .. . 15
E lectronic power contro l . . . . . . . . . . . . . 20
E lectronic stab ilizat ion program (ESP) . . 18
Generator ... .. ...... ............. . 16
Instrument cluster .. . .. .... .... .. .. . 10
Malfunction Ind icator Lamp (MIL) ..... 20
Safety be lt .. .. .. .. ... ....... ...... 16
T urn signals . .. .. ................. . 22
Warning/Indicator lights Airbag system ... .. ... ....... ..... 156
Dynam ic steering ................... 22
PASS ENGER A IR BAG OFF . .. ... ... .. 156
Warranty coverages .. ............... 283
Washe r reservo ir ...... ........... .. 236
Wash ing ... .. .. .. .. . .. .... .... .. .. 206
Automat ic car wash ............... . 207
by hand . .. .. .. .. .. . .. ....... ... .. 207
wi th a power was her ........... .. .. 208
Waxing ...... .. ...... ............. 209
Wea r indica to r .... .. . .. .. ..... ... .. 24 8
Weathe rst rips . .. .. .. . .. .... .... .. .. 211
Weights ...... .. ...... ............. 279