ESP AUDI S8 2012 User Guide
[x] Cancel search | Manufacturer: AUDI, Model Year: 2012, Model line: S8, Model: AUDI S8 2012Pages: 300, PDF Size: 75.06 MB
Page 51 of 300
windshield wipers react to moisture on the
windshield. You can deactivate rain sensor
mode in the MMI, which will then activate in
termittent mode. Select:
ICARI function but
ton
> Car systems control button > Driver as
sist > Rain sensor> Off.
In intermitten t
mode, you can adjust the interval time using
the switch @.
@-Slow wiping
@-Fast wiping
©-Single wipe. If you hold the lever in this
position longer, the wipers switch from slow
wiping to fast wiping.
® -Clean the windshield . The wipers wipe
one time after several seconds of driving to
remove water droplets. You can switch this
function off by moving the lever to position ®
within 10 seconds after the afterwipe. The af
terwipe function is reactivated the next time
you switch the ignition on.
Cleaning the headlights. The headlight wash
er system* only functions when the lights are
sw itched on. The headlights and the night vi
sion system camera* are cleaned automatical ly the first time the lever is press in position
® and every 8 times it is pressed after that.
They are also cleaned every time you hold the lever in position @for longer than 8 seconds .
A WARNING
- The rain sensor is only designed to assist
and support the driver.
It remains entire
ly the driver's responsibility to monitor
outside weather conditions and to man
ually activate the wipers as soon as rain
or drizzle reduces visibility through the
windshield.
- The windshield must not be treated with
water-repellent materials. They can in
crease glare under poor visibility condi·
tions such as wetness, darkness, or when
the sun is low on the horizon. In addi
tion, they can cause the windshield wip
ers to chatter.
- Properly functioning windshield wiper
blades are required for a clear view and
Clear vision 49
safe driving ¢ page 50, Replacing
windshield wiper blades.
(D Note
- In the case of frost, check whether the
windshield wiper blades are frozen to the windshield. Switching on the wind
shield wipers can damage the wiper
blades!
- Prior to using a car wash, the windshield
wiper system must be switched off (lever
in position @). This helps to prevent un
intentional switching on and damage to
the windshield wiper system.
- Do not use the wipers to clear a frosted
window . Using the wipers as a conven
ient ice scraper will destroy the wiper
blades.
@ Tips
- The windshield wipers are switched off
when the ignition is off . Activate the
windshield wipers after the ignition is
switched back on by moving the wind
shield wiper lever to any position.
- Worn or dirty windshield wiper blades
result in streaking. This can affect the
rain sensor function. Check your wind
shield wiper blades regularly.
- The washer fluid nozzles of the wind
shield washer system are heated at low
temperatures when the ignition is on.
- When stopping temporarily, e.g. at a
traffic light, the set speed of the wind
shield wipers is automatically reduced by
one speed.
Page 54 of 300
52 Clear vision
& WARNING
Electrolyte fluid can leak from automatic
dimming mirrors if the glass is broken.
Electrolyte fluid can irritate skin, eyes and
respiratory system .
- Repeated or prolonged exposure to elec
trolyte can cause irritation to the respira
tory system, especially among people
with asthma or other respiratory condi tions. Get fresh air immediately by leav
ing the vehicle or, if that is not possible,
open windows and doors all the way.
- If electrolyte gets into the eyes, flush
them thoroughly with large amounts of
clean water for at least 15 minutes;
medical attention is recommended.
- If electrolyte contacts skin, flush affect
ed area with clean water for at least 15
minutes and then wash affected area
with soap and water; medical attention
is recommended . Thoroughly wash af
fected clothing and shoes before reuse.
- If swallowed and person is conscious,
rinse mouth with water for at least 15
minutes . Do not induce vomiting unless
instructed to do so by medical professio
nal. Get medical attention immediately.
(D Note
Liquid electrolyte leaking from broken mir
ror glass will damage any plastic surfaces
it comes in contact with. Clean up spilled
electrolyte immediately with clean water
and a sponge.
@ Tips
-Switching off the dimming function of
the inside rear view mirror also deacti
vates the automatic dimming function of
the exterior mirrors.
- Automatic dimming for the mirror only
operates properly if the sun shade* for
the rear window is not in use or the light
striking the inside mirror is not hindered
by other objects. -
The automatic dimming mirrors do not
dim when the interior lighting is turned
on or the reverse gear is selected.
Digital compass
Switching the compass on and off
Applies to vehicles: with digita l compass
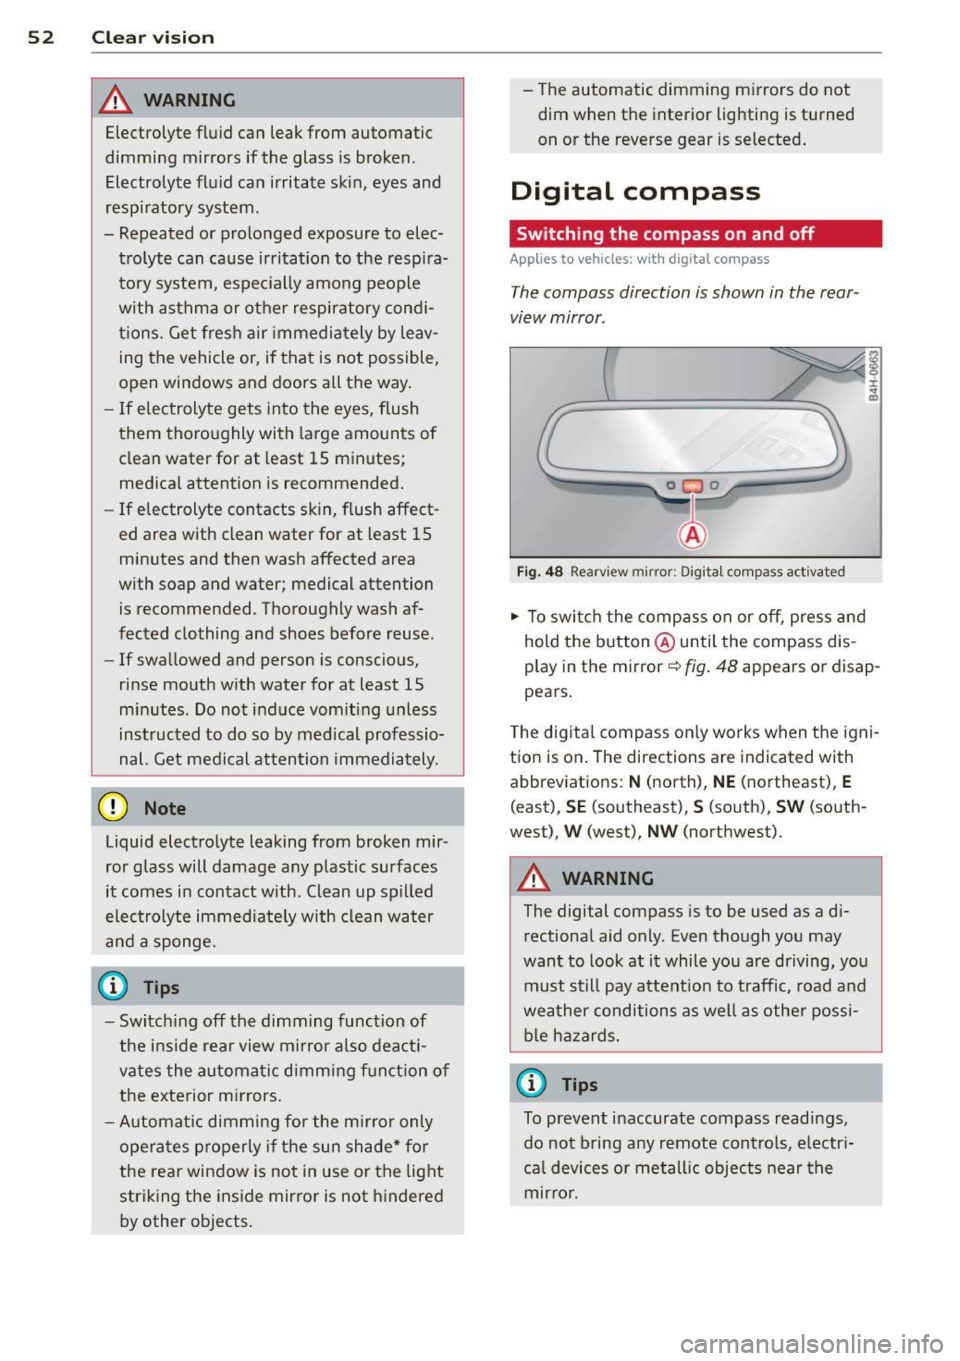
The compass direction is shown in the rear
view mirror .
J
Fig. 48 Rearview mirr or: Digi tal compass activated
.,. To switch the compass on or off, press and
hold the button @until the compass dis
play in the mirror
c::> fig. 48 appears or disap
pears.
The digital compass only works when the igni
tion is on. The directions are indicated with
abbrev iations:
N (north), NE (northeast), E
(east), SE (southeast), S (south), SW (south
west),
W (west), NW (northwest).
A WARNING -
The digital compass is to be used as a di
rectional aid only . Even though you may
want to look at it while you are driving, you
must still pay attention to traffic, road and
weather conditions as well as other possi
ble hazards.
(D Tips
To prevent inaccurate compass readings,
do not bring any remote controls, electri
cal devices or metallic objects near the
mirror.
Page 56 of 300
54 Seat s a nd s tor ag e
Seats and storage
General recommen
dations
Why is your seat adjustment so
important?
The safety belts and the airbag system can
only provide maximum protection if the front
seats are correctly adjusted.
There are various ways of adjust ing the front
seats to provide safe and comfortable support
for the driver and the front passenger . Adjust
you r seat prope rly so that :
- you can easily and quick ly reach all the
switches and controls in the instrument
panel
-your body is prope rly supported thus reduc
ing physical stress and fatigue
- the safety be lts and airbag system can offer
maximum protection
¢ page 142 .
In the following sec tions, you will see exactly
how you can best adjust you r seats .
There are special regulations and instructions
for insta lling a child seat on the front pas
senger's seat. Always fo llow the information
regarding child safety provided in
q page 166, Child Safety.
A WARNING
Incorrect seating position of the driver and
all other passengers can result in serious
personal in jury.
- Always keep your feet on the floor when
the vehicle is in motion -never p ut your
feet on top of the instrument panel, out
of the w indow or on top of the seat cush
ion . Th is app lies especially to the passen
gers .
If your seating position is incorrect,
yo u increase the r isk of injury in the case
of sudden braking or an acc ident.
If the
airbag infla tes and the seating position
is incorrect, this could result in personal
injury or even death.
- It is import ant for bo th the driver and
front passenger to keep a distance of at least 10 inches (25 cm) between them
selves and the steering wheel and/or in
strument panel. If you're s itting any
closer than th is, the a irbag system can
not protect you properly . In addition, the
front seats and head restraints must be
adjusted to your body height so that they
can give you max imum protect ion.
- Always try to keep as much distance as
possible between yourself and the steer
ing wheel o r inst rument panel.
- Do not adjust the driver's o r front pas
senger's seat whi le the vehicle is moving.
Your sea t may move unexpected ly, caus
ing sudden loss of vehicle control and
personal injury . If you adjust yo ur seat
while the veh icle is moving, yo u are out
of posit ion.
Driver's seat '
The correct seat position is important for safe
and relaxed driving.
We recommend tha t you adjus t the dr iver's
seat in the fo llowing manner :
.,. Adjust t he seat in fo re and aft direction so
t ha t you can eas ily push the peda ls to the
floor wh ile keeping your knees sl igh tly bent
q A in Why is your seat adjustment so im
portant? on page 54.
.. Adjust the back rest so that when you sit
w ith your back agains t th e backrest, you can
still g rasp the top of the steering wheel.
.. Adjust the head restraint so the upper edge
is as even as poss ible with the top of your
head . If that is not poss ible , try to adjust
the head restraint so that it is as close to
t his pos it ion as possib le
q page 61.
A WARNING
Neve r place any objects in the dr iver's foot
well. An object could get into the pedal
a rea and interfere with pedal function . In
case of sudden braking or an acc ident, you
would not be able to brake or accelerate .
Page 58 of 300
56 Seats and storage
Multifunction button
App lies to vehicles: wit h memory fu nctio n
You can adjust the massage function, upper
section of the backrest, lumbar support, side
bolsters, seating surface and safety belt
height using the multifunction button.
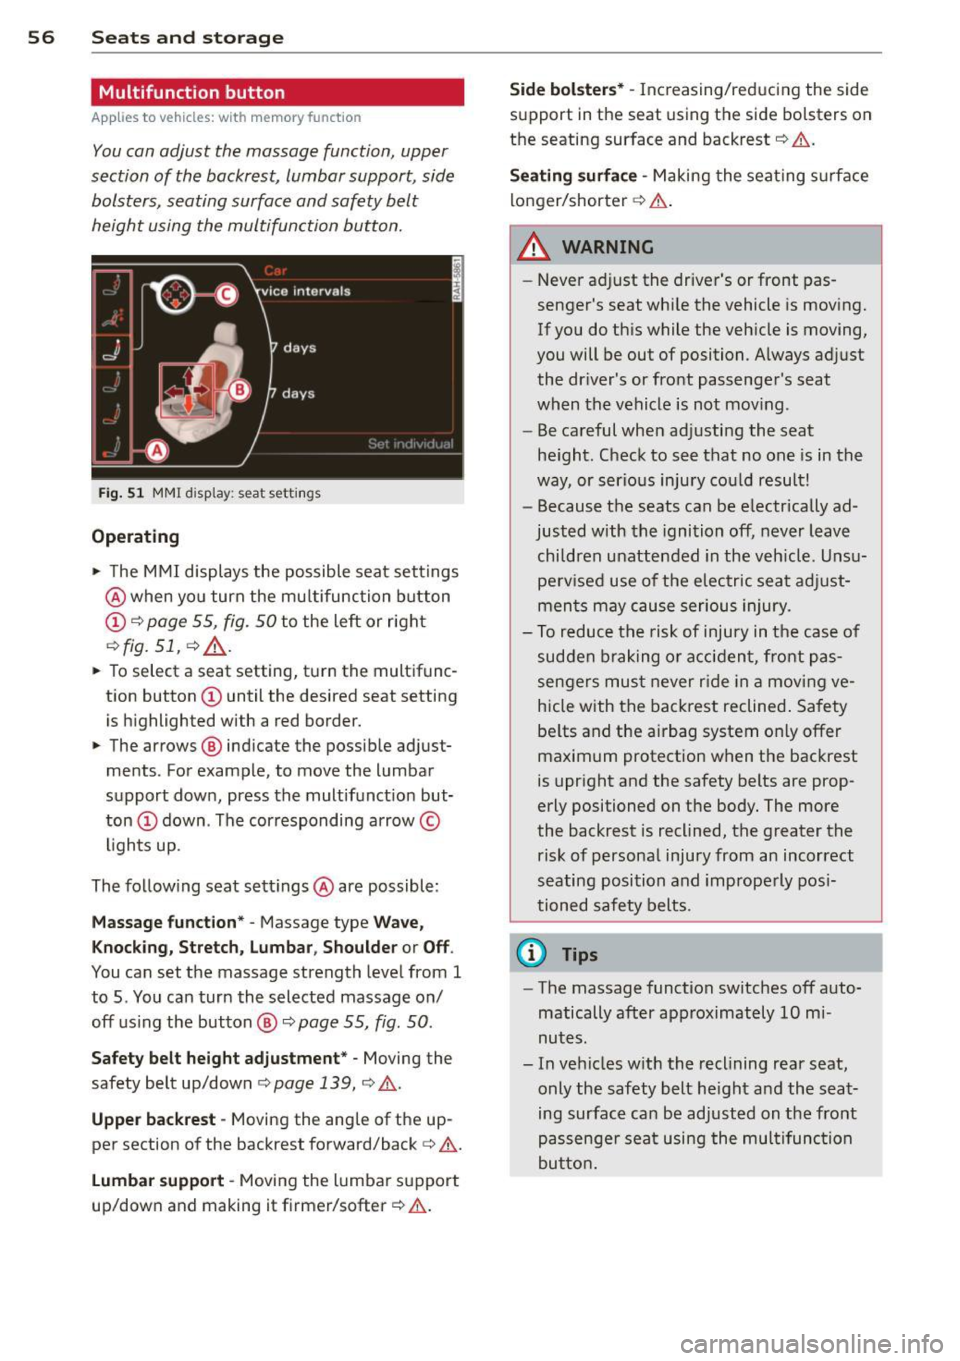
F ig. 51 MMI display : seat settings
Operating
• The M MI displays the possible seat settings
@ when yo u turn the mu ltifunction button
c:> fig. 51, c:> .&_.
• To select a seat setting, turn the multifunc
tion button
• The arrows @ indicate the possible adjust
ments . For example, to move the lumbar
support down, press the multifunct ion but
ton
The following seat settings @are possible:
Mas sage funct ion * -Massage type Wave,
K nock in g, Stretch, Lumbar , Sho ulder or Off .
You can set the massage strength level from 1
to 5 . You can turn the selected massage on/
off us ing the button @
c:> page 55, fig. 50 .
Safety belt h eight adju stment * -Moving the
safety belt up/down
c:> page 139, c:> .&..
Upper backre st -Moving the ang le of the up
per section of the backrest forward/back
c:> &.
Lu mb ar support -Moving the lumbar support
up/down and making it firme r/softer
c:> .&. .
Side bol ster s* -Increasing/reducing the side
support in the seat using the side bolsters on
the seating surface and backrest
c:> &.
Seat ing surfa ce -Making the seat ing s urface
longer/shorter
c:> A .
A WARNING
-
-Never ad just the driver's or front pas
senger's seat whi le the vehicle is moving.
If you do this while the vehicle is moving,
you will be out of position. A lways adjust
the dr iver's or front passenge r's seat
when the vehicle is not mov ing.
- Be careful when adjusting the seat
he ight . Check to see that no one is in the
way, or serious injury cou ld result!
- Because the seats can be electrically ad
justed with the ignition off, never leave
children unattended in the veh icle. Unsu
perv ised use of the e lectr ic sea t adj ust
men ts may cause serious injury.
- To reduce the risk of injury in the case of
sudden b raking or acc iden t, front pas
sengers mus t
never ride in a movi ng ve
hicle with the backrest reclined . Safety
be lts and the airbag system only offer
maximum protection when the backrest
is upright and the safety belts are prop
erly positioned on the body . The more
the backrest is reclined, the greater the risk of personal injury from an incorrect
seating position and improperly pos i
tioned safety belts .
@ Tips
-The massage function switches off auto
matically after approximately 10 mi
nutes.
- In vehicles w ith the reclining rear seat,
only the safety belt he ight and the seat
ing surface can be adjusted on the front
passenge r sea t using the mul tifunc tion
butto n.
Page 61 of 300
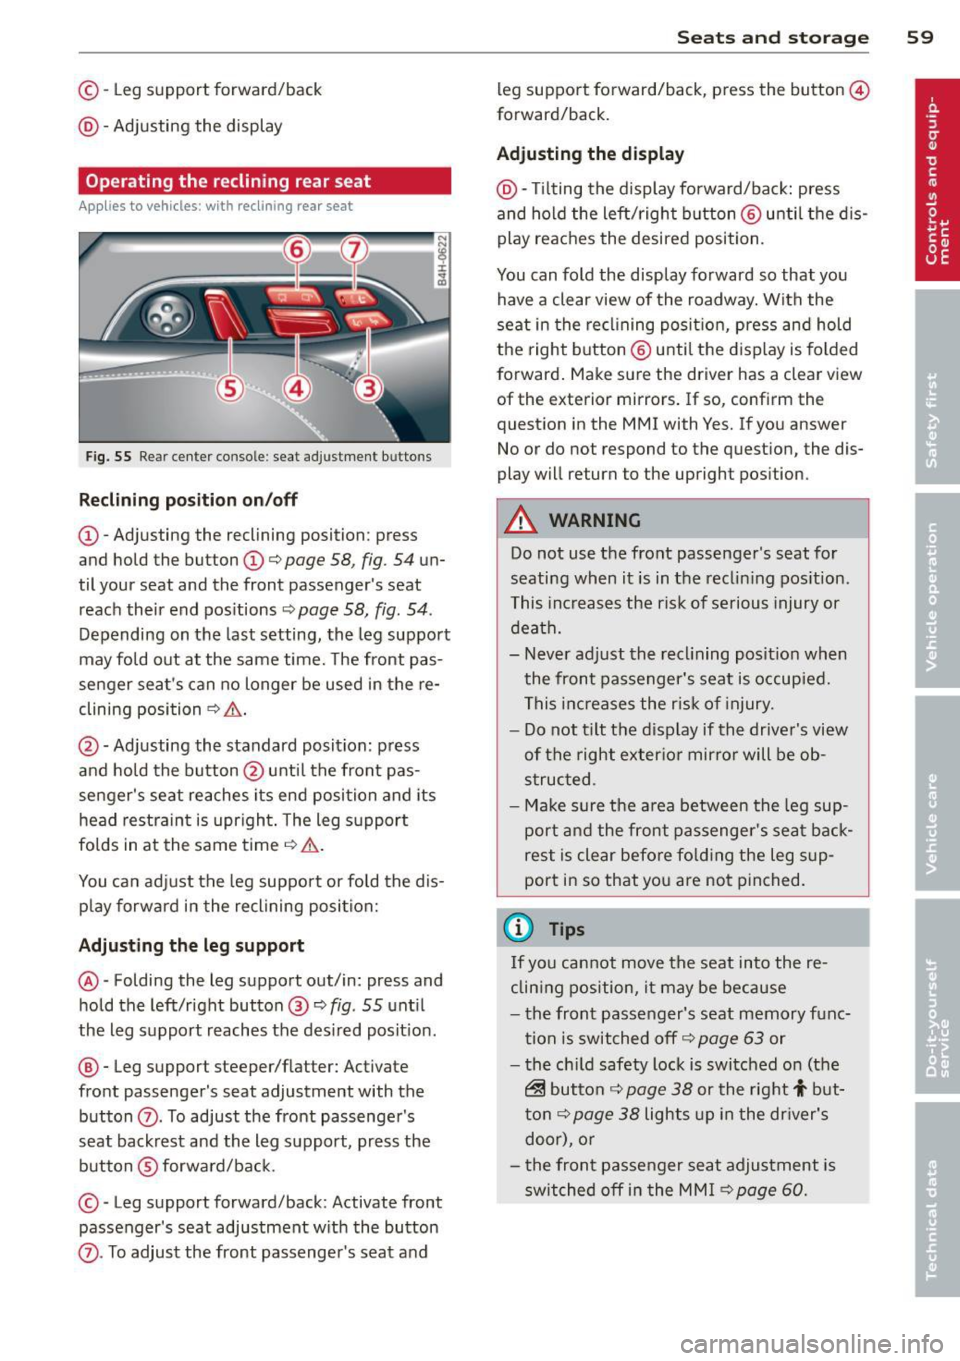
©-Leg support forward/back
@ -Adjusting the display
Operating the reclining rear seat
Ap plies to vehicles : wit h recl in ing rea r seat
Fig. 55 Rear ce nter console : seat adjustment buttons
R eclining po sition on /off
@ -Adjusting the reclining position: press
and hold the button@c:>
page 58, fig . 54 un
til your seat and the front passenger's seat
reach their end pos itions ¢
page 58, fig. 54.
Depending on the last setting, the leg support
may fold out at the same time. The front pas
senger seat 's can no longer be used in the re
clining position
¢ & .
@ -Adjusting the standard position: press
and hold the button @ unt il the front pas
senger's seat reaches its end position and its
head restra int is upr ight . The leg s upport
folds in at the same time
¢ .&, .
You can adjust the leg support or fold the dis
p lay forward in the reclining position:
Adju sting th e leg support
@ -Folding the leg support out/in: press and
hold the left/right button@¢
fig. 55 unt il
the leg support reaches the des ired posit ion .
@ -Leg support steeper/flatter: Activate
front passenger's seat adjustment with the
button
(Z) . To adjust the front passenger's
seat backrest and the leg support, press the button ®forwa rd/back.
© -Leg support forward/back: Activate front
passenger's seat adjustment w ith the button
Sea ts a nd s to rage 59
leg support fo rward/back, p ress the button @
forward/back.
Adju sting the d ispl ay
@ -Tilting the display forward/back: press
and hold the left/right b utton @ unti l the d is
play reaches the desired position.
You can fold the display forward so that you have a clear view of the roadway. With the
seat in the recl ining posit ion, press and hold
the right button @ unti l the display is folded
forward . Make sure the driver has a clear view
of the exterior mirrors. If so, confirm the
question in the MMI with Yes. If you answer
No or do not respond to the question, the dis
play will return to the upright position.
.&_ WARNING
Do not use the front passenger 's seat for
seating when it is in the reclin ing pos ition .
This increases the risk of serious injury or
death.
- Never adjust the recl ining posit ion when
the front passenger's seat is occupied.
This inc reases the r isk of injury.
- Do not t ilt the display if the driver's view
of the right exter io r mirro r will be ob
s truc ted .
- Ma ke sure the a rea between the leg sup
port and the front passenger's seat back
rest is clear before fo lding the leg sup
port in so that you are not pinched.
(D Tips
If you cannot move the seat into the re
clin ing position, it may be because
- the front passenger's seat memory func
tion is switched off c:>
page 63 or
- the ch ild safety lock is switched on (the
~ button c:> page 38 or the right t but
t on¢
page 38 lights up in the dr iver's
door), o r
- t he front passe nger seat adjustment is
switched off in the MM I c:>
page 60.
Page 62 of 300
60 Seats and storage
Massage function remote control
Applies to vehicles: with reclining rear seat and massage
f u nct ion
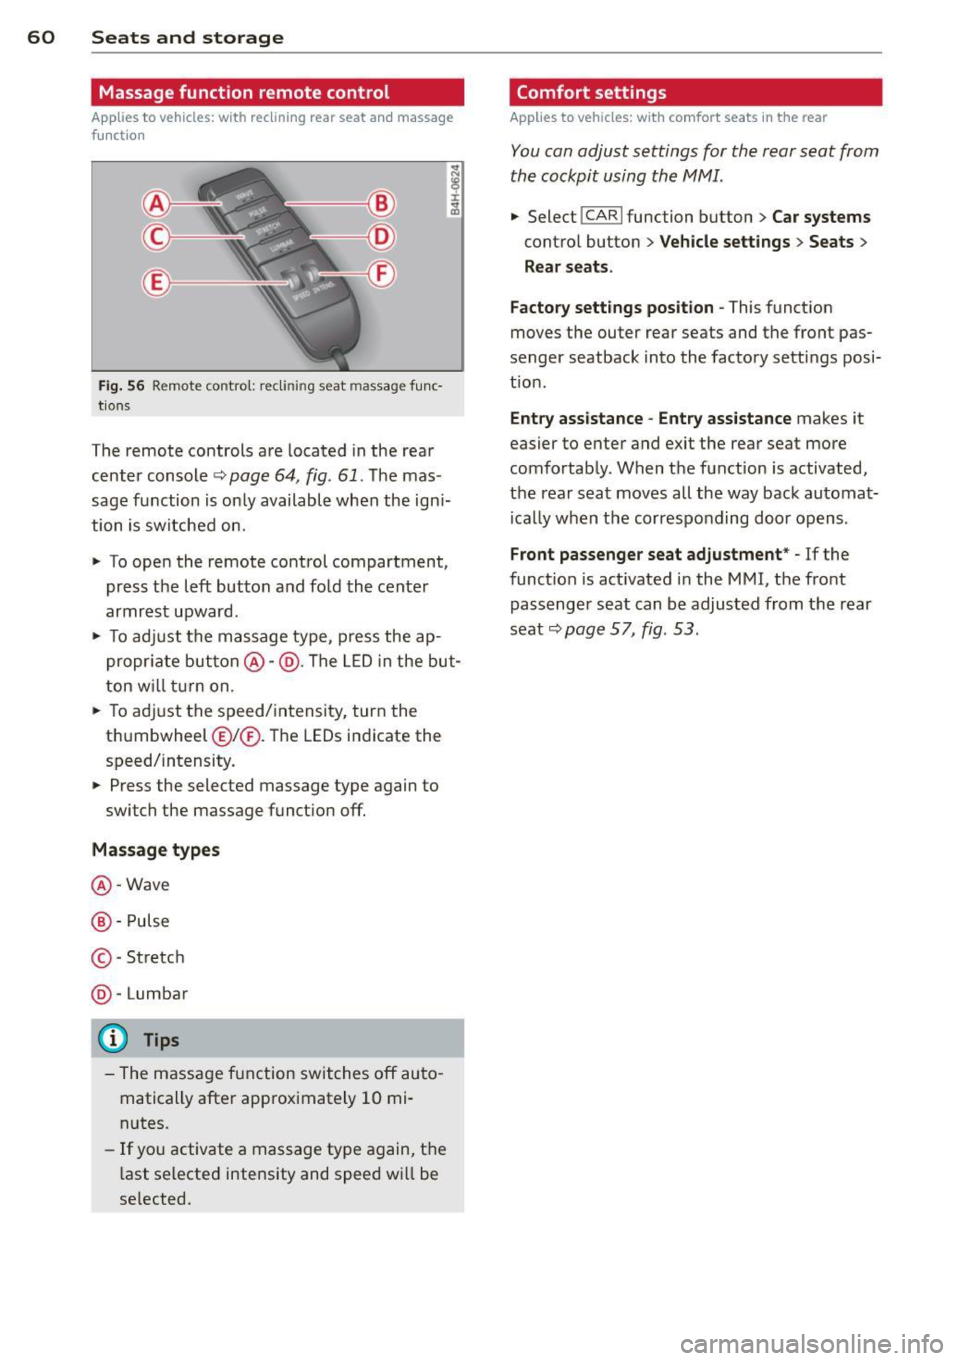
Fig. 56 Remote contro l: recli nin g seat massage func·
tions
The remote controls are located in the rear
center console
Q page 64 , fig . 61. Th e mas
sage function is only available when the ign i
tion is switched on.
" To open the remote control compartment,
press the left button and fold the center
armrest upward .
" To adjust the massage type, press the ap
propriate button@-@ . The LED in the but
ton will turn on.
" To adjust the speed/ intensity, turn the
t hu mbwheel @I® . Th e LEDs indicate the
speed/intensity.
" Press the selected massage type again to
switch the massage function off.
Massage types
@-Wave
@ -Pulse
© -St retch
@ -Lumbar
(D} Tips
- The massage function switches off auto
matically after approximately 10 mi·
nutes.
- If you activate a massage type again, the
l ast selected intensity and speed wi ll be
se lected.
Comfort settings
Applies to vehicles: wit h comfort seats in the rear
You can adjust settings for the rear seat from
the cockpit using the MMI.
" Selec t! CAR I function button > Car systems
contro l button > Vehicle settings > Seats >
Rear seats.
Factory settings position -
This function
moves the outer rear seats and the front pas
senger seatback into the factory settings posi
t ion .
Entry assistance -Entry assistance makes it
easier to enter and exit the rear seat more
comfortably. When the function is activated,
the rear seat moves all the way back automat
i ca lly when the corresponding door opens .
Front passenger seat adjustment* -If the
function is act ivated in the MMI, the front
passenger seat can be adjusted from the rear
seat
Q page 57, fig . 53 .
Page 66 of 300
64 Seats and storage
Full-length center
console
Overview
Appl ies to vehicles: with full-len gth ce nter console
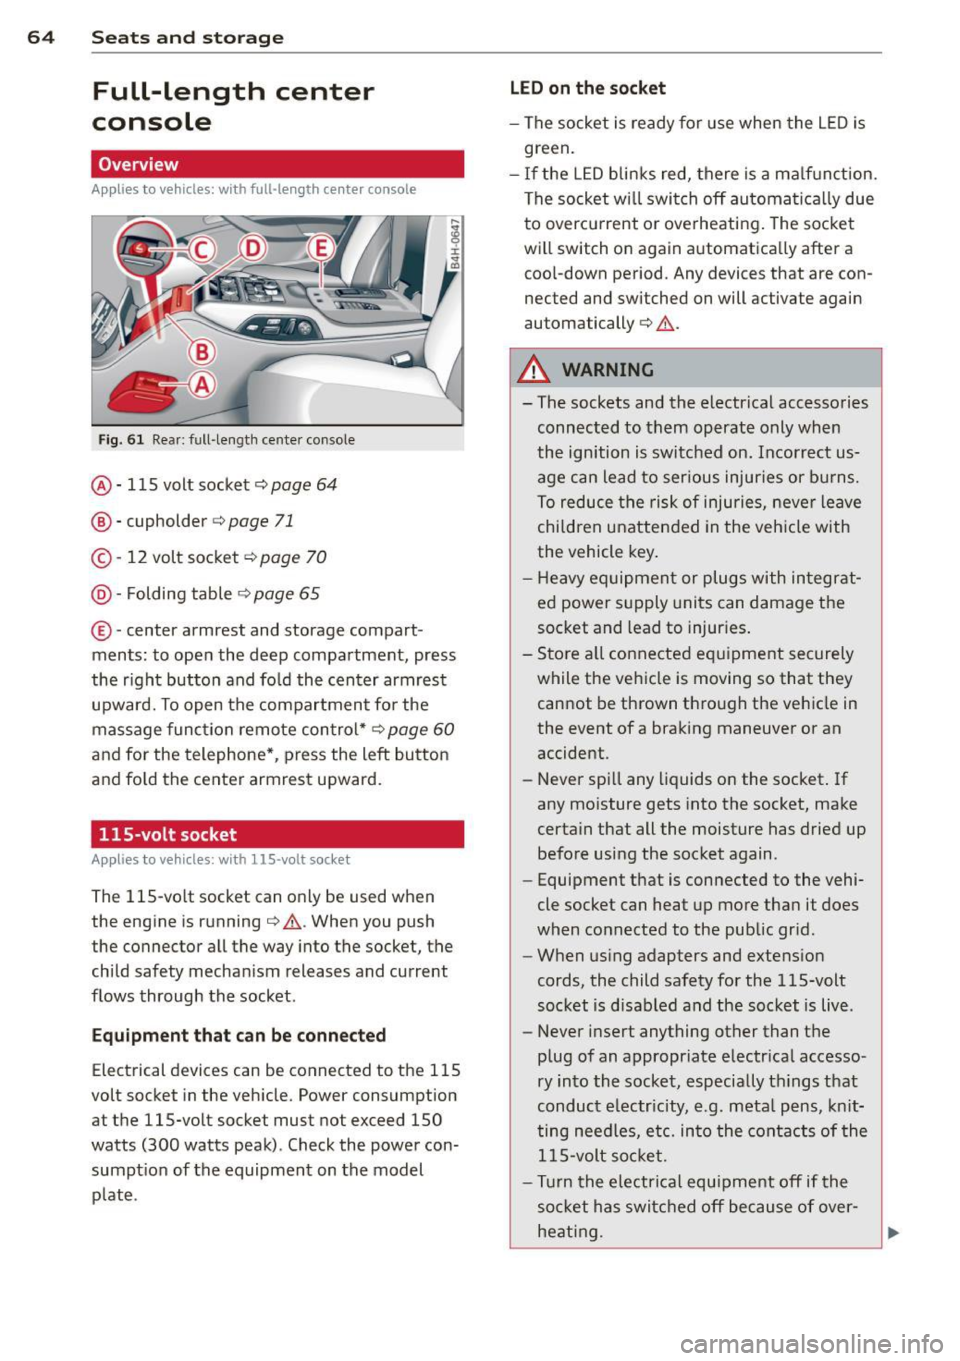
Fig. 61 Rear: full -length center console
@ · 115 volt socket ¢ page 64
@ · cupholder <=> page 71
© · 12 volt socket c:> page 70
@ · Folding table ¢ page 65
®·center armrest and storage com part ·
ments: to open the deep compartment, press
the right button and fold the center armrest
upward. To open the compartment for the
massage function remote control*
c:> page 60
and for the telephone*, press the left button
and fold the center armrest upward.
115-volt socket
Applies to vehicles: with 115 -vo lt socket
The 115-volt socket can only be used when
the engine is running¢
A. When you push
the connector all the way into the socket, the
child safety mechanism releases and current
flows through the socket .
Equipment that can be connected
Electrical devices can be connected to the 115
volt socket in the vehicle. Power consumption
at the 115-volt socket must not exceed 150
watts (300 watts peak) . Check the power con·
sumption of the equipment on the model
plate .
LED on the socket
-The socket is ready for use when the LED is
green.
- If the LED blinks red, there is a malfunction.
The socket will switch off automatically due
to overcurrent or overheating. The socket
will switch on again automatically after a cool-down period. Any devices that are con
nected and switched on will activate again
automatically
c:> A .
A WARNING
-
- The sockets and the electrical accessories
connected to them operate only when
the ignition is switched on. Incorrect us
age can lead to serious injuries or burns.
To reduce the risk of injuries, never leave
children unattended in the vehicle with
the vehicle key.
- Heavy equipment or plugs with integrat
ed power supply units can damage the
socket and lead to injuries.
- Store a ll connected equipment securely
while the vehicle is moving so that they
cannot be thrown through the vehicle in
the event of a braking maneuver or an
accident.
- Never spill any liquids on the socket. If
any moisture gets into the socket, make
certain that all the moisture has dried up before using the socket again.
- Equipment that is connected to the vehi·
cle socket can heat up more than it does
when connected to the public grid .
- When using adapters and extension
cords, the child safety for the 115-volt
socket is disabled and the socket is live.
- Never insert anything other than the
plug of an appropriate electrical accesso·
ry into the socket, especially things that
conduct electricity, e.g. metal pens, knit
ting needles, etc. into the contacts of the
115-volt socket.
- Turn the electrical equipment off if the
socket has switched off because of over·
heating.
Page 74 of 300
72 Seats and stor age
Addit ional storage
There are a variety of storage compartments
and fasteners in various places in the vehicle.
- Storage compartments in the doors
- Net in the front passenger footwell
- Eyeglasses compartment in the headliner (near the rearview mirror)
- Storage compartments under the center
armrests
- Compartments* on the back of the front
seat backrests
- Garment hooks over the rear doors
- Compartment in the center console with
pass-through)* (rear)
- Compartment behind the rear center arm
rest (in vehicles without the pass-through*
or refrigerator*)
- Bag hooks in the luggage compartment
A WARNING
-When driving, do not leave any hard ob
jects on the rear window shelf or allow
your pet to sit on the shelf. They could
become a hazard for vehicle occupants in
the event of sudden braking or a crash .
- Always remove objects from the instru
ment panel. Any items not stored could
slide around inside the vehicle while driv
ing or when accelerating or when apply
ing the brakes or when driving around a
corner.
- When you are driving make sure that
anything you may have placed in the cen
ter console or other storage locat ions
cannot fall out into the footwells. In case
of sudden braking you would not be able
to brake or accelerate.
- Any articles of clothing that you have
hung up must not interfere with the driv
er's view. The coat hooks are designed
only for lightweight clothing. Never hang
any clothing with hard, pointed or heavy
objects in the pockets on the coat hooks.
During sudden braking or in an accident -
especially if the airbag is deployed - these objects could injure any passen
gers
inside the vehicle.
- To reduce the risk of personal injury in an
accident or sudden stop, always keep the
glove compartment closed while driving.
- Read and follow all WARNINGS
c:> page 161, Important safety instruc
tions on the side airbag system.
- Hang clothes in such a way that they do
not impair the driver's vision.
- The coat hooks must only be used for
lightweight clothing. Do not leave any
heavy or sharp edged objects in the pock
ets which may interfere with the side cur
tain airbag deployment and can cause personal injury in a crash.
- Do not use coat hangers for hanging clothing on the coat hooks as this can in
terfere with proper deployment of the
side curta in airbags in an acc ident.
- Do not hang heavy objects on the coat
hooks, as they could cause personal in
jury in a sudden stop.
@ Note
Objects located on the rear shelf that rub
against the rear window could damage the
heating wires for the rear window defog
ger .
(D Tips
-A vent slot is located between the shelf
and the rear window. Do not block the
vent with any items you may place on the
rear window she lf.
- Do not place bulky items on the rear win
dow shelf as they could restrict or block
the driver's vision in the rear view mirror.
Cooler
Introduction
App lies to vehicles: wit h coo ler
Please clean the cooler before using it for the
first time
c:> page 213.
You can only switch on the cooler if ...
Page 77 of 300

Warm and cold Climate controls
Description
The climate control system warms, cools and
adds humidity to the a ir in the veh icle inter io r.
It is the most effect ive when the windows and
sunroof* are closed. If the temperature inside
the parked vehicle becomes very warm, open
ing the window briefly will speed up the cool
ing process.
I n all heating mode functions except
defrost,
the blower on ly switches to a higher speed
once the engine coolant has r eached a certain
temperature.
Condensation from the cooling system can
drip and form a puddle of water under the vehicle. This is normal and does not mean there
is a leak.
Pollut ant filter
The po llutant filte r removes pollutants s uch
as dust and pollen from the air.
The air pollutants filte r must be changed at
the intervals spec ified in you r Wa rra nty
&
Maintenance book let, so that the air condi
tioner can properly work.
I f you drive you r vehicle in an area with h igh
ai r po llution , the fi lter may need to be
changed more freq uent ly than specified in
your Aud i Warranty
& Ma intenance booklet. If
i n doubt, ask your authorized Audi Service Ad
visor for advice .
K ey coded settings
The climate con trol settings are a utomat ica lly
stored and assigned to the remote contro l key
that is in use .
& WARNING
Reduced visibility is dangero us and can
cause accidents . -
Warm and cold 75
- For safe driving it is very important that
all windows be free of ice, snow and con
densat ion.
- Comp letely fam iliarize yourse lf with the
proper use and funct ion of the heat ing
and ve nti lation system and especially
how to defog and defrost the w indows.
- Never use the windshield wiper/washer
system in freez ing weather unt il you
have warmed the w indshield first, using
the heating and ventilation system . The
washer solution may free ze o n the wind
shie ld and red uce visib ility.
(D Note
- If you suspect that the air conditioner has been damaged, switch the system
off to avoid furt her damage and have it
i n spected by a q ua lified dea lership.
- Repairs to the Audi air conditioner re
quire specia l techni cal know ledge and
special tools. Contact an autho rized Aud i
dealer fo r ass istance.
@ For the sake of the environment
By reduci ng the amou nt of f uel you use,
you also red uce the amount of pollutan ts
emitted into the air .
(D Tips
- Keep the air intake s lots ( in fro nt of the
w indshield) free from ice, snow and de
br is in order to maintain the proper f unc
tion of the climate control system.
- T he energy management system may
switch the seat heating* or rear window
defroster off temporar i Ly . These systems
are available again as soon as the energy
balance has been restored .
- Air escapes through vents under the rear
window. When placing items of clothing
on the luggage compartment cover, en
sure that the openings are not covered.
Page 87 of 300
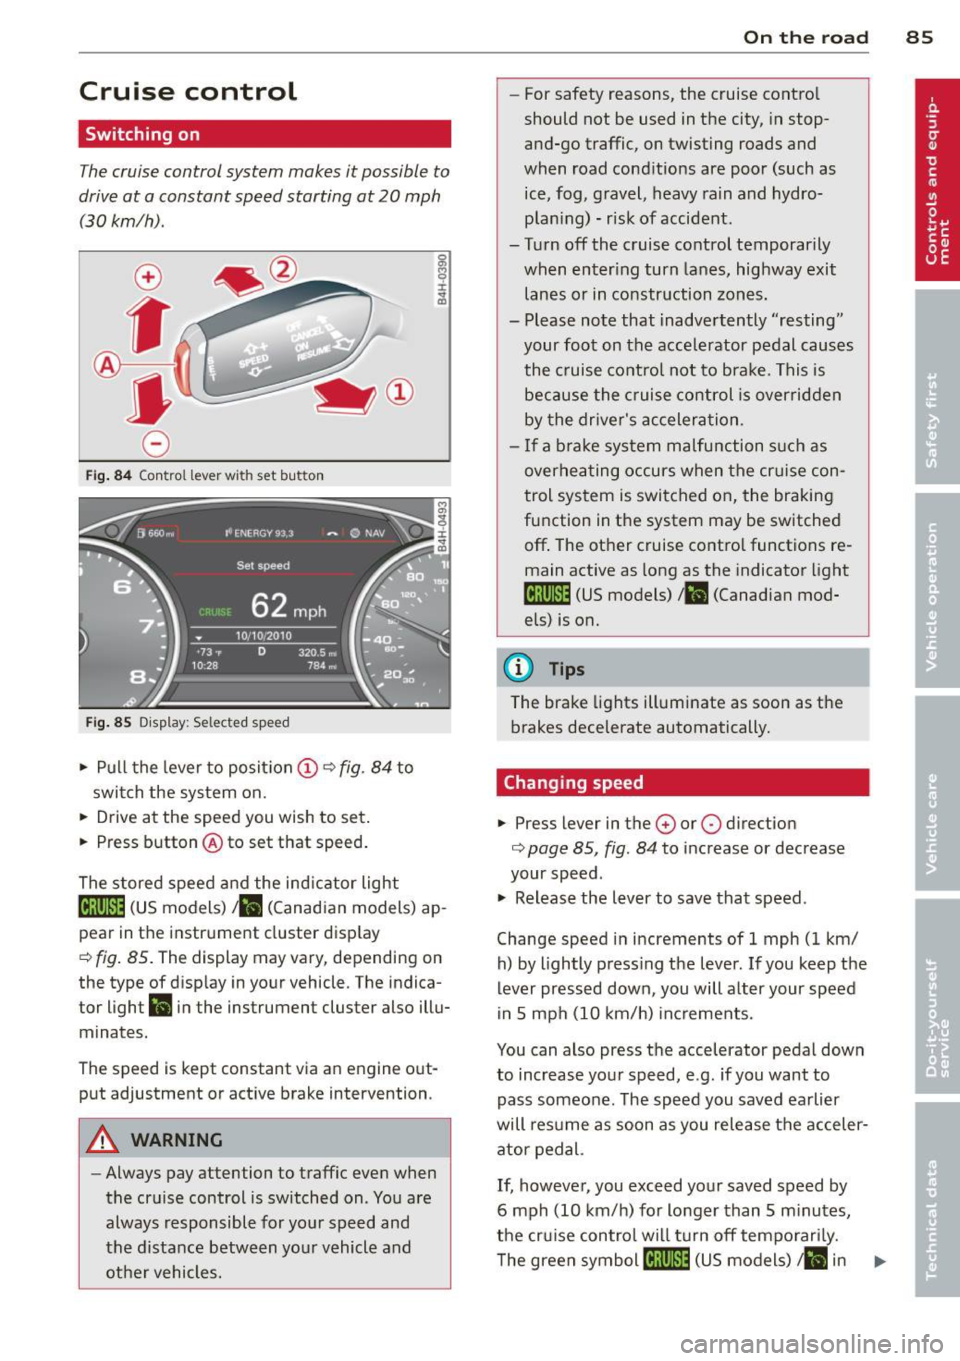
Cruise control
Switching on
The cruise control system makes it possible to
drive at a constant speed starting at 20 mph
(30 km/h).
0
f
~
0
Fig . 84 Control lever with set button
Fig . 85 D isplay: Selected speed
.,. Pull the lever to position (D ~ fig . 84 to
swit ch the system on .
.,. Drive at the speed you wish to set.
.,. Press button @to set that speed.
The stored speed and the ind icator light
[lj;(i)~1ij (US models) 1 11 (Canad ian models) ap
pear in the instrument cluster display
¢ fig. 85. The display may vary, depending on
the type of disp lay in your vehicle. The indica
tor light
Ill in the instrument cluster also illu
minates.
The speed is kept constant via an engine out
put adjustment or active brake intervention.
A WARNING
-Always pay attention to traffic even when
the cruise control is switched on . You are
always responsible for your speed and
the distance between your vehicle and other vehicles.
On the road 85
-For safety reasons, the cruise control
should not be used in the city, in stop
and-go traffic, on twisting roads and
when road conditions are poor (such as ice, fog, gravel, heavy rain and hydro
plan ing) - risk of accident .
- Turn off the cruise control temporarily
when enter ing turn lanes, highway exit
lanes or in construction zones.
- Please note that inadvertently ''resting"
your foot on the accelerator pedal causes
the cruise control not to brake. This is
because the cruise control is overridden
by the driver's acceleration .
- If a brake system malfunction such as
overheating occurs when the cr uise con
trol system is switched on, the braking
function in the system may be switched
off . The other cruise contro l functions re
main active as long as the indicator light
tij;[i)~1ij (US models) 111 (Canadian mod
els) is on.
(D Tips
The brake lights illuminate as soon as the brakes decelerate automatically.
Changing speed
.,. Press lever in the 0 or 0 direction
¢ page 85, fig . 84 to increase or decrease
your speed .
.,. Release the lever to save that speed.
Change speed in increments of 1 mph (1 km/ h) by lightly press ing the lever. If you keep the
lever pressed down , you will alter your speed
in 5 mph (10 km/h) increments.
You can also press the accelerator pedal down
to increase your speed, e.g. if you want to
pass someone. The speed you saved earlier
will resume as soon as you release the acceler
ator pedal.
If, however, you exceed your saved speed by
6 mph (10 km/h) for longer than 5 m inutes,
the cruise control wil l turn off temporarily.
The green symbol
[ljlIJll (US models) ill in ..,_