change wheel AUDI S8 2012 Owners Manual
[x] Cancel search | Manufacturer: AUDI, Model Year: 2012, Model line: S8, Model: AUDI S8 2012Pages: 300, PDF Size: 75.06 MB
Page 45 of 300
Clear vision Lights
Switching the headlights on and off
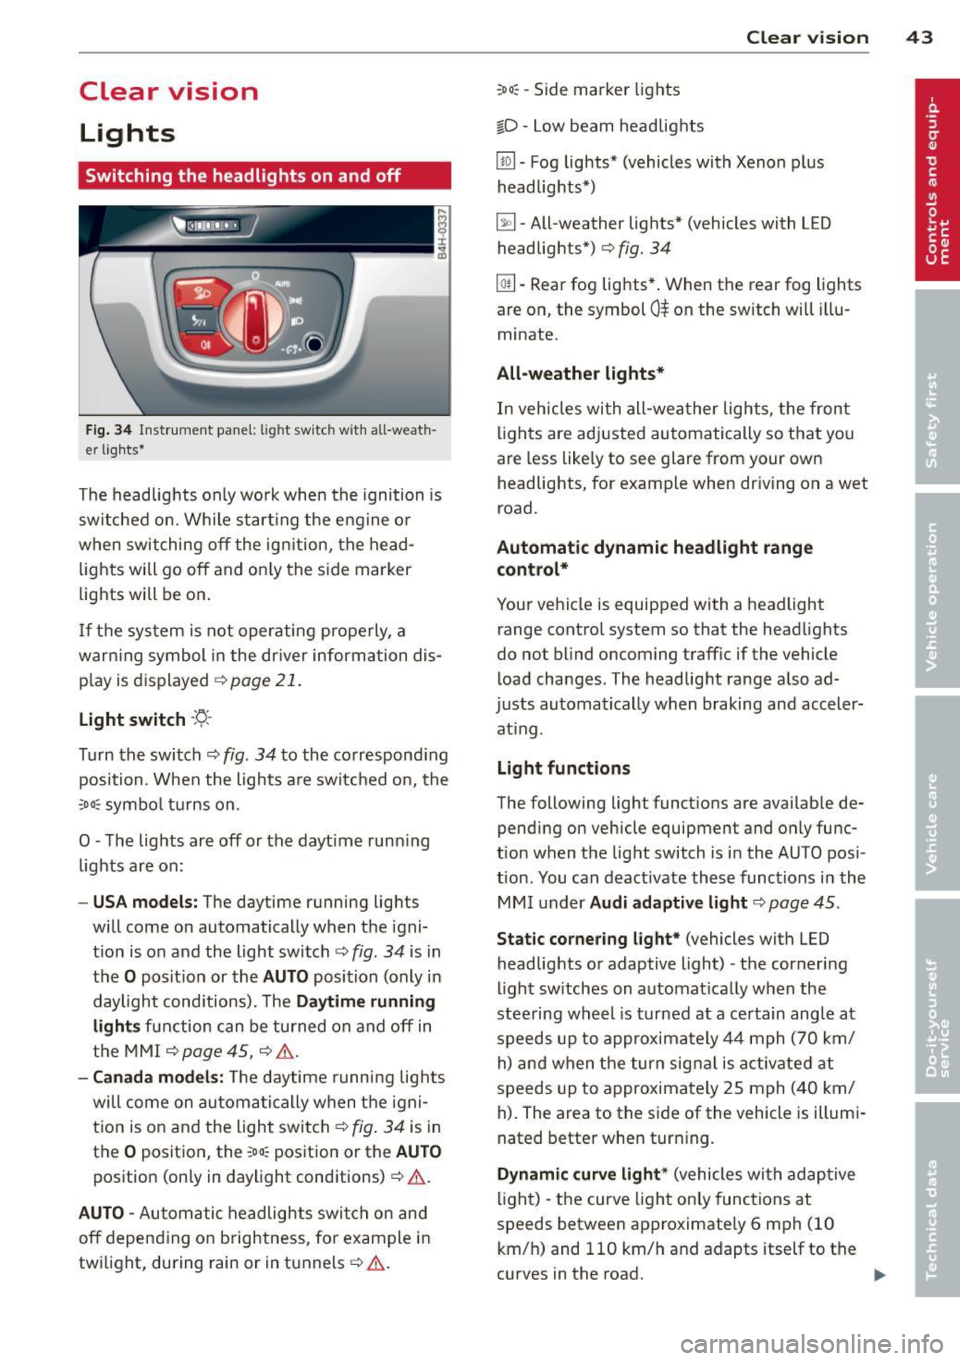
Fig . 34 Instrument pane l: lig ht sw itc h wit h all -weath
er lights•
The headlights only wo rk when the ignition is
switched on. Wh ile start ing the eng ine o r
when switching off the ign ition, the head
lights will go off and on ly the side marker
lights will be on .
If the system is not operating p rope rly, a
war ning symbol in the dr iver information dis
p lay is d isplayed
c::> page 21 .
Light switch ·'t!- -
Tu rn the switch c::> fig . 34 to the correspond ing
position . When the lights a re switched on, the
oD o: symbo l tu rns on .
0 -The lig hts are off or the dayt ime runn ing
lights are on:
- USA models: The day time running ligh ts
will come on automatically when the igni
t ion is on and the light switch
c::> fig . 34 is in
the
O posit ion or the AUTO position (only in
daylight cond itions). The
Daytime running
light s
function can be turned on and off in
the MMI
c::> page45, c::>A .
-Ca nada model s: The daytime running lig hts
will come on automa tically when the igni
t ion is on and the light switch
c::> fig . 34 is in
the
O position, the : Do: pos ition or the AUTO
position (only in daylight conditions) c::> A .
AUTO -Automatic headlights swi tch on and
off depend ing o n brightness, for example i n
tw ilight, during rain or in tunnels
c::> &. .
:Do: -Side marke r lights
io -Low beam headlights
Clear vi sion 43
lm -Fog lights* (vehicles with Xenon p lus
headlights *)
~ -All-weather lights * (vehicles with L ED
headligh ts*)
c::> fig. 34
@TI -Rear fog lights* . When the rear fog lights
are on, the symbol
0$ on the switch will illu
minate .
All-weather lights*
In vehicles wi th all -wea ther lights, the front
lights are adjusted au tomat ically so that you
are less like ly to see glare from your own
headlights, for example when dr iving on a wet
ro ad.
Automatic dynamic headlight rang e
control*
Your vehicle is equipp ed with a headlight
range contro l system so that the headlights
do no t blind oncoming traff ic if the vehicle
load changes. The headlig ht range a lso ad
justs automatically when braking and acceler
at ing .
Light function s
The following light funct ions are availab le de
pend ing on vehicle equipment and on ly func
t ion when t he light switch is in the AU TO posi
tion . You can deactivate these functions i n the
MM I under
Audi adapt ive light c::> page 45 .
Static corner ing light* (vehicles with L ED
headlights or adaptive light) -the cornering
ligh t sw itches on automat ica lly w hen the
stee ring wheel is turned at a ce rtain angle at
speeds up to approxima tely 44 mph (70 km/
h) and when the turn sig nal is act ivate d at
speeds up to approximately 25 mph (40 km/
h) . The area to the side of the veh icle is illumi
nated bette r when tur ning .
Dynamic curve light * (vehicles with adap tive
light) -the curve ligh t only functions at
speeds betwee n approximately 6 mph (10
km/ h) and 110 km/h and adapts itself to the
curves in the road.
Ill>
Page 86 of 300
84 On th e road
• You can release the switch (®) once you are
sure that you are developing enough for
ward momentum at the wheels as you de
press the accelerator .
Depending on the weight of the rig (vehicle
and trai ler) and the severity of the incline, you
may roll backwards as you start . You can pre
vent roll ing backwards by holding the parking
brake switch(®) pulled out and accelerating -
just as you would when starting on a hill with
a conventional hand brake .
Emergency braking
In the event that the conventional brake sys
tem fails or locks .
• In an emergency, pull the switch(®) and
continue to pull it to slow your vehicle down
with the parking brake .
• As soon as you release the sw itch
C®> or ac-
cele rate , the braking p rocess stops.
If you pull the switch(®) and hold it above a
speed of about 5 mph (8 km/h), the emergen
cy braking function is in it iated. The veh icle is
b raked at all four wheels by activa ting the hy
d raul ic br ake system. The b rake performance
is simi lar to making an emergency stop
c::> & .
In order not to activate the emergency brak
i ng by m ista ke, an audible wa rning tone (bu z
z er) sounds when the swi tc h
C®> is pulled. As
soon as the switch(®) is released, or the accel
erator pedal is depressed, emergency braking
stops .
.&_ WARNING
Emergency braking should only be used in
an emergency, when the normal foot brake
has failed or the brake pedal is obstructed.
Using the parking bra ke to perform emer
gency braking will slow yo ur vehicle down
as if you had made a fu ll brake applicat ion.
T he laws of physics cannot be s uspended
even w ith ESC and its associate d compo
nents (ABS, ASR, EDL). In corners and
when road or weather conditions are bad, a full brake application can cause the vehi- cle to sk
id or the rear end to break away -
risking an accident.
Speed warning system
, Introduction
The speed warning system helps you to stay
under a specified maximum speed .
The speed warning system warns you if you
are exceeding the maximum speed that you
have set . You will hear a warning tone when
your speed exceeds the stored value by ap proximate ly 3 mph (3 km/h). An ind icator
l ight . (USA
models) ;a (Canada mode ls) in
the instr ument cluster d isp lay also tur ns on at
the same time. The indicator light.,.
turns off when the speed decreases be low the
stored maxim um speed.
Setting a th reshold is recommended if you
would like to be rem inded when you reach a
certain maxim um speed. Situations whe re you
may want to do so include driving in a co untry
with a genera l speed limit or if there is a
specified maximum speed for winter tires.
(D Tips
Even though your vehicle is equipped w ith
a speed warn ing system, you should still
watch the speedometer to make sure you
are not dr iv ing faster than the speed limit.
Setting the threshold
You can set, change and delete the threshold
in the MMI.
• Select: !CAR ! function b utton > Car systems
contro l button > Dri ver ass ist > Speed warn
ing .
You can set any threshold between 20 mph
(30 km/h) and 150 mph (240 km/h). Sett ings
can each be adj usted in increments of 5 mph
(10 km/h).
Page 92 of 300
90 Audi adaptive cruise control and braking guard
• You must also press the brake pedal when
the vehicle is stopped.
Switching adaptive cruise control off
• Push the lever away from you into position
@ until it clicks into p lace. The message
ACC off appears.
@ Indicator lights
II-Adaptive cruise control is switched on . No
vehicles are detected up ahead. The stored
speed is maintained.
I-A moving vehicle is detected up ahead .
The adaptive cruise control system regulates
the speed and d istance to the moving vehicle
ahead and acce lerates/bra kes automatica lly.
f§ . Adaptive cru ise control is switched on . A
mov ing vehicle up ahead was detected. Your
vehicle remains stopped .
I -When automatic braking is not able to
keep enough distance to a p reviously detected
mov ing vehicle up ahead, you must take con
trol and brake¢
page 92, Prompt for driver
intervention.
© Display
If adap tive cruise control is not shown in the
d isplay, you can call it up with the multifunc
tion steering wheel buttons~
page 23.
Based on the symbols in the display , you can
determ ine if the system is maintaining a dis
tance to the vehicle ahead and w hat that dis
tance is.
No vehicle -No vehicle ahead was detected.
White vehicle -A vehicle ahead was detected .
Red vehicle -Prompt for the driver to take ac
tion ¢
page 92.
Both
arrows on the scale © indicate the dis
tance to the vehicle ahead . No arrow appears
when the vehicle is on an open road and there is no object ahead. If an object is detected
ahead, the arrow moves on the scale.
The green zone on the scale shows the stored d istance. For information on changing the stored distance, refer to
¢
page 91. If the
distance se lected is too close or may soon be
come too close, the arrows move into the red
z one on the sca le.
A WARNING
Improper use of the adaptive cruise con
trol can cause collisions, other accidents
and serious personal injur ies .
- Pressing the
!SET ! button when driving at
speeds below 20 mph (30 km/h), w ill au
tomatically accelerate the vehicle to 20
mph (30 km/h), which is the minimum
speed that can be set .
(D Tips
-If you switch the ignit ion or the adaptive
cruise control off, the set speed is erased
from the system memory.
- You cannot switch the Electron ic Stabili
ty Control (ESC) to the SPORT mode
when adaptive cruise control is switched
on .
Changing the speed
Applies to vehicles: with Audi adaptive cru ise control
0
f
• 0
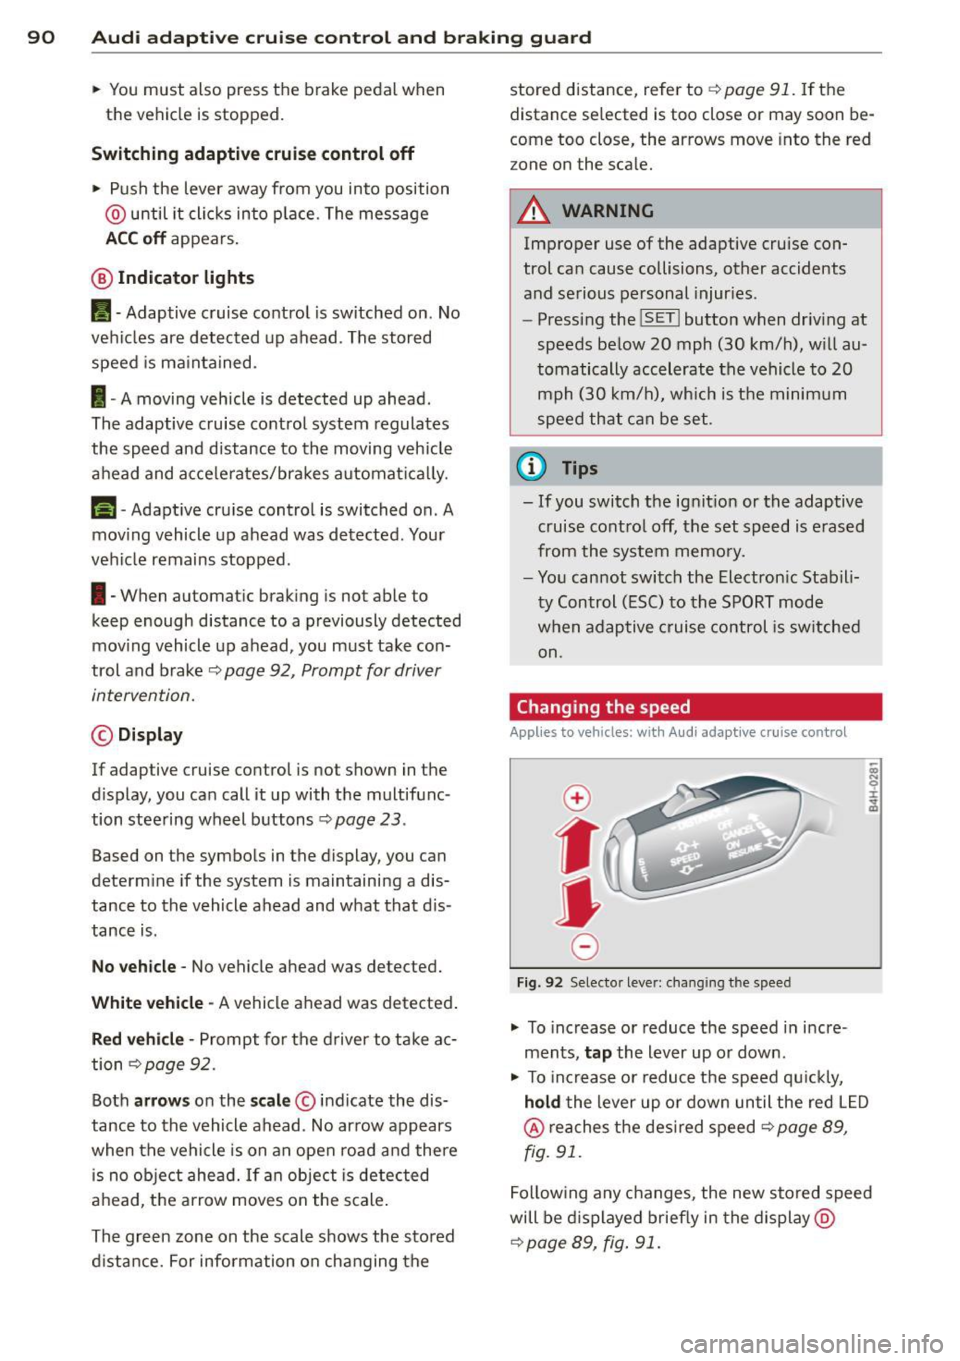
Fig. 92 Selecto r lever : chang ing t he spee d
• To increase or reduce the speed in incre
ments,
tap the lever up or down.
-
-a)
N
q :r
~
"' To increase or reduce the speed qu ickly,
hold the lever up or down until the red L ED
@ reaches the desired speed ¢ page 89,
fig . 91.
Following any changes, the new stored speed
will be displayed briefly in the display @
¢page 89, fig. 91.
Page 102 of 300

100 Audi side assist
General information
App lies to vehicles: with side assist
®
©
Fig. 103 Driving s it u at ions
A U D I
• 0
Fig . 104 Rear of th e ve hicle: pos it io n of t he se nso rs
Side assis t fu nctions at speeds above ap prox i
ma tely 19 mph (30 km/h).
(D V ehicles that are approaching
In certain cases, a vehicle will be classified as
cr itical for a lane change
even if it is still
somewhat far away. The fas ter a vehicle ap
p ro aches, the sooner the disp lay in the exteri
or m irror will t urn on.
@ Vehicles traveling with you
Vehicles traveling w ith you are indicated in the
exterior m irror if they are classified as cr it ical
for a lane change. All vehicles detec ted by
side assis t are in dicated by the time they en
ter your "blind spot", at the latest.
@ Vehicles left behind
If you s low ly pass a ve hicl e tha t sid e ass ist has
dete cted ( the difference in s peed between the
vehicle and you r vehicle is less than 9 mph or
15 km/ h), the display in the exterio r mirror
turns on as soon as the vehicle enters your blind spot.
The disp lay wi ll not t urn on if you quickly pass
a vehicle that s ide assist has detected (t he d if
f erence in speed between the ve hicle and your
vehicle is greater than 9 mph or 15 km/h).
Functional limitations
T he radar senso rs are designed to detect the
left and right adjacent lanes when the road
l anes a re the normal width. In certain situa
t ions, the d isp lay in the exterior mirror may
turn on even though there is no ve hicle locat
ed in the area that is cr itical fo r a la ne cha nge.
Fo r example:
- if the lanes are narrow or if your are driving on the edge of your lane. If this is the case ,
the system may have detected the vehicle in
another lane that is
not adjacent to you r
cur rent lane .
- if you a re driving through a c urve . Side assis t
may react to a vehicle that is one lane ove r
from the adjacent lane .
- if side assist reacts to other objects (such as
high or d isp laced gua rd rails) .
- In poor weather conditions. The side assist
fu nctions are limited .
Do not cover the radar sensors
c::> fig. 104 with
stickers, depos its, bicycle wheels or other ob
jects, because this wi ll affect the funct io n. Do
not use s ide ass ist when towing a trailer . For
information on cleaning, refe r to
c::> page 205 .
&_ WARNING
-Always pay a tten tion t o traffic and to the
a rea around your ve hicl e. Side a ssist can
no t repla ce a driver's atte ntion. The driv
er a lone is always respons ible fo r lane
cha nges a nd similar driving mane uvers.
Page 103 of 300

-Improper reliance on the side assist sys
tem can cause collisions and serious
personal injury:
- Never rely only on side assist when
changing lanes.
- Always check rear view mirrors to make
sure that it is safe to change lanes.
- Side assist cannot detect all vehicles un
der all conditions- danger of accident!
- Please note that side assist indicates
there are approaching vehicles, or vehi cles in your blind spot, only after your ve
hicle has reached a driving speed of at
least 19 mph (30 km/h).
- In certain situations, the system may not
function or its function may be limited.
For example:
- if vehicles are approaching or being left
behind very quickly. The display may
not turn on in time.
- in poor weather conditions such as
heavy rain, snow or heavy mist .
- on very wide lanes, in tight curves or if
there is a rise in the road surface . Vehi
cles in the adjacent lane may not be de
tected because they are outside of the
sensor range.
(D Note
The sensors can be displaced by impacts or
damage to the bumper, wheel housing and
underbody. This can affect the system .
Have your authorized Audi dealer or au
thorized Audi Service Facility check their
function.
(D Tips
- If the window glass in the driver's door
or front passenger's door has been tint
ed, the display in the exterior mirror may be misinterpreted.
- For Declaration of Compliance to United
States FCC and Industry Canada regula
tions
c::>page 283.
Audi side assist 101
Activating and deactivating
Applies to vehicles: m it s ide ass ist
Fig. 105 Driver 's doo r: Side ass ist button
.,. Press the c::> A in General information on
page 100
button to switch the system on/
off . The LED in the button turns on when
side assist is switched on.
Adjusting the display brightness
App lies to vehicles: wit h side assist
The brightness setting can be adjusted via the
MMI.
.,. Select: I CAR I function button > Car systems
control button
> Driver assist > Audi side
assist .
The display brightness adjusts automatically
to the brightness of the surroundings, both in
the information and in the warning stage . In
very dark or very bright surroundings, the dis
play is already set to the minimum or maxi
mum level by the automatic adjustment. In
such cases, you may notice no change when
adjusting the brightness, or the change may
only be noticeable once the surroundings
change.
Adjust the brightness to a level where the dis
play in the information stage will not disrupt
your view forward.
If you change the bright
ness, the display in the exterior mirror will
briefly show the brightness leve l in the infor
mation stage. The brightness of the warning
stage is linked to the brightness in the infor
mation stage and is adjusted along with the
information stage adjustment .
Page 158 of 300
156 Airbag system
airbag system and prevent that system from
working properly in a collision.
There are some important things you have to know to make sure that the effectiveness of
the system will not be impaired and that dis
carded components do not cause injury or pol
lute the environment.
.&_ WARNING
Improper care, servicing and repair proce
dures can increase the risk of personal in
jury and death by preventing an airbag
from deploying when needed or deploying an airbag unexpectedly:
- Never cover, obstruct, or change the steering wheel horn pad or airbag cover
or the instrument panel or modify them
in any way.
- Never attach any objects such as cup
holders or telephone mountings to the
surfaces covering the airbag units.
- For cleaning the horn pad or instrument
panel, use only a soft, dry cloth or one
moi5tened with plain water. Solvent5 or
cleaners could damage the airbag cover
or change the stiffness or strength of the
material so that the airbag cannot de
ploy and protect properly.
- Never repair, adjust, or change any parts
of the airbag system.
- All work on the steering wheel, instru
ment panel, front seats or electrical sys
tem (including the installation of audio
equipment, cellular telephones and CB
radios, etc .) must be performed by a
qualified technician who has the training
and special equipment necessary.
- For any work on the airbag system, we
strongly recommend that you see your authorized Audi dealer or qualified work
shop.
- Never modify the front bumper or parts
of the vehicle body.
-Always make sure that the side airbag
can inflate without interference:
- Never install seat covers or replace
ment upholstery over the front seat- backs that have not been specifically
approved by Audi.
- Never use additional seat cushions that
cover the areas where the side airbags
inflate.
- Damage to the original seat covers or
to the seam in the area of the side air
bag module must always be repaired
immediately by an authorized Audi
dealer.
- The airbag system can be activated only
once . After an airbag has inflated, it
must be replaced by an authorized Audi
dealer or qualified technician who has
the technical information, training and
special equipment necessary.
- The airbag system can be deployed only
once. After an airbag has been deployed,
it must be replaced with new replace
ment parts designed and approved espe
cially for your Audi model version. Re
placement of complete airbag systems
or airbag components must be per
formed by qualified workshops only. Make sure that any airbag service action
is entered in your Audi Warranty
& Main
tenance booklet under
AIRBAG REPLACE
MENT RECORD.
- For safety reasons in severe accidents,
the alternator and starter are separated
from the vehicle battery with a pyrotech
nic circuit interrupter.
- Work on the pyrotechnic circuit inter rupter must only be performed by a
qualified dealer - risk of an accident!
- If the vehicle or the circuit interrupter
is scrapped, all applicable safety pre
cautions must be followed.
® For the sake of the environment
Undeployed airbag modules and preten
sioners might be classified as Perchlorate Material - special handling may apply, see
www .dtsc .ca.gov/hazardouswaste/per-
ch lo rate. When the vehicle or parts of the
restraint system including airbag modules
and safety belts with pretensioners are
scrapped, all applicable laws and .,.
Page 159 of 300
regulations must be observed. Your au
thorized Audi dealer is familiar with these requirements and we recommend that you
have your dealer perform this service for
you.
Other things that can affect Advanced
Airbag performance
Changing the vehicle's suspension system can
change the way that the Advanced Airbag Sys
tem performs in a crash. For example, using
tire-rim combinations not approved by Audi, lower ing the vehicle, changing the stiffness of
the suspension, including the springs, suspen sion struts, shock absorbers etc. can change
the forces that are measured by the airbag
sensors and sent to the electronic control
un it . Some suspension changes can, for exam
ple, increase the force levels measured by the
sensors and make the airbag system deploy in
crashes in which it would not dep loy if the
changes had not been made. Other kinds of
changes may reduce the force Levels meas
ured by the sensors and prevent the airbag
from deploying when it should.
The sensors in the safety belt buckle for the
driver and front passenger seat tell the elec
tronic control module if the safety belt is
latched or not. If the safety belt is being used,
the front airbag will deploy at a slightly high
er rate of vehicle deceleration than if the safe
ty belt is not being used. Therefore, in a par
ticular collision, it is poss ible that an airbag
will not deploy at a seating position where the
safety belt is being used but will inflate at the
position where the safety belt is not being
used. It is important that nothing interfere
with the safety belt buckles so that the sen
sors can send the correct information about
safety belt use to the electronic control unit.
A WARNING
Changing the vehicle's suspension includ
ing use of unapproved tire-rim combina
tions can change Advanced Airbag per
formance and increase the risk of serious personal injury in a crash.
Airbag system 157
-Never install suspension components
that do not have the same performance
characteristics as the components origi
nally installed on your vehicle .
- Never use tire-rim combinations that
have not been approved by Audi.
A WARNING
-
Items stored between the safety belt
buckle and the center console can cause
the sensors in the buckle to send the
wrong information to the electronic con
trol module and prevent the Advanced Air
bag System from working properly.
- Always make sure that nothing can inter
fere with the safety belt buckles and that they are not obstructed.
Knee airbags
Description of knee airbags
The knee airbag system con provide supple
mental protection to properly restrained
front seat occupants.
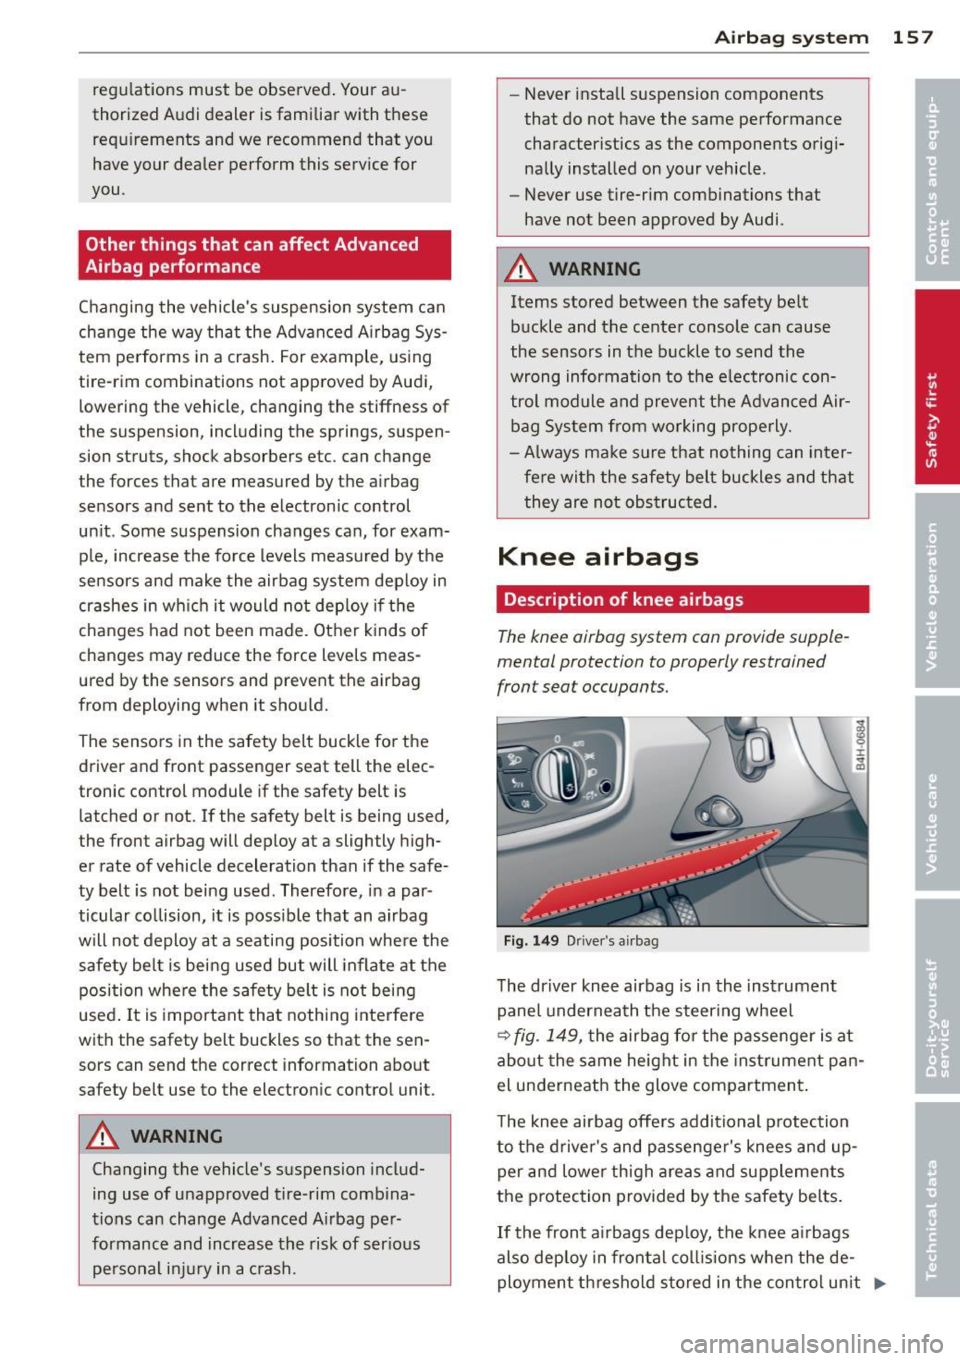
Fig. 149 Driver 's airbag
The driver knee airbag is in the instrument
panel underneath the steering wheel
¢ fig . 149, the airbag for the passenger is at
about the same height in the instrument pan
el underneath the glove compartment.
The knee airbag offers additional protection
to the driver's and passenger's knees and up
per and Lower thigh areas and supplements
the protection provided by the safety belts.
If the front airbags deploy, the knee airbags
also deploy in frontal col lisions when the de
ployment threshold stored in the control unit .,,.
Page 189 of 300
Intelligent technology Notice about data
recorded by vehicle
control modules
Your vehicle is not equipped with an Event Da
ta Recorder (EDR), installed by some manu
facturers for the express purpose of capturing
data for retrieval after an accident or crash
event. EDR's are sometimes called "crash re
corders".
Some state laws restrict the retr ieval or down
loading of data stored by EDR's that were in
stalled in a vehicle for the express purpose of
retrieving data after an accident or crash
event without the owner's consent.
Although your vehicle is not equipped with an
EDR, it is equipped with a number of electron
ic control modules for various vehicle systems
such as, for examp le, engine function, emis
sion control, as well as for the airbags and
safety belts.
These electronic control modules also record
vehicle-related data during norma l vehicle op
eration for diagnostic and repair purposes.
The recording capacity of the electronic con
trol modules is limited to data (no sound is re
corded) and only a small amount of data is ac
tually recorded over a very limited period of
time and stored when a system fault or other
condition is sensed by a control unit. Some of
the data then stored may relate to vehicle
speed, direction, braking as we ll as restraint
system use and performance in the event of a
crash or other condition. Stored data can only be read and downloaded with special equip
ment.
Electronic Stability
Control (ESC)
Description
ESC helps to improve road holding and vehicle
dynamics to help reduce the probability of
skidding and loss of veh icle control. It works
only when the engine is running. ESC detects
Intelligent technology 187
certain difficult driving situations, including
when the vehicle is beginning to spin (yaw)
out of control and helps you to get the veh icle
back under control by se lectively braking the
wheels, and/or reducing engine power and
providing steering ass istance to help hold the
vehicle on the driver's intended course. The in
dicator light
Ip.] in the instrument cluster
blinks when ESC is taking action to help you
control the vehicle.
ESC has limitations .
It is important to remem
ber that ESC cannot overcome the laws of
physics.
It will not always be able to help out
under all conditions you may come up against.
For example, ESC may not always be able to
help you master situations where there is a
sudden change in the coefficient of friction of
the road surface. When there is a section of
dry road that is suddenly covered with water,
slush or snow, ESC cannot perform the same
way it would on the dry surface . If the vehicle
hydroplanes (rides on a cushion of water in
stead of the road surface), ESC will not be
able to help you steer the vehicle because con
tact with the pavement has been interrupted
and the vehicle cannot be braked or steered .
During fast cornering, particularly on winding
roads, ESC cannot always deal as effectively
with difficult driving situations than at lower
speeds. When towing a trailer, ESC is not able
to help you regain control as it would if you
were not tow ing a trailer.
Always adjust your speed and driving style to road, traffi<; and weather conditions. ESC can
not override the vehicle's physical limits, in
crease the available traction, or keep a veh icle
on the road if road departure is a result of
driver inattention. Instead, ESC improves the
poss ibility of keeping the vehicle under con
trol and on the road dur ing extreme maneu
vers by using the driver's steering inputs to
help keep the vehicle going in the intended di
rection. If you are traveling at a speed that
causes you to run off the road before ESC can
provide any assistance, you may not experi
ence the benefits of ESC.
•
•
Page 190 of 300
188 Intelligent technology
ESC includes and/or works together with the
anti-lock braking system (ABS), brake assist
system, anti-s lip regulat ion (ASR), e lectronic
d ifferential lock ( EDL), dynamic steering* and
e lectronic interaxle differentia l lock*. ESC is
switched on all the time. I n certa in s ituations
when you need less tract io n, you ca n sw itch
off ASR by pressi ng the button above
~ page 189, fig. 167 the se lector lever. Be
sure to sw itch ASR on ag ain when you no lon
ger need less trac tion.
Anti -lock braking system (ABS)
ABS prevents t he wheels from locking up
when braking. The veh icle can still be st eered
even d uring ha rd b rak ing . Apply steady p res
sure to the br ake ped al. Do no t pu mp the ped
a l. A puls ing in t he bra ke peda l ind icates that
the system is he lping yo u to b rake the vehicle .
Brake assist system
The brake assist system can decrease b ra kin g
d ista nce. It increases braking powe r w hen the
d river p resses the brake pedal quickl y in eme r
gency situa tions . You mus t press and ho ld the
b rake peda l until the situation is over. In vehi
cles with adaptive cruise control*, the brake
assist system is more sensitive i f the d istance
detected to the vehicle ahead is t oo smal l.
Anti-slip regulation (ASR)
ASR reduces engine power w hen the drive
wheels begin to spin and adapts the fo rce to
the road condit ions. This makes it eas ier to
start, accelerate and drive up hills.
Electronic differential lock (EDL )
The E DL brakes wheels that are spinn ing and
transfers the drive powe r to the o ther d rive
wheel o r whee ls if the vehic le is equipped with
a ll whee l drive*. This funct ion is available up
to about 7S mph (120 km/h).
I n extreme cases , EDL automatica lly swit ches
off to help keep the brake on the braked whee l
from overheating. ED L wi ll switch on again au
tomatically when conditions have returned to normal.
Dynamic steering*
On vehicles wi th dynam ic s teeri ng, ES C helps
stab ilize the steer ing in cer tain sit uations.
Electronic interaxle differential lock
function*
T he ele ctronic i nte raxle di fferentia l lock f unc
tion ac tiva tes when dr iving t hrough curves.
B ra king is targeted towar d the whee ls on the
inside of the curve as needed . This helps to
min imi ze front whee l skid, improves traction
and allows for more precise driving throug h
cu rves .
A WARNING
- ESC, ABS, ASR , EDL, dynamic steering*
and the elect ronic interaxle differential
loc k function* cannot ove rcome t he laws
of physics . This is espe cially im po rtant
on slippery o r we t road s.
If the sys tems
begin actin g to stabilize your veh icle, you
should immediately change yo ur speed
to match the road and t raffic conditions .
Do not let the increased safety provided
by these systems tempt you to take risks. Doing so will increase the risk of a loss of
veh icle cont ro l, collision and ser io us per
sonal injur ies .
-Always ada pt your speed to road , traffic
and wea ther conditions. The risk of los
ing contr ol of the vehicle i ncreases wh en
d riving too fast, espe cially through
curve s and on slippe ry or wet roads, and
when dr iv ing too close to vehicles up
ahead. ESC, ABS, the brake ass ist sys
tem, EDL, ASR, dynam ic steering * and
the elect ron ic interaxle differential lock
function * cannot prevent co llisions.
- Always accelerate with s pecial care on
even, smooth s urfaces such as those that
are wet or covered with ice and snow.
The drive wheels can spin even w ith
these assistance sys tems that cannot al
ways he lp to red uce the risk of loss of ve
h icle co nt ro l.
-
Page 203 of 300

drive at the maximum permissible speed. Re
duce your speed even more if load, weather or
wind condit ions are unfavorable -part icularly
when going downhill.
Reduce vehicle speed
immediately if the trail
er shows the slightest sign of swaying .
Do not
try to stop the swaying by accelerating.
Observe speed limits . In some areas, speeds
for vehicles towing trailers are lower than for
regular vehicles .
A lways apply brakes early. When driving
downhill, shift into a lower gear to use the en
gine braking effect to slow the vehicle . Use of
the brakes a lone can cause them to overheat
and fail.
Coolant temperature
The coolant temperature gauge c:> page 10
must be observed carefully. The coo lant tem
perature can increase if you drive on long in
clines in a low gear at high engine speeds. Re
duce your speed immed iate ly if the L EDs in
the top part of the display turn on.
F or more information about indicator lights,
refer to.
i::> page 15.
A WARNING
Anyone not properly restrained in a mov
ing vehicle is at a much greater risk in an
accident . Never let anyone r ide in your car
who is not properly wear ing the restra ints
provided by Aud i.
Trailer towing tips
Important to know
Your veh icle hand les different ly when tow ing
-
a trailer because of the addit ional weight and
d ifferent weight distribution . Safety, perform
ance and economy will greatly depend on how
carefully you load your trailer and operate
your ng .
Before you actually tow your trailer, practice
turning, stopp ing and back ing up in an area
away from traffic. Keep practicing until you
Trailer towing 201
have become completely familiar with the way
your vehicle-trai ler combination behaves and
responds .
Backing up is difficult and requires practice .
Backing up with a t railer generally requires
steering action opposite to that when backing
up your vehicle without a tra iler.
Maintain a greater distance between your ve
hicle and the one in front of you . You wi ll need
more room to stop. To compensate for the
trailer, you w ill need a larger than normal
turning rad ius.
When passing, remembe r that you cannot ac
ce lerate as fast as you norma lly would be
cause of the added load. Make sure you have
enough room to pass. After passing, allow plenty of room for your trailer before chang
ing lanes again.
Avoid jerky starts, sharp turns or rapid lane changes.
(D Tips
- Do not tow a trailer during the break-in
period of your vehicle.
- If you tow a trailer, your Audi may re
quire more frequent maintenance due to
the extra load
c:> page 280.
Parking on a slope
Do not park on a slope with a trailer. If it can
not be avoided, do so only a~er doing the fol
lowing:
When parking:
.,. App ly the foot brake.
.,. Have someone p lace chocks under both the
vehicle and the trailer wheels .
.,. With chocks in place, slowly release the
brakes until the wheel chocks absorb the
load.
.,. Turn the wheels towards the curb .
.,. Apply the parking brake .
.,. Select the P selector lever posit ion .
When restarting after parking:
.,. Apply the foot brake.
•
•