fuel cap AUDI S8 2014 Owners Manual
[x] Cancel search | Manufacturer: AUDI, Model Year: 2014, Model line: S8, Model: AUDI S8 2014Pages: 314, PDF Size: 78.47 MB
Page 23 of 314
Instruments and warning/indicator lights 21
switched on and will turn off after the engine
has started and has sett led at a constant idle
speed . This ind icates that the MIL is working
properly .
The warning light illuminates when there is a
malfunction in the engine e lectronic system .
Contact your author ized Audi dealer and have
the malfunction corrected .
An improperly closed fuel filler cap may also
cause the MIL light to illuminate
¢page 225.
For mo re in format ion ¢ page 29.
~. Diesel particulate filter clogged
Appl ies to vehicles: with d iesel e ngine and diese l pa rticu
late fi lte r
II Particulate filter : System fault See own
er's manual
When the Ill symbol illuminates, you can al
ter your driving style to assist the filter self
cleaning process. Drive for approximately 15
minutes with the selector lever in the 5 posi
tion at a minimum speed of 37 mph (60 km/
h) and an engine speed of approximately
2,000 RPM. The temperature increase that
will resu lt from this can burn off the soot in
the filter . The symbol will switch off when the
cleaning is successful. After a successful
cleaning , there is no need to bring the car to
an author ized dealer or qualified workshop
because this is part of normal vehicle ope ra
tion .
If the symbol
&I does not switch off, see
your author ized dealer or other qualified
workshop to have the prob lem corrected.
For more informat ion on the d iesel particu
late filter , refer to¢
page 208.
A WARNING
Always adapt your speed to the current
weather, road and traffic conditions. You
should never disobey traffic laws in order
to follow driving recommendations.
-
!'1 Engine speed limitation
App lies to veh icles: w it h e ngine speed lim itat io n
(II Engine speed maximum XXXX RPM
The engine speed is automatically limited to
the speed d isplayed in the driver information
system. This protects the engine from over·
heating.
The engine speed limitation deactivates once
the engine is no longer in the critical tempera
ture range and you have re leased the accelera
tor pedal once.
If the engine speed limitation was activated
by an engine control malfunction, the indica
tor light
lli also turns on. Make sure that the
speed does not go above the speed disp layed.
Drive to your authorized Audi dealer immedi
ate ly to have the malfunction corrected.
~v, Engine oil sensor
Ill Oil level! Sensor defective
If the symbol illum inates, contact your au
thorized Audi dea le r and have the oil sensor
inspected. Until you have this done, check the
oi l level each time you refue l just to be on the
safe side¢
page 236.
Bu Fuel level indicator
Ii') Please refuel
If the indicator light turns on for the first
time and the message appears, there are
about 4 gallons (15 liters) of fuel left in the
tank. Time to refuel
q page 224.
Ii] Tank system malfunction! Contact dealer
If th e indicator light turns on and this mes
sage appears, there is a malfunction in the
tank system.
D rive to your authorized Audi dealer immedi
ate ly to have the malfunction corrected.
Page 31 of 314
Instrument s and warning /indicator lights
Open door/hood/rear lid warning
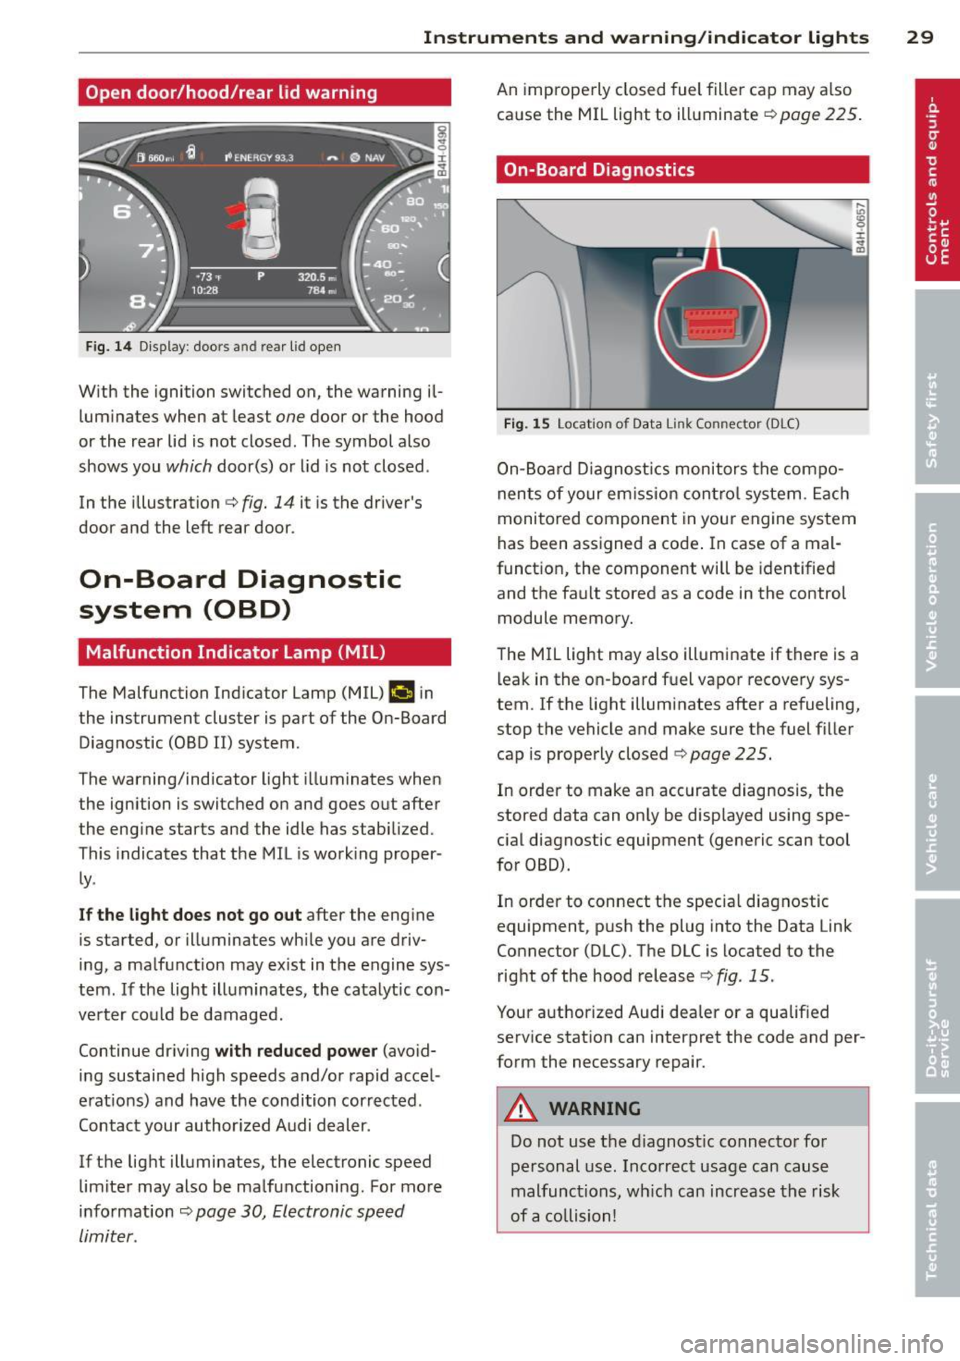
Fig. 14 D isplay: doors and rear lid open
With the ignition switched on, the warning il
luminates when at least
one door or the hood
or the rear lid is not closed. The symbol also
shows you
which door(s) or lid is not closed.
In the illustration ¢
fig. 14 it is the driver's
door and the left rear door.
On-Board Diagnostic
system (OBD)
Malfunction Indicator Lamp (MIL)
The Malfunction Indicator Lamp (MIL) ¢4 in
the instrument cluster is part of the On-Board Diagnostic (OBD II) system.
The warning/indicator light illuminates when
the ignition is switched on and goes out after
the engine starts and the idle has stabilized.
This indicates that the MIL is work ing proper
ly .
If the light does not go out after the engine
is started, or illuminates while you are driv
ing, a malfunction may ex ist in the engine sys
tem. If the light illuminates, the catalytic con
verter could be damaged.
Continue driving
with reduced power (avoid
ing sustained high speeds and/or rapid accel
erat ions) and have the condition corrected.
Contact your author ized Audi dealer.
If the light illuminates, the electronic speed limiter may also be malfunctioning. For more
in formation ¢
page 30, Electronic speed
limiter.
An improperly closed fuel filler cap may a lso
cause the MIL light to illuminate¢
page 225.
On-Board Diagnostics
Fig. 15 Location of Data Link Connector (DLC)
On-Board Diagnostics monitors the compo
nents of your emission control system. Each
monitored component in your engine system
has been assigned a code . In case of a mal
funct ion, the component will be identified
and the fault stored as a code in the control
module memory.
The MIL light may also illuminate if there is a leak in the on -board fuel vapor recovery sys
tem.
If the light illuminates after a refueling,
stop the vehicle and make sure the fuel filler
cap is properly closed ¢
page 225.
In order to make an accurate diagnosis, the
stored data can only be displayed using spe
cial diagnostic equipment (generic scan tool
for OBD).
In order to connect the special diagnostic
equipment, push the plug into the Data Link
Connector (DLC). The DLC is located to the
right of the hood release
¢fig. 15.
Your authorized Audi dealer or a qualified
service station can interpret the code and per
form the necessary repair.
A WARNING
Do not use the diagnost ic connector for
personal use. Incorrect usage can cause
malfunctions, wh ich can increase the risk
of a collision!
-
29
Page 75 of 314
-When not in use, to reduce fuel consump
tion, wind noise and to guard against theft.
A WARNING
- Use of an unapproved roof rack or incor
rect mounting of an approved roof rack
can cause the roof rack or the items at
tached to it to fall off the roof onto the
road .
- Objects falling from the roof of a veh icle
can cause a crash and personal injury .
- Only mount the roof rack on the desig
nated locations on the roof
c::> fig . 74 .
-The roof rack system must be installed
exactly according to the instructions pro
vided.
- When driving w ith a roof rack system,
changes to the center of gravity and wind
resistance can change the veh icle han
dling and lead to a collision . Always
adapt your driv ing and your speed to the
current conditions.
0 Not e
-Your vehicle warranty does not cover any
damages to the vehicle caused by using
r oof racks or mount ing structures not
approved by Audi for your vehicle. The
same applies to damage resulting from
incorrect roof rack installation.
- Always check the roof rack mountings
and hardware before each trip and dur
ing a trip to make sure everything is se
cure ly tightened . If necessary, retighten
the mount ings and check the ent ire sys
tem from t ime to t ime.
- After mounting a roof rack system, or
when you transport objects on the roof
of your veh icle, the height of the vehicle
i s naturally increased. Be careful when
driv ing under low br idges or in parking
garages for example. This could cause
damage to the load and even the vehicle
i tself.
- Make sure the open rear lid and the sun
roof* do not come into contac t with the
roof rack .
Seat s an d sto rage 73
Loading the roof rack
Always distribute loads evenly. Make sure
anything on the roof rack is securely tied
down .
.. Always distribute the loads on the roof rack
even ly .
.. Always attach items to the roof rack securely
before you dr ive off.
The maximum permissible roof weight is
2 20
lb (100 kg ).
The roof weight is the total of
the weight of the roof rack, the attachments
and the cargo you a re carrying. You must also
not exceed the maximum load we ight for the
roof rack you are using .
When using a roof rack system which has a l ower load ca rrying capaci ty , you must not use
up the tota l maxim um permissible load car ry
i ng capacity specified above . Instead, you
sho uld load the roof rack system only to the
maximum capacity specified by the manufac
turer of the roof rack system.
A WARNING
---Weak, damaged or improper straps used
to secure items to the roof rack can fail
during hard braking or in a collis ion and
cause ser ious personal injury.
- Make sure the roof rack is installed exact
ly as specified above
c::> page 72.
- Always use su itable mount ing straps for
securing items to the roof rack to help
p revent items from sh ifting or flying for
ward.
- Items on the roof rack must always be
securely mounted.
- The use of a roof rack can negat ively af
fect the way a veh icle hand les. Cargo
that is large, heavy, bulky, long or flat
will have a greater negat ive influence on
the vehicle's aerodynamics, center of gravity and overall handling . Always
drive s lowly, avoid sudden braking and
maneuvers when transporting cargo on
the roof of your vehicle .
Page 76 of 314
7 4 Seats and storage
- Never exceed the maximum perm issible
load carrying capacity of the roof o f your
vehicle, the permissible axle weights and
the permissible total weight of your veh i
cle
c::, page 289, Weights .
@ For the sake of the environment
As a result of the increased wind resist
ance created by a roof rack, your vehicle is
using fuel unnecessarily. So remove the
roof rack after using it.
12-volt sockets
Applies to vehicles: 12-volt soc kets
Electrical accessories can be connected to ev
ery 12-volt socket.
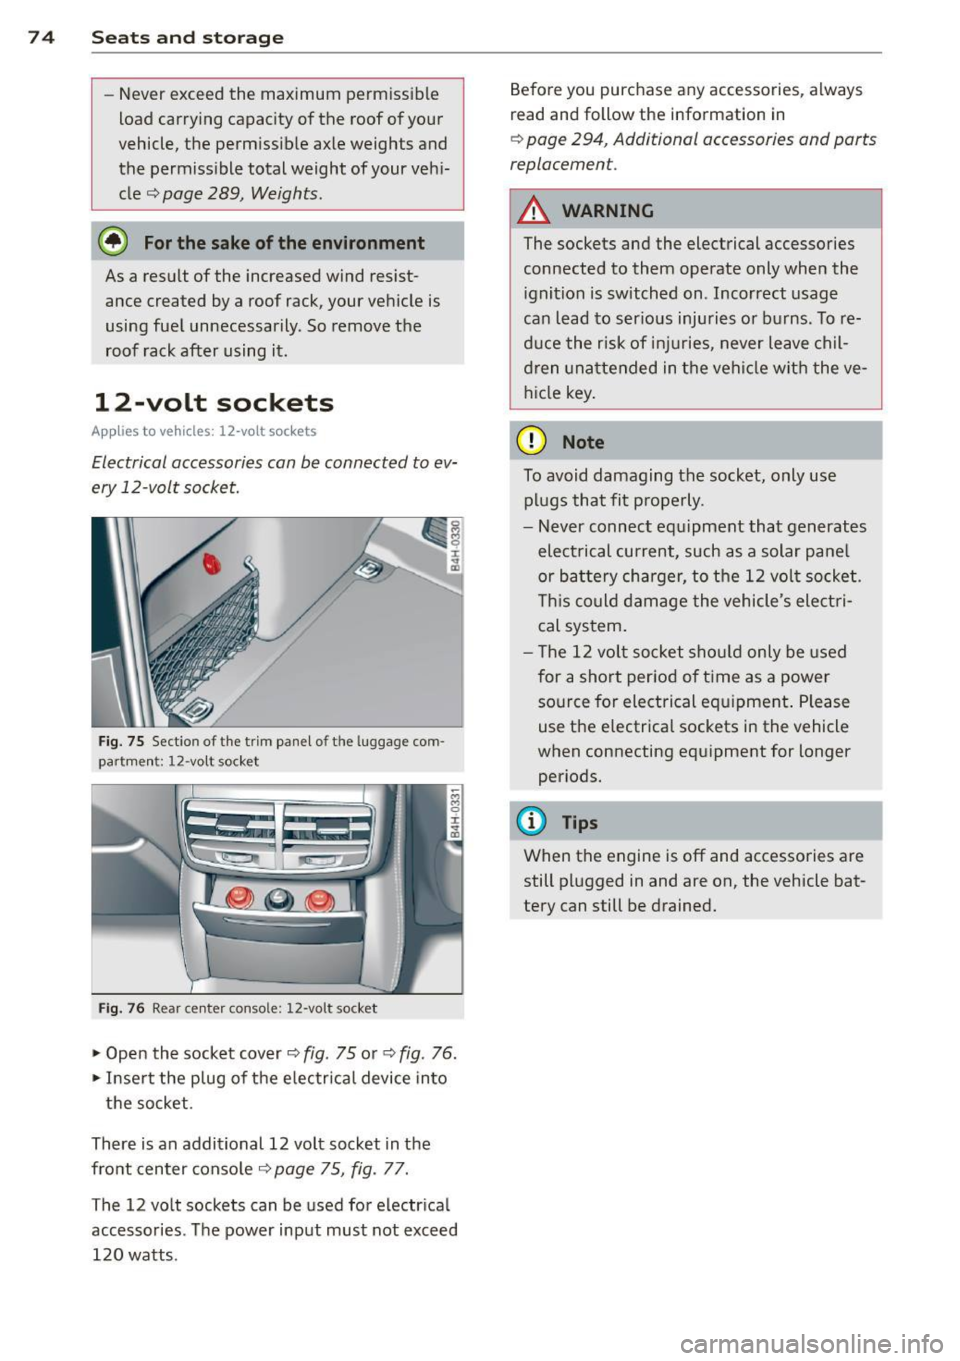
Fig. 75 Sect io n of the trim panel o f th e luggage com
part ment : 12 -vol t socket
Fig. 76 Rear center conso le: 12-vo lt socket
... Open the socket cover c::, fig . 75 or c::, fig . 76 .
... Inse rt the p lug of the e lectrical device into
the socket.
There is an additional 12 vo lt socket in the
fro nt center console
c::> page 75, fig. 77.
The 12 volt sockets can be used for electr ica l
accessories . Th e power input must not exceed
120 watts . Before you purchase any accessories
, always
read and follow the information in
c::, page 294, Additional accessories and parts
replacemen t.
A WARNING
The sockets and the electrical accessories
connected to them operate only when the
i gnition is switched on . Incorrect usage
ca n lead to ser ious injuries or burns. To re
duce the risk of inj uries, never leave ch il
dren unattended in t he vehicle with the ve
hicle key .
(D Note
To avoid damaging the socket, only use
plugs that fit p roperly.
- Never connect equ ipment that generates
elect rical current, such as a solar panel
or battery charger, to the 12 vol t socket .
T his could damage the vehicle 's elect ri
cal sys tem .
- The 12 volt socket shou ld only be used
for a short per iod of t i me as a power
so urce for electrical equ ipment . Please
use the electrical sockets in the vehicle
when connecting equipment for longer periods.
@ Tips
When the engine is off and accessories are
still plugged in and are on, the vehicle bat
tery can still be drained.
Page 226 of 314
224 Fuel supply and filling your fuel tank
Winter operation
At temperatures below 20° F (-7° C), Diesel
fuel No.
2 loses its fluidity due to wax separa
tion, which may clog the fuel filter or tank fil
ter and keep the engine from running .
To help the filter from being clogged by wax,
the fue l filter in your vehicle is automatically
preheated. Preheating the fuel filter makes
operation of your vehicle possible with Diesel
fuel No. 2 down to -10° F (-24° C).
If you expect temperatures below
5° F
(-15° C)
ask your fuel dealer whether their
Diese l fuel No.
2 is sufficiently winterized for
the prevailing and expected temperatures.
If not winterized or insufficiently winterized
Diesel fuel has already thickened to the extent
that the engine will not start, warm the vehi
cle up by leaving it in a heated garage.
It is normal that the engine noise leve l (die
seling) is louder during the warm-up period in
winter. It is also norma l when whitish-blue
smoke comes out of the tailpipe after starting
and during warm-up . The amount of smoke
depends on the outs ide temperature.
Do not let your Diese l engine idle unnecessari
ly after a cold start. Driving off slowly will
shorten the warm-up period.
A WARNING
- Never use "starting assist fluids." They
may be potent ially explosive or cause a
"run-away" engine condition. This could
result in ser ious engine damage and per
sonal injur y.
- Never use fuel line anti-freeze offered for
gasoline engines.
(D Note
- Your Diesel engine has been specifically designed to operate only on Ultra Low
Sulfur Diesel fuel. Therefore, never use
home heating oil or regular gasoline. The
properties of these fuels may cause seri
ous damage to the fuel injection system
and to the engine. Using these fuels can
-
cause expensive engine repairs and will
also adversely affect your New Vehicle
Limited Warranty.
- If Diesel fuel sho uld get on any rubber
hose, it must be wiped off immediately.
Then wash the contaminated hose por
tion with soap and warm water. Do not allow D iesel fuel to remain on connect
ing hoses . They may develop leaks and
cause serious damage.
Fuel tank
Fuel filler neck
The fuel filler neck is located on the right rear
side panel behind the fuel filler flap.
If the power locking system shou ld fail, you
can still open the flap manua lly -for detailed
instructions see ¢
page 22 7.
You can find the fuel tank capacity of your ve
hicle in ¢
page 290.
The label on the inside of the fuel filler flap
te lls you the correct fuel for your vehicle. For
more information about fuel specifications,
see ¢
page 222.
Your vehicle fuel tank has an on board refuel
ling vapo r recovery system. This feature helps
to prevent fue l vapors from escaping from the
tank and polluting the environment while you refuel your vehicle. In order to fi ll the tank
proper ly while protecting the environment,
please fo llow this refueling procedure careful
ly.
A WARNING
-Under normal operating conditions, never
carry addit ional fuel conta iners in your car .
Gas canisters and other conta iners used to
transport fuel can be dangerous. Such con
tainers, full or empty, may leak and could
cause a fire in a collision.
If you must
transport fuel to use for your lawn mower,
snow blower, etc., be very careful and al
ways observe loca l and state laws regard
ing the use, transportation and storage of
such fuel containers. Make certain the ..,.
Page 227 of 314
container meets industry standards (ANSI/
ASTM F852 -86).
(D Note
Never drive yo ur vehicle unt il the fuel tank
is complete ly empty. The irregular supply
of fuel can cause misfiring . Gasoline could
enter the exhaust system and damage the
catalyt ic converter.
Refuelling
•
F ig. 190 Righ t rear vehicle side: Opening th e fue l fill er
flap
F ig. 191 Fu el filler flap wit h at tached fue l cap
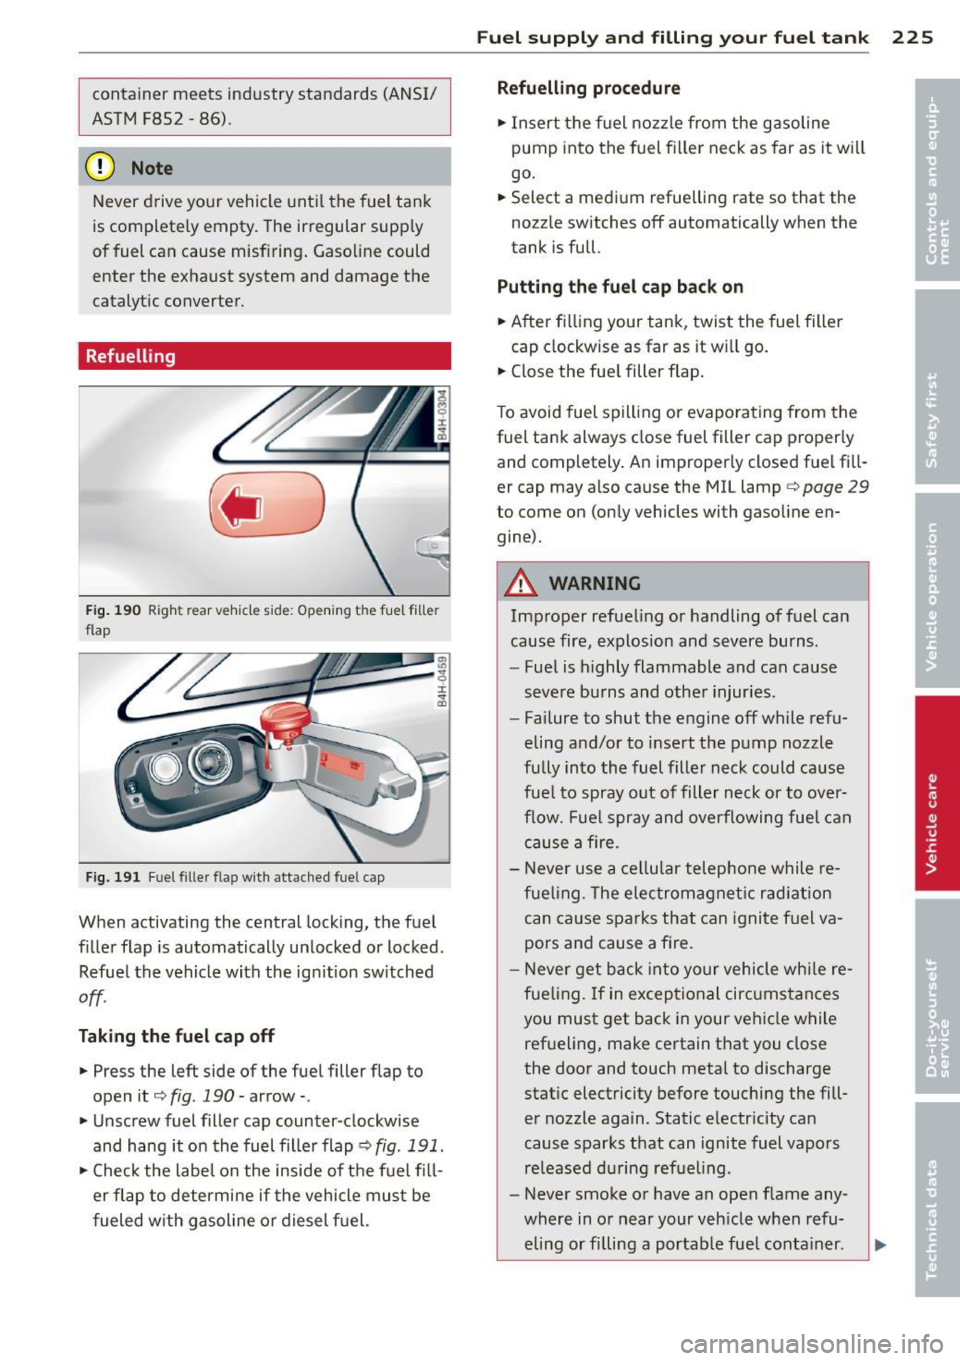
When activating the central locking, the fuel
filler flap is automatically unlocked or locked.
Refuel the vehicle with the ign ition switched
off.
Tak ing the fuel c ap off
.,. Press the left side of the fuel filler flap to
open it ¢
fig . 190 -arrow -.
.,. Unscrew fuel filler cap counter-clockwise
and hang it on the fuel fille r flap ¢
fig. 191.
.,. Check the label on the inside of the fuel fi ll
er flap to determine if the vehicle must be
fueled with gasoline or diesel f uel.
Fuel suppl y and filli ng your fuel t ank 225
Refuelling proce dur e
.,. Insert the fuel nozzle from the gasoline
pump into the fuel fi ller neck as far as it wi ll
go .
.,. Select a medium refuelling rate so that the
nozz le switches off automatically when the
tank is full.
Pu tting th e fuel cap bac k on
.,. After filling your tank, twist the fuel filler
cap clockwise as far as it wi ll go.
.,. Close the fue l filler flap.
T o avoid fuel spill ing or evaporating from the
fuel tank always close fuel filler cap properly
and completely . An improperly closed fuel fill
er cap may also cause the MIL lamp¢
page 29
to come on (only vehicles with gasoline en
gine).
A WARNING
Improper refue ling or handling of fuel can
cause fire, explosion and severe burns.
- Fuel is highly flammable and can cause
severe burns and other injur ies.
- Failure to shut the engine off wh ile refu
eling and/or to insert the pump nozzle
fully into the fuel filler neck could cause
fue l to spray out of filler neck or to over
f low. Fue l spray and overflowing fue l can
cause a fire.
- Never use a ce ll ular telephone while re
fueling. The electromagnet ic rad iation
can cause sparks that can ignite fuel va
pors and cause a fire.
- Never get back into yo ur vehicle whi le re
fueling. If in exceptional circumstances
you must get back in your vehicle while
refueling, make certain that you close
the door and touch metal to discharge
stat ic electricity before touching the fill
er nozzle again. Static e lectr icity can
cause sparks that can ignite fuel vapors re leased du ring refuel ing .
- Never smoke or have an open flame any
where in or near your veh icle when refu-
eling or fi lling a portab le fue l conta iner.
ll>
Page 228 of 314
226 Fuel su ppl y and fi lling yo ur fu el t an k
- For your safety , we strongly recommend
that you do not travel with a portable
fuel container in your vehicle. The con
tainer, full or empty may leak and could cause a fire, especially in a crash.
- If, under exceptional circumstances, you
must transport a portable fuel container,
please observe the following:
- Never fill a portab le fuel container
while it is anywhere in or on the vehicle
(for example, in the luggage compart
ment, or on the trunk). Static electrici
ty can build up while filling and can ig n ite fuel vapors causing a fire .
- Always place a portable fuel container
on the ground before filling.
- Always keep the fi ller nozzle complete
ly inside the portable container before
and during filling.
- If filling a portable container made of
metal, the filler nozzle must always be
in contact with the container . This will
help prevent static electricity from dis
charging and cause a fire .
- Never sp ill fuel inside the vehicle or
luggage compartment. Fuel vapors are
h ighly flammable.
- Always observe local and state/provin
cial laws regarding the use, storage
and transpo rtation of fuel conta iners.
- Make certa in the fuel container meets
industry standards (ANSI/ ASTM
F8S2-86).
@ Note
If any fuel has spilled onto the car, it
should be removed immed iately to prevent
damage to the paint .
@) For the sake of the environment
As soon as the correctly operated nozzle
sw itches off automatically for the first
time, the tank is full . Do not try to add
mo re fuel because fuel may spill out. In
add it ion, the expans ion space in the fuel
tank will be f illed -causing the fue l to overflow when it becomes warm and pol
lute the environment .
(D Tips
-Running your engine whi le refue lling
may cause vapors to escape or even
cause fuel to spi ll out of the tank. This
would then shut off the fue l nozzle be
fore the tank is full.
- Do not refuel your vehicle with the igni
tion switched on. The fuel gauge may
otherwise not indicate the correct fuel
level after refuelling .
- Diesel vehicles* are equipped with a die sel misfueling protector. It allows the
vehicle to be fueled only with a diesel
fuel pump nozzle. A worn or damaged nozzle or a nozzle that is too small may
not be ab le to open the diesel misfueling
protector. If this is the case, try turning
the nozzle before insert ing it in the f uel
filler neck, use a different fuel pump or
see your authorized Audi dea ler or au
thorized repair facility for assistance.
- The fuel fi ller f lap of your vehicle is not
locked when you lock the vehicle from
the inside.
Page 231 of 314

Filling AdBlue
Applies to vehicles: wit h diesel engine
A special refill bottle must be used to fill the
AdBlue .
Fig. 195 Right rear ve hicle s ide: remov ing the Ad B lu e
cap
Fi g. 196 AdBl ue filler tube: inse rt in g the ref ill bott le
The Ad B lue fi ller tube is located near the die
sel filler tube . Always add 1 gallon (3.8 liters)
of AdBlue (two bottles). This is the m inimum
amount req uired to ensure the system detects
the ref illing and to start the engi ne. The Ad Bl
ue tank capac ity is approximate ly 6 gallons
(23 liters) .
Opening the filler tube and adding
AdBlu e
Requirement: The request to add Ad B lue m ust
appear in the inst rument cluster display.
.. Switch the ignition off .
.. Open the tank cover
¢page 225 .
.. Turn the cap counte rclockw ise with the l ug
wrenc h from the veh icle tool k it to remove it
~fig . 195.
.. Remove the cap from the refill bottle.
.. Position the refill bottle on the filler tube
and turn the bottle clockwise unt il it stops
turning
(D ¢ fig . 196.
Fu el suppl y and filli ng your fuel t ank 229
.. Press ligh tly against the bottom of the bot
tle @ to empty it. Continue pressing the
bottom of the bottle unt il it is empty or un
til f luid stops flowing into the tank.
.. Turn the bottle to the left w ithout pressing
on the bottom .
Clo sing the filler tube
.. Turn the cap clockwise on the filler tube
w ith the lug wrench until you hear it t ighten
completely .
.. Close the tank cover.
After filling
The vehicle must be driven . The system may
take up to two minutes to detect t hat the
AdB lue has been f illed .
.. If the re was no Ad Blue left in the tank and a
range of
O mi (0 km ) was displayed in the
instrument cluster, switch the ignition on
for about 15 seconds before start ing the en
gine.
A WARNING
Ad B lue can irritate the sk in , eyes and res
p ira to ry system .
If there is contact with
the fluid, flush immedia tely with plenty of
wa ter . Co nsu lt a phys ician if ne cessary.
(D Note
- On ly use AdB lue that conforms to the
s tandar d ISO 22241-1. Do not mix any
add itives w ith the AdBlue and do not d i
lute it wi th water.
- Ad Blue is not a diesel add itive . Do not
add it to the diese l tank. If AdBl ue is
m ixed wi th diesel f uel, it can lead to
d amage to the engine an d the AdBl ue
t ank system . The Limited New Vehicle
W arranty does not cove r such damage .
- Ad B lue attacks su rfaces s uch as painted
vehicle components, p las tic a nd carpet .
Remove t he fluid as quickly as possible
w ith a damp cloth and p lenty o f cold wa
ter. If the Ad Bl ue has already crystal-
lized, use warm water and a sponge. ..,_
Page 232 of 314
230 Fuel supply and filling your fuel tank
AdBlue residue that is not removed w ill
crystallize and can damage the affected
surface .
- Do not store the refill bott le in the vehi
cle. If it leaks, the escaping Ad B lue could
damage the vehicle inter ior.
- Do not allow Ad Blue to come into con
tact with clothing . If there is contact
with the f luid, flush immediately with
plenty of water.
@ Tips
- You can obta in refill bott les from any au
thorized Audi dealer or other qualified
workshop.
- Follow the Ad Bl ue manufacturer's in
structions for usage and storage.
Page 239 of 314
(D Tips
The oil level indicator in the MMI Display is
only an information d isp lay. If the oil leve l
is low, a minimum oi l warning appears in
the instrument cluster. Add oil
r::;, page 23 7 . If the hood has been opened,
the cu rre nt oil level is shown in the instru
ment cluster the next time the ign ition is
sw itched on.
Checking the engine oil level
Ap plies to vehicles: with oil dipstick
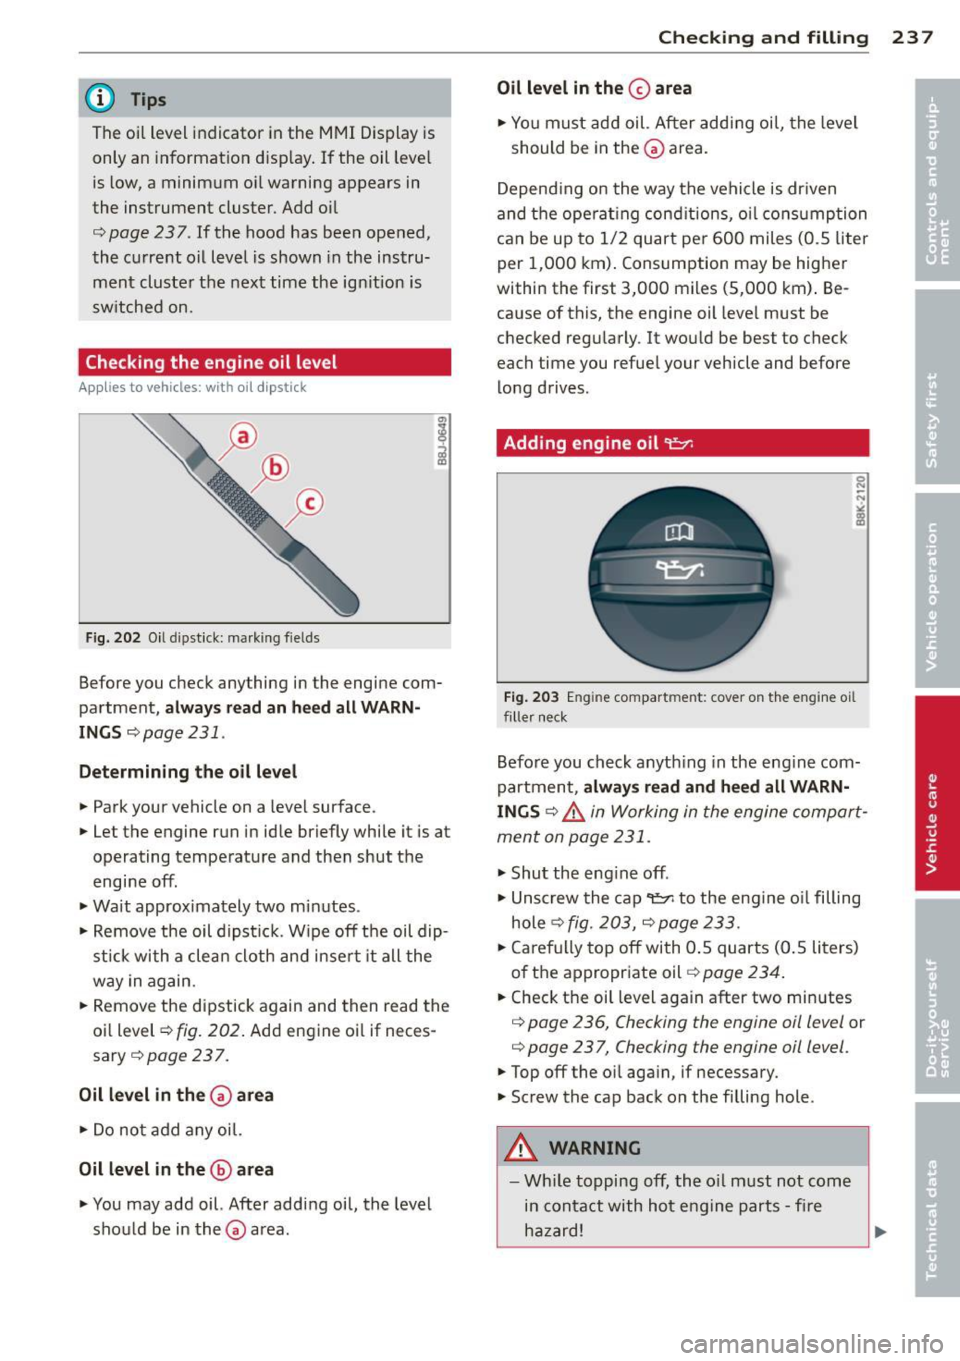
Fig. 202 Oil dips tick: marking fields
Before you check anything in the engine com
partment,
alway s read an he ed all WARN
INGS r=;,page 231.
Determining th e oil le ve l
.. Park your vehicle on a level surface.
.. Let the engine run in idle briefly while it is at
operating temperature and then shut the
engine off .
.. Wait approximately two minutes .
.. Remove the oil dips tick. W ipe off the oil dip
stick with a clean cloth and insert it all the
way in again.
.. Remove the dipstick again and then read the
oil level
¢ fig. 202. Add engine oil if neces
sary
r::;, page 23 7.
Oil l evel in th e (v area
.. Do no t add any oil.
Oil level in the @area
.. You may add oil. After adding oil, the level
should be in the
(v area.
Checkin g and fillin g 237
Oil le vel in the 0 a rea
.. Yo u must add oil. After add ing oi l, the level
should be in the
0 area.
Depend ing on the way the vehicle is dr iven
and the ope rat ing cond itions, oi l consumption
can be up to
1/2 quart pe r 600 miles (0.5 liter
per
1 ,000 km) . Consumption may be higher
within the first
3,000 miles (5,000 km). Be
cause of this, the engine oil leve l must be
checked regularly.
It would be best to check
each time you refuel your vehicle and before
long drives .
Adding engine oil 9=:1-
0 N
N
"' :l!
Fig. 203 En gin e compart ment: cover on th e eng ine oil
filler neck
Before you check anything in the eng ine com
partment,
alw ay s re ad and heed all WARN
INGS r::;, .&. in Working in the engine compart
ment on page 231 .
.. Shut the eng ine off .
.,. Unscrew the cap~ to the eng ine o il filling
hole
¢ fig. 203, r=;,page 233 .
.. Carefully top off with 0.5 quarts (0 .5 liters)
of the appropriate oil
r::;, page 234 .
.. Check the oil level aga in after two minutes
r::;, page 236, Checking the engine oil level or
r::;, page 23 7, Checking the engine oil level.
.. Top off the oil aga in, if necessary.
.. Screw the cap back on the filling hole .
A WARNING
-
-Wh ile topping off, the o il must not come
in contact with hot engine parts -fire
hazard!
II-