seats AUDI S8 2016 Owners Manual
[x] Cancel search | Manufacturer: AUDI, Model Year: 2016, Model line: S8, Model: AUDI S8 2016Pages: 302, PDF Size: 75.68 MB
Page 4 of 302
Table of content s
Owner' s Lit e rature
5
About thi s Own er' s Manual . . . . . . 6
Opera tion . . . . . . . . . . . . . . . . . . . . . . . . 8
Cockpit . . . . . . . . . . . . . . . . . . . . . . . . . . . 8
General illustration . . . . . . . . . . . . . . . . . . 8
Instruments and indicator lights 10
I nstruments . . . . . . . . . . . . . . . . . . . . . . . . 10
I ndicator lights . . . . . . . . . . . . . . . . . . . . . 11
Driver informat ion system . . . . . . . . . . . . . 23
On Board Diagnostic System (OBD) . . . . . 28
Opening and closing . . . . . . . . . . . . . 30
K eys . . . . . . . . . . . . . . . . . . . . . . . . . . . . . . 30
Central locking . . . . . . . . . . . . . . . . . . . . . . 32
Luggage comp art men t lid . . . . . . . . . . . . . 36
Parental control . . . . . . . . . . . . . . . . . . . . . 39
Power Windows . . . . . . . . . . . . . . . . . . . . . 40
Va let parking . . . . . . . . . . . . . . . . . . . . . . . 41
Sunroof. . . . . . . . . . . . . . . . . . . . . . . . . . . . 42
P ano rama glass roof . . . . . . . . . . . . . . . . . 43
Garage doo r opener (Home Link) . . . . . . . . 44
Lights and Vision . . . . . . . . . . . . . . . . . 46
E xterio r ligh ting . . . . . . . . . . . . . . . . . . . . . 46
I n terior lighting . . . . . . . . . . . . . . . . . . . . . 50
V1s1on . . . . . . . . . . . . . . . . . . . . . . . . . . . . . 51
Windshi eld wip ers . . . . . . . . . . . . . . . . . . . 54
Dig ital compass . . . . . . . . . . . . . . . . . . . . . 56
Seats and storage . . . . . . . . . . . . . . . . 58
General information . . . . . . . . . . . . . . . . . 58
Front seat s . . . . . . . . . . . . . . . . . . . . . . . . . 59
Rearseats .. .. .... .... .... ....... .. . 61
H ead restra ints . . . . . . . . . . . . . . . . . . . . . 64
Memory function . . . . . . . . . . . . . . . . . . . . 65
F u ll -length center console . . . . . . . . . . . . . 66
L uggage compartment . . . . . . . . . . . . . . . 68
P ass-through w it h ski bag . . . . . . . . . . . . . 69
Roof rack . . . . . . . . . . . . . . . . . . . . . . . . . . 70
12-volt sockets . . . . . . . . . . . . . . . . . . . . . 72
Storage . . . . . . . . . . . . . . . . . . . . . . . . . . . . 73
Refrigerator . . . . . . . . . . . . . . . . . . . . . . . . 7 4
Warm and cold . . . . . . . . . . . . . . . . . . . 76
Climate control system . . . . . . . . . . . . . . . 7 6
2
Driving .... . .. .. .. .. ... . .. .... ... . .
Steering . ... .. .. .. .. .. .. .. .... ... . .
Start ing and stopping the eng ine
E lec tromechanical parking brake ... .. . .
S ta rt/Stop sys tem .. .. ...... ... .. .. . .
Speed warning system ............... .
Cru ise cont rol system ..... ... ... ... . .
Audi adapt ive cru ise control and
braking guard ... .. .... ... ... ... . .
Introduction ...... ................. .
Genera l information .. ...... ... .. .. . .
A udi adaptive cruise contro l ... ...... . .
Audi bra kin g g uard . .. ........ ..... . .
Messages ... .. .. .. .. .. .. .. .... ... . .
Audi active lane assist .. .... .... .
Lane assist . ... .. .. .. .. . ... .... ... . . 80
80
81
83
85
88
88
90
90
90
92
96
97
99
99
Audi side assist . . . . . . . . . . . . . . . . . . 102
S ide assist . . . . . . . . . . . . . . . . . . . . . . . . . 102
Audi drive select . . . . . . . . . . . . . . . . . 106
D riving settings . . . . . . . . . . . . . . . . . . . . . 106
Raising/lower ing the veh icle . . . . . . . . . . . 108
Driver messages . . . . . . . . . . . . . . . . . . . . . 108
Night vision assistant . . . . . . . . . . . . 109
Night vision assistant with ped estrian and
wild animal marking . . . . . . . . . . . . . . . . . 109
Automatic transmission . . . . . . . . . 112
tiptronic . . . . . . . . . . . . . . . . . . . . . . . . . . . 112
Parking systems . . . . . . . . . . . . . . . . . 118
G enera l information . . . . . . . . . . . . . . . . . 118
Parking syst em plus with rearvi ew came ra 119
Periphera l cameras . . . . . . . . . . . . . . . . . . 122
Adjusting the d isplay and the w arning
tones . . . . . . . . . . . . . . . . . . . . . . . . . . . . . . 1 28
E rror messages . . . . . . . . . . . . . . . . . . . . . 128
T railer hitch . . . . . . . . . . . . . . . . . . . . . . . . 128
Safety . . . . . . . . . . . . . . . . . . . . . . . . . . . . 129
Driving safety . . . . . . . . . . . . . . . . . . . . 129
Bas ics . . . . . . . . . . . . . . . . . . . . . . . . . . . . . 129
Co rrect passenge r seat ing positions . . . . . 130
Driver 's and front passenger's foo twell . . 134
Page 5 of 302
Pedal a rea . . . . . . . . . . . . . . . . . . . . . . . . . . 134
Storing cargo correctly . . . . . . . . . . . . . . . 135
Repo rting Safety Defects . . . . . . . . . . . . . . 136
Safety belts . . . . . . . . . . . . . . . . . . . . . . 138
General information . . . . . . . . . . . . . . . . . 138
Why use safety belts? . . . . . . . . . . . . . . . . 139
Safety belts . . . . . . . . . . . . . . . . . . . . . . . . 141
Belt tensioners . . . . . . . . . . . . . . . . . . . . . . 144
Airbag system . . . . . . . . . . . . . . . . . . . . 146
Important information . . . . . . . . . . . . . . . 146
F ront ai rbags . . . . . . . . . . . . . . . . . . . . . . . 150
M on itoring the Advanced Airbag System . 156
Knee ai rbags. . . . . . . . . . . . . . . . . . . . . . . . 160
S ide airbags . . . . . . . . . . . . . . . . . . . . . . . . 162
Side curtain airbags . . . . . . . . . . . . . . . . . . 165
Child safety . . . . . . . . . . . . . . . . . . . . . . 168
I m portan t info rm ation . . . . . . . . . . . . . . . 168
C hil d seats . . . . . . . . . . . . . . . . . . . . . . . . . 173
Secur ing ch ild seats . . . . . . . . . . . . . . . . . . 17 7
L ATCH system ( Lower anchorages and
tethers for chi ldren) . . . . . . . . . . . . . . . . . 180
Addit ional information
186
Audi pre sense . . . . . . . . . . . . . . . . . . . 187
Preventative passenger protection 187
Driver messages . . . . . . . . . . . . . . . . . 189
Smart Technology . . . . . . . . . . . . . . . 189
Not ice about data recorded by the Event
Data Reco rder and vehicle control
modules . . . . . . . . . . . . . . . . . . . . . . . . . . . 189
E lect ronic Stabilizat ion Control ( ESC) . . . . 190
B ra king . . . . . . . . . . . . . . . . . . . . . . . . . . . . 192
E lect romech ani cal powe r assist, dyn amic
s teer ing . . . . . . . . . . . . . . . . . . . . . . . . . . . 194
D riving w ith your quat tro . . . . . . . . . . . . . 195
Energy management . . . . . . . . . . . . . . . . . 195
Driving and the environment . . . . 197
Breaking in . . . . . . . . . . . . . . . . . . . . . . . . . 197
Avoid damaging the vehicle . . . . . . . . . . . 197
Catalytic converter . . . . . . . . . . . . . . . . . . . 197
Diese l part iculate filter . . . . . . . . . . . . . . . 198
Shutting down vehicle . . . . . . . . . . . . . . . . 198
Table of contents
D riving thro ugh wa ter on roads . . . . . . . . 199
Econ om ica l and envi ronmenta lly-friend ly
driv ing . . . . . . . . . . . . . . . . . . . . . . . . . . . . 199
Trailer mode . . . . . . . . . . . . . . . . . . . . . 202
Driving with a trai ler . . . . . . . . . . . . . . . . . 202
Trailer mode notes . . . . . . . . . . . . . . . . . . . 204
Operating instructions . . . . . . . . . . . 206
Care and cleaning . . . . . . . . . . . . . . . . 206
Genera l information . . . . . . . . . . . . . . . . . 206
Car washes . . . . . . . . . . . . . . . . . . . . . . . . . 206
Cleaning and care informat ion 207
Fuel and Refueling . . . . . . . . . . . . . . . 212
Gasoline . . . . . . . . . . . . . . . . . . . . . . . . . . . 212
Diesel f uel . . . . . . . . . . . . . . . . . . . . . . . . . 213
Refue ling . . . . . . . . . . . . . . . . . . . . . . . . . . 214
Se lective cata lytic red uction (AdBlue) 216
Checking and Filling . . . . . . . . . . . . . 220
Hood ..... .... ................... .. 220
En gine compartment . . . . . . . . . . . . . . . . . 22 2
En gine oi l . . . . . . . . . . . . . . . . . . . . . . . . . . 2 23
Cooling sys tem . . . . . . . . . . . . . . . . . . . . . . 2 27
Brake fl uid . . . . . . . . . . . . . . . . . . . . . . . . . 230
Battery . . . . . . . . . . . . . . . . . . . . . . . . . . . . 231
Windsh ield washer system 234
Wheels .. .. .. .. .. ... .. ..... ... .. .. 236
Whee ls and Tires . . . . . . . . . . . . . . . . . . . . 236
Tire p ressure monitoring system 254
Troubleshooting . . . . . . . . . . . . . . . . . 256
Emergency assistance . . . . . . . . . . . 256
Trunk escape handle . . . . . . . . . . . . . . . . . 256
Eq uipment . . . . . . . . . . . . . . . . . . . . . . . . . 256
Replacing wheels . . . . . . . . . . . . . . . . . . . . 259
Fuses and bulbs . . . . . . . . . . . . . . . . . . 266
Fuses ........ ... .. ................. 266
Bu lbs . . . . . . . . . . . . . . . . . . . . . . . . . . . . . . 270
Emergency situations . . . . . . . . . . . . 271
Genera l . . . . . . . . . . . . . . . . . . . . . . . . . . . . 271
Start ing by p ushi ng o r tow ing . . . . . . . . . . 271
Start ing wi th jumpe r cabl es . . . . . . . . . . . 271
U se of j um per cables . . . . . . . . . . . . . . . . . 272
3
Page 60 of 302
Seat s and sto rage
Seats and storage
General information
Why is your seat adjustment so important?
The safety belts and the airbag system can only
provide maximum protection if the front seats are correctly adjusted .
There are various ways of adjusting the front
seats to provide safe and comfortable support
for the dr iver and the front passenger . Adjust
your seat properly so that:
- you can easily and quickly reach all the switches
and controls in the instrument panel
- your body is properly supported thus reducing
physical stress and fatigue
- the safety belts and a irbag system can offer
maximum protection ¢
page 146.
In the following sections, you will see exact ly
how you can best adjust your seats.
There are spec ial regulat ions and instr uctions for
installing a c hild seat on the front passenger's
seat. Always follow the information regarding
child safety provided in
¢ page 168, Child safe
ty .
A WARNING
Incorrect seating position of the driver and all
other passengers can result in serious person
al injury.
- Always keep your feet on the floor when the
vehicle is in motion - never put your feet on
top o f the instr ument pane l, o ut of the win
dow o r on top of the sea t cushion. This ap
plies espe cially to the passenge rs.
If your
seat ing pos ition is inco rre ct, you increase
the risk of injury in the case of sudden brak
ing or an accident . If the airbag inf lates and
the seating position is incor rect, this could
result in personal injury or even death.
- It is important for both the driver and front
passenge r to keep a d istance o f at least
10 inches (25 cm) between themselves and
the steering wheel and/or instrument pan el. If you're s itting any closer than this, the
airbag system cannot pro tect you properly.
58
In addition, the front seats and head re
straints must be adjusted to your body
he ight so that they can give you maximum
protection .
- Always try to keep as much distance as pos
sible between yourself and the steer ing
wheel or instrument panel.
- Do not adjust the driver's or front passeng
er's seat while the veh icle is moving. Yo ur
seat may move unexpectedly, causing sud
den loss of vehicle contro l and personal in
jury. If you ad just yo ur seat while the veh icle
is moving, you a re o ut of po sition.
, Driver's seat
The correct seat position is important for safe
and relaxed driving .
We recommend that you adjust the dr iver's seat
i n the following manner:
.. Adjust the seat in fore and aft direction so that
you can easi ly push the pedals to the floor
while keep ing your knees slightly bent¢
A. in
Why is your seat adjustment so important? on
page 58 .
.. Adjust the bac krest so that whe n you s it w it h
your back agains t the backrest, yo u can s till
gras p the top of the steering wheel.
.. Adjust the head res traint so the uppe r edge is
as even as possib le w ith the top of you r head. If
that is not possible, try to adjust the head re
straint so that it is as close to this pos it ion as
possible ¢
page 64.
A WARNING
Neve r place any objects in the dr iver's foo t
well. An object could get into the pedal area and inte rfere with pedal function. In case of
sud den bra king or an ac cident, you w ould no t
be ab le to b rake o r accelerate.
-
Page 61 of 302
Front passenger's seat
Always move the front pas senger seat into the
rearmost position .
To avoid contact with the airbag while it is de
ploying, do not sit any closer to the instrument
panel than necessary and always wear the three
point safety belt provided adjusted correctly . We
recommend that you adjust the passenger's seat
in the following manner:
.. Bring the backrest up to an (almost) upright
posit ion .
Do not ride with the seat reclined .
.. Adjust the head restraint so the upper edge is
as even as possible with the top of your head.
If
that is not possible, try to adjust the head re
straint so that it is as close to this position as
possible
c::> page 64.
.. Place your feet on the floor in front of the pas
senger's seat .
Front seats
Controls
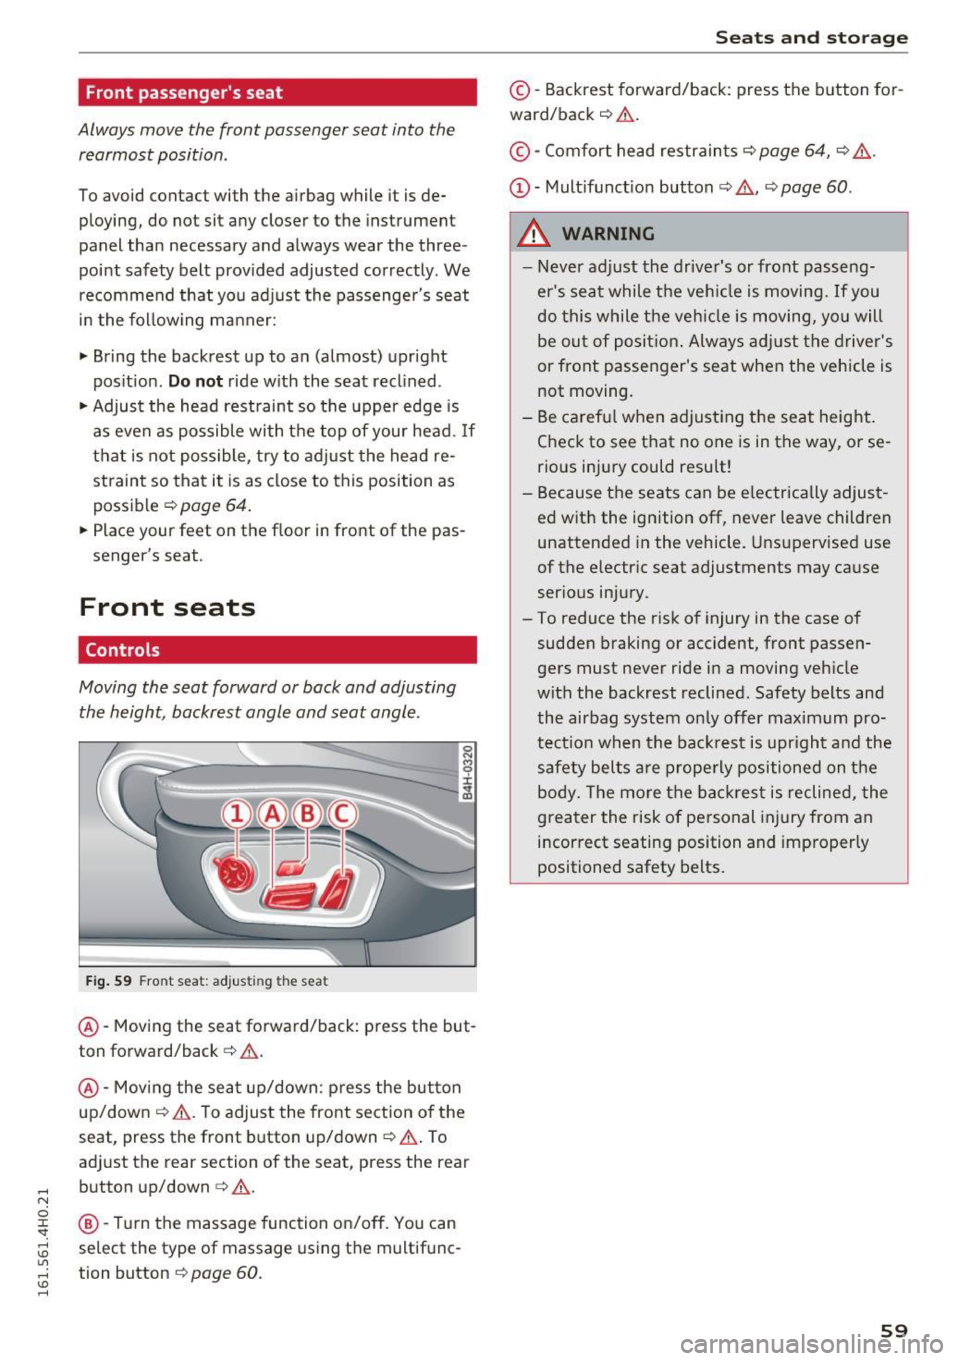
Moving the seat forward or back and adjusting
the height , backrest angle and seat angle.
Fig. 59 Front s eat : adjus ting the sea t
®-Moving the seat forward/back: press the but
ton forward/back
c::> & .
@ -Moving the seat up/down: press the button
up/down
c::> & . To adjust the front section of the
seat, press the front button up/down
c::> & . To
adjust th e rear section of the seat, press the rear
button up/down
c:> &.
@ -
Turn the massage function on/off. You can
select the type of massage using the multifunc
tion button
¢ page 60.
Seats and storage
© -Backrest forward/back : press the button for
ward/back
c::> .&. .
©-Comfort head restraints¢ page 64, c::> ,&.
(D -Multifunction button c:;, .&., c::> page 60 .
A WARNING
--Never adjust the driver's or front passeng
er's seat while the vehicle is moving. If you
do this while the veh icle is moving, you will
be out of position. Always adjust the driver's
or front passenger 's seat when the vehicle is
not moving .
- Be careful when adjusting the seat height .
Check to see that no one is in the way, or se
rious injury could result!
- Because the seats can be electrically adjust
ed with the ignition off, never leave children
unattended in the vehicle. Unsupervised use
of the electric seat adjustments may cause
serious injury .
- To reduce the risk of injury in the case of sudden braking or accident, front passen
gers must never ride in a moving vehicle
with the backrest reclined. Safety belts and
the airbag system only offer maximum pro
tection when the backrest is upright and the
safety belts are properly positioned on the
body. The more the backrest is reclined, the
greater the risk of personal injury from an
incorrect seating position and improperly positioned safety belts.
59
Page 62 of 302
Sea ts and stor age
Multifunction button
Applies to: ve hicles w ith memory funct ion
You con adjust the massage function, upper sec
tion of the backrest, lumbar support, side bol
sters, seating surface and safety belt height us
ing the multifunction button.
F ig . 60 MMI display: seat settings
Operat ing
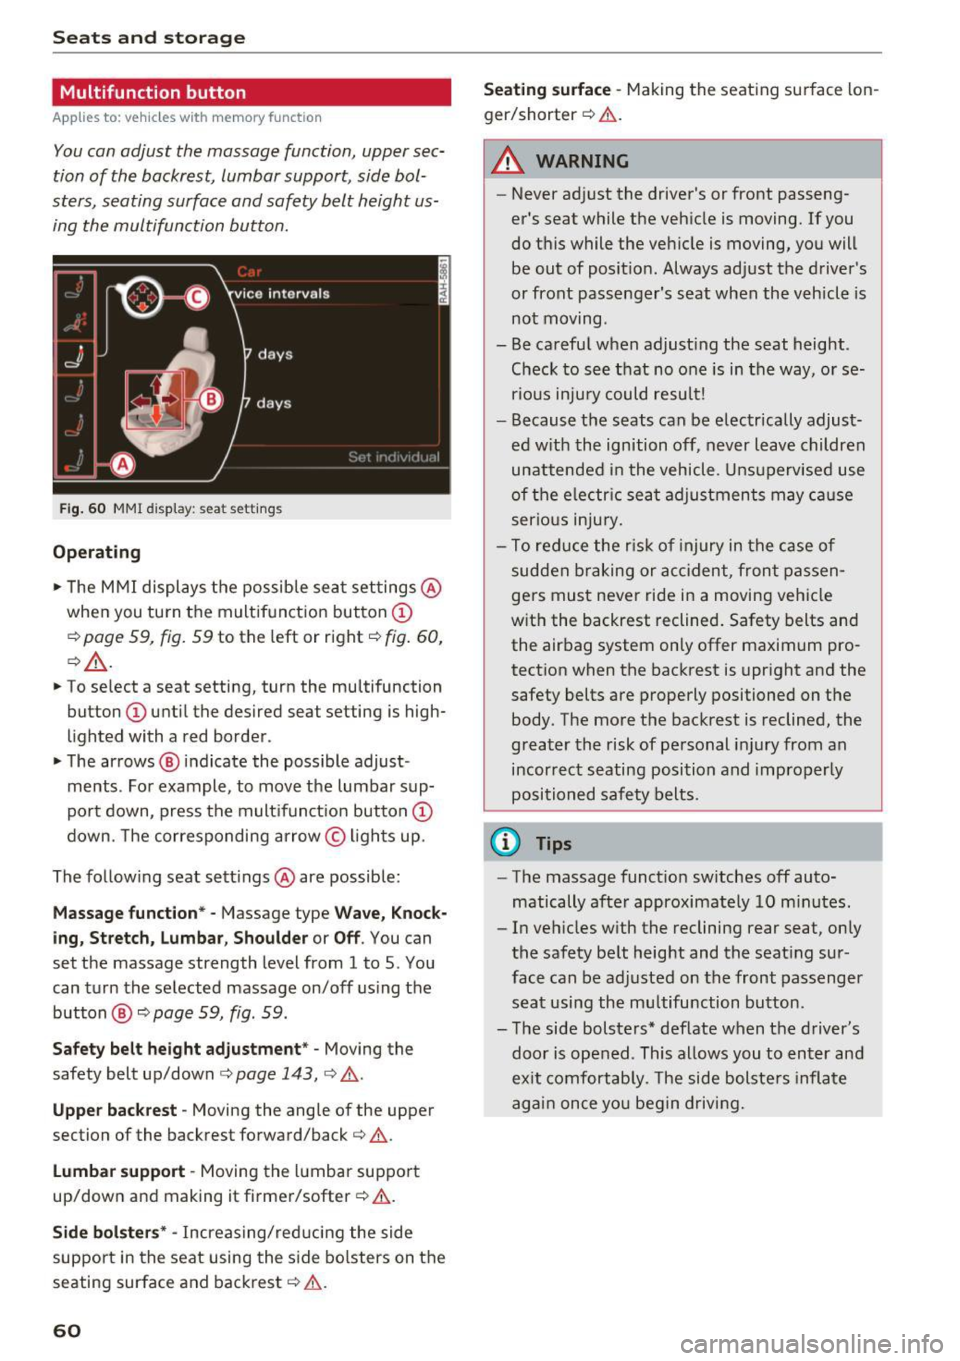
,.. The M MI displays the possible sea t set tings @
when you tu rn the multifunct ion button @
c::> page 59, fig . 59 to the left or right c::> fig. 60,
c::> _&. .
,.. To select a seat setting, turn the multifunction
button
(I) until the desired seat setting is high
lighted with a red border .
• The arrows ® indicate the possible adjust
ments . Fo r example, to move the lumbar sup
po rt down, press the mult ifunct ion button @
down. The corresponding arrow © ligh ts up.
The follow ing seat sett ings @are possible:
Massage func tion * -Massage type Wave, Kno ck
ing , Stre tch, Lumbar , S houlder or Off .
You can
set the massage strength level from 1 to 5. You
can turn the selected massage on/off us ing the
button @
c::> page 59, fig . 59.
Safe ty belt height adju stm ent * -Moving the
safety belt up/down
c::> page 143, c::> &.
Uppe r back rest -Moving the angle of the upper
section of the backrest forward/back
c::> &.
Lumb ar support -Moving the l umbar support
up/down and making it firmer/softer
c::> & .
Side bolst ers* -Increas ing/red ucing the side
support in the seat using the s ide bo lsters on the
seating surface and backrest
c::> .&. .
60
Seating surface -Making the seating surface lon
ger/shorter
c::> & .
A WARNING
-Never ad just the driver's or front passeng
er 's seat while the vehicle is moving. If you
do this while the vehicle is moving, you will
be out of posit io n. Always adjust the driver's
or front passenger's seat when the vehicle is
not moving .
- Be careful when adjust ing the seat height .
Check to see that no o ne is in the way, or se
rious inju ry could result!
- Because the seats can be electr ically adjust
ed w ith the ignition off, never leave children
unattended i n the vehicle. Uns upervised use
of the e lectr ic sea t adjustments may ca use
serious in ju ry.
- To reduce the r is k of injury in the case of
sudden b raking or accident, front pa ssen
gers must never ride in a moving vehicle
w ith the backrest reclined . Safety belts and
the airbag system on ly offer maximum pro
tection when the backrest is upright and the
safety belts are properly positioned on the
body. The more the backrest is reclined, the
greater the risk of pe rsonal injury from an
incorrect seating position and improperly
positioned safety belts.
@ Tips
- The massage funct ion sw itches off auto
matically after approximately 10 m inutes.
- In vehicles w ith the reclining rear seat, on ly
the safety be lt height and the seat ing sur
face can be adjusted on the front passenger
seat using the mu ltifunction bu tton.
- The side bolsters* deflate when the driver's
door is ope ned . This allows you to enter and
ex it comfortab ly. The side bolste rs infla te
again once yo u begin driving.
-
Page 63 of 302
Armrest
There is a storage compartment under the arm
rest.
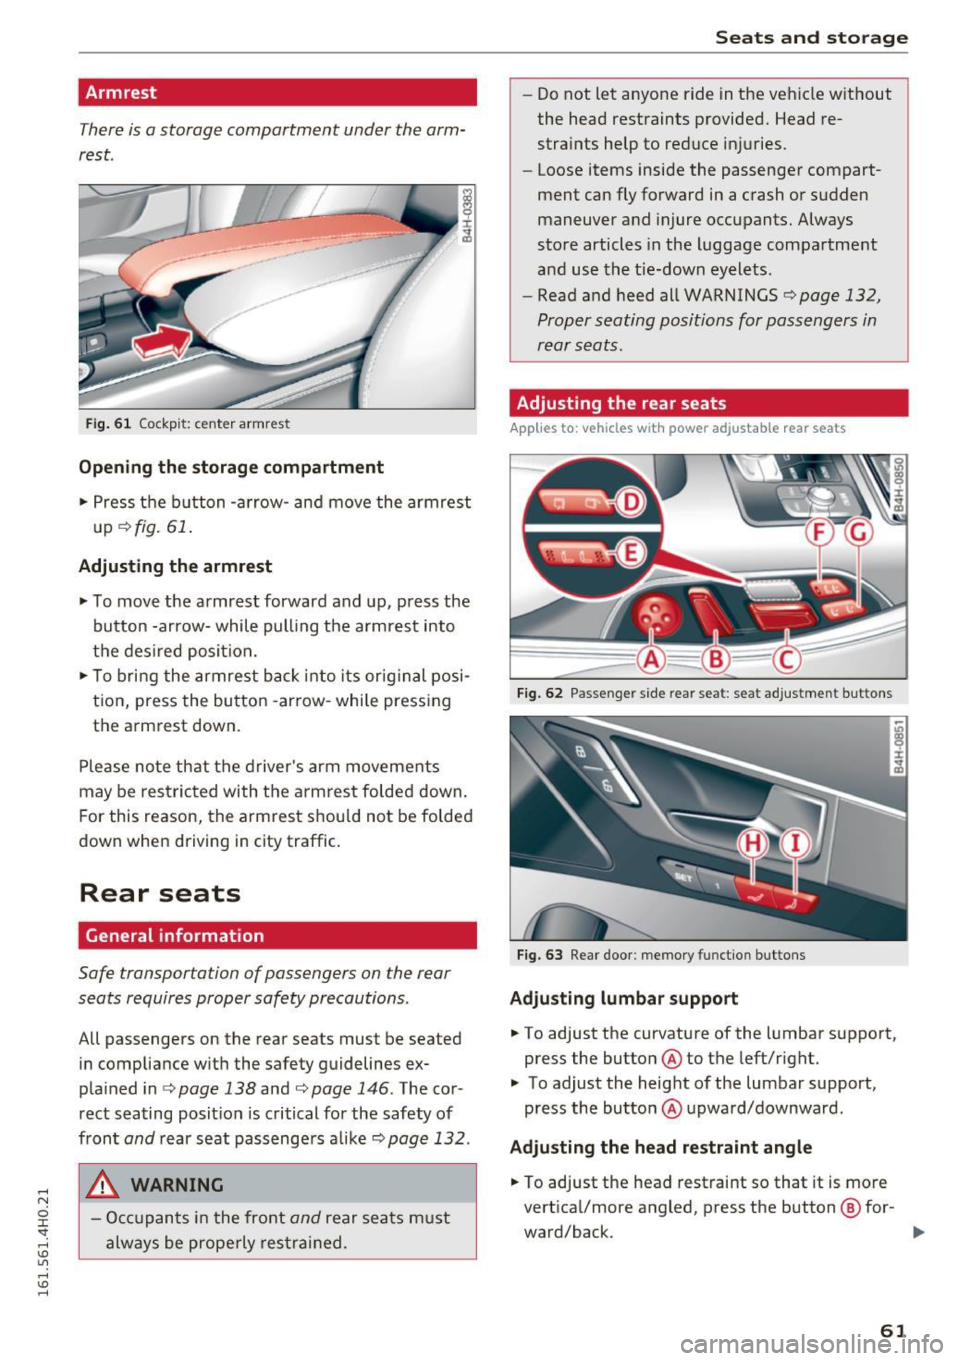
Fi g. 6 1 Cockpit: center armrest
Opening th e stor age compartment
... Press the b utton -arrow -and move the armrest
up
¢fig. 61.
Adjusting the armrest
... To move the armrest forward and up, press the
button -arrow- while pull ing the a rmrest into
the des ired position .
.,. To bri ng the armrest back into its orig inal posi
tio n, press the button -ar row -while press ing
the arm rest down.
Pl ease note that the driver 's arm movements
may be restric ted with the arm rest folded down.
F or this reason, the armrest shou ld not be folded
down when driving in city traffic .
Rear seats
General information
Safe transportation of passengers on the rear
seats requires proper safety precautions.
All passengers on the rear seats must be seated
in compliance w ith the safety guidelines ex
p la ined in ¢
page 138 and¢ page 146 . The cor
rect seating posit ion is critical for the safety of
front
and rear seat passenge rs a like¢ page 132 .
A WARNING
-Occ upan ts in the fro nt and rear seats m ust
always be prope rly res trai ned.
Seats and storag e
-Do not let anyone ride in the ve hicle w ithout
the head restraints provided. Head re
straints help to reduce injuries.
- Loose items inside the passenger compart
ment can fly forward in a c rash or sudden
maneuver and injure occupants. Always
store articles in the luggage compa rtment
and use the tie-down eyelets.
- Read and heed all WARNINGS
<=> page 132,
Proper seating positions for passengers in
rear seats .
Adjusting the rear seats
Applies to: vehicles with power adjustable rear seats
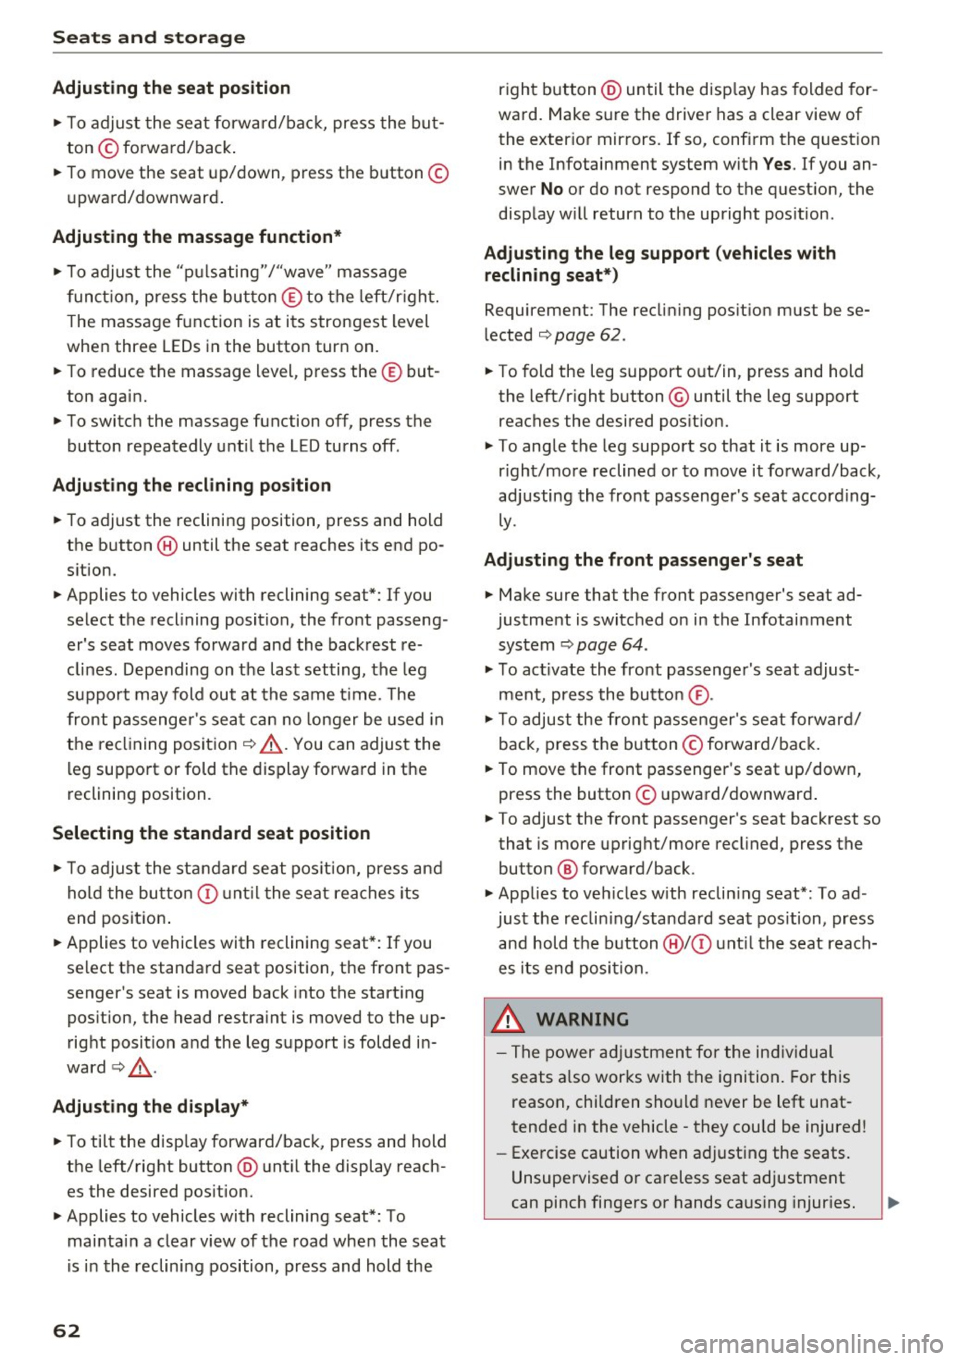
Fig. 6 2 Passenger side rear seat: seat ad justment buttons
F ig. 63 Rear door: memo ry function buttons
Adjusting lumbar support
... To adjust the curvature of the lumbar support,
press the button @ to the left/right.
.,. To adjust the height of the lumbar support,
press the button @ upward/downward.
Adjusting the head re straint angle
... To adjust the head restraint so that it is more
vertical/more angled, press the button @ for-
ward/back. ..,.
61
Page 64 of 302
Seat s and sto rage
Adju st ing th e seat po sition
.,. To adjust the seat forwa rd/bac k, press the but
ton © forward/back .
.,. To move the seat up/down, press the button ©
upward/downward .
Adjusting th e massage function*
.,. To adjust the "p ulsating"/"wave" massage
funct ion, press the butto n© to the left/r ight.
The massage f unction is at its strongest level
when three LEDs in the button turn on .
.,. To reduce the massage level, press the © but
ton again .
.,. To switch the massage function off, press the
button repeatedly until the LED turns off.
Adju st ing th e re clining p osition
.,. To adjust the reclining position, press and hold
the button ® until the seat reaches its end po
s ition .
.,. Applies to vehicles with reclining seat*: If you
select the reclining position, the front passeng
er's seat moves forward and the backrest re
cl ines. Depending on the last setting, the leg
support may fold out at the same t ime. The
front passenger 's seat can no longer be used in
the recl ining position¢ _&.. You can adjust the
l eg support or fold the display fo rward in the
reclining position.
Selecting the standard seat position
.,. To adjust the standard seat pos ition, press and
hold the bu tton (D unt il the seat reaches its
end position .
.,. Applies to vehicles with reclining seat*: If you
select the standard seat position, the front pas
senger's seat is moved back into the starting
pos ition, the head restra int is moved to the up
rig ht posit ion a nd the leg support is folded in
ward ¢_& .
Adju st ing th e di splay*
.,. To tilt the disp lay forward/back, press and hold
the left/right button @ unt il the display reach
es the desired pos ition.
.,. Applies to vehicles with reclining seat*: To
maintain a clear view of the road when the seat
is in the reclining position, press and hold the
62
right button @ until the disp lay has folded for
ward. Make sure the driver has a clear view of the exter ior mirrors. If so, confirm the quest ion
in the Infotainment system with
Yes . If you an
swer
No or do not respond to the quest ion, the
disp lay w ill return to the upright pos ition.
Adju sting the leg support (vehicles with
reclining seat*)
Requirement: The reclining pos it ion must be se
lected ¢
page 62.
.,. To fold the leg support o ut/in, press and hold
the left/r ight button @ until the leg support
reaches the desired pos it ion.
.,. To angle the leg support so that it is more up
r ight/more reclined or to move it forward/back,
adjusting the front passenger's seat accord ing
ly.
Adjusting the front pa ssenger 's seat
.,. Make sure that the front passenger's seat ad
justment is switched on in the Infotainment
system
¢ page 64 .
.,. To act ivate the front passenger's seat adjust
ment, press the button ®·
.,. To adjust the front p assenger's se at forward/
back, press the button © forward/back .
.,. To move the front passenger's seat up/down,
press the button © upward/downward .
.,. To adjust the front passenger's seat backrest so
that is more upright/more recl ined, press the
button @ forward/back .
.,. Applies to veh icles with reclin ing seat*: To ad
just the reclin ing/standa rd seat position, press
and hold the button@/(D unt il the seat reach
es its end position.
~ WARNING
-
- The power ad justment for the ind iv idual
seats a lso works with the ignition. For this
reason, children sho uld never be left unat
tended in the vehicle -they could be injured!
- Exercise caution when adjust ing the seats.
Unsupervised or careless seat adjustment
can pinch fingers or hands ca us ing injur ies .
Page 65 of 302
-Vehicles with a pass through in the center
console have seating for four. The long cen
ter console between the two rear seats is
not a seating position . Therefore, a safety
belt is not provided .
- Applies to vehicles with reclining rear seat*:
- Do not use the front passenger's seat for
seating when it is in the reclining position.
This increases the risk of serious injury or
death .
- Never adjust the reclining position when
the front passenger 's seat is occupied .
This increases the risk of injury.
- Do not tilt the display if the driver's view
of the right exterior mirror will be ob
structed .
- Make sure the area between the leg sup
port and the front passenger's seat back
rest is clear before folding the leg support in so that you are not pinched.
(D Note
If a child seat is attached to one of the rear
seats, this seat must not be adjusted using
the power controls under any circumstances.
The easy entry function for this seat must also
be deactivated in the MMI
c:> page 64. The
child seat as well as the rear seat can be dam
aged by the adjustment process .
(!) Tips
The massage function switches off automati
cally after approximately
10 minutes .
- If you cannot move the front passenger seat
or the reclining rear seat, it may be because
- the front passenger's seat memory func
tion is switched off¢
page 66 or
- the child safety lock is switched on (the~
button ¢
page 40 or the right T button
c::> page 40 lights up in the driver's door),
or
- the front passenger seat adjustment is
switched off in the MMI
c:> page 64.
Seats and storage
Massage function remote control
Applies to: vehicles with reclining rear seat and massage
functio n
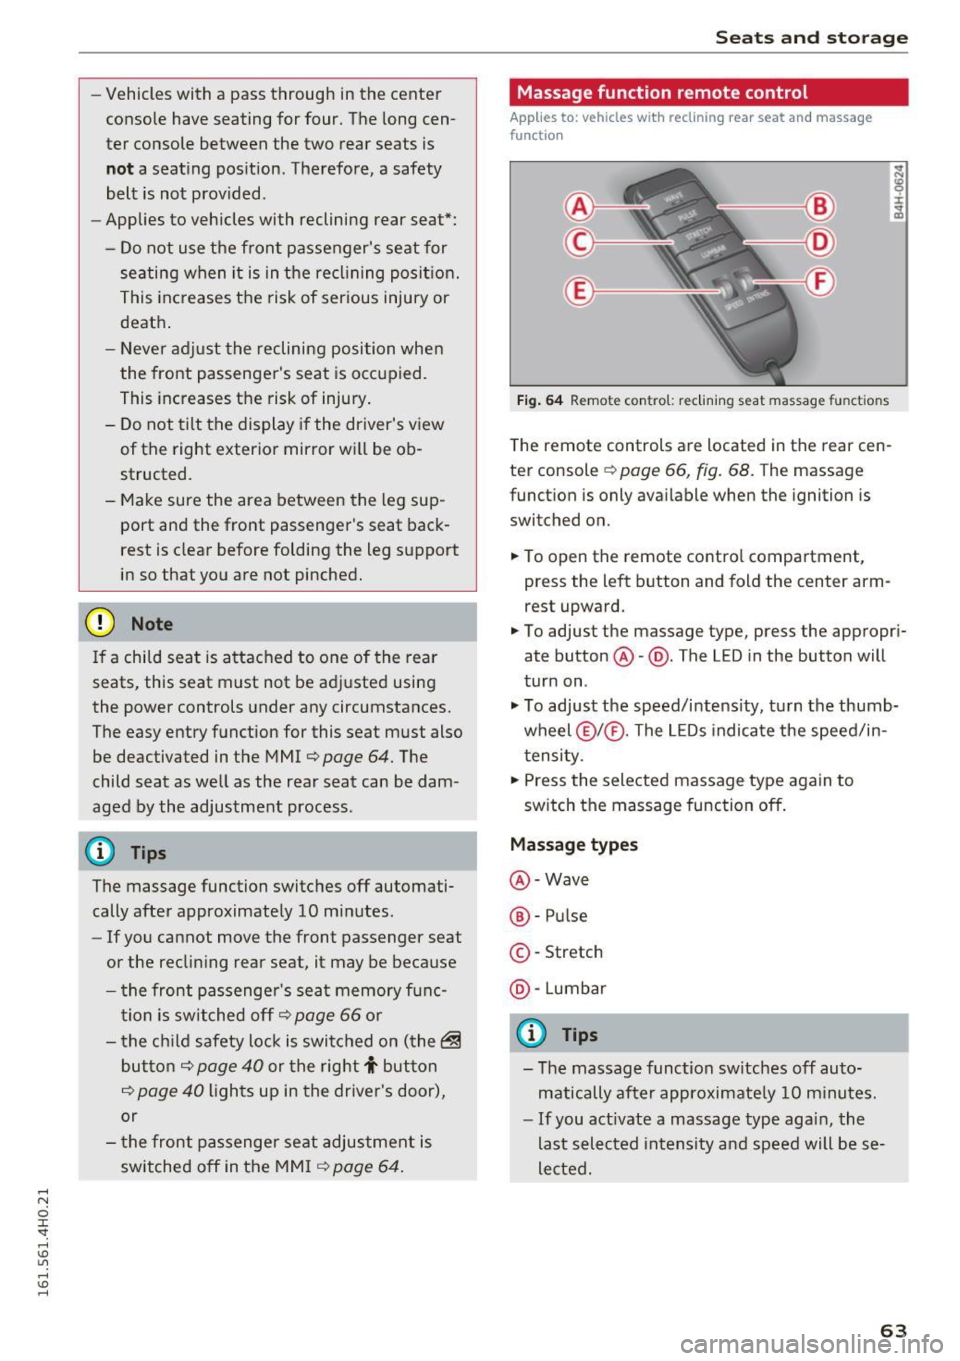
Fig. 64 Remote con trol: re clining seat massag e functions
The remote controls are located in the rear cen
ter console
c::> page 66, fig. 68. T he massage
function is only available when the ignition is
switched on.
.,. To open the remote control compartment,
press the left button and fold the center arm rest upward.
.,. To adjust the massage type, press the appropri
ate button @-@ . The L ED in the button will
turn on .
.,. To adjust the speed/intensity, turn the thumb
wheel @I® . The LEDs indicate the speed/in
tensity.
.,. Press the selected massage type again to
switch the massage function off.
Massage types
@-Wave
®-Pulse
©-Stretch
@ -Lumbar
@ Tips
- The massage function switches off auto
matically after approximate ly
10 minutes.
- If you act ivate a massage type again, the
last selected intensity and speed will be se
lected.
63
Page 66 of 302
Seats and storage
Comfort settings
Applies to: vehicles with comfort seats in the rear
You con adjust settings for the rear seat from
the cockpit using the MMI.
• Se lect I CAR I function button> Car systems con
trol button
> Vehicle settings > Seats > Rear
seats .
Factory settings position -
This function moves
the outer rear seats and the front passenger
seatback into the factory settings posit io n.
Entry assistance -Entry assistance makes it eas
ier to enter and ex it the rear seat more comforta
b ly. When the function is activated, the rear seat
moves all the way back automatically when t he
corresponding door opens.
Front passenger seat adjustment* -If the fu nc
tion is activated in the MMI, the front passenger
seat can be adjusted from the rear seat
c::> page 61, fig. 62.
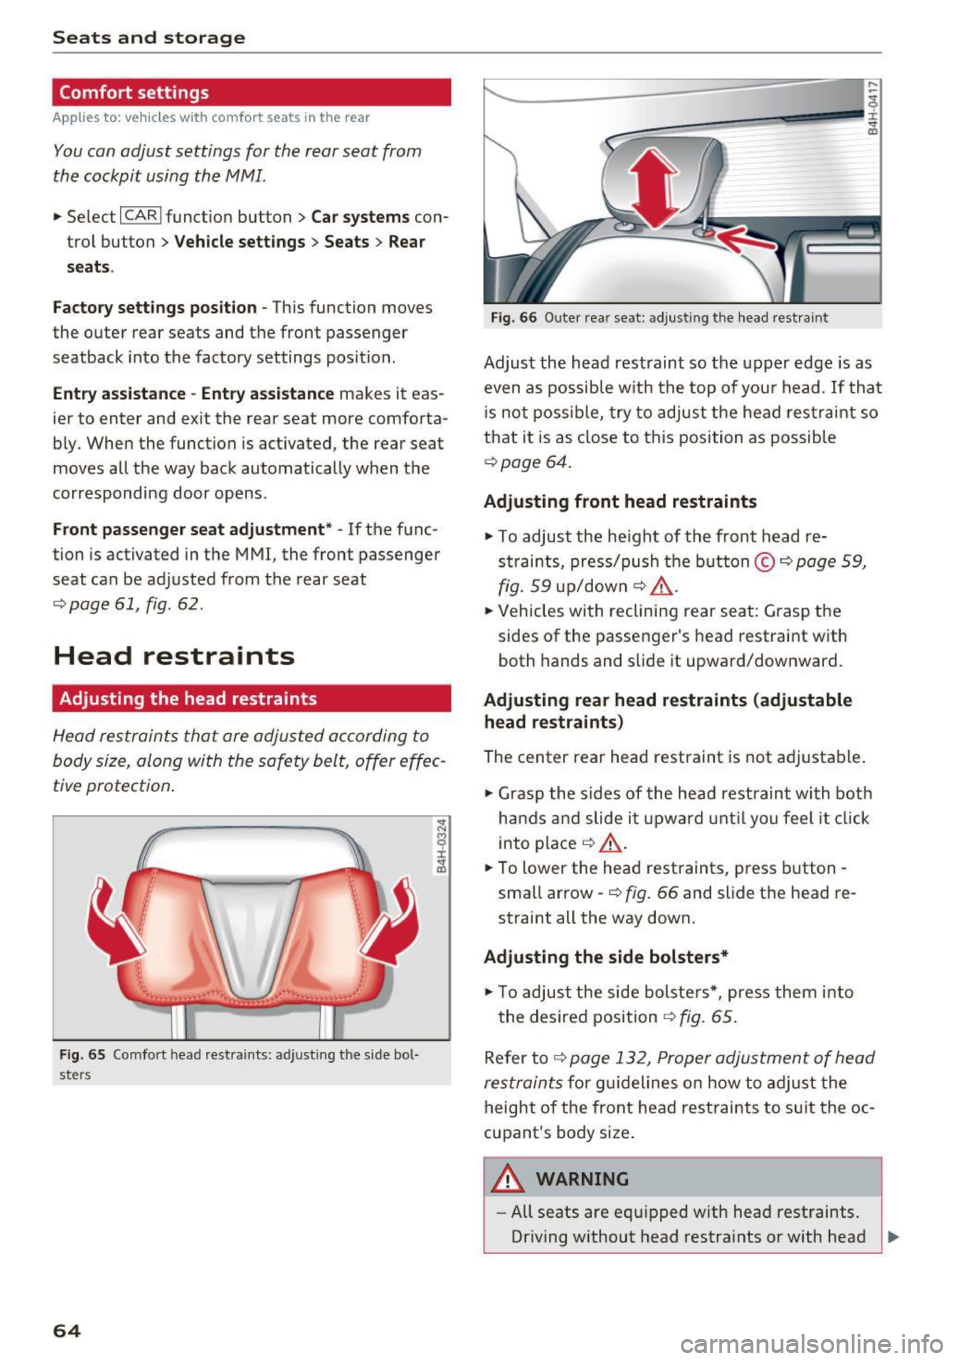
Head restraints
Adjusting the head restraints
Head restraints that ore adjusted according to
body size, along with the safety belt, offer effec
tive protection .
Fig. 65 Comfo rt hea d rest ra ints: a dju st ing t he s ide bol
sters
64
Fig. 66 Outer rea r seat: adjus ting the head restra in t
Adjust the head restraint so the upper edge is as
even as possible with the top of your head . If tha t
i s not possible, try to adjust the head res traint so
that it is as close to this position as possible
c::> poge 64.
Adjusting front head restraints
• To adjust the height of the front head re
straints, press/push the button©
c::> page 59,
fig. 59 up/down c::> ,&...
• Vehicles with reclining rear seat: Grasp the
sides of the passenger's head restraint with
both hands and slide it upward/downward.
Adjusting rear head restraints (adjustable
head restraints )
The center rear head restraint is not adjustable .
• Grasp the sides of the head restraint wi th both
hands and slide it up ward until you feel it click
into place
c::> ,&...
• To lower the head restraints, press button -
sma ll arrow -
c::> fig. 66 and slide the head re
straint all the way down.
Adjusting the side bolsters*
• To adjust the side bolsters*, press them int o
the desired position
c::> fig. 65.
Refer to
c::> page 132, Proper adjustment of head
restraints
for guidelines on how to adjust the
height of the front head restraints to suit the
oc
cupant's body size.
~ WARNING
-All seats are equ ipped with head restraints.
Driving without head restra ints or with head ..,.
Page 67 of 302
restraints that are not properly adjusted in
creases the risk of ser ious or fatal neck in
jury dramatically.
- Read and heed all WARNINGS
¢page 132,
Proper adjustment of head restraints.
- Vehicles with a pass through in the center
console have seating for four. The long cen
ter console between the two rear seats is
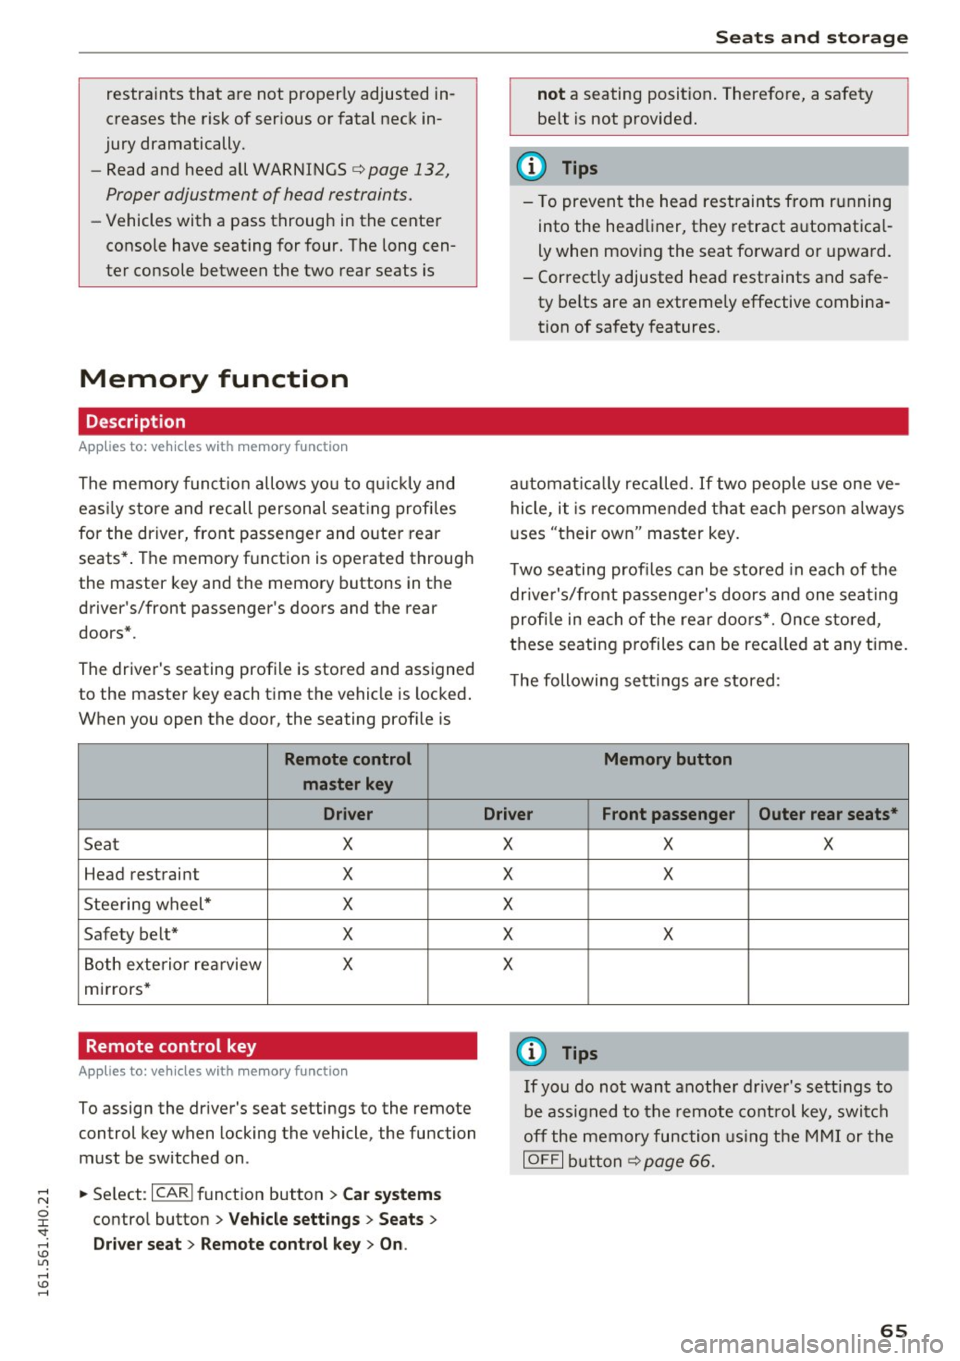
Memory function
Description
Applies to: vehicles with memory function
The memory functio n allows you to quickly and
eas ily store and recall personal seating profi les
for the driver, front passenger and outer rear
seats* . The memory function is operated through
the master key and the memory buttons in the
driver's/front passenger's doors and the rear
doors".
The driver's seating profi le is stored and assigned
to the master key each time the vehicle is locked.
When you open the door, the seating profile is
Remote control
master key
Driver
Seat X
Head restraint X
Steering wheel* X
Safety belt* X
Both exterior rea rview X
mirrors*
Remote control key
Applies to: veh icles with memory function
To assign the driver's seat settings to the remote
control key when locking the vehicle, the function
must be switched on .
~ Select: I CARI function button > Car systems
control button > Vehicle settings > Seats >
Driver seat > Remote control key > On .
Seats and storage
not a seating position. Therefore, a safety
be lt is not provided.
(D Tips
-To prevent the head restraints from running
into the headliner, they retract automatica l
ly when moving the seat forward or upward.
- Correctly adjusted head restraints and safe
ty be lts are an extremely effective combina
tion of safety features.
automat ically recalled. If two people use one ve
hicle, it is recommended that each person always
uses "their own" master key .
T wo seating profiles can be stored in eac h of the
drive r's/front passenger's doors and one seating
profi le in each of the rear doors*. Once stored,
these seating p rofiles can be reca lled at any time.
Th e following sett ings are stored:
Memory button
Driver Front passenger Outer rear seats*
X
X
X
X
X X
X
X
X
@ Tips
If you do not want another driver's settings to
be assigned to the remote control key, switch
off the memory function using the MMI or the
IOFF I button ¢p age 66.
65