turn signal AUDI TT 2021 Owner´s Manual
[x] Cancel search | Manufacturer: AUDI, Model Year: 2021, Model line: TT, Model: AUDI TT 2021Pages: 280, PDF Size: 99.18 MB
Page 95 of 280

8S1012721BE
Assist systems
— If timing is paused, you can continue it later
even if you switch the ignition off.
— Saved lap times cannot be individually de-
leted from the total results.
— The saved lap timer values will remain after
switching the ignition off.
Audi side assist
Applies to: vehicles with Audi side assist
BFV-0079
Fig. 98 Diagram: coverage area of the sensors
BFV-0080
Fig. 99 Exterior mirror: display
Side assist helps you monitor your blind spot and
traffic behind your vehicle. Within the limits of
the system, it warns you about vehicles that are
coming closer or that are traveling with you with-
in sensor range @) > fig. 98: if a lane change is
classified as critical, the display @ in the exterior
mirror © fig. 99 turns on.
The display in the left exterior mirror provides as-
sistance when making a lane change to the left,
while the display in the right exterior mirror pro-
vides assistance when making a lane change to
the right.
Information stage
As long as you do not activate the turn signal,
side assist informs you about vehicles that are
detected and classified as critical. The display in
the mirror turns on, but is dim.
The display remains dim in the information stage
so that your view toward the front is not distur-
bed.
Warning stage
If you activate the turn signal, side assist warns
you about vehicles that are detected and classi-
fied as critical. The display in the respective mir-
ror blinks brightly. If this happens, check traffic
by glancing in the exterior mirrors and over your
shoulder > A\ in General information on
page 94.
You can adjust the brightness on of the dis-
play on the rearview mirror > page 95.
93
Page 102 of 280
Parking aid
Siedler lie Rela
Applies to: vehicles with parking aid plus
BFV-0209
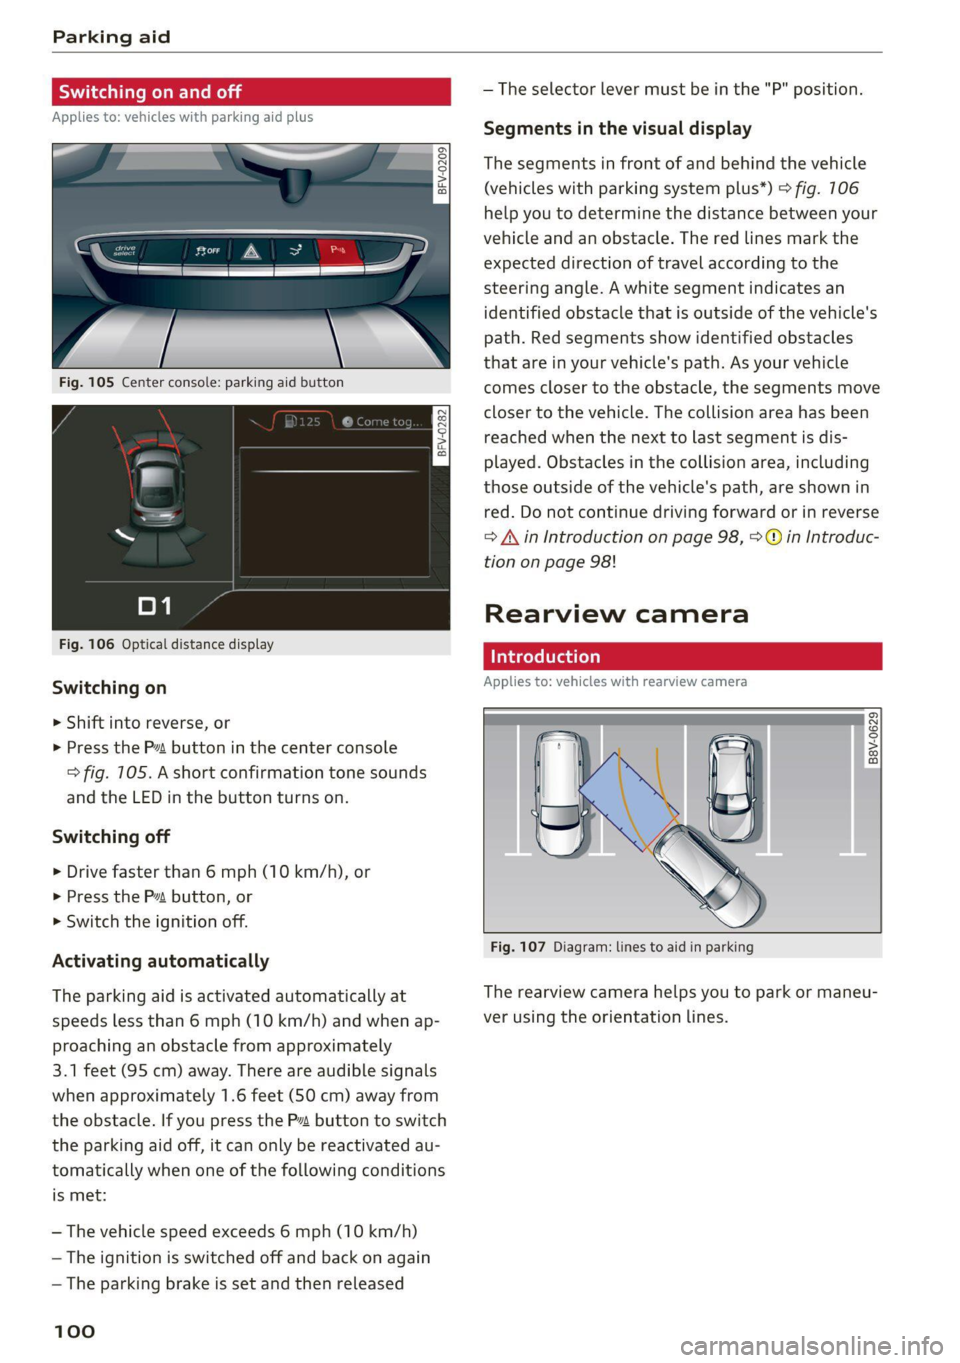
Fig. 105 Center console: parking aid button
Fig. 106 Optical distance display
Switching on
> Shift into reverse, or
> Press the P~ button in the center console
> fig. 105. A short confirmation tone sounds
and the LED in the button turns on.
Switching off
> Drive faster than 6 mph (10 km/h), or
> Press the P button, or
> Switch the ignition off.
Activating automatically
The parking aid is activated automatically at
speeds less than 6 mph (10 km/h) and when ap-
proaching an obstacle from approximately
3.1 feet (95 cm) away. There are audible signals
when approximately 1.6 feet (50 cm) away from
the obstacle. If you press the Pa button to switch
the parking aid off, it can only be reactivated au-
tomatically when one of the following conditions
is met:
— The vehicle speed exceeds 6 mph (10 km/h)
— The ignition is switched off and back on again
— The parking brake is set and then released
100
— The selector lever must be in the "P" position.
Segments in the visual display
The segments in front of and behind the vehicle
(vehicles with parking system plus*) > fig. 106
help you to determine the distance between your
vehicle and an obstacle. The red lines mark the
expected direction of travel according to the
steering angle. A white segment indicates an
identified obstacle that is outside of the vehicle's
path. Red segments show identified obstacles
that are in your vehicle's path. As your vehicle
comes closer to the obstacle, the segments move
closer to the vehicle. The collision area has been
reached when the next to last segment is dis-
played. Obstacles in the collision area, including
those outside of the vehicle's path, are shown in
red. Do not continue driving forward or in reverse
= A in Introduction on page 98, >@ in Introduc-
tion on page 98!
Rearview camera
Introduction
Applies to: vehicles with rearview camera
B8V-0629
Fig. 107 Diagram: lines to aid in parking
The rearview camera helps you to park or maneu-
ver using the orientation lines.
Page 104 of 280
Parking aid
> Switch the ignition off.
iG) Tips
— The visual display in the left part of the dis-
play should help you detect the critical vehi-
cle areas.
— You can change the volume of the signals
and the display > page 102.
Perpendicular parking
Applies to: vehicles with rearview camera
This view may be used when parking in a garage
or ina parking space.
4. Look! Safe to move?
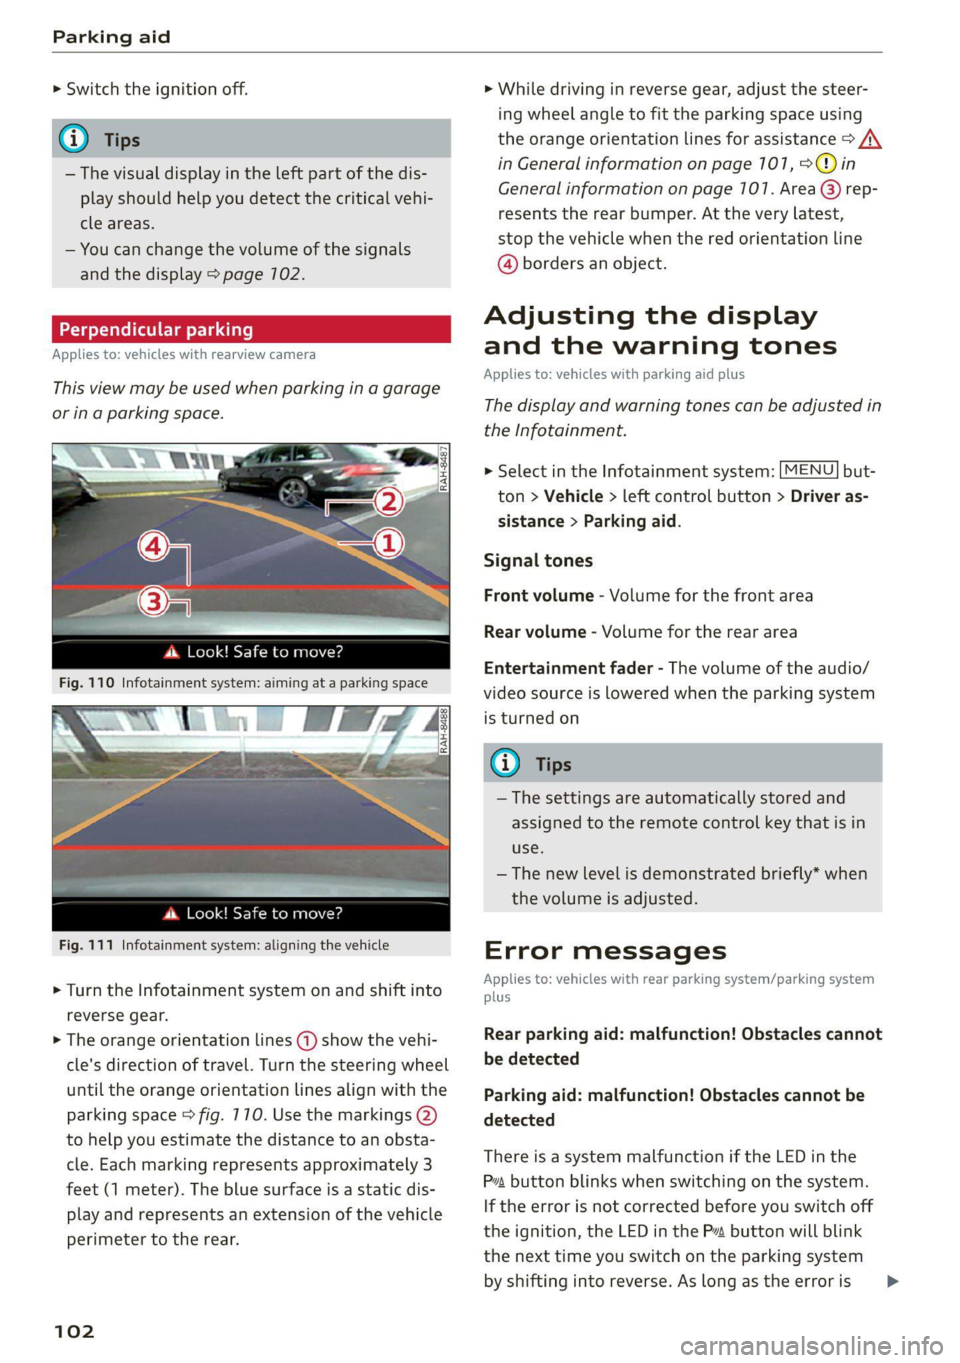
Fig. 110 Infotainment system: aiming at a parking space
ds. Look! Safe to move?
Fig. 111 Infotainment system: aligning the vehicle
> Turn the Infotainment system on and shift into
reverse gear.
> The orange orientation lines @) show the vehi-
cle's direction of travel. Turn the steering wheel
until the orange orientation lines align with the
parking space > fig. 710. Use the markings @)
to help you estimate the distance to an obsta-
cle. Each marking represents approximately 3
feet (1 meter). The blue surface is a static dis-
play and represents an extension of the vehicle
perimeter to the rear.
102
> While driving in reverse gear, adjust the steer-
ing wheel angle to fit the parking space using
the orange orientation lines for assistance > /\.
in General information on page 101, >@)in
General information on page 107. Area @) rep-
resents the rear bumper. At the very latest,
stop the vehicle when the red orientation line
@ borders an object.
Adjusting the display
and the warning tones
Applies to: vehicles with parking aid plus
The display and warning tones can be adjusted in
the Infotainment.
> Select in the Infotainment system: [MENU] but-
ton > Vehicle > left control button > Driver as-
sistance > Parking aid.
Signal tones
Front volume - Volume for the front area
Rear volume - Volume for the rear area
Entertainment fader - The volume of the audio/
video source is lowered when the parking system
is turned on
@ Tips
— The settings are automatically stored and
assigned to the remote control key that is in
use.
— The new level is demonstrated briefly* when
the volume is adjusted.
Error messages
Applies to: vehicles with rear parking system/parking system
plus
Rear parking aid: malfunction! Obstacles cannot
be detected
Parking aid: malfunction! Obstacles cannot be
detected
There is a system malfunction if the LED in the
Pva button blinks when switching on the system.
If the error is not corrected before you switch off
the ignition, the LED in the P button will blink
the
next time you switch on the parking system
by shifting into reverse. As long as the error is >
Page 113 of 280
8S1012721BE
Multi Media Interface
A WARNING Opening a main menu/menu
To reduce the risk of an accident, adjust the
volume of the audio systems so that signals EJ Vehicle
outside of the vehicle, such as police and fire
sirens, can be heard easily at all times.
}) NI cl
6) Tips = J édia
The MMI switches off automatically if the en-
gine is not running and the vehicle battery is
low.
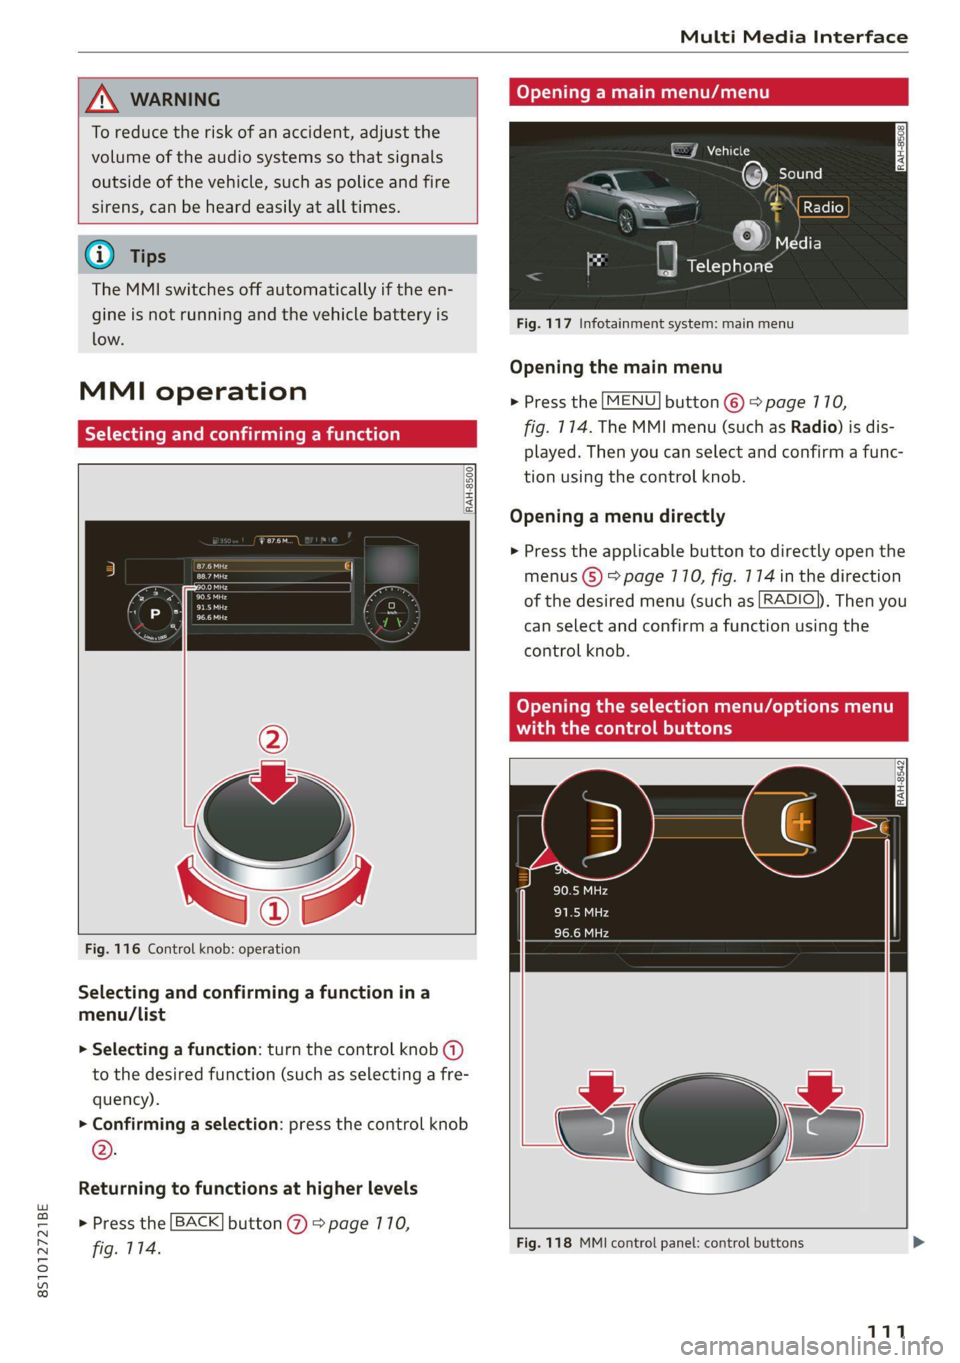
Fig. 117 Infotainment system: main menu
Opening the main menu
> Press the [MENU] button ©) > page 770,
fig. 114. The MMI menu (such as Radio) is dis-
played. Then you can select and confirm a func-
tion using the control knob.
MMI operation
Ya ate) rming a func
RAH-8500.
Opening a menu directly
> Press the applicable button to directly open the
eras menus (5) > page 110, fig. 174 in the direction
sare ‘ ' of the desired menu (such as [RADIO}), Then you
— can select and confirm a function using the
control knob.
Opening the selection menu/options menu
with the control buttons
RAH-8542
Fig. 116 Control knob: operation
Selecting and confirming a function ina
menu/List
> Selecting a function: turn the control knob (a)
to the desired function (such as selecting a fre-
quency).
> Confirming a selection: press the control knob
®.
Returning to functions at higher levels
> Press the [BACK] button @ > page 770,
fig. 114. Fig. 118 MMI control panel: control buttons >
111
Page 115 of 280
8S1012721BE
Multi Media Interface
Requirement: it must be possible to enter text or
numbers and the symbol (4) must appear in the
Infotainment system display.
Basic input
> Write in individual upper case or lower case Let-
ters or numbers/characters on the MMI touch
control pad using your finger. A symbol that is
recognized clearly by the system is displayed in
the Infotainment system display 2)
=> page 112, fig. 119, confirmed with an audi-
ble signal if necessary, and transferred to the
input field.
Entering spaces
> Move your finger from Left to right on the MMI
touch control pad.
Deleting characters
> Move your finger from right to left on the MMI
touch control pad.
Deleting characters quickly
> Move your finger quickly from right to left on
the MMI touch control pad.
Selecting the input suggestion
> Press the control knob.
Switching directly to the results list
> Turn the control knob to the left or to the right.
Opening the speller
> Select: the right control button > Open speller.
Text or numbers are entered using the speller
=> page 117.
Moving the crosshairs
Applies to: vehicles with MMI touch
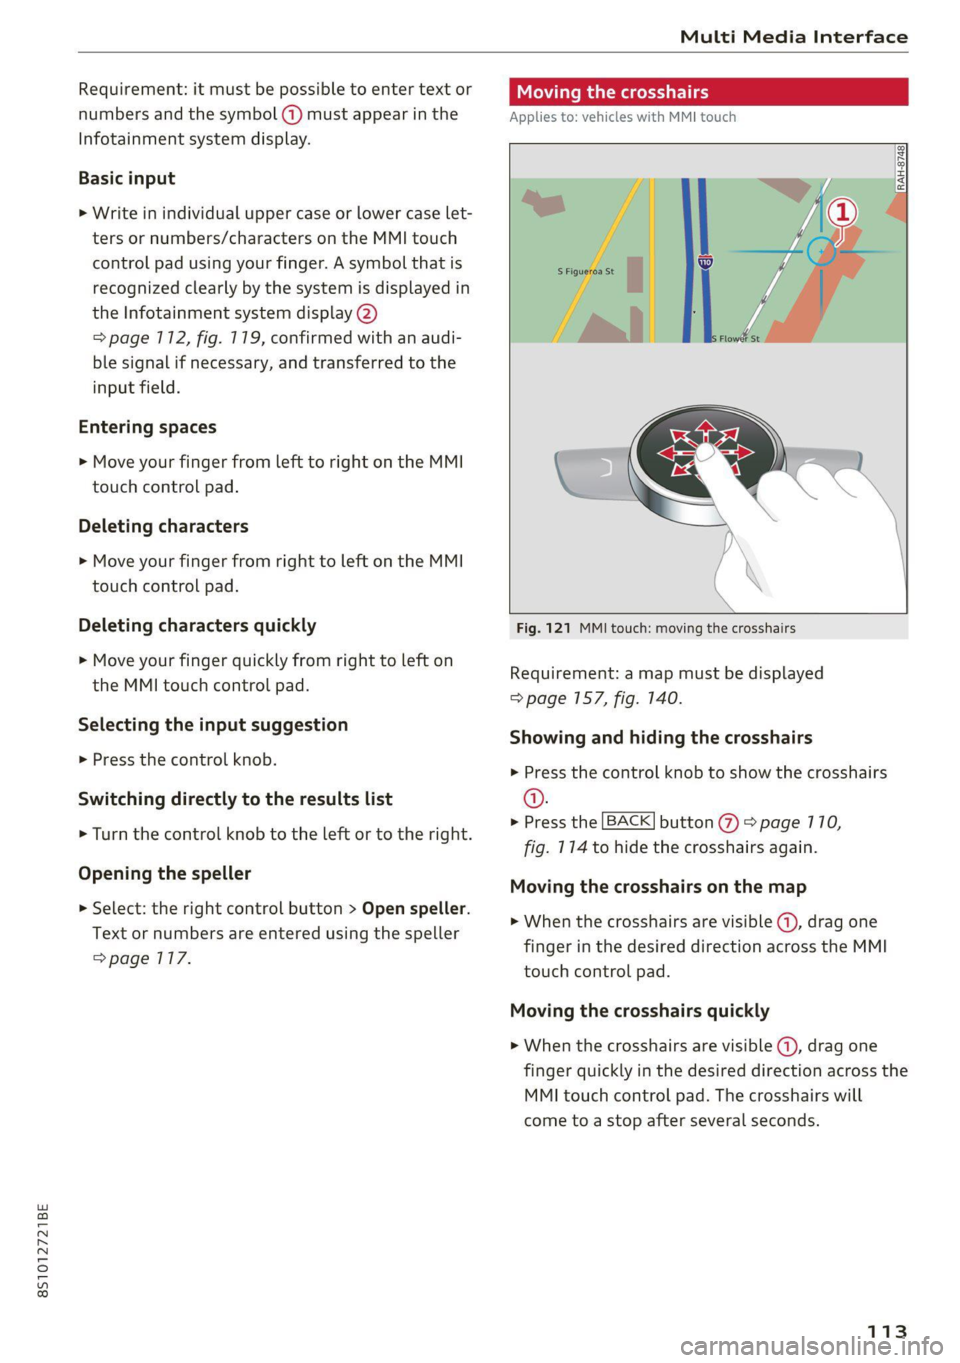
Fig. 121 MMI touch: moving the crosshairs
Requirement: a map must be displayed
=> page 157, fig. 140.
Showing and hiding the crosshairs
» Press the control knob to show the crosshairs
@.
> Press the [BACK] button % > page 110,
fig. 114 to hide the crosshairs again.
Moving the crosshairs on the map
> When the crosshairs are visible @, drag one
finger in the desired direction across the MMI
touch control pad.
Moving the crosshairs quickly
> When the crosshairs are visible (4), drag one
finger quickly in the desired direction across the
MMI touch control pad. The crosshairs will
come to a stop after several seconds.
113
Page 122 of 280
Multi Media Interface
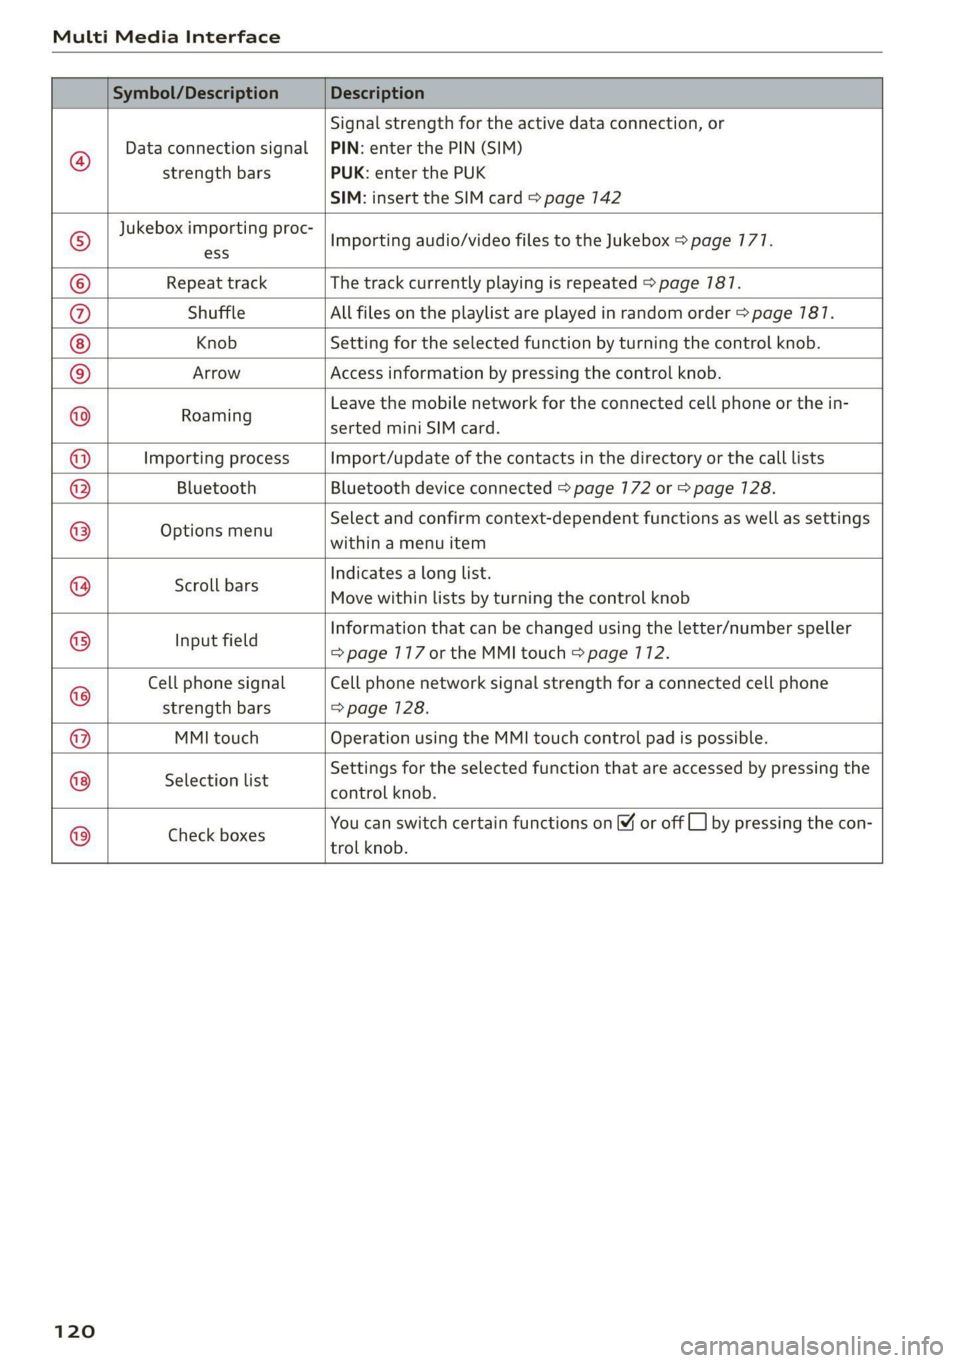
Symbol/Description Description
®
Data connection signal
strength bars
Signal strength for the active data connection, or
PIN: enter the PIN (SIM)
PUK: enter the PUK
SIM: insert the SIM card > page 142
Jukebox importing proc-
Importing audio/video files to the Jukebox > page 177.
© ess
© Repeat track The track currently playing is repeated > page 787.
®@ Shuffle All files on the playlist are played in random order > page 787.
Knob Setting for the selected function by turning the control knob.
© Arrow Access information by pressing the control knob.
Earning Leave the mobile network for the connected cell phone or the in-
serted mini SIM card.
Importing process Import/update of the contacts in the directory or the call lists
Bluetooth Bluetooth device connected > page 172 or > page 128.
Options menu
Select and confirm context-dependent functions as well as settings
within a menu item
Scroll bars
Indicates a long list.
Move within lists by turning the control knob
Input field
Information that can be changed using the letter/number speller
=> page 117 or the MMI touch > page 712.
Cell phone signal
strength bars
Cell phone network signal strength for a connected cell phone
=> page 128.
MMI touch Operation using the MMI touch control pad is possible.
Selection list
Settings for the selected function that are accessed by pressing the
control knob.
@©@|@
|O}
@|O/]@
|
©
|O|O
Check boxes
You can switch certain functions on © or off
trol knob.
by pressing the con-
120
Page 166 of 280
Radio
Radio
Opening the radio
@ =
CEUs AEP
89.9 _WIBI-FM HD4
WIBI-FM HD6
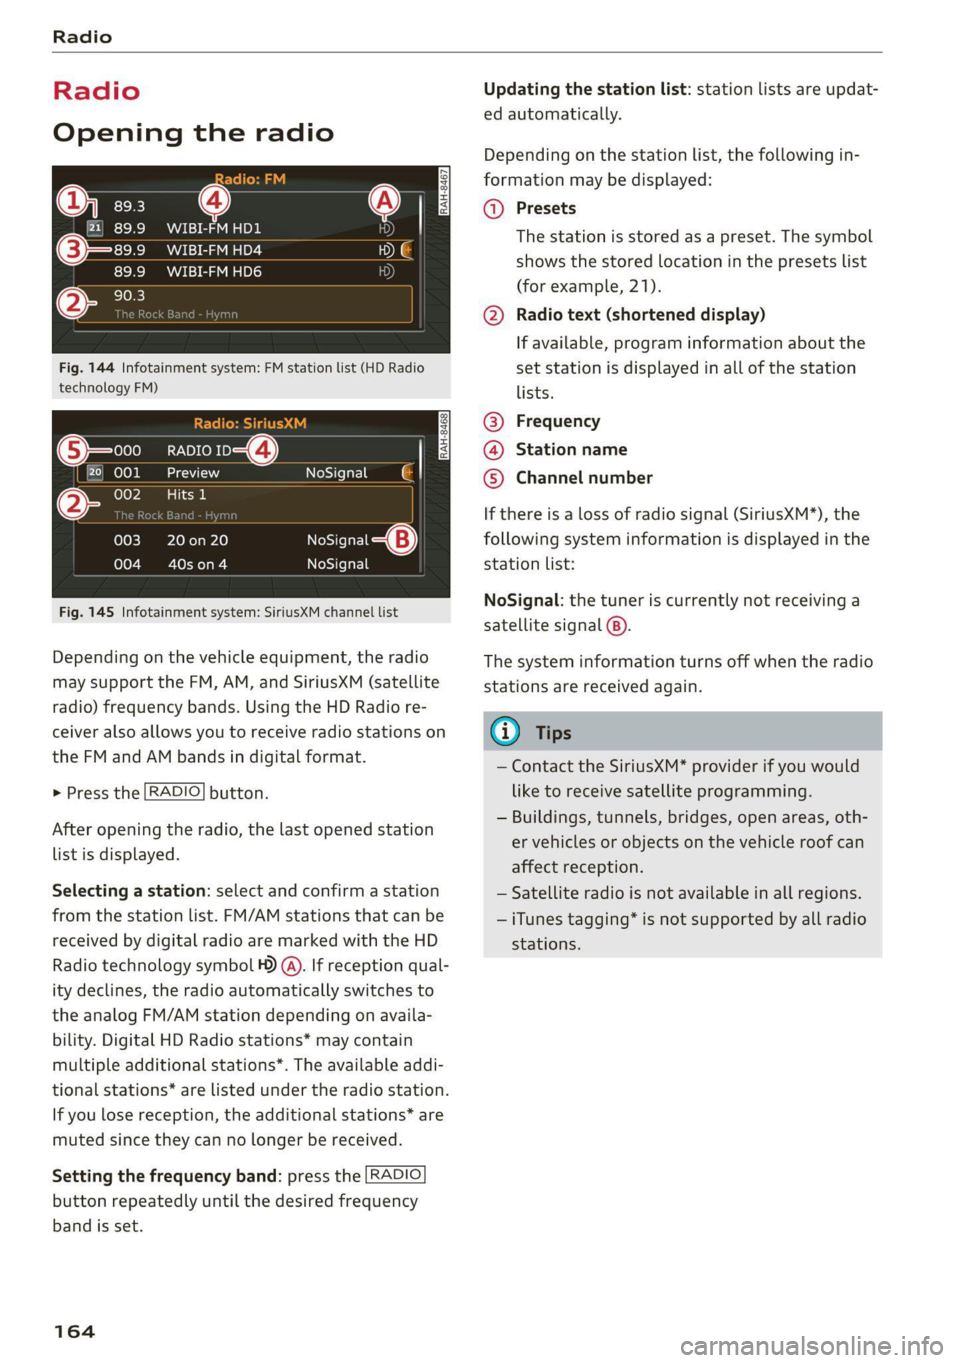
Fig. 144 Infotainment system: FM station list (HD Radio
technology FM)
RADIO ro 4)
kad
ieee
NoSignal é |
20 on 20
Cowon)
NoSigna
NoSignal
Fig. 145 Infotainment system: SiriusXM channel list
Depending on the vehicle equipment, the radio
may support the FM, AM, and SiriusXM (satellite
radio) frequency bands. Using the HD Radio re-
ceiver also allows you to receive radio stations on
the FM and AM bands in digital format.
> Press the [RADIO] button.
After opening the radio, the last opened station
list is displayed.
Selecting a station: select and confirm a station
from the station list. FM/AM stations that can be
received by digital radio are marked with the HD
Radio technology symbol ) (A). If reception qual-
ity declines, the radio automatically switches to
the analog FM/AM station depending on availa-
bility. Digital HD Radio stations* may contain
multiple additional stations*. The available addi-
tional stations* are listed under the radio station.
If you lose reception, the additional stations* are
muted since they can no longer be received.
Setting the frequency band: press the [RADIO
button repeatedly until the desired frequency
band is set.
164
Updating the station list: station lists are updat-
ed automatically.
Depending on the station list, the following in-
formation may be displayed:
@ Presets
The station is stored as a preset. The symbol
shows the stored location in the presets list
(for example, 21).
@ Radio text (shortened display)
If available, program information about the
set station is displayed in all of the station
lists.
@ Frequency
@® Station name
© Channel number
If there is a loss of radio signal (SiriusXM*), the
following system information is displayed in the
station list:
NoSignal: the tuner is currently not receiving a
satellite signal ®).
The system information turns off when the radio
stations are received again.
@) Tips
— Contact the SiriusXM* provider if you would
like to receive satellite programming.
— Buildings, tunnels, bridges, open areas, oth-
er vehicles or objects on the vehicle roof can
affect reception.
— Satellite radio is not available in all regions.
— iTunes tagging* is not supported by all radio
stations.
Page 191 of 280
![AUDI TT 2021 Owner´s Manual 8S1012721BE
System settings
System settings
Setting the date and
time
You can set the clock time manually or using the
GPS.
> Select: [MENU] button > Settings > left control
button > AUDI TT 2021 Owner´s Manual 8S1012721BE
System settings
System settings
Setting the date and
time
You can set the clock time manually or using the
GPS.
> Select: [MENU] button > Settings > left control
button >](/img/6/40287/w960_40287-190.png)
8S1012721BE
System settings
System settings
Setting the date and
time
You can set the clock time manually or using the
GPS.
> Select: [MENU] button > Settings > left control
button > MMI settings > Date & time, or:
> Select: [MENU] button > Vehicle > left control
button > Vehicle settings > Date & time.
Automatic setting
When this function is switched on ¥, the time
and date are automatically set.
Time
Requirement: the Automatic setting must be
switched off.
Press the control knob. You can set the Time
manually by turning and pressing the control
knob.
Date
Requirement: the Automatic setting must be
switched off.
Press the control knob. You can set the Date
manually by turning and pressing the control
knob.
Time zone
When selecting the appropriate time zone, a
sampling of countries in this zone will be listed.
Automatic time zone*
When this function is switched on MW, the time
will automatically adjust to the corresponding
time zone.
Time format
If you select 24h, the clock will display, for exam-
ple, 13:00. If you select AM/PM, the clock will
display, for example, 1:00 PM.
1) The Qi standard makes it possible to charge your mobile
device wirelessly.
Date format
If you select DD.MM.YYYY, the date display will
show, for example, 31.03.2020. If you select
MM/DD/YYVY, the date display will show, for ex-
ample, 03/31/2020. If you select YYYY-MM-DD,
the date display will show, for example,
3/31/2020.
MMI settings
> Select: [MENU] button > Settings > left control
button > MMI settings.
Language
You can change the display language as well as
the language for the voice guidance* and voice
recognition system*.
The number of languages available depends on
the country.
Measurement units
The following measurement units can be set de-
pending on availability: Speed, Distance, Tem-
perature, Fuel consumption, Volume, Pressure.
Mobile device reminder signal
Applies to: vehicles with Audi phone box
Requirement: your cell phone must be Qi-capa-
ble ) or connected to the Audi music interface @
with a USB adapter cable > page 730, fig. 130.
When the device reminder signal is switched on,
you will be notified that your mobile device is still
in the Audi phone box when you leave the vehicle.
You can select between Spoken cue, Signal tone
and Off.
Mobile device reminder signal volume: you can
adjust the reminder signal volume by turning the
control knob.
Switch off pop-up: when the function is switched
on [M, the messages in the Infotainment system
display regarding the charging status of your cell
phone in the Audi phone box are hidden. The re-
minder not to forget your cell phone when leav-
ing the vehicle is also switched off.
189
Page 195 of 280
8S1012721BE
System settings
on the software contained in the MMI and the
licensing agreement.
Sound settings
The sound distribution and volume of the MMI
can be adjusted individually. The settings depend
on the vehicle equipment.
> Select: [MENU] button > Sound > left control
button > Entertainment.
Treble/Bass
You can adjust the Treble and Bass settings by
turning the control knob. The changed settings
only apply for the audio source that is active at
the time. This allows you to adjust the sound set-
tings for each audio source separately.
Balance/fader (Sound focus)
— Adjusting the sound distribution to the left or
right: press the control knob. Turn the control
knob to the left or right to the desired position.
— Adjusting the sound distribution to the front
or rear: press the control knob again. Turn the
control knob to the left or right to the desired
position.
— Adjusting the sound distribution using the
MMI touch: move your finger on the MMI touch
control panel in the desired direction.
Sound effects
Select and confirm a Focus setting:
— All: all speakers in the vehicle are active (sym-
metrical sound distribution).
— Front: only the speakers in the front of the ve-
hicle are active.
Speed dependent volume control
Turn the control knob to adjust the playback vol-
ume to the noise inside the vehicle.
Volume settings
Adjusting the volume
The volume of an audio source or a system mes-
sage (for example, from the voice recognition
system*) can be adjusted directly while the sound
is playing using the On/Off knob.
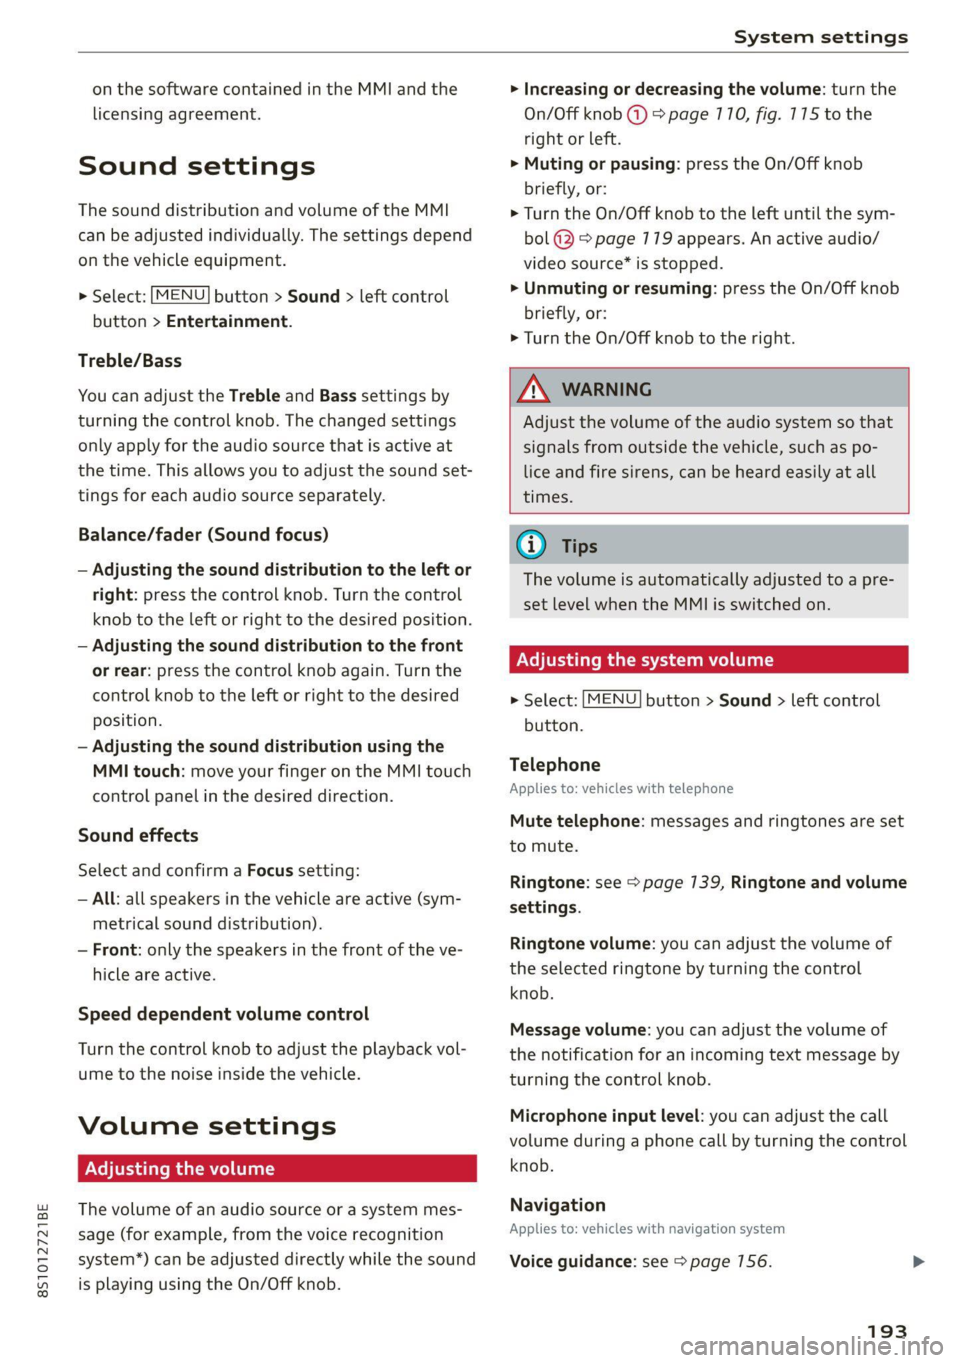
> Increasing or decreasing the volume: turn the
On/Off knob (2) > page 170, fig. 175 to the
right or left.
> Muting or pausing: press the On/Off knob
briefly, or:
> Turn the On/Off knob to the left until the sym-
bol @ > page 779 appears. An active audio/
video source* is stopped.
> Unmuting or resuming: press the On/Off knob
briefly, or:
> Turn the On/Off knob to the right.
ZA\ WARNING
Adjust the volume of the audio system so that
signals from outside the vehicle, such as po-
lice and fire sirens, can be heard easily at all
times.
@ Tips
The volume is automatically adjusted to a pre-
set level when the MMI is switched on.
Adjusting the system volume
> Select: [MENU] button > Sound > left control
button.
Telephone
Applies to: vehicles with telephone
Mute telephone: messages and ringtones are set
to mute.
Ringtone: see > page 139, Ringtone and volume
settings.
Ringtone volume: you can adjust the volume of
the selected ringtone by turning the control
knob.
Message volume: you can adjust the volume of
the notification for an incoming text message by
turning the control knob.
Microphone input level: you can adjust the call
volume during a phone call by turning the control
knob.
Navigation
Applies to: vehicles with navigation system
Voice guidance: see > page 156.
193
Page 196 of 280
System settings
Voice guidance during phone call: see
=> page 156.
Voice guidance volume: you can adjust the voice
guidance volume by turning the control knob or
you can adjust it while route guidance is active by
turning the On/Off knob.
Entertainment fader: the volume of audio play-
back can be temporarily lowered when the park-
ing system or voice guidance is active.
Voice recognition system
Applies to: vehicles with voice recognition system
Short dialog: see > page 190.
Speech dialog system volume: see > page 190.
Parking aid*
You can adjust the volume of the signal tone by
turning the control knob.
— Adjusting the Front volume: select and con-
firm
High, Medium or Low.
— Adjusting the Rear volume: select and confirm
High, Medium or Low.
MMI touch*
Turn the control knob to adjust the volume of the
spoken prompts from the MMI touch*.
Audi Heartbeat
You can adjust the volume of Audi Heartbeat by
turning the control knob.
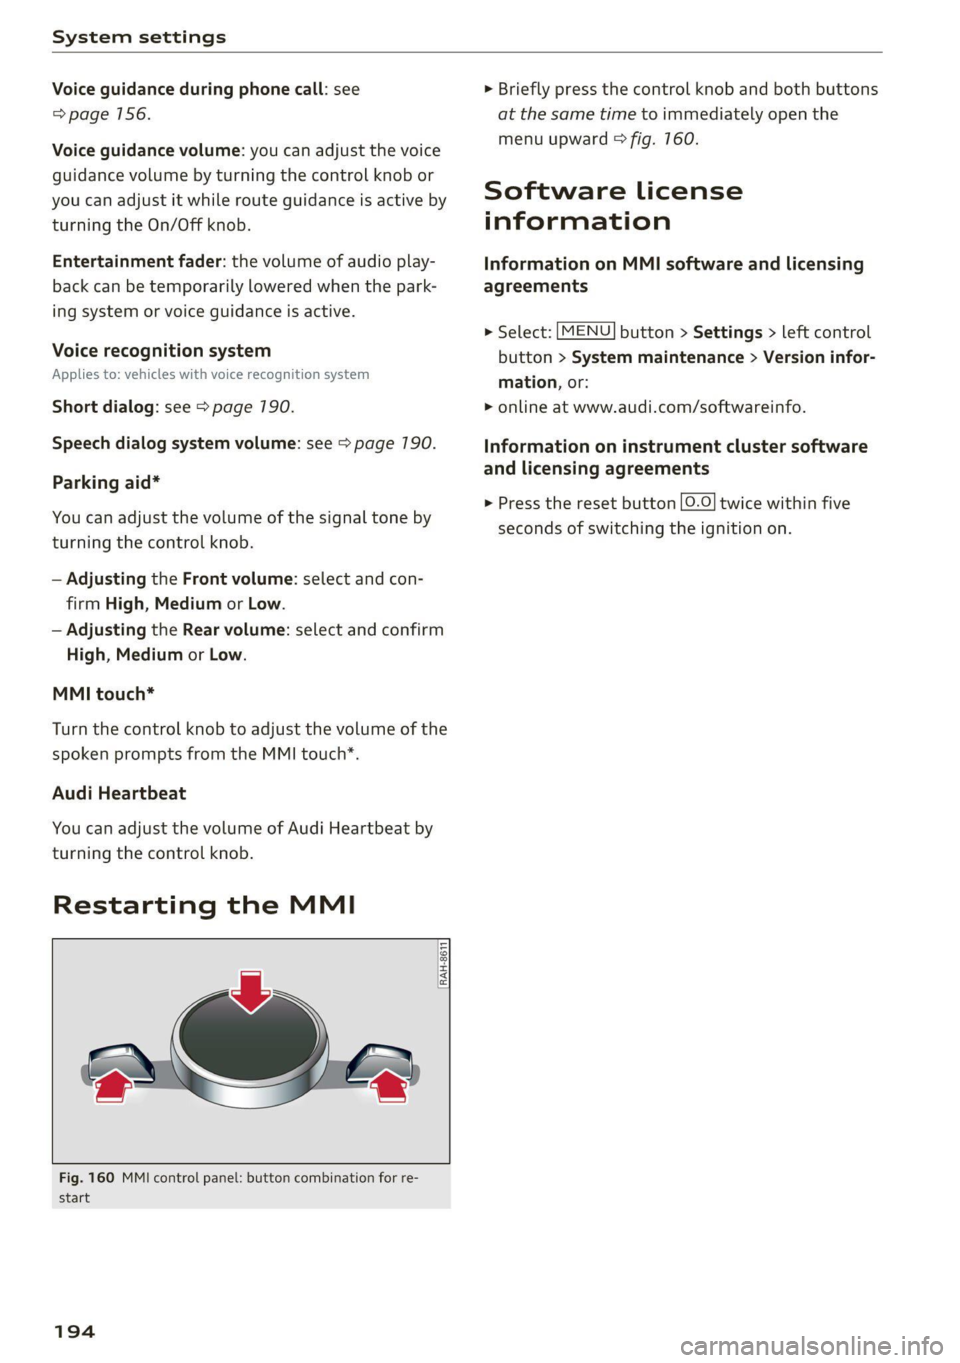
Restarting the MMI
RAH-8611
wv
= ‘=
Fig. 160 MMI control panel: button combination for re-
start
194
> Briefly press the control knob and both buttons
at the same time to immediately open the
menu upward > fig. 760.
Software License
information
Information on MMI software and licensing
agreements
> Select: [MENU] button > Settings > left control
button > System maintenance > Version infor-
mation, or:
> online at www.audi.com/softwareinfo.
Information on instrument cluster software
and licensing agreements
> Press the reset button |O.O} twice within five
seconds of switching the ignition on.