ESP AUDI TT 2021 Owner´s Manual
[x] Cancel search | Manufacturer: AUDI, Model Year: 2021, Model line: TT, Model: AUDI TT 2021Pages: 280, PDF Size: 99.18 MB
Page 7 of 280
8S1012721BE
About this Owner's Manual
In this manual, Audi provides important informa-
tion, tips, suggestions, and warnings for using
your vehicle. “Audi” refers to AUDI AG, the re-
spective importer in a country, as well as joint
ventures.
It has always been Audi's policy to continuously
improve its products. Audi reserves the right to
make changes in design and specifications, and
to make additions or improvements in its prod-
ucts without incurring any obligation to install
them on products previously manufactured. This
owner's manual is based on the current data
available when it was printed. Text, illustrations,
and specifications in this owner's manual are
based on the most current information available
at the time of printing, and shall not constitute a
basis for liability claims.
KEEP THIS GUIDE
Keep this manual and any other applicable docu-
ments in your vehicle at all times. This is espe-
cially important if you loan your vehicle to others
or sell it.
This owner's manual describes the equipment
range for all model versions of this vehicle at the
time of printing. Individual equipment options
described may only be available at a later date or
may only be offered in certain countries.
Some sections in this manual do not apply to all
vehicles. When this is the case, the beginning of
the section indicates the validity, for example
“Applies to: vehicles with speed warning sys-
tem”. Optional or vehicle-specific equipment is
ugn also identified with an asterisk “*”.
The illustrations in this manual are a guide.
Some of the details in your vehicle may differ
from the illustration.
All directions, such as “Left”, “right”, “front” and
“rear”, are based on the vehicle's direction of
travel.
* — Optional or vehicle-specific equipment
> The section continues on the next page.
=> A\ Cross reference to a “WARNING” within a
section. If a page number is indicated, the
WARNING is located outside of the section.
ZA WARNING
Text with this symbol contains information
about safety and how to reduce the risk of se-
rious personal injury or death.
@) Note
Text with this symbol contains information
about reducing the risk of damage to your ve-
hicle.
@) For the sake of the environment
Text with this symbol contains information on
protecting the environment.
@) Tips
Text with this symbol contains additional use-
ful information.
Page 15 of 280
8S1012721BE
Instrument cluster
@ Left thumbwheel ing the left thumbwheel (for example, sound
— Selecting a function in a menu/lList: turn the settings).
left thumbwheel to the desired function ina
menu or list (such as selecting a station, Lap Baas
times*).
— Confirming a selection: press the left thumb-
wheel (for example, confirm the station).
— Zooming in or out on the map: when a map is
displayed, turn the left thumbwheel up/down
to zoom in/out on the map. E 3:50"
2/17/2019
RAH-8025|
SO
PATTIE
es
Pes
era
tte
2/17/2019
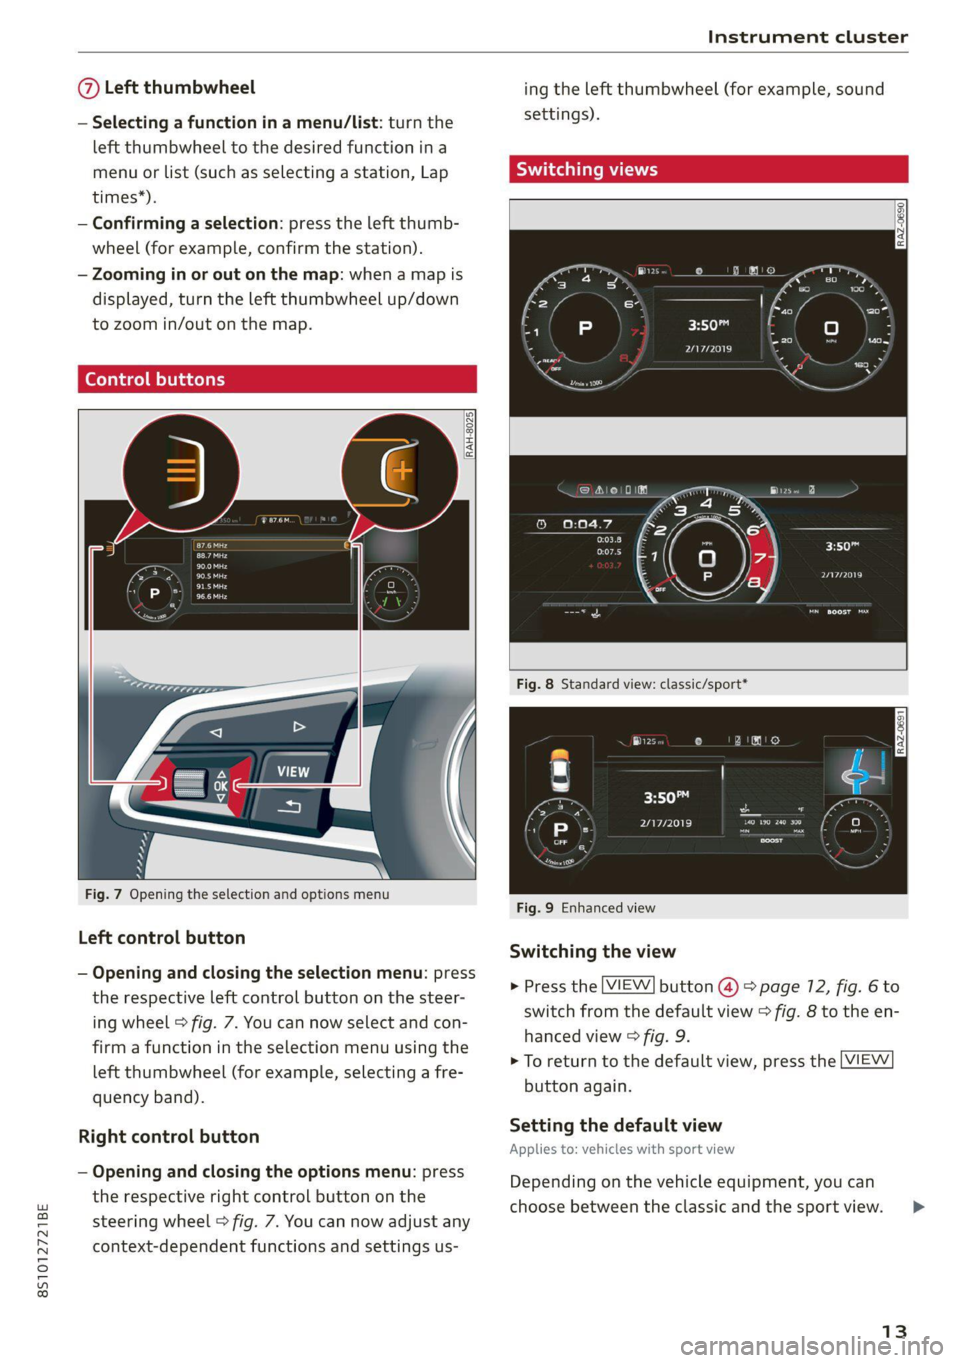
Fig. 7 Opening the selection and options menu
Fig. 9 Enhanced view
Left trol butt
ens contro’ purron Switching the view
— Opening and closing the selection menu: press
the respective left control button on the steer-
ing wheel > fig. 7. You can now select and con-
firm a function in the selection menu using the
left thumbwheel (for example, selecting a fre-
quency band).
> Press the [VIEW] button @) > page 12, fig. 6 to
switch from the default view > fig. 8 to the en-
hanced view © fig. 9.
> To return to the default view, press the [VIEW
button again.
Setting the default view
Right control button . " .
Applies to: vehicles with sport view
— Opening and closing the options menu: press
the respective right control button on the
steering wheel > fig. 7. You can now adjust any
context-dependent functions and settings us-
Depending on the vehicle equipment, you can
choose between the classic and the sport view. >
13
Page 23 of 280
8S1012721BE
Opening and closing
> Slide the battery holder carefully into the re-
mote control key.
> Insert the mechanical key.
ZA WARNING
If batteries or coin cell batteries are swal-
lowed or enter the body in any other way, they
can cause serious or fatal injuries within a
short period of time. There is a risk of chemi-
cal burns.
— Keep vehicle keys and key fobs with batter-
ies out of the reach of children.
— Keep new or used batteries away from chil-
dren.
— If the battery compartment on a vehicle key
does not close securely, stop using the key
and keep it away from children.
— Seek medical attention immediately if you
suspect that a battery was swallowed or has
entered the body in any other way.
@) For the sake of the environment
‘& Discharged batteries must be disposed of
using methods that will not harm the environ-
ment. Do not dispose of them in household
trash. They contain harmful substances and
recyclable raw materials. Contact an author-
ized Audi dealer or authorized Audi Service
Facility for more information.
@® Tips
Replacement batteries for the remote control
key must meet the same specifications as the
original battery.
OT Cle diate MLM Cle Cie M Mee meelil cel |
BFV-0240
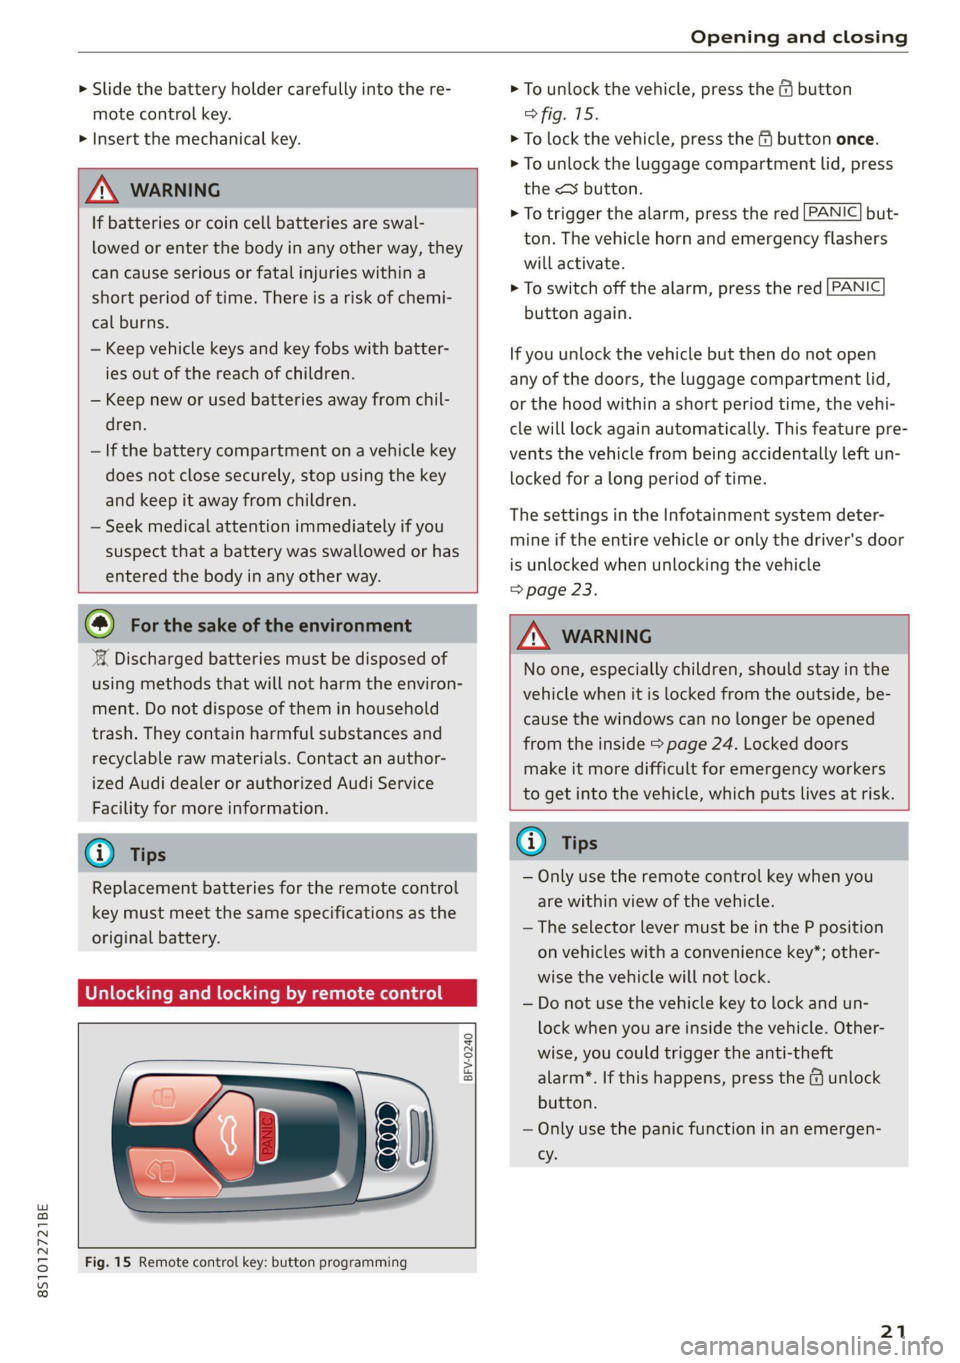
Fig. 15 Remote control key: button programming
> To unlock the vehicle, press the @ button
> fig. 15.
> To lock the vehicle, press the & button once.
> To unlock the luggage compartment lid, press
the < button.
> To trigger the alarm, press the red but-
ton. The vehicle horn and emergency flashers
will activate.
> To switch off the alarm, press the red
button again.
PANIC
PANIC
If you unlock the vehicle but then do not open
any of the doors, the luggage compartment lid,
or the hood within a short period time, the vehi-
cle will lock again automatically. This feature pre-
vents the vehicle from being accidentally left un-
locked for a long period of time.
The settings in the Infotainment system deter-
mine if the entire vehicle or only the driver's door
is unlocked when unlocking the vehicle
> page 23.
Z\ WARNING
No one, especially children, should stay in the
vehicle when it is locked from the outside, be-
cause the windows can no longer be opened
from the inside > page 24. Locked doors
make it more difficult for emergency workers
to get into the vehicle, which puts lives at risk.
@ Tips
— Only use the remote control key when you
are within view of the vehicle.
— The selector lever must be in the P position
on vehicles with a convenience key*; other-
wise the vehicle will not lock.
— Do not use the vehicle key to lock and un-
lock when you are inside the vehicle. Other-
wise, you could trigger the anti-theft
alarm. If this happens, press the fj unlock
button.
— Only use the panic function in an emergen-
cy.
21
Page 24 of 280
Opening and closing
Unlocking and locking with the
oT Bcd
Applies to: vehicles with convenience key
The doors and luggage compartment lid can be
unlocked and locked without using the remote
control key.
BFV-0007
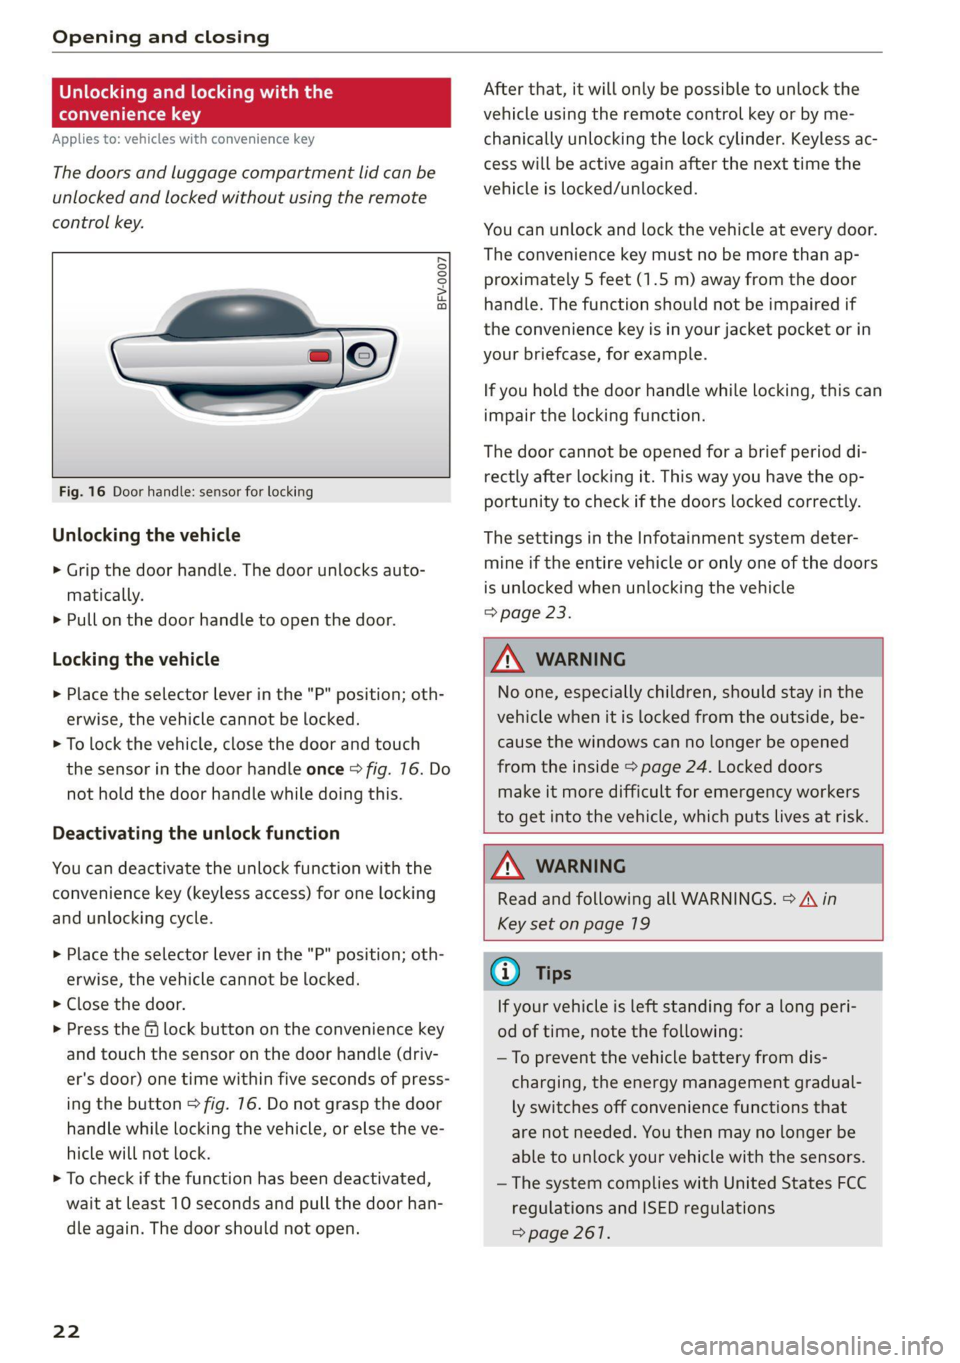
Fig. 16 Door handle: sensor for locking
Unlocking the vehicle
> Grip the door handle. The door unlocks auto-
matically.
> Pull on the door handle to open the door.
Locking the vehicle
> Place the selector lever in the "P" position; oth-
erwise, the vehicle cannot be locked.
> To lock the vehicle, close the door and touch
the sensor in the door handle once > fig. 76. Do
not hold the door handle while doing this.
Deactivating the unlock function
You can deactivate the unlock function with the
convenience key (keyless access) for one locking
and unlocking cycle.
> Place the selector lever in the "P" position; oth-
erwise, the vehicle cannot be locked.
> Close the door.
> Press the f lock button on the convenience key
and touch the sensor on the door handle (driv-
er's door) one time within five seconds of press-
ing the button > fig. 16. Do not grasp the door
handle while locking the vehicle, or else the ve-
hicle will not lock.
> To check if the function has been deactivated,
wait at least 10 seconds and pull the door han-
dle again. The door should not open.
22
After that, it will only be possible to unlock the
vehicle using the remote control key or by me-
chanically unlocking the lock cylinder. Keyless ac-
cess will be active again after the next time the
vehicle is locked/unlocked.
You can unlock and lock the vehicle at every door.
The convenience key must no be more than ap-
proximately 5 feet (1.5 m) away from the door
handle. The function should not be impaired if
the convenience key is in your jacket pocket or in
your briefcase, for example.
If you hold the door handle while locking, this can
impair the locking function.
The door cannot be opened for a brief period di-
rectly after locking it. This way you have the op-
portunity to check if the doors locked correctly.
The settings in the Infotainment system deter-
mine if the entire vehicle or only one of the doors
is unlocked when unlocking the vehicle
=> page 23.
ZA WARNING
No one, especially children, should stay in the
vehicle when it is locked from the outside, be-
cause the windows can no longer be opened
from the inside > page 24. Locked doors
make it more difficult for emergency workers
to get into the vehicle, which puts lives at risk.
Z\ WARNING
Read and following all WARNINGS. > A\ in
Key set on page 19
G) Tips
If your vehicle is left standing for a long peri-
od of time, note the following:
—To prevent the vehicle battery from dis-
charging, the energy management gradual-
ly switches off convenience functions that
are not needed. You then may no longer be
able to unlock your vehicle with the sensors.
— The system complies with United States FCC
regulations and ISED regulations
=> page 267.
Page 25 of 280
8S1012721BE
Opening and closing
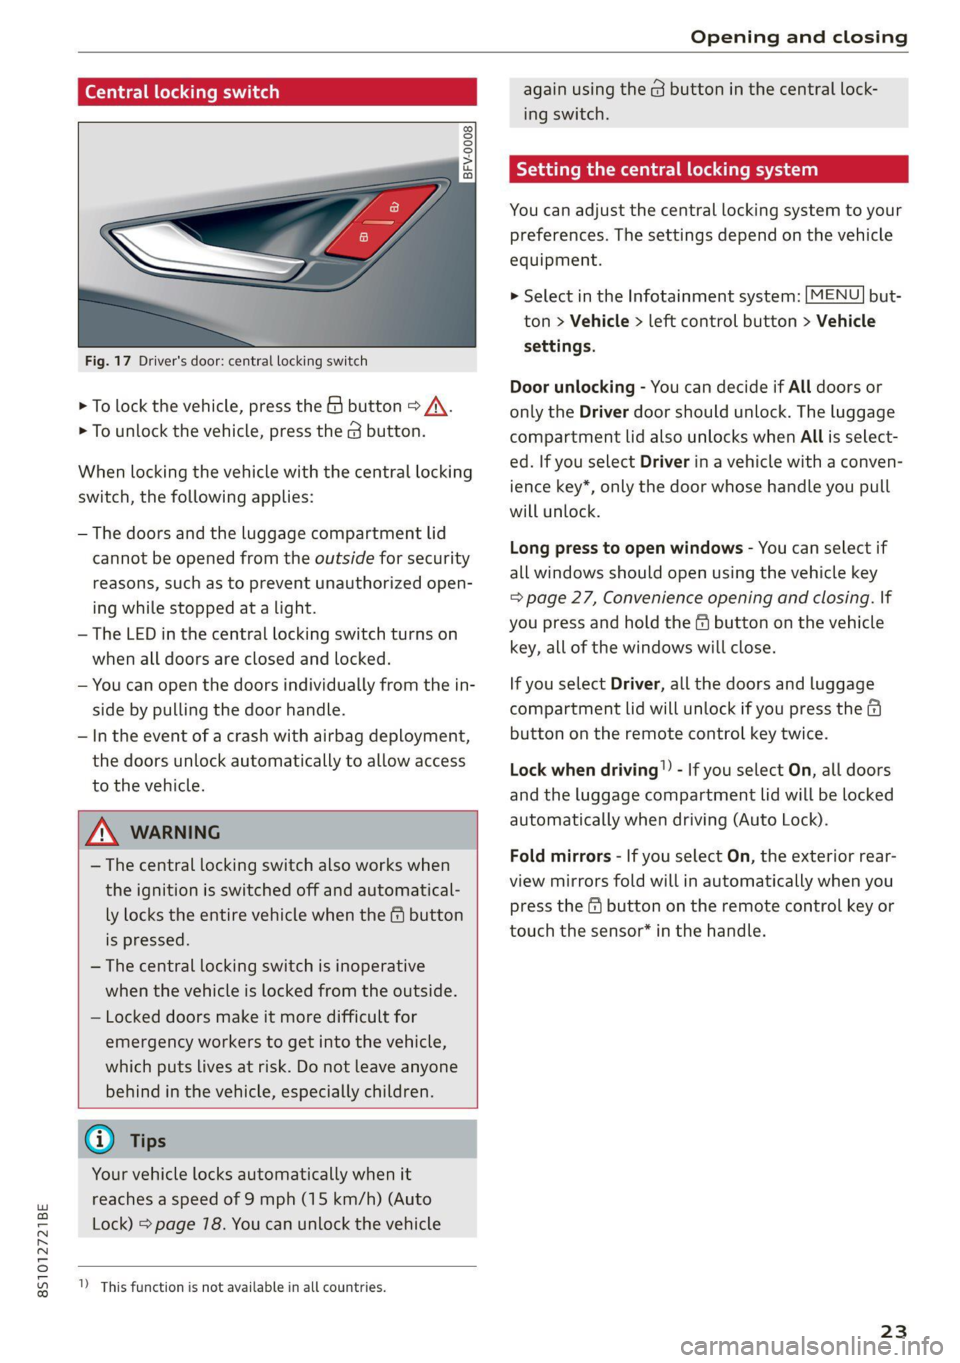
Central locking switch
@ 3 S
g| > cz oo.
Fig. 17 Driver's door: central locking switch
> To lock the vehicle, press the & button > /\.
> To unlock the vehicle, press the @ button.
When locking the vehicle with the central locking
switch,
the following applies:
— The doors and the luggage compartment lid
cannot be opened from the outside for security
reasons, such as to prevent unauthorized open-
ing while stopped at a light.
— The LED in the central locking switch turns on
when all doors are closed and locked.
— You can open the doors individually from the in-
side by pulling the door handle.
— In the event of a crash with airbag deployment,
the doors unlock automatically to allow access
to the vehicle.
ZX WARNING
— The central locking switch also works when
the ignition is switched off and automatical-
ly locks the entire vehicle when the & button
is pressed.
— The central locking switch is inoperative
when the vehicle is locked from the outside.
— Locked doors make it more difficult for
emergency workers to get into the vehicle,
which puts lives at risk. Do not leave anyone
behind in the vehicle, especially children.
@ Tips
Your vehicle locks automatically when it
reaches a speed of 9 mph (15 km/h) (Auto
Lock) > page 78. You can unlock the vehicle
)) This function is not available in all countries.
again using the @ button in the central lock-
ing switch.
tting the central locking system
You can adjust the central locking system to your
preferences. The settings depend on the vehicle
equipment.
> Select in the Infotainment system: [MENU] but-
ton > Vehicle > left control button > Vehicle
settings.
Door unlocking - You can decide if All doors or
only the Driver door should unlock. The luggage
compartment lid also unlocks when All is select-
ed. If you select Driver in a vehicle with a conven-
ience key*, only the door whose handle you pull
will unlock.
Long press to open windows - You can select if
all windows should open using the vehicle key
= page 27, Convenience opening and closing. lf
you press and hold the & button on the vehicle
key, all of the windows will close.
If you select Driver, all the doors and luggage
compartment lid will unlock if you press the @
button on the remote control key twice.
Lock when driving!) - If you select On, all doors
and the luggage compartment lid will be locked
automatically when driving (Auto Lock).
Fold mirrors - If you select On, the exterior rear-
view mirrors fold will in automatically when you
press the fq button on the remote control key or
touch the sensor* in the handle.
23
Page 27 of 280
8S1012721BE
Opening and closing
interior/towing protection monitoring alarm to
prevent the alarm from being triggered:
> Press the fj button on the remote control key a
second time within 2 seconds. Or
> Applies to: vehicles with convenience key:
Touch the sensor on the door handle a second
time within two seconds. Or
> Turn the mechanical key in the door lock to the
close position a second time within two sec-
onds.
> If you lock the vehicle, then the interior/towing
protection monitor will stay off until the next
time the vehicle is unlocked.
@) Tips
The interior/towing protection monitoring on-
ly functions correctly when the windows and
the power top* are closed.
Luggage compartment
lid
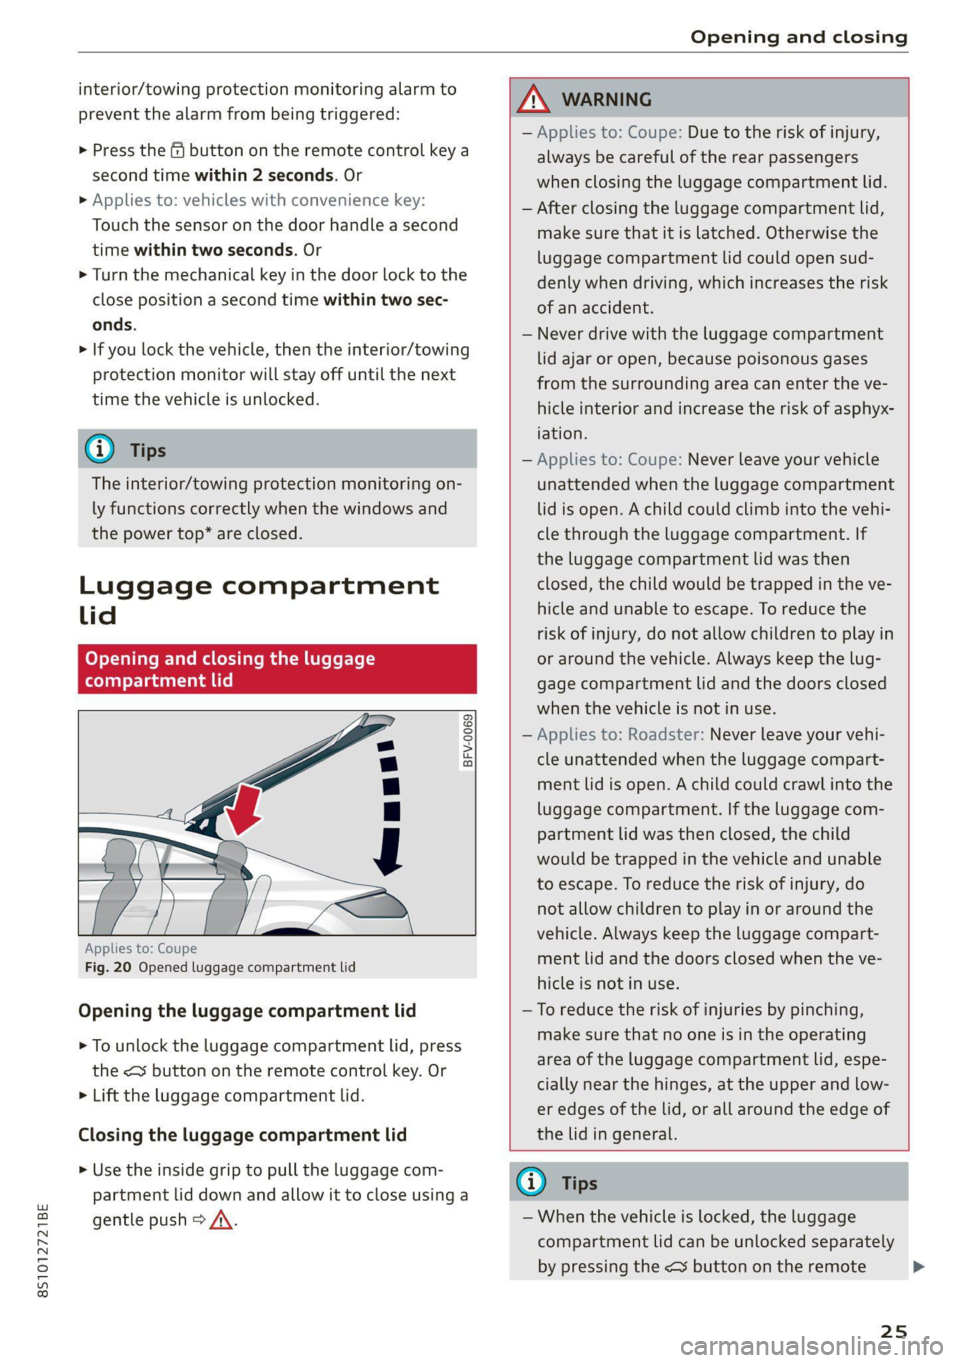
Opening and closing the luggage
compartment lid
BFV-0069
Applies to: Coupe
Fig. 20 Opened luggage compartment lid
Opening the luggage compartment lid
> To unlock the luggage compartment lid, press
the < button on the remote control key. Or
> Lift the luggage compartment lid.
Closing the luggage compartment lid
> Use the inside grip to pull the luggage com-
partment lid down and allow it to close using a
gentle push > /\.
ZA WARNING
— Applies to: Coupe: Due to the risk of injury,
always be careful of the rear passengers
when closing the luggage compartment lid.
— After closing the luggage compartment lid,
make sure that it is latched. Otherwise the
luggage compartment lid could open sud-
denly when driving, which increases the risk
of an accident.
— Never drive with the luggage compartment
lid ajar or open, because poisonous gases
from the surrounding area can enter the ve-
hicle interior and increase the risk of asphyx-
iation.
— Applies to: Coupe: Never leave your vehicle
unattended when the luggage compartment
lid is open. A child could climb into the vehi-
cle through the luggage compartment. If
the luggage compartment lid was then
closed, the child would be trapped in the ve-
hicle and unable to escape. To reduce the
risk of injury, do not allow children to play in
or around the vehicle. Always keep the lug-
gage compartment lid and the doors closed
when the vehicle is not in use.
— Applies to: Roadster: Never leave your vehi-
cle unattended when the luggage compart-
ment lid is open. A child could crawl into the
luggage compartment. If the luggage com-
partment lid was then closed, the child
would be trapped in the vehicle and unable
to escape. To reduce the risk of injury, do
not allow children to play in or around the
vehicle. Always keep the luggage compart-
ment lid and the doors closed when the ve-
hicle is not in use.
—To reduce the risk of injuries by pinching,
make sure that no one is in the operating
area of the luggage compartment lid, espe-
cially near the hinges, at the upper and low-
er edges of the lid, or all around the edge of
the lid in general.
@ Tips
— When the vehicle is locked, the luggage
compartment lid can be unlocked separately
by pressing the <3 button on the remote
25
>
Page 38 of 280
Lights and Vision
Lights and Vision
Exterior lighting
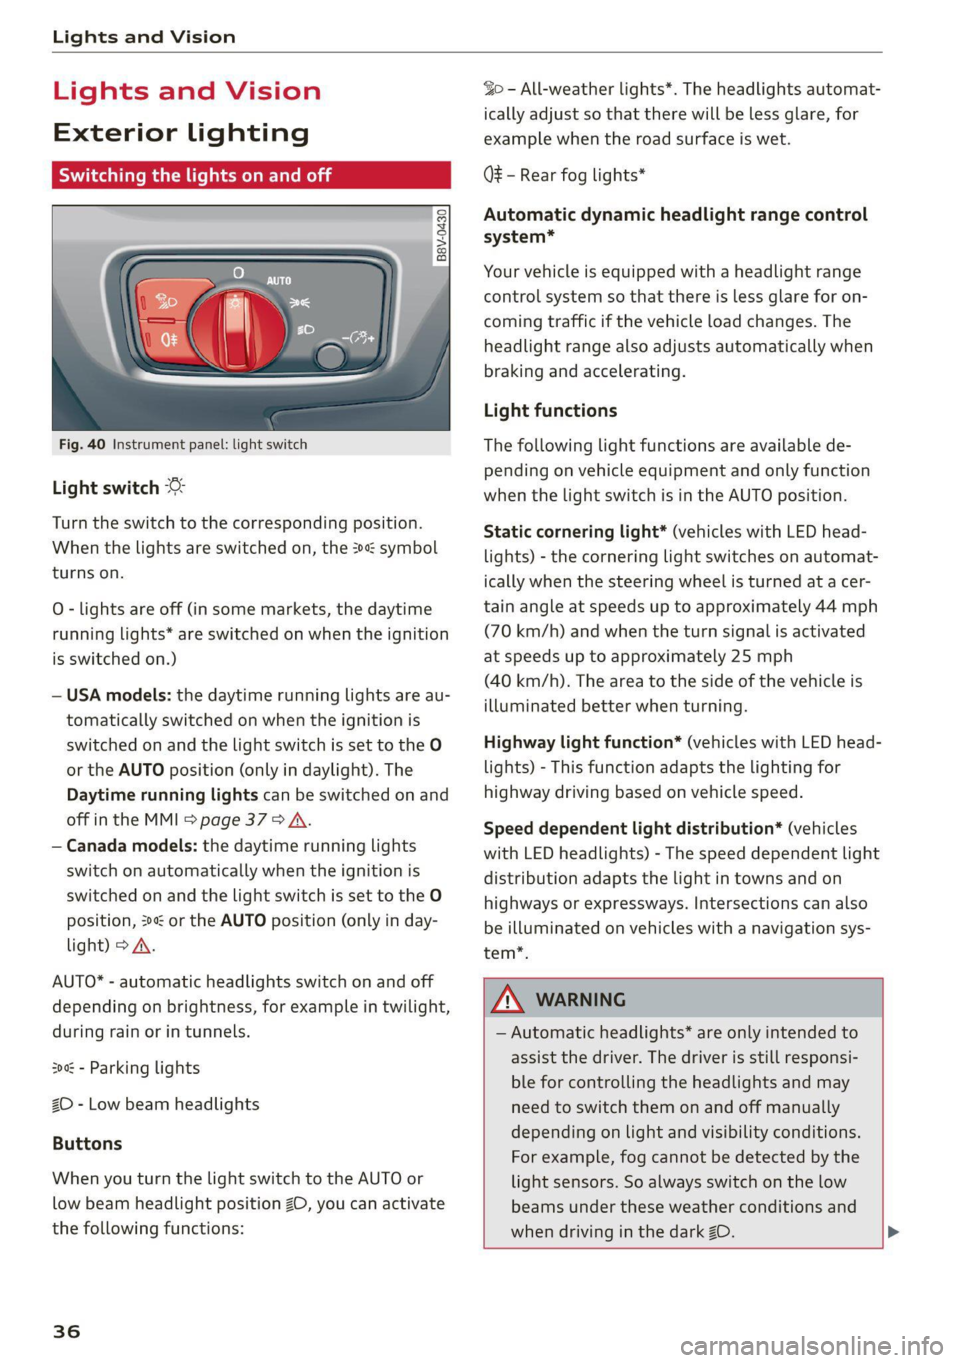
Switching the lights on and off
B8V-0430
Fig. 40 Instrument panel: light switch
Light switch ©
Turn the switch to the corresponding position.
When the lights are switched on, the »« symbol
turns on.
O - lights are off (in some markets, the daytime
running lights* are switched on when the ignition
is switched on.)
— USA models: the daytime running lights are au-
tomatically switched on when the ignition is
switched on and the light switch is set to the O
or the AUTO position (only in daylight). The
Daytime running lights can be switched on and
off in the MMI > page 37 > A.
— Canada models: the daytime running lights
switch on automatically when the ignition is
switched on and the light switch is set to the O
position, 24 or the AUTO position (only in day-
light) > A.
AUTO* - automatic headlights switch on and off
depending on brightness, for example in twilight,
during rain or in tunnels.
30a - Parking lights
2D - Low beam headlights
Buttons
When you turn the light switch to the AUTO or
low beam headlight position 20, you can activate
the following functions:
36
So - All-weather lights*. The headlights automat-
ically adjust so that there will be less glare, for
example when the road surface is wet.
Q# - Rear fog lights*
Automatic dynamic headlight range control
system*
Your vehicle is equipped with a headlight range
control system so that there is less glare for on-
coming traffic if the vehicle load changes. The
headlight range also adjusts automatically when
braking and accelerating.
Light functions
The following light functions are available de-
pending on vehicle equipment and only function
when the light switch is in the AUTO position.
Static cornering light* (vehicles with LED head-
lights) - the cornering light switches on automat-
ically when the steering wheel is turned at a cer-
tain angle at speeds up to approximately 44 mph
(70 km/h) and when the turn signal is activated
at speeds up to approximately 25 mph
(40 km/h). The area to the side of the vehicle is
illuminated better when turning.
Highway light function* (vehicles with LED head-
lights) - This function adapts the lighting for
highway driving based on vehicle speed.
Speed dependent light distribution* (vehicles
with LED headlights) - The speed dependent light
distribution adapts the light in towns and on
highways or expressways. Intersections can also
be illuminated on vehicles with a navigation sys-
tem*.
ZA WARNING
— Automatic headlights* are only intended to
assist the driver. The driver is still responsi-
ble for controlling the headlights and may
need to switch them on and off manually
depending on light and visibility conditions.
For example, fog cannot be detected by the
light sensors. So always switch on the low
beams under these weather conditions and
when driving in the dark ZO. >
Page 39 of 280
8S1012721BE
Lights and Vision
—To reduce glare for traffic behind your vehi-
cle, the rear fog lights* should only be
turned on in accordance with the legal regu-
lations in the country where you are operat-
ing the vehicle.
— If the battery has been discharging for a
while, the parking light may switch off auto-
matically. Always make sure your vehicle is
parked and adequately illuminated accord-
ing to the legal regulations in the country
where you are operating the vehicle. Avoid
using the parking lights for several hours.
G) Tips
— When using lighting equipment, the driver
is responsible for adhering to any local ap-
plicable regulations while driving and when
parking the vehicle.
— The light sensor for the automatic head-
lights* is in the rearview mirror mount. Do
not place any stickers in this area on the
windshield.
— Some exterior lighting functions can be ad-
justed > page 37.
— In some markets, the tail lights will switch
on when the daytime running lights switch
on.
—In cool or damp weather, the inside of the
headlights, turn signals, and tail lights can
fog over due to the temperature difference
between the inside and outside. They will
clear shortly after switching them on. This
does not affect the service life of the light-
ing.
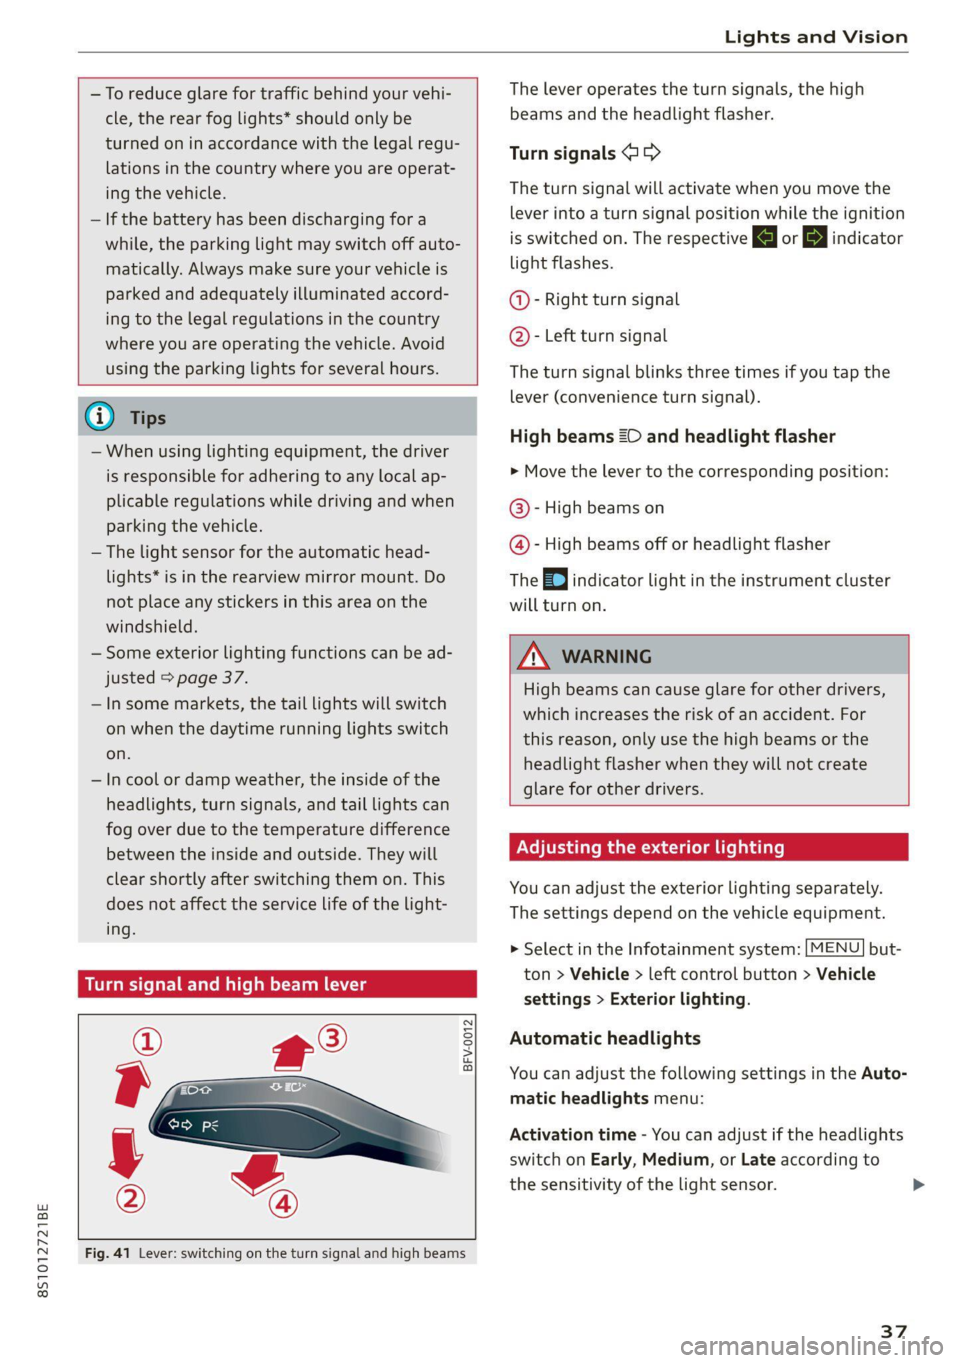
Turn signal and high beam lever
BFV-0012
Fig. 41 Lever: switching on the turn signal and high beams
The lever operates the turn signals, the high
beams and the headlight flasher.
Turn signals >>
The turn signal will activate when you move the
lever into a turn signal position while the ignition
is switched on. The respective a or indicator
light flashes.
@- Right turn signal
@- Left turn signal
The turn signal blinks three times if you tap the
lever (convenience turn signal).
High beams ZO and headlight flasher
> Move the lever to the corresponding position:
@®- High beams on
@- High beams off or headlight flasher
The
EJ indicator light in the instrument cluster
will turn on.
Z\ WARNING
High beams can cause glare for other drivers,
which increases the risk of an accident. For
this reason, only use the high beams or the
headlight flasher when they will not create
glare for other drivers.
Adjusting the exterior lighting
You can adjust the exterior lighting separately.
The settings depend on the vehicle equipment.
> Select in the Infotainment system: [MENU] but-
ton > Vehicle > left control button > Vehicle
settings > Exterior lighting.
Automatic headlights
You can adjust the following settings in the Auto-
matic headlights menu:
Activation time - You can adjust if the headlights
switch on Early, Medium, or Late according to
the sensitivity of the light sensor.
37
Page 42 of 280
Lights and Vision
if the mirrors fold in automatically when you lock
the vehicle > page 23.
Front passenger's exterior mirror tilt
function*
Requirement: the knob must be in the position
for the front passenger’s exterior mirror.
The mirror surfaces tilt slightly when reverse
gear is selected to provide a better view, for ex-
ample of the edge of the curb.
You can adjust the mirror surface by turning the
knob in the desired direction. When you move
out of reverse and into another gear, the new
mirror position is stored and assigned to the key
you are using.
The mirror goes back into its original position
once you drive forward faster than 9 mph
(15 km/h) or turn the ignition off.
Z\ WARNING
Curved mirror surfaces (convex) enlarge the
field of vision. However, they make objects in
the mirror appear smaller and farther away.
When using these mirrors to estimate your
distance to vehicles behind you when chang-
ing lanes, you could estimate incorrectly,
which increases the risk of an accident.
@) Note
If the mirror housing was moved by force (for
example, by running into an object when ma-
neuvering the vehicle), the mirror must be
folded all the way in using the power folding
function. The mirror housing must not be
moved back into place by hand because this
could impair the function of the mirror mech-
anism.
@ Tips
If the power adjusting function malfunctions,
the glass in both mirrors can be adjusted by
pressing on the edge of it by hand.
40
Palate mwa eceley
Manual
dimming rearview mirror
> Pull the lever on the bottom of the mirror back.
Automatic dimming rearview mirror*
> The interior and exterior mirrors* dim auto-
matically when light shines on them, for exam-
ple from headlights on a vehicle behind you.
Z\ WARNING
Electrolyte fluid can leak from automatic dim-
ming mirrors if the glass is broken. Electrolyte
fluid can irritate skin, eyes and airways.
— Repeated or long-term exposure to electro-
lyte fluid can lead to irritation of the air-
ways, especially in people with asthma or
other respiratory conditions. Take deep
breaths immediately after leaving the vehi-
cle or, if this is not possible, open all of the
doors and windows as wide as possible.
— If electrolyte fluid comes into contact with
the eyes, flush them thoroughly with plenty
of clean water for at least 15 minutes and
then seek medical attention.
— If electrolyte fluid comes into contact with
the skin, flush the affected area with clean
water for at least 15 minutes, and then
clean with soap and water and seek medical
attention. Clean affected clothing and shoes
thoroughly before wearing again.
— If the fluid was swallowed and the person is
conscious, flush the mouth with water for at
least 15 minutes. Do not induce vomiting
unless this is recommended by medical pro-
fessionals. Seek medical attention immedi-
ately.
() Note
If the glass on an automatic dimming mirror
breaks, electrolyte can leak out. This liquid
damages plastic surfaces. Clean this liquid as
quickly as possible, for example with a wet
sponge.
Page 43 of 280
8S1012721BE
Lights and Vision
® Tips
— If the light reaching the rearview mirror is
obstructed, the automatic dimming mirror
will not function correctly,
— The automatic dimming mirrors do not dim
when the interior lighting is turned on or
the reverse gear is selected.
ry Ss cd
> c
o
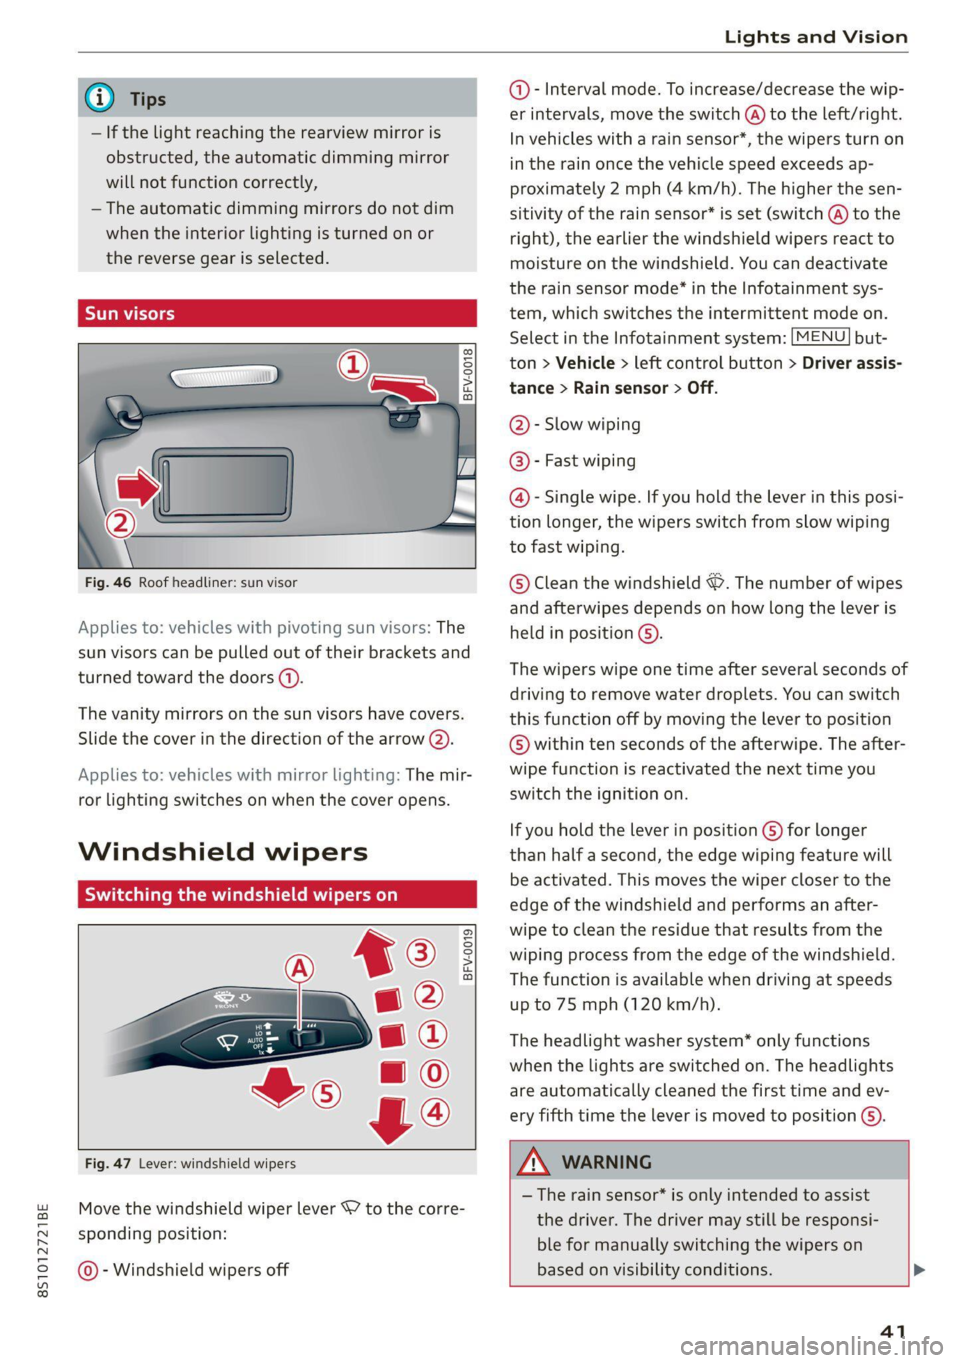
Fig. 46 Roof headliner: sun visor
Applies to: vehicles with pivoting sun visors: The
sun visors can be pulled out of their brackets and
turned toward the doors (4).
The vanity mirrors on the sun visors have covers.
Slide the cover in the direction of the arrow (2).
Applies to: vehicles with mirror lighting: The mir-
ror lighting switches on when the cover opens.
Windshield wipers
Switching the windshield wipers on
BFV-0019
Fig. 47 Lever: windshield wipers
Move the windshield wiper lever SY to the corre-
sponding position:
@ - Windshield wipers off
@- Interval mode. To increase/decrease the wip-
er intervals, move the switch @ to the left/right.
In vehicles with a rain sensor*, the wipers turn on
in the rain once the vehicle speed exceeds ap-
proximately 2 mph (4 km/h). The higher the sen-
sitivity of the rain sensor* is set (switch @) to the
right), the earlier the windshield wipers react to
moisture on the windshield. You can deactivate
the rain sensor mode®* in the Infotainment sys-
tem, which switches the intermittent mode on.
Select in the Infotainment system: [MENU] but-
ton > Vehicle > left control button > Driver assis-
tance > Rain sensor > Off.
@- Slow wiping
@®- Fast wiping
@- Single wipe. If you hold the lever in this posi-
tion longer, the wipers switch from slow wiping
to fast wiping.
© Clean the windshield &. The number of wipes
and afterwipes depends on how long the lever is
held in position ©).
The wipers wipe one time after several seconds of
driving to remove water droplets. You can switch
this function off by moving the lever to position
© within ten seconds of the afterwipe. The after-
wipe function is reactivated the next time you
switch the ignition on.
If you hold the lever in position ) for longer
than half a second, the edge wiping feature will
be activated. This moves the wiper closer to the
edge of the windshield and performs an after-
wipe to clean the residue that results from the
wiping process from the edge of the windshield.
The function is available when driving at speeds
up to 75 mph (120 km/h).
The headlight washer system” only functions
when the lights are switched on. The headlights
are automatically cleaned the first time and ev-
ery fifth time the lever is moved to position ©).
ZX WARNING
— The rain sensor* is only intended to assist
the driver. The driver may still be responsi-
ble for manually switching the wipers on
based on visibility conditions.
41