jack points AUDI TT COUPE 2009 Owners Manual
[x] Cancel search | Manufacturer: AUDI, Model Year: 2009, Model line: TT COUPE, Model: AUDI TT COUPE 2009Pages: 316, PDF Size: 71.16 MB
Page 272 of 316

1111...__W_ h_ a _ t_d_ o_ l _d _o_ n_ o_ vv_ ? ______________________________________________ _
Loosening and tightening the wheel bolts
The wheel bolts must be loosened before raising the
vehicle.
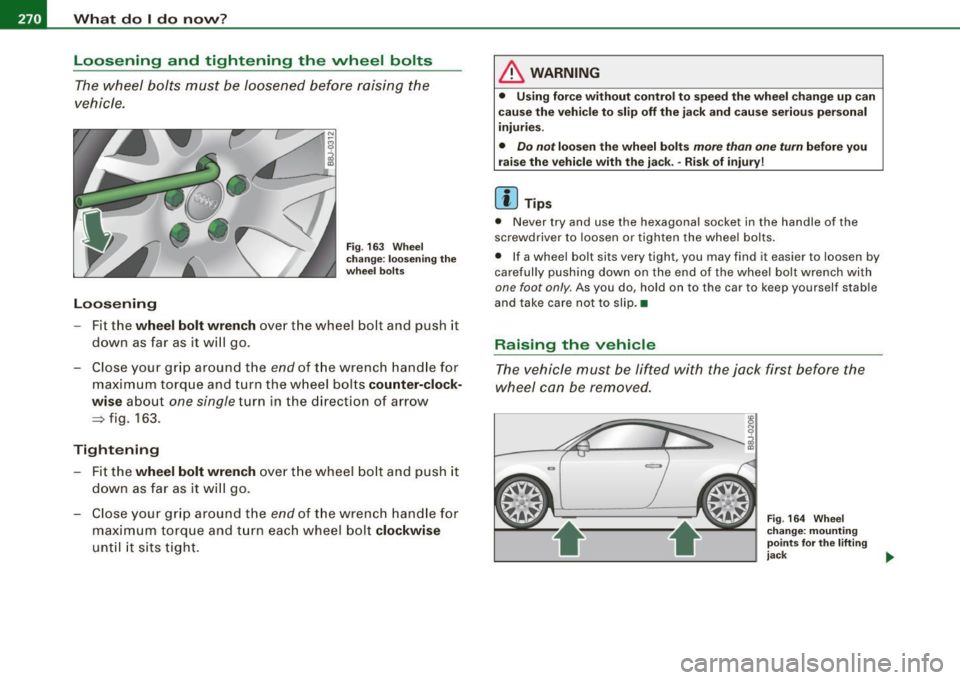
Loosening
Fig . 163 Wheel
change: loosening the
wheel bolts
- Fit the wheel bolt wrench over the wheel bolt and push it
down as far as it will go .
- Close your grip around the
end of the wrench handle for
maximum torque and turn the wheel bolts
counter-clock
wise
about one single turn in the direction of arrow
~ fig. 163.
Tightening
Fit the wheel bolt wrench over the wheel bolt and push it
down as far as it will go.
- Close your grip around the
end of the wrench handle for
maximum torque and turn each wheel bolt
clockwise
until it sits tight.
& WARNING
• Using force without control to speed the wheel change up can
cause the vehicle to slip off the jack and cause serious personal
injuries.
• Do not loosen the wheel bolts more than one turn before you
raise the vehicle with the jack. -Risk of injury!
[ i] Tips
• Never try and use the hexagonal socket in the handle of the
screwdriver to loosen or tighten the wheel bolts.
• If a wheel bolt sits very tight, you may find it easier to loosen by
carefully pushing down on the end of the wheel bolt wrench with
one foot only . As you do, hold on to the car to keep yourself stable
and take care not to slip.•
Raising the vehicle
The vehicle must be lifted with the jack first before the
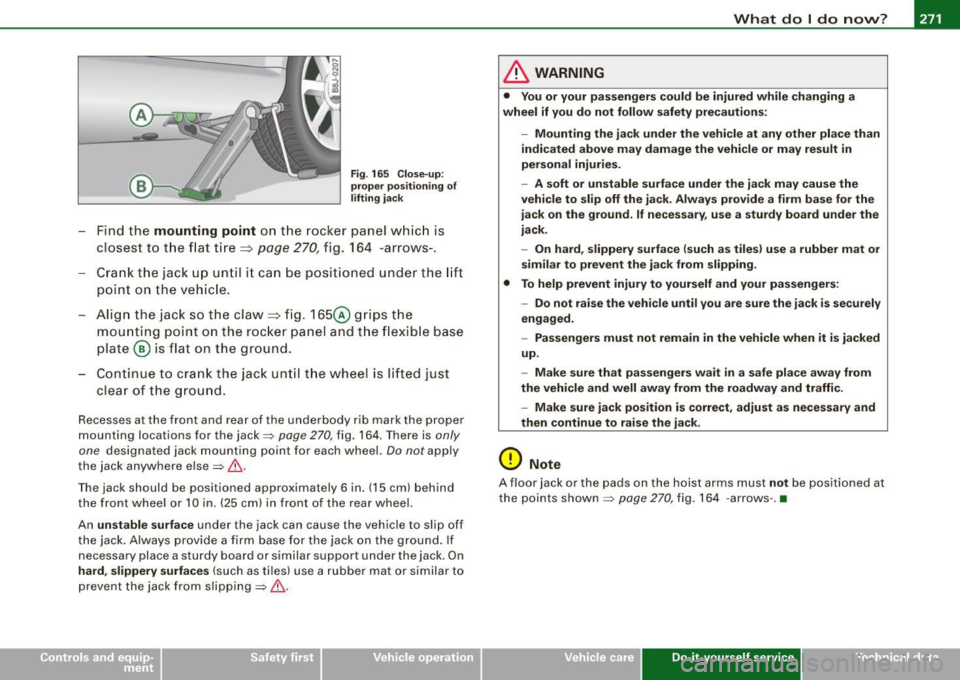
wheel can be removed.
Fig. 164 Wheel
change: mounting
points
for the lifting
jack ..
Page 273 of 316

What do I do now? -
------------------
Fig. 165 Close-up:
proper positioning of
lifting jack
- Find the mounting point on the rocker panel which is
closest to the flat tire =>
page 270, fig. 164 -arrows-.
- Crank the jack up until it can be positioned under the lift
point on the vehicle.
- Align the jack so the claw=> fig. 165@ grips the
mounting point on the rocker panel and the flexible base
plate ® is flat on the ground.
- Continue to crank the jack until the wheel is lifted just
clear of the ground.
Recesses at the front and rear of the underbody rib mark the proper
mounting locations for the jack=>
page 270 , fig. 164. There is only
one
designated jack mounting point for each wheel. Do not apply
the jack anywhere else=>&.
The jack should be positioned approximately 6 in. (15 cm) behind
the front wheel or 10 in. (25 cm) in front of the rear wheel.
An
unstable surface under the jack can cause the vehicle to slip off
the jack. Always provide a firm base for the jack on the ground. If
necessary place a sturdy board or similar support under the jack. On
hard, slippery surfaces (such as tiles) use a rubber mat or similar to
prevent the jack from slipping=> &.
& WARNING
• You or your passengers could be injured while changing a
wheel if you do not follow safety precautions:
-Mounting the jack under the vehicle at any other place than
indicated above may damage the vehicle or may result in
personal injuries.
- A soft or unstable surface under the jack may cause the
vehicle to slip off the jack. Always provide a firm base for the
jack on the ground. If necessary, use a sturdy board under the
jack.
- On hard, slippery surface (such as tiles) use a rubber mat or
similar to prevent the jack from slipping.
• To help prevent injury to yourself and your passengers:
-Do not raise the vehicle until you are sure the jack is securely
engaged.
- Passengers must not remain in the vehicle when it is jacked
up.
- Make sure that passengers wait
in a safe place away from
the vehicle and well away from the roadway and traffic.
- Make sure jack position is correct, adjust as necessary and
then continue to raise the jack.
0 Note
A floor jack or the pads on the hoist arms must not be positioned at
the points shown
=> page 270 , fig. 164 -arrows -. •
Vehicle care Do-it-yourself service irechnical data
Page 286 of 316

IIII...__E_ m _ e _r.;:g '-e_ n_ c-=y _ s_ i_t _u _a _t_ i_o _n_ s _______________________________________________ _
Rear hook up
- Align the vehicle with the centerline of the car carrier
ramp.
- Attach the winch hook to the rear towline eye previously
installed.
[ i ] Tips
Check carefully to make sure the hook-up is secure before moving
the car up the flatbed truck ramp. •
Lifting vehicle
Lifting with workshop hoist and with floor
jack
The vehicle may only be lifted at the lifting points illus
trated.
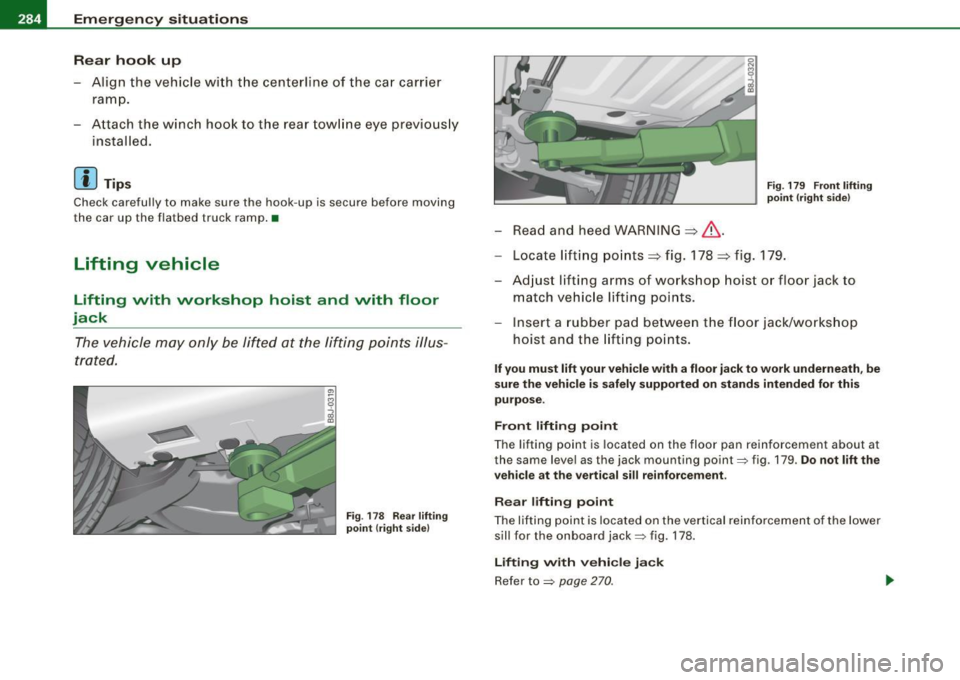
Fig . 178 Rear lifting
point (right side)
- Read and heed WARNING ::::,& .
Fig. 179 Front lifting
point (right side)
-Locate lifting points ::::, fig. 178 ::::, fig. 179.
- Adjust lifting arms of workshop hoist or floor jack to
match vehicle lifting points.
- Insert a rubber pad between the floor jack/workshop
hoist and the lifting points.
If you must lift your vehicle with a floor jack to work underneath, be
sure the vehicle is safely supported on stands intended for this
purpose.
Front lifting point
The lifting point is located on the floor pan reinforcement about at
the same level as the jack mounting point:::::, fig. 179 .
Do not lift the
vehicle at the vertical sill reinforcement.
Rear lifting point
The lifting point is located on the vertical reinforcement of the lower
sill for the on board jack:::::, fig. 178.
Lifting with vehicle jack
Refer to :::::, page 270 .
Page 287 of 316

________________________________________________ E _m_ e_r.:g :;,. e_ n_c ...: y:.- s_ i_ t _u _a_ t_ i_ o _ n_ s __ ffllll
•
& WARNING
• To reduce the risk of serious injury and vehicle damage.
-Always lift the vehicle only at the special workshop hoist and
floor jack lift points illustrated=> page
284, fig. 178 and
=> page 284, fig. 179.
- Failure to lift the vehicle at these points could cause the
vehicle to tilt or fall from a lift if there is a change in vehicle
weight distribution and balance. This might happen, for
example, when heavy components such as the engine block or
transmission are removed.
• When removing heavy components like these, anchor vehicle
to hoist or add corresponding weights to maintain the center of
gravity. Otherwise, the vehicle might tilt or slip off the hoist,
causing serious personal injury.
0 Note
• Be aware of the following points before lifting the vehicle:
- The vehicle should never be lifted or jacked up from under
neath the engine oil pan, the transmission housing, the front or
rear axle or the body side members . This could lead to serious
damage.
- To avoid damage to the underbody or chassis frame, a rubber
pad must be inserted between the floor jack and the lift points.
- Before driving over a workshop hoist, check that the vehicle
weight does not exceed the permissible lifting capacity of the hoist .
- Before driving over a workshop hoist, ensure that there is
sufficient clearance between the hoist and low parts of the
vehicle. •
Do-it-yourself service
Page 297 of 316

__________________________________________________ C_o_ n _ s_u_ m_ e ___ r_l_ n _f_ o_ r _m...:....:.. a:.;..:. ti .... o:.. n ........ _lllll
& WARNING (continued)
• The engine compartment of any motor vehicle is a potentially
hazardous area. Never reach into the area around or touch the
radiator fan. It is temperature controlled and can switch on
suddenly -even when the engine is off and the ignition key has
been removed. The radiator fan switches on automatically when
the coolant reaches a certain temperature and will continue to run
until the coolant temperature drops .
• Always remove the ignition key before anyone gets under the
vehicle.
• Always support your vehicle with safety stands if it is neces
sary to work underneath the vehicle. The jack supplied with the
vehicle is not adequate for this purpose and could collapse
causing serious personal injury.
• If you must work underneath the vehicle with the wheels on
the ground, always make sure the vehicle is on level ground, that
the wheels are always securely blocked and that the engine
cannot be started .
• Always make sure the transmission selector lever (automatic
transmission) is in "P" (Park position) (automatic transmission) or
Neutral (manual transmission) and the hand brake is firmly
applied.
<£> For the sake of the environment
• Changing the engine settings will adversely affect emission
levels. This is detrimental to the environment and increases fuel
consumption .
• Always observe environmental regulations when disposing of
old engine oil, used brake fluid, dirty engine coolant, spent batteries
or worn out tires.
• Undeployed airbag modules and pretensioners might be classi
fied as Perchlorate Material -special handling may apply, see
www.dtsc.ca.gov/hazardouswaste/perchlorate . When the vehicle or
parts of the restraint system including airbag modules safety belts
Controls and equip ment Safety first Vehicle operation with pretensioners are scrapped, all applicable laws and regula
tions must be observed. Your authorized Audi dealer is familiar with
these requirements and we recommend that you have your dealer
perform this service for you. •
Additional accessories,
modifications and parts replacement
Additional accessories and parts
replacement
Always consult an authorized Audi dealer before
purchasing accessories.
Your vehicle incorporates the latest safety design features ensuring
a high standard of active and passive safety.
This safety could be compromised by non -approved changes to the
vehicle. For this reason, if parts have to be replaced, please observe
the following points when installing additional accessories:
Approved Audi accessories and genuine Audi parts are available
from authorized Audi dealers .
These dealers also have the necessary facilities, tools and trained specialists to install the parts and accessories properly .
& WARNING
Using the wrong spare parts or using non-approved accessories
can cause serious personal injury.
• Use only accessories expressly approved by Audi and genuine
Audi spare parts
• These parts and accessories have been specially designed to
be used on your vehicle.
• Never install accessories such as telephone cradles or
beverage holders on airbag covers or within the airbag deploy-
Vehicle care Do-it-yourself service Tec hn ica l da ta