key AUDI TT COUPE 2014 User Guide
[x] Cancel search | Manufacturer: AUDI, Model Year: 2014, Model line: TT COUPE, Model: AUDI TT COUPE 2014Pages: 284, PDF Size: 34.42 MB
Page 36 of 284

Downloaded from www.Manualslib.com manuals search engine Doors
and windows
Convenience open/close function
The windows can be opened or closed simultane
ously when the vehicle is unlocked or Locked.
Convenience open function
... Press and hold the� button on the remote
control key until all the windows have reached
the desired position, or
... First unlock the vehicle using the� button on
the remote control key, then insert the key in
the driver's door lock, turn it to the "unlock" po
sition and hold it there until all the windows
have reached the desired position.
Convenience close function
... Press and hold the locking button l'.D on the re
mote control key until all windows are closed
¢.&, ,or
... Lock the driver's door with the key and hold the
key in the "lock" position until all the windows
are closed
Convenience close function with convenience
key*
... Touch and keep your hand in contact with the
sensor* on the door handle until all the win
dows are closed. Do not rest your hand on the
door handle while this is happening.
Adjusting settings for convenience open
function via infotainment system
... Select the following on the infotainment sys
tem: l MEN u
I button > Car > left control button
> Vehicle settings.
If you wish to use the convenience open function
for the windows, select on for Front windows.
A WARNING
- Take care when closing the windows. Care
less use of the windows can cause injuries.
- For safety reasons, you should only use the
remote control open and close functions
within about 2 metres of the vehicle. To
avoid injuries, always keep an eye on the
windows when pressing the !filJ button to
close them. The windows and soft top stop
moving as soon as the !filJ button is released.
34 What
to do after a malfunction
The one-touch open and close function must be
reactivated if the battery has been disconnected.
... Pull and hold the electric window switch until
the window is fully closed .
... Release the switch and then pull it again for at
least one second.
Garage door opener
(Homelink)
Description
Applies to vehicles: with garage door opener (Homelink)
Fig. 32 Garage door opener: Examples of various devices
which can be activated
Th e garage door opener (Homelink) allows you
to activate garage doors, security systems, home
or office lighting and other electric devices by
means of control buttons inside your car. It com
prises three buttons integrated in the headliner
which perform the functions of up to three hand
held transmitters.
To operate the desired systems with the garage
door opener, you first need to program the but
tons in the headliner.
A WARNING
When you are operating or programming the
garage door opener, make sure that no per
sons or objects are close to the devices receiv
ing the transmitter signals. Otherwise, per
sons might be injured or other damage
caused by moving parts.
�
Page 40 of 284

Downloaded from www.Manualslib.com manuals search engine Lights
and vision
@ Note
- The light sensor for the automatic head
lights* is Located in the mounting for the in
terior mirror. Do not affix any stickers on
this section of the windscreen.
- Some of the settings for the exterior light
ing can be adjusted in the driver informa
tion system.
- A buzzer will sound if you remove the igni
tion key and open the door when the exteri
or Lighting is on.
- On vehicles for some markets, the rear
lights switch on together with the daytime
running lights.
- In cool or damp weather, the inside of the
headlights, turn signals or rear lights can
sometimes mist up, due to the temperature
difference between the interior and exterior
of the car. They should clear again partially
or completely soon after you switch on the
headlights. This phenomenon has no influ
ence on the life expectancy of the vehicle
lights.
Turn signal and main beam lever
The turn signal Lever also operates the main
beam headlights, parking Lights and headlight
flasher.
Fig. 36 Turn signal and main beam headlight lever
Turn signals ¢¢ and parking lights pE
The turn signals will flash if you move the Lever
while the ignition is switched on. The parking
Lights will be switched on if you do this with the
ignition switched off.
@ -Turn signals/parking lights (right side)
38 0 @
-Turn signals/parking lights (left side)
If you just tap the Lever, the turn signals will
flash three times (one-touch signalling).
Main beam and headlight flasher �D
Move the lever to the appropriate position:
@ -Main beam headlights on (vehicles with main
beam assist* � page 38)
@ -Main beam headlights off or headlight flash
er
The indicator Lamp Ill will light up in the instru
ment cluster.
A WARNING
The main beam can dazzle other drivers. Risk
of accident! Never use the main beam head
lights or the headlight flasher if they could
dazzle other drivers.
((D Note
A buzzer will sound if you open the door when
the parking light is on.
' Main beam assist
Applies to vehicles: with main beam assist
The main beam assist automatically switches
the main beam headlights on or off depending
on the surrounding Light conditions.
Fig. 37 Turn signal and main beam lever: Switching main
beam assist on/off 0
A camera (located in the mounting for the interi
or mirror) detects light sources from other road
users. The main beams are activated or deactiva
ted automatically depending on the position of
vehicles on either side of the road, on the road �
Page 43 of 284
Downloaded from www.Manualslib.com manuals search engine 0
N
co
,-j
\D L/'l
N
L/'l
,-j functions
can be adjusted on the infotainment
system. Select the following on the infotainment
system: I MENU! button> Car > Left control button
> Vehicle settings > Background lighting.
Instrument lighting
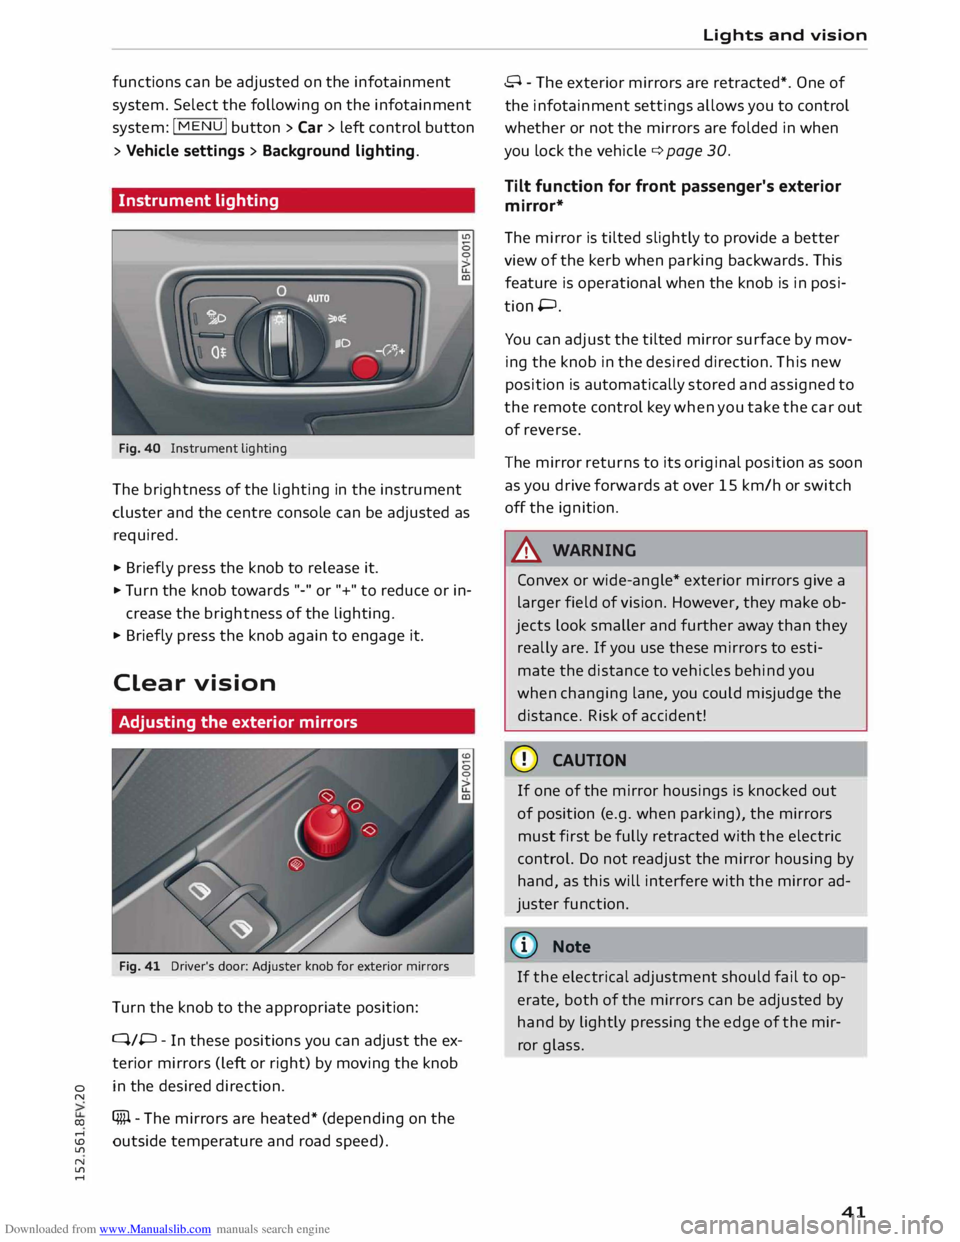
Fig. 40 Instrument lighting
The brightness of the Lighting in the instrument
cluster and the centre console can be adjusted as
required.
.,. Briefly press the knob to release it.
.,. Tu rn the knob towards "-" or"+" to reduce or in
crease the brightness of the lighting.
.,. Briefly press the knob again to engage it.
Clear vision
Adjusting the exterior mirrors
Fig. 41 Driver's door: Adjuster knob for exterior mirrors
Turn the knob to the appropriate position:
Q/P -In these positions you can adjust the ex
terior mirrors (Left or right) by moving the knob
in the desired direction.
(fill - The mirrors are heated* (depending on the
outside temperature and road speed). Lights
and vision
8 - The exterior mirrors are retracted*. One of
the infotainment settings allows you to control
whether or not the mirrors are folded in when
you Lock the vehicle q page 30.
Tilt function for front passenger's exterior
mirror*
The mirror is tilted slightly to provide a better
view of the kerb when parking backwards. This
feature is operational when the knob is in posi
tion P.
You can adjust the tilted mirror surface by mov
ing the knob in the desired direction. This new
position is automatically stored and assigned to
the remote control key when you take the car out
of reverse.
The mirror returns to its original position as soon
as you drive forwards at over 15 km/h or switch
off the ignition.
A WARNING
Convex or wide-angle* exterior mirrors give a
Larger field of vision. However, they make ob
jects Look smaller and further away than they
really are. If you use these mirrors to esti
mate the distance to vehicles behind you
when changing Lane, you could misjudge the
distance. Risk of accident!
CD CAUTION
If one of the mirror housings is knocked out
of position (e.g. when parking), the mirrors
must first be fully retracted with the electric
control. Do not readjust the mirror housing by
hand, as this will interfere with the mirror ad
juster function.
{CD) Note
If the electrical adjustment should fail to op
erate, both of the mirrors can be adjusted by
hand by Lightly pressing the edge of the mir
ror glass.
41
Page 48 of 284
Downloaded from www.Manualslib.com manuals search engine Seats
and storage
Seats and storage
General notes
A WARNING
You will find important information, tips, sug
gestions and warnings that you should read
and observe for your own safety and the safe
ty of your passengers on ¢page 192, Safe
driving.
Front seats
Manual adjustment of seats
Applies to vehicles: with manual seat adjustment
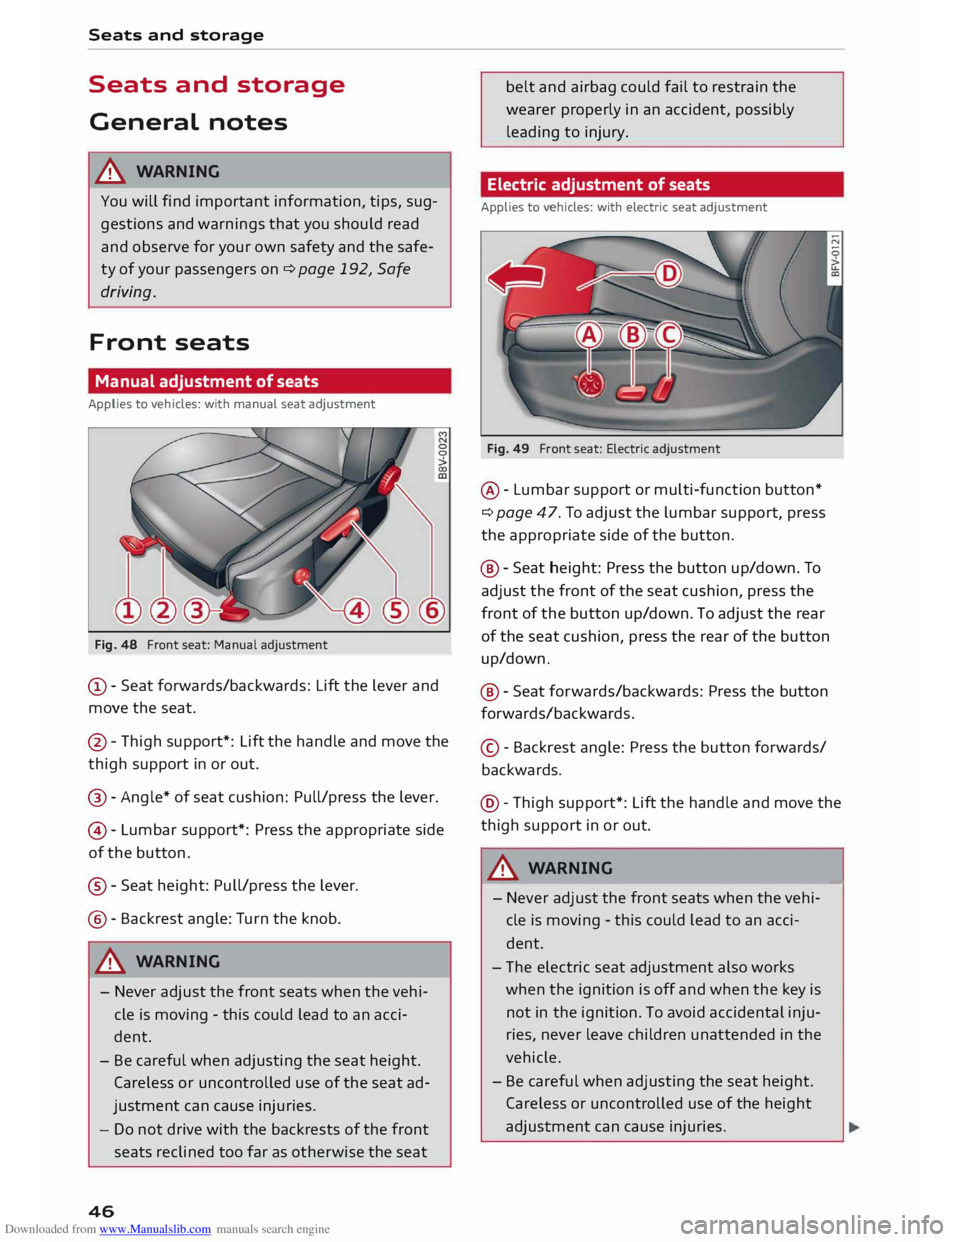
Fig. 48 Front seat: Manual adjustment
(I) -Seat forwards/backwards: Lift the lever and
move the seat.
@ -Thigh support*: Lift the handle and move the
thigh support in or out.
@ -Angle* of seat cushion: Pull/press the lever.
@ -Lumbar support*: Press the appropriate side
of the button.
®- Seat height: Pull/press the lever.
@ -Backrest angle: Turn the knob.
A WARNING
- Never adjust the front seats when the vehi
cle is moving -this could lead to an acci
dent.
- Be careful when adjusting the seat height.
Careless or uncontrolled use of the seat ad
justment can cause injuries.
- Do not drive with the backrests of the front
seats reclined too far as otherwise the seat
46 belt
and airbag could fail to restrain the
wearer properly in an accident, possibly
leading to injury.
Electric adjustment of seats
Applies to vehicles: with electric seat adjustment
Fig. 49 Front seat: Electric adjustment
@ -Lumbar support or multi-function button*
¢ page 47. To adjust the lumbar support, press
the appropriate side of the button.
@ -Seat height: Press the button up/down. To
adjust the front of the seat cushion, press the
front of the button up/down. To adjust the rear
of the seat cushion, press the rear of the button
up/down.
@ -Seat forwards/b ackwards: Press the button
forwards/backwards.
© -Backrest angle: Press the button forwards/
backwards.
@- Thigh support*: Lift the handle and move the
thigh support in or out.
A WARNING
- Never adjust the front seats when the vehi
cle is moving -this could lead to an acci
dent.
- The electric seat adjustment also works
when the ignition is off and when the key is
not in the ignition. To avoid accidental inju
ries, never leave children unattended in the
vehicle.
- Be careful when adjusting the seat height.
Careless or uncontrolled use of the height
adjustment can cause injuries. -
Page 55 of 284
Downloaded from www.Manualslib.com manuals search engine 0
N
co
....
\D Lfl
N
Lfl
.... Heating
and cooling
Air conditioner
Description
The air conditioner heats, cools and dehumidifies
the air inside the vehicle. It operates most effec
tively with the windows closed. If the vehicle has
been standing in the sun, it may cool down faster
if you open the windows briefly to let the hot air
escape.
The pollution filter removes impurities, such as
dust and pollen, from the air.
@ For the sake of the environment
If you wish to save fuel, switch off the cooling
mode on the air conditioner by pressing the
Controls for manual air conditioner
Applies to vehicles: with manual air conditioner
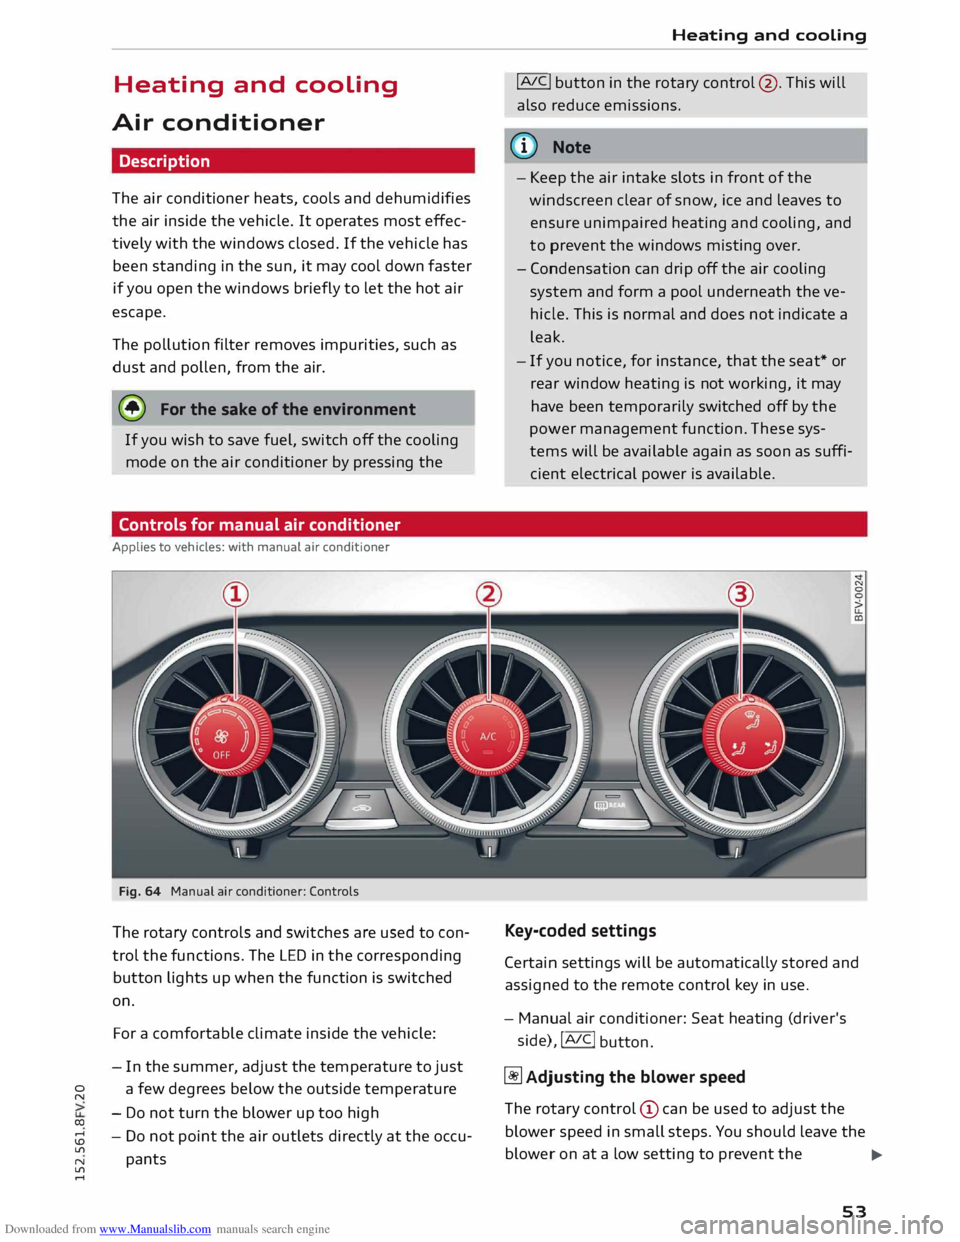
Fig. 64 Manual air conditioner: Controls
The rotary controls and switches are used to con
trol the functions. The LED in the corresponding
button lights up when the function is switched
on.
For a comfortable climate inside the vehicle:
- In the summer, adjust the temperature to just
a few degrees below the outside temperature
- Do not turn the blower up too high
- Do not point the air outlets directly at the occu-
pants Heating
and cooling
!AJC! button in the rotary control @. This will
also reduce emissions.
ijJ} Note
- Keep the air intake slots in front of the
windscreen clear of snow, ice and leaves to
ensure unimpaired heating and cooling, and
to prevent the windows misting over.
- Condensation can drip off the air cooling
system and form a pool underneath the ve
hicle. This is normal and does not indicate a
leak.
- If you notice, for instance, that the seat* or
rear window heating is not working, it may
have been temporarily switched off by the
power management function. These sys
tems will be available again as soon as suffi
cient electrical power is available.
Key-coded settings
Certain settings will be automatically stored and
assigned to the remote control key in use.
- Manual air conditioner: Seat heating (driver's
side), !AIC!
button.
� Adjusting the blower speed
The rotary control (!) can be used to adjust the
blower speed in small steps. You should Leave the
blower on at a Low setting to prevent the
...,
53
Page 57 of 284
Downloaded from www.Manualslib.com manuals search engine Controls
for automatic air conditioner
Applies to vehicles: with automatic air conditioner
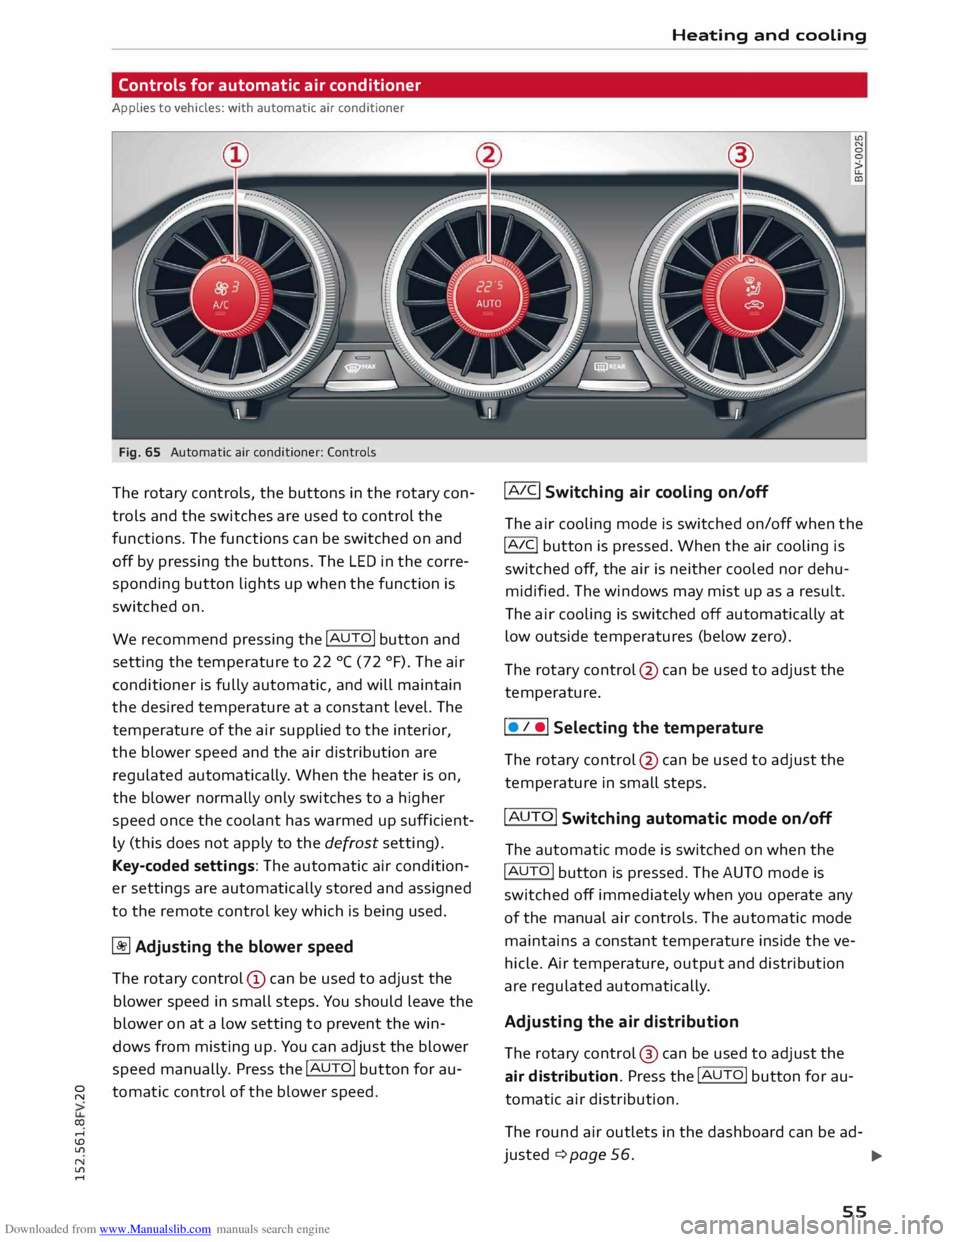
Fig. 65 Automatic air conditioner: Controls
The rotary controls, the buttons in the rotary con
trols and the switches are used to control the
functions. The functions can be switched on and
off by pressing the buttons. The LED in the corre
sponding button lights up when the function is
switched on.
We recommend pressing the !AUTO! button and
setting the temperature to 22 °C (72 °F). The air
conditioner is fully automatic, and will maintain
the desired temperature at a constant level. The
temperature of the air supplied to the interior,
the blower speed and the air distribution are
regulated automatically. When the heater is on,
the blower normally only switches to a higher
speed once the coolant has warmed up suff icient
ly (this does not apply to the defrost setting).
Key-coded settings: The automatic air condition
er settings are automatically stored and assigned
to the remote control key which is being used.
� Adjusting the blower speed
The rotary control (D can be used to adjust the
blower speed in small steps. You should leave the
blower on at a low setting to prevent the win
dows from misting up. You can adjust the blower
speed manually. Press the !AUTO! button for au-
� tomatic
control of the blower speed.
co ....
\D L/'l
N
L/'l
.... Heating
and cooling
IAIC! Switching air cooling on/off
The air cooling mode is switched on/off when the
!A IC
! button
is pressed. When the air cooling is
switched off, the air is neither cooled nor dehu
midified. The windows may mist up as a result.
The air cooling is switched off automatically at
low outside temperatures (below zero).
The rotary control @ can be used to adjust the
temperature.
I • I •I Selecting
the temperature
The rotary control @ can be used to adjust the
temperature in small steps.
IAUTO! Switching automatic mode on/off
The automatic mode is switched on when the
!AUTO I
button is pressed. The AUTO mode is
switched off immediately when you operate any
of the manual air controls. The automatic mode
maintains a constant temperature inside the ve
hicle. Air temperature, output and distribution
are regulated automatically.
Adjusting the air distribution
The rotary control @ can be used to adjust the
air distribution. Press the !AUTO! button for au
tomatic air distribution.
The round air outlets in the dashboard can be ad-
justed ¢ page 56.
..,.
55
Page 59 of 284
Downloaded from www.Manualslib.com manuals search engine 0
N
co
.-I
\D U'l
N
U'l
.-I The
seat heating has three levels. The heat level
is indicated by an LED.
,. To switch on the seat heating, press the� but
ton once.
,. To reduce the level, press the� button again.
,. To switch off the seat heating, press the [tJ but-
ton repeatedly until all the LEDs have gone out.
The seat heating automatically switches from
level 3 to level 2 after about 10 minutes.
When not to switch on the seat heating
Do not switch on the seat heating in the follow
ing situations:
- Seat is unused
- A protective cover is fitted on the seat
- A child seat is fitted on the seat
- The seat is damp or wet
_&. WARNING
People with limited capacity to feel pain or
sense temperature could burn themselves
when using the seat heating. These people
must not use the seat heating -risk of injury!
CD CAUTION
To avoid damaging the heating elements of
the seat heating, please do not kneel on the
seat or apply sharp pressure at a single point.
(I)) Note
- The setting for the driver's seat heating is
assigned to the key in use.
- If the front passenger's seat heating was on
when you last switched off the ignition, it
will be switched on automatically only if the
ignition is switched on again within 10 mi
nutes.
Supplementary heater
Applies to vehicles: with diesel engine
On cold days, the interior of the vehicle warms up
more quickly with the supplementary electric
heater. The supplementary heater is switched on
automatically as required, depending on the set
ting on the vehicle heating system. Heating
and cooling
The "supplementary heater" function can be
switched on or off as required. Select the follow
ing on the infotainment system: I MENU
I button >
Car > left control button > Vehicle settings > A/C
> Auto supplementary heater.
57
Page 62 of 284
Downloaded from www.Manualslib.com manuals search engine Driving
Steering Adjusting the steering wheel position
The height and reach of the steering wheel can
be adjusted as required to suit the driver.
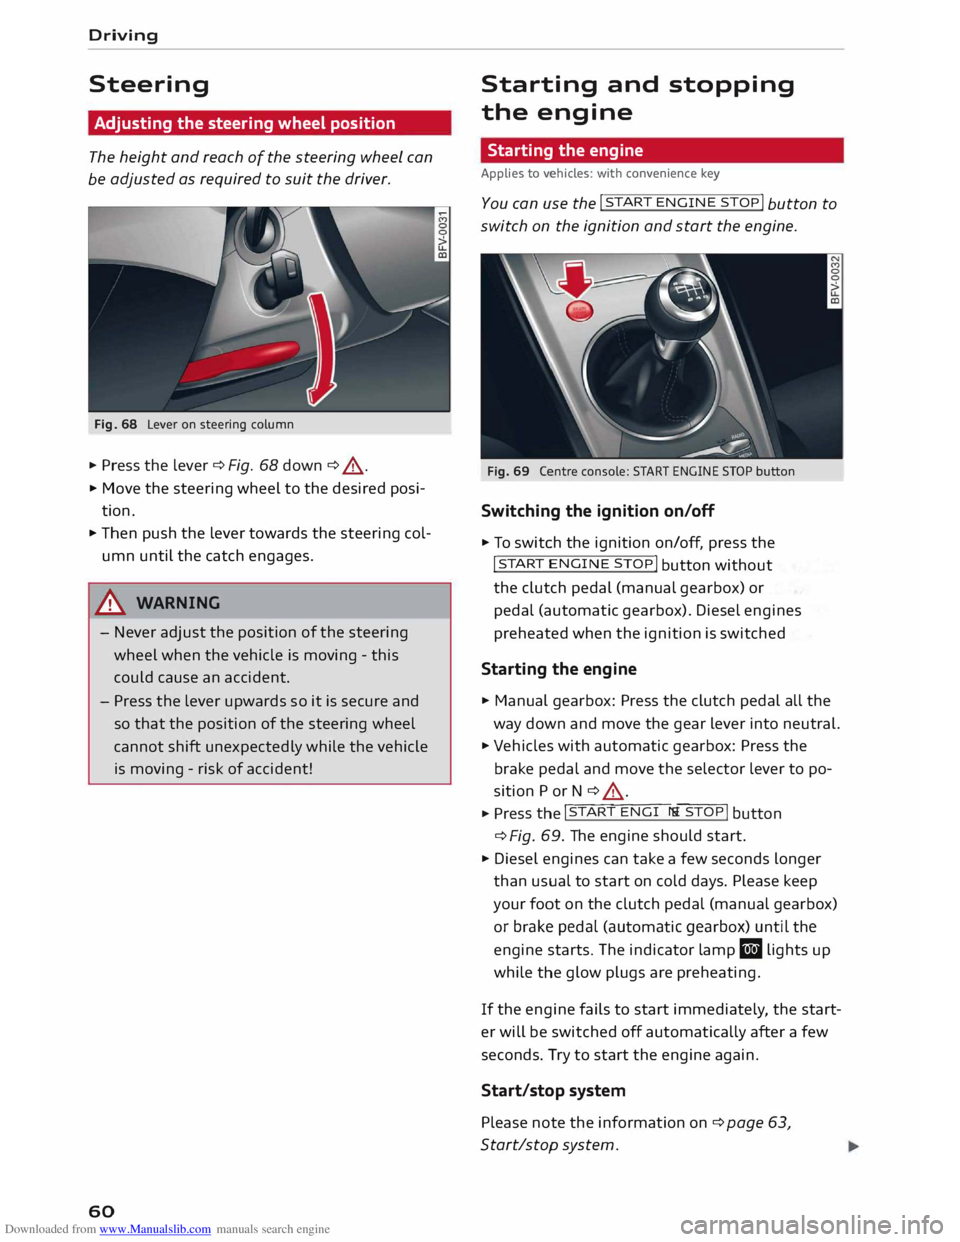
Fig. 68 Lever on steering column
... Press the lever ¢ Fig. 68 down ¢ &_
.
... Move the steering wheel to the desired posi
tion .
... Then push the lever towards the steering col
umn until the catch engages.
& WARNING
- Never adjust the position of the steering
wheel when the vehicle is moving -this
could cause an accident.
- Press the lever upwards so it is secure and
so that the position of the steering wheel
cannot shift unexpectedly while the vehicle
is moving -risk of accident!
60 Starting
and stopping
the engine
Starting the engine
Applies to vehicles: with convenience key
Y ou can u
se the !START
ENGINE STOP!
button to
switch on the ignition and start the engine.
Fig. 69 Centre console: START ENGINE STOP button
Switching the ignition on/off
... To switch the ignition on/off, press the
!START ENGIN
E STOP!
button without
the clutch pedal (manual gearbox) or
pedal (automatic gearbox). Diesel engines
preheated when the ignition is switched
Starting the engine
... Manual gearbox: Press the clutch pedal all the
way down and move the gear lever into neutral.
... Vehicles with automatic gearbox: Press the
brake pedal and move the selector lever to po
sition P or N ¢ &_
. ... Press th
e l�
S�
T_
A_R_T_ E_N�G_I _N_
E_S� T -
O �
P �I button
¢ Fig.
69. The engine should start .
... Diesel engines can take a few seconds longer
than usual to start on cold days. Please keep
your foot on the clutch pedal (manual gearbox)
or brake pedal (automatic gearbox) until the
engine starts. The indicator lamp El lights up
while the glow plugs are preheating.
If the engine fails to start immediately, the start
er will be switched off automatically after a few
seconds. Try to start the engine again.
Start/stop system
Please note the information on ¢ page 63,
Start/stop system.
Page 63 of 284
Downloaded from www.Manualslib.com manuals search engine 0
N
co
....
\D L/'l A
WARNING
- Never run the engine in confined spaces.
The exhaust gases are toxic -risk of poison
ing!
- Never switch off the engine until the vehicle
is stationary.
- The brake servo and the power steering sys
tem work only when the engine is running.
You need more strength to steer and brake
the vehicle when the engine is switched off.
This would mean a greater risk of accidents
and serious injury, because you cannot steer
and brake in the normal manner.
Avoid high engine speeds, full throttle and ex
treme load conditions until the engine has
reached its normal operating temperature;
otherwise this can damage the engine.
{:!)) Note
- When starting from cold the engine may be
a little noisy for the first few seconds until
oil pressure has built up in the hydraulic
tappets. This is quite normal and no cause
for concern.
- If you leave the vehicle with the ignition
switched on, it will be switched off auto
matically after a while. Please note that
electrical equipment such as the exterior
lighting will also be switched off.
Switching off the engine
Applies to vehicles: with convenience key
• Stop the vehicle .
• Press the rel
s=
Tc-c
A -,c
R=
T,,..
E=
N�G =
I c-c
N -=
E ,....,
S=
T=
o=-c
P�I button
¢ page 60, Fig. 69.
Steering lockl
)
The steering will be locked if you switch off the
engine with the !STA
R
T E NGI N
E STOP!
button ,
move the selector lever to position P (on vehicles
with automatic gearbox*) and open the driv er's
door.
N
� l
l
This function is not available on all export versions. Driving
The steering will be locked if you switch off the
engine with the !S
T
A RT
ENGINE ST
O P
!
button
and open the driver's door. The steering lock acts
as a theft deterrent.
Emergency Off function
If necessary in an emergency, the engine can be
switched off while the vehicle is still moving.
Press the !STA
RT
ENGI
NE
STOP!
button twice in
quick succession or hold it in for longer than two
seconds.
A WARNING
- Never switch off the engine until the vehicle
is stationary . Otherwise you may not have
the full benefit of the brake servo and power
steering. You may need more strength to
steer and brake the vehicle than you nor
mally would. This would mean a greater risk
of accidents and serious injury, because you
cannot steer and brake in the normal man
ner.
-Always take the key with you when you leave
the vehicle. Otherwise the engine can be
started or power-operated equipment such
as the electric windows can be used. This
could result in serious injury.
CD CAUTION
If the engine has been working hard for a long
time, there is a risk of heat building up in the
engine compartment after the engine has
been switched off; this could cause engine
damage. For this reason, you should leave the
engine idling for about 2 minutes before
switching it off.
(1'> Note
After the engine is stopped the radiator fan
may run on for up to 10 minutes, even if the
ignition is switched off. The fan may also start
running again after some time if the coolant
temperature rises due to a build-up of heat,
llll-
61
Page 64 of 284
Downloaded from www.Manualslib.com manuals search engine Driving
or if the engine is hot and the engine com
par tment is heated up further by direct
sunlight.
Driver messages
Switch off ignition before leaving car. Battery is
being discharged
This message appears and the buzzer sounds if
you open the driver's door while the ignition is
switched on. Switch off the ignition to prevent
the battery from being discharged.
Pressing start/stop button again will switch off
engine.
This message appears if you press the
!START ENGINE STOP!
button while the vehicle is
moving.
Engine start system: fault. Please contact work
shop
A fault has occurred when starting the engine au
tomatically (automatic start function). Drive to a
qualified workshop soon and have the fault recti
fied. Press
and hold
the !S
TA RT
ENGINE STOP I
button to start the engine.
II Remote control key: hold back of key
against marked area. See owner's manual
This message appears if there is no convenience
key inside the vehicle or if the system cannot de
tect or identify the key. This can happen, for ex
ample, if the radio signal from the key is obstruc
ted by a metal briefcase or similar, or if the key
battery is weak. Electronic equipment, such as
mobile phones, can also interfere with the radio
signal from the key.
If you encounter any problems starting or stop
ping the engine, please refer to "What to do if
the "START ENGINE STOP" button is inoperation
al" ¢page 63.
Ill Remote control key: key not recognis ed. Is
key still in vehicle?
If the indicator lamp Ill Lights up and the mes
sage appears, the convenience key was removed
from the vehicle while the engine was running. If
the convenience key is not in the vehicle you will
62 not
be able to switch on the ignition or restart
the engine after it has been switched off. You will
also not be able to lock the vehicle from the out
side.
Please press brake pedal
This message appears on vehicles with an auto
matic gearbox if you try to start the engine with
out first pressing the brake pedal.
Please press clutch pedal
This message appears on vehicles with a manual
gearbox if you try to start the engine without
first pressing the clutch pedal. The engine will
only start if you press the clutch pedal.
Please engage N or P
This message will appear if you try to start or
switch off the engine when the selector lever is
not in Nor P. The engine can then not be started
or switched off.
Shift to P, otherwise vehicle can roll away.
Doors do not lock if lever is not in P
For safety reasons, this message will appear and
a warning buzzer will sound if the selector lever
of the automatic gearbox is not in position P
when you switch off the ignition with the
!START ENGINE STOP!
button. Put the selector
lever in position P; otherwise the vehicle can roll
away. If the lever is not in position P you will not
be able to Lock the vehicle using the locking sen
sor on the door handle or the convenience key.