park assist AUDI TT COUPE 2020 User Guide
[x] Cancel search | Manufacturer: AUDI, Model Year: 2020, Model line: TT COUPE, Model: AUDI TT COUPE 2020Pages: 280, PDF Size: 98.79 MB
Page 88 of 280
![AUDI TT COUPE 2020 User Guide Driving
Selector lever emergency release
|
BFV-0266]
Fig. 91 Selector lever: using the emergency release to
move out of the Park position
The emergency release mechanism is located in](/img/6/57658/w960_57658-87.png "AUDI TT COUPE 2020 User Guide Driving
Selector lever emergency release
|
BFV-0266]
Fig. 91 Selector lever: using the emergency release to
move out of the Park position
The emergency release mechanism is located in")
Driving
Selector lever emergency release
|
BFV-0266]
Fig. 91 Selector lever: using the emergency release to
move out of the Park position
The emergency release mechanism is located in
the right area under the selector lever shift gate.
Using the emergency release can be complicated.
See an authorized Audi dealer or authorized Audi
Service Facility for assistance.
You will need the screwdriver from the vehicle
tool kit to release it > page 241. Use the flat side
of the reversible screwdriver blade.
Removing the cover
> Set the parking brake to secure your vehicle
from rolling away. If this is not possible, secure
your vehicle from rolling using another meth-
od.
> Switch the ignition off.
> To loosen the shifter boot, carefully insert the
flat side of the screwdriver sideways into the
slit near the shifter boot > fig. 90.
> Carefully pry the shifter boot out with the
screwdriver while gripping the boot at the fold
and pulling it upward and out of the opening
> fig. 91.
> Fold the shifter boot up around the shifter
knob.
86
Selector lever emergency release
> Press and hold the yellow release button with
the screwdriver.
> At the same time, press the release button on
the selector lever (2) and move the selector lev-
er to the “N” position.
Reattaching the cover
> Clip the shift cover back into the shift gate.
ZA\ WARNING
— The parking lock may only be released using
the emergency release if the parking brake
is set. If it is not working, secure the vehicle
from rolling using the brake pedal or other
suitable means, such as blocking a front and
a rear wheel. An unsecured vehicle may roll
away, which increases the risk of an acci-
dent.
— Only activate the emergency release while
ona level surface or a slight slope.
—To reduce the risk of an accident, you must
not drive when the emergency release is ac-
tivated.
Page 101 of 280

8S1012721BB
Parking aid
Parking aid
Introduction
Applies to: vehicles with rear parking system/parking system
plus
Depending on the vehicle equipment, various
parking aids will help you when parking and ma-
neuvering.
The rear parking system is an audible parking aid
that warns you of obstacles behind the vehicle
=> page 100.
The parking system plus assists you while park-
ing by audibly and visually warning you of objects
detected in front of and behind the vehicle
=> page 100.
The rearview camera shows the area behind the
vehicle in the Infotainment system display. The
lines in the rearview camera image help you to
park or maneuver > page 101.
ZA WARNING
— Always look for traffic and check the area
around your vehicle by looking at it directly
as well. The parking system cannot replace
the driver's attention. The driver is always
responsible when entering or exiting a park-
ing space and during similar maneuvers.
— Please note that some surfaces, such as
clothing, are not detected by the system.
— Sensors and cameras have blind spots in
which people and objects cannot be detect-
ed. Be especially cautious of small children
and animals.
— The sensors can be displaced by impacts or
damage to the radiator grille, bumper,
wheel housing and the underbody. The park-
ing system may be impaired as a result.
Have an authorized Audi dealer or author-
ized Audi Service Facility check their func-
tion.
— Make sure the sensors are not obstructed by
stickers, deposits or other materials. If they
are, the sensor function could be impaired.
For additional information on cleaning, see
=> page 235.
CG) Note
— Some objects are not detected or displayed
by the system under certain circumstances:
— objects such as barrier chains, trailer draw
bars, vertical poles or fences
— objects above the sensors such as wall ex-
tensions
— objects with certain surfaces or structures
such as chain link fences or powder snow
— If you continue driving closer to a low ob-
ject, it may disappear from the sensor
range. Note that you will no Longer be
warned about this obstacle.
— Maintain enough distance from the curb to
reduce the risk of damage to the rims.
G@) Tips
— The system may provide a warning even
though there are no obstacles in the cover-
age area in some situations, such as:
— certain road surfaces or when there is tall
grass
— external ultrasonic sources such as from
cleaning vehicles
—in heavy rain, snow, or thick vehicle ex-
haust
— We recommend that you practice parking in
a traffic-free location or parking lot to be-
come familiar with the system. Practice
parking in good light and weather condi-
tions.
— You can change the volume of the signals.
— What appears in the display is slightly de-
layed.
— The sensors must be kept clean and free of
snow and ice for the parking aid to operate.
99
Page 102 of 280

Parking aid
Rear parking system
Applies to: vehicles with rear parking system
The rear parking system is an audible parking
aid.
Description
There is a sensor in the rear bumper cover. If
these detect an obstacle, audible signals warn
you.
Make sure the sensors are not covered by stick-
ers, deposits or any other obstructions as it may
impair the sensor function. For information on
cleaning, see > page 235.
The range at which the sensors begin to measure
is approximately:
Side
Center
3 ft (0.90 m)
5.2 ft (1.60 m)
Rear
The closer you get to the obstacle, the shorter
the interval between the audible signals. A con-
tinuous tone sounds when the obstacle is less
than approximately 1 foot (0.30 meters) away.
Do not continue backing up > A\ in Introduction
on page 99, >@ in Introduction on page 99!
If the distance to an obstacle remains constant,
the volume of the distance warning gradually
drops after about four seconds (this does not ap-
ply in the continuous tone range).
Activating
The rear parking assist activates automatically
when the reverse gear is engaged. A brief tone
will sound.
100
Parking system plus
Applies to: vehicles with parking system plus
Parking system plus provides audio and visual
signals when parking.
BFV-0262
Fig. 105 Principle of operation
Sensors are located in the front and rear bump-
ers. If these detect an obstacle, audible and visu-
al signals warn you.
Make sure the sensors are not covered by stick-
ers, deposits or any other obstructions as it may
impair the sensor function. For information on
cleaning, see > page 235.
The display field begins approximately at:
@ 4 ft (1.20 m)
@ 3 ft (0.90 m)
® 5.2 ft (1.60 m)
@ 3 ft (0.90 m)
The closer you get to the obstacle, the shorter
the interval between the audible signals. A con-
tinuous tone sounds when the obstacle is less
than approximately 1 foot (0.30 meters) away.
Do not continue driving forward or in reverse
= A\ in Introduction on page 99, >© in Intro-
duction on page 99!
If the distance to an obstacle remains constant,
the volume of the distance warning gradually
drops after about four seconds (this does not ap-
ply in the continuous tone range).
Page 104 of 280
Parking aid
General information
Applies to: vehicles with rearview camera
© © 3
S cz o
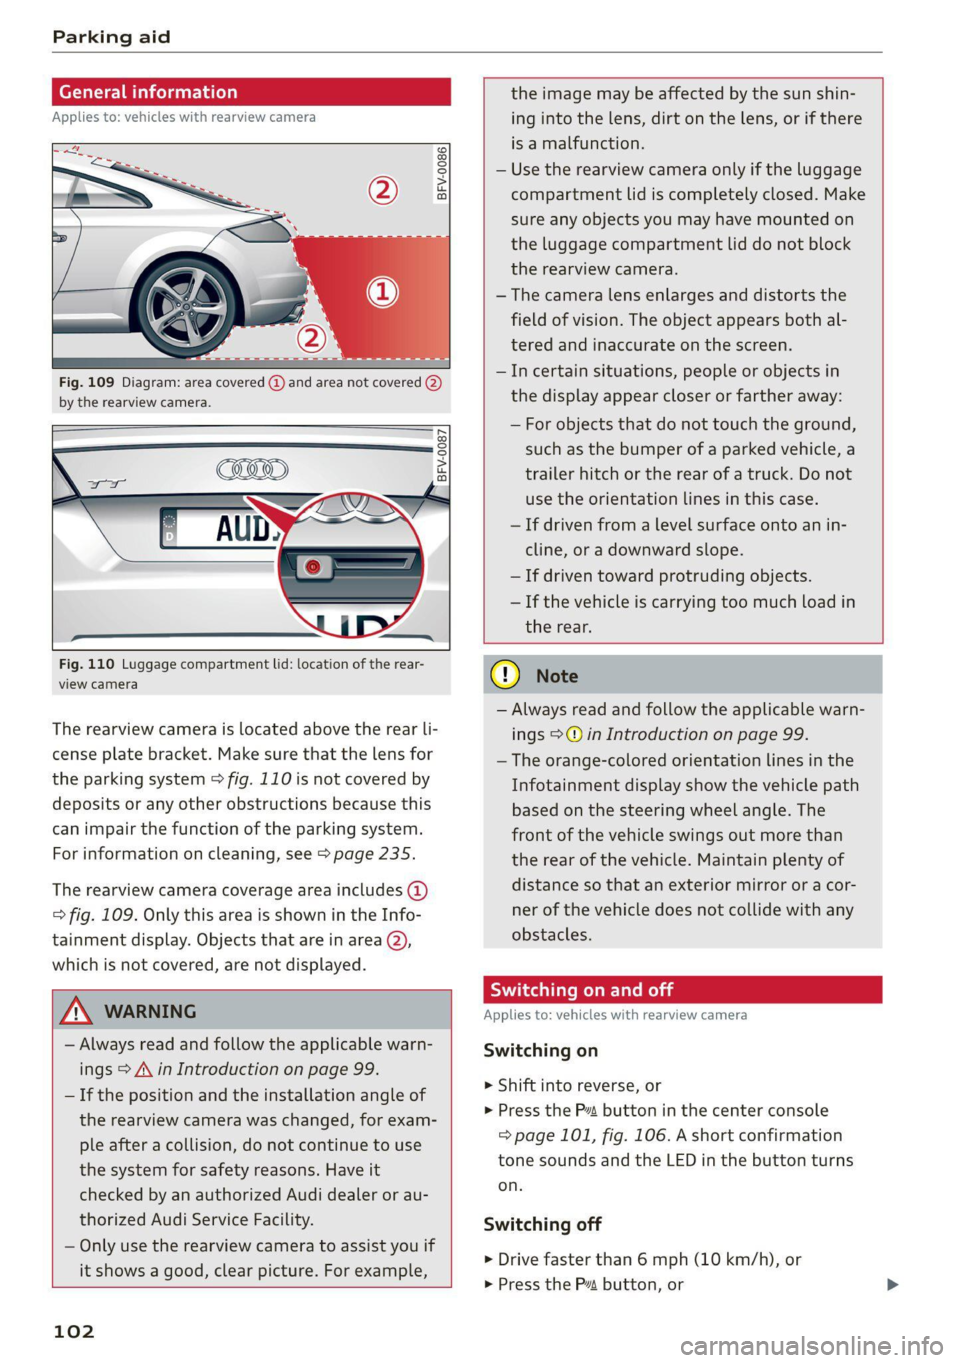
Fig. 109 Diagram: area covered @) and area not covered (2)
by the rearview camera.
BFV-0087
Fig. 110 Luggage compartment lid: location of the rear-
view camera
The rearview camera is located above the rear li-
cense plate bracket. Make sure that the lens for
the parking system > fig. 110 is not covered by
deposits or any other obstructions because this
can impair the function of the parking system.
For information on cleaning, see > page 235.
The rearview camera coverage area includes (4)
=> fig. 109. Only this area is shown in the Info-
tainment display. Objects that are in area Q),
which is not covered, are not displayed.
ZA\ WARNING
— Always read and follow the applicable warn-
ings > A in Introduction on page 99.
— If the position and the installation angle of
the rearview camera was changed, for exam-
ple after a collision, do not continue to use
the system for safety reasons. Have it
checked by an authorized Audi dealer or au-
thorized Audi Service Facility.
— Only use the rearview camera to assist you if
it
shows a good, clear picture. For example,
102
the image may be affected by the sun shin-
ing into the lens, dirt on the lens, or if there
is a malfunction.
— Use the rearview camera only if the luggage
compartment lid is completely closed. Make
sure any objects you may have mounted on
the luggage compartment lid do not block
the rearview camera.
— The camera lens enlarges and distorts the
field of vision. The object appears both al-
tered and inaccurate on the screen.
—Incertain situations, people or objects in
the display appear closer or farther away:
— For objects that do not touch the ground,
such as the bumper of a parked vehicle, a
trailer hitch or the rear of a truck. Do not
use the orientation lines in this case.
—If driven from a level surface onto an in-
cline, or a downward slope.
— If driven toward protruding objects.
— If the vehicle is carrying too much load in
the rear.
@) Note
— Always read and follow the applicable warn-
ings >@ in Introduction on page 99.
— The orange-colored orientation lines in the
Infotainment display show the vehicle path
based on the steering wheel angle. The
front
of the vehicle swings out more than
the rear of the vehicle. Maintain plenty of
distance so that an exterior mirror or a cor-
ner of the vehicle does not collide with any
obstacles.
Sct Rolal
Applies to: vehicles with rearview camera
Switching on
> Shift into reverse, or
> Press the Pz button in the center console
=> page 101, fig. 106. A short confirmation
tone sounds and the LED in the button turns
on.
Switching off
> Drive faster than 6 mph (10 km/h), or
> Press the Pa button, or
Page 105 of 280
8S1012721BB
Parking aid
> Switch the ignition off.
@ Tips
— The visual display in the left part of the dis-
play should help you detect the critical vehi-
cle areas.
— You can change the volume of the signals
and the display > page 103.
leet hms L are)
Applies to: vehicles with rearview camera
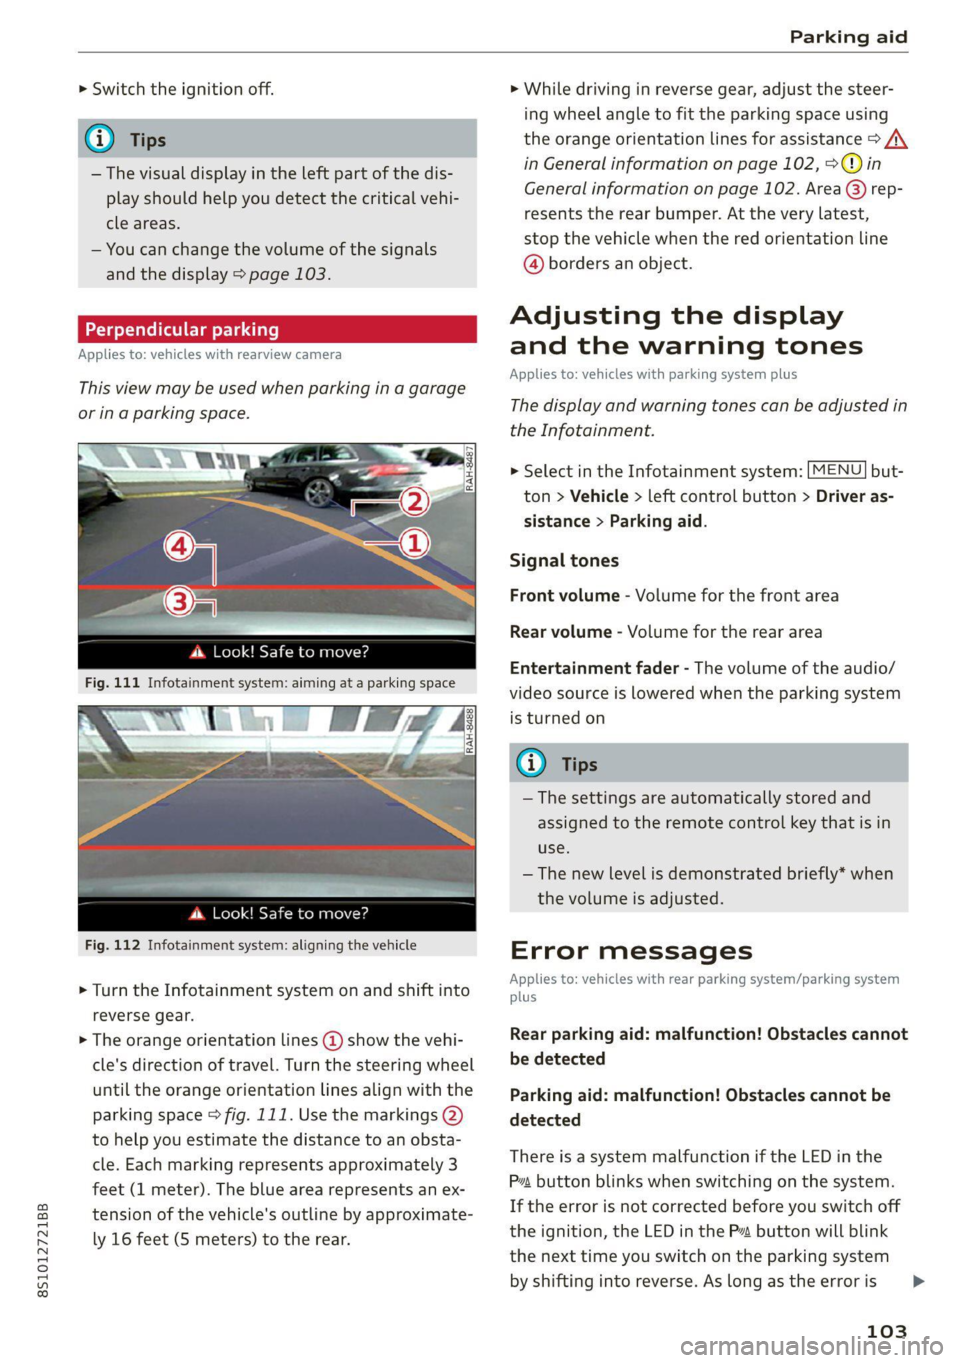
This view may be used when parking in a garage
or ina parking space.
cS ale
ds. Look! Safe to move?
Fig. 112 Infotainment system: aligning the vehicle
> Turn the Infotainment system on and shift into
reverse gear.
> The orange orientation lines @ show the vehi-
cle's direction of travel. Turn the steering wheel
until the orange orientation lines align with the
parking space fig. 111. Use the markings @
to help you estimate the distance to an obsta-
cle. Each marking represents approximately 3
feet (1 meter). The blue area represents an ex-
tension of the vehicle's outline by approximate-
ly 16 feet (S meters) to the rear.
> While driving in reverse gear, adjust the steer-
ing wheel angle to fit the parking space using
the orange orientation lines for assistance > /\.
in General information on page 102, >@) in
General information on page 102. Area @) rep-
resents the rear bumper. At the very latest,
stop the vehicle when the red orientation line
@ borders an object.
Adjusting the display
and the warning tones
Applies to: vehicles with parking system plus
The display and warning tones can be adjusted in
the Infotainment.
> Select in the Infotainment system: [MENU] but-
ton > Vehicle > left control button > Driver as-
sistance > Parking aid.
Signal tones
Front volume - Volume for the front area
Rear volume - Volume for the rear area
Entertainment fader - The volume of the audio/
video source is lowered when the parking system
is turned on
1@) Tips
—The settings are automatically stored and
assigned to the remote control key that is in
use.
— The new level is demonstrated briefly* when
the volume is adjusted.
Error messages
Applies to: vehicles with rear parking system/parking system
plus
Rear parking aid: malfunction! Obstacles cannot
be detected
Parking aid: malfunction! Obstacles cannot be
detected
There is a system malfunction if the LED in the
Pya button blinks when switching on the system.
If the error is not corrected before you switch off
the ignition, the LED in the P button will blink
the
next time you switch on the parking system
by shifting into reverse. As long as the error is
103
Page 110 of 280

Intelligent Technology
— Utilize the engine braking effect when driv-
ing downhill by selecting the “S” driving
program > page 80. This reduces the load
on the brakes. If you need to brake addition-
ally, brake in intervals and not continuously.
G) Tips
— If you retrofit your vehicle with a front spoil-
er, wheel covers or similar items, make sure
that the air flow to the brakes is not ob-
structed. Otherwise the brake system can
overheat.
— Also refer to the information about brake
fluid > page 208.
Messages
EG / @ Brakes: malfunction! Safely stop ve-
hicle
There is a malfunction in the brake system. If
s/w and BAlalso turn on, there is a malfunc-
tion in the ABS, ESC, and braking distribution.
Do not continue driving. See an authorized Audi
dealer or authorized Audi Service Facility for as-
sistance. Read and follow the other safety pre-
cautions > A\.
GG / © Warning! No brake booster function
If the brake booster is not working, you have to
use much more force when braking the vehicle.
See an authorized Audi dealer or authorized Audi
Service Facility for assistance.
GG / @ Brake pads: wear limit reached. You
can continue driving. Please contact Service
The brake pads are worn. Drive to an authorized
Audi dealer or authorized Audi Service Facility as
soon as possible to have the malfunction correct-
ed.
Ga Jo Parking brake: malfunction! Safely
stop vehicle. See owner's manual
— If the indicator light and the message appear
when the vehicle is stationary or after switch-
ing the ignition on, check if you can release the
parking brake. If you cannot release the parking
brake, see an authorized Audi dealer or author-
ized Audi Service Facility. If you can release the
108
parking brake and the message still appears,
see an authorized Audi dealer or authorized
Audi Service Facility immediately to have the
malfunction corrected.
— If the indicator light and message appear while
driving, the hill start assist or emergency brak-
ing function may be malfunctioning. It may not
be possible to set the parking brake or release
it once it has been set. Do not park your vehicle
on hills. See an authorized Audi dealer or au-
thorized Audi Service Facility for assistance.
Z\ WARNING
If a malfunction occurs in the ABS, ESC, and
braking distribution, interventions that stabi-
lize the vehicle will no longer be available.
This could cause the vehicle to swerve, which
increases the risk that the vehicle will slide.
Do not continue driving. See an authorized
Audi dealer or authorized Audi Service Facility
for assistance.
Steering
Electromechanical steering supports the driver's
steering movements by electronically adapting
the power steering depending on the vehicle
speed. The settings depend on the selected Audi
drive select* mode.
Messages
a Steering: malfunction! Please stop vehicle
The power steering may have failed. Adapt your
driving style immediately to compensate for the
fact that it may be more difficult to turn the
steering wheel, and stop your vehicle in a safe lo-
cation as soon as possible. Do not continue driv-
ing. See an authorized Audi dealer or authorized
Audi Service Facility for assistance.
a Steering: malfunction! You can continue
driving
There is a malfunction. Steering may be more dif-
ficult or more sensitive. Adapt your driving style.
Have the steering system checked immediately >
Page 125 of 280

8S1012721BB
Voice recognition system
Voice recognition system
General information
Applies to: vehicles with voice recognition system
You can operate many functions in the vehicle
easily using voice commands.
Using the voice recognition system optimally
> Speak clearly and distinctly at a normal volume.
Speak louder when driving faster.
» Emphasize the words in the commands evenly
and do not leave long pauses.
>» Close the doors, the windows, and the sunroof*
to reduce background noise. Make sure that
passengers are not speaking when you are giv-
ing a voice command.
> Do not direct the vents toward the hands-free
microphone, which is in the roof headliner/on
the driver’s safety belt* near the front interior
lights. For additional information on the safety
belt microphone’, see > page 141.
> Only the driver should speak to the system, be-
cause the handsfree microphone is aimed to-
ward this seating position.
Z\ WARNING
— Direct your full attention to driving. As the
driver, you have complete responsibility for
safety in traffic. Only use the functions in
such a way that you always maintain com-
plete control over your vehicle in all traffic
situations.
— Do not use the voice recognition system in
emergencies because your voice may change
in stressful situations. The system may take
longer to dial the number or may not be
able to dial it at all. Dial the emergency
number manually.
G) Tips
There are no voice guidance* prompts when a
dialog is active.
Operating
Applies to: vehicles with voice recognition system
Requirement: the ignition and the MMI must be
switched on. A system language supported by
the voice recognition system must be set. There
must be no phone calls in progress and the park-
ing aid must not be active.
> Switching on: briefly press the [2] button @)
=> page 14, fig. 10 on the multifunction steer-
ing wheel and say the desired command after
the Beep.
> Switching off: press and hold the |] button,
or:
» Say the command Cancel.
> Pausing: say the command Pause. To resume,
press the |] button.
> Correcting: press the [5] button one time ©)
=> page 12, fig. 6, or:
> Say the command Correction.
Input assistance
The system guides you through the input with
visual and audio feedback.
— Visual input assistance: after switching on
voice recognition, a display with a selection of
possible commands appears. This command
display can be switched on or off. Select:
MENU] > Settings > left control button > MMI
settings > Speech dialog system.
— Audio input assistance: to have the possible
commands read, press the [2] button on the
multifunction steering wheel briefly and say
Help.
Additional settings
See > page 194, Voice recognition system.
@) Tips
— The dialog pauses when there is an incom-
ing phone call and will continue if you ig-
nore the call. The dialog ends if you answer
the call.
— You can select an item in the list using ei-
ther the voice recognition system or the
control knob.
123
Page 243 of 280
8S1012721BB
Emergency assistance
Emergency assistance
General information
> Park the vehicle as far as possible from moving
traffic in the event of a breakdown. In the event
of a flat tire, park the vehicle ona level surface.
If you are ona steep hill, be especially careful.
> Set the parking brake.
> Switch the emergency flashers on.
> Have the passengers exit the vehicle. They
should move to a safe place, for example be-
hind a guard rail.
ZX WARNING
Follow the steps given above. This is for your
protection and the for the safety of others on
the road.
Equipment
Vehicle tool kit/tire mobility kit/
compressor
Vii =) \
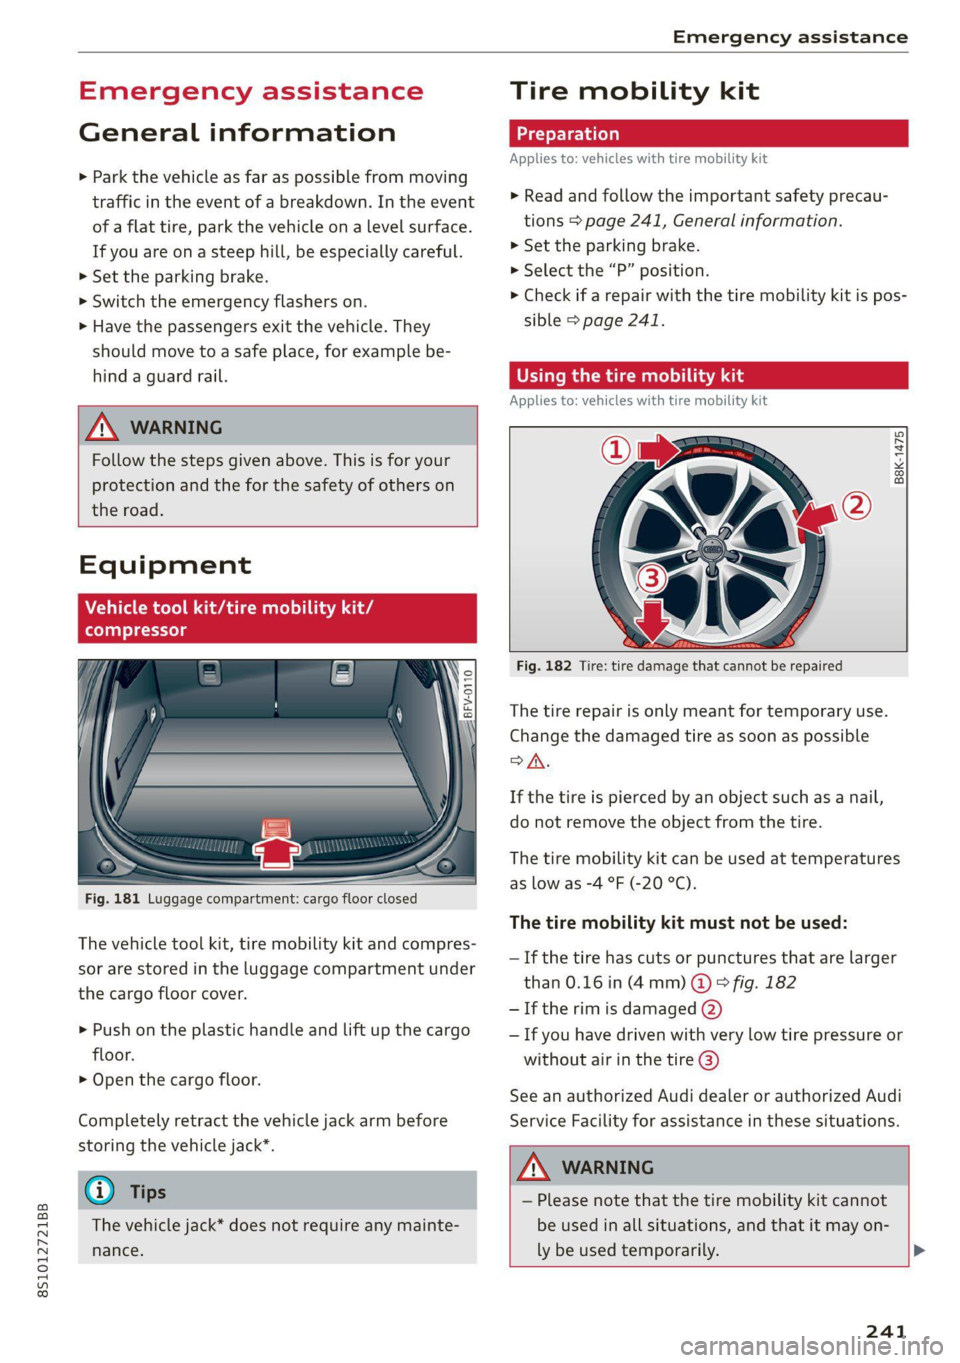
Fig. 181 Luggage compartment: cargo floor closed
The vehicle tool kit, tire mobility kit and compres-
sor are stored in the luggage compartment under
the cargo floor cover.
> Push on the plastic handle and lift up the cargo
floor.
> Open the cargo floor.
Completely retract the vehicle jack arm before
storing the vehicle jack*.
@) Tips
The vehicle jack* does not require any mainte-
nance.
Tire mobility kit
Applies to: vehicles with tire mobility kit
> Read and follow the important safety precau-
tions > page 241, General information.
>» Set the parking brake.
> Select the “P” position.
> Check if a repair with the tire mobility kit is pos-
sible > page 241.
UE Raimi) sala
Applies to: vehicles with tire mobility kit
B8K-1475
Fig. 182 Tire: tire damage that cannot be repaired
The tire repair is only meant for temporary use.
Change the damaged tire as soon as possible
SA.
If the tire is pierced by an object such as a nail,
do not remove the object from the tire.
The tire mobility kit can be used at temperatures
as low as -4 °F (-20 °C).
The tire mobility kit must not be used:
—If the tire has cuts or punctures that are larger
than 0.16 in (4 mm) @ © fig. 182
— If the rim is damaged (2)
— If you have driven with very low tire pressure or
without air in the tire @)
See an authorized Audi dealer or authorized Audi
Service Facility for assistance in these situations.
ZA\ WARNING
— Please note that the tire mobility kit cannot
be used in all situations, and that it may on-
ly be used temporarily. >
241
Page 245 of 280
8S1012721BB
Emergency assistance
> Inflate the tire to between 29 psi (200 kPA)
and 36 psi (250 kPA) and read the pressure on
the gauge.
> If this tire pressure is not reached, remove the
filler hose. Drive slowly approximately 33 feet
(10 m) forward or in reverse so that the sealant
can be distributed in the tire. Inflate the tire
again > A\.
ZA\ WARNING
— Read and follow the manufacturer's safety
precautions on the compressor and in the in-
structions on the bottle of sealant.
— Ifa tire pressure of 29 psi (200 kPA) cannot
reached after inflating for 6 minutes, then
the tire is too severely damaged. Do not con-
tinue driving.
— If the tire cannot be repaired with the tire
sealant, see an authorized Audi dealer or au-
thorized Audi Service Facility for assistance.
@) Tips
Do not operate the compressor for more than
six minutes continuously, or it can overheat.
Once the compressor has cooled, you can con-
tinue to use it.
CeeTnn eas]
Applies to: vehicles with tire mobility kit
> Affix the sticker that says "max. 50 mph (max.
80 km/h)" that is provided with the tire mobili-
ty kit within the driver's field of vision.
> Stop the vehicle after driving for about 10 mi-
nutes and check the tire pressure.
> If the tire pressure is lower than 19 psi (130
kPA), then the tire is too severely damaged. Do
not continue driving.
Nv WARNING
Pay attention to the following after repairing
the tire:
— Do not drive faster than 50 mph (80 km/h).
— Avoid hard acceleration or braking and driv-
ing fast around curves.
— The vehicle may become more difficult to
control.
— If the tire is too severely damaged, see an
authorized Audi dealer or authorized Audi
Service Facility for assistance.
(@) For the sake of the environment
You can give the used tire sealant bottle to an
authorized Audi dealer or authorized Audi
Service Facility for disposal.
G) Tips
Remember to obtain a new bottle of sealant
from an authorized Audi dealer or authorized
Audi Service Facility after repairing a tire.
Replacing wheels
You must complete the preparation before
changing a tire.
> Read and follow the important safety precau-
tions > page 241, General information.
> Set the parking brake.
> Select the “P” position.
> Lay out the vehicle tool kit > page 241 and the
spare tire > page 247.
Z\ WARNING
The vehicle must also be secured to prevent it
from rolling when using the vehicle jack*. Use
suitable objects to block the front and back of
the wheel that is diagonal from the wheel
with the flat tire.
243
Page 252 of 280

Emergency assistance
coupling becoming overloaded when driving off-
road.
For the most safety and security, drive with a tow
bar. You should use a towing cable only if a tow
bar is not available. Use a towing cable made of
synthetic elastic cable similar elastic material.
ZX WARNING
— Towing highly increases the risk of an acci-
dent, for example from colliding with the
towing vehicle.
— To reduce the risk of an accident, do not al-
low anyone to remain inside the vehicle
when it is being transported by a tow truck
or a special transporter.
@) Note
— If normal towing is not possible, for exam-
ple if the transmission is faulty or if the
towing distance is greater than 30 miles
(50 km), then transport the vehicle on a
special carrier.
— If the vehicle is towed by a tow truck at the
axle that is not permitted, this can cause se-
vere damage to the transmission.
— The vehicle must not be tow started for
technical reasons.
@) Tips
— If there is a power failure, the selector lever
will not move out of the "P" position. The
parking lock must be released using the
emergency release before towing the vehi-
cle > page 86.
— Follow the local legal regulations for tow-
ing.
Read and follow the important information under
=> page 249.
Preparations
> Only secure the towing cable or tow bar at the
designated towing loops > page 250,
=>page 251.
250
>» Make sure the towing cable is not twisted. Oth-
erwise it could disconnect from the towing loop
while towing.
> Switch the emergency flashers on in both
vehicles > page 38. However, do not do this if it
prohibited by law.
Towing vehicle (front)
> Only start to drive when the towing cable is
taut.
> Be especially careful when accelerating.
» Avoid sudden braking or driving maneuvers.
Vehicle being towed (rear)
> Make sure the ignition is switched on so that
the steering wheel is not locked and so that you
can use the turn signals, the horn, and the
windshield wipers if needed > /A\.
> Switching it off before the vehicle has stopped
may impair the function of the brake booster
and power steering. You would then need to
use more force to steer and brake the vehicle.
> Release the parking brake > page 77.
> Select the “N” selector lever position.
> Make sure the towing cable is always taut.
ZA WARNING
Never tow a vehicle using a tow bar or towing
cable if the vehicle does not have electrical
power.
Front towing loop
BFV-0309
Fig. 196 Front bumper: installing the towing loop
The threaded opening for the towing loop is lo-
cated on the right side of the front bumper.
> Remove the towing loop from the vehicle tool
kit > page 241.