remote start AUDI TT ROADSTER 2008 Owners Manual
[x] Cancel search | Manufacturer: AUDI, Model Year: 2008, Model line: TT ROADSTER, Model: AUDI TT ROADSTER 2008Pages: 316, PDF Size: 70.1 MB
Page 4 of 316
Table of contents
Table of contents
Vehicle literature ........ .
About this Owner's Manual .............. ...... . .
Controls and
equipment .. .. ... . .. ... ... . .
Cockpi t ... .......... ...... ..... .
Genera l ill ustration ............. .
Instruments and
warning/indica tor lig hts ....... .
Instruments .............. ..... .
Warning/indicator lights ........ .
Driver informa tion system ..... .
Introduction ............... .... .
On-Board Diagnostic system (080)
Menu display ...... ............ .
Au to-Check Control ... ... .... .. .
Speed warn ing system . ... ..... .
Trip computer ................. .
T ire pressure monitoring system ..
Opening and closing .......... .
Keys .......................... .
Powe r lock ing system ..... ..... .
Rear lid /tr unk lid .............. . . 5 Ant
i-theft a larm system ........ .
Power w indows ... ... .... .... .
Folding top ................ ... .
Folding top ... .. ..... ...... ... .
6 W ind Deflector ........... ... .. .
E merge ncy Ope rat ion of the Fold ing
Top ........... ............ .. . .
Clear vision . ... ............ ... .
56 Cruise control . . . . . . . . . . . . . . . . . . 11 O
57 Audi magnetic ride . . . . . . . . . . . . . 112
60
Transm1ss1on . . . . . . . . . . . . . . . . . . . 113
60 Manua l transmiss ion . . . . . . . . . . . . 1 13
64 S tron ic tra nsmission . . . . . . . . . . . 1 13
64
69
Home link® . ...... .. ... ... ... .. .
Universa l remote control ....... .
121
121
Lights . . . . . . . . . . . . . . . . . . . . . . . . . 69
In ter io r lights ....... ..... ... .. .
V is ion ..................... ... .
W iper and washer system ...... .
Mirrors ..... ............... ... .
Digital compass ............... .
9 Seats and storage ......... ... .
11
1 1
1 2
12
1 6
22
22
26
27
29
37
39
41
47
47
50 55 Genera
l recommendat ions ..... .
Ad justing front seats manua lly ..
Powe r seats ..... ....... .... .. .
Lumbar support .. ............. .
Head restraints ............•...
Luggage compartment ........ .
Cup holder ... ...... ... ..... .. .
As htray ................... ... .
Cigarette lighter /socket ..... ... .
Storage ............ ....... ... .
Warm and cold ............... .
Climate controls ....... ... .• .. .
Rear window defogger
Qlil ..••.••
Heated sea ts .. ..... ..... ..... .
On the road . ... .. .......... ... .
Steering ...................... .
Ign it ion lock an d ignition sw itch .
Starting and stopping the engine
Park ing brake ................. .
Acoustic pa rking system .... ... .
77
77
78
82
85
87
87
88
89
91
92
93
94
94
95
95
98
98
103
104
105
105
106
107
108
109
Safety first ............... . .
Driving Safely . ...... ... ...... . .
General notes .. .... ....... ... . .
Prope r occupan t seating pos it ions
D river and passenger side footwe ll
Peda l a rea .. .. .... .... ... ..... .
Stow ing luggage .............. .
Report ing s afety defects ...... . .
Safety belts ................... .
General notes ................. .
Why safe ty be lts? .............. .
Safety belts ................... .
Safety belt tensioners .......... .
Airbag system ... ... ...... .... . .
Important things to know ...... .
F . b ron t air ags ........ ....... .. .
Monito ring the Advanced Airbag
System ....................... . 127
128
128
130
13
4
13 4
135
136
137
137
138
141
14 4
146
146
150
157
Page 49 of 316
Opening and closing
Keys
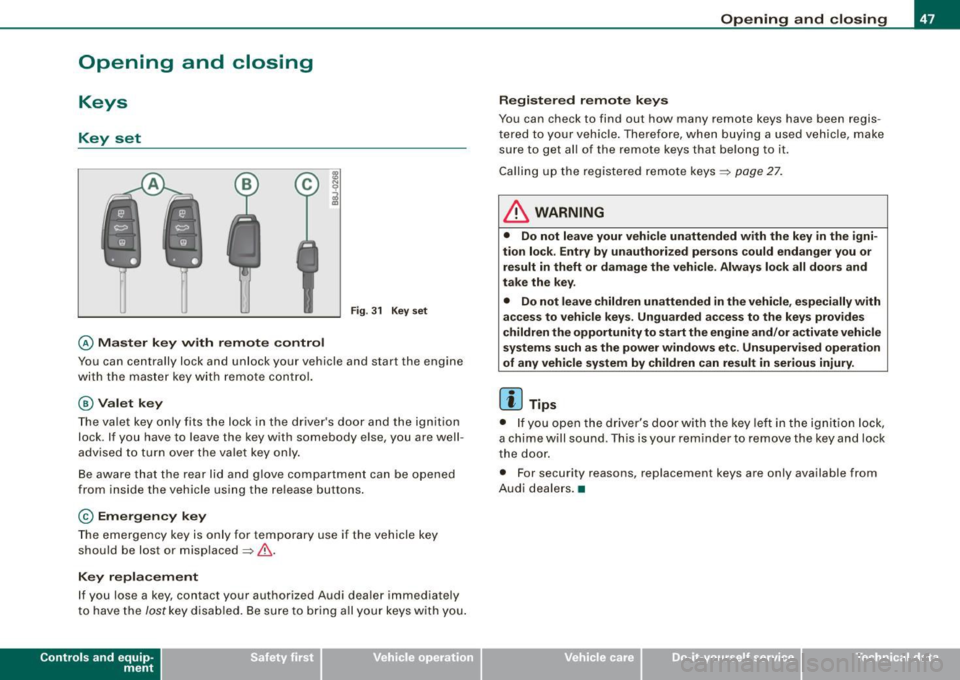
Key set
Fig. 31 Key set
© Master key with remote control
Y ou can centrally lock and unlock your vehicle and start the engin e
wi th the mas te r key wit h remote c ontr ol.
@ Valet key
The va let key only fits the lock in the driv er's d oor an d the ignition
lock . If you have to leave the key with somebody e lse, you are well
advised to turn over the vale t key o nly .
B e aware that t he rea r lid and glove co mpartme nt can be opened
from inside the vehicle usi ng the re lea se b uttons .
© Emergency key
The emerge ncy ke y is only fo r tempo rar y use if the vehicle key
should be lost or misplaced=> &.
Key replacement
If you lose a ke y, contact your authorized Audi dea ler immedia tely
t o have the
Jost k ey disa bled. Be s ure to br ing a ll yo ur k eys wit h you.
Con tro ls and eq uip
ment
Opening and closing
Registered remote keys
You can chec k to find out how many remote keys have been regi s
te re d to you r vehi cle. Th ere for e, wh en bu ying a used v ehicle , ma ke
su re to get a ll of t he remote keys that belong to it.
Ca lling up the registered remote ke ys =>
page 27.
& WARNING
• Do not leave your vehicle unattended with the key in the igni
tion lock . Entry by unauthorized persons could endanger you or
result in theft or damage the vehicle . Always lock all doors and
take the key .
• Do not leave children unattended
in the vehicle, especially with
access to vehicle keys . Unguarded access to the keys provides
children the opportunity to start the engine and/ or a ctivate vehicle
systems such as the power windows etc . Unsupervised operation
of any vehicle system by children can result in serious injury .
[ i ] Tips
• If y ou open the dri ver's doo r with the key left i n the ig nit ion loc k,
a chi me will sound . Thi s is your rem inde r to remove the ke y an d lock
t he door.
• F or security reasons, replacement keys are only available from
A udi deale rs.•
Vehicle care I I irechnical data
Page 51 of 316
Master key battery replacement
Each master key contains a battery housed under the
cover.
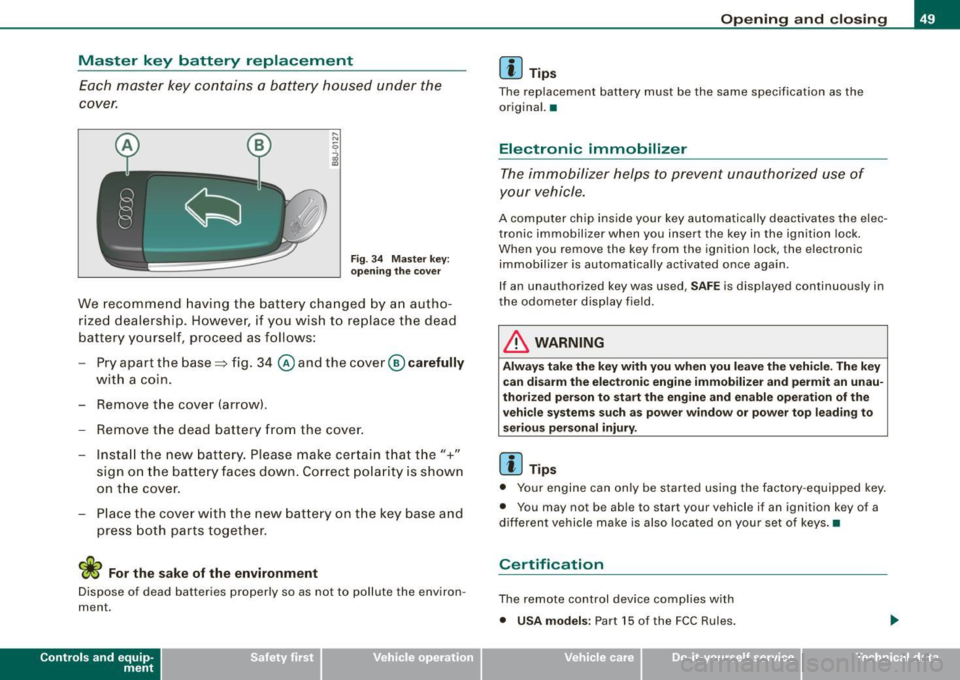
Fig . 3 4 Master key:
o peni ng the cover
We recommend having the battery cha nged by a n autho
rized dealership. However, if y ou wish to replace the dead
battery y ourself, proceed as follows :
- Pry apart the base => fig. 34
@ and the cover@ carefully
with a coin.
- Remove the cove r (arrow).
- Remove the dead battery from the cover.
- I nsta ll the new battery . Pl eas e make ce rtain t hat t he" +"
sign on the batte ry faces down . Correct po la rity is shown
on t he cover .
- Place the cover w ith the new bat tery on t he key base and
press both parts together .
For the sake of the environment
Dispose of dead batteries proper ly so as not to pol lute the environ
ment.
Con tro ls and eq uip
ment
Op ening and clo sing
[ i ] Tip s
The replacement battery must be the same specification as the
origina l.•
Electronic immobilizer
The immobilizer helps to prevent unauthorized use of
your vehicle.
A computer chip inside your key automatically deactivates the elec
tronic immobilizer when you insert the key in the ignition lock.
When you remove the key from the ignition lock, the e lectronic
immobil izer is automatically activated once again.
If an unauthorized key was used, SA FE is displayed continuously in
the odometer display field .
& WARNING
Always ta ke the key with y ou when you le ave the vehi cle. The key
ca n dis arm the el ectroni c eng ine immob ilizer and permit an un au
thori zed p erson to start the engine and enabl e ope ration of the
v ehi cle s ystems su ch a s po wer window or power t op leading to
s eri ous pe rso nal injury .
[ i ] Tip s
• Your engine can only be started using the fac tory -equipped key .
• You may not be ab le to start your vehicle if an ignition key of a
different vehicle make is a lso loca ted on your set of keys .•
Certification
The remote control device comp lies with
• USA models : Part 15 of the FCC Rules.
Vehicle care
I I irechnical data
Page 52 of 316
Openin g a nd clo sin g
• Cana da mo dels: RSS-210 of Industry Canada .
Operation is subject to the following conditions:
• this device may not cause harmful interference, and
• this device must accept any interference received, including
interference that may cause undesired operation.
0 Note
The manufacturer is not responsible for ANY RADIO OR TV interfer ence caused by unauthorized modifications to this equipment.
Changes or modifications to this unit not express ly approved by the
party responsib le for comp liance could void the user's authority to
operate the equipment .•
Power locking system
General description
The power locking system Jocks or unlocks all doors
simultaneously.
The power locking system in your vehicle incorpora tes the following
functions:
• Central locking function
• Remote contro l feature
=> page 48 .
• Anti -Theft Alarm System
=> page 56.
You can lock and un lock the veh icle from outside either with the
k ey s or the remot e control transmitter inside the master key.
Act ivatin g the po wer loc king sy ste m lo ck s or unlo cks all doo rs
s im ult ane ously.
You can also open or close the windows when you lock or unlock the
driver's door using the key . For safety reasons, you cannot use the
remote contro l to open/close the windows . T
he selective unlock feature makes it possible to open just the
driver's door.
If the power locking system should malfunction, you can lock and
unlock each lock individually using the vehicle key.
A ut om atic lock ing*
The automatic locking feature locks all the vehicle doors and the rear lid when you drive faster than 9 mph (15 km/h) .
You can unlock the vehicle from the inside by:
• removing the key from the ignition switch (the vehicle wi ll auto
matically un lock itself) or
• pressing the unlock part of the power lock switch
oc:'i:l or
pulling the door handle (to open the door).
If you wish, you can have an authorized Audi dealer convert your
power door lock system to automatic loc king .
Unlo cking /locking t he vehi cle
When you unlo ck your vehicle:
• T he anti -theft alarm system is deactivated briefly .
• The vehicle interior lights illuminate for approximate ly 30
seconds.
When you
lo ck the vehicle:
• All doors are locked .
• The anti-theft alarm system is activated.
• The vehicle interior lights turn off.
• The anti-theft alarm system is activated . The horn of the anti
theft a larm system wi ll sound and the anti -theft alarm system readi
ness light, located in the center of the instrument panel below the
windshie ld on the right side of the air vent, will start to blink. .,_
Page 54 of 316
Openin g a nd clo sin g
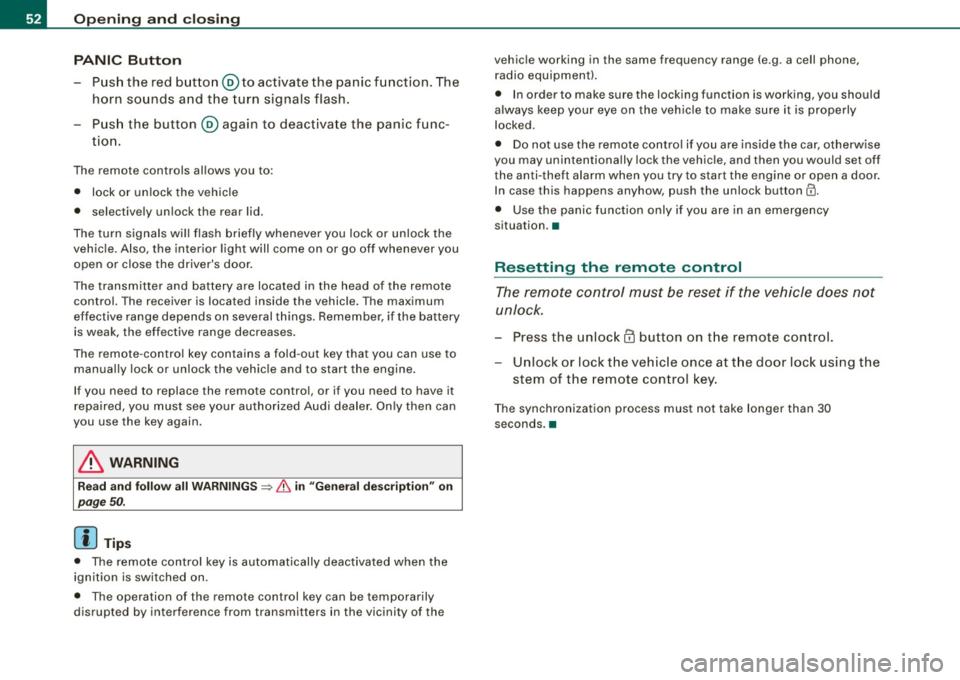
PANIC B utton
- Push the red button@to activate the panic function. The
horn sounds and the turn signals flash.
- Push the button ® again to deactivate the panic func-
tion.
The remote controls allows you to:
• lock or unlock the vehicle
• selectively unlock the rear lid.
The turn signals wi ll flash briefly whenever you lock or unlock the
vehic le. Also, the interior light will come on or go off whenever you
open or close the driver's door.
The transmitter and battery are located in the head of the remote control. The receiver is located inside the vehicle. The maximum
effective range depends on several things. Remember, if the battery
is weak, the effective range decreases.
The remote -contro l key contains a fo ld -out key that you can use to
manually lock or unlock the vehicle and to start the engine.
If you need to replace the remote contro l, or if you need to have it
repaired, you must see your authorized Audi dealer . On ly then can
you use the key again.
& WARNING
Re ad and follo w all WARNINGS ~ & in "General de scr iption " on
page 50 .
[ i J Tips
• The remote control key is automatically deactivated when the
ignition is switched on.
• The operation of the remote control key can be temporarily
disrupted by interference from transmitters in the vicinity of the vehic
le working in the same frequency range (e.g . a cell phone,
radio equipment).
• In order to make sure the locking function is working, you should
a lways keep your eye on the vehic le to make sure it is properly
locked .
• Do not use the remote control if you are inside the ca r, otherwise
you may unintentionally lock the vehicle, and then you would set off
the an ti-theft alarm when you try to start the engine or open a door.
I n case this happens anyhow, push the unlock button@.
• Use the panic func tion only if you are in an emergency
situation. •
Resetting the remote control
The remote con tr o l must be reset if the vehicle does not
unlock.
- Press the unlock
III button on the remote control.
- Unlock or lock the vehicle once at t he door lock using the
stem of the remote control key.
T he synchronization process must not take longer than 30
seco nds. •
Page 58 of 316
Opening and closing
Rear Lid Emergency Release
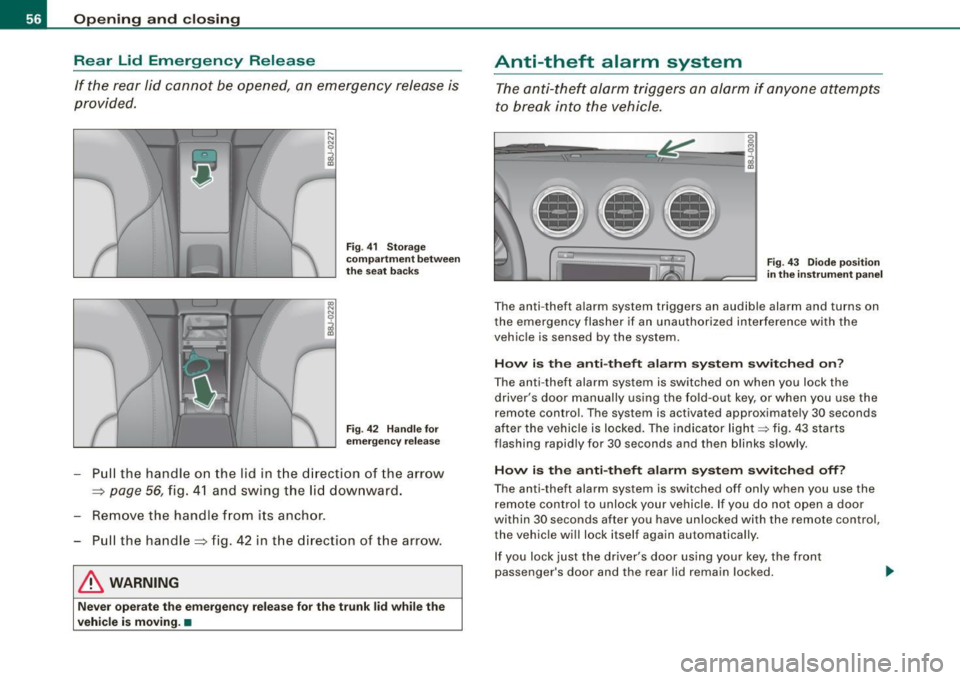
If the rear li d cannot be opened, an emergency relea se is
provided.
F ig . 41 Stor ag e
c omp artm en t b etw een
th e se at ba cks
Fig . 4 2 Handl e for
e m erg ency re lease
- Pull the handle on the lid in t he d irecti on of th e arrow
=> page 56, fig . 41 and swing the lid downwa rd.
- Remove the handle f rom its anchor .
Pull the handle=> fig. 42 in the direction of the arrow.
& WARNING
Ne ver oper ate the emergen cy r ele ase fo r the tr unk lid while the
vehicle is moving .•
Anti-theft alarm system
The a nti-thef t alarm triggers an alarm if anyone attempts
to break into the vehicle .
---
Fig . 4 3 Diode p osition
in th e ins tru ment pan el
T he an ti- theft alarm system triggers an audible alarm and turns on
the emergency flasher if an unauthorized inte rference with the
vehic le is sensed by the system.
How i s the anti -theft alarm sy stem switched on ?
The anti-theft alarm system is switched on when you lock the
driver's door manually using the fold-out key, or when you use the
remote control. The system is activated approximate ly 30 seconds
after the vehicle is locked. The indicator light~ fig. 43 starts
flashing rapidly for 30 seconds and then blinks slowly .
How is the anti-theft alarm sy stem switched off ?
The anti- theft alarm system is switched off only when you use the
r emote control to unl ock your vehicle. I f you do not open a doo r
wi thin 30 seconds after you have unlocked with the remote control ,
the vehic le will lock itse lf again automatically .
If you lock just the driver's door using your key, the front
passenger's door and the rear lid remain locked.
Page 123 of 316
HomeLink® -_______________ ___.
Homelink®
Universal remote control
Applies to veh icles: wit h Home link® unive rsa l rem ote cont rol
General information
The Homelink® feature can learn up to three radio
frequency codes for most current transmitters used for
operating garage doors, estate gates, home or outdoor
lighting systems, and other devices.
You must first program the Homelink® transmitter before you can
use the system~
page 121, "Programming the Homelink® trans
mitter" .
In order to program the Homelink® transmitte r for devices utili zing
rolling cod e, a second person on a ladder who can safely reach the
garage door opener motor is recommended. It is also necessary to
locate the "learn" button on your garage door opener motor . Refer
to the operating instructions for the opener, as the location and
color of this button may vary by manufacturer .
You can still use the original remote control for the device at any
time .
& WARNING
• Never use the Homelink"" transmitter with any garage door
opener that does have not the safety stop and reverse feature as
required by federal safety standards. This includes any garage
door opener model manufactured before April 1, 1982.
• A garage door opener which cannot detect an object, signaling
the door to stop and reverse does not meet current federal safety standards. Using a garage door opener without these features
increases risk of serious injury or death .
Con tro ls and eq uip
ment
& WARNING (continued)
• For safety reasons never release the parking brake or start the
engine while anyone is standing in front of the vehicle.
• A garage door or an estate gate may sometimes be set in
motion when the Homelink® remote control is being
programmed .
If the device is repeatedly activated, this can over
strain motor and damage its electrical components -an over
heated motor is a fire hazard!
• To avoid possible injuries or property damage, please always
make absolutely certain that no persons or objects are located in
the range of motion of any equipment being operated. •
Applies to vehi cles : wit h Home link ® un iv ers al re mote co ntrol
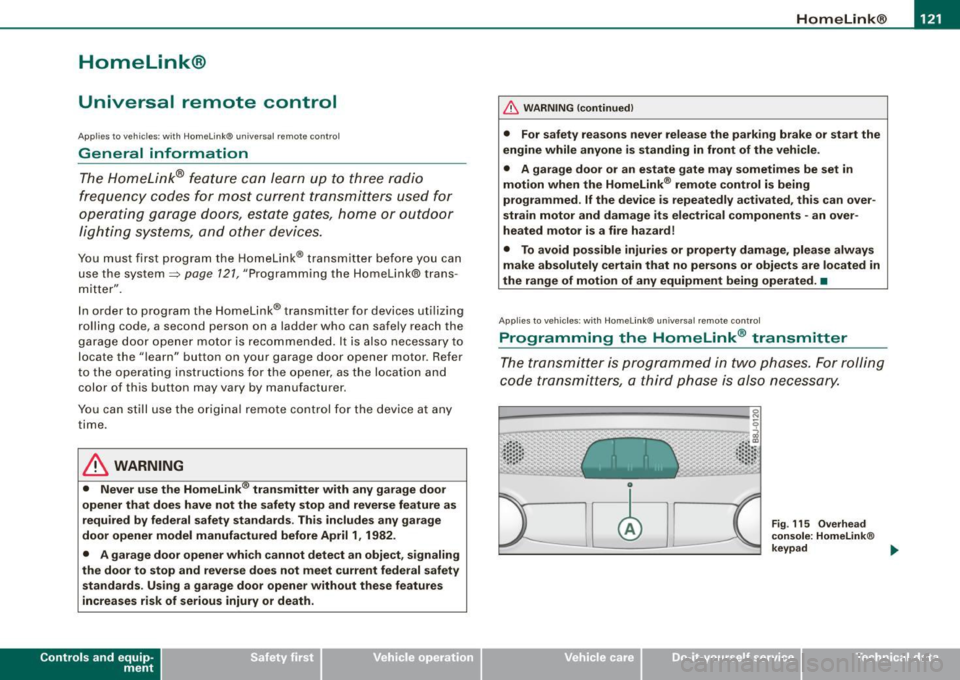
Programming the Homelink ® transmitter
The transmitter is programmed in two phases. For rolling
code transmitters, a third phase is also necessary.
0
Vehicle care I I
Fig. 115 Overhead
console: Homelink®
keypad ...
irechnical data
Page 124 of 316
-L_!H~o~m~ e~L:!!in~ k~®~------------------------------------------------
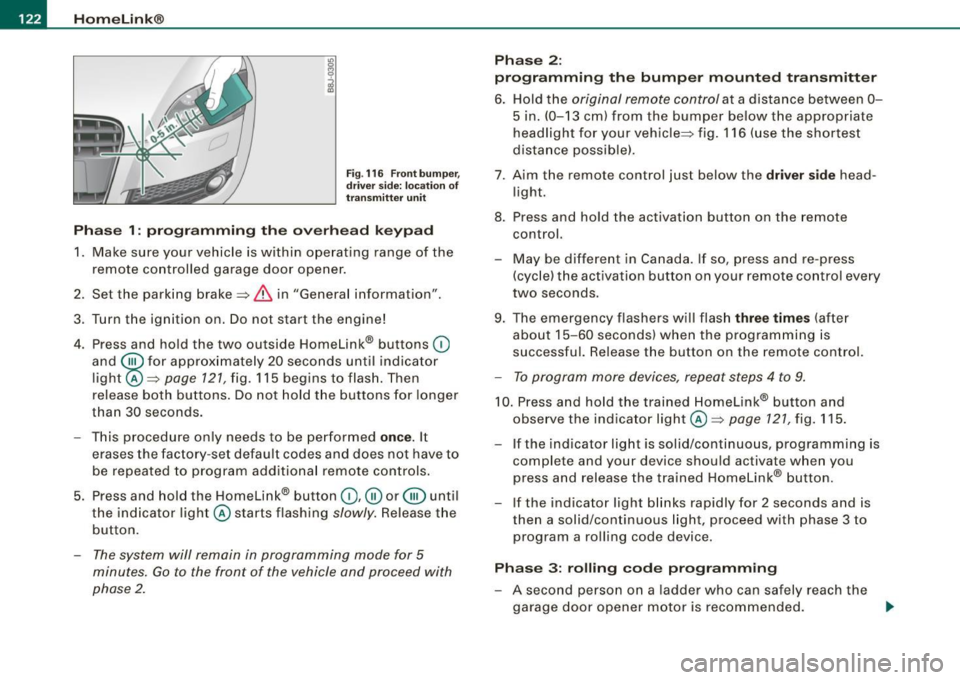
Fig . 116 Front bumper ,
driver side: location of
transmitter unit
Phase 1: programming the overhead keypad
1. Make sure your vehicle is within operating range of the
remote controlled garage door opener.
2. Set the parking brake::::,
& in "Genera l information".
3. Turn the ignition on. Do not start the engine!
4. Press and hold the two outside Homelink® buttons
(D
and @f or approxim~tely 20 sec_onds until indicator
light@::::,
page 121, fig. 115 begins to flash. Then
release both buttons. Do not hold the buttons for longer
than
30 seconds.
- This procedure only needs to be performed
once. It
erases the factory-set default codes and does not have to
be repeated to program additional remote controls.
5. Press and hold the Homelink® button
(D , ® or @ until
the indicator light@starts flashing
slowly. Release the
button.
- The system will remain in programming mode for 5
minutes.
Go to the front of the vehicle and proceed with
phase 2.
Phase 2:
programming the bumper mounted transmitter
6. Hold the original remote control at a distance between 0-
5 in. (0-13 cm) from the bumper below the appropriate
headlight for your vehicle::::, fig.
116 (use the shortest
distance possible).
7 . Aim the remote control just below the driver side head
light.
8. Press and hold the activation button on the remote control.
- May be different in Canada. If so, press and re-press
(cycle) the activation button on your remote control every
two seconds.
9. The emergency flashers will flash three times (after
about
15-60 seconds) when the programming is
successful. Release the button on the remote control.
- To program more devices, repeat steps 4 to 9.
10. Press and hold the trained Homelink® button and
observe the indicator light @::::,
page 121, fig. 115.
If the indicator light is solid/continuous, programming is
complete and your device should activate when you
press and release the trained Homelink® button.
- If the indicator light blinks rapidly for 2 seconds and is
then a solid/continuous light, proceed with phase 3 to
program a rolling code device.
Phase 3: rolling code programming
- A second person on a ladder who can safely reach the
garage door opener motor is recommended.
~
Page 307 of 316
______________________________________________ A_ l_,_ p _h_ a_ b_e _t_ic _ a _ l _in _ d_e _ x __ _
Heated
front seats (climate control) .... .... 104
rear window ...... ....... ..... ... 103
Heated outside mirrors ... .. .... .... .. 83
Heated seats .................. .... . 104
Seats ...... ...... .... ........ ... 104
Heated washer jets
Wiper and washer system . ......... 78
Heating .. .... ... .... .... ......... ... 98
High beam ...... ................. 69, 76
Warning/indicator lights ... ... .... .. 18
High voltage warning label ........... 288
Homelink® ... .. .... .... ........... 121
Homelink® universal remote control ... 121
Hood Opening .. ............... ... .... 219
Release lever .................... 219
Horn ......... ... .. .... .... ...... ... 11
How many airbags does my vehicle have? . .
153
How often should I check my tire pressures?
245
How safety belt tensioners work .... ... 144
Hydroplaning ........ .... .... .... ... 249
I
Igni tion key 106
Ignition lock ...... ...... .... ...... .. 106
Ignition lock positions ............... 106
Immobili zer ... ............. ..... ... . 14
Important things to do before driving .. 128
Controls and equip
ment Safety first
Improperly
worn safety belts ... .. ... .. 144 K
Indicator light
Airbag system ........ .... .... ... 157 Key .....
........ ........ ...... ... .. . 47
Audi magnetic ride ................ 17 Battery replacement ......
.... .... . 49
PASSENGER AIR BAG OFF ... ....... 157 Conven
ience opening and closing of pow-
Indicator lights .. ...... .... .... ...... 16
Infant seats ........ ...... ... .... ... 173
How do I properly insta ll an infant seat in
my vehicle? ....... ...... ....... 173
Safety instructions ......... ....... 173
Inside rearview mirror ......... ...... . 82
Installing child safety seats
Safety belts ...................... 177
Instrument cluster and controls . ...... . 12
Instrument panel
Illumination ......... ............. 74
Ins truments and controls
Genera l il lustration ................ 11
Interior lights ....... ..... ....... .... . 77 er top
... .... .... ... ............ 63
Convenience opening and closing of windows ............ .... ........ 58
Emergency key .. ...... ............ 47
Key replacement ......... .... ..... 47
Master key . ...... .... ...... .... .. 47
Valet key ... .. .... .... .... .... .... 47
Key less entry remote contro l .......... . 48
Kick-down Automatic transmission ........... 117
Knee airbags ........ ... .... ........ 161
Description . ...... .... ....... .... 161
How they work ................... 163
Important safety instructions ... .... 163
Luggage compartment .. ....... .... 77
L
J Launch Control Program ............. 117
Jump start location ........... ... .... 279
Jump starting ...................... 279
Jumper cables ... ..... ...... .... .... 279
Jump-starting . ........ .... ... .. .... 278 Leather ...
... .... ....... .... ...... . 209
Cleaning ...... .... ..... .. .... ... 210
Leaving -home-function ................ 73
Lifting jack ......................... 269
Lift ing vehicle .... .................. 283
Light sensor defective ........... ...... 36
Light sensor package Automatic headlight control .. ....... 70
Vehicle operation Vehicle care Do-it-yourself service Technical data