fuse AUDI TT ROADSTER 2014 Owners Manual
[x] Cancel search | Manufacturer: AUDI, Model Year: 2014, Model line: TT ROADSTER, Model: AUDI TT ROADSTER 2014Pages: 244, PDF Size: 60.87 MB
Page 5 of 244
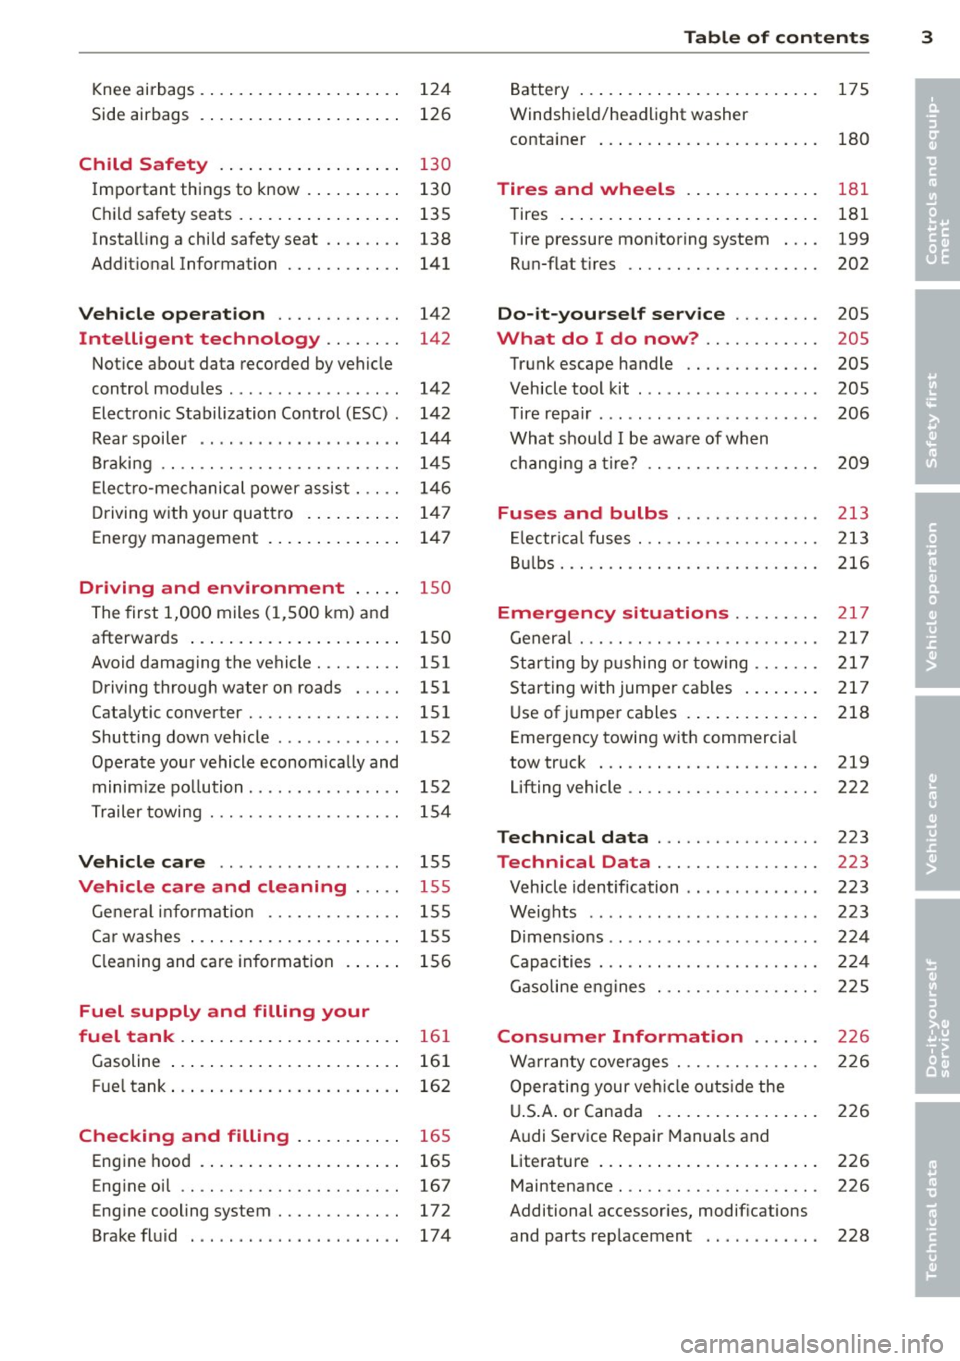
Knee airbags . . . . . . . . . . . . . . . . . . . . . 124
Side airbags . . . . . . . . . . . . . . . . . . . . . 126
Child Safety . . . . . . . . . . . . . . . . . . . 130
Important things to know ......... .
Child safety seats ................ .
Instal ling a chi ld safety seat .. .. .. . .
Additional Information ........... .
Vehicle operation ............ .
Intelligent technology .. .. .. . .
Notice about data recorded by vehicle
control modules .............. ... .
Electronic Stabilization Control (ESC) .
Rear spoiler ................ ... . .
Braking ........................ .
E lect ro-me chan ical power assis t ... . .
D riving w ith your quattro ......... .
Energy management ............. .
Driving and environment .....
The first 1,000 miles (1,500 km) and
afterwards .............. .. .. .. . .
Avoid damaging the vehicle ........ .
Driving through water on roads ... . .
Catalytic converter ............... .
Shutting down vehicle ............ .
Operate your vehicle economically and
minimize pollution ............... . 130
135
138
141
142
142
142
142
144
145
146
1 47
147
1 5 0
150
151
151 151
152
15 2
Tra iler towing . . . . . . . . . . . . . . . . . . . . 154
Vehicle care . . . . . . . . . . . . . . . . . . . 155
Vehicle care and cleaning . . . . . 155
General information . . . . . . . . . . . . . . 155
Car washes . . . . . . . . . . . . . . . . . . . . . . 155
Cleaning and care information . . . . . . 156
Fuel supply and filling your
fuel tank . . . . . . . . . . . . . . . . . . . . . . .
16 1
Gasoline . . . . . . . . . . . . . . . . . . . . . . . . 161
Fuel tank. . . . . . . . . . . . . . . . . . . . . . . . 162
Checking and filling . . . . . . . . . . . 16 5
Engine hood . . . . . . . . . . . . . . . . . . . . . 165
Eng ine oil . . . . . . . . . . . . . . . . . . . . . . . 167
Eng ine cooling system............. 172
Brake fluid ...................... 174
Table of contents 3
Battery . . . . . . . . . . . . . . . . . . . . . . . . . 175
Windshield/headlight washer
container . . . . . . . . . . . . . . . . . . . . . . . 180
Tires and wheels ........... .. .
Tires ..... .. .... .. . .. .......... .
Tire pressure monitoring system ... .
Run-flat tire s .. .. ............... .
Do-it-yourself service ........ .
What do I do now? ........... .
Trunk escape handle ............. .
Vehicle tool kit .... .............. .
T ire repai r .... ... .. ............. .
What should I be aware of when
h . t
' 7 c angmg a ire .................. .
Fuses and bulbs .. .. .. ..... ... .
El ectr ical fuses . .. .. ............. .
Bulbs .......................... .
Emergency situations ........ .
General ........................ .
Starting by pushing or towing ...... .
Starting with jumper cables ....... .
U se of jump er cables ............. .
Emergency towing with commercia l
tow truck ...................... .
Lifting vehicle .. .. ............... . 181
181
199
202
205
205
205
205
206
209
213
213
216
217
217
217
217
218
219
222
Technical data
. . . . . . . . . . . . . . . . . 223
Technical Data . . . . . . . . . . . . . . . . . 223
Vehicle identification . . . . . . . . . . . . . . 223
Weights . . . . . . . . . . . . . . . . . . . . . . . . 223
Dimensions . . . . . . . . . . . . . . . . . . . . . . 224
Capacities . . . . . . . . . . . . . . . . . . . . . . . 224
Gasoline engines . . . . . . . . . . . . . . . . . 225
Consumer Information . . . . . . . 226
Warranty coverages . . . . . . . . . . . . . . . 226
Operating your vehicle outside the
U.S. A. or Canada . . . . . . . . . . . . . . . . . 226
Audi Service Repair Manuals and
Literature . . . . . . . . . . . . . . . . . . . . . . . 226
Maintenance. . . . . . . . . . . . . . . . . . . . . 226
Additional accessories, modifications
and parts rep lacement . . . . . . . . . . . . 228
•
•
Page 22 of 244
20 Instruments and warning /indicator lights
speed displayed in the driver information sys
tem . Keep in mind that the engine speed will
not exceed the va lue disp layed in the driver in
formation system, for example when down
shifting.
Please go to an authorized Audi dea ler or oth
er qualified workshop to have the ma lfunction
repaired.
~ . Checking the engine oil level
II Please add max . 1 qt of engine oil!
If the II symbol comes on, add 1 quart (1 li
ter) of oil at the next opportunity
¢page 170.
~ ... Engine oil sensor defective
If the II symbol illuminates, contact your
author ized Audi dealer and have the oil sensor
inspected .
Bi) Fuel supply too low
When the 001 symbol illuminates, this means
there are about 1.9 gallons (7 liters) of fuel
left in the fuel tank. Time to refuel!
¢ page 162.
If the symbol lights up, even when there is
ample fuel in the tank, and the text
Tank sys
tem malfunction! Please contact workshop
appears in the display, there is a fault in the
system. Contact a qualified workshop to have
the fault rectified.
If the -symbol illum inates, add w indshield
washer f luid to the washer system
¢page 180.
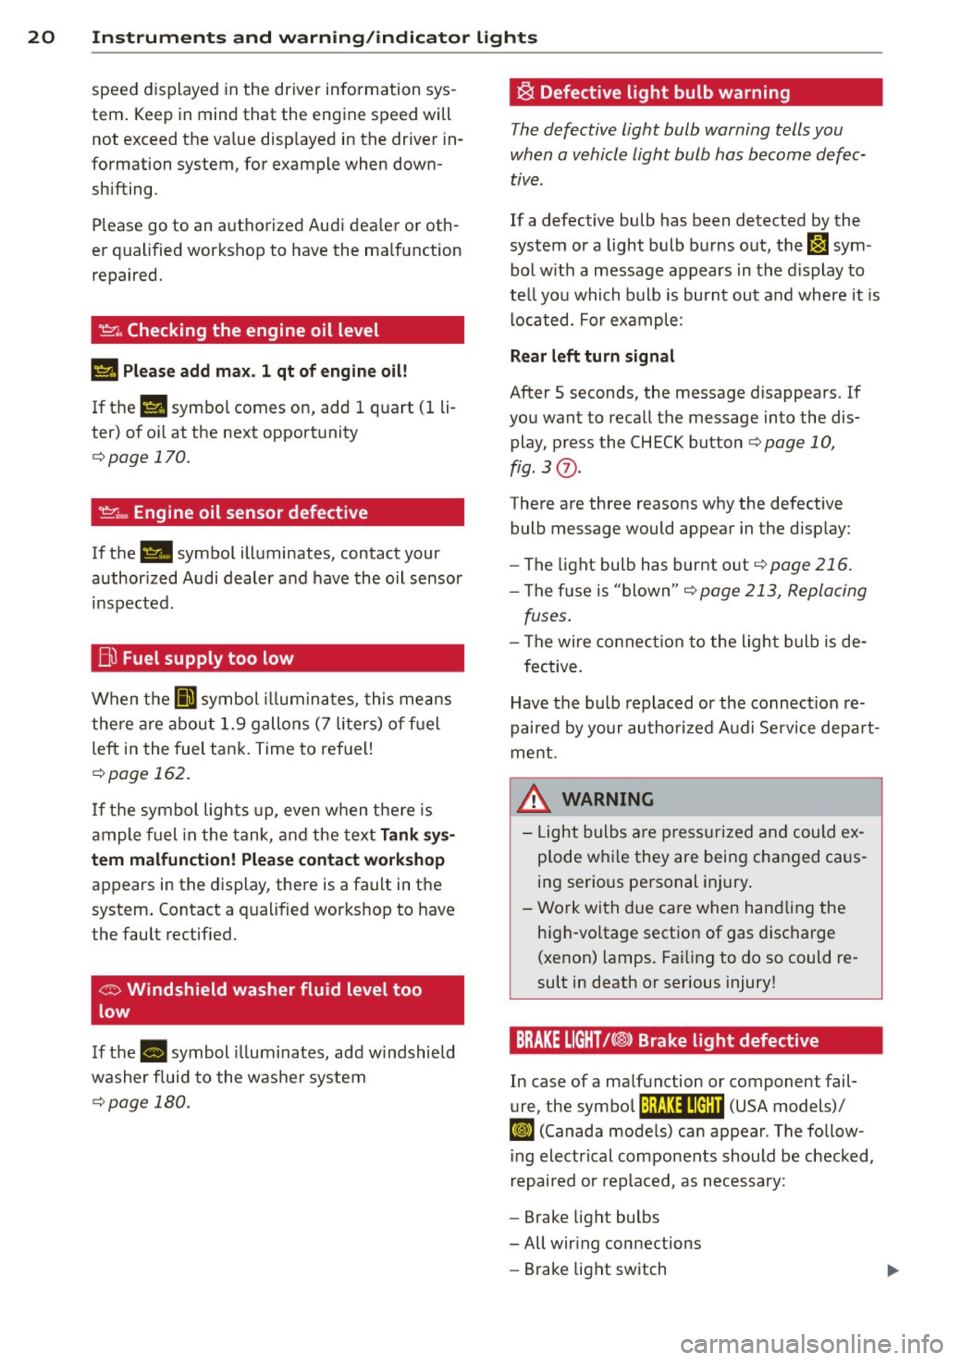
~ Defective light bulb warning
The defective light bulb warning tells you
when a vehicle light bulb has become defec
tive.
If a defective bulb has been detected by the
system or a light bulb burns out,
the m sym
bol w ith a message appears in the display to
te ll you which bulb is burnt out and where it is
located. For example :
Rear left turn signal
After 5 seconds, the message disappears. If
you want to recall the message into the dis play, press the CHECK button
¢ page 10,
fig. 3
(J) .
There are three reasons why the defective
bulb message would appear in the display:
- The light bu lb has burnt out
¢page 216.
-The f use is "blown" ¢ page 213, Replacing
fuses .
-The wire connection to the light bulb is de-
fective.
Have the bulb replaced or the connect ion re
paired by your authorized Aud i Service depart
ment .
A WARNING
-
-Light bulbs are pressurized and could ex
p lode while they are being changed caus
ing serious personal injury.
- Work with due care when handling the
high-vo ltage section of gas discharge
(xenon) lamps. Failing to do so could re
sult in death or serious injury!
BRAKE LIGHT!<®> Brake light defective
In case of a malfunction or component fail-
ure, the symbol (USA models)/
It:$
repaired or replaced, as necessary:
- Brake light bulbs
- All wiring connections
- Brake light switch
Page 215 of 244
Fuses and bulbs
Electrical fuses
Replacing fuses
Fuses that have blown will have metal strips
that have burned through.
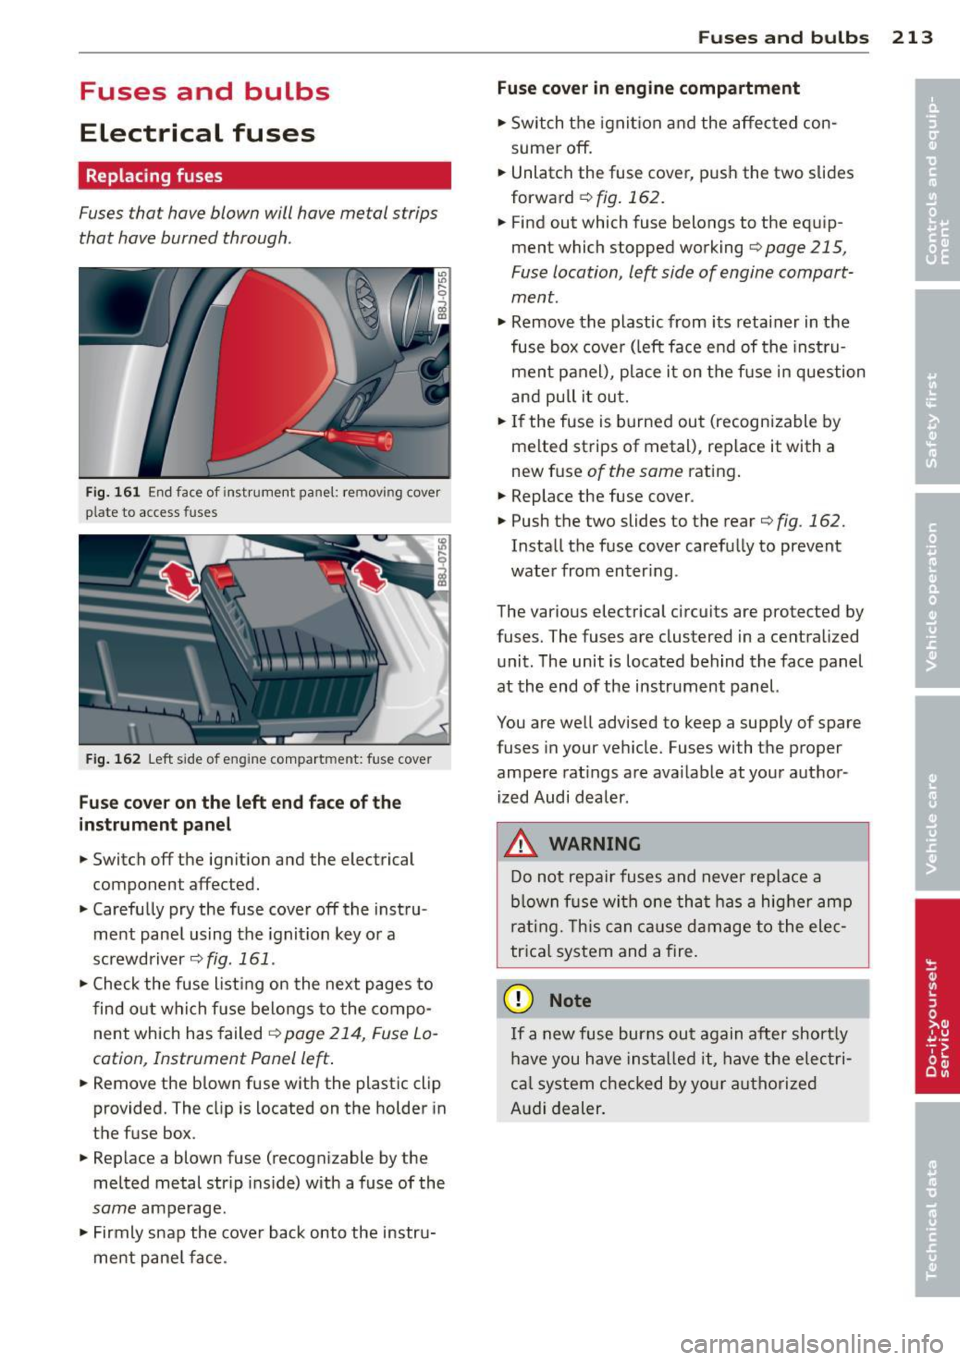
Fig. 161 End face of instrument panel: removing cover
p la te to access fuses
Fig . 162 Left side of eng ine compart ment: fuse cove r
Fuse cover on the left end face of the
instrument panel
.. Switch off the ignition and the electrical
component affected.
.. Carefully pry the fuse cover off the instru
ment panel using the ignition key or a
screwdriver
~ fig. 161 .
.. Check the fuse list ing on the next pages to
find out which f use belongs to the compo
nent which has failed
¢ page 214, Fuse Lo
cation, Instrument Panel left .
.. Remove the blown fuse with the plastic clip
provided. The clip is located on the holder in
t he fuse box .
.. Replace a blown fuse (recognizable by the
melted metal str ip inside) with a fuse of the
same amperage .
.. Firmly snap the cover back onto the instru
ment pane l face .
Fuses and bulbs 213
Fuse cover in engine compartment
.. Switch the ignit ion and the affected con
sumer off .
.. Unlatch the fuse cover, p ush the two slides
forward
~ fig. 162.
.. Fi nd out which fuse belongs to the equip
ment which stopped working
~page 215,
Fuse location, le~ side of engine compart
ment.
.. Remove the plastic from its retainer in the
fuse box cove r (left face end of the instru
ment panel), place it on the f use in question
and pull it out .
.. If the fuse is burned out (recogni zable by
melted strips of metal), replace it with a
new fuse
of the same rating .
.. Replace the fuse cover .
.. Push the two slides to the rear
¢ fig. 162.
Insta ll the fuse cover carefully to prevent
water from enter ing .
The various electrical circuits are protected by
fuses. The fuses are clustered in a centralized
unit. The unit is located behind the face panel
at the end of the instrument panel.
You are well advised to keep a supply of spare
fuses in your vehicle. Fuses with the proper
ampere ratings are available at your author
ized Audi dealer.
A WARNING
-
Do not repair fuses and never replace a
b lown fuse with one that has a higher amp
rating. This can cause damage to the elec
trica l system and a fire.
(D Note
If a new fuse burns out again after short ly
have you have installed it, have the electri
ca l system checked by your authorized
Audi dealer.
Page 216 of 244
214 Fuses and bulbs
Fuse Location, Instrument Panel left
0
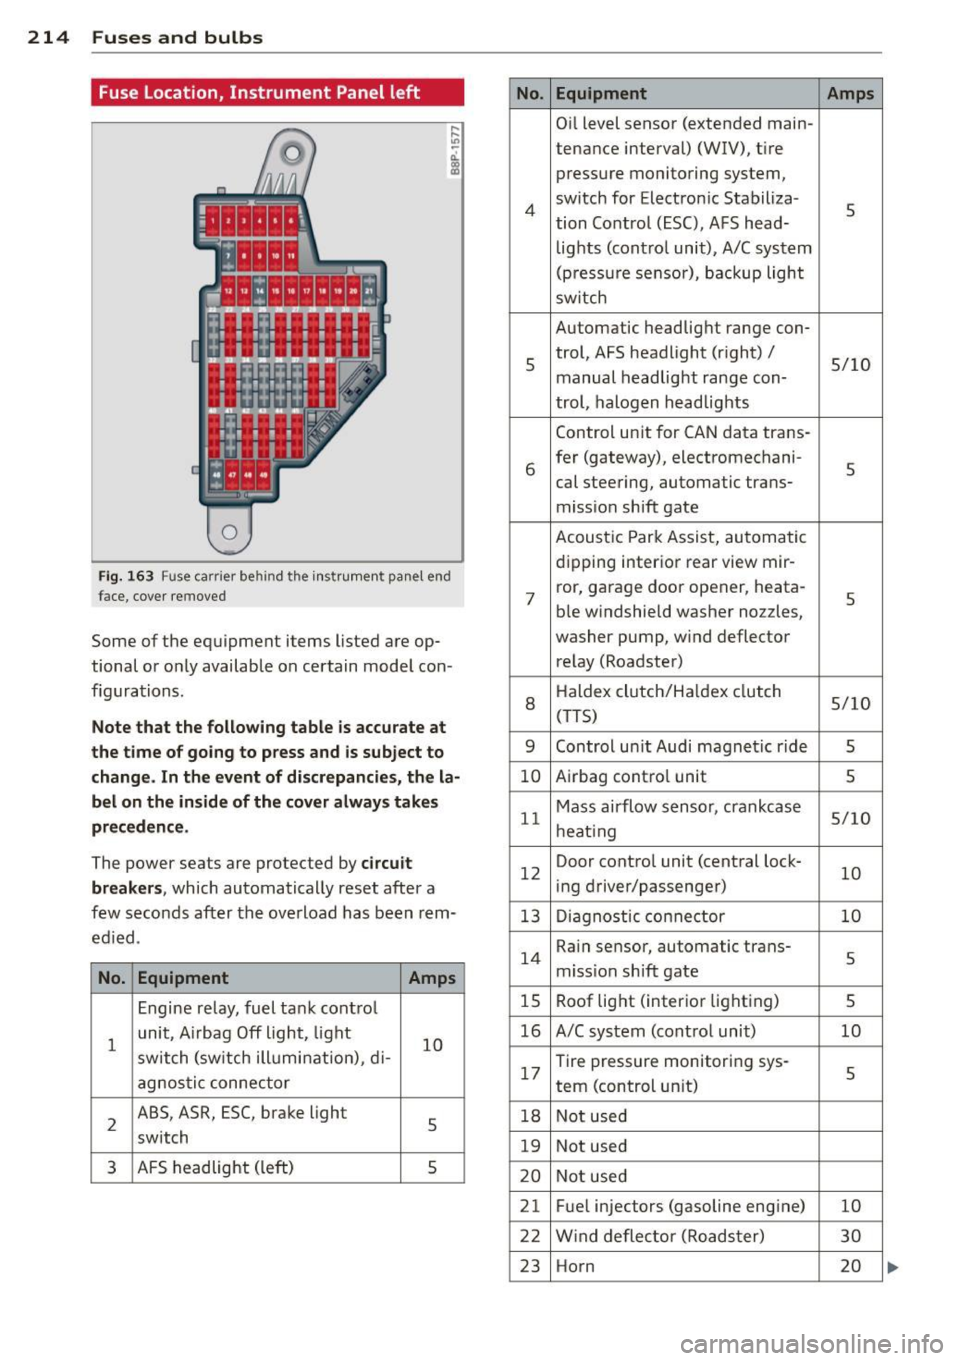
Fi g. 163 Fuse carrier behind the instrument panel end
face, cove r removed
Some of the equipment items listed are op
tional or only available on certain model con
figurations .
Note that the following table is accurate at
the time of going to press and is subject to
change. In the event of discrepancies, the la
bel on the inside of the cover always takes
preceden ce .
The power seats are protected by circuit
breaker s,
which automatically reset after a
few seconds after the overload has been rem
ed ied.
No . Equipment Amps
Engine relay, fuel tank control
1
unit, A irbag Off light, light
10 switch (sw itch illumination), d i-
agnos tic connector
2
ABS, ASR, ESC, brake light
5 switch
3 AFS headlight (left) s
No.
4
5
6
7
8
9
10
11
12
13
14
15
16
17
18
19
20
21
22
23
Equipment Amps
Oil level sensor (extended main-
tena nce interval) (WIV), tire
pressure monitoring system,
switch for Electronic Stabiliza-
s tion Control (ESC), AFS head-
lights (control unit), A/C system
(pressure sensor), backup light
sw itch
Automatic headlight range con-
trol, AFS headlight (right) /
5/10
manual headlight range con-
trol, halogen headlights
Control unit for CAN data trans-
fer (gateway), electromechani-
s cal steering, automatic trans-
mission shift gate
Acoustic Park Assist, automatic
dipping interior rear view mir- ror, garage door opener, heata-
s ble windshield washer nozzles,
washer pump, wind deflector
relay (Roadster)
H aldex clutch/Ha ldex clutch
5/10 (T TS)
Control un it Audi magnetic ride
s
Airbag contro l unit s
Mass airflow sensor, crankcase 5/10
heating
Door control unit (central lock-
10 ing driver/passenger)
Diagnostic connector
10
Rain sensor, automatic trans-
s miss ion shift gate
Roof light (interior lighting)
5
A/C system (control unit) 10
Tire pressure monitoring sys-
5 tern (control un it)
Not used
Not used
Not used
Fuel injectors (gasoline engine)
10
Wind deflector (Roadster) 30
Horn 20
Page 217 of 244
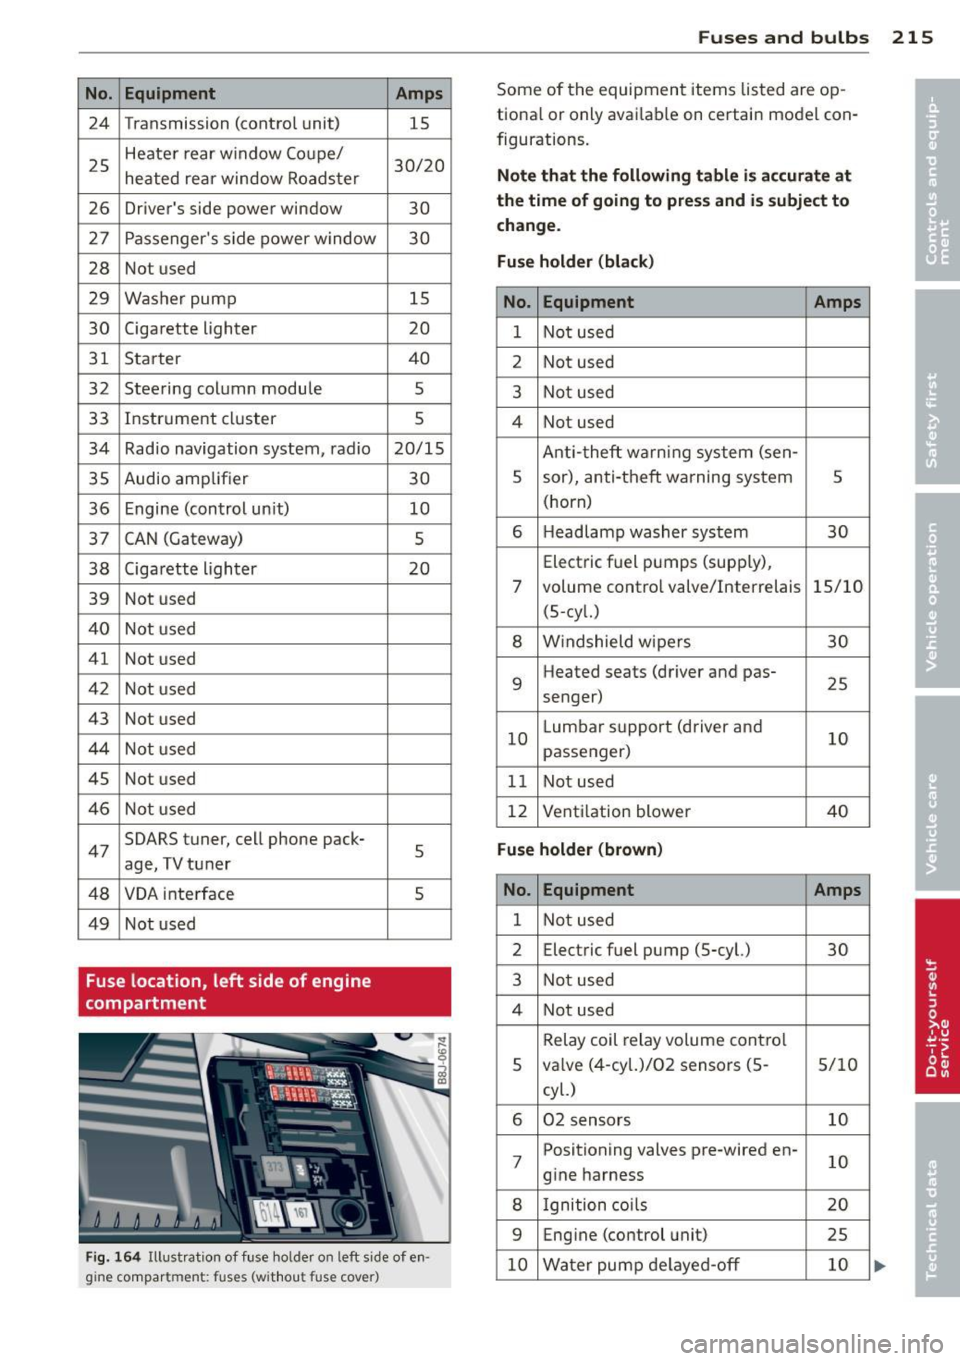
No. Equipment 24 Transmission (control unit)
25 Heater rear window Coupe/
heated rear window Roadster
26 Driver's side power window
27 Passenger's s ide power window
28 Not used
29 Washer pump
30 Cigarette lighter
31 Starter
32 Steering column module
33 Instrument cluster
34 Radio navigation system, radio
35 Audio amplifier
36 Engine (control un it)
37 CAN (Gateway)
38 Cigarette lighter
39 Not used
40 Not used
41 Not used
42 Not used
43 Not used
44 Not used
45 Not used
46 Not used
47 SOARS
tuner, cell phone pack-
age, TV tuner
48 VOA inte rface
49 Not used
Fuse location, left side of engine
compartment Amps
15
30/20
30
30
15
20
40
5
5
20/15
30 10
5
20
5
5
Fig. 164 Illustrat ion of fuse ho lder on left side of en
gine compart ment: fuses (without fuse cover)
Fuse s and bulb s 215
Some of the equipment items listed are op
tiona l or only avai lab le on certain model con
figurations.
Note th at the foll owing t abl e is ac cur ate at
the time of going t o pre ss and i s subject to
ch ang e.
Fus e holder (bla ck )
No. Equipment Amps
1 Not used
2 Not used
3 Not used
4 Not used
Anti-theft warning system (sen-
5 sor), anti-theft warning system
5
(horn)
6 H
eadlamp washer system
30
Electric f uel pumps (supp ly),
7 volume contro l valve/Interrelais 15/10
(5-cy l.)
8 W indshield w ipers 30
9 Heated
seats (driver and pas-
25
senger)
10 L
umbar support (driver and
10
passenger)
11 Not used
12 Vent
ilation blower
40
Fu se holder (brown )
No. Equipment Amps
1 Not used
2 Electric
fuel pump (5-cyl.)
30
3 Not used
4 Not used
Relay coil relay volume cont ro l
5 va
lve (4-cy l.)/02 sensors (5 -
5/10
cyl.)
6 02 sensors 10
7 Positioning valves pre-wired en-
10
g ine harness
8 Ignition coi ls 20
9 Eng
ine (control unit)
25
10 Water pump de layed-off 10
Page 218 of 244

216 Fuse s a nd bul bs
No. Equipment Amps
11 Feed (brake pedal) 5
12
Activated charcoal fi lter/charge
10 pressure contro l valve
Bulbs
Replacing light bulbs
For your safety, we recommend that you have
your authorized Audi dealer replace burned
out bulbs for you .
It is becoming increasingly more and more
difficult to replace vehicle light bulbs since in
many cases, other parts of the car must first
be removed before you are able to get to the
bulb . Th is appl ies especially to the l ight bulbs
in the front of your car which you can only
reach through the engine compartment.
Sheet metal and bulb holders can have sharp
edges that can cause ser ious cuts, and parts
must be co rrectly taken apart and then prop
e rly put back together to help prevent break
age of parts and long term damage from wa
ter that can enter housings that have not been properly resealed.
For your safety, we recommend that you have
your author ized Audi dealer replace any bulbs
for you, since your dealer has the proper tools,
the correct bu lbs and the expertise.
Gas disc harg e la mps (X enon l ig ht s}*:
Due to the high electrical voltage, have the
bulbs replaced by a qualified technician.
Headlights with Xenon light can be identified
by the high voltage sticker.
A WARNING
Contact with high-voltage components of
the electrical system and improper re
placement of gas discharge (Xenon) head
light bulbs can cause serious personal in
jury and death.
- Xenon bulbs are pressurized and can ex
plode when being changed. -
Changing Xenon lamps requires the spe
cial tra ining, instructions and equip
ment.
- Only an authorized Audi dealer or other
qualified workshop should change the
bulbs in gas discharge lamps.
A WARNING
=
There are parts with sharp edges on the
openings and on the bulb holders that can
cause ser ious cuts.
- If you are uncertain about what to do,
have the work performed by an author
ized Audi dealer or other qualified work
shop. Serious personal injury may result
from improperly performed work.
@ Tips
- If you must replace the light bulbs your
self, a lways remember that the eng ine
compartment of any vehicle is a hazard
ous area to work in. A lways read and
heed all WARNINGS
¢page 165, Work
ing in the engine compartment¢.&..
-It is best to ask your authorized Audi
dealer whenever yo u need to change a
bulb .
-
Page 236 of 244
234 Index
F
Fan ... . ... ... .. .. ..... ... .. .. .... .. 69
Radiator ... .. . .. ..... ... .. .. .... . 174
Fasten ing
B ooste r seats ............ .... .. .. .
137
Conve rtible c hild safety se ats . .. .. .. . 135
Infant sea ts
F lat t i re 13 5
Changing .. ... ......... ... .. .. ... 209
Floor mats . . . . . . . . . . . . . . . . . . . . . . . . . . 97
Fog lights . . . . . . . . . . . . . . . . . . . . . . . . . . 5 0
Fo ld ing master key w ith remote contro l .. 32
Foot pedals . . . . . . . . . . . . . . . . . . . . . . . . . 97
For the sake of the environmen t
G asoline fumes and the environmen t ..
163
Le tting you r engine warm up ... .. .. . . 74
Refue ling . . . . . . . . . . . . . . . . . . . . . . . . 163
Saving fue l by early upshifting . ..... . . 10
Fr ont airbags
D escr ipt ion . . . . . . . . . . . . . . . . . . . . . . .
113
H owtheywork ...... .......... .... 118
Fronta l collisions and the laws of physics 102
F ront seats . . . . . . . . . . . . . . . . . . . . . . . . . 60
Ad justing ....................... ..
94
Ad just ing the manual seats . .... .... .. 61
C hi ld restra ints in the front seat ... .. . 110
Fu el
Additives ... ... . ...... ... .. .. .... .
161
Blended gasoline ........... .. .... . 161
Current fuel mileage . . . . . . . . . . . . . . . . 23
Fill er neck .. .. .. ...... .... ... .. .. . 162
Fue l gauge . ... ......... ... .. .. ... . 12
Fuel supp ly too low . . . . . . . . . . . . . . . . . 20
Gasoline ... ... .......... .. .. .. .. . 16 1
Gasoline additives ........ .... .... . 162
Octane rating . ........... .. .. .. .. . 16 1
Recommendation .... ... .. .. .. .... . 161
Refue lling . .. .. .. ..... ... .. .. .... . 163
Reserve . ... ... . ...... ... .. .. .... .. 1 2
Tank capacity .............. .. .... . 224
Unlock ing the fue l filler flap by hand .. 164
Fu el economy messages (efficiency pro-
gram) ... .... ... . ...... ... .. .. .... ..
27
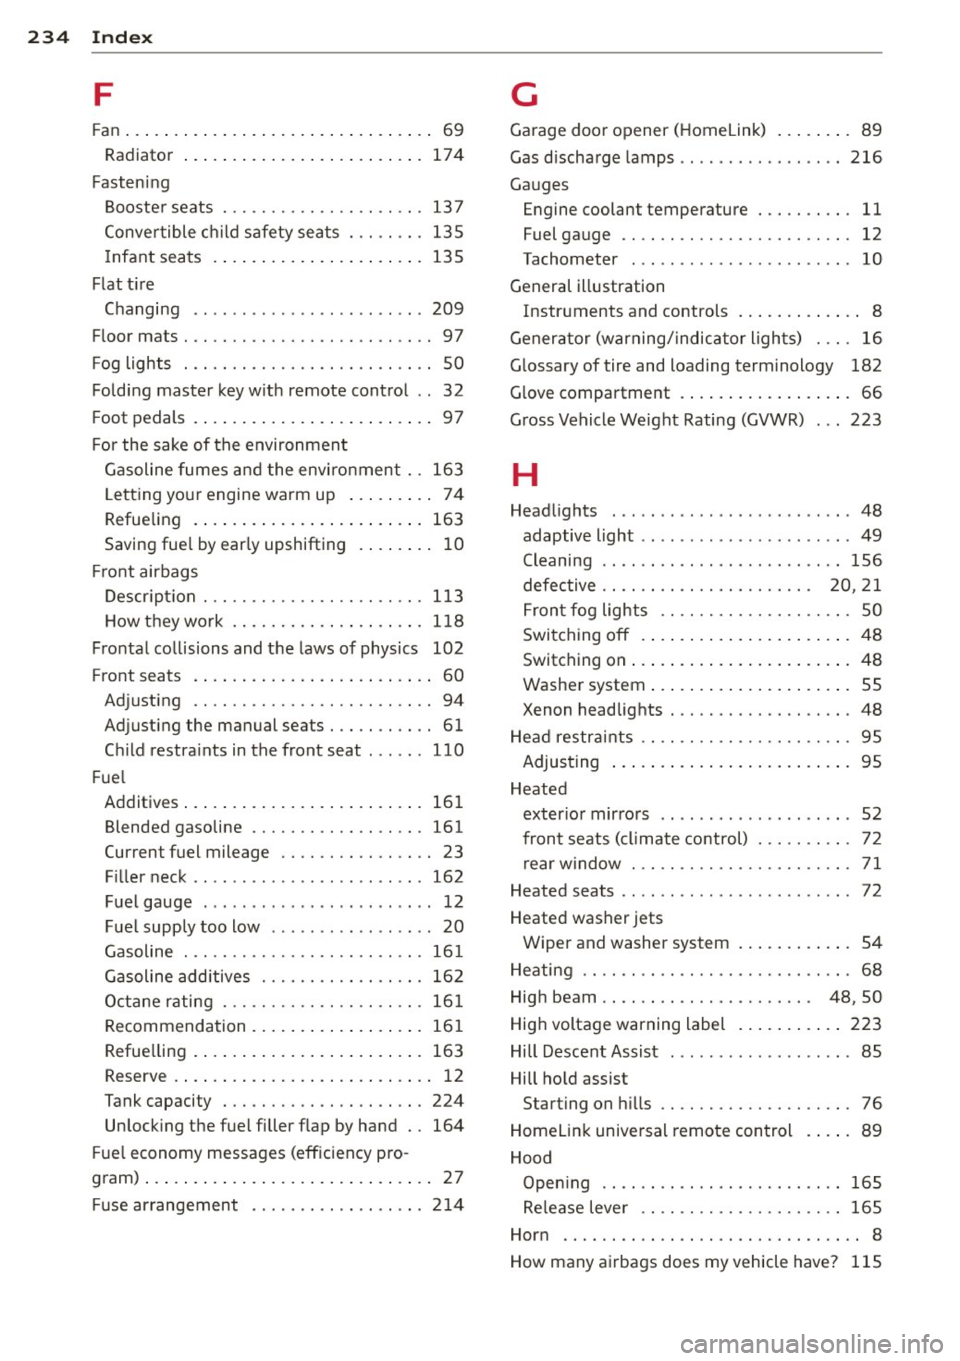
Fuse ar rangement ....... .. .. .. .. .. . 2 14
G
Garage doo r opener ( Homelink) .... . .. . 89
Gas discha rge lamps ..... .. ... ..... ..
2 16
Ga uges
Engine coolant temperature . . . . . . . . . .
11
Fuel gauge . . . . . . . . . . . . . . . . . . . . . . . . 12
Tachometer . . . . . . . . . . . . . . . . . . . . . . . 10
General illustration
Instruments and controls .. ... .. .. .. .. 8
Generator (warning/ indicator l igh ts) . .. .
16
G lossary of tire and loading terminology 182
G love compartment . . . . . . . . . . . . . . . . . . 66
G ross Vehicle We ight Rating (GVWR) ... 223
H
Head lights ..... .. .......... ... ... .. 48
adaptive light . . . . . . . . . . . . . . . . . . . . . . 49
Cleaning . . . . . . . . . . . . . . . . . . . . . . . . . 156
defective . . . . . . . . . . . . . . . . . . . . . . 20, 2 1
Fron t fog lights . . . . . . . . . . . . . . . . . . . . 50
Switching off .... ... .. ..... ... .. .. . 4 8
Switching on ..... .. ... ..... ... .. .. . 48
Washe r system . . . . . . . . . . . . . . . . . . . . . SS
Xenon headlights .............. .. .. . 48
He ad restr aints .. .. ............. .. ... 95
Adjusting ..... .. .. .... .... ... .. .. . 95
Heated
exter io r mir ro rs . . . . . . . . . . . . . . . . . . . .
52
fron t seats (cl ima te control) ..... .. .. . 72
rear window ...................... . 71
Heated seats . . . . . . . . . . . . . . . . . . . . . . . . 72
Heate d washer jets
Wiper and washer system .. ... .. .. .. .
54
H eating .. .. ...... ............. ..... 68
Hig h beam . . . . . . . . . . . . . . . . . . . . . . 48, 50
High voltage warning label .. ... .. .. .. 223
Hill Descent Assist . ... .. ......... ... . 85
Hill ho ld assist
Starting on hills ............... .....
76
Homel in k unive rsal remote control . ... . 89
Hood Open ing .. .. .. .. .................
165
Re le a se lever . . . . . . . . . . . . . . . . . . . . . 165
Hor n .... .. .. .. .. ............... .. .. 8
How many ai rba gs does my vehicle have?
115
Page 239 of 244
Programming the Homelink universa l re
mote contro l . . . . . . . . . . . . . . . . . . . . . . . . 89
Pr oper occupa nt seating posit ions .. .. .. 93
Proper safety belt pos ition . . . . . . . . . . . . 105
P roper seat ing position
Fr ont passenger .. ..... ... .. .. .. .... 94
Occupants .. .... .. .... ... .. .. .. .... 93
Pr otec ting . .. .. ........... .. .. .. ... 157
Q
Quartz clock . . . . . . . . . . . . . . . . . . . . . . . . 11
q uattro
refer to All-wheel dr ive .... .. .. .. .. . 147
Question What happens to unbelted occupants? 102
Why safety be lts? ..... ... .. .. .. .. . 10 1
R
Radiato r fan ... ... ..... ... .. .. .. ... 174
Ra in sensor defect ive . . . . . . . . . . . . . . . . . 21
Reading lights . ... .. .... ... .. .. .... .. 51
Rear lid ... .. .. ........... .. .. .. .... 37
Emergency release . . . . . . . . . . . . . . . . . . 38
Rear lig ht defective . . . . . . . . . . . . . . . . . . 20
Rear spoiler . ... .... .... ... .. .. .. ... 144
Rear view mir ro r . . . . . . . . . . . . . . . . . . . . . 53
Rear window defogger . . . . . . . . . . . . . . . . 71
Refue lling ... .. .... .... ... .. .. .. ... 163
Release lever for hood .. .... .. .. .. .. . 165
Remote control . . . . . . . . . . . . . . . . . . 33, 36
Remote cont rol garage door opene r
( H omelink) . . . . . . . . . . . . . . . . . . . . . . . . . 89
Remote master key Un lock ing and locking ........ .... ... 35
Remote rear lid release . . . . . . . . . . . . . . . 3 7
Rep air manua ls ............ .... .. .. . 226
Repa irs
A irbag system ... ... ..... .. .. .. .. . 122
Replacement parts ......... .. .. .. .. . 228
Replacing Wheel rims ... .. .. .... ... .. .. .... . 192
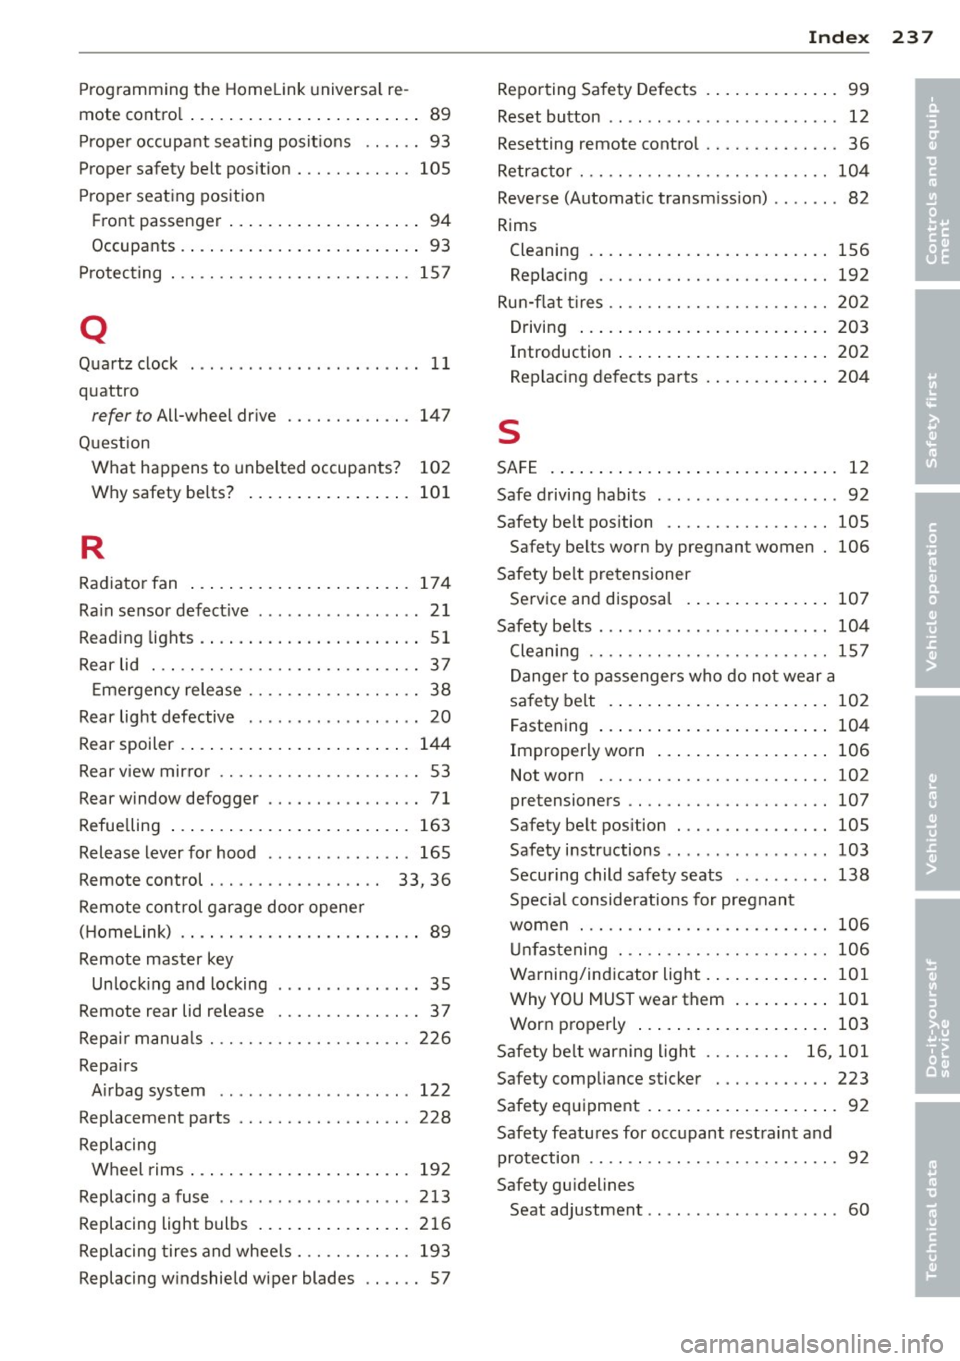
Replacing a fuse . . . . . . . . . . . . . . . . . . . . 213
Replacing light bulbs .... ... .. .. .. .. . 216
Replacing tire s and wheels . .. .. .. .. .. . 193
Replacing w indshield wiper blades .. .. .. 57
Inde x 237
Reporting Sa fety Defects . ..... ... .. .. . 99
Reset button . . . . . . . . . . . . . . . . . . . . . . . . 12
Resetting remote contro l ......... .. .. . 36
Retractor . . . . . . . . . . . . . . . . . . . . . . . . . . 10 4
Reverse (Automat ic transm iss ion) . . . . . . . 82
Rims Cleaning . ... .. .. .. . .. ... .... ... .. 1S6
Replacing . .. .. .. ................. 192
Ru n-flat tires .. .. .. ................. 202
Drivi ng ... .. .. .... . ... ...... ... .. 203
Introduction . . . . . . . . . . . . . . . . . . . . . . 202
Rep lacing de fects parts . ..... ... .. .. 204
s
SA FE . ... .. .. .. .... .. .. ...... ... .. . 12
Safe driving habits ................. .. 92
Safety be lt pos ition .... ............. 105
Safety be lts worn by pregnant women 106
Safety be lt pretensioner
Se rvice an d disposa l ... .. ..... ... .. 107
Safety be lts . .. .. .... ... .. ..... ..... 104
Cleaning .. .. .. .. .. . .............. 15 7
Danger to passengers who do not wear a
sa fe ty belt . ..... .. . .. .. ..... ... .. 10 2
Fastening ... .... .. . .. .. ..... ... .. 104
Improperly worn ... . ... ...... ... .. 106
Not worn . .. .. .. ................. 102
pretensioners .. .. ................. 107
Safe ty be lt pos ition . ... .. ..... ... .. 105
Safety i nstructions .. .............. . 103
Secu ring child safety seats .. ... ... .. 138
Spec ial considerations for pregnant
women ... .. .. .. .. . .............. 106
Unf astening . .. .. .. .. ........... .. 1 06
Warning/ind icator light . ..... ... .. .. 101
WhyYOUMUSTwearthem ... ... .. .. 101
Wor n properly ... .. . ... ...... ... .. 103
Safety be lt warning ligh t . . . . . . . . . 16, 101
Safety compliance sticker ........ .. .. 223
Safety equipment .. .. . ... ...... ... .. . 92
Safety featu res for occupant rest raint and
protection .. .. .. .. ................. . 92
Safety gu idelines
Seat adjustment . . . . . . . . . . . . . . . . . . . . 60
•
•