mirror controls AUDI TT ROADSTER 2014 Owners Manual
[x] Cancel search | Manufacturer: AUDI, Model Year: 2014, Model line: TT ROADSTER, Model: AUDI TT ROADSTER 2014Pages: 244, PDF Size: 60.87 MB
Page 55 of 244

_& WARNING
- Curved (i. e. convex) mirror surfaces in
crease your field of view. Remember that
vehicles or other objects will appear
smaller and farther away than when seen
in a flat mirror.
If you use this mirror to
estimate distances of following vehicles
when changing lanes, you could estimate
incorrectly and cause an accident.
CD Note
- If the mirror housing is moved uninten
tionally (for example, while parking your
vehicle), then you must first fold the mir ror electrically. Do not readjust the mir
ror housing manually. You could damage
the motor which controls the mirror .
- If you wash the vehicle in an automatic
car wash, you must fold the exterior mir
rors in to reduce the risk of damage to
the mirrors . Never fold power folding ex
terior mirrors* by hand. Only fold them in and out using the power controls .
@ Tips
If there should be a malfunction in the
electrical system, you can still adjust the
exterior mirrors by pressing the edge of
the mirror .
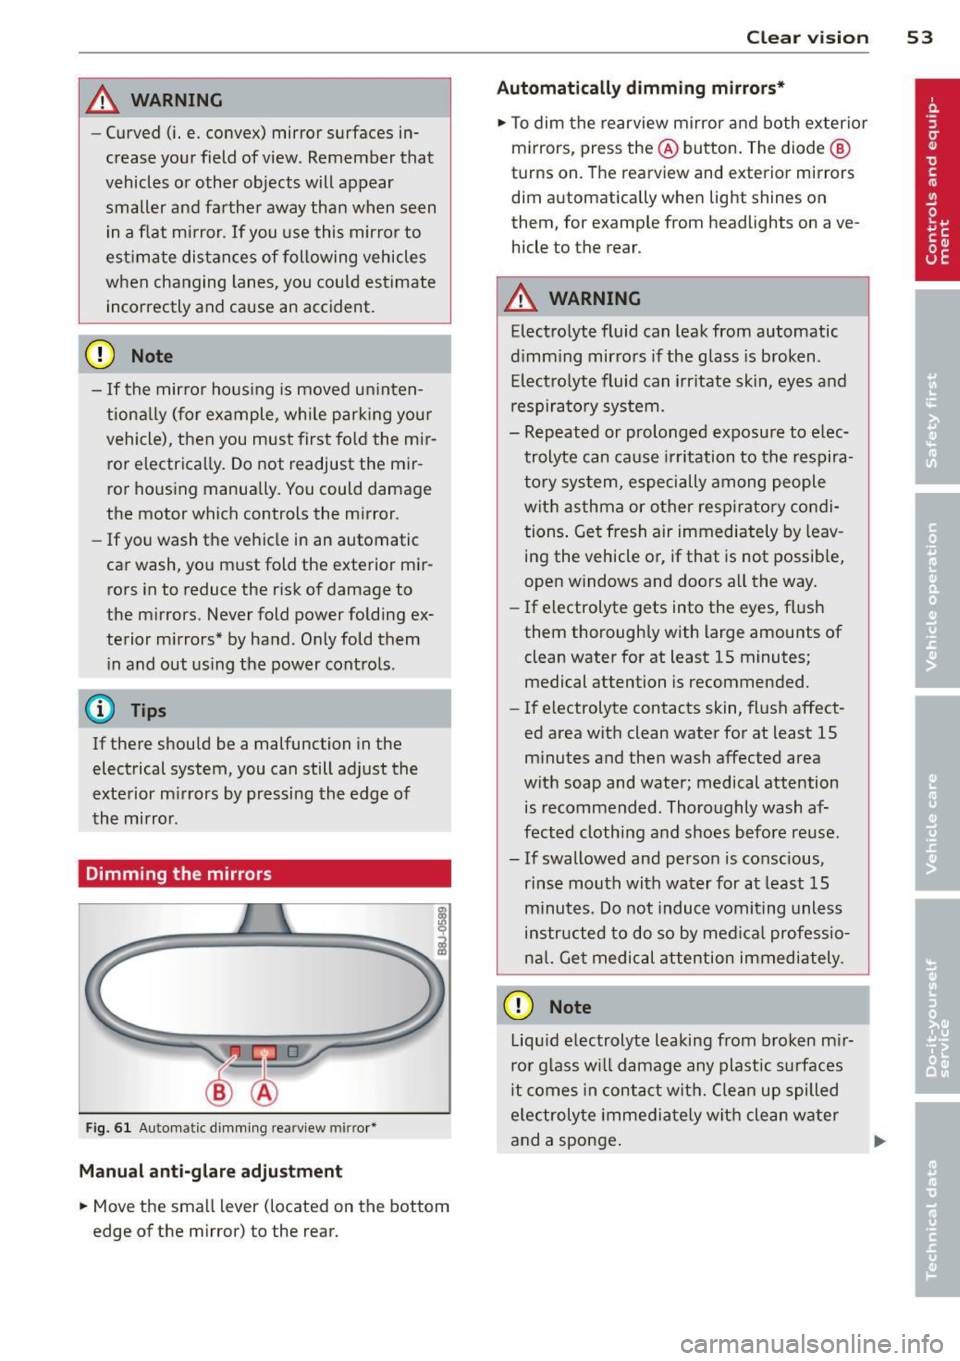
Dimming the mirrors
Fig. 61 Automa tic dimming re arview mirror•
Manual anti-glare adjustment
• Move the small l ever (located on the bottom
edge of the mirror) to the rear.
Clear vision 53
Automatically dimming mirrors*
• To dim the rearview mirror and both exterior
mirrors, press the @button. The diode @
turns on . The rearview and exterior mirrors
dim automatically when light shines on
them, fo r ex ample from headlights on ave
hicle to the rear .
_& WARNING
Electrolyte fluid can leak from automatic
dimming mirrors if the glass is broken .
Electrolyte fluid can irritate skin, eyes and
respiratory system.
- Repeated or prolonged exposure to elec
trolyte can cause irritation to the respira
tory system, especially among people
with asthma or other respiratory condi
tions. Get fresh air immediately by leav
ing the vehicle or, if that is not possible,
open windows and doors all the way.
- If electrolyte gets into the eyes, flush
them thoroughly with large amounts of
clean water for at least 15 minutes·
. '
medical attention is recommended.
- If electrolyte contacts skin, flush affect
ed area with clean water for at least 15 minutes and then wash affected area
with soap and water; medical attention is recommended. Thoroughly wash af
fected clothing and shoes before reuse .
- If swallowed and person is conscious, rinse mouth with water for at least 15
minutes. Do not induce vomiting unless
instructed to do so by medical professio
nal. Get medical attention immediately .
CD Note
Liquid electrolyte leaking from broken mir
ror glass will damage any plastic surfaces
it comes in contact with. Clean up spilled
electrolyte immediately with clean water
and a sponge. .,..
Page 56 of 244

54 Clear vis ion
@ Tips
- Switching off the dimming function of
the inside rear view mirror also deact i
vates the automatic dimming f unction of
the exterior m irrors.
- The automatic dimming mirrors do not dim when the interior lighting is turned
on or the reverse gear is selected .
-Automat ic dimming for the m irror only
operates properly if the light striking the inside mirror is not hindered in any way.
Sun visors
Using the sun visors makes driving safer.
Fi g. 62 Sun v iso r
The vanity mirrors in the sun v isors are equ ip
ped with lids. Push lid in direction of a rrow to
open.
Wiper and washer system
Windshield wiper
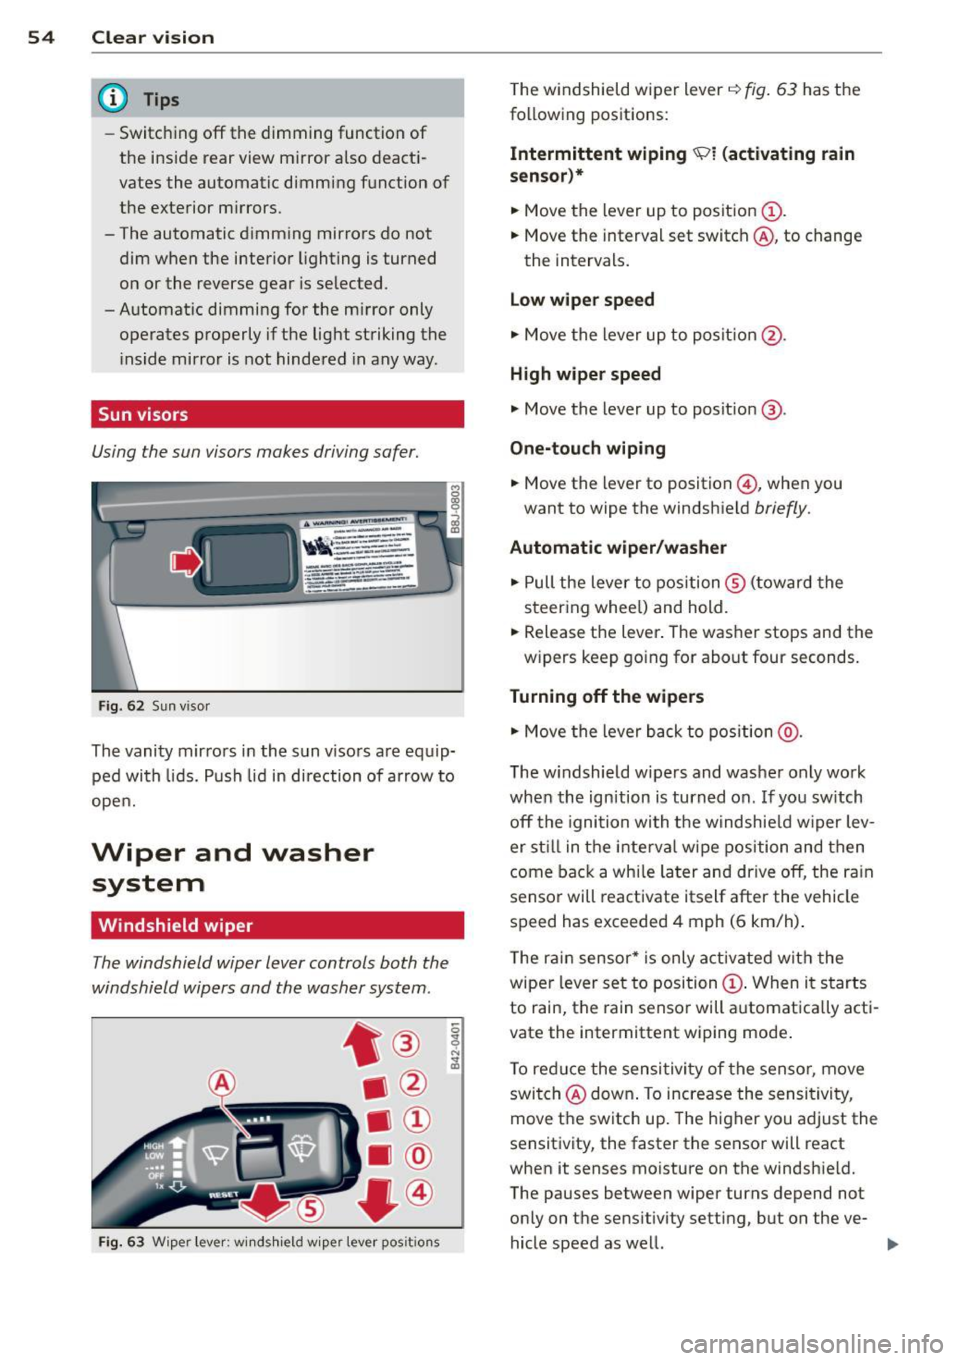
The windshield wiper lever controls both the
windshield wipers and the washer system .
Fig. 63 Wiper lever: win ds hield w iper lever pos it ions
T he windshield wiper lever i=:> fig. 63 has the
following positions:
Int ermittent wiping ~l (activating rain
s e nsor)*
.. Move the lever up to position (D .
.. Move the interval set switch @, to change
the intervals.
Low wiper spe ed
.. Move the lever up to posit ion @.
High w ipe r speed
.. Move the lever up to posit ion @.
One-touch wip ing
.. Move the lever to position @ , when you
want to wipe the windshield
briefly.
Automat ic wip er/ washer
.. Pull the lever to position ® (t oward the
steering whee l) and hold .
.. Release the lever . The washer stops and the
w ipers keep going for about four seconds.
Turning off the wipers
.. Move the lever back to position @ .
The w indshield w ipers and washer only work
when the ignition is turned on . If you sw itch
off the igni tion with the windshie ld w iper lev
er st ill in the inte rva l wipe position and then
come back a whi le later and drive off, the ra in
sensor will reactivate itself after the vehicle speed has exceeded 4 mph (6 km/h) .
T he rai n sensor* is only activated with the
wiper lever set to position
(D . When it starts
to rain, the rain senso r will a utomat ically acti
vate the intermittent wiping mode .
T o reduce the sensi tivity of the sensor, move
swi tch @ down . To increase the sensi tivity,
move the switc h up. The higher you adjust the
sensitivity, the faster the senso r will react
when it senses moisture on the windsh ield.
The pauses between wiper turns depend not only on the sensitivity setting, but on the ve-
hicle speed as well. ..,.
Page 60 of 244

58 Clear vis ion
- To help prevent damage to the wiper
arms or other components, do not at
tempt to move the wipers by hand .
@ Tips
-Commercial hot waxes applied by auto
matic car washes affect the cleanability
of the glass surface.
- The front wiper blades are different
l engths; the blade on the driver's side is
l onger.
Digital compass
Activating or deactivating the compass
Appl ies to vehicles: with digital compass
The direction is displayed on the interior rear
view mirror.
Fig. 66 Ins ide rear vi ew mirror: digita l compass acti·
vate d
,. To activate or deactivate, hold the@
i=> fig. 66 button down until the red display
appears or d isappears.
The digital compass only works with the igni
tion turned on. The direct ions are displayed as
in itials:
N (North), NE (Northeast), E (East),
SE (Southeast), S (South), SW (Southwest),
W (West), NW (Northwest).
(j) Tips
To avo id inaccurate directions, do not al
low any remote controls, electrical sys
tems, or metal parts close to the mirror.
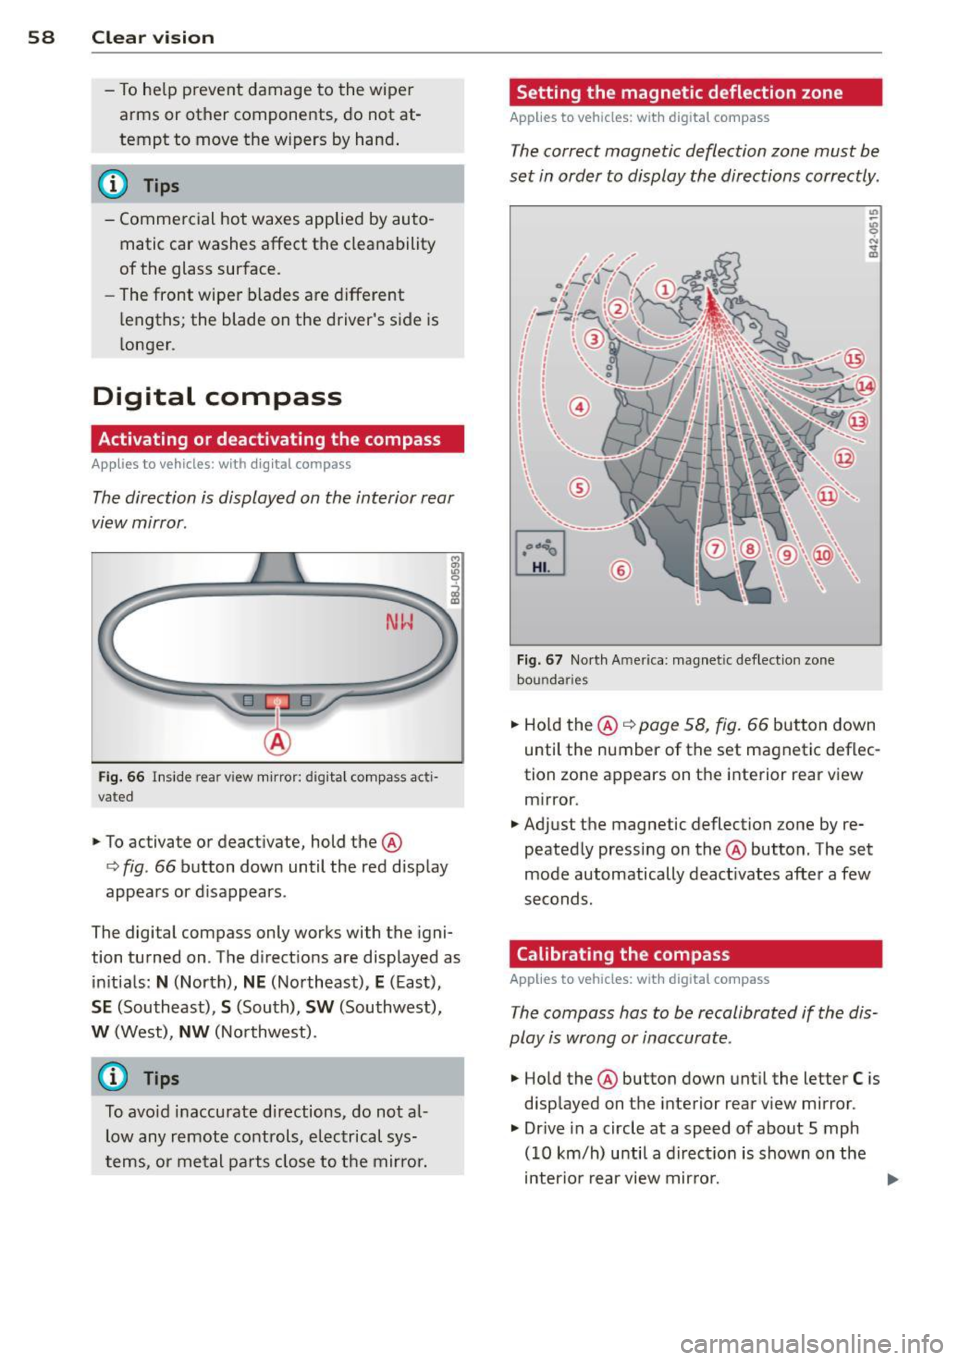
Setting the magnetic deflection zone
Applies to vehicles: with digital compass
The correct magnetic deflection zone must be
set in order to display the directions correctly.
Fig. 67 North America: mag netic defle ction zone
boundar ies
,. Ho ld the @¢ page 58, fig. 66 button down
until the number of the set magnetic deflec
tion zone appears on the interior rear view mirror.
,. Adjust the magnetic deflection zone by re
peatedly pressing on the @button. The set
mode automatically deact ivates after a few
seconds.
Calibrating the compass
Applies to vehicles: with digital compass
The compass has to be recalibrated if the dis
play is wrong or inaccurate.
,. Hold the @button down until the letter
C is
displayed on the interior rear view mirror.
,. Dr ive in a circle at a speed of about S mph
(10 km/h) until a direct ion is shown on the
interior rear view mirror. ..,.
Page 234 of 244

232 Index
Temperature ............ ... .. .... .. 69
Ventilation .... ........... ... .... .. 68
C lock . . . . . . . . . . . . . . . . . . . . . . . . . . . . . . 11
Clutch overheating . . . . . . . . . . . . . . . . . . . 87
Cold ti re inflation pressure ..... ... ... . 185
Com ing home .............. .... ..... 49
Compass mirror ............ ... .... .. 58
Compl iance .. ............. .. .. .. .. . 229
Consumer Information . . . . . . . . . . . 99, 226
Contacting NHTSA .......... ... .... .. 99
Controls Cleaning . .... ........... .. .. .... . 157
Controls and displays .................. 8
Convenience close/open feature Pow er top . . . . . . . . . . . . . . . . . . . . . . . . . 43
Windows . ................. ..... .. 40
Conve rtible child safety seats .. .. .... . 135
Convertible locking retractor Activating .................... ... . 140
Deactivating .................. .... 140
Using to secure a ch ild safety seat 138, 140
Convertible top .. .......... .. .. .... .. 41
Automatic convertible top ............ 43
Eme rgency operation . . . . . . . . . . . . . . . . 44
General information ........... ..... 41
manual convertible top ........ .. .. .. 42
Warn ing/ indictor lights .............. 17
W ind deflecto r ..................... 44
Cooling system . . . . . . . . . . . . . . . . . . . . . 172
Expansion tank ... ..... ..... .. .. .. . 173
Cornering light ............ .. .. .. .. .. 49
C ruise control . . . . . . . . . . . . . . . . . . . . . . . 78
Changing speed . . . . . . . . . . . . . . . . . . . . 79
Pr esetting your speed . . . . . . . . . . . . . . . 79
Switching
off .............. .. .... .. 79
Sw itching on ....................... 78
Warning/indicator lights ... .. .. .. .. . . 21
Cup holder . . . . . . . . . . . . . . . . . . . . . . . . . . 64
Current fuel mileage 23
D
Damping
refer to Audi magnetic ride . .. .. .. .. . . 80
Data recorder . . . . . . . . . . . . . . . . . . . . . . 142
Date display . . . . . . . . . . . . . . . . . . . . . . . . 11
Daytime running lights ................ 48 D
ecla ration of compliance
Cell phone package ................ 229
E lectronic immob ilizer .............. 229
Homelink universal remote control ... 229
Remote control key ............ .... 229
D ecorative decals
Cleaning . ..... .. ............. .... 157
D eco rative parts/tr im
Cleaning .. .... .. ............. .... 157
def What does this mean when it appears in
the tr ip odometer display? ........... 12
Defective light bulb warning ........... 20
Defrosting the windows .......... .. .. . 71
Determining correct load limit ........ 190
Digital clock . . . . . . . . . . . . . . . . . . . . . . . . 11
Dig ital compass . . . . . . . . . . . . . . . . . . . . . 58
Dimensions . .... .. ............. .... 224
Dimming the rearview mirror .......... 53
Dipst ick
Reading the dipst ick properly ........ 170
Displays Cleaning .. .... .. ............. .... 157
D istance ......... .. .............. .. 23
Driver information system
Boost ........ .. .. ................ 26
Engine oil temperature .............. 26
Menu button . . . . . . . . . . . . . . . . . . . . . . 25
Menu display . . . . . . . . . . . . . . . . . . . . . . 24
Open door or front lid warning ........ 22
Outside temperature display . . . . . . . . . . 22
Red symbo ls ... ... ................ . 13
Service interval display . . . . . . . . . . . . . . 28
Setting ........................... 26
Sound system display . . . . . . . . . . . . . . . 22
Tr ip computer .. .................. .. 23
yellow symbols . . . . . . . . . . . . . . . . . . . . . 13
Driver seat
refer to Seating position . . . . . . . . . . . . . 93
Driving Run-flat tires .... ............. .... 203
Driving safely . .. .. ... .......... .... . 92
Driving through water ............... 151
Duplicat e key ..... ............. ..... 32
Dust filter . . . . . . . . . . . . . . . . . . . . . . . . . . 69