open hood AUDI TT ROADSTER 2014 Owners Manual
[x] Cancel search | Manufacturer: AUDI, Model Year: 2014, Model line: TT ROADSTER, Model: AUDI TT ROADSTER 2014Pages: 244, PDF Size: 60.87 MB
Page 13 of 244
Instrument s and warning /indicator lights 11
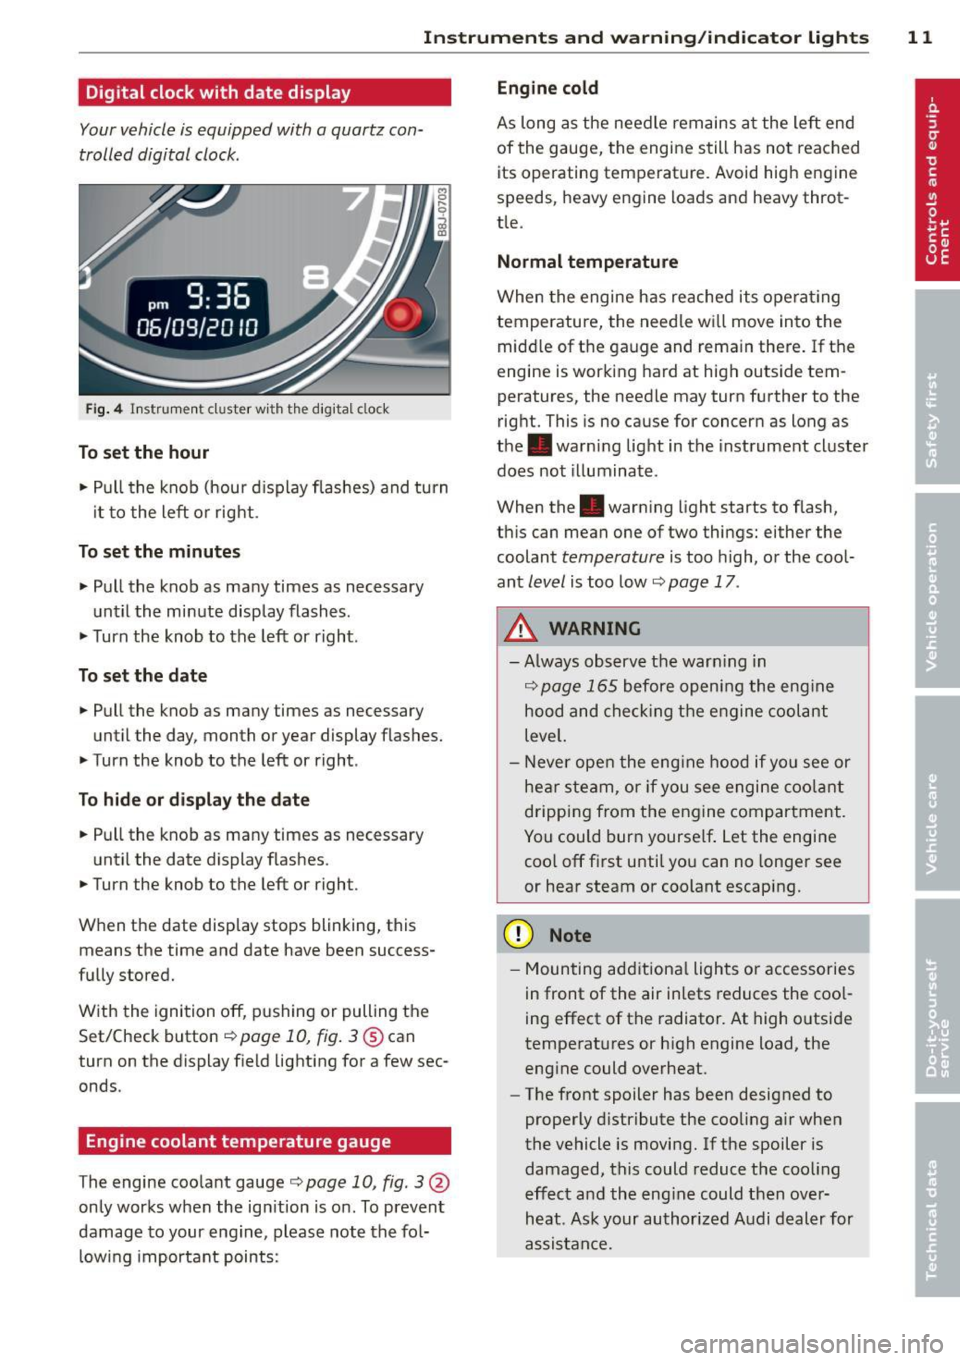
Digital clock with date display
Your vehicle is equipped with a quartz con
trolled digital clock .
Fig. 4 In str um en t cl uste r w it h t he dig ita l cloc k
To set the hour
.. Pull the knob (hou r d isp lay flashes) and turn
i t to the left o r right.
To set the minutes
.. Pull the knob as ma ny times as necessary
un til the mi nute display flash es.
.. Turn the knob to the left or right .
To set the date
.. Pull the knob as many times as necessary
unt il the day, month or year display flashes.
.. Turn the knob to the left or right .
To hide or d isplay the date
.. Pull the knob as many times as necessary
unti l the date display flashes.
.. Turn the knob to the left or right.
When the date disp lay stops blinking, this
means the time and date have been success
fu lly stored.
W ith the ignition off, pushing or pulling the
Set/Check button¢
page 10, fig . 3@ can
turn on the dis play f ie ld lighting for a few sec
onds .
Engine coolant temperature gauge
The engine coo la nt gauge ¢ page 10 , fig. 3@
only works when the ign ition is on. To prevent
damage to your e ngine, please note the fo l
l owing important points:
Engine cold
As long as the nee dle rem ains a t the left end
of the gauge, the engine s till h as not reac hed
its operating temperat ure. Avoid high engine
speeds, heavy engine loads and heavy throt
tle.
Normal temperature
W hen the engine has re ache d its ope rat ing
temperature, the need le w ill move into the
mid dle of t he gauge and rema in there .
If the
engine is working hard at high outside tem
peratures, the needle may turn fu rther to the
right. This is no cause for concern as long as
the . warni ng light in the inst rument cl uster
does not illuminate .
When the. war ning light starts to flash,
th is can mean one of two thi ngs: either the
coolant
temperature is too high, o r the coo l
ant
level is too low ¢ page 17 .
A WARNING
--Always obs erv e th e warn ing in
¢ page 165 before openi ng the eng ine
h oo d and che ck ing the e ngine coolan t
leve l.
- Neve r open t he eng ine hood if you see or
he ar ste am, or if you see engi ne coo lant
drippi ng from t he en gine compar tment .
You could bur n yourse lf . Let the en gin e
coo l off fi rst until you can no longer see
or hear steam or coolant escap ing.
(D Note
- M ounting ad ditiona l lights or accessories
i n fr ont of the air inlets reduces the coo l
ing effect of t he radiato r. At high o utsi de
tempe rat ures or h igh engine load, the
eng ine could overheat.
- The front spoiler has been designed to
properly d istribute the cooling a ir when
the vehicle is movi ng. If the spoiler is
damaged, this could reduce the coo ling
e ff ect a nd th e eng ine could then ove r
h eat . As k yo ur au thori zed A udi deal er for
a ssis tan ce.
Page 17 of 244
Instrument s and warnin g/indic ator ligh ts 15
system ma lfunction warning/indicator light
c> ,&. .
The ligh t 1111 (USA)/ . (Canada) illumi
nates when the ignit ion is tu rned on. I t goes
out after the engine has been started and the
parking brake is fully released. This indicates
that the brake warning lig ht is funct ion ing
properly.
If the brake warn ing light doe s not light up
w hen the engin e is cr anking o r the p arking
br ak e is applied, th ere m ay be a malfun ction
in th e electrical syste m. In thi s cas e, conta ct
y ou r A udi dealer .
If the ABS fails, the ABS warning/indicator
light
E (USA mode ls)! EIJ (Canada models)
f lashes together with the brake system warn
ing/indicator light
c> ,&. .
(USA models): If the warning light 1111 and
the warning light
EiJ illum inate together, im
mediately contact your author ized Audi dealer
or qualified workshop to have all brake pads
inspected
c> page 19.
When the light comes on, an audible warning
signa l is also given.
Parking brake set
The parking brake warning light_ /_
(Canada models) illuminates when the park
ing brake is set. In addition, a warning tone
will sound after you have driven for longer
than 3 seconds and faster than 3 mph (5 km/
h).
Park ing brak e set
The 1111 warning/indicator light illuminates
when the parking brake is set
c> &..
A WARNING
-Always observe the warnings in
c> page 165, Working in the engine
compartment, before opening the en
gine hood and check ing the bra ke fluid.
- Driv ing with low brake fluid is a safety
hazard! Stop the car and get professional
assistance. -
USA models: If both, the
1111 warning
light and the
E warn ing light come
on at the same time, the rear wheels
could lock up first under hard braking.
Lock-up of the rear wheel brakes can
cause loss of vehicle contro l and an acci
dent. Have your veh icle repa ired immedi
ately by your authorized Audi dealer or a
qualified workshop . Drive s low ly and
avoid sudden, hard brake application.
- Canada models:
If both, the b rake warn
ing light . and the ABS warning light
EiJ come on at the same time, the rear
wheels could lock up f irst under hard
brak ing. Lock-up of the rear wheel brakes
can cause loss of veh icle control and an
accident. Have your vehicle repaired im
mediately by your author ized Audi dealer
or a qualified wo rkshop. Drive slowly and
avoid sudden, hard brake application.
- If the b rake warning/ind icator light does
not go out after a few seconds and the
pa rking brake is re leased, or lights up
while you are dr iving, the flu id leve l in
the brake fl uid reservo ir is too low . If you
believe that it is safe to do so, proceed
immediate ly at low speed to the nea rest
author ized Audi dealer or qualif ied work
shop and have the brake system inspect
ed.
-Always keep in mind that after severa l
brake applications, you will need greater
pressure on the brake pedal to stop your
veh icle. Do not rely on strained brakes to
respond with maximum stopping powe r
i n critical s ituations. You must allow for
increased b raking dis tances. The extra
distance used up by fading bra kes could
lead to an accident.
tli1 !.!r Safety systems
The I ( U SA models) . (Canada mode ls) in
dicator light monitors the safety systems e.g.
(airbags, pretensioners) and i lluminates for a
few seconds each time you switch the ignitio n
o n.
Page 19 of 244
Instrument s and warnin g/indic ator ligh ts 17
- The yello w oil level warning indic ation
II require s oil refill o r work shop se rv
i c e without del ay. Do not w ait until the
r ed o il p ressure warning symbol.
sta rts to flash befo re you respond to
th e l ow oil l eve l warning
I'll . By th en,
your engine ma y alr eady ha ve suff ere d
s eriou s damag e.
_L Engine cooling system
A malfunction in the engine cooling system
must be repaired as soon as possible .
When the. symbol in the display flashes,
then either the eng ine coolant
temperature is
too h igh, or the coolant
level is too low . In ad
d ition to the symbol, the fo llowing message
a lso appears in the display:
Sw it c h off engin e and ch eck coo lant l evel
~ Pull off the road and stop the vehicle.
~ Turnoff the engine.
~ Check coolant level ¢ page 173.
~ Add coolant if necessary ¢ page 173 .
~ Conti nue driving only after the eng ine cool
ant warn ing/ indicator light goes out .
~ Contact you r authorized Audi dea le r fo r as-
s istance if necessary .
If the engine coolant level is correct, then the
radiato r fan may be the cause of the malfunc
tion .
If the generator warning/ind icator light
should also illuminate ¢
page 16, then the
fan belt may be damaged .
A WARNING
-If your veh icle should break down for
mechanical or other reasons, park at a
sa fe distance from moving traffic, turn
off the engine and turn on the hazard
warning lights ¢
page 51, Emergency
flasher.
- Never open the hood if you see or hear
steam or coolant escaping from the en
gine compartment - you risk being scald
ed . Wait until you can no longer see or
hear steam or coolant escaping . -
The engine compartment of any vehicle
is a dangerous area . Before you perform
any work in the engine compartment,
turn off the eng ine and allow it to cool.
Follow the warn ing stickers .
(D Note
Do not continue dr iv ing if the . symbol
ill uminates. There is a malfunction in the
engine cooling system -you could damage
your engine .
~ Electro-mechanical power assist
If the indicato r light illum inates while you are
driv ing , there is a malfunction in the electro
mecha nica l steering. If the indi cator light is
showing
'".[-1. there may be a reduction in pow
er steering assist. If the indicator light is
showing ., ther e may be a tota l loss of pow
er steering assist. The stee ring must be in
spected immed iately by a qualified workshop
¢ .&. .With the eng ine not running (e.g . when
the car is being towed), there is also no power
ass ist available .
A WARNING
-
If there is a ma lfunction, the indicato r
l ight for the electro-mechanical power as
sist il l uminates. Seek pro fessional assis
tance.
~ Convertible top
The warning/indicator light monitors the con
vertible top function .
The !I warning/ indicator light illumi nates
when you switch on the ignition for about 2 seconds as a check and then goes out. The
warning/indicator ligh t has the following
functions :
- The light illumi nates when the foldi ng top
opens or closes.
- I t flashes if one of the cond it ions for auto
mat ically lower ing or ra is ing the convertible
top is no t met and the switch to actuate the
convertible top is pressed . .,..
Page 41 of 244
When will the anti theft ala rm system be
triggered?
When the vehicle is locked , the alarm system
monitors and protects the following parts of
the vehicle:
- engine compartment
- luggage compartment
- doo rs
- ignition
When the system is activated, the alarm will
be triggered if one of the doors, the engine
hood or the rear lid are opened, or if the ign i
tion is turned on.
The anti-theft alarm system will also go off
when the battery is disconnected.
You can a lso trigger the alarm by pressing the
PANIC button on your remote-control key.
This will alert other people in case of emer
gency. Press the
PANIC button again to turn
off the alarm .
How is the anti-theft alarm switched off
when triggered?
The alarm system is switched off when you
unlock the vehicle using the remote-control key or when the ignition is sw itched on . The
a larm will also switch itse lf off when it comes
to the end of its cycle.
Emergency flasher
The emergency flasher will blink briefly when
the doors, engine hood and rear lid are prop
erly closed.
If the emergency flashers do not blink, check
the doors, engine hood and rear lid to make
sure they are properly closed. If you close a
door, the hood or the rear lid with the ant i
theft alarm switched on, the emergency flash
ers will blink only after you have closed the
door or lid.
(1) Tips
For the anti-theft alarm system to func
tion properly, make sure all vehicle doors
and windows are closed before leaving the
vehicle.
Opening and closing 39
Power windows
Controls
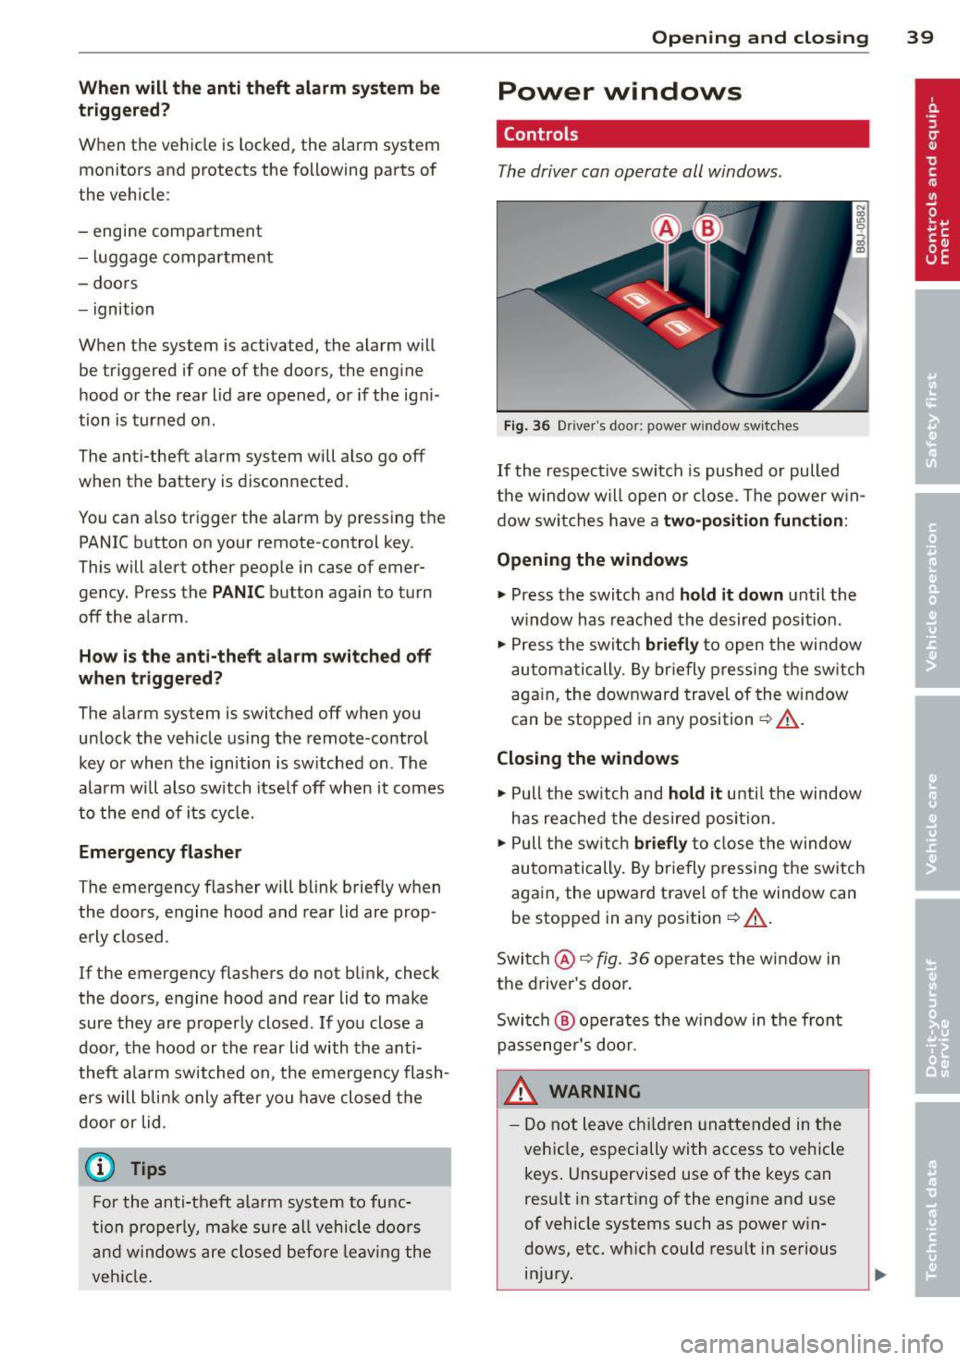
The driver can operate all windows .
Fig. 36 Driver's door: power w indow switches
If the respective switch is pushed or pulled
the window w il l open or clos e. The power win
dow switches have a two-position function :
Opening the windows
.,. Press the switch and hold it down until the
w indow has reached the desired position .
.,. Press the switch
briefly to open the window
automatically. By briefly pressing the switch
again, the downward travel of the window
can be stopped in any position<=-> .&_.
Closing the windows
.,. Pull the sw itch and hold it unti l the window
has reached the desired position .
.,. Pull the switch
briefly to close the window
automatically. By briefly press ing the switch
aga in, the upward travel of the window can
be stopped in any position
~ .&_ .
Switch @<=->fig .
36 operates the window in
the driver's door.
Switch @ operates the window in the front
passenger 's door.
&_ WARNING
- Do not leave children unattended in the
vehicle, especially with access to vehicle
keys . Unsupervised use of the keys can
result in start ing of the engine and use
of vehicle systems such as power win
dows, etc. wh ich could result in serious
injury.
Page 85 of 244
engaged, the engine should never be
speeded up unintentionally (e.g. manual ly from under the hood). Otherwise the
vehicle will immediately start to move -
sometimes even if the parking brake is
firmly applied - risk of an accident!
- Before you or other persons open the
hood and work on a running engine, the
selector lever must be moved to P and
the parking brake applied firmly - risk of
an accident! Follow the warning stickers.
@ Tips
If you have inadvertently sh ifted into N
while the veh icle is moving, you should re
move your foo t from the accelerator and
wait until the engi ne speed has dropped to
id le before shifting back to Dor S.
Selector lever lock
Applies to vehicles: with S tro nic
The selector lever lock prevents a gear from
being engaged occidentally and unintention
ally setting the vehicle in motion .
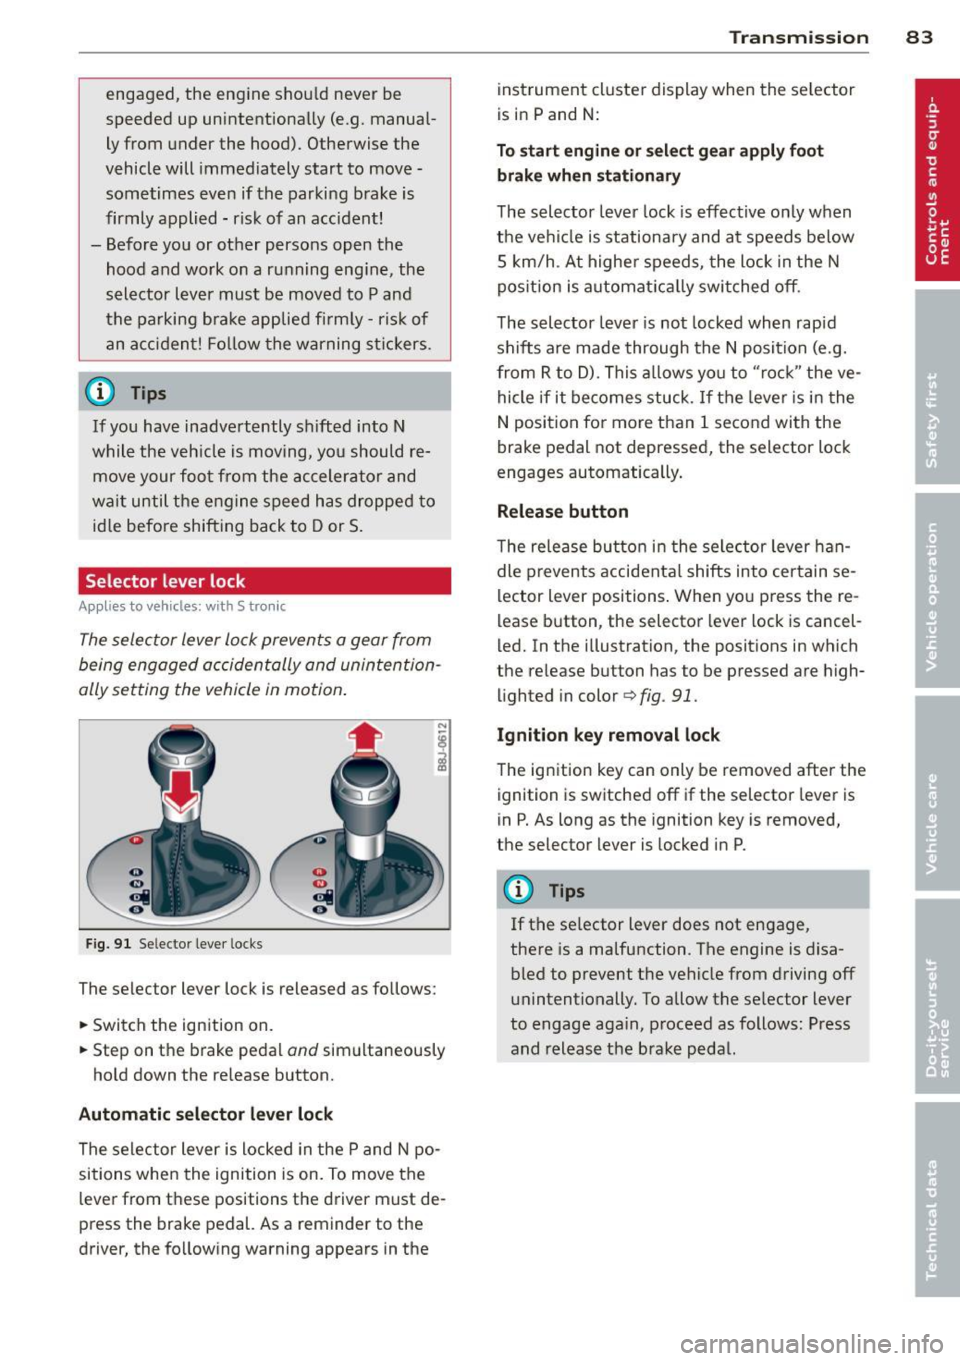
Fig. 91 Selector lever locks
The selector lever lock is released as follows:
.,. Switch the ignition on.
.,. Step on the brake pedal
and simultaneously
hold down the re lease button.
Automatic selector lever lock
The selector lever is locked in the P and N po
sitions when the ignition is on. To move the
l ever from these positions the driver must de
press the brake pedal. As a reminder to the
driver, the following warning appears in the
Transmission 83
instrument cluster display when the se lector
is in P and N:
To start engine or select gear apply foot
brake when stationary
The selector lever lock is effective only when
the vehi cle is stationary and a t speeds below
S km/h . At higher speeds, the lock in the N
pos ition is automat ically switched off.
The selector lever is not locked when rapid
shifts are made through the N position (e.g.
from R to D) . This allows you to "rock " the ve
hicle if it becomes stuck. If the lever is in the
N position for more than 1 second with the
brake pedal not depressed, the selector lock
engages automatically .
Release button
The release butto n in the selector lever han
dle prevents accidental shifts into certain se
lector lever positions . When you press the re
lease button , the selector lever lock is cancel
led. In the illustration, the positions in which
the release button has to be pressed are high
lighted in color
¢ fig . 91.
Ignition key removal lock
The ignition key can only be removed after the
ignition is switched off if the selector lever is
in P. As long as the ignition key is removed,
the selector lever is locked in P.
(y Tips
If the se lector lever does not engage,
there is a malfunction . The engine is disa
bled to prevent th e vehicle from driving off
unintentionally. To allow the selector lever
to engage again, proceed as follows: Press
and release the brake pedal.
Page 167 of 244
Checking and filling Engine hood
Releasing the engine hood
The engine hood is released from inside the
vehicle .
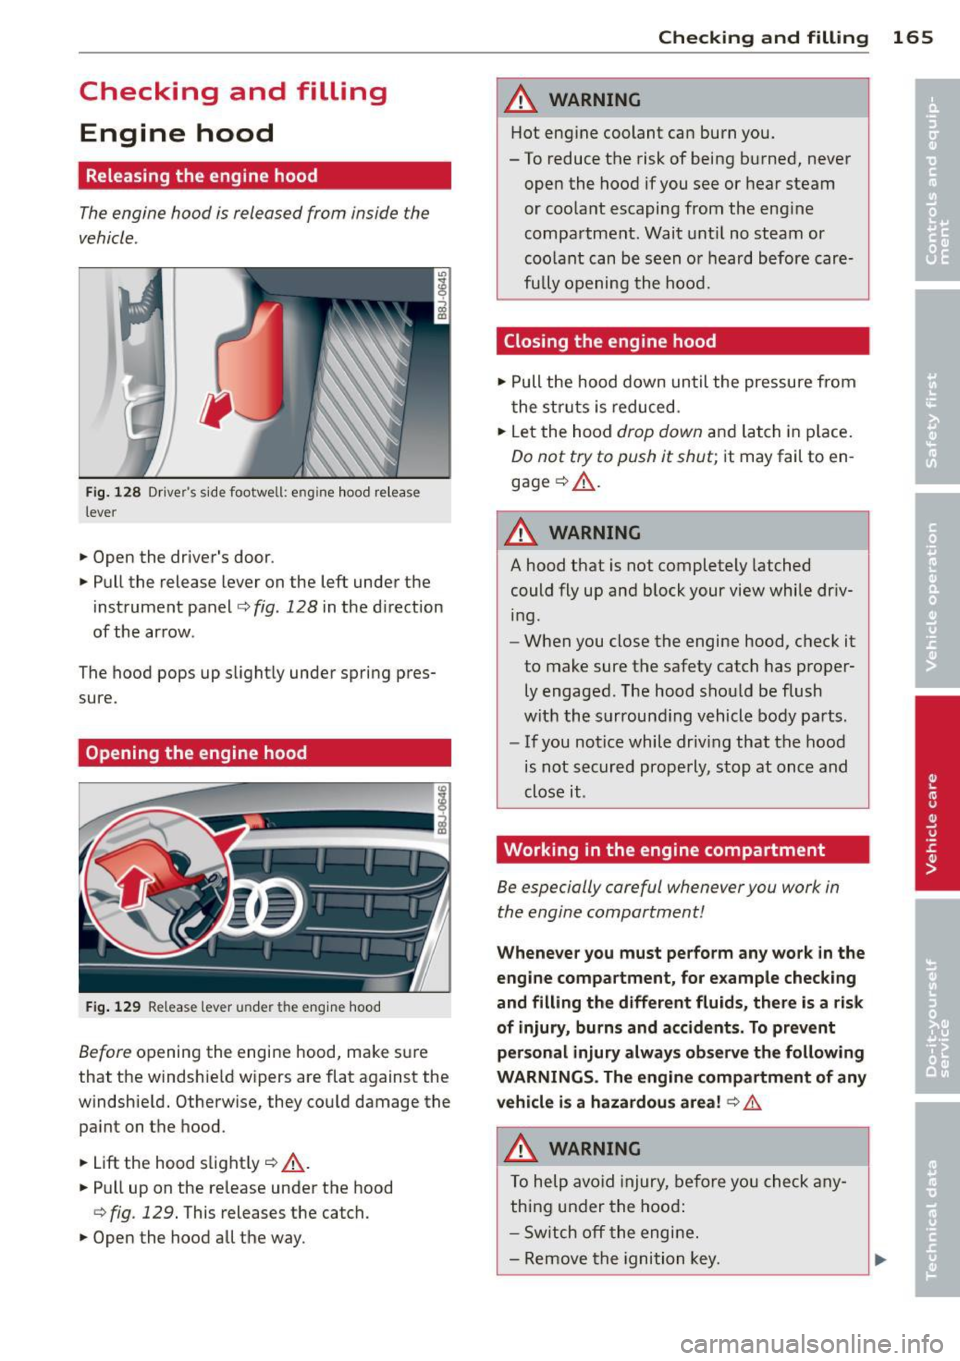
Fig. 128 Dr ive r's s ide footwe ll: e ng ine hood relea se
lever
"' Open the driver's door .
"' Pull the release lever on the left under the
instrument panel
i=> fig. 128 in the d irection
of the arrow .
The hood pops up slightly under spring pres
sure.
Opening the engine hood
F ig . 129 Release lever u nde r the engine hood
Before opening the engi ne hood, make sure
that the windshield wipers are flat against the
windshie ld. Otherwise, they could damage the
paint on the hood.
"' Lift the hood slight ly ¢
_A .
"' Pull up on the release under the hood
¢ fig . 129. This releases the catch.
"' Open the hood all the way .
Checking and fillin g 165
A WARNING
Hot engine coolant can burn you.
- To reduce the risk of being burned, never open the hood if you see or hear steam
or coolant escaping from the eng ine
compartment . Wait unt il no steam or
coolant can be seen or heard before care
fu lly opening the hood.
Closing the engine hood
"' Pull the hood down until the pressure from
the struts is reduced.
"' Let the hood
drop down and latch in p lace.
Do not try to push it shut; it may fail to en
gage ¢_& .
A WARNING
--
A hood that is not completely latched
could fly up and b lock your view while dr iv
ing.
- When you close the engine hood, check it
to make sure the safety catch has proper
ly engaged. The hood shou ld be flush
with the surround ing vehicle body parts.
- If you notice while driv ing that the hood
is not secured properly, stop at once and
close it .
Working in the engine compartment
Be especially careful whenever you work in
the engine compartment!
Whenever yo u must pe rform any wo rk in the
e n g ine compartment, for e xample ch ecki ng
and filling th e diff erent fluids, there is a risk
of injury, burn s and a ccidents. To prev ent
p ersonal injury always obse rve the foll owing
WARNINGS . The engine compa rtment of an y
vehicle i s a hazardou s area !
¢ &.
A WARNING ~
To help avoid injury, be fo re yo u check any
thing under the hood:
- Sw itch off the engi ne.
- Remove the ignition key.
Page 168 of 244
166 Checking and filling
-Apply the parking brake.
- Move selector lever to "P" (Park).
- Always let the engine cool down. Hot
components will burn skin on contact.
- To reduce the risk of being burned, never
open the hood if you see or hear steam
or coolant escaping from the engine
compartment . Wait until no steam or
coolant can be seen or heard before care
fully opening the hood.
- Keep children away from the engine com
partment .
- Never spill fluids on hot engine compo
nents. They can cause a fire.
- Never touch the radiator fan. The auxili
ary electric fan is temperature controlled
and can switch on suddenly.
- Never open the coolant reservoir cap
when the engine is still warm. The cool
ant system is pressurized and hot cool
ant could spray out .
- Protect your face, hands and arm from
steam or hot engine coolant by placing a
thick rag over the cap when you open the coolant reservoir .
- Do not remove the engine cover under
any circumstances . This increases the
risk of burns.
- If work on the fuel system or the electri
cal system is necessary:
- Always disconnect the battery .
- Never smoke or work near heaters or
open flames. Fluids in the engine com
partment could start a fire.
- Keep an approved fire extinguisher im
mediately available.
- To avoid electrical shock and personal in
jury while the engine is running or being
started, never touch:
- Ignition cables
- Other components of the high voltage
electronic ignition system.
- If you must perform a check or repair
with the engine running: -
First, fully apply the parking brake,
move selector lever to "P" (Park) .
- Always use extreme caution to prevent
clothing, jewelry, or long hair from get
ting caught in the radiator fan, V-belts
or other moving parts, or from contact ing hot parts. Tie back hair before
starting, and wear no clothing that will hang or droop into the engine.
- Minimize exposure to emission and chemical hazards~&, .
A WARNING
=
California Proposition 65 Warning:
- Engine exhaust, some of its constituents, and certain vehicle components contain
or emit chemicals known to the State of
California to cause cancer and birth de
fects and reproductive harm. In addition,
certain fluids contained in vehicles and
certain products of component wear con
tain or emit chemicals known to the
State of California to cause cancer and
birth defects or other reproductive harm.
- Battery posts, terminals and related ac
cessories contain lead and lead com
pounds, chemicals known to the State of
California to cause cancer and reproduc
tive harms. Wash hands after handling.
(D Note
When adding fluids, always make sure that
they are poured into the proper container
or filler opening, otherwise serious dam
age to vehicle systems will occur.
@) For the sake of the environment
To detect leaks in time, inspect the vehicle
floor pan from underneath regularly. If
you see spots from oil or other vehicle flu ids, have your vehicle inspected by an au
thorized Audi dealer.
Page 236 of 244
234 Index
F
Fan ... . ... ... .. .. ..... ... .. .. .... .. 69
Radiator ... .. . .. ..... ... .. .. .... . 174
Fasten ing
B ooste r seats ............ .... .. .. .
137
Conve rtible c hild safety se ats . .. .. .. . 135
Infant sea ts
F lat t i re 13 5
Changing .. ... ......... ... .. .. ... 209
Floor mats . . . . . . . . . . . . . . . . . . . . . . . . . . 97
Fog lights . . . . . . . . . . . . . . . . . . . . . . . . . . 5 0
Fo ld ing master key w ith remote contro l .. 32
Foot pedals . . . . . . . . . . . . . . . . . . . . . . . . . 97
For the sake of the environmen t
G asoline fumes and the environmen t ..
163
Le tting you r engine warm up ... .. .. . . 74
Refue ling . . . . . . . . . . . . . . . . . . . . . . . . 163
Saving fue l by early upshifting . ..... . . 10
Fr ont airbags
D escr ipt ion . . . . . . . . . . . . . . . . . . . . . . .
113
H owtheywork ...... .......... .... 118
Fronta l collisions and the laws of physics 102
F ront seats . . . . . . . . . . . . . . . . . . . . . . . . . 60
Ad justing ....................... ..
94
Ad just ing the manual seats . .... .... .. 61
C hi ld restra ints in the front seat ... .. . 110
Fu el
Additives ... ... . ...... ... .. .. .... .
161
Blended gasoline ........... .. .... . 161
Current fuel mileage . . . . . . . . . . . . . . . . 23
Fill er neck .. .. .. ...... .... ... .. .. . 162
Fue l gauge . ... ......... ... .. .. ... . 12
Fuel supp ly too low . . . . . . . . . . . . . . . . . 20
Gasoline ... ... .......... .. .. .. .. . 16 1
Gasoline additives ........ .... .... . 162
Octane rating . ........... .. .. .. .. . 16 1
Recommendation .... ... .. .. .. .... . 161
Refue lling . .. .. .. ..... ... .. .. .... . 163
Reserve . ... ... . ...... ... .. .. .... .. 1 2
Tank capacity .............. .. .... . 224
Unlock ing the fue l filler flap by hand .. 164
Fu el economy messages (efficiency pro-
gram) ... .... ... . ...... ... .. .. .... ..
27
Fuse ar rangement ....... .. .. .. .. .. . 2 14
G
Garage doo r opener ( Homelink) .... . .. . 89
Gas discha rge lamps ..... .. ... ..... ..
2 16
Ga uges
Engine coolant temperature . . . . . . . . . .
11
Fuel gauge . . . . . . . . . . . . . . . . . . . . . . . . 12
Tachometer . . . . . . . . . . . . . . . . . . . . . . . 10
General illustration
Instruments and controls .. ... .. .. .. .. 8
Generator (warning/ indicator l igh ts) . .. .
16
G lossary of tire and loading terminology 182
G love compartment . . . . . . . . . . . . . . . . . . 66
G ross Vehicle We ight Rating (GVWR) ... 223
H
Head lights ..... .. .......... ... ... .. 48
adaptive light . . . . . . . . . . . . . . . . . . . . . . 49
Cleaning . . . . . . . . . . . . . . . . . . . . . . . . . 156
defective . . . . . . . . . . . . . . . . . . . . . . 20, 2 1
Fron t fog lights . . . . . . . . . . . . . . . . . . . . 50
Switching off .... ... .. ..... ... .. .. . 4 8
Switching on ..... .. ... ..... ... .. .. . 48
Washe r system . . . . . . . . . . . . . . . . . . . . . SS
Xenon headlights .............. .. .. . 48
He ad restr aints .. .. ............. .. ... 95
Adjusting ..... .. .. .... .... ... .. .. . 95
Heated
exter io r mir ro rs . . . . . . . . . . . . . . . . . . . .
52
fron t seats (cl ima te control) ..... .. .. . 72
rear window ...................... . 71
Heated seats . . . . . . . . . . . . . . . . . . . . . . . . 72
Heate d washer jets
Wiper and washer system .. ... .. .. .. .
54
H eating .. .. ...... ............. ..... 68
Hig h beam . . . . . . . . . . . . . . . . . . . . . . 48, 50
High voltage warning label .. ... .. .. .. 223
Hill Descent Assist . ... .. ......... ... . 85
Hill ho ld assist
Starting on hills ............... .....
76
Homel in k unive rsal remote control . ... . 89
Hood Open ing .. .. .. .. .................
165
Re le a se lever . . . . . . . . . . . . . . . . . . . . . 165
Hor n .... .. .. .. .. ............... .. .. 8
How many ai rba gs does my vehicle have?
115
Page 239 of 244
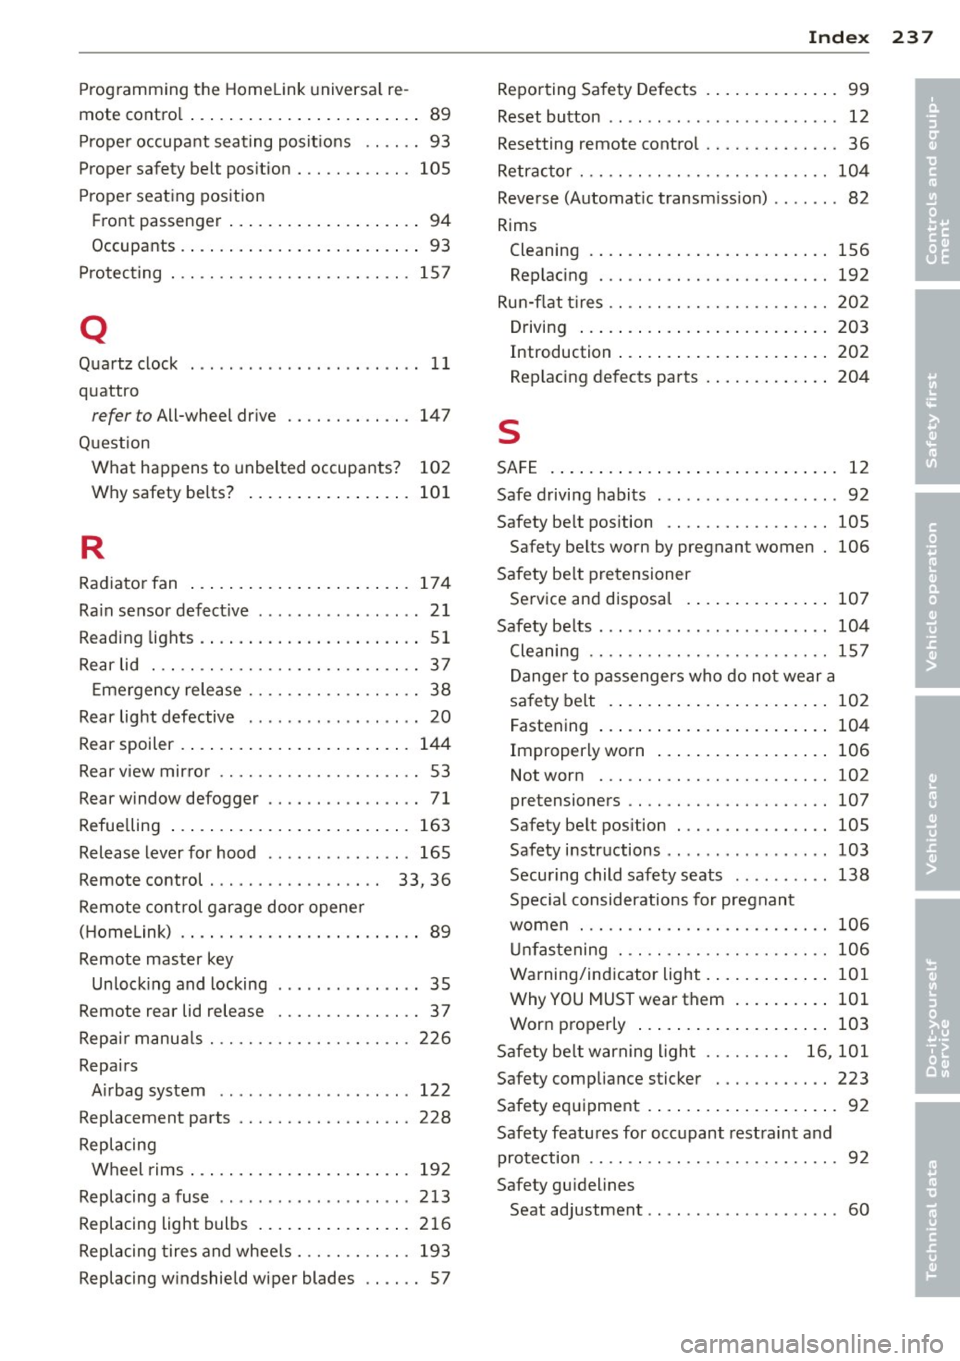
Programming the Homelink universa l re
mote contro l . . . . . . . . . . . . . . . . . . . . . . . . 89
Pr oper occupa nt seating posit ions .. .. .. 93
Proper safety belt pos ition . . . . . . . . . . . . 105
P roper seat ing position
Fr ont passenger .. ..... ... .. .. .. .... 94
Occupants .. .... .. .... ... .. .. .. .... 93
Pr otec ting . .. .. ........... .. .. .. ... 157
Q
Quartz clock . . . . . . . . . . . . . . . . . . . . . . . . 11
q uattro
refer to All-wheel dr ive .... .. .. .. .. . 147
Question What happens to unbelted occupants? 102
Why safety be lts? ..... ... .. .. .. .. . 10 1
R
Radiato r fan ... ... ..... ... .. .. .. ... 174
Ra in sensor defect ive . . . . . . . . . . . . . . . . . 21
Reading lights . ... .. .... ... .. .. .... .. 51
Rear lid ... .. .. ........... .. .. .. .... 37
Emergency release . . . . . . . . . . . . . . . . . . 38
Rear lig ht defective . . . . . . . . . . . . . . . . . . 20
Rear spoiler . ... .... .... ... .. .. .. ... 144
Rear view mir ro r . . . . . . . . . . . . . . . . . . . . . 53
Rear window defogger . . . . . . . . . . . . . . . . 71
Refue lling ... .. .... .... ... .. .. .. ... 163
Release lever for hood .. .... .. .. .. .. . 165
Remote control . . . . . . . . . . . . . . . . . . 33, 36
Remote cont rol garage door opene r
( H omelink) . . . . . . . . . . . . . . . . . . . . . . . . . 89
Remote master key Un lock ing and locking ........ .... ... 35
Remote rear lid release . . . . . . . . . . . . . . . 3 7
Rep air manua ls ............ .... .. .. . 226
Repa irs
A irbag system ... ... ..... .. .. .. .. . 122
Replacement parts ......... .. .. .. .. . 228
Replacing Wheel rims ... .. .. .... ... .. .. .... . 192
Replacing a fuse . . . . . . . . . . . . . . . . . . . . 213
Replacing light bulbs .... ... .. .. .. .. . 216
Replacing tire s and wheels . .. .. .. .. .. . 193
Replacing w indshield wiper blades .. .. .. 57
Inde x 237
Reporting Sa fety Defects . ..... ... .. .. . 99
Reset button . . . . . . . . . . . . . . . . . . . . . . . . 12
Resetting remote contro l ......... .. .. . 36
Retractor . . . . . . . . . . . . . . . . . . . . . . . . . . 10 4
Reverse (Automat ic transm iss ion) . . . . . . . 82
Rims Cleaning . ... .. .. .. . .. ... .... ... .. 1S6
Replacing . .. .. .. ................. 192
Ru n-flat tires .. .. .. ................. 202
Drivi ng ... .. .. .... . ... ...... ... .. 203
Introduction . . . . . . . . . . . . . . . . . . . . . . 202
Rep lacing de fects parts . ..... ... .. .. 204
s
SA FE . ... .. .. .. .... .. .. ...... ... .. . 12
Safe driving habits ................. .. 92
Safety be lt pos ition .... ............. 105
Safety be lts worn by pregnant women 106
Safety be lt pretensioner
Se rvice an d disposa l ... .. ..... ... .. 107
Safety be lts . .. .. .... ... .. ..... ..... 104
Cleaning .. .. .. .. .. . .............. 15 7
Danger to passengers who do not wear a
sa fe ty belt . ..... .. . .. .. ..... ... .. 10 2
Fastening ... .... .. . .. .. ..... ... .. 104
Improperly worn ... . ... ...... ... .. 106
Not worn . .. .. .. ................. 102
pretensioners .. .. ................. 107
Safe ty be lt pos ition . ... .. ..... ... .. 105
Safety i nstructions .. .............. . 103
Secu ring child safety seats .. ... ... .. 138
Spec ial considerations for pregnant
women ... .. .. .. .. . .............. 106
Unf astening . .. .. .. .. ........... .. 1 06
Warning/ind icator light . ..... ... .. .. 101
WhyYOUMUSTwearthem ... ... .. .. 101
Wor n properly ... .. . ... ...... ... .. 103
Safety be lt warning ligh t . . . . . . . . . 16, 101
Safety compliance sticker ........ .. .. 223
Safety equipment .. .. . ... ...... ... .. . 92
Safety featu res for occupant rest raint and
protection .. .. .. .. ................. . 92
Safety gu idelines
Seat adjustment . . . . . . . . . . . . . . . . . . . . 60
•
•