oil pressure AUDI TT ROADSTER 2016 User Guide
[x] Cancel search | Manufacturer: AUDI, Model Year: 2016, Model line: TT ROADSTER, Model: AUDI TT ROADSTER 2016Pages: 306, PDF Size: 31.82 MB
Page 247 of 306
Downloaded from www.Manualslib.com manuals search engine 0
N
,.....
N
......
0
,.....
Vl
CX) -
Never spill fluids on a hot engine. These flu
ids can cause a fire (e.g. radiator anti
freeze).
- Take care not to cause short circuits in the
electrical system, especially when working
on the battery.
- When working in the engine compartment
be aware that the radiator fan may start
running suddenly, even if the ignition is
switched off -risk of injury!
- Do not unscrew the cap on the expansion
tank when the engine is hot. The cooling
system is under pressure.
- Protect face, hands and arms by covering
the cap with a large, thick rag to protect
against escaping coolant and steam.
- Never remove the engine cover panel -risk
of burns!
- If any tests have to be performed with the
engine running, there is an extra safety risk
from the rotating parts, such as the drive
belts, alternator and radiator fan, etc., and
from the high-voltage ignition system.
- Vehicles with automatic gearbox: Never
open the throttle inadvertently (for instance
by hand from the engine compartment) if a
gear is engaged while the vehicle is station
ary with the engine running. The vehicle will
otherwise start moving immediately and
could cause an accident.
- Observe the following additional warnings if
work on the fuel system or the electrical
system is necessary:
- Do not smoke.
- Never work near naked flames.
- Always keep an approved fire extinguisher
immediately available.
- Any work on the batteries and electrical sys
tem in your vehicle entails a risk of injury
and chemical burns in addition to danger of
accident or fire. For this reason, you must
have the work carried out by a qualified
workshop.
CD CAUTION
When topping up fluids make sure the correct
fluid is put into the correct filler opening. This Checking
and topping up fluids
can otherwise cause serious malfunctions or
engine damage.
@ For the sake of the environment
Inspect the ground underneath your vehicle
regularly so that any leaks are detected at an
early stage. If you find spots of oil or other
fluids, have your vehicle inspected in the
workshop.
i Note
On right-hand drive vehicles* some of the
containers/ reservoirs mentioned below are
located on the other side of the engine com
partment.
Opening/closing bonnet
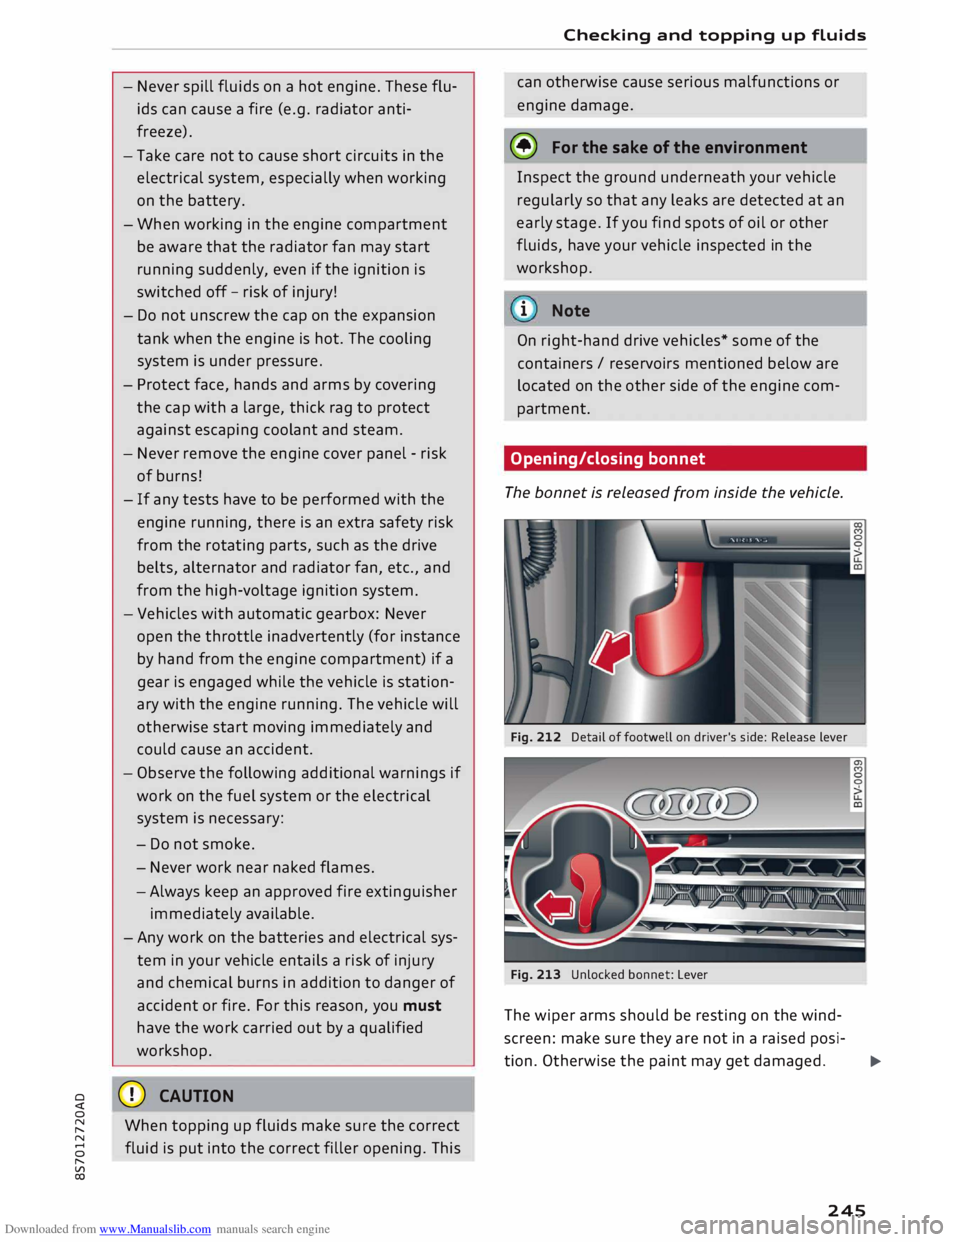
The bonnet is released from inside the vehicle.
Fig. 212 Detail of footwell on driver's side: Release lever
Fig. 213 Unlocked bonnet: Lever
The wiper arms should be resting on the wind
screen: make sure they are not in a raised posi-
tion. Otherwise the paint may get damaged.
..,..
245
Page 248 of 306
Downloaded from www.Manualslib.com manuals search engine Checking
and topping up fluids
Opening the bonnet
� With the driver's door open, pull the Lever un
der the dashboard in the direction indicated
(arrow) ¢Fig. 212.
� Lift the bonnet slightly¢,&.
� Press the release Lever ¢Fig. 213 in the direc
tion indicated (arrow). This will release the ar
rester hooks.
� Open the bonnet.
Closing the bonnet
� To close the bonnet, pull it down to overcome
the spring pressure.
� Then Let it drop into the catches; do not press
down ¢,&.
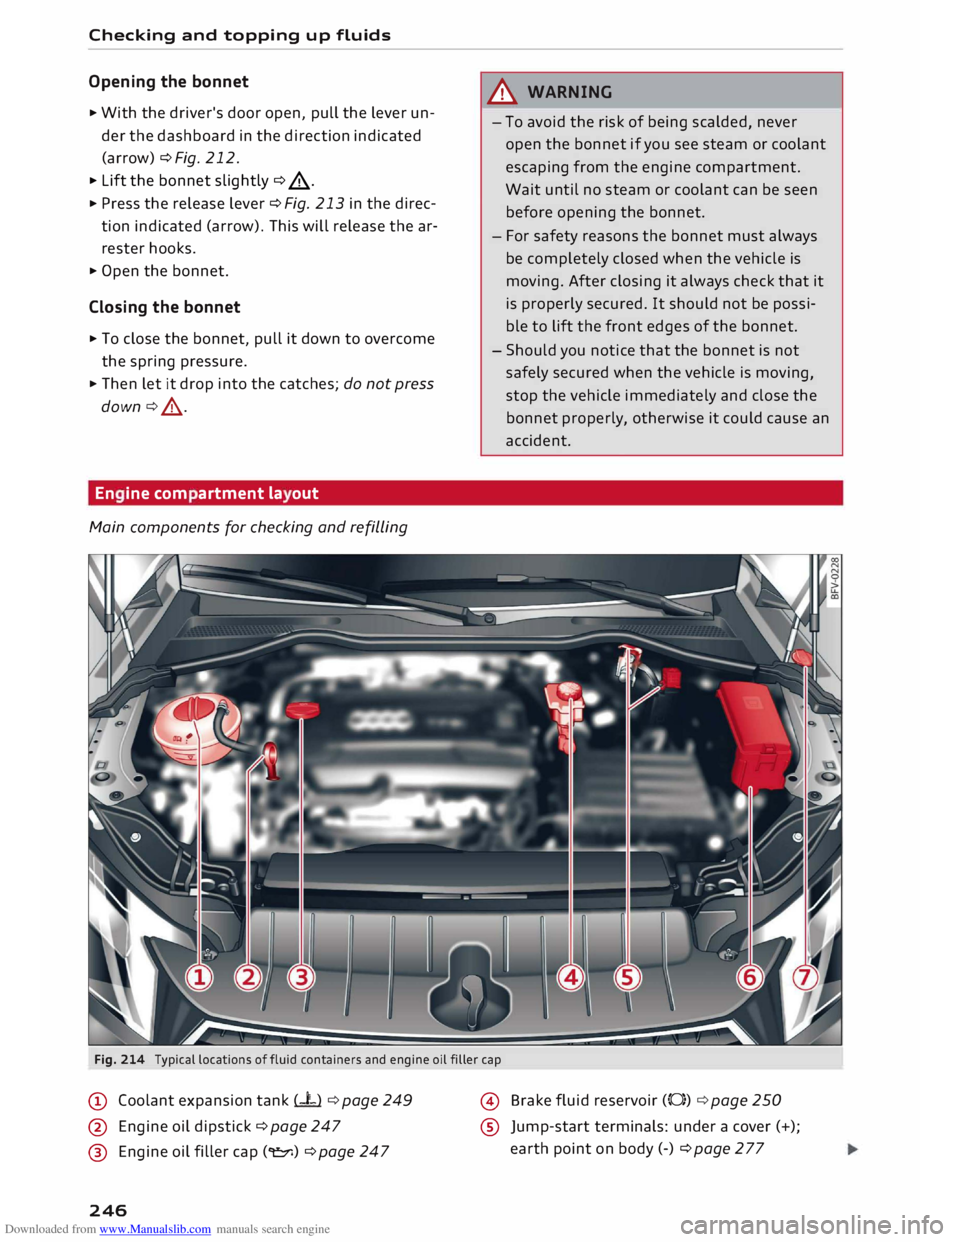
En ine com artment la out
Main components for checking and refilling A
WARNING
- To avoid the risk of being scalded, never
open the bonnet if you see steam or coolant
escaping from the engine compartment.
Wait until no steam or coolant can be seen
before opening the bonnet.
- For safety reasons the bonnet must always
be completely closed when the vehicle is
moving. After closing it always check that it
is properly secured. It should not be possi
ble to Lift the front edges of the bonnet.
- Should you notice that the bonnet is not
safely secured when the vehicle is moving,
stop the vehicle immediately and close the
bonnet properly, otherwise it could cause an
accident.
Fig. 214 Typical locations offluid containers and engine oil filler cap
@ Coolant expansion tank (-L) ¢ page 249
@ Engine oil dipstick ¢ page 247
@ Engine oil filler cap(�) ¢ page 247
246 @
Brake fluid reservoir (0)) ¢ page 250
® Jump-start terminals: under a cover (+);
earth point on body (-) ¢page277
Page 252 of 306
Downloaded from www.Manualslib.com manuals search engine Checking
and topping up fluids
Any loss of coolant normally indicates a leak in
the cooling system. Drive to a qualified workshop
without delay and have the cooling system
checked. If there are no leaks in the system, a
loss of coolant can only occur if the coolant boils
and is forced out of the system as a result of
overheating.
A WARNING
- The cooling system is under pressure. Do
not unscrew the cap on the expansion tank
when the engine is hot: you could be scal
ded by escaping steam.
- The coolant and coolant additive can be a
health hazard. Store the coolant additive in
the original container in a safe place out of
reach of children -risk of poisoning.
- When working in the engine compartment
be aware that the radiator fan may start
running suddenly, even if the ignition is
switched off- risk of injury!
CD CAUTION
Do not add coolant if the expansion tank is
empty. Air could have got into the cooling
system -risk of engine damage! In this case,
do NOT drive on. Obtain professional assis
tance.
Brake fluid
&
8cm DOT 4 �
0
0
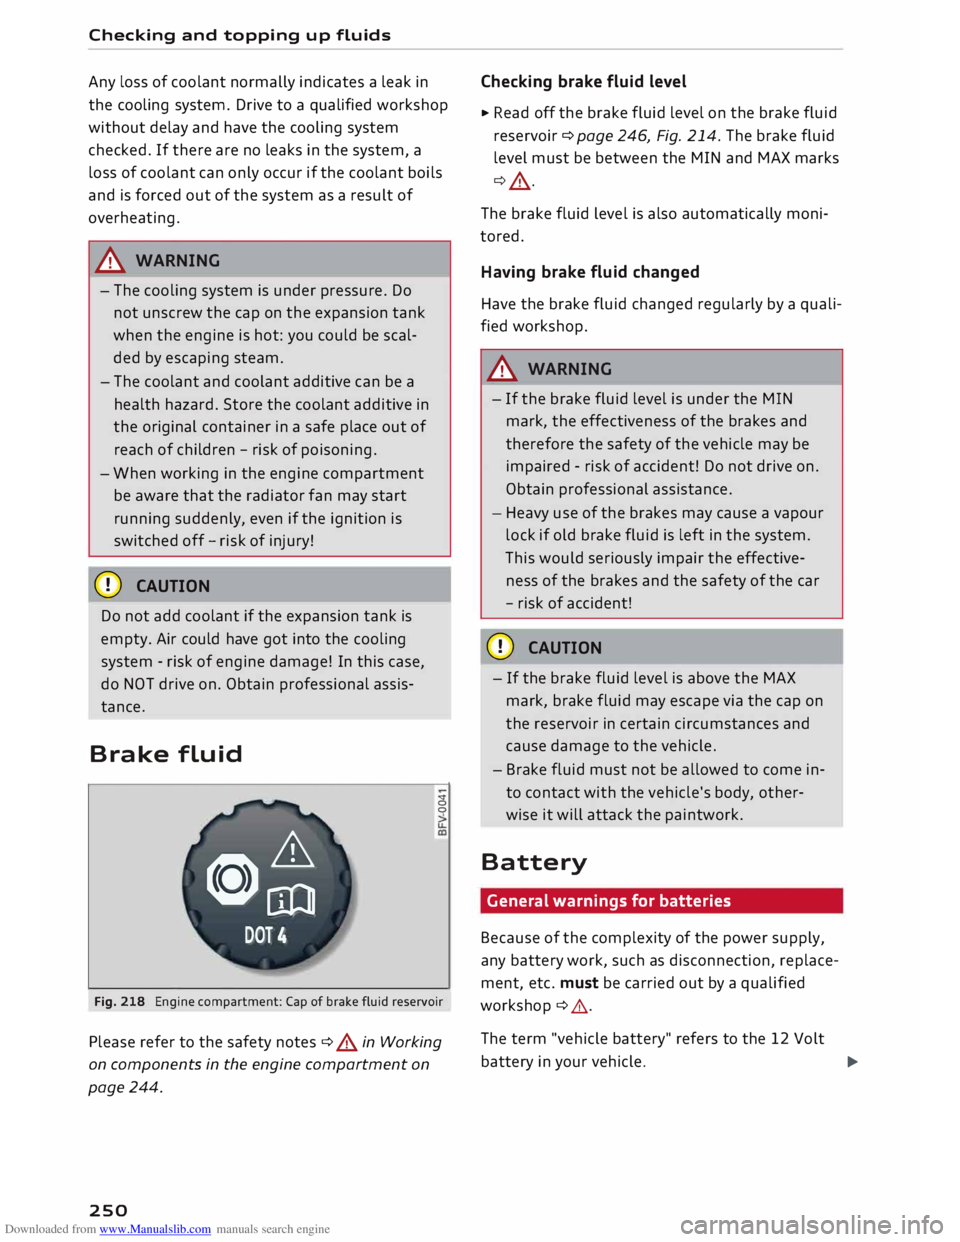
Fig. 218 Engine compartment: Cap of brake fluid reservoir
Please refer to the safety notes ¢ A in Working
on components in the engine compartment on
page 244.
250 Checking
brake fluid level
� Read off the brake fluid level on the brake fluid
reservoir ¢page 246, Fig. 214. The brake fluid
level must be between the MIN and MAX marks
¢_A.
The brake fluid level is also automatically moni
tored.
Having brake fluid changed
Have the brake fluid changed regularly by a quali
fied workshop.
A WARNING
- If the brake fluid level is under the MIN
mark, the effectiveness of the brakes and
therefore the safety of the vehicle may be
impaired -risk of accident! Do not drive on.
Obtain professional assistance.
- Heavy use of the brakes may cause a vapour
lock if old brake fluid is left in the system.
This would seriously impair the effective
ness of the brakes and the safety of the car
- risk of accident!
CD CAUTION
- If the brake fluid level is above the MAX
mark, brake fluid may escape via the cap on
the reservoir in certain circumstances and
cause damage to the vehicle.
- Brake fluid must not be allowed to come in
to contact with the vehicle's body, other
wise it will attack the paintwork.
Battery General warnings for batteries
Because of the complexity of the power supply,
any battery work, such as disconnection, replace
ment, etc. must be carried out by a qualified
workshop ¢ ,& .
The term "vehicle battery" refers to the 12 Volt
battery in your vehicle.
�
Page 266 of 306
Downloaded from www.Manualslib.com manuals search engine Care
of vehicle and cleaning
.&_ WARNING
- Follow the rules and recommendations of
the car wash operator and do not wash the
vehicle with the ignition switched on -risk
of accident!
- To avoid cutting yourself on sharp metal
parts, always wear suitable protection when
cleaning the underside of the car or inside
the wheel arches.
-After the car has been washed, the full brak
ing effect can be delayed by moisture (or in
winter by ice) on the discs and brake pads -
risk of accident! The brakes should be dried
by pressing the pedal to restore full braking
effect.
CD CAUTION
- Before washing the vehicle in an automatic
car wash, please make sure to retract the
exterior mirrors and, if necessary, retract
the automatic rear spoiler* to prevent dam
age. Always use the electrical power control
to fold the mirrors in/out on vehicles with
electrically retractable exterior mirrors*.-
Notes on cleaning and care
For cleaning and care of individual components
on the vehicle, please refer to the tables below.
These are recommendations only. If you have
Cleaning the exterior
Component I Situation
Wiper blades Dirt/deposits
¢page 51 -
Do not wash the vehicle in direct sunlight -
otherwise the paint can be damaged.
- The soft top must not be washed with a
high-pressure cleaner -risk of damage!
- Do not use insect sponges or abrasive
household sponges, etc. -they can damage
the surfaces.
- Matt-painted vehicle parts:
- Do not use polish or wax -otherwise the
paintwork can be damaged.
- Never use car-wash programmes that in
clude wax coatings. This could spoil the
matt finish.
- Do not attach any stickers or magnet la
bels to matt-painted parts as these could
damage the paintwork when they are re
moved.
@ For
the sake of the environment
The car should only be washed in special wash
bays. This prevents oily water from getting in
to the public drains.
special questions or certain components are not
listed, please ask your qualified workshop. Please
also refer to the notes ¢,&.
Remedy
Headlights/ Dirt/deposits Soft
sponge with mild detergent a
>
rear lights
Sensors/ Dirt/deposits Sensors:
soft cloth with solvent-free cleaning agent
camera lenses Camera lenses: soft cloth with alcohol-free cleaning agent
Snow/ice Small brush/solvent-free de-icer spray
Wheels Road salt Water
Brake dust Acid-free
cleaning agent
Tailpipes Road salt Water;
suitable stainless steel cleaning product if necessa-
ry
Soft top Dirt/deposits
Wash with a soft brush and clean water (add soft top
cleaner as required); follow the grain of the fabric and al-
low to dry naturally.
264
Page 273 of 306
Downloaded from www.Manualslib.com manuals search engine 0
N
,.....
N
......
0
,.....
Vl
CX) should
only be used as a temporary meas
ure.
- Do not allow the sealant to come into con
tact with your eyes, skin or clothing.
- If you do come into contact with the sealant
immediately rinse the eyes or skin affected
with clean water.
- Make sure you do not breathe in the fumes.
- If you accidentally swallow tyre sealant, im-
mediately rinse your mouth thoroughly and
drink a large amount of water. Do not in
duce vomiting. Immediately contact a doc
tor.
- Change clothing immediately if it becomes
soiled with the tyre sealant.
- If any allergic reactions should occur get
medical help immediately.
- Keep the sealant away from children.
(©) Note
- If sealant should leak out, leave it to dry.
When it has dried, you can pull it off like a
piece of foil.
- Observe the expiry date stated on the seal
ing compound can. Have the sealing com
pound exchanged by a qualified workshop.
- Interference to the radio reception may oc
cur when using the compressor*.
- Please observe the relevant regulations.
Tyre repairs
Applies to: vehicles with tyre repair kit
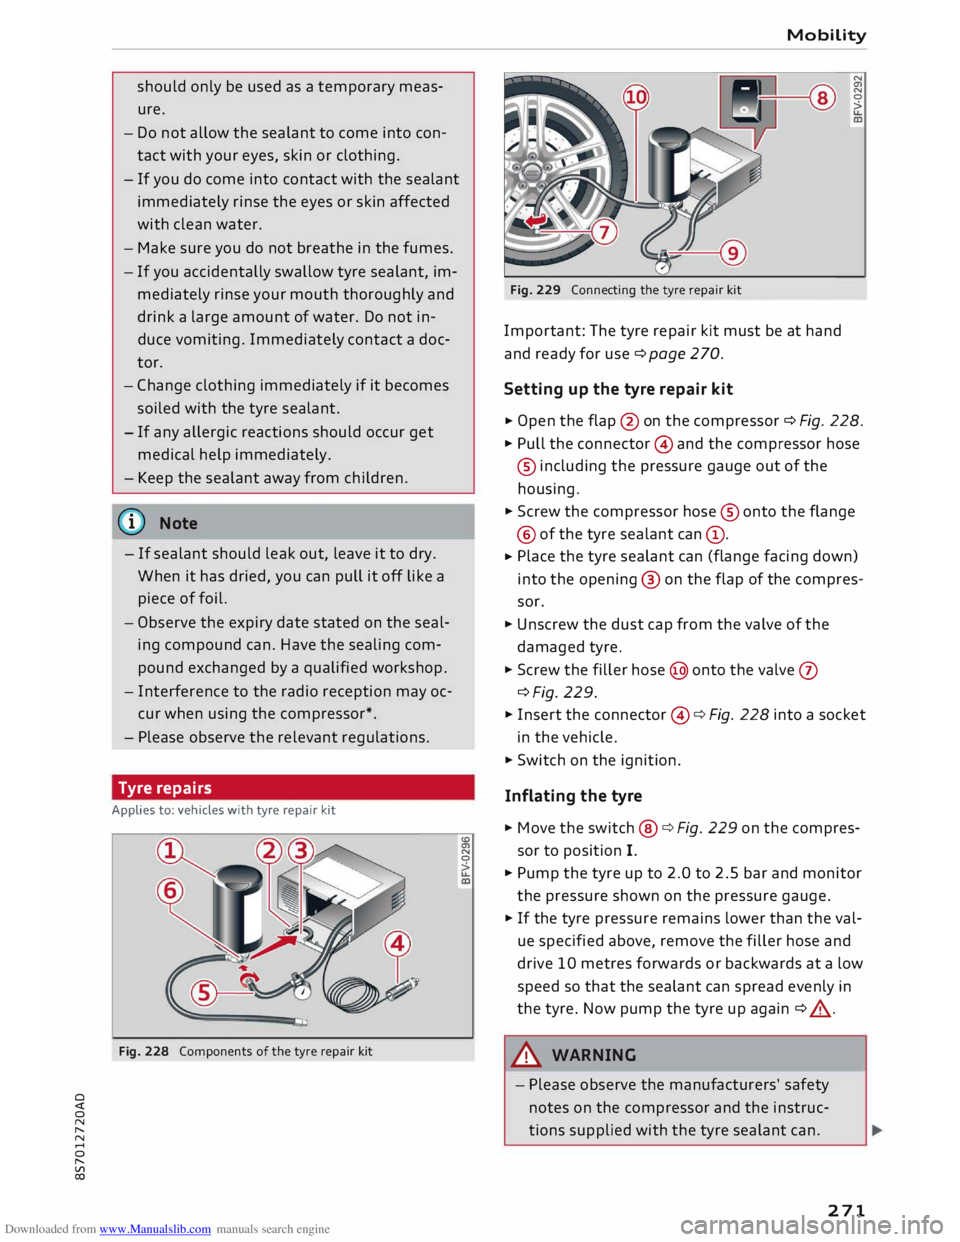
Fig. 228 Components of the tyre repair kit <.O
a,
N
0
> Mobility
Fig. 229 Connecting the tyre repair kit
Important: The tyre repair kit must be at hand
and ready for use ¢ page 2 70.
Setting up the tyre repair kit N
a,
N
0
>
� Open
the flap @on the compressor ¢ Fig. 228.
� Pull the connector © and the compressor hose
® including the pressure gauge out of the
housing.
� Screw the compressor hose® onto the flange
@ of the tyre sealant can@.
� Place
the tyre sealant can (flange facing down)
into the opening @ on the flap of the compres
sor.
� Unscrew the dust cap from the valve of the
damaged tyre.
� Screw the filler hose@ onto the valve 0
c:::>Fig. 229.
� Insert the connector ©¢ Fig. 228 into a socket
in the vehicle.
� Switch on the ignition.
Inflating the tyre
� Move the switch@ ¢ Fig. 229 on the compres
sor to position I.
� Pump the tyre up to 2.0 to 2.5 bar and monitor
the pressure shown on the pressure gauge.
� If the tyre pressure remains lower than the val
ue specified above, remove the filler hose and
drive 10 metres forwards or backwards at a low
speed so that the sealant can spread evenly in
the tyre. Now pump the tyre up again ¢ _A .
.&_ WARNING
- Please observe the manufacturers' safety
notes on the compressor and the instruc
tions supplied with the tyre sealant can.
271
Page 285 of 306
Downloaded from www.Manualslib.com manuals search engine 0
N
,.....
N
......
0
,.....
Vl
CX) &,
WARNING
Never attempt to repair a fuse or replace a
blown fuse by fitting a fuse with a higher am
pere rating. This could damage the electrical
system -risk of fire!
CD CAUTION
If a newly replaced fuse blows again after a
short time, the electrical system must be
checked by a qualified workshop as soon as
possible.
@ Note
- Unassigned fuse locations are not shown in
the tables below.
- Some of the items of equipment listed in
the tables below are only fitted on certain
models or are optional extras.
Fuses in vehicle interior
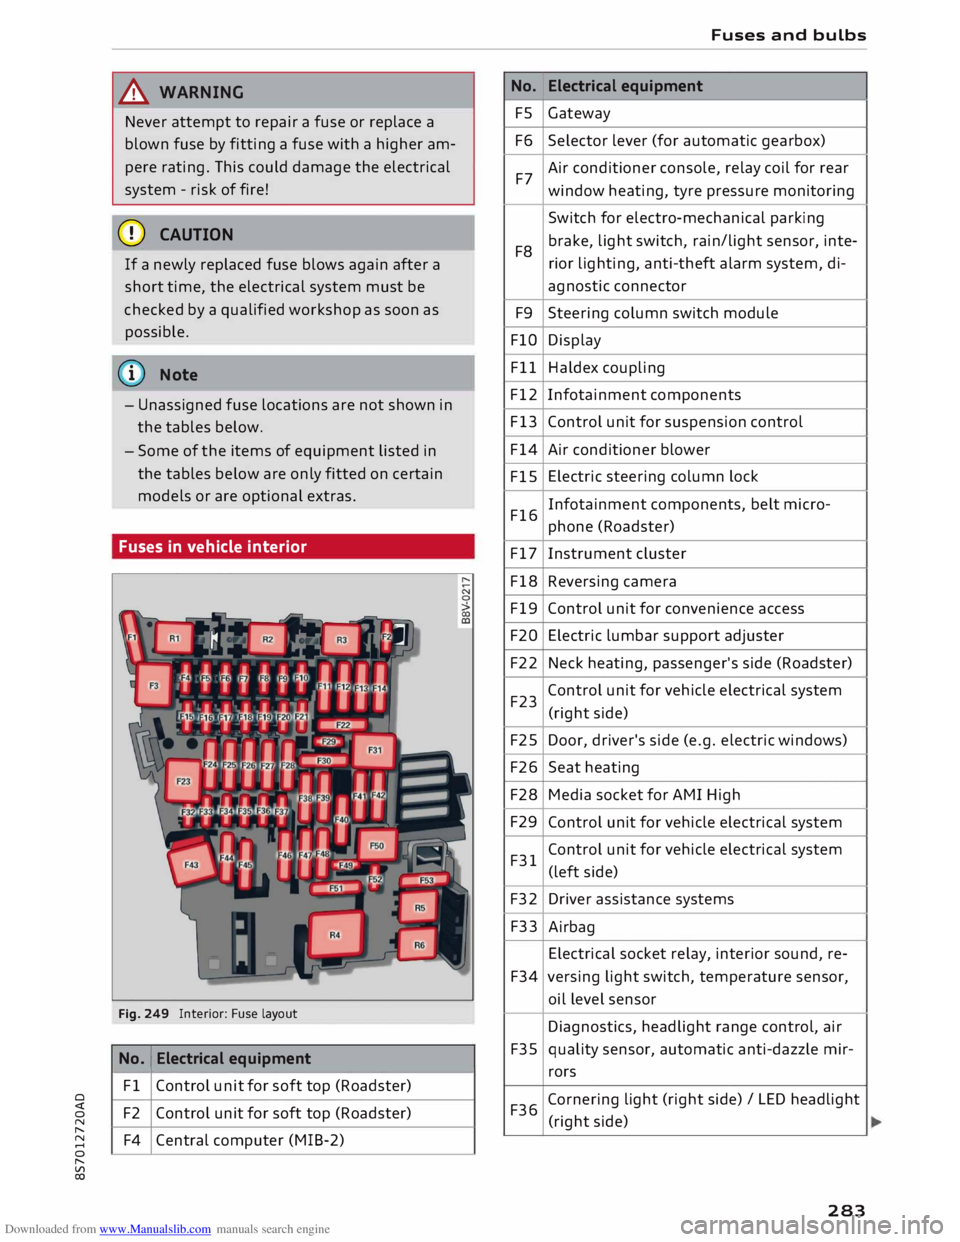
Fig. 249 Interior: Fuse layout
No. 1
Electrical equipment
Fl Control unit for soft top (Roadster)
F2 Control unit for soft top (Roadster)
F4 Central computer (MIB-2) No.
FS
F6
F7
F8 F9
FlO
Fll
F12
F13
F14
FlS
F16
F17
F18
F19
F20
F22
F23
F25
F26
F28
F29
F31
F32
F33
F34
F35
F36 Fuses
and bulbs
Electrical equipment
Gateway
Selector lever (for automatic gearbox)
Air conditioner console, relay coil for rear
window heating, tyre pressure monitoring
Switch for electro-mechanical parking
brake, light switch, rain/light sensor, inte-
rior lighting, anti-theft alarm system, di-
agnostic connector
Steering column switch module
Display
Haldex coupling
Infotainment components
Control unit for suspension control
Air conditioner blower
Electric steering column lock
Infotainment components, belt micro-
phone (Roadster)
Instrument cluster
Reversing camera
Control unit for convenience access
Electric lumbar support adjuster
Neck heating, passenger's side (Roadster)
Control unit for vehicle electrical system
(right side)
Door, driver's side (e.g. electric windows)
Seat heating
Media socket for AMI High
Control unit for vehicle electrical system
Control unit for vehicle electrical system
(left side)
Driver assistance systems
Airbag
Electrical socket relay, interior sound, re-
versing light switch, temperature sensor,
oil level sensor
Diagnostics, headlight range control, air
quality sensor, automatic anti-dazzle mir-
rors
Cornering light (right side)/ LED headlight
(right side)
283
Page 300 of 306
Downloaded from www.Manualslib.com manuals search engine Index
Paint number 287
Park assist . . . . . . . . . . . . . . . . . . . . . . . . . . .
108
Description . . . . . . . . . . . . . . . . . . . . . . . . .
108
Driver messages . . . . . . . . . . . . . . . . . . . . .
111
Driving out of a parking space . . . . . . . . . . 110
Finding a parking space . . . . . . . . . . . . . . . 109
Parking . . . . . . . . . . . . . . . . . . . . . . . . . . . .
110
Parking aid . . . . . . . . . . . . . . . . . . . . . . . . . .
103
Parking aids
360 °
display . . . . . . . . . . . . . . . . . . . . . . . .
104
Adjusting graphic display/warning beeps 112
Cleaning reversing camera . . . . . . . . . . . . 106
Cleaning sensors/camera . . . . . . . . . . . . . 264
Malfunction . . . . . . . . . . . . . . . . . . . . . . . . 112
Park assist . . . . . . . . . . . . . . . . . . . . . . . . . 108
Parking system plus . . . . . . . . . . . . . . . . . . 104
Rear parking aid . . . . . . . . . . . . . . . . . . . . .
104
Reversing camera . . . . . . . . . . . . . . . . . . . .
106
Parking brake Warning lamp . . . . . . . . . . . . . . . . . . . . . . .
13
see also Electro-mechanical parking brake 74
Parking lights . . . . . . . . . . . . . . . . . . . . . . . . .
45
Parking system
see Parking aids . . . . . . . . . . . . . . . . . 104,
106
Parking (automatic
gearbox) . . . . . . . . . . . . . 79
Particulate filter (diesel) . . . . . . . . . . . . . . . 244
Passenger's door, locking manually . . . . . . . 32
Path descriptions in Owner's Manual . . . . .
123
Pause (audio/video file) . . . . . . . . . . . . . 23, 200
Pedals . . . . . . . . . . . . . . . . . . . . . . . . . . . . . .
226
Pedestrian protection system . . . . . . . . . . . 228
Servicing . . . . . . . . . . . . . . . . . . . . . . . . . . . 229
Performance (engine) . . . . . . . . . . . . . . . . . . 289
Personal Wi-Fi hotspot . . . . . . . . . . . . . . . . .
161
Petrol . . . . . . . . . . . . . . . . . . . . . . . . . . . . . .
241
Phone book
see Contacts . . . . . . . . . . . . . . . . . . . . . . . .
153
Picture format (video) . . . . . . . . . . . . . . . . .
203
Playback (media) . . . . . . . . . . . . . . . . . . . . .
200
Playlist . . . . . . . . . . . . . . . . . . . . . . . . . . . . .
203
Point of interest search ................
173
Polishing . . . . . . . . . . . . . . . . . . . . . . . . . . . .
265
Pollen filter
see Pollution filter . . . . . . . . . . . . . . . . . . . .
60
Pollution filter . . . . . . . . . . . . . . . . . . . . . . . .
60
298 Power/torque
display
see Sport displays . . . . . . . . . . . . . . . . . . . . 96
Power management . . . . . . . . . . . . . . . . . . . 118
Power steering
see Electro-mechanical power steering . .
116
Preheating (glow plugs) . . . . . . . . . . . . . . . . . 68
Pressures (tyres) . . . . . . . . . . . . . . . . . . . . . .
256
Pressure (tyres) . . . . . . . . . . . . . . . . . . . . . .
258
Privacy . . . . . . . . . . . . . . . . . . . . . . . . . . . . . . 191
Programme guide Radio . . . . . . . . . . . . . . . . . . . . . . . . . . . . .
185
Q
quattro (four-wheel drive) . . . . . . . . . . . . . .
116
R
Radio . . . . . . . . . . . . . . . . . . . . . . . . . . . . . . .
185
Radio text . . . . . . . . . . . . . . . . . . . . . . . . . .
186
Station names . . . . . . . . . . . . . . . . . . . . . .
187
Radio-operated remote control
see Remote control keys . . . . . . . . . . . . . . . 2 7
Radio equipment . . . . . . . . . . . . . . . . . . . . . 286
Radio frequency
see Waveband . . . . . . . . . . . . . . . . . . . . . . 185
Radio transmitters . . . . . . . . . . . . . . . . . . . . 286
Rain sensor/light sensor
Headlights . . . . . . . . . . . . . . . . . . . . . . . . . . 44
Indicator lamp . . . . . . . . . . . . . . . . . . . . . . . 19
Intermittent wipe (windscreen wipers) . . .
50
Random playback . . . . . . . . . . . . . . . . . . . . . 203
Reading lights . . . . . . . . . . . . . . . . . . . . . . . . . 47
Rear spoiler . . . . . . . . . . . . . . . . . . . . . . . . . . 117
Rear window heating . . . . . . . . . . . . . . . . 61, 63
Recuperation . . . . . . . . . . . . . . . . . . . . . . . . . 25
Refuelling with spare fuel canister . . . . . . . 243
Reminder signal . . . . . . . . . . . . . . . . . . . . . .
212
Remote control keys. . . . . . . . . . . . . . . . . . . .
27
LED . . . . . . . . . . . . . . . . . . . . . . . . . . . . . . . .
29
Locking and unlocking the vehicle . . . . . . .
29
Personalising . . . . . . . . . . . . . . . . . . . . . . . . 2 7
Replacing the battery . . . . . . . . . . . . . . . . .
29
Repair kit
Tyre Mobility System (tyre repair kit) . . . .
270
Repairs . . . . . . . . . . . . . . . . . . . . . . . . . . . . .
285
Replacement parts . . . . . . . . . . . . . . . . . . . .
285