exhaust AUDI TT ROADSTER 2016 Owners Manual
[x] Cancel search | Manufacturer: AUDI, Model Year: 2016, Model line: TT ROADSTER, Model: AUDI TT ROADSTER 2016Pages: 306, PDF Size: 31.82 MB
Page 13 of 306
Downloaded from www.Manualslib.com manuals search engine 0
N
,.....
N
......
0
,.....
Vl
CX) Instruments
and warning/indicator lamps
The tank capacity of your vehicle is given in the
Technical data section ¢ page 288.
CD CAUTION
Never run the tank completely dry. If there is
an irregular fuel supply, misfiring can occur.
Unburnt fuel can then enter the exhaust sys
tem. This can lead to overheating and dam
age to the catalytic converter.
Warning and indicator
Lamps
Description
The warning and indicator lamps light up or flash
in the instrument cluster. Their purpose is to in
dicate functions or faults.
Some of the warning and indicator lamps may be
accompanied by a driver message and a warning
tone. The warning/indicator lamps and driver
messages on the display can be masked by fur
ther displays. To display a warning or message
again, use the controls on the multi-function
steering wheel to select the display tab for warn
ing/indicator lamps and messages ¢ page 20.
If several malfunctions have occurred, you can
use the thumbwheel to scroll through them on
the display.
Some of the warning lamps may be displayed in
different colours.
Overview
When you switch on the ignition, some of the
warning and indicator lamps light up briefly to
show that the associated systems are working
properly. These systems are marked with a../ in
the following tables. If one of these warning/in
dicator lamps does not light up, there is a fault in
the associated system.
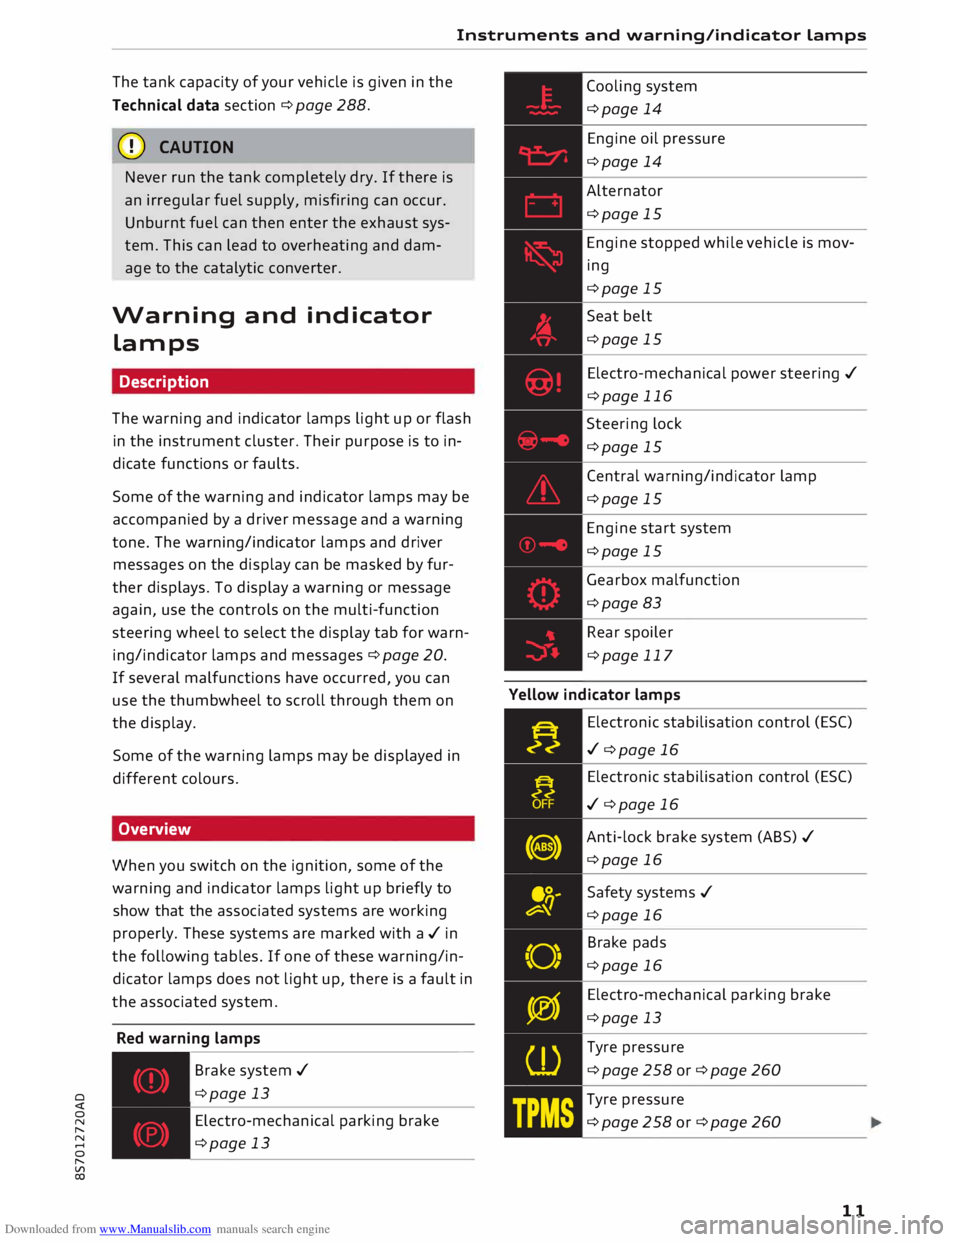
Red warning lamps
---------------
Br a k e system ../
¢page 13
Electro-mechanical parking brake
¢page 13 Cooling
system
¢page 14
Engine oil pressure
¢page 14
Alternator
¢page 15
Engine stopped while vehicle is mov
ing
¢page 15
Seat belt
¢page 15
Electro-mechanical power steering ../
¢page 116
Steering lock
¢page 15
Central warning/indicator lamp
¢page 15
Engine start system
¢page 15
Gearbox malfunction
¢page 83
Rear spoiler
¢page 117
Yellow indicator lamps
Electronic stabilisation control (ES()
../ ¢page 16
Electronic stabilisation control (ES()
../ ¢page 16
Anti-lock brake system (ABS) ../
¢page 16
Safety systems ../
¢page 16
Brake pads
¢page 16
Electro-mechanical parking brake
¢page 13
Tyre pressure
¢page258or¢page260
Tyre pressure
¢page258or¢page260
11
Page 19 of 306
Downloaded from www.Manualslib.com manuals search engine 0
N
,.....
N
......
0
,.....
Vl
CX) Instruments
and warning/indicator lamps
Pedestrian protection system
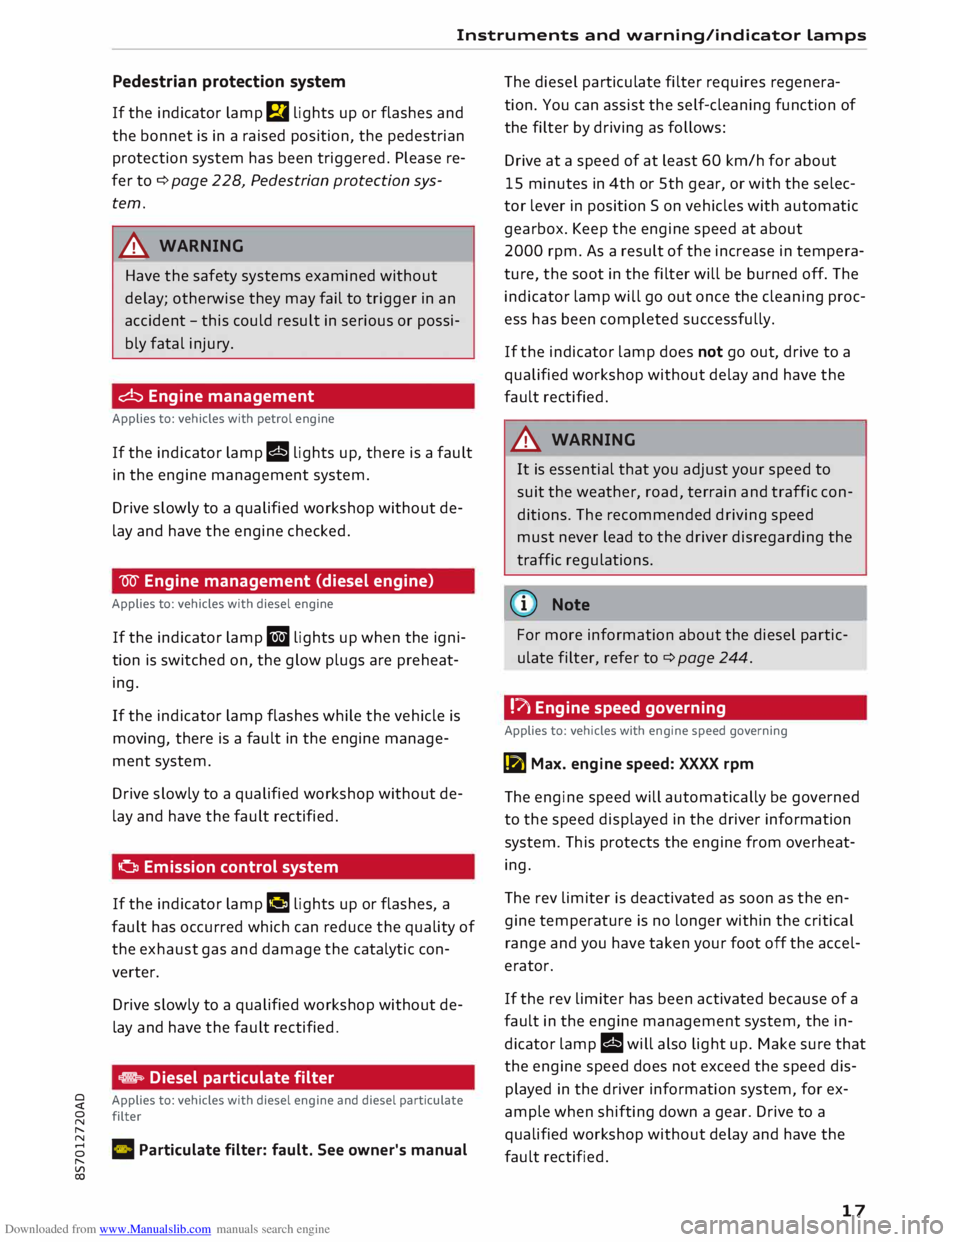
If the indicator Lamp El Lights up or flashes and
the bonnet is in a raised position, the pedestrian
protection system has been triggered. Please re
fer to¢ page 228, Pedestrian protection sys
tem.
.&_ WARNING
Have the safety systems examined without
delay; otherwise they may fail to trigger in an
accident -this could result in serious or possi
bly fatal injury.
� Engine management
Applies to: vehicles with petrol engine
If the indicator Lamp II Lights up, there is a fault
in the engine management system.
Drive slowly to a qualified workshop without de
lay and have the engine checked.
W Engine management (diesel engine)
Applies to: vehicles with diesel engine
If the indicator Lamp II Lights up when the igni
tion is switched on, the glow plugs are preheat
ing.
If the indicator lamp flashes while the vehicle is
moving, there is a fault in the engine manage
ment system.
Drive slowly to a qualified workshop without de
lay and have the fault rectified.
G Emission control system
If the indicator Lamp II Lights up or flashes, a
fault has occurred which can reduce the quality of
the exhaust gas and damage the catalytic con
verter.
Drive slowly to a qualified workshop without de
lay and have the fault rectified.
@.> Diesel particulate filter
Applies to: vehicles with diesel engine and diesel particulate
filter
C Particulate filter: fault. See owner's manual The
diesel particulate filter requires regenera
tion. You can assist the self-cleaning function of
the filter by driving as follows:
Drive at a speed of at Least 60 km/h for about
15 minutes in 4th or 5th gear, or with the selec
tor lever in position Son vehicles with automatic
gearbox. Keep the engine speed at about
2000 rpm. As a result of the increase in tempera
ture, the soot in the filter will be burned off. The
indicator lamp will go out once the cleaning proc
ess has been completed successfully.
If the indicator Lamp does not go out, drive to a
qualified workshop without delay and have the
fault rectified.
.&_ WARNING
It is essential that you adjust your speed to
suit the weather, road, terrain and traffic con
ditions. The recommended driving speed
must never Lead to the driver disregarding the
traffic reg u Lations.
@ Note
For more information about the diesel partic
ulate filter, refer to ¢page 244.
!?') Engine speed governing
Applies to: vehicles with engine speed governing
(m Max. engine speed: XXXX rpm
The engine speed will automatically be governed
to the speed displayed in the driver information
system. This protects the engine from overheat
ing.
The rev Limiter is deactivated as soon as the en
gine temperature is no Longer within the critical
range and you have taken your foot off the accel
erator.
If the rev Limiter has been activated because of a
fault in the engine management system, the in
dicator Lamp II will also Light up. Make sure that
the engine speed does not exceed the speed dis
played in the driver information system, for ex
ample when shifting down a gear. Drive to a
qualified workshop without delay and have the
fault rectified.
17
Page 36 of 306
Downloaded from www.Manualslib.com manuals search engine Doors
and windows
- The boot lid must always be completely
closed when the vehicle is moving; other
wise toxic exhaust fumes can be drawn into
the interior.
@ Note
When the vehicle is locked, you can unlock
the boot lid separately by pressing the�
button on the remote control key. The boot
lid will lock automatically when you close it
again.
Releasing the boot lid manually
The boot lid can be released manually from the
inside.
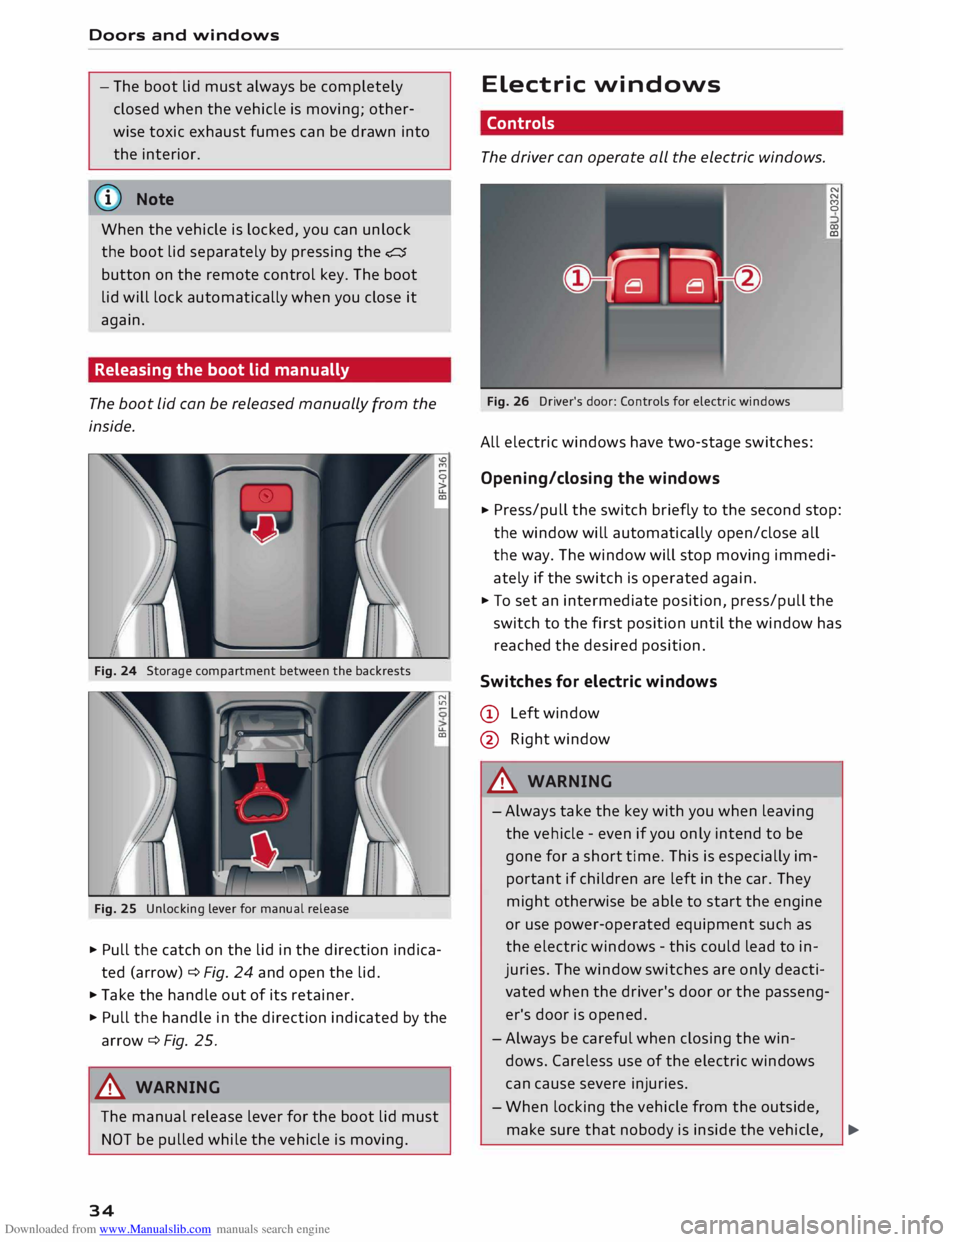
Fig. 24 Storage compartment between the backrests
Fig. 25 Unlocking lever for manual release "'
"'
LL
a,
� Pull the catch on the lid in the direction indica
ted (arrow) ¢ Fig. 24 and open the lid.
� Take the handle out of its retainer.
� Pull the handle in the direction indicated by the
arrow¢ Fig. 25.
A WARNING
The manual release lever for the boot lid must
NOT be pulled while the vehicle is moving.
34 Electric
windows
Controls
The driver can operate all the electric windows.
Fig. 26 Driver's door: Controls for electric windows
All electric windows have two-stage switches:
Opening/closing the windows N
N
M 0
00
Ill
� Press/pull
the switch briefly to the second stop:
the window will automatically open/close all
the way. The window will stop moving immedi
ately if the switch is operated again.
� To set an intermediate position, press/pull the
switch to the first position until the window has
reached the desired position.
Switches for electric windows
(D Left window
@ Right window
A WARNING
- Always take the key with you when leaving
the vehicle -even if you only intend to be
gone for a short time. This is especially im
portant if children are left in the car. They
might otherwise be able to start the engine
or use power-operated equipment such as
the electric windows -this could lead to in
juries. The window switches are only deacti
vated when the driver's door or the passeng
er's door is opened.
- Always be careful when closing the win
dows. Careless use of the electric windows
can cause severe injuries.
- When locking the vehicle from the outside,
make sure that nobody is inside the vehicle,
..,
Page 65 of 306
Downloaded from www.Manualslib.com manuals search engine 0
N
,.....
N
......
0
,.....
Vl
CX) To
prevent the front side windows from misting
up in wet weather, it's a good idea to open the
side air outlets and point them to the side.
� Switching air recirculation on/off
The air recirculation mode can be switched on
manually or automatically*.
- To switch the manual air recirculation mode
on/off, press the[;] button.
- The automatic* air recirculation function must
be activated on the infotainment system. Se
lect the following on the infotainment system:
IM ENU
I
button > Car > left control button > Ve
hicle settings > A/C > Auto recirculation. The
air quality sensor, which is designed for the de
tection of diesel and petrol exhaust fumes, au
tomatically switches the air recirculation mode
on or off depending on the level of pollution in
the outside air.
In air recirculation mode, the air from the interi
or of the vehicle is filtered and recirculated. This
setting prevents fumes etc. from entering the in
terior. We recommend switching on the air recir
culation mode when driving through a tunnel or
in traffic queues ¢ A.
The air recirculation mode is switched off when
the [;] or I
AUTO I
or I l!ii'
M
AX
I button is pressed.
I@ MAX!
Switching the defroster on/off
The windscreen and side windows are defrosted
or demisted as quickly as possible. Most of the
air comes out of the outlets below the wind
screen. The air recirculation mode is deactivated.
The temperature is regulated automatically.
The defroster is switched off when the !AUTO!
button is pressed.
l[jjj) REAR!
Switching the rear window heating
on/off
If the rear window heating is activated with the
ignition switched on, the battery management
determines whether or not the battery charge
level is sufficient for the rear window heating to
be switched on. Otherwise the rear window heat
ing operates when the engine is running, and
switches off automatically after about Heating
and cooling
10 -20 minutes, depending on the outside tem
perature.
To switch on the rear window heating perma
nently, press and hold the l[jjj) REA
R!
button for at
least two seconds. This setting will be stored for
approximately 15 minutes after the ignition is
switched off.
A WARNING
For reasons of safety you should not leave the
air recirculation switched on for too long. This
mode prevents fresh air from entering the ve
hicle, so the windows can mist over if the air
cooling is switched off. Bad visibility can
cause an accident.
Adjusting air outlets
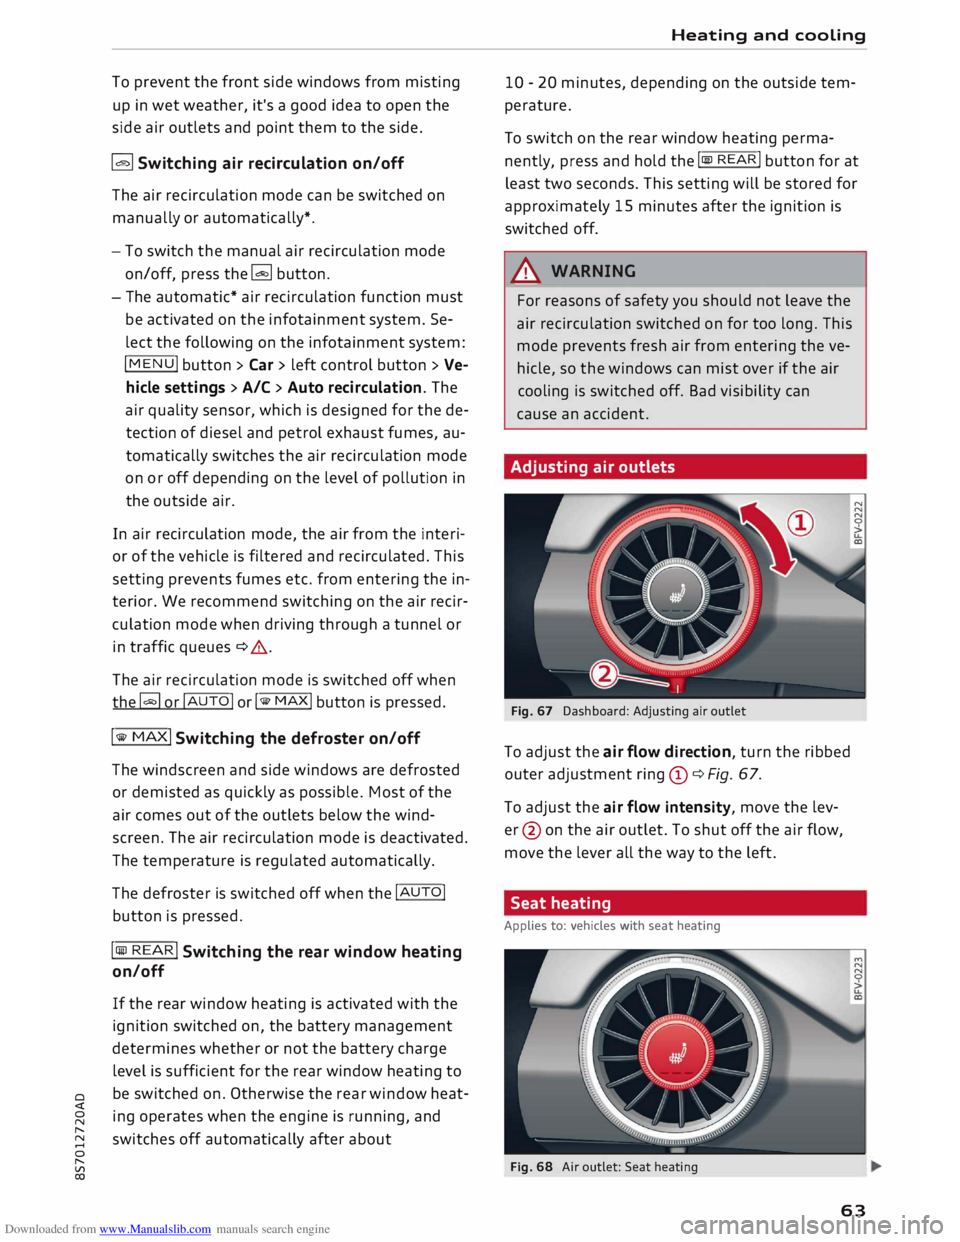
Fig. 67 Dashboard: Adjusting air outlet
To adjust the air flow direction, turn the ribbed
outer adjustment ring(!)¢ Fig. 67.
To adjust the air flow intensity, move the lev
er @ on the air outlet. To shut off the air flow,
move the lever all the way to the left.
Seat heating
Applies to: vehicles with seat heating
Fig. 68 Air outlet: Seat heating
63
Page 68 of 306
Downloaded from www.Manualslib.com manuals search engine Driving
Driving
General notes
Running in
A new vehicle should be run in over a distance of
1,500 km. For the first 1,000 km the engine
speed should not exceed 2/3 of the maximum
permissible engine speed -do not use full throt
tle. From 1,000 to 1,500 km you can gradually
increase the engine rpm and road speed.
During its first few hours of running, the internal
friction in the engine is greater than later on
when all the moving parts have bedded down.
How the vehicle is driven for the first 1,500 km
also influences the engine quality. After this peri
od you should continue driving at moderate en
gine speeds, in particular when the engine is
cold. This helps to reduce wear and tear on the
engine and increases the potential mileage which
can be covered by the engine.
You should also avoid driving with the engine
speed too low. Change down to a lower gear
when the engine no longer runs "smoothly". Ex
cessively high engine speeds are prevented by an
automatic rev limiter.
Letting the engine warm up/cool down
Applies to: Sand RS models
You can reduce the amount of wear and tear on
your vehicle during a sporty driving session sim
ply by adopting a more restrained driving style
while the engine is warming up and cooling
down.
When the engine is cold, the engine speed is limi
ted so that the full range of engine power is not
available. Once the engine has reached operating
temperature, the rev Limit moves to a higher
range of engine speeds. In addition, the tyres will
not develop their full grip potential until they
have had a chance to warm up on the road.
Even though the engine continues to be cooled
after you switch it off, it is particularly important
to give it time to cool down before parking. The
engine, brakes, exhaust system and gearbox will
66 all
reach very high temperatures when you adopt
a sporty driving style. Before you park the vehi
cle, allow it to cool down to normal temperature
by driving at moderate engine speeds for several
miles.
Avoiding damage to the car
CD CAUTION
Take care not to damage low-mounted parts
of the car (such as the spoiler or exhaust sys
tem) on steep ramps, uneven road surfaces or
roadside kerbs, etc. This applies especially to
vehicles with low ground clearance and to all
vehicles when fully laden.
Driving through water on roads
Please note the following in order to prevent
damage to the vehicle when driving through wa
ter (e.g. on flooded roads):
- The water level must not be higher than the ve
hicle's underbody.
- Do not drive faster than walking pace.
A WARNING
After driving through water, mud, sludge,
etc., the braking effect can be delayed slightly
due to moisture on the discs and brake pads.
Applying the brakes carefully several times
will remove the moisture and restore the full
braking effect.
CD CAUTION
- Parts of the vehicle (e.g. engine, gearbox,
running gear or electrical components) can
be badly damaged when driving through
water.
- Always switch off the start/stop system*
¢ page 71 before driving through water.
i Note
- It is advisable to check the depth at the
deepest point before approaching the wa
ter.
Page 69 of 306
Downloaded from www.Manualslib.com manuals search engine 0
N
,.....
N
......
0
,.....
Vl
CX) -
Do NOT stop the vehicle, drive in reverse or
switch off the engine before you are out of
the water.
- Bear in mind that waves created by oncom
ing traffic could exceed the permissible
wading depth of your vehicle.
- Avoid driving through salt water (corrosion).
How to improve economy and minimise
pollution
Fuel economy, environmental impact and wear
on the engine, brakes and tyres depend largely
on the way you drive the vehicle. By adopting an
economical driving style and anticipating the
traffic situation ahead, you can reduce fuel con
sumption by 10-15%. The following section gives
you some tips on lessening the impact on the en
vironment and reducing your operating costs at
the same time.
Anticipate well in advance
A car uses most fuel when accelerating. If you an
ticipate hazards and speed changes well in ad
vance, you will need to brake less and thus accel
erate less. Wherever possible, let the car slow
down gradually with a gear engaged, for in
stance when you can see that the next traffic
lights are red.
Change gear early to save fuel
An effective way of saving fuel is to change up
quickly through the gears. Running the engine at
high rpm in the lower gears uses an unnecessary
amount of fuel. Press the accelerator slowly and
avoid using the "kick-down" feature.
Avoid driving at high speed
Avoid travelling at top speed. Fuel consumption,
exhaust emissions and noise levels all increase
very rapidly at higher speeds. Driving at moder
ate speeds will help to save fuel.
Do not let the engine idle for longer than
necessary
Engine idling periods are automatically reduced
on vehicles with start/stop system*. On vehicles
without start/stop system*, it is worthwhile
switching off the engine at level crossings, for in- Driving
stance, or at traffic lights with a long red phase.
The fuel saved after only 30 -40 seconds is
greater than the amount of fuel needed to re
start the engine.
The engine takes a very long time to warm up
when it is running at idling speed. Mechanical
wear and pollutant emissions are also especially
high during this initial warm-up phase. It is
therefore best to drive off immediately after
starting the engine. Avoid running the engine at
high speed.
Regular servicing
Regular servicing can establish a basis for good
fuel economy before you start driving. A well
serviced engine gives you the benefit of im
proved fuel efficiency as well as maximum relia
bility and an enhanced resale value.
A poorly maintained engine can consume up to
ten percent more fuel than necessary.
Check the oil level when filling the tank. Oil con
sumption depends to a great extent on the en
gine load and engine speed. It is quite normal
that the oil consumption of a new engine only
reaches its lowest level after a certain mileage.
This means that the oil consumption can only be
properly assessed after about 5,000 km.
Avoid short trips
The engine and emission control system need to
reach their proper working temperature in order
to minimise fuel consumption and emissions.
A cold engine uses disproportionately more fuel.
The engine only reaches its working temperature
after about four kilometres, when fuel consump
tion will return to a normal level.
Check tyre pressures
Always make sure the tyres are inflated to the
correct tyre pressures to save fuel. If the tyre
pressures are just 0.5 bar too low, this can in
crease the fuel consumption by as much as 5 %.
Due to the greater rolling resistance, under-infla
tion also increases tyre wear and impairs han
dling.
67
Page 71 of 306
Downloaded from www.Manualslib.com manuals search engine Starting
the engine
� Manual gearbox: Press the clutch pedal all the
way down and move the gear Lever into neutral.
� Vehicles with automatic gearbox: Press the
brake pedal and move the selector Lever to po
sition P or N ¢ ,&..
� Press the ....,1s=
T_A_R _T_E_
N_G_I_N_ E-ST_O_PI
button. The
engine should start.
� Diesel engines can take a few seconds Longer
than usual to start on cold days. Please keep
your foot on the clutch pedal (manual gearbox)
or brake pedal (automatic gearbox) until the
engine starts. The indicator Lamp IJ Lights up
while the glow plugs are preheating.
If the engine fails to start immediately, the start
er will be switched off automatically after a few
seconds. Try to start the engine again.
Start/stop system
Please note the information on ¢ page 71,
Start/stop sy
stem.
A WARNING
Never run the engine in confined spaces. The
exhaust gases are toxic -risk of poisoning!
CD CAUTION
Avoid high engine speeds, full throttle and ex
treme load conditions until the engine has
reached its normal operating temperature;
otherwise this can damage the engine.
@) For the sake of the environment
Do not warm up the engine by running it with
the car stationary. You should drive off imme
diately whenever possible. This will help avoid
unnecessary exhaust emissions.
ijj} Note
-Any noises which may be heard when the
engine is started are quite normal and no
cause for concern.
- If you leave the vehicle with the ignition
� switched
on, it will be switched off auto-
o
N
,.....
N
......
0
,.....
� 1}
This function is not available on all export versions. Driving
matically after a while. Please note that
electrical equipment such as the exterior
Lighting will also be switched off.
Switching off the engine
� Stop the vehicle.
� Vehicles with automatic gearbox: Move these
lector Lever to position P.
� Press the !START
ENGINE STOP!
button
¢page 68, Fig. 72.
Steering lock1
)
The steering will be locked if you switch off the
engine with the !START
ENGINE STOP!
button,
move the selector lever to position P (on vehicles
with automatic gearbox*) and open the driver's
door.
The steering will be Locked if you switch off the
engine with the !START
ENGINE STOP!
button
and open the driver's door. The steering lock acts
as a theft deterrent.
Emergency Off function*
If necessary in an emergency, the engine can be
switched off while the vehicle is still moving at
speeds of 7 km/h and above. To switch off the
engine, press the !START E
NG I
N E
ST
OP!
button
twice in quick succession or hold it in for longer
than two seconds.
A WARNING
- Never switch off the engine until the vehicle
is stationary. Otherwise you may not have
the full benefit of the brake servo and pow
er steering. You may need more strength to
steer and brake the vehicle than you nor
mally would. This would mean a greater risk
of accidents and serious injury, because you
cannot steer and brake in the normal man
ner.
- Always take the key with you when you leave
the vehicle. Otherwise the engine can be
started or power-operated equipment such
as the electric windows can be used. This
could result in serious injury.
liJI>
69
Page 73 of 306
Downloaded from www.Manualslib.com manuals search engine !START
E
NGIN E
STOP!
button. Put the selector
lever in position P; otherwise the vehicle can roll
away. If the lever is not in position P you will not
be able to lock the vehicle using the locking sen
sor on the door handle or the convenience key.
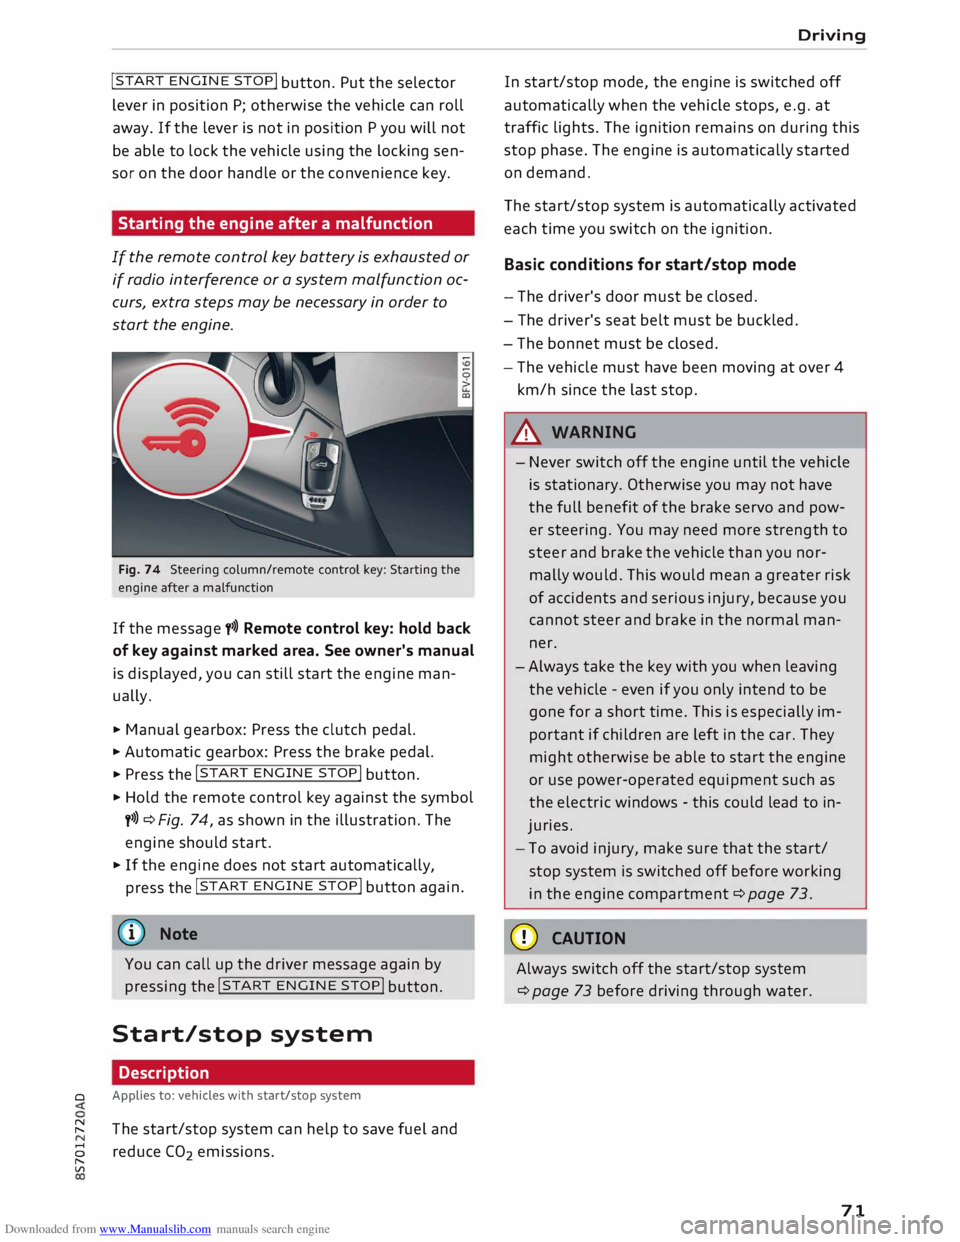
Starting the engine after a malfunction
If the remote control key battery is exhausted or
if radio interference or a system malfunction oc
curs, extra steps may be necessary in order to
start the engine.
Fig. 74 Steering column/remote control key: Starting the
engine after a malfunction
If the message t>>) Remote control key: hold back
of key against marked area. See owner's manual
is displayed, you can still start the engine man
ually.
� Manual gearbox: Press the clutch pedal.
� Automatic gearbox: Press the brake pedal.
� Press the !START
ENGINE STOP!
button.
� Hold the remote control key against the symbol
y>>) ¢Fig. 74, as shown in the illustration. The
engine should start.
� If the engine does not start automatically,
press the !START
E
NGINE STOP!
button again.
@ Note
You can call up the driver message again by
pressing the !START
ENGINE STOP!
button.
Start/stop system Description
0 Applies
to: vehicles with start/stop system
� The start/stop system can help to save fuel and
8 reduce CO
2 emissions.
"
Vl Driving
In start/stop mode, the engine is switched off
automatically when the vehicle stops, e.g. at
traffic lights. The ignition remains on during this
stop phase. The engine is automatically started
on demand.
The start/stop system is automatically activated
each time you switch on the ignition.
Basic conditions for start/stop mode
- The driver's door must be closed.
- The driver's seat belt must be buckled.
- The bonnet must be closed.
- The vehicle must have been moving at over 4
km/h since the last stop.
A WARNING
- Never switch off the engine until the vehicle
is stationary. Otherwise you may not have
the full benefit of the brake servo and pow
er steering. You may need more strength to
steer and brake the vehicle than you nor
mally would. This would mean a greater risk
of accidents and serious injury, because you
cannot steer and brake in the normal man
ner.
- Always take the key with you when leaving
the vehicle -even if you only intend to be
gone for a short time. This is especially im
portant if children are left in the car. They
might otherwise be able to start the engine
or use power-operated equipment such as
the electric windows -this could lead to in
juries.
- To avoid injury, make sure that the start/
stop system is switched off before working
in the engine compartment ¢page 73.
CD CAUTION
Always switch off the start/stop system
¢page 73 before driving through water.
71
Page 75 of 306
Downloaded from www.Manualslib.com manuals search engine 0
N
,.....
N
......
0
,.....
Vl
CX) -
The engine has not yet reached the minimum
temperature required for start/stop mode.
- The interior temperature selected on the air
conditioner has not yet been reached.
- The exterior temperature is very high/Low.
- The windscreen is being defrosted @.
- The parking aid* or park assist* is switched on.
- The vehicle battery charge is too Low.
- The steering wheel is close to full Lock or the
vehicle is being steered.
- Reverse gear has just been selected.
- The vehicle is on a steep gradient.
� will appear in the infotainment display to in
dicate this status.
Engine cuts in again automatically
The stop phase is interrupted in the following sit
uations, for example. The engine cuts in auto
matically without intervention from the driver.
- The vehicle starts to roll (e.g. on a hill).
- The interior temperature deviates from the air
conditioner setting.
- The windscreen is being defrosted @.
- The brake pedal is pressed several times in suc-
cession.
- The vehicle battery charge drops to an insuffi-
cient level.
- The power consumption is high.
Ignition is switched off automatically
To prevent the vehicle battery from being dis
charged, the ignition will be switched off auto
matically if certain conditions are met. For in
stance:
- The vehicle has already been driven.
- The start/stop system has switched off the en-
gine.
- The driver's door is opened.
- The driver's seat belt is unbuckled.
- The brake pedal is not pressed.
- The vehicle is stationary.
If the dipped beam headlights are on when this
happens, the side lights will be turned on instead
and the message Side Lights will be automatical
ly switched off in 30 minutes. See owner's man
ual will appear on the infotainment display. After Driving
approx. 30 minutes, or when you Lock the vehicle,
the side lights will be switched off.
If the start/stop system has not stopped the en
gine or if you have switched off the start/stop
system manually, the engine will continue run
ning and the ignition will not be switched off au
tomatically¢,&..
A WARNING
Never run the engine in confined spaces. The
exhaust gases are toxic -risk of poisoning!
(© Note
If you select D, No r S (on vehicles with auto
matic gearbox) after selecting reverse gear,
the car must have been moving at over
10 km/h before the system can switch off the
engine again.
Switching the start/stop system off and on
manually
Applies to: vehicles with start/stop system
You can switch the system off manually if you
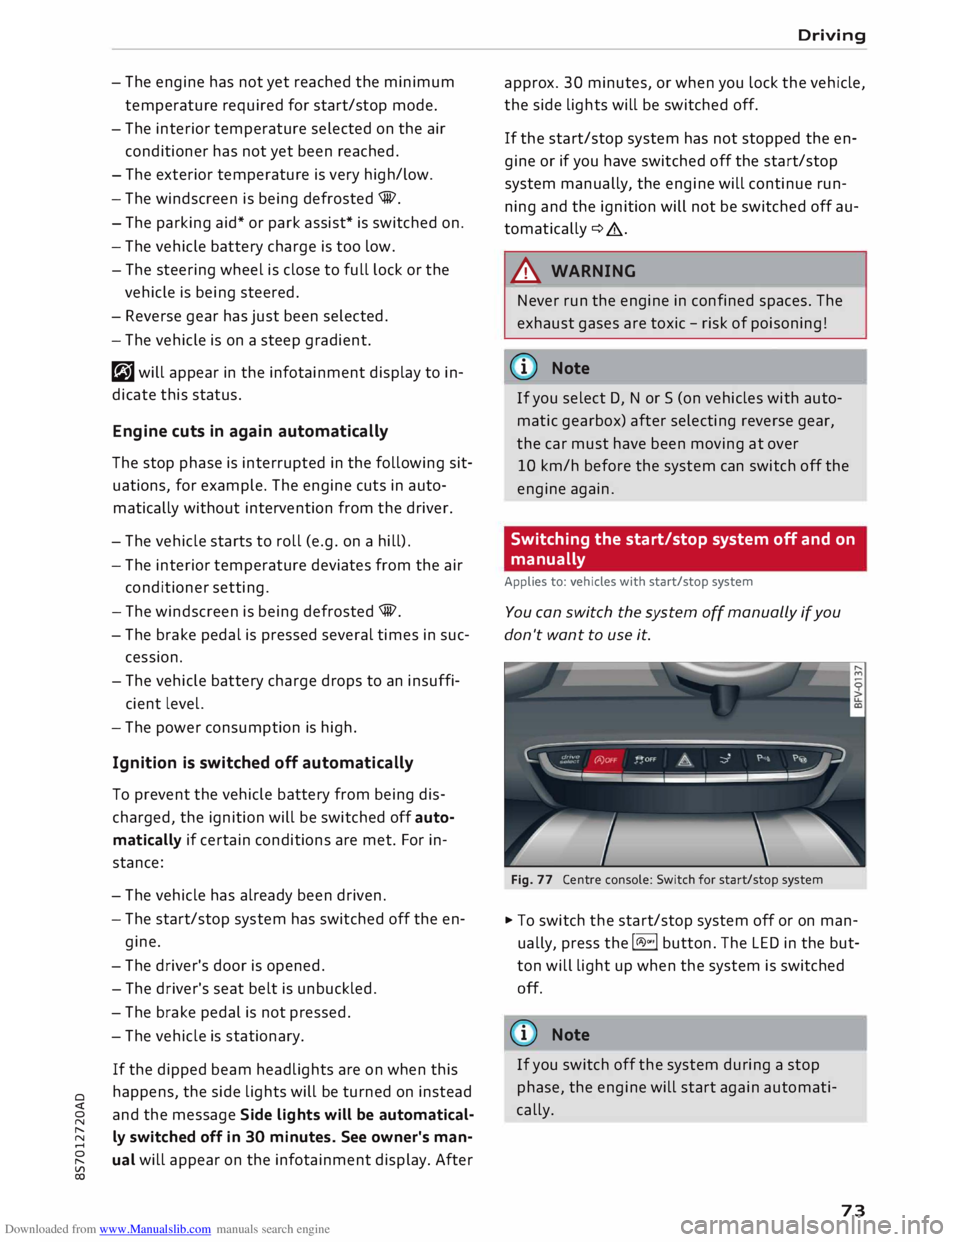
don't want to use it.
Fig. 77 Centre console: Switch for start/stop system
� To switch the start/stop system off or on man
ually, press the l(A)"'I button. The LED in the but
ton will light up when the system is switched
off.
@ Note
If you switch off the system during a stop
phase, the engine will start again automati
cally.
73
Page 105 of 306
Downloaded from www.Manualslib.com manuals search engine 0
N
,.....
N
......
0
,.....
Vl
CX) Parking
aids
General notes
Applies to: vehicles with rear parking aid/parking system
plus/park assist
Various systems are available to help you when
parking or manoeuvring in tight spaces, depend
ing on the equipment fitted on your vehicle.
The rear parking aid gives an acoustic warning if
there are any obstacles behind the car
¢page 104.
When you are parking, the parking system plus
warns you acoustically and optically about obsta
cles detected in front of and behind the vehicle
¢page 104. On vehicles with park assist, the
area detected at the side of the vehicle ®
¢page 104, Fig. 106 is also monitored.
The reversing camera uses the infotainment sys
tem display to show a picture of the area behind
the vehicle captured by the camera. Orientation
lines in the image from the reversing camera as
sist you when parking or manoeuvring
¢ page 106. In addition, you are assisted by the
functions of the parking system plus
¢page 104.
The park assist helps you to find suitable parking
spaces, to manoeuvre the vehicle into spaces par
allel or perpendicular to the roadside and to drive
out of spaces parallel to the kerb ¢ page 108.
A WARNING
-Always watch the road and the area sur
rounding the vehicle. The electronic systems
cannot replace the full concentration of the
driver. The driver is always responsible for
safety during parking and all other manoeu
vres.
- Please note that certain surfaces, such as
clothing fabrics, cannot be detected or dis
played by the system -risk of accident!
- The sensors and cameras have blind spots in
which neither people nor objects are regis
tered. It is particularly important to ensure
that there are no small children or animals
near the vehicle -risk of accident! Parking
aids
- Impacts or damage to the radiator grille,
bumper, wheel arches or underbody can
cause misalignment of the sensors. This can
impair the effectiveness of the parking aids.
Have the systems checked by a qualified
workshop.
CD CAUTION
- The system may not always be able to de
tect objects such as the following:
- Chains, trailer draw bars, posts or fences
- Objects above the sensors, such as wall
protrusions, etc.
- Objects with certain surfaces or struc
tures, such as wire fences or powder snow
- As your car moves closer to low obstacles,
they may disappear from the sensors' field
of vision. Please note that you will no longer
be warned about these obstacles.
- Remember to maintain sufficient clearance
from the kerb to avoid damaging the wheel
rims.
(@ Note
- In certain situations, a warning may be giv
en by the system even if there is no obstacle
within range of the sensors. This can be
caused by the following, for instance:
- Certain road surfaces or long grass
- External ultrasound sources, e.g. from
street cleaning vehicles
- Heavy rain or snow or dense exhaust
fumes
- To familiarise yourself with the system, we
recommend that you practise parking in a
quiet location or a car park. The weather
and light conditions should be good.
- You can adjust the volume of the beeps.
- There is a slight delay in the picture display.
- To ensure that the acoustic parking aid
works properly, the sensors must be kept
clean and free of snow and ice.
103