manual radio set AUDI TT ROADSTER 2016 Owners Manual
[x] Cancel search | Manufacturer: AUDI, Model Year: 2016, Model line: TT ROADSTER, Model: AUDI TT ROADSTER 2016Pages: 306, PDF Size: 31.82 MB
Page 5 of 306
Downloaded from www.Manualslib.com manuals search engine 0
N
,.....
N
......
0
,.....
Vl
CX) Adjusting
graphic display and warning
beeps . . . . . . . . . . . . . . . . . . . . . . . . . . . . . 112
Fault warnings . . . . . . . . . . . . . . . . . . . . . .
112
Intelligent technology........... 113
Electronic stabilisation control (ESC) . . . . 113
Brakes............................. 115
Electro-mechanical power steering . . . . .
116
Four-wheel drive (quattro)
. . . . . . . . . . . . 116
Rear spoiler ........................ 117
Power management.................. 118
Information saved in the control units . . . 119
Infotainment..................... 121
Multi Media Interface ............ 121
Notes on traffic safety . . . . . . . . . . . . . . . .
121
Introduction . . . . . . . . . . . . . . . . . . . . . . . .
121
M MI ON/OFF button with joystick
function . . . . . . . . . . . . . . . . . . . . . . . . . . .
121
How to use the MMI . . . . . . . . . . . . . . . . . . 122
MMI touch . . . . . . . . . . . . . . . . . . . . . . . . . 124
Rotary pushbutton with joystick function 126
Speller for letters/numbers . . . . . . . . . . . 128
Search function . . . . . . . . . . . . . . . . . . . . . 129
Menus and symbols . . . . . . . . . . . . . . . . . . 130
Speech dialogue system . . . . . . . . . 133
How to use the speech dialogue system . . 132
Notes on the overviews of commands . . .
134
Commands . . . . . . . . . . . . . . . . . . . . . . . . .
134
Telephone . . . . . . . . . . . . . . . . . . . . . . . .
141
Introduction . . . . . . . . . . . . . . . . . . . . . . . .
141
Setting up . . . . . . . . . . . . . . . . . . . . . . . . . .
142
Using the Audi phone box . . . . . . . . . . . . . 146
Using the telephone . . . . . . . . . . . . . . . . .
147
Favourites . . . . . . . . . . . . . . . . . . . . . . . . . . 149
Messages . . . . . . . . . . . . . . . . . . . . . . . . . . 150
Listening to
voicemail messages.. . . . . . . 152
Emergency call functions . . . . . . . . . . . . . 152
Directory . . . . . . . . . . . . . . . . . . . . . . . . . . .
153
Settings . . . . . . . . . . . . . . . . . . . . . . . . . . .
155
Seat belt microphone . . . . . . . . . . . . . . . .
157
Troubleshooting . . . . . . . . . . . . . . . . . . . . .
158
Audi connect . . . . . . . . . . . . . . . . . . . . .
159
Introduction . . . . . . . . . . . . . . . . . . . . . . . .
159
Setting up . . . . . . . . . . . . . . . . . . . . . . . . . .
159 Table
of Contents
Configuring using myAudi . . . . . . . . . . . . . 162
Audi connect
services . . . . . . . . . . . . . . . . . 162
Wi-Fi hotspot . . . . . . . . . . . . . . . . . . . . . . . 165
Configuring the data connection . . . . . . . . 166
Notes on Audi connect . . . . . . . . . . . . . . . . 167
Troubleshooting . . . . . . . . . . . . . . . . . . . . .
168
Navigation . . . . . . . . . . . . . . . . . . . . . . . . 169
Calling up the navigation menu . . . . . . . . 169
Entering a destination . . . . . . . . . . . . . . . . 170
Stop route guidance . . . . . . . . . . . . . . . . .
175
Home address . . . . . . . . . . . . . . . . . . . . . .
175
Favourites . . . . . . . . . . . . . . . . . . . . . . . . . .
17 5
Directory contacts ................... 175
Other settings . . . . . . . . . . . . . . . . . . . . . .
176
Ma p
............................... 178
Google Earth map display . . . . . . . . . . . . .
181
Calling up traffic information . . . . . . . . . .
182
Troubleshooting . . . . . . . . . . . . . . . . . . . . .
184
Radio ............................. 185
Calling up the radio menu . . . . . . . . . . . . . 185
Radio functions . . . . . . . . . . . . . . . . . . . . . 185
Radio menu . . . . . . . . . . . . . . . . . . . . . . . . 187
Favourites . . . . . . . . . . . . . . . . . . . . . . . . . . 188
Other settings . . . . . . . . . . . . . . . . . . . . . .
188
Troubleshooting . . . . . . . . . . . . . . . . . . . . . 190
Media ............................. 191
Introduction . . . . . . . . . . . . . . . . . . . . . . . . 191
Notes . . . . . . . . . . . . . . . . . . . . . . . . . . . . . 191
Media drives . . . . . . . . . . . . . . . . . . . . . . . .
192
Bluetooth audio player . . . . . . . . . . . . . . . 194
Wi-Fi audio players . . . . . . . . . . . . . . . . . . 195
Online media and Internet radio . . . . . . . .
196
Multimedia connections . . . . . . . . . . . . . .
197
Playing media . . . . . . . . . . . . . . . . . . . . . . .
200
Other settings . . . . . . . . . . . . . . . . . . . . . .
203
Supported media and file formats . . . . . .
206
Troubleshooting . . . . . . . . . . . . . . . . . . . . .
207
3
Page 6 of 306
Downloaded from www.Manualslib.com manuals search engine Table
of Contents
Audi smartphone interface . . . . . . 210
Setting up.......................... 210
How to use . . . . . . . . . . . . . . . . . . . . . . . . . 211
Troubleshooting..................... 211
System settings .................. 212
Setting the time and date . . . . . . . . . . . . .
212
MMI settings . . . . . . . . . . . . . . . . . . . . . . .
212
Connection manager . . . . . . . . . . . . . . . . .
213
System update . . . . . . . . . . . . . . . . . . . . . .
216
On-board Handbook.................. 216
Sound settings . . . . . . . . . . . . . . . . . . . . . .
217
Volume settings ..................... 217
Restarting the MMI system (Reset) . . . . . 218
Notes on software licences 218
Safety ............................ 220
Safe driving . . . . . . . . . . . . . . . . . . . . . . 220
General notes . . . . . . . . . . . . . . . . . . . . . . .
220
Correct sitting positions . . . . . . . . . . . . . . 221
Child seats . . . . . . . . . . . . . . . . . . . . . . . . .
223
Securing a child seat . . . . . . . . . . . . . . . . .
225
Pedal area . . . . . . . . . . . . . . . . . . . . . . . . . . 226
Stowing luggage safely . . . . . . . . . . . . . . .
227
Pedestrian protection system . . . . . . . . . . 228
Seat belts . . . . . . . . . . . . . . . . . . . . . . . .
230
Why is it so important to use seat belts? . 230
Forces acting in a collision . . . . . . . . . . . . .
231
How to wear seat belts properly . . . . . . . .
232
Belt tensioners . . . . . . . . . . . . . . . . . . . . . .
234
Airbag system . . . . . . . . . . . . . . . . . . . . 235
Description of airbag system . . . . . . . . . . .
235
Front airbags . . . . . . . . . . . . . . . . . . . . . . .
236
Side airbags . . . . . . . . . . . . . . . . . . . . . . . .
239
Service and care . . . . . . . . . . . . . . . . . . 241
Checking and topping up fluids . 241
Fuel . . . . . . . . . . . . . . . . . . . . . . . . . . . . . . . 241
Filling the tank . . . . . . . . . . . . . . . . . . . . . . 242
Emission control systems . . . . . . . . . . . . . 244
Engine compartment . . . . . . . . . . . . . . . . . 244
Engine oil . . . . . . . . . . . . . . . . . . . . . . . . . .
247
Cooling system . . . . . . . . . . . . . . . . . . . . . .
249
Brake fluid . . . . . . . . . . . . . . . . . . . . . . . . .
250
Battery . . . . . . . . . . . . . . . . . . . . . . . . . . . .
250
4 Windscreen
washer . . . . . . . . . . . . . . . . . .
252
Service interval display . . . . . . . . . . . . . . .
252
Wheels ........................... 254
Tyres and rims . . . . . . . . . . . . . . . . . . . . . .
254
Tyre pressure loss indicator . . . . . . . . . . . . 258
Tyre pressure monitoring system . . . . . . .
260
Care of vehicle and cleaning . . . . .
263
General notes . . . . . . . . . . . . . . . . . . . . . . .
263
Washing the vehicle . . . . . . . . . . . . . . . . . .
263
Notes on cleaning and care . . . . . . . . . . . . 264
Taking the vehicle out of service . . . . . . . . 268
Self-help . . . . . . . . . . . . . . . . . . . . . . . . .
269
Mobility . . . . . . . . . . . . . . . . . . . . . . . . . . 269
General notes . . . . . . . . . . . . . . . . . . . . . . .
269
Equipment . . . . . . . . . . . . . . . . . . . . . . . . .
269
Tyre repair kit . . . . . . . . . . . . . . . . . . . . . . .
270
Changing a wheel . . . . . . . . . . . . . . . . . . . .
272
Spare wheel . . . . . . . . . . . . . . . . . . . . . . . .
276
Jump-starting . . . . . . . . . . . . . . . . . . . . . . .
277
Tow-starting / towing away. . . . . . . . . . . . 278
Fuses and bulbs . . . . . . . . . . . . . . . . . .
282
Fuses.............................. 282
Bulbs.............................. 284
Accessories and technical data . . 285
Accessories and modifications
to the vehicle . . . . . . . . . . . . . . . . . . . . . 285
Accessories, replacement parts and
repairs . . . . . . . . . . . . . . . . . . . . . . . . . . . . 285
Modifications . . . . . . . . . . . . . . . . . . . . . . . 285
Radio transmitters and business
equipment . . . . . . . . . . . . . . . . . . . . . . . . . 286
Technical data . . . . . . . . . . . . . . . . . . . . 287
Vehicle identification
data . . . . . . . . . . . . . 287
Explanation of technical data . . . . . . . . . . 287
Dimensions . . . . . . . . . . . . . . . . . . . . . . . . . 288
Capacities . . . . . . . . . . . . . . . . . . . . . . . . . . 288
Weights . . . . . . . . . . . . . . . . . . . . . . . . . . .
288
Engine data . . . . . . . . . . . . . . . . . . . . . . . .
289
Index ............................. 290
Page 24 of 306
Downloaded from www.Manualslib.com manuals search engine Driver
information system
5th tab Navigation*
¢ page 169
Map* ¢page 178
6th tabb)
Sound ¢page 212
Audi connect* ¢page 159
Settings ¢page 212
al This tab is only visible if one or more warning/indicator
lamps or driver messages are displayed or if the relevant
system is switched on.
b l
The tab contents depend on which menu you used last.
@� button
- To switch between tabs: Press the left/right
side of the !<1 t>I button (e.g. to call up radio
functions).
@!VIEW! button
To change views: Press the !VIEW! button to
switch from the classic view ¢ page 20, Fig. 4 to
the extended view¢ page 20, Fig. 5.
®� button
To return to the previous function level.
@ Control buttons [ll and [g
To call up/close the selection menu or options
menu ¢ page 22.
0 Left thumbwheel
- To select a fun ction in a menu/list: Scroll the
left thumbwheel to the desired function in a
menu or list (e.g. to select a radio station or lap
times*).
- To con firm your selection: Press the left
thumbwheel (e.g. to tune to the radio station).
- To zoom in/out of the map: When a map is
shown on the display, scroll the left thumb
wheel up/down to make the map scale larger or
smaller.
22 Control
buttons
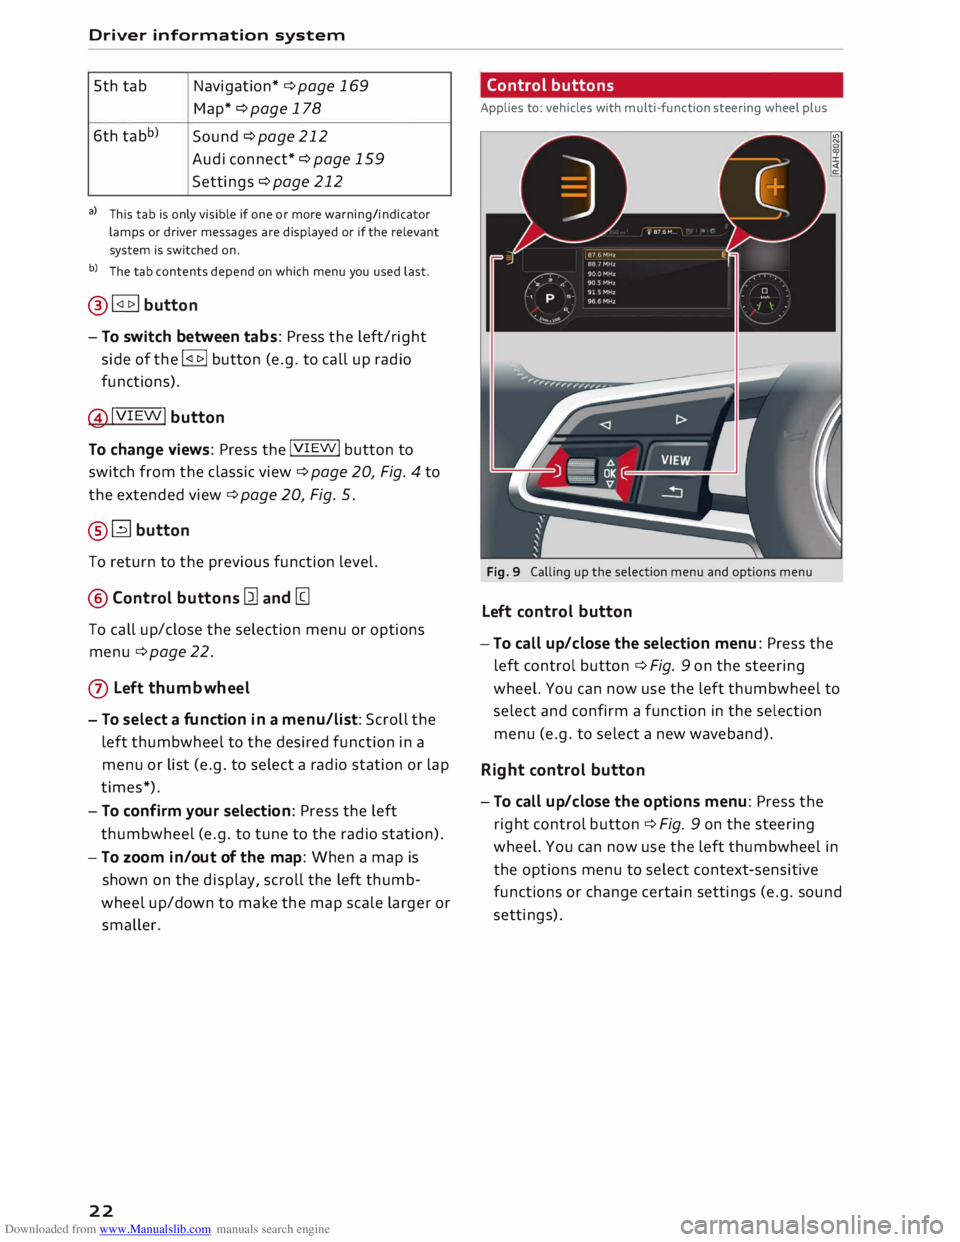
Applies to: vehicles with multi-function steering wheel plus
Fig. 9 Calling up the selection menu and options menu
Left control button
-To call up/close the selection menu: Press the
left control button ¢ Fig. 9 on the steering
wheel. You can now use the left thumbwheel to
select and confirm a function in the selection
menu (e.g. to select a new waveband).
Right control button
- To call up/close the options menu: Press the
right control button ¢ Fig. 9 on the steering
wheel. You can now use the left thumbwheel in
the options menu to select context-sensitive
functions or change certain settings (e.g. sound
settings).
Page 26 of 306
Downloaded from www.Manualslib.com manuals search engine Driver
information system
The equipment installed on your vehicle deter
mines which of the following tabs are available:
1st tab
Car ¢page 25
2nd taba)
Warnings
3rd tab Radio
¢ page 185
Media ¢ page 191
4th tabb)
Sound ¢page 212
Settings ¢page 212
a) This tab is only visible if one or more warning/indicator
lamps or driver messages are displayed or if the relevant
system is switched on.
b) The tab contents depend on which menu you used last.
- To switch between tabs: Press the
I MOD
E
! but
ton on the multi-function steering wheel until
the desired tab is displayed.
- To select a function in a menu/list: Scroll the
left thumbwheel on the multi-function steering
wheel to the desired function.
- To confirm the selection: Press the left thumb
wheel on the multi-function steering wheel to
confirm your selection.
- To scroll within the lists: Scroll the left thumb
wheel on the multi-function steering wheel
rapidly to scroll within the lists.
@!VIEW! button
- To change views: Press the !VIE
W! button to
switch from the classic view¢ page 20, Fig. 4
to the extended view¢ page 20, Fig. 5.
@ Right thumbwheel
You can adjust the volume of an audio source or
system message (e.g. during a traffic announce
ment) directly while it is being played.
- Volume up/down: Scroll the right thumbwheel
up/down.
- Mute/pause: Scroll the right thumbwheel
down. Or: Press the right thumbwheel.
- Unmute/resume: Scroll the right thumbwheel
upwards. Or: Press the right thumbwheel.
24 Rev
counter
The rev counter indicates the number of engine
revolutions per minute.
The start of the red zone on the dial indicates the
maximum engine speed which may be used brief
ly in all gears when the engine is warm and after
it has been run in properly. However, it is advisa
ble to change up a gear or move the selector lev
er to D/S (or lift your foot off the accelerator) be
fore the needle reaches the red zone.
Shift light display in the rev counter
Applies to: vehicles with Audi virtual cockpit and shift light
display
The shift light display is only visible in the sport
view* ¢ page 25 when shifting gears in tiptron
ic mode. Green, yellow and red zones are dis
played in the high-rev area of the dial. The entire
rev counter flashes in red at engine speeds near
the limit. Remember to shift to the next gear in
good time.
CD CAUTION
The rev counter needle must only ever briefly
go into the red zone on the scale; otherwise
there is a risk of engine damage. The start of
the red zone on the dial is different for some
engine versions.
@ For the sake of the environment
Changing up a gear early will help you to save
fuel and minimise engine noise.
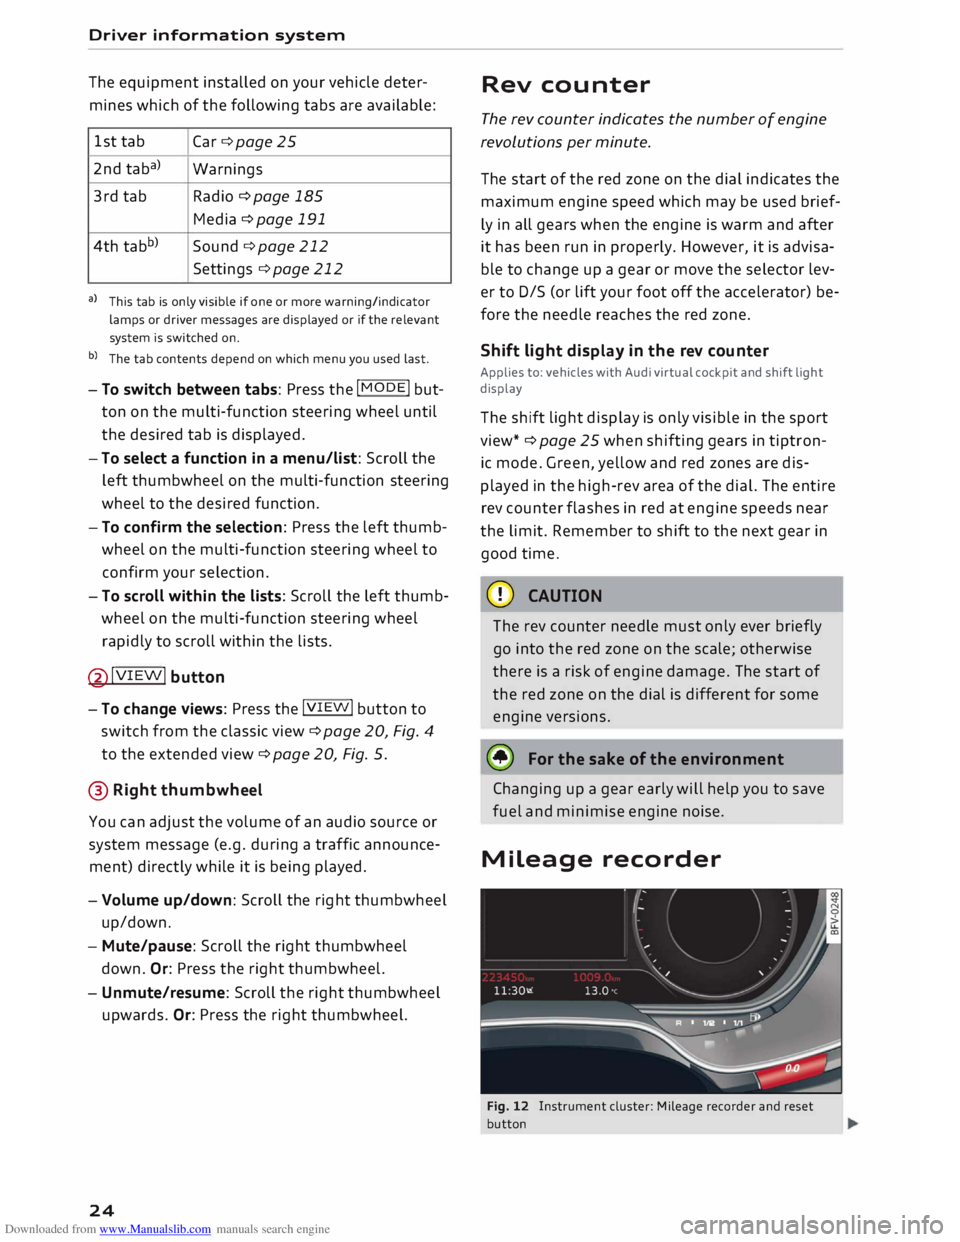
Mileage recorder
Fig. 12 Instrument cluster: Mileage recorder and reset
button
Page 30 of 306
Downloaded from www.Manualslib.com manuals search engine Doors
and windows
@ Key fob with vehicle code*
You can reveal the vehicle code* on the key fob by
rubbing off the coating. It is not, however, rele
vant for this vehicle.
Replacing a key
If you should lose a key, please contact an Audi
dealer. Have the remote control coding for that
key deactivated. For this purpose you should
bring all available keys with you. It is also impor
tant to notify your insurance company if a key has
been lost.
Number of keys
You can check how many keys are initialised for
your vehicle using the infotainment system. To
do so, select: I MENU I button >Car> left control
button > Servicing & checks > Car information.
This feature enables used car buyers to make
sure they have received all of the keys.
Electronic immobiliser
The immobiliser is designed to prevent unauthor
ised persons from driving the vehicle.
It may not be possible to start the engine with
the key if there is another remote control key
from a different make of vehicle on the same key
ring.
Data stored on remote control key
Data related to the service and maintenance of
the vehicle are stored continuously on your re
mote control key while you are driving. Your Audi
dealer can read out the data and will then be able
to tell you what service work is required. This also
applies to vehicles with convenience key*.
Personal convenience settings
If two people use the same car regularly, it is a
good idea for each person to have his or her
"own" remote control key. When you switch off
the ignition or lock the vehicle, your personal set
tings for the following convenience features are
stored and assigned to the remote control key:
- Air conditioner
- Parking aid*
- Active lane assist*
28 -
Side assist*
- Drive select
The stored settings are then recalled automati
cally the next time the vehicle is unlocked, the
doors are opened or the ignition is switched on.
A WARNING
Always take the key with you when leaving the
vehicle -even if you only intend to be gone for
a short time. This is especially important if
children are left in the car. They might other
wise be able to start the engine or use power
operated equipment such as the electric win
dows -this could lead to injuries.
.
1 Note
The function of the remote control key may
be impaired by interference from other near
by radio signals (for example from a mobile
telephone or TV transmitter) if these are in
the same frequency range. You should always
check that your vehicle is locked.
Removing the emergency key
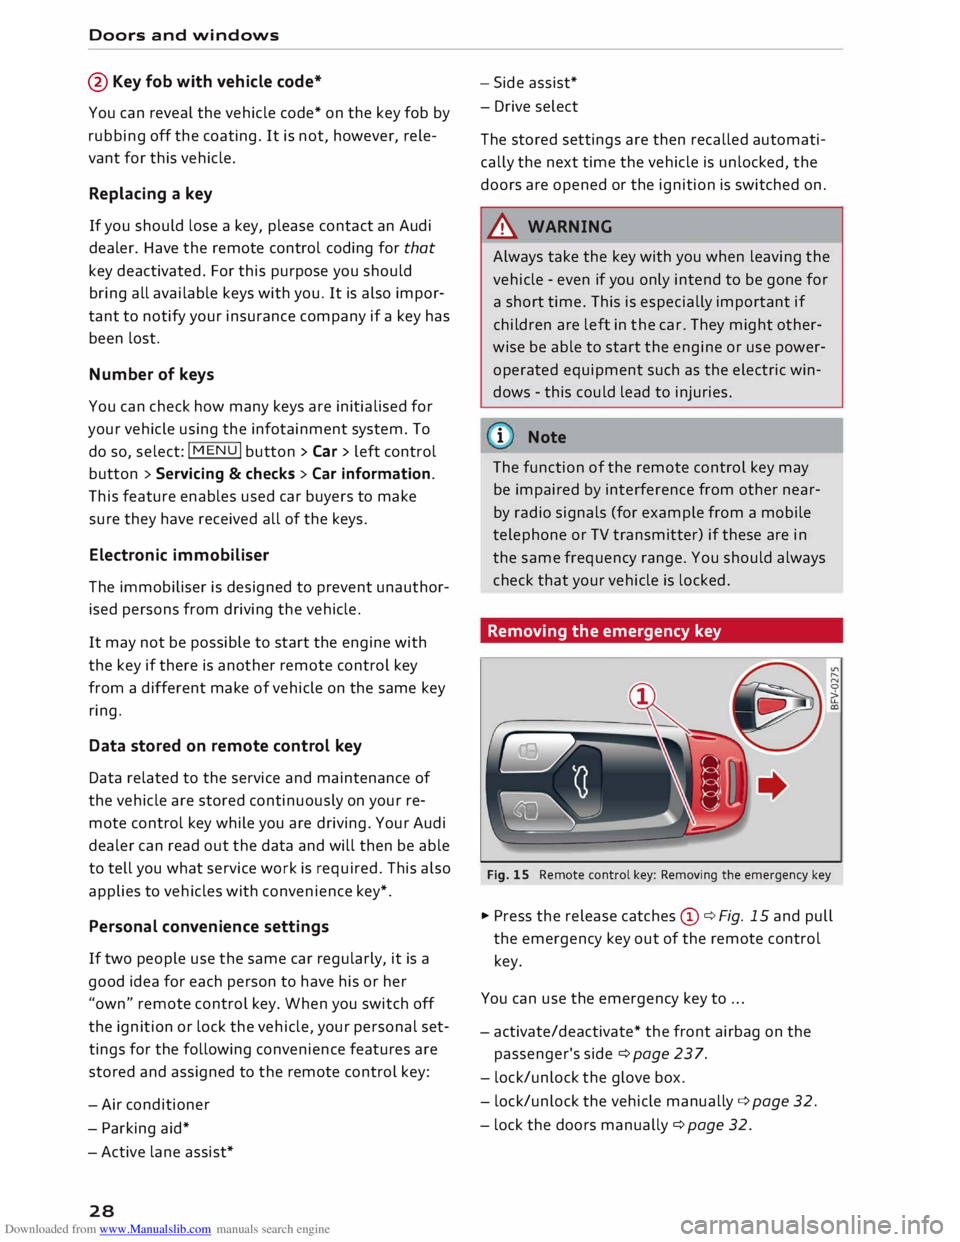
Fig. 15 Remote control key: Removing the emergency key
� Press the release catches Cy¢ Fig. 15 and pull
the emergency key out of the remote control
key.
You can use the emergency key to ...
- activate/deactivate* the front airbag on the
passenger's side¢ page 237.
- lock/unlock the glove box.
- lock/unlock the vehicle manually ¢page 32.
- lock the doors manually ¢ page 32.
Page 125 of 306
Downloaded from www.Manualslib.com manuals search engine Calling
up the selection/options menu with
the control buttons
You can use the selection menu to call up further
functions for individual menu items (e.g. radio).
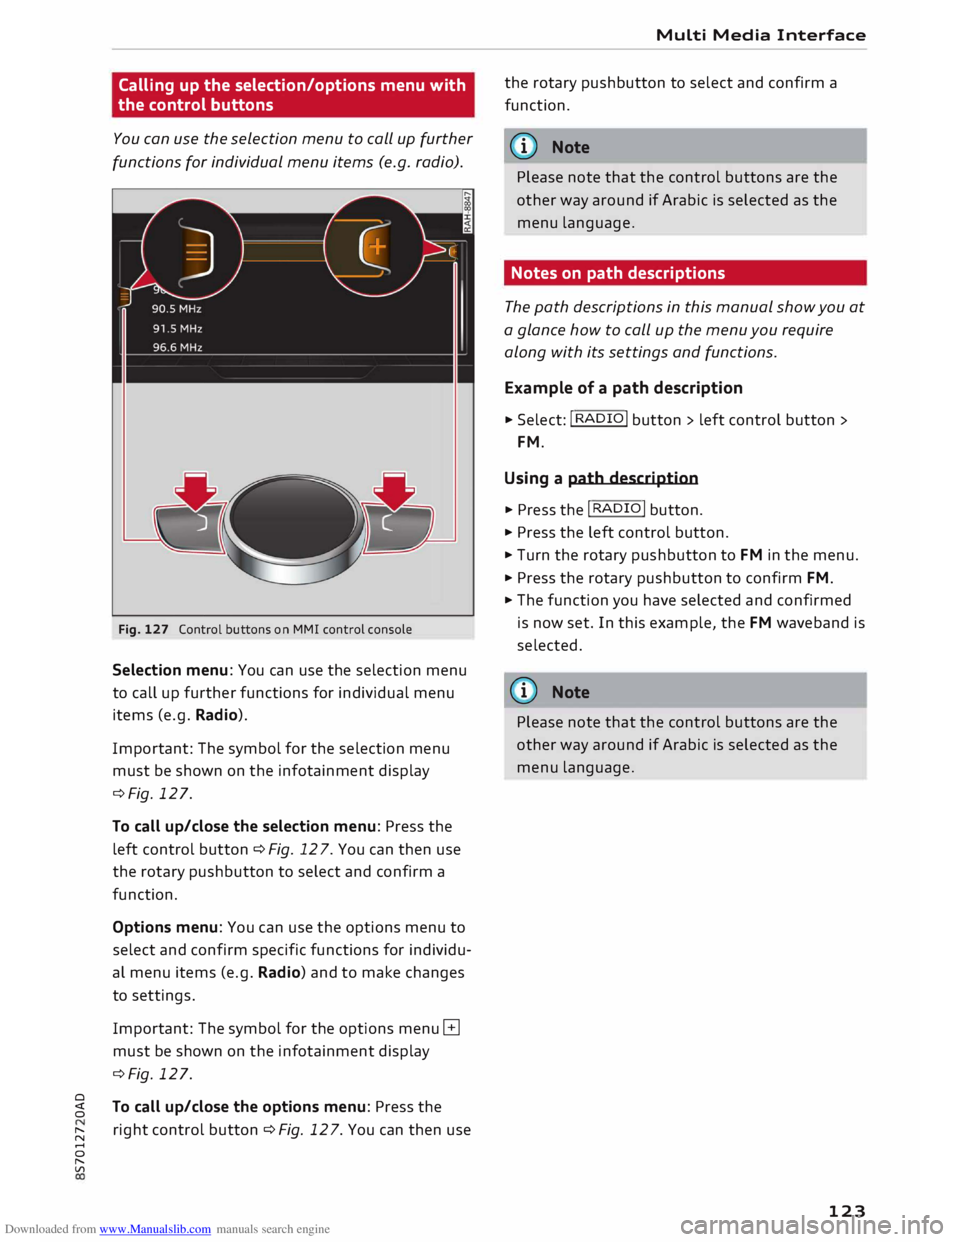
Fig. 127 Control buttons on MMI control console
Selection menu: You can use the selection menu
to call up further functions for individual menu
items (e.g. Radio).
Important: The symbol for the selection menu
must be shown on the infotainment display
¢Fig. 127.
To call up/close the selection menu: Press the
left control button ¢ Fig. 12 7. You can then use
the rotary pushbutton to select and confirm a
function.
Options menu: You can use the options menu to
select and confirm specific functions for individu
al menu items (e.g. Radio) and to make changes
to settings.
Important: The symbol for the options menu G
must be shown on the infotainment display
¢Fig. 127.
0
� To
call up/close the options menu: Press the
� right
control button ¢ Fig. 12 7. You can then use
......
0
"
Vl Multi
Media Interface
the rotary pushbutton to select and confirm a
function.
{(D Note
Please note that the control buttons are the
other way around if Arabic is selected as the
menu language.
Notes on path descriptions
The path descriptions in this manual show you at
a glance how to call up the menu you require
along with its settings and functions.
Example of a path description
.,. Select: I RADIO! button> left control button>
FM.
Using a path description
.,. Press the I RADIO I button .
.,. Press the left control button .
.,. Turn the rotary pushbutton to FM in the menu .
.,. Press the rotary pushbutton to confirm FM .
.,. The function you have selected and confirmed
is now set. In this example, the FM waveband is
selected.
@ Note
Please note that the control buttons are the
other way around if Arabic is selected as the
menu language.
123
Page 140 of 306
Downloaded from www.Manualslib.com manuals search engine Speech
dialogue system
- Please always note the information in the
chapter ¢ page 167, Notes on Audi con
nect.
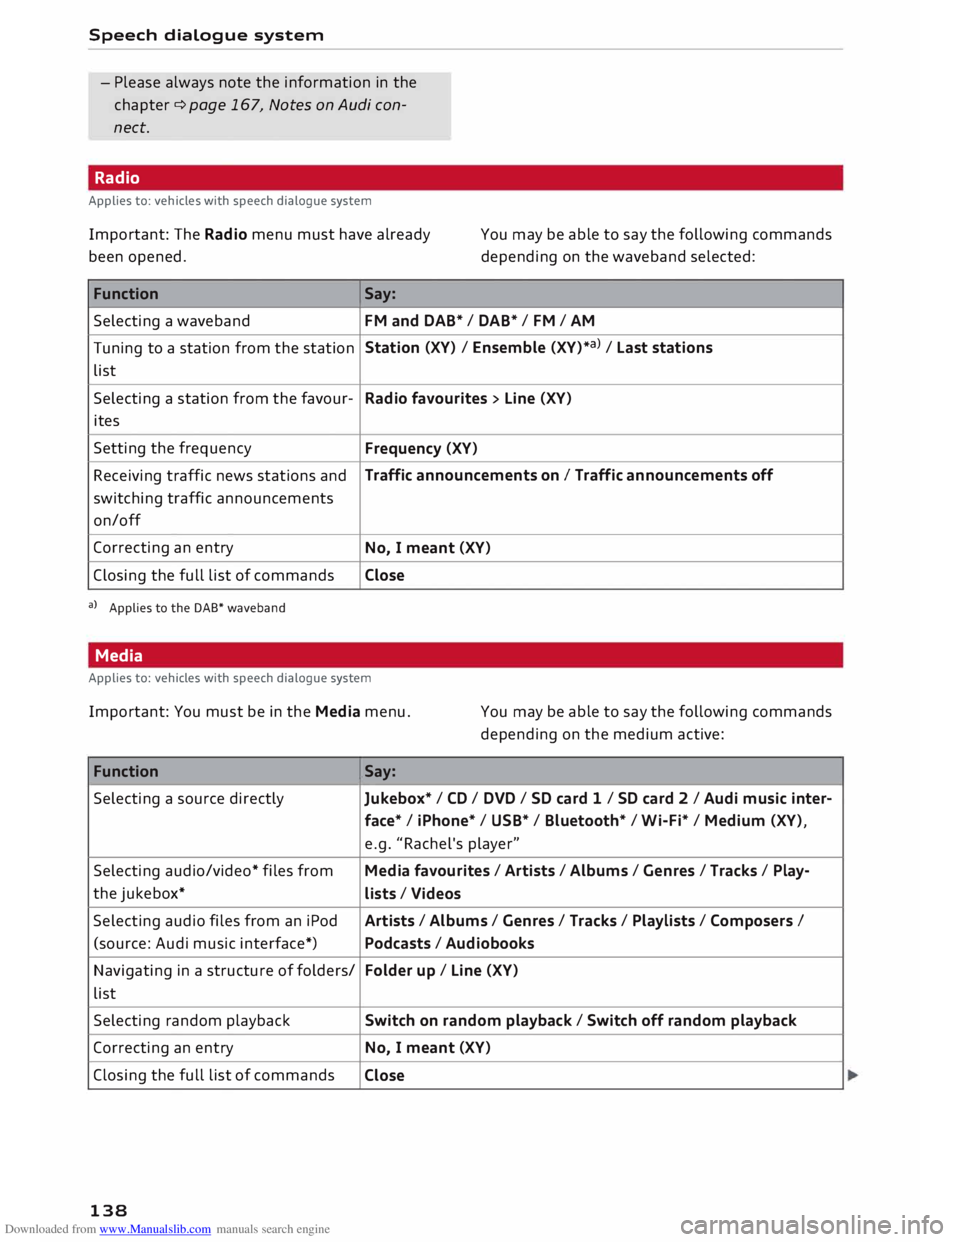
Radio
Applies to: vehicles with speech dialogue system
Important: The Radio menu must have already
been opened. You
may be able to say the following commands
depending on the waveband selected:
Function Say:
Selecting a waveband
FM and DAB* / DAB* / FM / AM
Tuning to a station from the station Station
(XV) / Ensemble (XV)*a) / La st stations
list
Selecting a station from the favour-
Radio favourites > Line (XV)
ites
Setting the frequency
Frequency (XV)
Receiving traffic news stations and Traffic
announcements on I Traffic announcements off
switching traffic announcements
on/off
Correcting an entry
No, I meant (XV)
Closing the full list of commands Close
a) Applies to the DAB* waveband
Media
Applies to: vehicles with speech dialogue system
Important: You must be in the Media menu. You may be able to say the following commands
depending on the medium active:
Function Say:
Selecting a source directly
Jukebox*/ CD/ DVD/ SD card 1 / SD card 2 I Audi music inter-
face* I iPhone* / USB* / Bluetooth* / Wi-Fi* / Medium (XV),
e.g. "Rachel's player"
Selecting audio/video* files from Media favourites / Artists / Albums / Genres I Tracks / Play-
the jukebox*
Lists / Videos
Selecting audio files from an iPod
Artists/ Albums / Genres I Tracks / Playlists / Composers I
(source: Audi music interface*) Podcasts / Audiobooks
Navigating in a structure of folders/ Folder
up/ Line (XV)
list
Selecting random playback Switch
on random playback/ Switch off random playback
Correcting an entry
No, I meant (XV)
Closing the full list of commands
Close
138
Page 154 of 306
Downloaded from www.Manualslib.com manuals search engine Telephone
The
following options may be available depend
ing on which menu you have selected:
Storing an e-mail as a template
There are already ten e-mail templates stored on
the MMI. You can store up to ten additional tem
plates.
- Create an e-mail.
- Select and confirm Store as template.
Continue with last edited e-mail
You can continue with the e-mail you last edited.
Reply*
You can reply to an e-mail you have selected in
the Inbox.
Reply to all*
You can reply to all the recipients of an e-mail
you have selected in the Inbox.
Forward
You can forward an e-mail you have selected to
another recipient.
Delete this message*
You can delete an e-mail you have selected.
Read 1
>
You can have the MMI read an opened e-mail to
you.
E-mail settings*
Activate E-mail notifications to have a notifica
tion displayed when a new e-mail is received. An
envelope symbol� is displayed in the status line
of the infotainment display if there are any new
e-mails.
Connection manager
Refer to¢ page 213.
Telephone settings
Refer to ¢page 155.
l l
Not available in all languages.
152 (I))
Note
Messages deleted using the MMI are also au
tomatically deleted on the mobile phone con
nected.
Listening to voicemail
messages Applies to: vehicles with telephone
... Select: I MENU I button >Telephone > left con
trol button. Select and confirm Call list/Direc
tory/Favourites > Mailbox.
- To enter the mailbox number: Enter the num
ber desired. Select and confirm OK.
- To dial the mailbox number: Select and con
firm Mailbox.
(I)) Note
- This service must be set up and activated by
your mobile network service provider before
you can use it. For more information, con
tact your service provider.
- The mailbox number depends on your serv
ice provider.
Emergency call functions
Applies to: vehicles with telephone
... Select: !MENU! button> Telephone > left con
trol button > Enter number > enter emergency
number (e.g. 112) > OK.
A WARNING
- Since your telephone operates via radio
waves, a connection cannot be guaranteed
under all circumstances. Do not rely solely
on your telephone when a vital communica
tion (e.g. medical emergency) is involved.
- Always follow the directions of the emer
gency operators when making an emergency
call and do not end the call before you are
requested to do so.
Page 187 of 306
Downloaded from www.Manualslib.com manuals search engine 0
N
,.....
N Radio
Calling up the radio
menu
The radio supports the following wavebands:
FM, AM, DAB* (digital radio). You can use the HD
Radio receiver* to receive radio stations from the
FM/AM wavebands digitally.
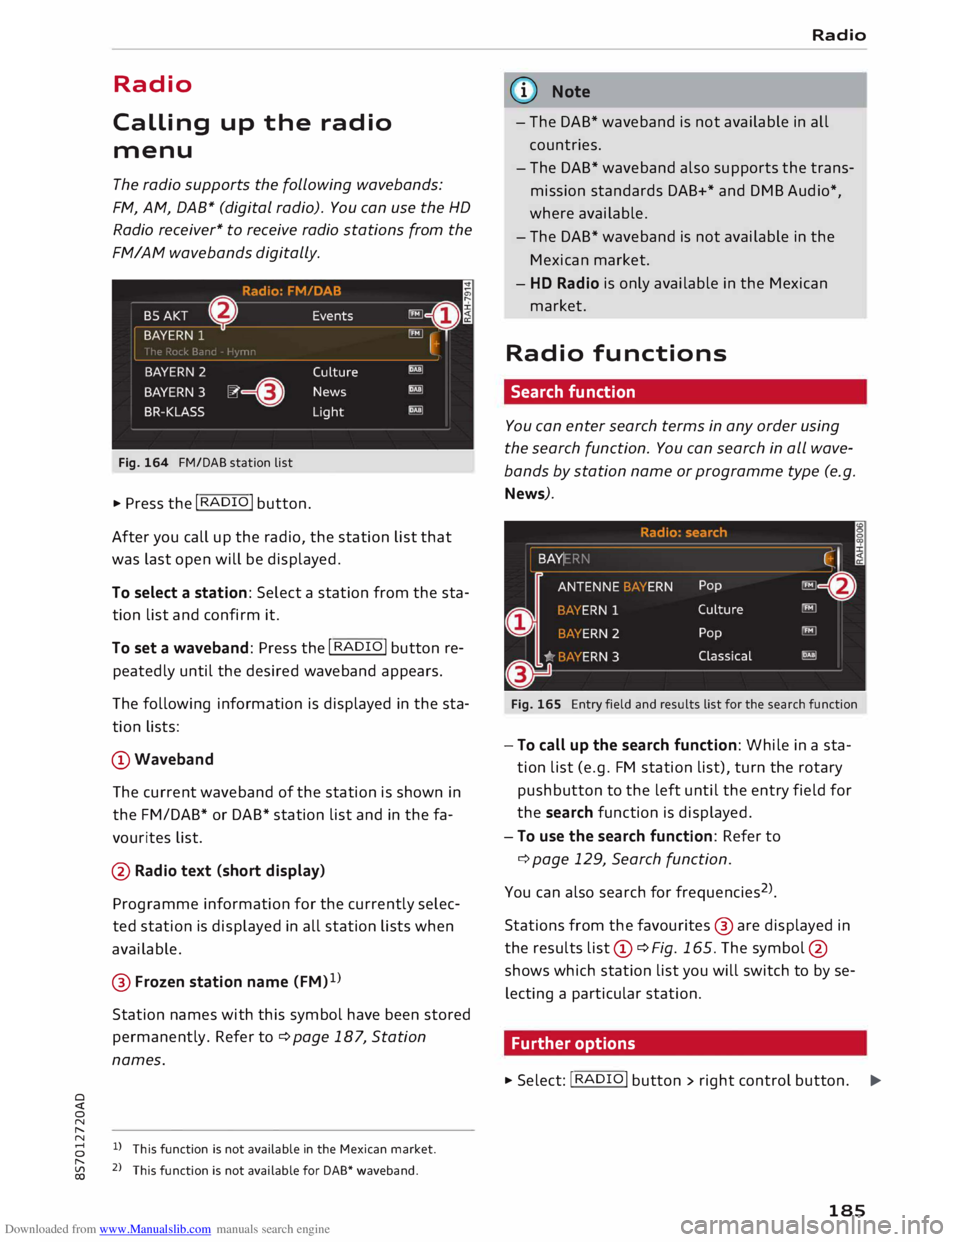
Fig. 164 FM/DAB station list
� Press the I RADIO I button.
After you call up the radio, the station list that
was last open will be displayed.
To select a station: Select a station from the sta
tion list and confirm it.
To set a waveband: Press the I RADIO! button re
peatedly until the desired waveband appears.
The following information is displayed in the sta
tion lists:
CD Waveband
The current waveband of the station is shown in
the FM/DAB* or DAB* station list and in the fa
vourites list.
@ Radio text (short display)
Programme information for the currently selec
ted station is displayed in all station lists when
available.
@ Frozen station name (FM)1
)
Station names with this symbol have been stored
permanently. Refer to¢ page 187, Station
names.
8 l)
This function is not available in the Mexican market.
[;:j 2
> This function is not available for DAB* waveband.
CX) Radio
G}) Note
- The DAB* waveband is not available in all
countries.
- The DAB* waveband also supports the trans
mission standards DAB+* and DMB Audio*,
where available.
- The DAB* waveband is not available in the
Mexican market.
- HD Radio is only available in the Mexican
market.
Radio functions
Search function
You can enter search terms in any order using
the search function. You can search in all wave
bands by station name or programme type (e.g.
News).
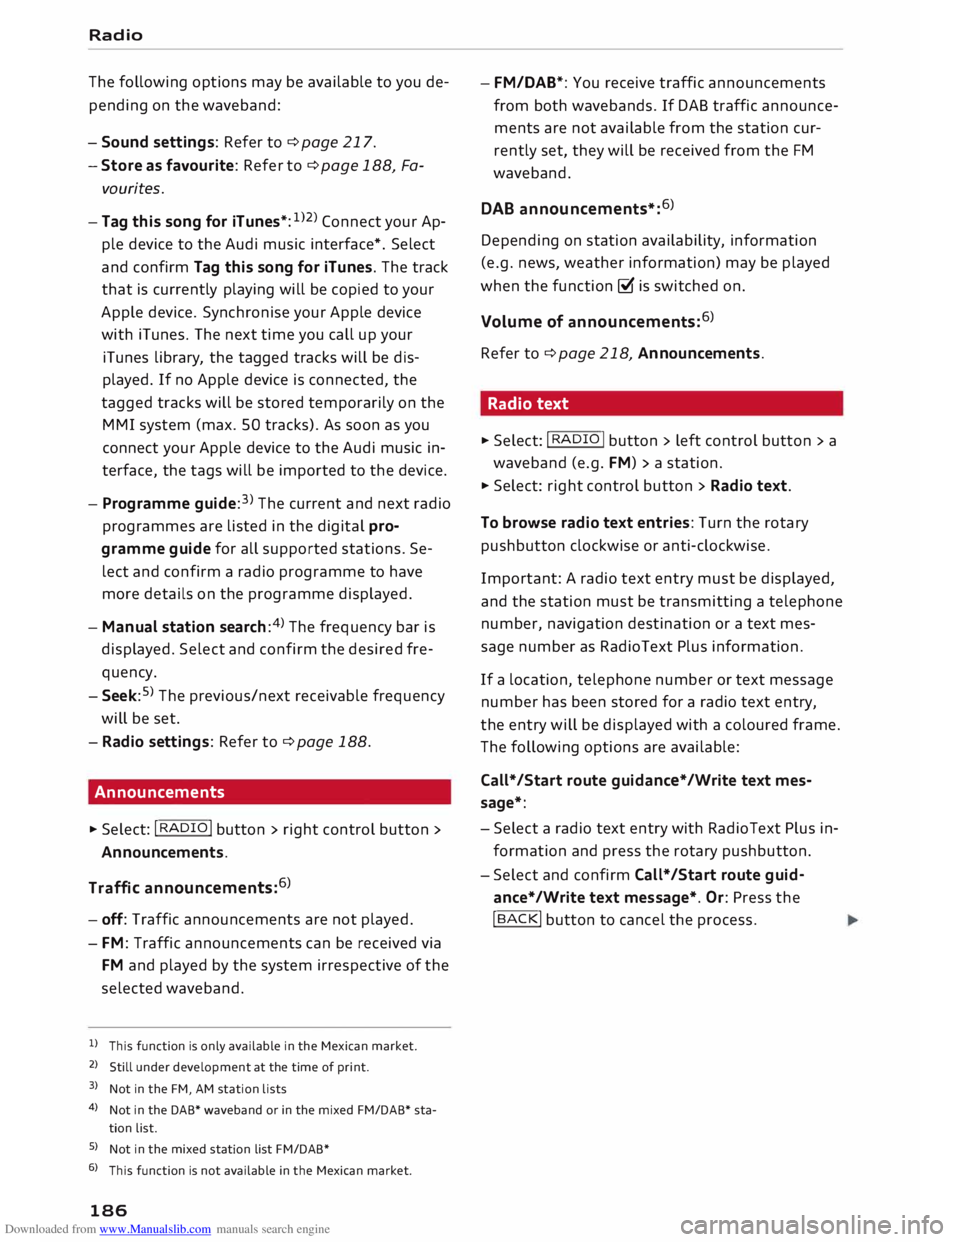
Fig. 165 Entry field and results list for the search function
- To call up the search function: While in a sta
tion list (e.g. FM station list), turn the rotary
pushbutton to the left until the entry field for
the search function is displayed.
- To use the search function: Refer to
¢ page 129, Search function.
You can also search forfrequencies 2
>
.
Stations from the favourites @ are displayed in
the results list(D ¢Fig. 165. The symbol @
shows which station list you will switch to by se
lecting a particular station.
Further options
� Select: I RADIO! button> right control button.
..,.
185
Page 188 of 306
Downloaded from www.Manualslib.com manuals search engine Radio
The following options may be available to you de
pending on the waveband:
- Sound settings: Refer to ¢ page 217.
- Store as favourite: Refer to¢ page 188, Fa-
vourites.
- Tag this song for iTunes*: 1
>2
> Connect your Ap
ple device to the Audi music interface*. Select
and confirm Tag this song for iTunes. The track
that is currently playing will be copied to your
Apple device. Synchronise your Apple device
with iTunes. The next time you call up your
iTunes library, the tagged tracks will be dis
played. If no Apple device is connected, the
tagged tracks will be stored temporarily on the
MMI system (max. 50 tracks). As soon as you
connect your Apple device to the Audi music in
terface, the tags will be imported to the device.
- Programme guide:3
>
The current and next radio
programmes are listed in the digital pro
gramme guide for all supported stations. Se
lect and confirm a radio programme to have
more details on the programme displayed.
- Manual station search:4
>
The frequency bar is
displayed. Select and confirm the desired fre
quency.
- Seek: 5
>
The previous/next receivable frequency
will be set.
- Radio settings: Refer to¢ page 188.
Announcements
"" Select: I RADIO! button> right control button>
Announcements.
Traffic announcements: 6
)
- off: Traffic announcements are not played.
- FM: Traffic announcements can be received via
FM and played by the system irrespective of the
selected waveband.
l l
This function is only available in the Mexican market.
2 l
Still under development at the time of print.
3 l
Not in the FM, AM station lists
4 l
Not in the DAB* waveband or in the mixed FM/DAB* sta
tion list.
S l
Not in the mixed station list FM/DAB*
6 l
This function is not available in the Mexican market.
186 -
FM/DAB*: You receive traffic announcements
from both wavebands. If DAB traffic announce
ments are not available from the station cur
rently set, they will be received from the FM
waveband.
DAB announcements*: 6
)
Depending on station availability, information
(e.g. news, weather information) may be played
when the function � is switched on.
Volume of announcements: 6
)
Refer to¢ page 218, Announcements.
Radio text
"" Select: I RADIO I
button > left control button > a
waveband (e.g. FM)> a station.
""Select: right control button > Radio text.
To browse radio text entries: Turn the rotary
pushbutton clockwise or anti-clockwise.
Important: A radio text entry must be displayed,
and the station must be transmitting a telephone
number, navigation destination or a text mes
sage number as RadioText Plus information.
If a location, telephone number or text message
number has been stored for a radio text entry,
the entry will be displayed with a coloured frame.
The following options are available:
Call*/Start route guidance*/Write text mes
sage*:
- Select a radio text entry with Radio Text Plus in
formation and press the rotary pushbutton.
- Select and confirm Call*/Start route guid
ance*/Write text message*. Or: Press the
I BACK
I button to cancel the process.