ESP AUDI TT ROADSTER 2017 Owners Manual
[x] Cancel search | Manufacturer: AUDI, Model Year: 2017, Model line: TT ROADSTER, Model: AUDI TT ROADSTER 2017Pages: 314, PDF Size: 76.54 MB
Page 7 of 314
This Owner's Manual applies to all versions of
this model. It manua l contains important infor
mat ion, tips, suggestions and warn ings for using
your vehicle.
Keep this manual in your vehicle at all times . This
is especially important if you loan your vehicle to
others or sell it.
This owner's manua l describes the
equipment
range
specified for th is mode l at the time of
printing. Individua l equipment options described
may on ly be available at a later date or may only
be offered in certain countries.
Some sect ions in this manua l do not apply to all
vehicles. When this is the case, the beginning of
the sect ion ind icates the
validity, for example
"Applies to: vehicles with B iXenon headlights".
Opt ional or vehicle-specific equipment is also
identified with an asterisk
"*".
The illustrations are designed as a general guide
and on your vehicle may look slightly different
than what is illustrated.
All
directions , such as "left", "right", "front" and
"rear", are based on the vehicle's direction of
travel.
* Optional or vehicle
-specific equipment
... The section continues on the next page.
c::> .& Cross reference to a "WARNING"w ith in a
section. If a page number is indicated, the
WARN ING is located outs ide of the section.
_& WARNING
Text with this symbol contains information
about safety and how to reduce the risk of se
rious personal injury or death.
(D Note
Text with this symbol contains informat ion
about reducing the ris k of damage to your ve
hicle.
@ For the sake of the environment
-
~ Text with this symbol contains informat ion on ....
~ protecting the environment.
N .... 0 r---
"' c:o
About this Owner 's Manual
{!) Tips
Text with this symbol contains additional use
ful information.
5
Page 22 of 314
Driver information system
Multifunction steering
wheel plus
Operating
Apples to: vehicles with multifunctio n steering wheel plus
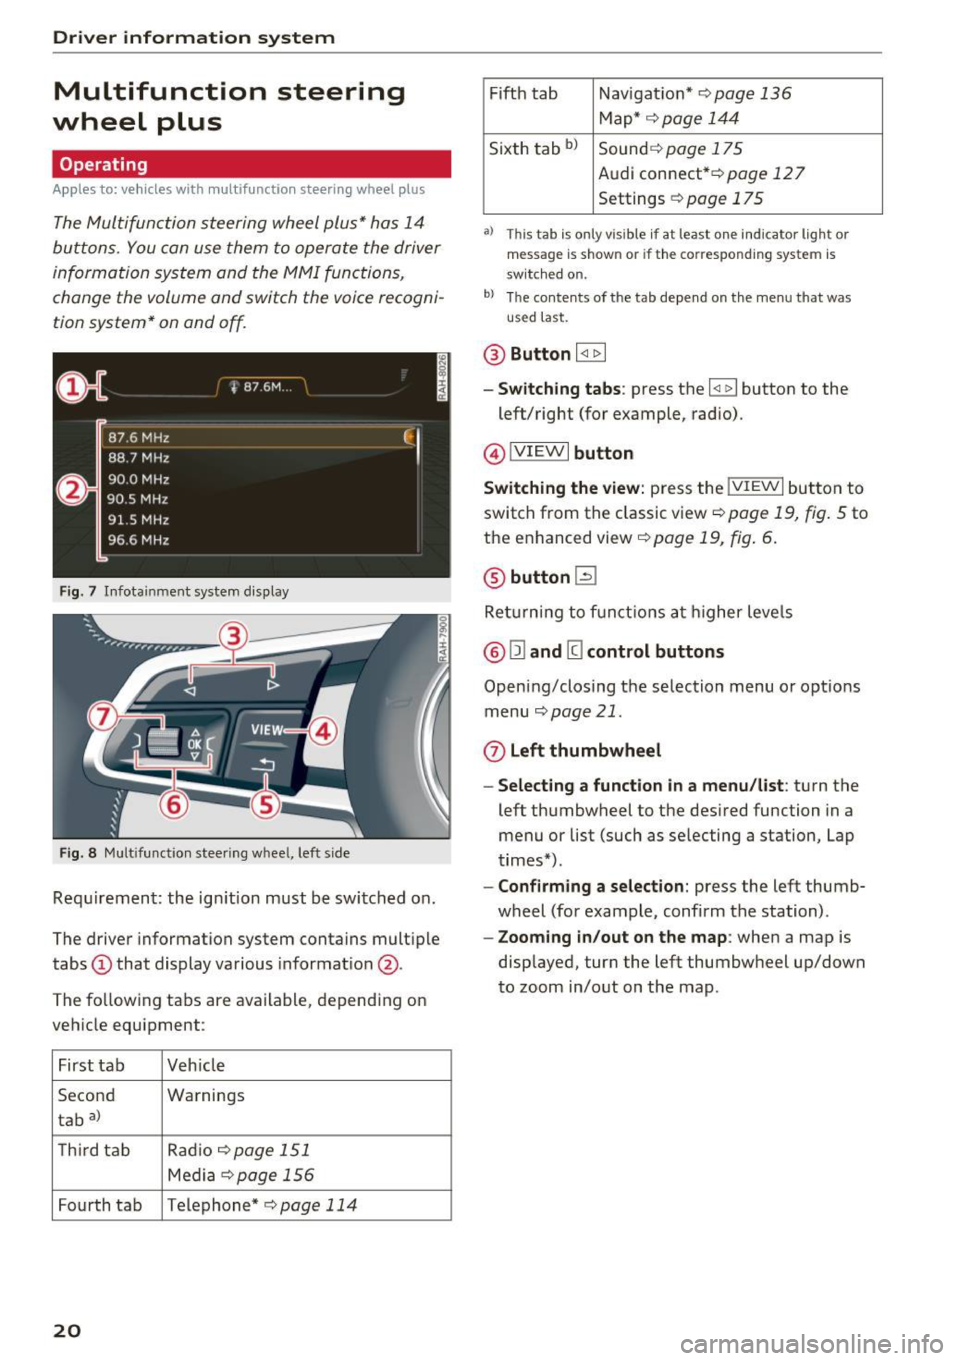
The Multifunction steering wheel plus* hos 14
buttons. You con use them to operate the driver
information system and the MMI functions,
change the volume and switch the voice recogni
tion system* on and off.
F ig. 7 Infotainment system display
Fig. 8 Mult ifunction steering wheel, left side
Requirement: the ign ition must be switched on .
The driver information system contains multiple
tabs
(D that display various informat ion @.
The fo llowing tabs are available, depending on
vehicle equipment :
First tab Veh icle
Second Warnings
tab
a)
T h ird tab Rad
io c:>page 151
Media c:> page 156
Fourth tab Telephone* c:> page 114
20
Fifth tab Navigat ion* c:> page 136
Map * c:> page 144
Sixth tab bl Sound c:> page 175
Audi connect* c:>page 127
Settings c:> page 175
a) This tab is only visible if at least o ne indicator lig ht or
message is shown or if the correspond ing system is
sw itc hed on.
bl Th e contents of the tab depend on the menu that was
u se d last.
® Button I <1 1> I
- Switching tabs: press the I
left/right (for example, radio).
@!VIEWI button
Switching the view: press the !VIEWI button to
switch from the classic view
c:> page 19, fig. 5 to
the enhanced view c:>
page 19, fig. 6.
@ button l2J
Returning to f unctions at higher levels
® l1l and III control buttons
Opening/closing the selection menu o r options
menu
c:>poge 21.
0 Left thumbwheel
-Selecting a function in a menu/list: turn the
left thumbwheel to the desired function in a
menu or list (such as selecting a station, Lap
times*) .
-Confirming a selection: press the left thumb
wheel (for example, confirm the station) .
-Zooming in/out on the map : when a map is
displayed, turn the left thumbwheel up/down
to zoom in/out on the map.
Page 23 of 314
CD
CD
.... N
" N ...... 0 r--. V, co
Control buttons
Applies to: vehicles with multifunction steering wheel plus
Fig . 9 Open ing th e selec tio n and opt ions menu
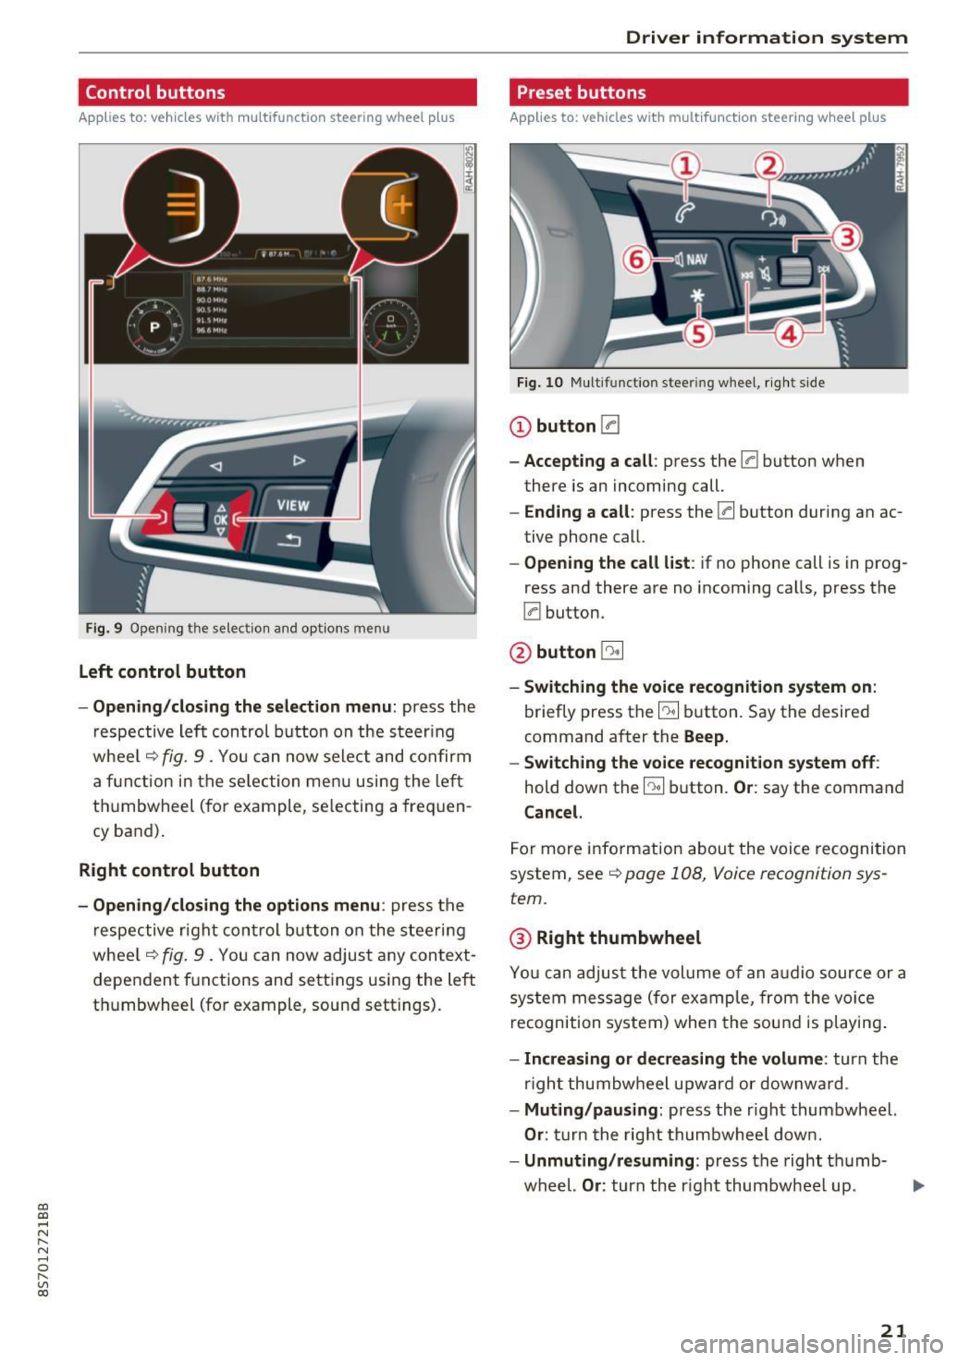
Left control button
- Opening /closing the select ion menu : press the
respective lef t control button on the s teer ing
whee l
c::> fig. 9 . You can now sele ct and confirm
a f unction in the se lection men u using the le ft
t hu mbwheel (for example, se lec ting a frequen
cy band) .
Right control button
-Opening /closing the options menu : press the
r espective r ight con trol b utton o n the stee rin g
whee l
c::> fig. 9 . You can now adjus t any context
dependent f unctions and setti ngs using the left
t hu mbwheel (fo r example , sound sett ings).
Driver in forma tion system
Preset buttons
Applies to: vehicles with multifunctio n steering wheel plus
Fig . 10 M ulti fun ctio n stee ring whee l, ri ght s ide
CD button [a
-Accepting a call : press the [a button when
there is an incoming call.
- Ending a call : press the [a button during an ac
tive phone call.
- Opening the call list : if no phone call is in prog
ress and there are no incoming ca lls, press the
[a button.
@ button 5l
-Switching the voice re cognition system on :
briefly press the~ button. Say the desired
command a fter the
Beep.
- Switching the voice recognition system off :
hold down the~ button. Or : say the command
Cancel.
For more info rm ation abou t the voice recognition
system, see
c::> page 108, Voice recognition sys
tem.
@ Right thumbwheel
You can adjus t the vol ume of an a udio source or a
system message (for ex ample, from the voice
recognition system) when the sou nd is pl ayin g.
-Increasing or decrea sing the volume: turn the
r ight thumbw heel upward or downw ard.
- Muting /pausing : press the r ight thumbwheel.
Or : turn the rig ht thumbwhee l dow n.
- Unmuting /resuming : press the right t humb-
wheel.
Or : turn th e right thumbw heel up. .,,.
21
Page 24 of 314
Driver information system
© button l1<1<1 I l1>1>1 I
-Selecting the previous/next tr ack or station :
press the ll
- Fast forwarding /re winding audio file s: press
and ho ld the
! 1q<] I or l1>1> 1I bu tton un til t he desired
location in the fi le is reached .
@button @
- Programmable steering wheel button - open
ing a function :
press the@ bu tton.
- Programmable steering wheel button - re
questing a function :
ho ld dow n the Ill button.
- Programmable steering wheel button - chang
ing a function:
selec t the fi rst tab> Vehicle
settings
> Steering wheel button a ssignment .
@ button 1~·" 1
- Repeating the last navigat ion prompt : press
the
I Q•,.., I button when route guidance is active.
- Changing the voice guidance volume : when
route gu idance is active, turn th e right thumb
whee l upward or dow nward d uring a navigat ion
prom pt.
Multifunction steering
wheel
Operating
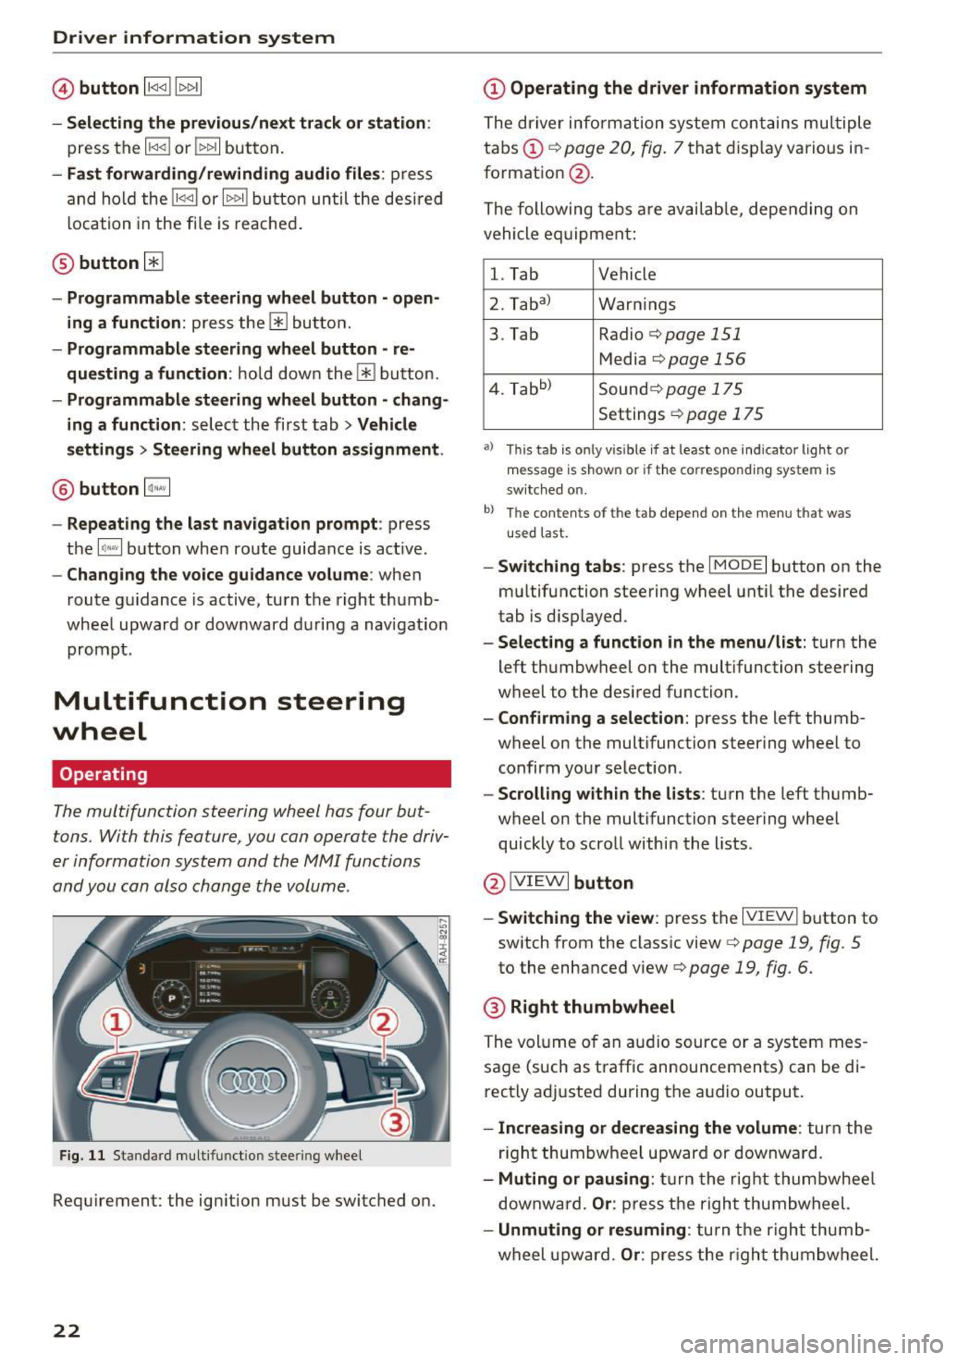
The multifunction steering wheel has four but
tons. With this feature, you can operate the driv
er information system and the MMI functions
and you can also change the volume.
Fig . 11 Standard multifunction stee ring wheel
Requirement: the ignition must be switched on.
22
(D Operating the driver information system
The driver information system contains multiple
tabs (!)¢
page 20, fig . 7 that disp lay various i n
format ion
@ .
The following tabs a re av ail ab le, depe nding on
vehicle e quipment:
l. Tab Vehicle
2. Taba )
Warnings
3. Tab Radio¢
page 151
Media ¢page 156
4. Tabb )
Sound¢ page 1 75
Settings ¢ page 175
a) Thi s tab is only v is ib le if at least one indicator lig ht or
message is shown or if t he co rrespond ing sys te m is
sw itched o n.
b ) Th e co ntents of th e tab depend on the menu t hat was
u se d l ast.
-Switch ing tabs : press th e I MODE I button on the
m ultifunction steering wheel unt il the desired
tab is disp layed .
-Selecting a function in the menu/list : turn the
left thumbwheel on the multifunction steering
wheel to the desired function .
-Confirming a selection : press the left thumb
wheel on the multifunction steering wheel to
confirm your selection.
-Scrolling with in the lists : turn the left thumb
wheel on the multifunction steering whee l
quickly to scro ll within the lists .
@!VI EWI button
- Switching the view :
press the IVIEWI button to
switch from the class ic view ¢
page 19, fig. 5
to th e enhanced view¢ page 19, fig. 6.
® Right thumbwheel
The volume o f an a udio source o r a system mes
sage (such as traffic announcements) can be di
r ectly adjusted during the a udio output.
- Increasing or decreasing the volume : turn the
r ig ht thumbwheel u pward or downwa rd.
- Muting or pausing : turn the rig ht thumbwhee l
downwa rd.
Or : press th e righ t thumbwheel.
- Unmuting or resuming : turn the righ t thumb
wheel u pw ard.
Or : press the r igh t thumbwheel.
Page 29 of 314
co
co
.... N
" N .... 0
" "' c:o
A WARNING ,~
No one, especially children, sho uld stay in the
veh icle w he n i t is locked from the outside, be
cause the w indows can no longer be opened
from th e inside
c::> page 29. Locked doors
ma ke it more difficult for eme rgency workers
t o get into the vehicle, which puts lives at
r isk.
@ Tips
- Only use the remote control key when you
are within view of the vehicle.
- Do not use the remote control when you are
inside the vehicle. Otherwise, yo u could un
i ntent io nally loc k the vehicle. If you then
tried to start the eng ine or open a door, the
alarm wou ld be triggered . If this happens,
press the un lock button@ .
- The selector leve r must be in the P position
on vehicles with a convenience key*. Other
wise the vehicle will not be ab le to lock .
- Only use the panic function in an emergen
cy .
Unlocking and locking with the
convenience key
Appl ies to: ve hicles with co nve nien ce key
The doors and luggage compartment lid can be
unlocked/locked without using the remote con
trol key.
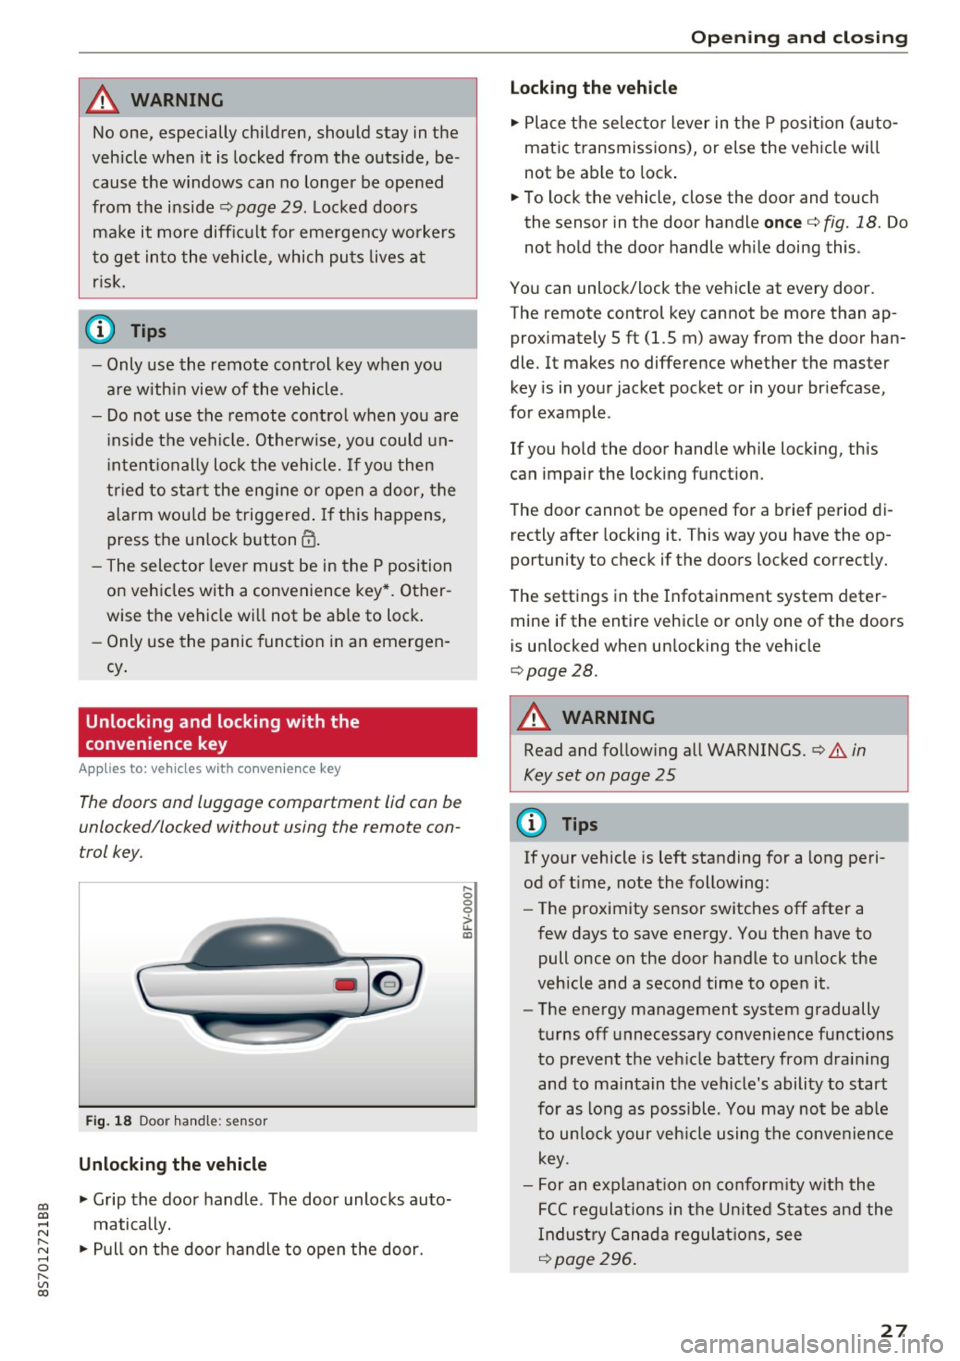
F ig . 18 Door han dle: senso r
Unlocking the vehicle
.,. Grip the door handle . The door unlocks auto
matically .
.,. Pull on the door handle to open the door.
.... 0 0 0
ii: IXl
Op ening and cl osing
Locking the v ehicle
.,. Place the se lecto r lever in t he P posi tion (a uto
matic transmiss ions), or else the vehicle wi ll
not be able to lock .
.,. To lock the vehicle, close the door and touch
the sensor in the door handle
once c::> fig. 18. Do
not hold the door handle wh ile doing this .
You can unlock/lock the ve hicle at every door.
The remote control key cannot be more than ap
prox imately 5 ft (1.5 m) away from the door han
dle. It makes no difference whether the master
key is in your jacket pocket or in your br iefcase,
for example .
If you ho ld the door handle wh ile lock ing, this
can impair the locking function.
The door cannot be opened for a brief period di rectly after locking it. This way you have the op
portunity to check if the doors locked correctly.
The settings in the Infotainment system deter mine if the entire vehicle or only one of the doors
is unlocked when un locking the vehicle
c::> page28.
A WARNING
-Read and follow ing all WARNINGS. c::> .&. in
Key set on page 25
0) Tips
If your vehicle is left standing for a long peri
od of t ime, note the follow ing:
- The proximity sensor sw itches off after a
few days to save energy. You then have to
pull once on the door handle to un lock the
vehicle and a second time to open it.
- The energy management system gradually
turns off unnecessary convenience functions
to prevent the veh icle battery from drain ing
and to ma intain the vehicle's ability to start
for as lo ng as poss ible. You may no t be ab le
to un lo ck your veh icle using the conve nience
key.
- For an explanat ion on co nfo rm ity w ith the
FCC regulat ions in the U nited S ta tes an d the
Indus try Canad a regulat ions, see
c::> page296 .
27
Page 30 of 314
Opening and clo sin g
Central locking switch
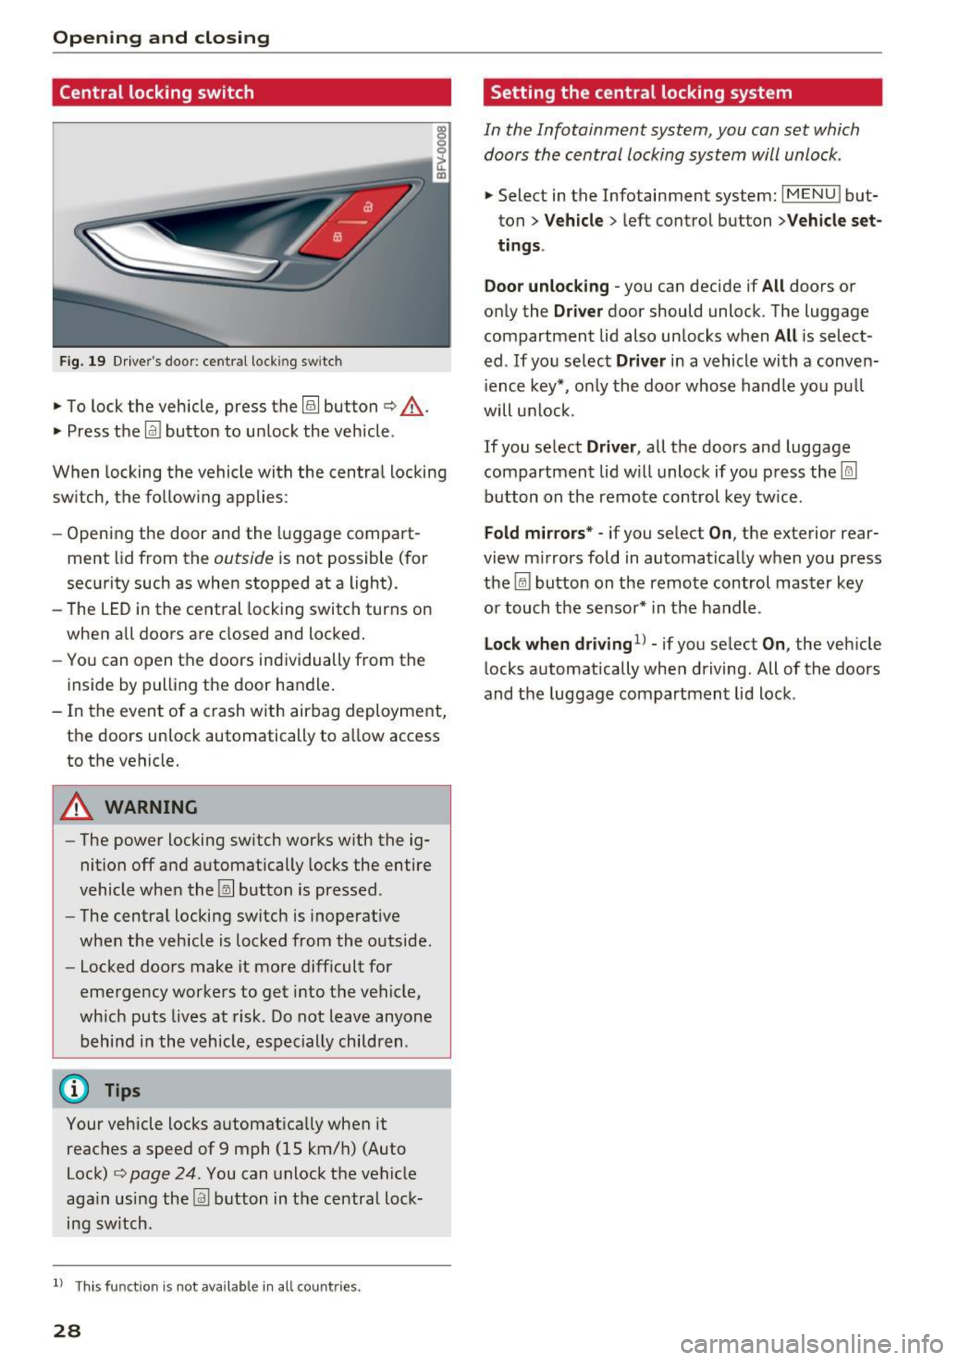
Fig. 19 D rive r's door : central lock ing switch
• To lock the vehicle, press the~ button c> .&,.
• Press t he !ill button to unlock the vehicle.
When locking the vehicle with the centra l locking
switch, the follow ing applies:
- Opening the door and the luggage compart
ment lid from the
outside is not possible (for
security such as when stopped at a light).
- The LED in the central locking switch turns on
when all doors are closed and locked.
- You can open the doors ind ividually from the
inside by pulling the door handle .
- In the event of a c rash with airbag deployment,
the doors unlock automat ically to a llow access
to the vehicle.
& WARNING
- The power locking sw itch works with the ig
nition off and automatically locks the entire
vehicle when the~ button is pressed.
- The centra l locking switch is inoperative
when the vehicle is locked from the outside.
- Locked doors make it more difficult for
emergency worke rs to get into t he vehicle,
wh ich puts lives at risk. Do not leave anyone
behind in the vehicle, especially children .
(D Tips
Your vehicle locks automatically when it
reaches a speed of 9 mph (15 km/h) (Auto Lock)
c> page 24 . You can unlock the vehicle
aga in using the
!ill b utton in the central lock
ing sw itch.
l) Th is fun ctio n is not a vailab le in a ll coun tries.
28
Setting the central locking system
In the Infotainment system, you can set which
doors the central locking system will unlock .
• Select in the Infotainment system: IMENU ! but
ton>
V eh icle > left control button >Vehicle set
t ings.
Door unloc king -
you can decide if All doors or
only the
Dr ive r door should unlock . The luggage
compartment lid also unlocks when
All i s select
ed . If you select
D riv er in a vehicle with a conven
i ence key*, on ly the door whose handle you pu ll
will unlock .
If you se lect
Dri ver , all the doors and luggage
compartment lid w ill unlock if you press the
I@
button on the remote control key tw ice .
Fold m irrors* -if you select On, the exterior rear
view m irrors fold in automatically when you press
the ~ button on the remote control master key
or touch the sensor* in the handle.
Lock whe n driving1l -if you select On , the veh icle
locks automatically when driving. All of the doors
and the luggage compartment lid lock .
Page 32 of 314
Opening and clo sin g
the luggage compartment lid and the doors
closed when the vehicle is not in use.
- Always make sure no o ne is in the luggage
compartment lid's range of motion when it
is clos ing, especially near the h inges . Fin
gers or hands could be p inched.
(D Tips
- When the vehicle is locked, the luggage
compartment lid can be unlocked separately
by p ressing the
1£) button on the remote
contro l key. The luggage compartment lid
locks automatically whe n it is closed again .
- In case of an emergency or a faulty handle,
the luggage compartment lid can be opened
manua lly from the inside
c::> page 30.
Luggage compartment lid emergency
release
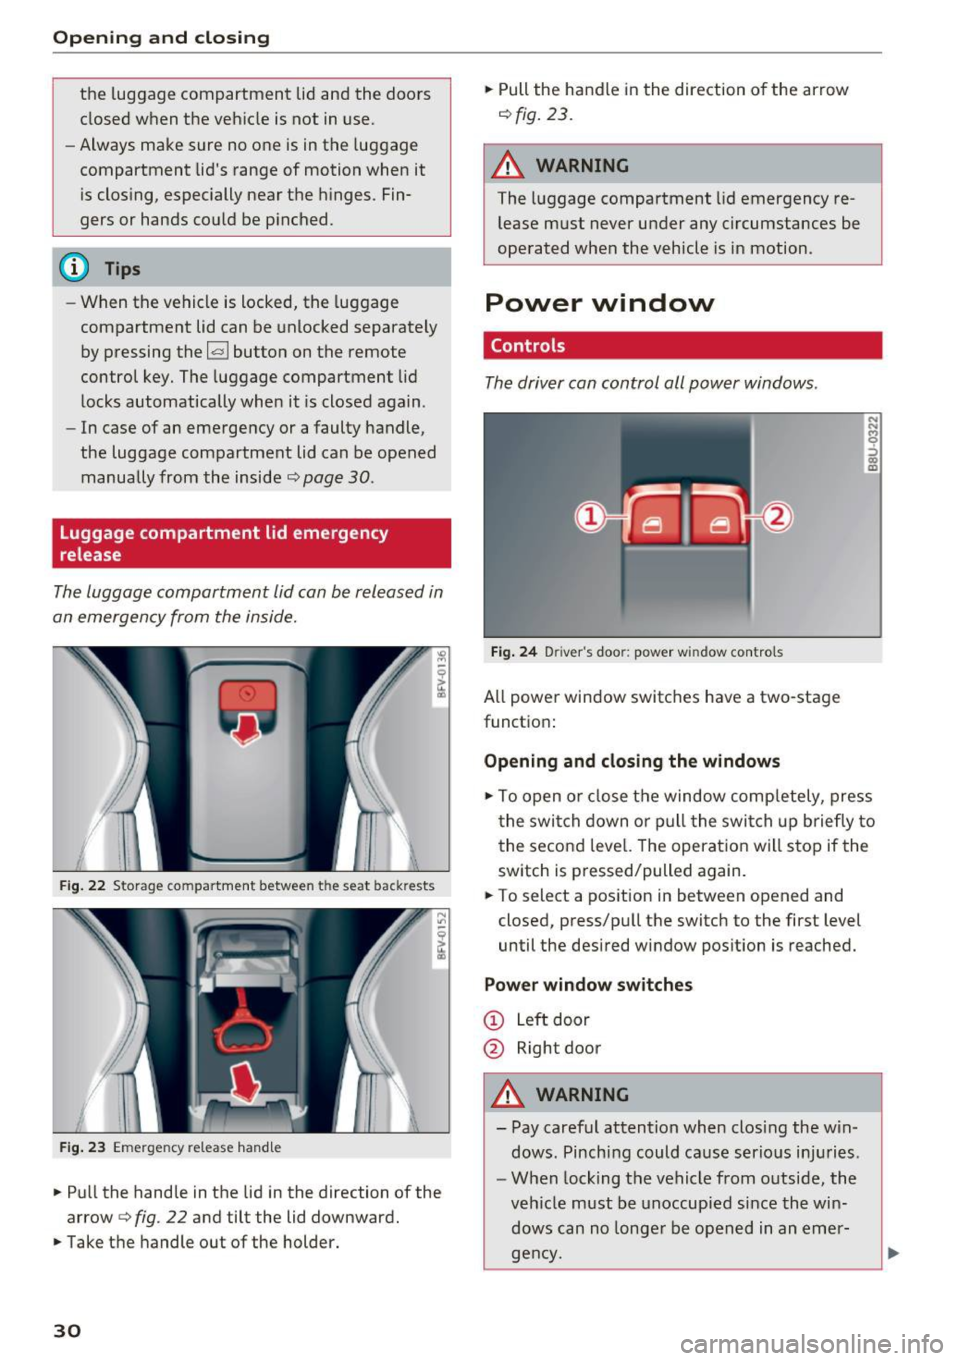
The luggage compartment lid can be released in
an emergency from the inside.
F ig. 22 Storage co mpartment between t he seat back rests
F ig. 2 3 Em erge ncy release hand le
.,. Pu ll the hand le in t he lid in the direction of the
arrow
c::> fig. 22 and tilt the lid downward .
.,. Take t he handle out of the holder.
30
.,. Pull the h andle in the direction of the arrow
c::> fig. 23 .
A WARNING
The luggage compartment lid emergency re
lease m ust never under any circumstances be
ope rated when the vehicle is in motion .
Power window
Controls
The driver can control all power windows .
Fig. 24 Driver 's doo r: power w indow controls
All power window switches have a two-stage
functio n:
Opening and closing the windows
.,. To open o r close t he window comp letely, press
t he swi tch down o r pu ll the swi tch up brie fly to
the second leve l. The operat io n w ill s to p if the
sw itch is pressed/pulled again.
.,. To select a pos ition in between opened and
closed, press/p ull the switch to the first level
until the desired window pos ition is reached.
Power window switches
@ L eft door
@ Rightdoor
A WARNING
- Pay caref ul attention when clos ing th e w in
dows . Pinching could c ause serio us inj uries .
- W hen locking t he vehicle from o utside, the
veh icle must be unoccupied si nce the wi n
dows can no longe r be opened in an eme r
gen cy.
Page 41 of 314
CD
CD
.... N
" N ...... 0
" V, co
Lights and Vision
Exterior Lighting
Switching lights on and off
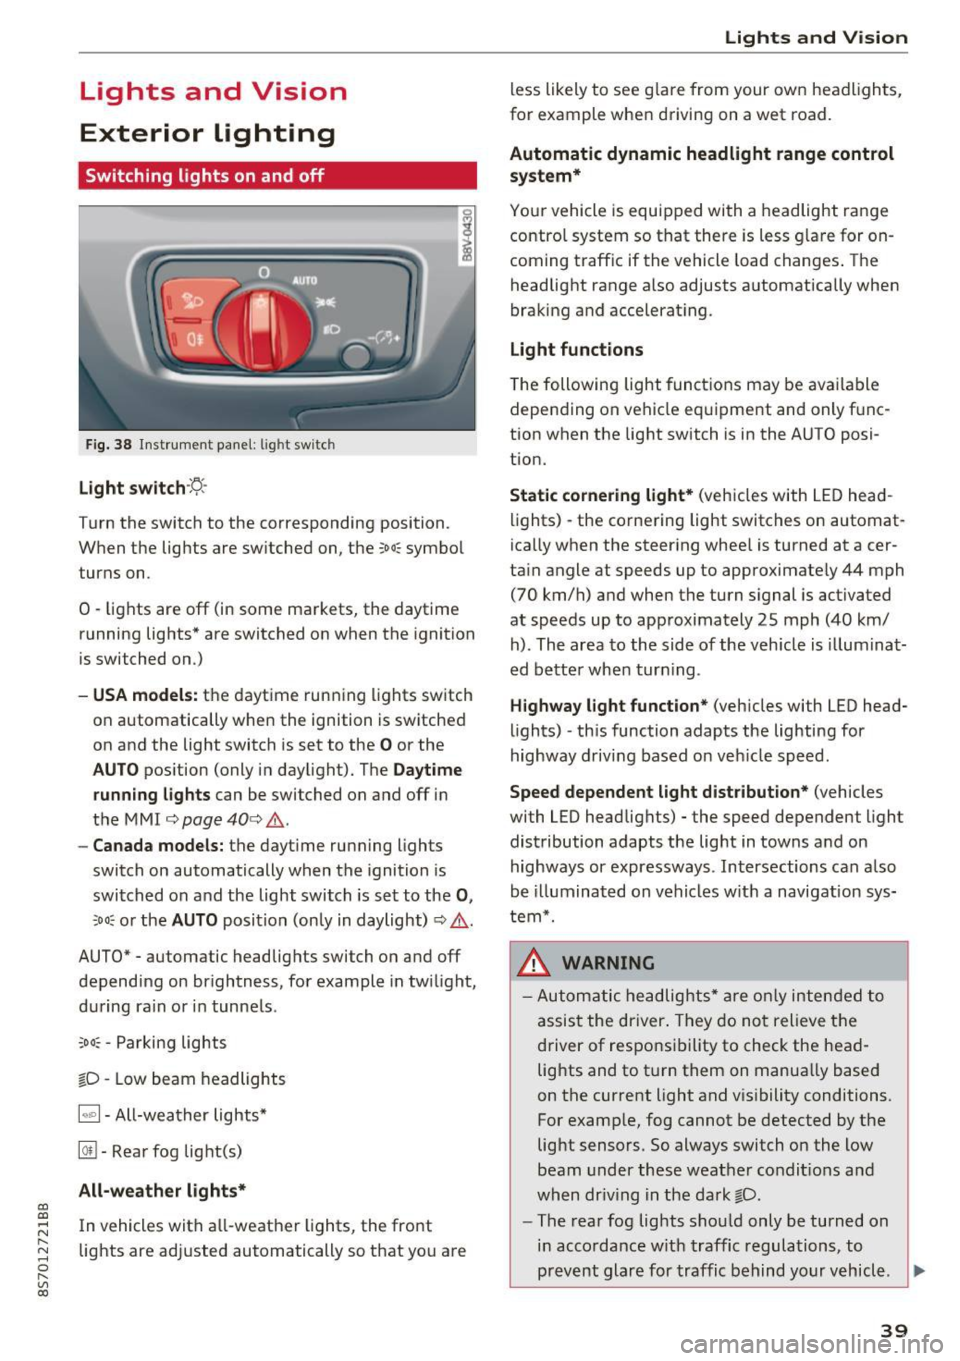
Fig. 38 Instrument panel: l ig ht switc h
Light switch ·:<'>'.·
Turn the switch to the corresponding position.
When the lights are switched on, the
;oo: symbol
turns on.
0 · lights are off (in some markets, the daytime
running lights* are switched on when the ignition
is switched on.)
-USA model s: the daytime running lights sw itch
on automatically when the ignition is switched
on and the light switch is set to the
O or the
AUTO pos ition (only in daylight). The D aytime
runn ing lights
can be switched on and off i n
the MMI
¢ page 40 ¢ &.
- Canada models: the dayt ime running lights
switch on automatically when the ignition is
switched on and the light switch is set to the
0 ,
;oo: or the AUTO posit ion (only in daylight) ¢ & .
AUTO* - automatic headlig hts switch on and off
depending on brightness, for example in tw ilight,
during ra in or in tunne ls .
~oo: -Parking lights
gD -Low beam headlights
IQ., 1-All-weather lights*
@il -Rear fog lig ht(s)
All-weather light s*
In vehicles with all-weather lights, the front
lights are adjusted automatically so that yo u are
Lights and V ision
less likely to see g lare from your own headlights,
for example when driving on a wet road.
Automatic dynamic headlight range control
system*
Your vehicle is equipped with a headlight range
contro l system so that there is less g lare for on
coming traff ic if the vehicle load changes . The
headlight range also adjusts automatically when
braking and accelerat ing .
Light function s
The following light funct ions may be avai lable
depending on vehicle eq uipment and only f unc
tion when the lig ht switch is in the AUTO posi
tion.
Static cornering light * (vehicles with LED head
li ghts) - the cornering light switches on automat
ica lly when the steer ing whee l is turned at acer
ta in angle at speeds up to approximate ly 44 mph
(70 km/h) and when the turn signal is activated
at speeds up to approximately 25 mph (40 km/
h) . The area to the side of the veh icle is illumina t
ed bette r when turn ing .
Highway l ight function * (vehicles with LED head
lights) -th is function adapts the lighting for
highway driving based o n veh icle speed.
Speed dependent light distribution* (vehicles
with LED headlights) - the speed dependent l ight
distribution adapts the lig ht in towns a nd on
highways or expressways . Intersections can a lso
be illuminated on vehicles w ith a navigation sys
tem*.
_& WARNING
- Autom atic headlights * are only inten ded to
a ssis t the driver . They do no t relieve t he
d river of respo nsibility to check the head
lig hts and to t urn them on manua lly based
on the current light and v is ibility conditions.
For example, fog cannot be detected by the
light sensors . So always switch on the low
beam under these weather condit ions a nd
when dr iv ing in the da rk
gD .
-The rear fog lights shou ld only be turned on
i n acco rdanc e w ith traffic regulations, to
prevent glare for traffic behind yo ur v ehicl e.
~
39
Page 42 of 314
Lights and Vision
-If the battery has been discharging for a
wh ile, the parking light may switch off auto
matically. Always make sure your vehicle is
parked and adequately lit according to the
laws. Avo id using the parking lights for sev
era l hours.
- Always observe legal regulations when us ing the light ing systems described.
(D Tips
- The light sensor for the automatic head
lights* is in the rearview m irror mount. Do
not place any stickers in th is area on the
windsh ield.
- Some exterior lighting functions can be ad
ju sted
c:::;, page 40.
-If you turn off the ignition wh ile the exter ior
lights are on and open the-door, a warning
tone so unds.
- In some markets, the tail lights will sw itch
on when the daytime runn ing lights sw itch
on .
- In cool or damp weather, the inside of the
headlights, turn s ignals and tail lights can
fog over due to the tempe rature d ifference
betwee n the inside and ou ts ide. They will
clea r short ly after sw itch ing them on. This
does not affect the service life o f the light
i ng.
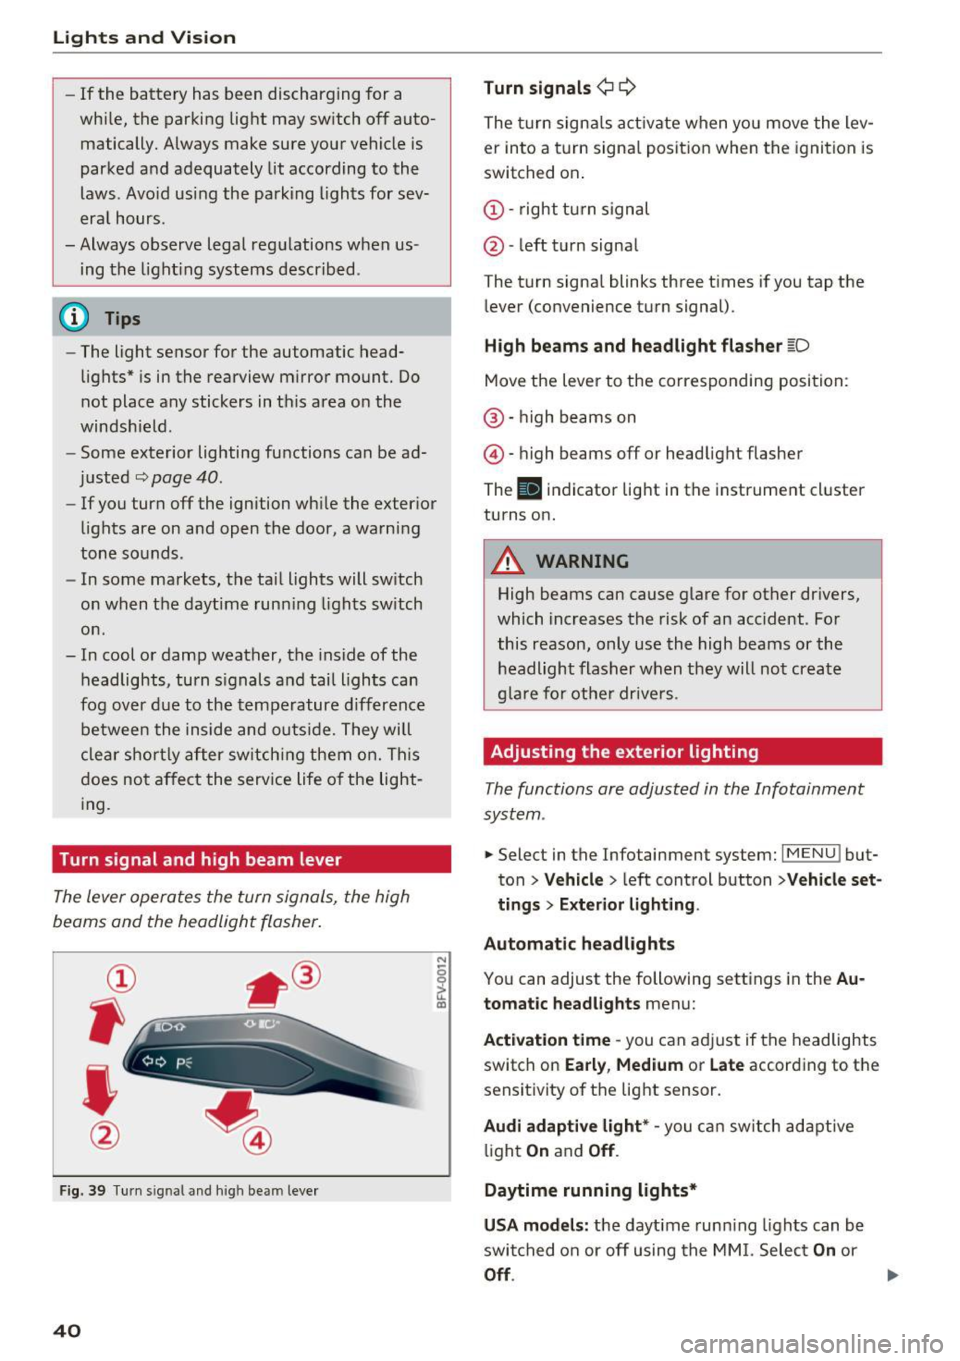
Turn signal and high beam lever
The lever operates the turn signals, the high
beams and the headlight flasher.
®
,
I
@
F ig . 39 Tu rn sig nal a nd high beam lever
40
N
c 0
ct a,
Turn signals ¢ Q
The turn sign als act ivate when yo u move the lev
er into a turn signa l posit ion when the igni tion is
switched on.
(D -right tu rn signal
@ -left t urn signa l
The tu rn signa l blinks three t imes i f you tap the
l ever (convenience t urn signal).
High beams and headlight fla sher l[D
Move the lever to the correspondin g position:
@ · high beams on
@ · high beams off or head light flasher
The
El i ndicator lig ht in the instrume nt cl uster
turns on.
_8 WARNING
High beams can cause glare for other dr ivers,
which inc reases the risk of an accident . Fo r
this reason, only use the high beams or the headlight flasher when t hey will no t create
g la re for ot he r drive rs.
Adjusting the exterior lighting
The functions are adjusted in the Infotainment
system .
.. Select in the Infotainment system: IMENU! but
ton>
Veh icle > left control button >Vehicle set
tings > Exterior light ing.
Automatic headlights
You can adjust the following sett ings in the Au
tomatic headlights
menu:
Act ivation time -you can a dju st if the headlights
switch on
Early , Medium or Late according to the
sensit ivity of th e lig ht sensor.
Audi adaptive light* -you c an switch adapt ive
li ght
On an d Off .
Daytime running lights*
USA models: the daytime runn ing lights can be
swi tched on or off using the MM I. Selec t
On or
Off.
Page 45 of 314
CD
CD
.... N
" N ...... 0
" V, co
Dimming the mirrors
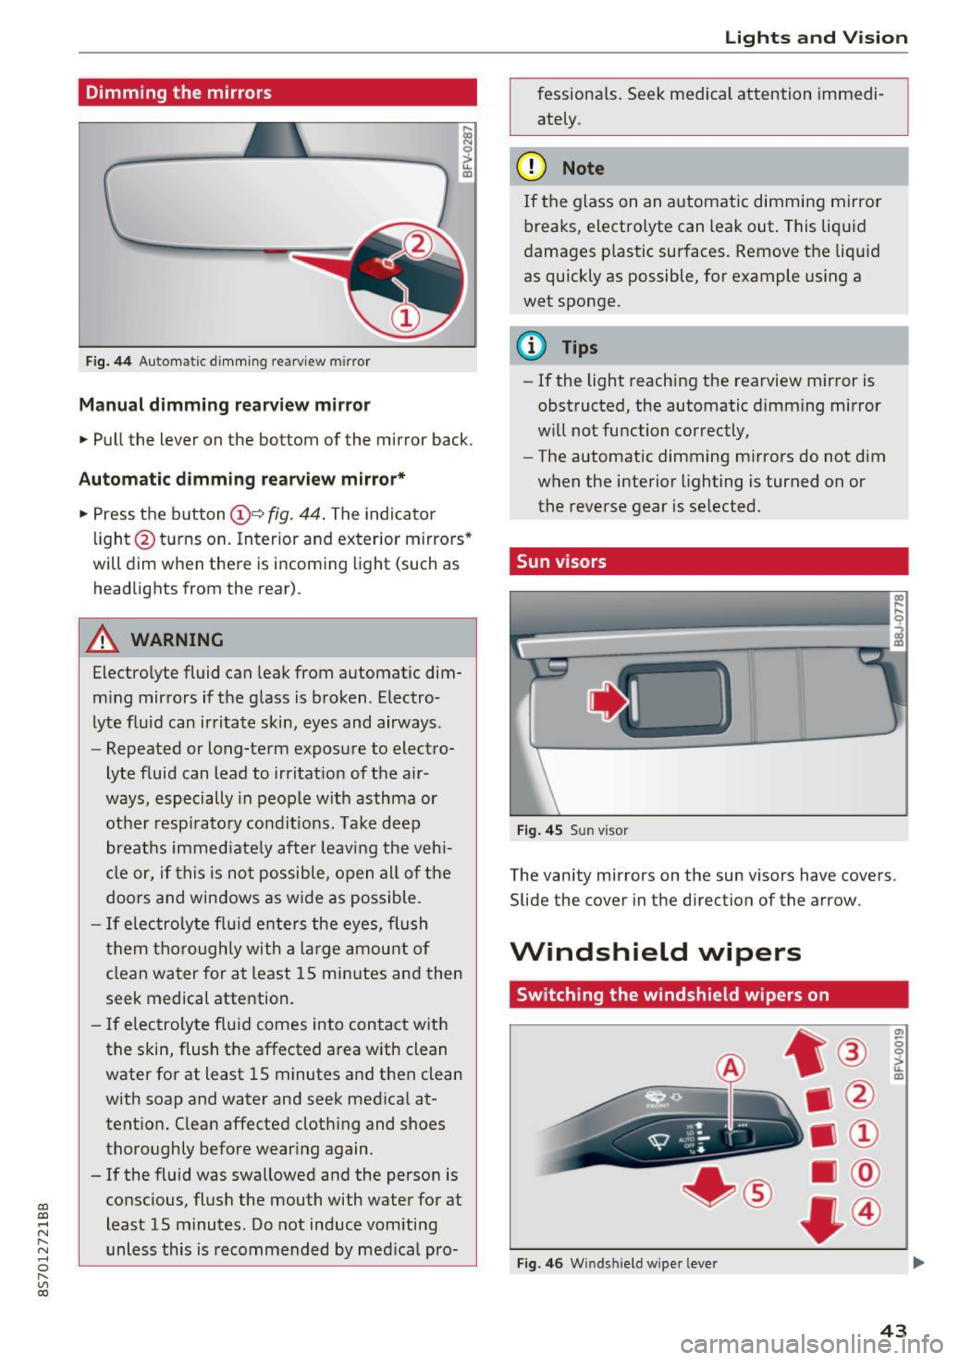
Fig . 44 Automat ic dimm ing rearview mirror
Manual dimming rear view mirror
• Pull the lever on the bottom of the mirror back.
Automatic dimming rea rvie w mirror*
• Press t he button @~
fig. 44 . The indicato r
li ght @turns on. In terior and exterior mirrors"
will dim when there is incoming light (such as
headlights from the rear).
A WARNING
Electrolyte fluid can leak from automat ic dim
m ing mirrors if t he g lass is b roken . Electro
lyte fluid can ir ritate skin, eyes and airways .
- Repeated or long-term exposure to elect ro-
lyte fluid can lead to irritat ion of the a ir
ways, especially in peo ple with asthma or
ot he r resp irato ry condi tions. Take deep
breat hs immed iate ly after leaving the veh i
cl e or, if this is n ot possib le, open all of t he
doo rs and windows as wide as possible.
- If elec troly te flu id ente rs the eyes, flush
t hem thorough ly with a large amou nt o f
cl ean water for at least 15 mi nutes and then
seek medical attention.
- If elec troly te f lu id comes into con tact wit h
the skin, flush t he affected area with clean
water for at least 15 minutes a nd then clean
with soap and water and seek medical at
tent ion. Clean affected cloth ing and shoes
thoroughly before wear ing again .
- If the fluid was swallowed and the person is
conscious, flus h the mouth with water for at
least 15 minutes. Do not induce vomiting
unless this is recommended by med ica l pro-
Lights and V ision
fessionals. Seek medical attention immedi
ately .
(D Note
If the glass on an a utomat ic dimmi ng mirror
breaks, electro lyte can leak out. This liquid
damages plastic sur faces. Remove t he liqu id
as quickly as possible, for example using a
wet sponge.
@ Tips
- If the light reaching the rearview mirror is
obstructed, the automatic dimming mirror
w ill not function correctly,
- The automatic dimming m irrors do not dim
w hen the interior lighting is turned on or
the reverse gear is selected.
Sun visors
Fi g. 4 5 Su n visor
The vanity mirrors on the sun visors have covers.
Slide the
cover in the direction of the arrow.
Windshield wipers
Switching the windshield wipers on
Fig. 4 6 W indshi eld wiper leve r
(7)
-0 0 :,;.. u. m
43