oil AUDI TT ROADSTER 2019 Owners Manual
[x] Cancel search | Manufacturer: AUDI, Model Year: 2019, Model line: TT ROADSTER, Model: AUDI TT ROADSTER 2019Pages: 304, PDF Size: 80.77 MB
Page 4 of 304
Table of contents
About this Owner's Manual......
SUMIMALY: ; « ss6% : osen ss sean cs poe s
QC CCeS Skis: si esis a 6 ores os ewe
Cockpit overview.............-000005
Indicator lights overview...........0.
Display and operation............
Instrument cluster...............
Instrument cluster overview...........
Coolant temperature indicator.........
Tachometer.......... 0.0 eee eee eee
Odometer as = s eee = seen ge zee a tows e
Outside temperature display...........
Fuellevel.......... 0. cece eee eee eee
Multifunction steering wheel..........
Vehicle functions « se-0 2. ese ve eee ees
MessageS ... 0... eee eee eee
Starting and driving.............
Opening and closing.............
Central locking 2.2% ieee seven a eevee
Luggage compartment lid.............
Power windows.............0.00 0005
Garage door opener...............0..
POWER EOPE: « «cece 0 csv « o semiens 6 0 eens
Automatic power top.................
Wind deflector ecax « x came + 5 yom 2 4 ews
Power top emergency operation........
Lights and Vision.................
Exterior lighting ssivses + « ssa 3s inane 9 & sou
Interior lighting. ................000.
VISION s « s saas ss sees Fo Hees Eo ee ee
Windshield wipers..............00005
Digital compass................0000.
Storage... eee eee eee
Luggage compartment...............
NOD
OO
11 il 12 12 15
16
21 21 21
27
28
30
3.
33 35 35
38 38
40
Al 42
44
46 46
46
48
48
48 48 49
50
Warm and cold...
Climate control system............00.
DRIVING: & tacos 6 2 maemo e eae 0 x iano 4
General information .
Steering.........6.
Starting and stopping
Electromechanical par
Starting to drive.....
theengine.......
king brake.......
Automatic transmission..............
Trailer towing.......
Driver assistance.
Assist systems...
Speed warning system...............-
Cruise control system
Audi active lane assist
Audi side assist
Audi drive select (drive settings) ........
Parking aid.......
Introduction........
Rear parking system .
Parking system plus.............-.00.
Rearview camera
Intelligent Technology...........
Electronic stabilization control (ESC) ....
StEOKing © esse we wssuse
All wheel drive (quattro) ..............
Rear spoiler........
Energy management .
Information about data recorded by
vehicle control modules...............
Infotainment system............
Multi Media Interface............
Traffic safety information.............
Introduction........
MMI On/Off knob with joystick function . .
MMI operation......
MMT OU CPi ccm. » 6 camere
Control knob with joys
Letter/number speller
tick function. ....
52
56 56 57 57 59
61
61
69 70 70 70
70
72
75
77
80
80
81
81
82
84
84
86
86
88
89
89 90
91
91 92
92
92
92
92
93
94
97
98
Page 9 of 304
8S8012721BA
Quick access
OOOO
©
OOOOGOOOO
©
O
®OOO®
Side assist display ..............
Door handle
Central locking switch ...........
Air vent with seat heating controls
Lever for:
—Turn signals and high beams ....
— Active lane assist .............
Multifunction steering wheel with:
— Horn Pe
— Driver's airbag ...............
— Buttons for the virtual instrument
cluster, including the driver infor-
mation system, audio/video, tele-
phone, navigation and voice rec-
ognition system
—Shift paddles ................
Audi virtual cockpit (instrument
cluster) 22... 0... eee eee eee
Windshield washer system lever . .
Starting the engine if there is a
malfunction ..............00 00
Adjustable steering column ......
Cruise control lever .............
Instrument illumination .........
Hood release! » « wae ¢ s eae vs setee
Headlight control switch ........
Power exterior mirror adjustment .
Power windows ............005-
Air vent including climate control
system controls ................
Lockable glove compartment
Drives for CD, DVD, SIM/SD cards .
Front passenger's airbag ........
Rear window defogger button
Depending on equipment, buttons
for:
sdriverselect oc. seins 6 + cgies oo neve
— Electronic Stabilization Control
(ESC) «5 « cows ss owen 4 ¢ ee a8 i vee
—Emergency flashers ...........
— Retractable rear spoiler ........
Depending on equipment, center
console with:
— Multimedia compartment for cell
PNONG aces cs ees s Ree se BER es
75 25
39
72
193
66
10
42
59 57 70
Al
227
38
Al
28
52
153,
193
TT
86
40
90
159
= Audi phone box sessie ss owe oo cee 113
@) Infotainment system on/off button . 92
@5) Infotainment system unit ....... 92
@8 Wind deflector button .......... 35
@) Depending on equipment:
— Storage compartment
—Ashtray 0.2... 00. eee eee eee 48
—CUPHGIDES wis 5 2 wens s x eee 5 2: 49
Power top button .............. 33
@ Parking’ brake: « + cs ss wows so sors 59
G0 Depending on equipment:
—[START ENGINE STOP] button ... 57
— Sound button for exhaust door
control
@) Selector lever (S tronic).......... 62
@) Tips
Some the equipment listed here is only instal-
led in certain models or is available as an op-
tion.
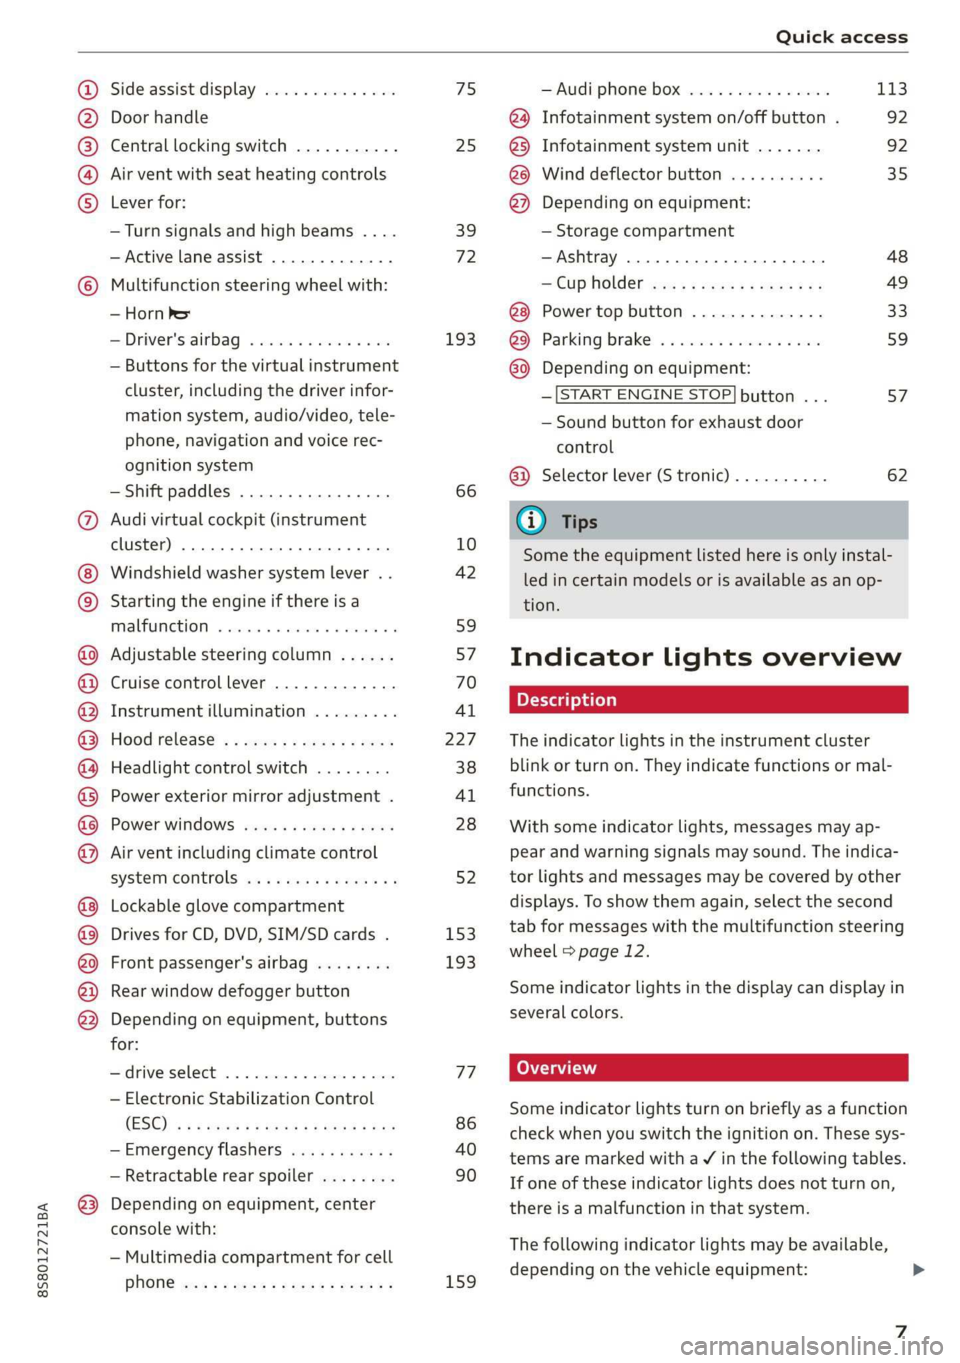
Indicator lights overview
The indicator lights in the instrument cluster
blink or turn on. They indicate functions or mal-
functions.
With some indicator lights, messages may ap-
pear and warning signals may sound. The indica-
tor lights and messages may be covered by other
displays. To show them again, select the second
tab for messages with the multifunction steering
wheel © page 12.
Some indicator lights in the display can display in
several colors.
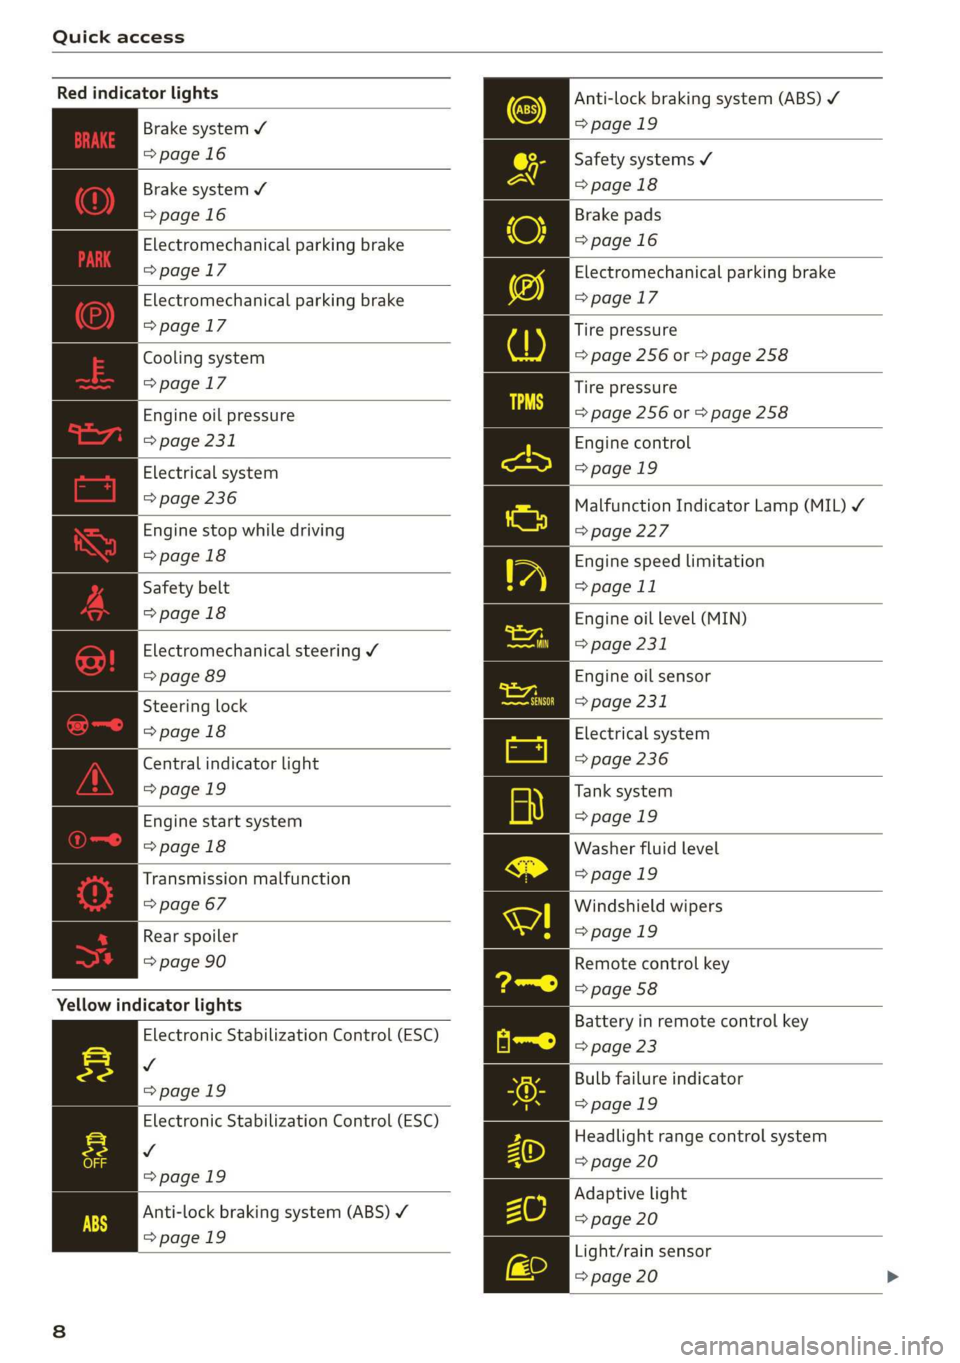
Some indicator lights turn on briefly as a function
check when you switch the ignition on. These sys-
tems are marked with a V in the following tables.
If one of these indicator lights does not turn on,
there is a malfunction in that system.
The following indicator lights may be available,
depending on the vehicle equipment:
Page 10 of 304
Quick access
Red indicator lights
Anti-lock braking system (ABS)
=>page 19
Safety systems ¥
>page 18
Brake pads
=>page 16
Electromechanical parking brake
>page 17
Tire pressure
=> page 256 or > page 258
Brake system ¥
=>page 16
Brake system 4
=>page 16
Electromechanical parking brake
=>page 17
Electromechanical parking brake
=>page 17
Cooling system
=>page 17
Tire pressure
Engine oil pressure => page 256 or © page 258
> page 231
Electrical system
=> page 236
Engine stop while driving
>page 18
Safety belt
>page 18
Electromechanical steering Y
=> page 89
Steering lock
>page 18
Central indicator light
=>page 19
Engine start system
>page 18
Transmission malfunction
=> page 67
Engine control
>page 19
Malfunction Indicator Lamp (MIL) ¥
=>page 227
Engine speed limitation
=> page 11
Engine oil level (MIN)
=> page 231
Engine oil sensor
=> page 231
Electrical system
=> page 236
Tank system
>page 19
Washer fluid level
>page 19
Windshield wipers
Rear spoiler = page 19
=> page 90 Remote control key
=> page 58
Yellow indicator lights
Electronic Stabilization Control (ESC)
v
=>page 19
Electronic Stabilization Control (ESC)
Vv
=>page 19
Battery in remote control key
=> page 23
Bulb failure indicator
=>page 19
Headlight range control system
=> page 20
Adaptive light
Anti-lock braking system (ABS) ¥ > page 20
=>page 19
Light/rain sensor
=> page 20
Page 11 of 304

8S8012721BA
Quick access
Transmission High beams
=> page 67
Steering lock = High beam assistant
=> page 18 Vy
Engine start system
>page 18
High beam assistant
Central indicator light
=>page 19
Electromechanical steering
=> page 89
Suspension control
=> page 20
Rear spoiler
=> page 90
Other indicator lights
Turn signals
=> page 20
Cruise control system
=> page 70
Cruise control system
=> page 70
Active lane assist
=> page 73
Convenience key
=> page 59
Electromechanical parking brake
>page 17
Active lane assist
=> page 73
Audi side assist
=> page 76
Transmission
=> page 67
)
(®
7 ¥
0;
PARK BRAKE Electromechanical parking brake
=>page 17
Electromechanical parking brake
‘@)) => page 17
Speed warning system
=> page 70
Speed warning system
=> page 70
Page 13 of 304
8S8012721BA
Instrument cluster
— The front spoiler also helps to distribute
cooling air correctly while driving. If the
spoiler is damaged, the cooling effect will
be impaired and the risk of the engine over-
heating will increase. See an authorized Au-
di dealer or authorized Audi Service Facility
for assistance.
Tachometer
The tachometer (2) > page 10, fig. 3 displays the
engine speed in revolutions per minute (RPM).
The beginning of the red zone in the tachometer
indicates the maximum permissible engine speed
for all gears once the engine has been broken in.
Before reaching the red zone, you should shift in-
to the next higher gear, choose the "D" or "S" se-
lector lever position, or remove your foot from
the accelerator pedal.
Engine speed limitation
Applies to: vehicles with engine speed limitation
If the BB indicator light turns on, the engine will
be automatically limited to the RPM displayed in
the instrument cluster. This protects the engine
from overheating.
The engine speed limitation deactivates once the
engine is no Longer in the critical temperature
range and you have released the accelerator ped-
al once.
If the engine speed limitation was activated by
an engine control malfunction, the B indicator
light also turns on. Make sure the engine speed
does not go above the speed displayed, for exam-
ple when downshifting. Drive to an authorized
Audi dealer or authorized Audi Service Facility im-
mediately to have the malfunction corrected.
@) Note
The needle in the tachometer may only be in
the red area of the gauge for a short period of
time before there is a risk of damaging the
engine. The location where the red zone be-
gins varies depending on the engine.
Odometer
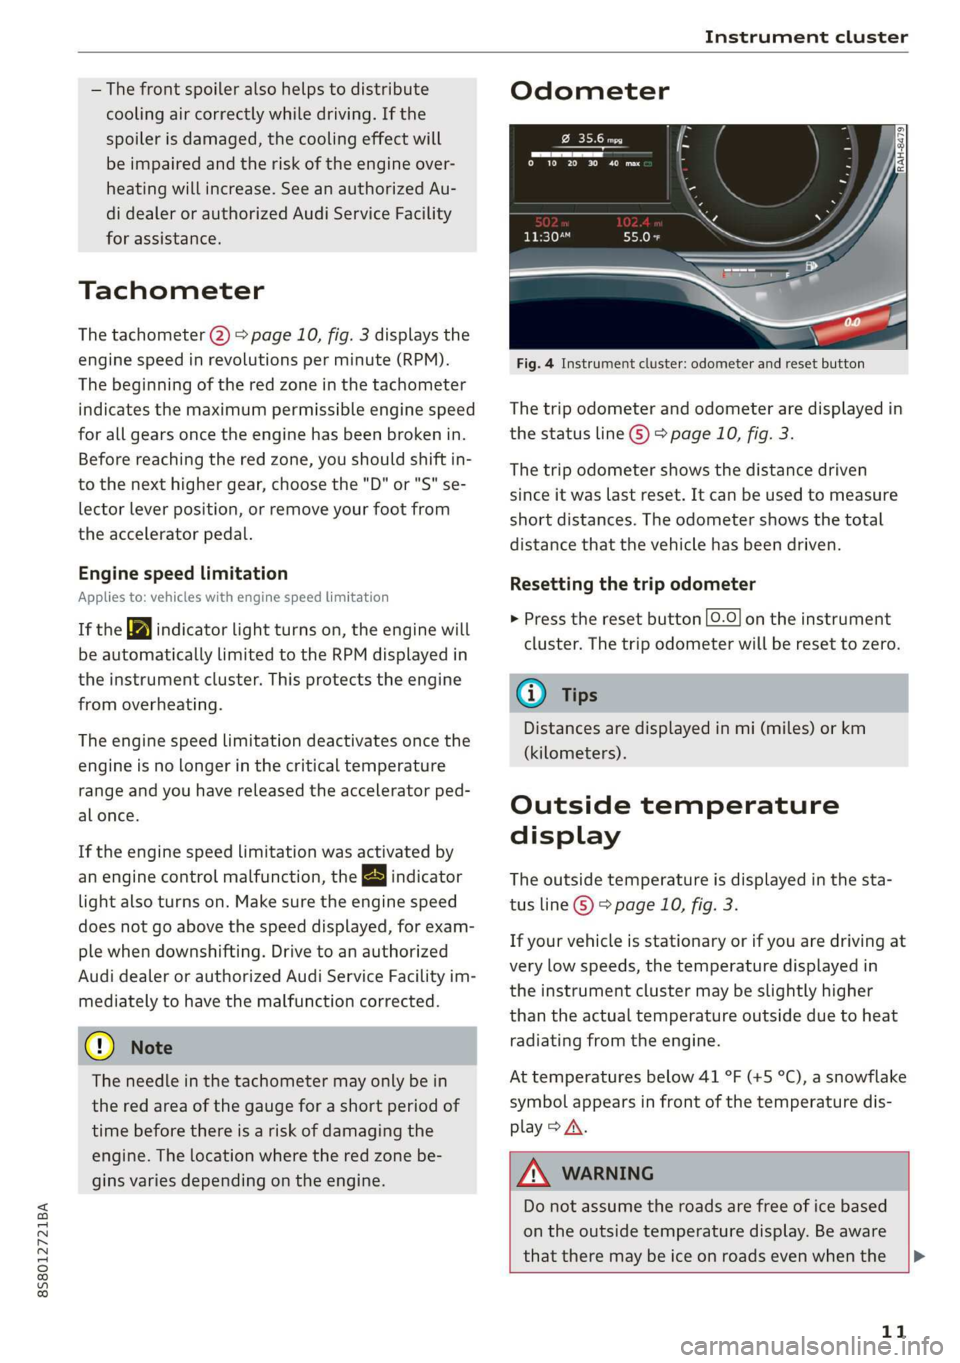
Fig. 4 Instrument cluster: odometer and reset button
The trip odometer and odometer are displayed in
the status line ©) > page 10, fig. 3.
The trip odometer shows the distance driven
since it was last reset. It can be used to measure
short distances. The odometer shows the total
distance that the vehicle has been driven.
Resetting the trip odometer
> Press the reset button [0-9] on the instrument
cluster. The trip odometer will be reset to zero.
@) Tips
Distances are displayed in mi (miles) or km
(kilometers).
Outside temperature
display
The outside temperature is displayed in the sta-
tus line ® page 10, fig. 3.
If your vehicle is stationary or if you are driving at
very low speeds, the temperature displayed in
the instrument cluster may be slightly higher
than the actual temperature outside due to heat
radiating from the engine.
At temperatures below 41 °F (+5 °C), a snowflake
symbol appears in front of the temperature dis-
play > A.
ZA\ WARNING
Do not assume the roads are free of ice based
on the outside temperature display. Be aware
that there may be ice on roads even when the
11
Page 17 of 304
8S8012721BA
Instrument cluster
Vehicle functions
On-board computer
Depending on the vehicle equipment, you may be
able to access the following information in this
order on the on-board computer > page 10, fig. 3
@:
—Time and date > page 171
— Average consumption
— Short-term memory overview
— Long-term memory overview
— Energy consumers > page 15
— Driver assistance
— Traffic sign recognition
The short-term memory collects driving informa-
tion from the time the ignition is switched on un-
til it is switched off. If you continue driving within
two hours after switching the ignition off, the
new values are included when calculating the cur-
rent trip information.
Unlike the short-term memory, the long-term
memory is not erased automatically. You can se-
lect the time period for evaluating trip informa-
tion yourself.
Energy consumers*
The Energy consumers view lists other equip-
ment that is currently affecting fuel consump-
tion. The display shows up to three equipment
items. The equipment using the most power is
listed first. If more than three items using power
are switched on, the equipment that is currently
using the most power is displayed. A chart also
shows you the current total of all other consum-
ers.
Fuel consumption
The current fuel consumption can be shown using
a bar graph. The average consumption stored in
the short-term memory is also displayed. If the
bar is green, your vehicle is saving fuel through
one of the following functions:
— Recuperation: electrical energy can be stored in
the battery when the vehicle is coasting or driv-
ing downhill. The bar will move toward (1.
Engine oil temperature display and boost
atelte- hele
Applies to: vehicles with engine oil temperature display/boost
indicator
The
engine oil temperature display and boost in-
dicator are only shown in the enhanced view or in
the sport view > page 13.
Engine oil temperature indicator =
The engine has reached its operating tempera-
ture when the engine oil temperature is between
176 °F (80 °C) and 248 °F (120 °C) under normal
driving conditions. The engine oil temperature
may be higher if there is heavy engine load and
high temperatures outside. This is not a cause for
concern as long as the = => page 231 or EA
= page 231 indicator lights do not turn on.
Boost indicator
The current engine load (meaning the current
boost pressure) is indicated by a bar.
Shift light indicator
Applies to: vehicles with shift light indicator
The
shift light indicator informs the driver when
the rpm limit is reached.
Accessing the shift light indicator
Requirement: tiptronic mode must be activated
=> page 66.
> Select the sport view > page 13. The shift light
indicator is displayed with green, yellow and
red ranges in the upper areas of the tachome-
ter.
The shift light indicator will blink red when ap-
proaching the engine speed limit. Shift to the
next highest gear at the right time.
Sy eame ENE
Applies to: vehicles with Sport displays
Depending on the vehicle equipment, the sport
displays may include the G-meter, the engine da-
ta and the tire pressure monitoring system. You
can access the sport displays in the central area
or in the additional display in the driver informa-
tion system. >
15
Page 58 of 304
Driving
Driving
General information
A new vehicle must be broken in within the first
1,000 miles (1,500 km) so that all moving parts
work smoothly together, which helps to increase
the service life of the engine.
Do not drive higher than two-thirds of the maxi-
mum permitted engine RPM during the first 600
miles (1,000 km) and do not use full accelera-
tion. The engine can be increased RPM gradually
during the next 300 miles (500 km).
rela ire ma Mae aoa Cle (
@) Note
When driving on poor roads, over curbs, and
on steep ramps, make sure that components
that hang below the vehicle, such as the spoil-
er and exhaust system, are not struck because
they could be damaged. This especially ap-
plies to vehicles with low ground clearance
and vehicles that are heavily loaded.
Driving through water on roads
Note the following to reduce the risk of vehicle
damage when driving through water, for example
on flooded roads:
— The water must not be any higher than the bot-
tom of the vehicle body.
— Do not drive faster than walking speed.
ZA\ WARNING
After driving through water or mud, the effec-
tiveness of the brakes may be reduced due to
moisture on the brake rotors and brake pads.
A few careful brake applications should dry off
the brakes and restore the full braking effect.
@) Note
Vehicle components such as the engine,
transmission, suspension, or electrical sys-
56
tem, can be severely damaged by driving
through water.
G) Tips
— Determine the depth before driving through
water.
— Do not stop the vehicle, drive in reverse, or
switch the engine off when driving through
water.
— Keep in mind that oncoming vehicles may
create waves that raise the water level and
make it too deep for your vehicle to drive
through safely.
— Avoid driving through salt water, because
this can cause corrosion.
Efficient and environmentally-conscious
The amount of fuel consumption, the environ-
mental impact, and the wear to the engine,
brakes, and tires depends mostly on your driving
style. Note the following information for efficient
and environmentally-conscious driving:
— Do not let the engine run while the vehicle
parked.
— Turn off electrical equipment that is not need-
ed, for example seat heating*.
— Anticipate upcoming traffic situations while
driving to avoid unnecessary acceleration and
braking.
— Utilize the engine braking effect.
— Avoid driving short distances or at high speeds
when possible.
— Avoid adding extra weight to the vehicle if pos-
sible, for example by not leaving roof racks or
bike racks installed when they are not needed.
— Have maintenance performed regularly on the
vehicle.
— Do not drive with winter tires during the summ-
ef,
— Make sure the tire pressure is correct
=> page 250.
G@) Tips
The amount of noise produced by the vehicle
can increase significantly when driving with a >
Page 90 of 304
Intelligent Technology
— There is no vehicle stabilization when
ESC/ASR are switched off.
@) Tips
— When the cruise control system* is switched
on, ESC/ASR cannot be switched off or sport
mode cannot be switched on.
— Malfunctions in the rear spoiler or the Audi
magnetic ride may make it impossible to
switch the ESC/ASR off or to switch sport
mode on.
Brakes
You can apply the vehicle's brakes using the brake
pedal.
Operating noise
Noises may occur when braking depending on the
speed, braking force, and outside conditions such
as temperature and humidity.
Braking effect
The response time from the brakes depends on
the weather and environmental conditions. To
ensure the optimum braking effect, the brake
system is cleaned at regular intervals. This is
done by applying the brake pads to the brake ro-
tors for a short period of time when driving at
high speeds when the windshield wipers are
switched on.
If the brake system becomes damp, for example
after driving in heavy rain, the braking effect may
be delayed. Other factors that could temporarily
increase the response time of the brakes include:
— Wet conditions
— Low temperatures, ice, and snow
— Roads covered in salt
— Dirty brake pads
Corrosion
Corrosion may form on the brake rotors if there is
no heavy braking, if the vehicle is not driven for
long periods of time, or if the vehicle is not driv-
en
frequently or for long distances. In this case,
braking heavily several times while driving at
high speeds can clean the brake rotors > A\.
838
Brake pads
New brake pads do not achieve their full braking
effect during the first 250 miles (400 km). They
must be “broken in” first. However, you can com-
pensate for the slightly reduced braking force by
pressing firmly on the brake pedal. Avoid heavy
braking during the break-in period.
Brake pad wear depends largely on the way the
vehicle is driven and on operating conditions.
Brake pad wear increases when driving frequently
in the city or short distances or when using a very
sporty driving style.
Ceramic brakes
Applies to: vehicles with ceramic brakes
Ceramic brakes provide excellent deceleration
rates.
The break-in period for new ceramic brakes may
be significantly longer than for standard brake
rotors. Due to the properties of the material,
they may cause noises at lower speeds. Ceramic
brakes also absorb more moisture in wet condi-
tions. Therefore, there will temporarily be less
braking force than when the brakes are dry. You
can compensate for this by pressing the brake
pedal harder.
A WARNING
— Only apply the brakes for the purpose of
cleaning the brake system when road and
traffic conditions permit. You must not en-
danger other road users and increase the
risk of an accident.
— Due to the risk of injury, only have an au-
thorized Audi dealer or authorized Audi
Service Facility work on the brake system.
Incorrect repairs could impair the function.
— Never let the vehicle roll while the engine is
stopped because this increases the risk of an
accident.
— Depending on vehicle equipment, the brake
pedal may move downward automatically
during autonomous braking maneuvers. To
reduce the risk of injury, do not place your
foot under the brake pedal.
Page 91 of 304
8S8012721BA
Intelligent Technology
@) Note
— Never let the brakes “rub” by pressing the
pedal lightly when braking is not actually
necessary. This can cause the brakes to over-
heat and increases braking distance and
causes wear.
— Before driving on long stretches with steep
hills, reduce the vehicle speed and shift to a
lower gear to use the engine braking effect.
This reduces the load on the brakes. If you
need to brake additionally, brake in intervals
and not continuously.
@) Tips
— If you retrofit your vehicle with a front spoil-
er, wheel covers or similar items, make sure
that the air flow to the brakes is not ob-
structed. Otherwise the brake system can
overheat.
— Also refer to the information about brake
fluid > page 235.
Steering
Electromechanical steering supports the driver's
steering movements by electronically adapting
the power steering depending on the vehicle
speed. The settings depend on the selected Audi
drive select* mode.
a Steering: malfunction! Please stop vehicle
The power steering may have failed. Adapt your
driving style immediately to compensate for the
fact that it may be more difficult to turn the
steering wheel, and stop your vehicle in a safe lo-
cation as soon as possible. Do not continue driv-
ing. See an authorized Audi dealer or authorized
Audi Service Facility for assistance.
a Steering: malfunction! You can continue
driving
There is a malfunction. Steering may be more dif-
ficult or more sensitive. Adapt your driving style.
Have the steering system checked immediately
by an authorized Audi dealer or authorized Audi
Service Facility. Please note that the red indicator
light may turn on after restarting the engine. Do
not continue driving if it does.
G@) Tips
If the 12 or al indicator light only stays on
for a short time, you may continue driving.
ALL wheel drive (quattro)
Applies to: vehicles with all wheel drive
In all wheel drive, all four wheels are powered.
General information
In all wheel drive, the driving power is divided be-
tween all four wheels. This happens automatical-
ly depending on your driving behavior as well as
the current road conditions. Also see > page 86,
Electronic stabilization control (ESC).
The all wheel drive concept is designed for high
engine power. Your vehicle is exceptionally pow-
erful and has excellent driving characteristics
both under normal driving conditions and on
snow and ice. Always read and follow safety pre-
cautions > A\.
Winter tires
By using all wheel drive, your vehicle has good
forward motion with standard tires in winter con-
ditions. However, in winter we recommend using
winter or all season tires on all four wheels, be-
cause this will improve the braking effect.
Snow chains
If there are snow chain laws, snow chains must
also be used on vehicles with all wheel drive
=> page 255, Snow chains.
Replacing tires
For vehicles with all wheel drive, only wheels with
the same rolling circumference should be used.
Avoid using tires with different tread depths
=> page 247, New tires or wheels.
89
Page 92 of 304
Intelligent Technology
Is this an offroad vehicle?
Your Audi is not an offroad vehicle - there is not
enough ground clearance. For this reason, avoid
difficult terrain.
ZA\ WARNING
— Also, in vehicles with all wheel drive, adapt
your driving style to the current road and
traffic conditions. Do not let the increased
safety provided tempt you into taking risks,
because this increases the risk of an acci-
dent.
— The braking ability of your vehicle is limited
to the traction of the wheels. In this way, it
is not different from a two wheel drive vehi-
cle. Do not be tempted to accelerate to a
high speed when the road is slippery, be-
cause this increases the risk of an accident.
— Note that on wet streets, the front wheels
can “hydroplane’” if driving at speeds that
are too high. Unlike front wheel drive vehi-
cles, the engine RPM does not increase sud-
denly when the vehicle begins hydroplaning.
For this reason, adapt your speed to the
road conditions to reduce the risk of an acci-
dent.
Rear spoiler
Applies to: vehicles with retractable rear spoiler
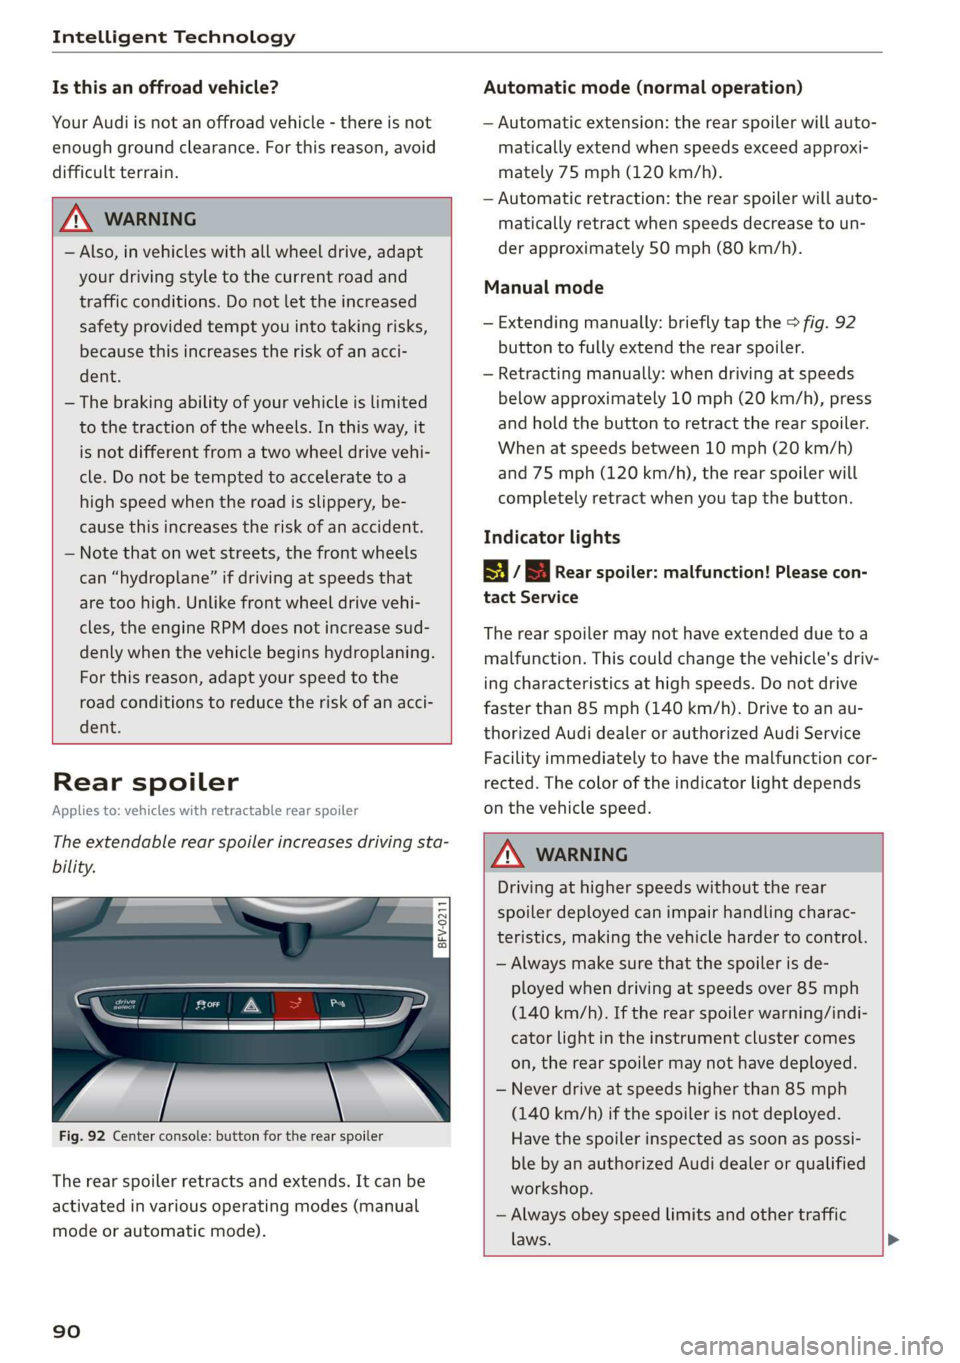
The extendable rear spoiler increases driving sta-
bility.
a
g| = z
a.
Fig. 92 Center console: button for the rear spoiler
The rear spoiler retracts and extends. It can be
activated in various operating modes (manual
mode or automatic mode).
90
Automatic mode (normal operation)
— Automatic extension: the rear spoiler will auto-
matically extend when speeds exceed approxi-
mately 75 mph (120 km/h).
— Automatic retraction: the rear spoiler will auto-
matically retract when speeds decrease to un-
der approximately 50 mph (80 km/h).
Manual mode
— Extending manually: briefly tap the > fig. 92
button to fully extend the rear spoiler.
— Retracting manually: when driving at speeds
below approximately 10 mph (20 km/h), press
and hold the button to retract the rear spoiler.
When at speeds between 10 mph (20 km/h)
and 75 mph (120 km/h), the rear spoiler will
completely retract when you tap the button.
Indicator lights
8 / | Rear spoiler: malfunction! Please con-
tact Service
The rear spoiler may not have extended due toa
malfunction. This could change the vehicle's driv-
ing characteristics at high speeds. Do not drive
faster than 85 mph (140 km/h). Drive to an au-
thorized Audi dealer or authorized Audi Service
Facility immediately to have the malfunction cor-
rected. The color of the indicator light depends
on the vehicle speed.
ZA WARNING
Driving at higher speeds without the rear
spoiler deployed can impair handling charac-
teristics, making the vehicle harder to control.
— Always make sure that the spoiler is de-
ployed when driving at speeds over 85 mph
(140 km/h). If the rear spoiler warning/indi-
cator light in the instrument cluster comes
on, the rear spoiler may not have deployed.
— Never drive at speeds higher than 85 mph
(140 km/h) if the spoiler is not deployed.
Have the spoiler inspected as soon as possi-
ble by an authorized Audi dealer or qualified
workshop.
— Always obey speed limits and other traffic
laws.