spare tire AUDI TT ROADSTER 2019 Owners Manual
[x] Cancel search | Manufacturer: AUDI, Model Year: 2019, Model line: TT ROADSTER, Model: AUDI TT ROADSTER 2019Pages: 304, PDF Size: 80.77 MB
Page 6 of 304
Table of contents
Kiteerairbagsicc 2 secs ee esac a w anaes ¥ vo 204
Side airbags. ........... eee eee eee 206
SRC SARSEY ois i ese se ween 4 & ese a 210
Important information............... 210
Child 'safety S@atSiivec 2s gcan
Additional information............... 222
Maintenance and Care........... 223
Checking and Filling............. 223
Fuel... 2. cece eee eee eee eee 223
Refuelingjecs ss sees se ane + eeee § s peme 224
Emissions control system...........4. 227
Engine compartment................. 227
ERGINGOtls seus 2 x seme « ¥ neue =e oRBER Fae 230
Cooling:system . « sscses v < ssesens vo eevee so ave 234
Brake fluid... 2... eee eee eee 235
Electrical SySteMi wis ¢ scm ae mews eg ey 236
Battery: « & cess 6 6 ceva © 5 mews « wenn ¥ © oi 236
Windshield washer system...........- 238
Service interval display............... 239
Wheels ........ 0... eee 240
Wheels and Tires . . 240
Tire pressure monitoring system....... 256
Tire pressure monitoring system....... 258
Care and cleaning................ 262
General information wo. ceo saeco es 262
Car washes...............2..20.00005 262
Cleaning and care information......... 263
Taking your vehicle out of service....... 267
Do-It YOUrSEUT v5 ¢ «gee8 & peas es eee 268
Emergency assistance........... 268
General
information................. 268
EQUIPITICNE sass ¢ ¢ eens + eeen a 3 ces 3s He 268
Tire mobility kit ose: <2 cere ae eee se ees 268
Replacing wheels..............000005 270
Sparetire........... 0.00.0 20.000000. 274
TOWING scsvss = ¢ wesos « § eeons & 2 Keres 4 = HES 274
Fuses and bulbs.................. 277
FUSES an + x css 5 © ames + © eRe = Beem He 277
BULDSisi0e svowave 4 6 oniuen a a stants a Hanon w 8 ave 279
Customer information........... 280
Accessories and technical
CHANGES: « s seve + a wees ¢ s eee oe ee Ze 280
Warratttys: < s wexsas os menus vo oncans © 0 sence 280
Audi Literature Shop.............005- 280
Driving in other countries............. 280
Maintenance, repairs, and technical
modifications...............02.-00 280
Accessories and parts..............-. 282
Reporting Safety Defects.............. 282
Declaration
of compliance for
telecommunications equipment and
electroniesystemss: + - seca ss sec oo waren 283
Technical data.................... 285
Identification data................0.. 285
Ne@hicle’datiabaccic = 2 cms » @ canseae » 1 sumone a oo 285
TWAS Rey + xaos 5c owe co UE a eee se 287
Page 50 of 304
Stowing and using
Stowing and using
Ashtray
Applies to: vehicles with ashtray
2 3 ° >
c o
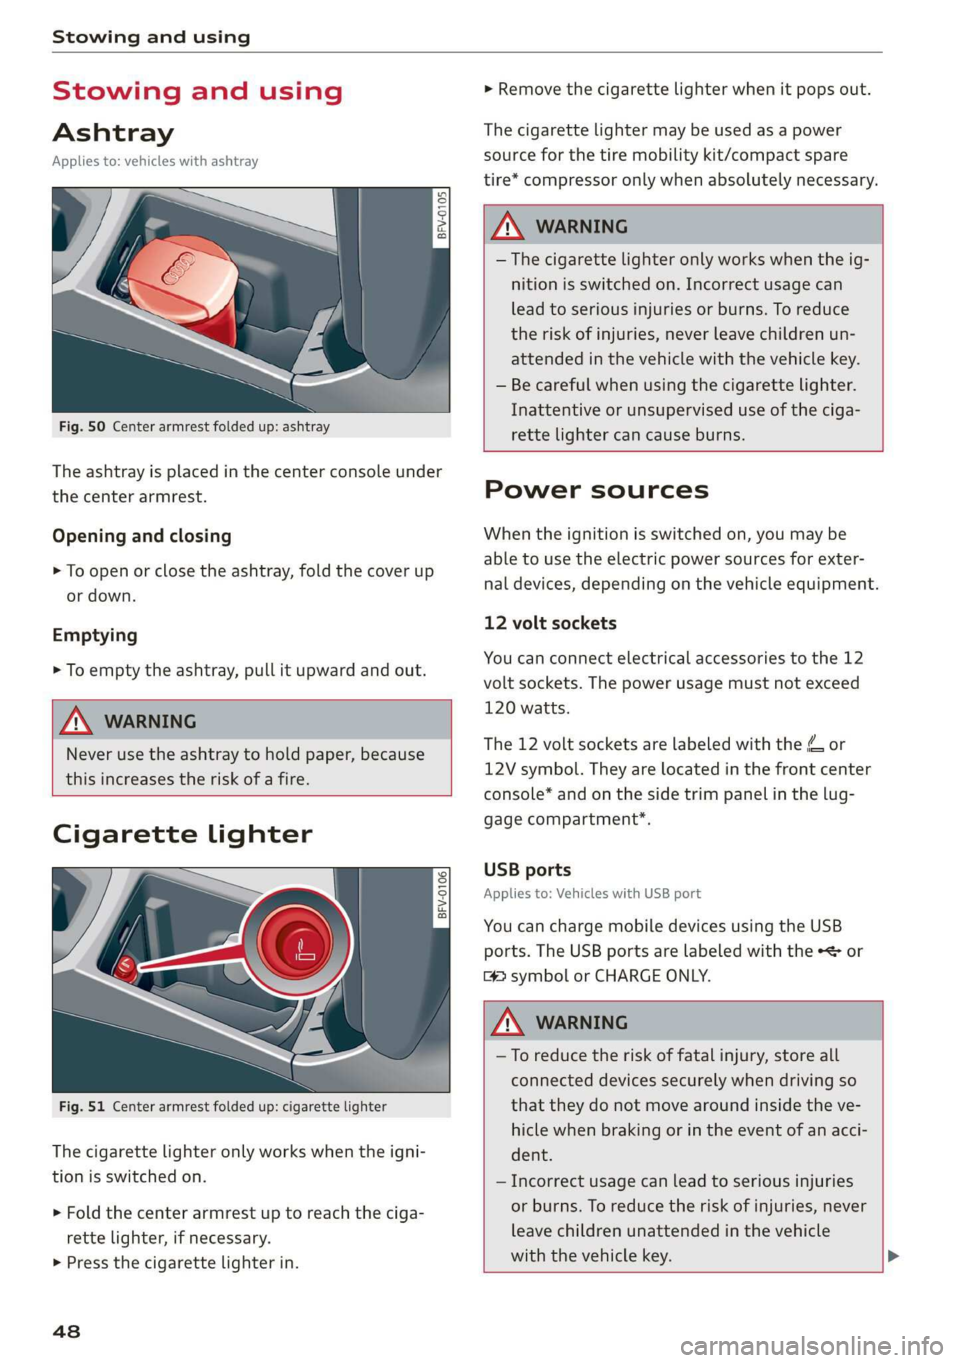
Fig. 50 Center armrest folded up: ashtray
The ashtray is placed in the center console under
the center armrest.
Opening and closing
> To open or close the ashtray, fold the cover up
or down.
Emptying
> To empty the ashtray, pull it upward and out.
ZA WARNING
Never use the ashtray to hold paper, because
this increases the risk of a fire.
Cigarette lighter
Fig. 51 Center armrest folded up: cigarette lighter
The
cigarette lighter only works when the igni-
tion is switched on.
> Fold the center armrest up to reach the ciga-
rette lighter, if necessary.
> Press the cigarette lighter in.
48
> Remove the cigarette lighter when it pops out.
The cigarette lighter may be used as a power
source for the tire mobility kit/compact spare
tire* compressor only when absolutely necessary.
Z\ WARNING
— The cigarette lighter only works when the ig-
nition is switched on. Incorrect usage can
lead to serious injuries or burns. To reduce
the risk of injuries, never leave children un-
attended in the vehicle with the vehicle key.
— Be careful when using the cigarette lighter.
Inattentive or unsupervised use of the ciga-
rette
lighter can cause burns.
Power sources
When the ignition is switched on, you may be
able to use the electric power sources for exter-
nal devices, depending on the vehicle equipment.
12 volt sockets
You can connect electrical accessories to the 12
volt sockets. The power usage must not exceed
120 watts.
The 12 volt sockets are labeled with the & or
12V symbol. They are located in the front center
console* and on the side trim panel in the lug-
gage compartment*.
USB ports
Applies to: Vehicles with USB port
You can charge mobile devices using the USB
ports. The USB ports are labeled with the «<> or
[4 symbol or CHARGE ONLY.
Z\ WARNING
—To reduce the risk of fatal injury, store all
connected devices securely when driving so
that they do not move around inside the ve-
hicle when braking or in the event of an acci-
dent.
— Incorrect usage can lead to serious injuries
or burns. To reduce the risk of injuries, never
leave children unattended in the vehicle
with the vehicle key. >
Page 53 of 304
8S58012721BA
Stowing and using
Loading
> Open the storage compartment cover between
the seat backrests.
> Open the luggage compartment lid.
> Press the release button and fold the cover for
the pass-through towards the luggage com-
partment © fig. 54.
> Slide the bag from the luggage compartment
into the vehicle interior with the zipper facing
toward the rear > /\.
> Load the ski bag.
Securing
> Secure the carabiner hooks on both straps in
the corresponding rear tie-downs > fig. 55.
Z\ WARNING
After loading the bag, it must be tied down
with both straps.
@) Tips
— Only fold the ski bag up if it is dry.
— Lay skis in the bag with the points facing
forward and ski pole points facing the rear.
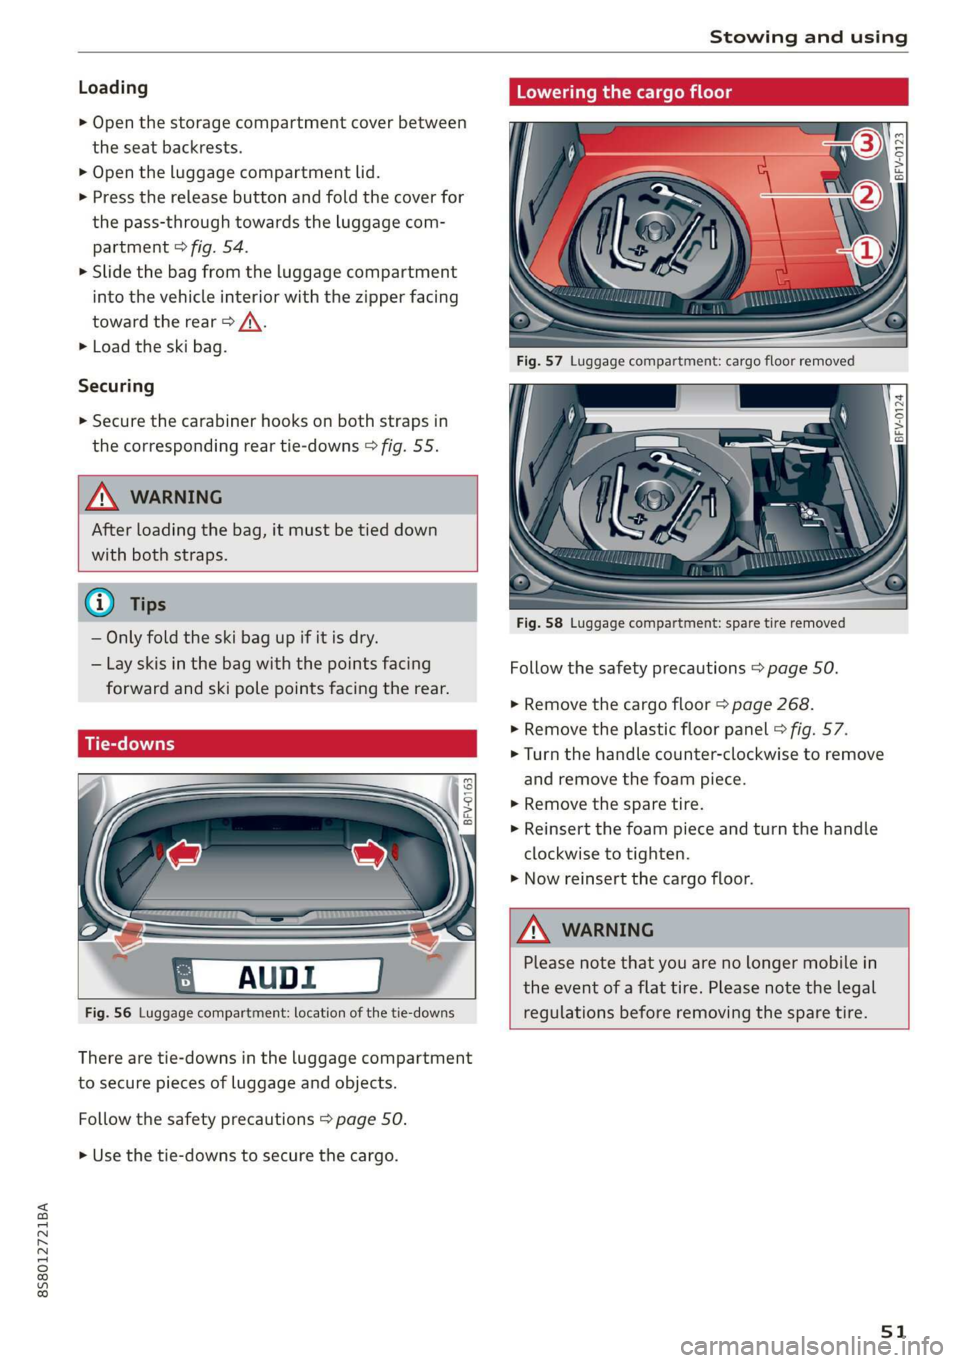
Fig. 56 Luggage compartment: location of the tie-downs
There are tie-downs in the luggage compartment
to secure pieces of luggage and objects.
Follow the safety precautions > page 50.
> Use the tie-downs to secure the cargo.
Lowering the cargo floor
BFV-0124
Fig. 58 Luggage compartment: spare tire removed
Follow the safety precautions > page 50.
> Remove the cargo floor > page 268.
> Remove the plastic floor panel > fig. 57.
> Turn the handle counter-clockwise to remove
and remove the foam piece.
> Remove the spare tire.
> Reinsert the foam piece and turn the handle
clockwise to tighten.
> Now reinsert the cargo floor.
ZA WARNING
Please note that you are no longer mobile in
the event of a flat tire. Please note the legal
regulations before removing the spare tire.
51
Page 249 of 304
Wheels
distributing to each axle its share
of the maximum loaded vehicle
weight and dividing by two.
Vehicle normal load on the tire
means that load on an individual
tire that is determined by distrib-
uting to each axle its share of the
curb weight, accessory weight,
and normal occupant weight (dis-
tributed in accordance with > ta-
ble on page 252) and dividing by
two.
Occupant loading and distri-
bution for vehicle normal load
for various designated seating
capacities
Refer to the tire inflation pressure
label for the number of seating
positions. Refer to the table > ta-
ble on page 252 for the number
of people that correspond to the
vehicle normal load.
New tires or wheels
Audi recommends having all work
on tires or wheels performed by
an authorized Audi dealer or au-
thorized Audi Service Facility.
These facilities have the proper
knowledge and are equipped with
>New tires do not yet have the
optimum gripping properties.
Drive carefully and at moderate
speeds for the first 350 miles
(500 km) with new tires.
> Only use tires with the same de-
sign, size (rolling circumfer-
ence), and as close to the same
tread pattern as possible on all
four wheels.
>Do not replace tires individually.
At least replace both tires on the
same axle at the same time.
> Audi recommends that you use
Audi Original Tires. If you would
like to use different tires, please
note that the tires may perform
differently even if they are the
same size > A.
>If you would like to equip your
vehicle with a tire and rim com-
bination that is different from
what was installed at the facto-
ry, consult with an authorized
Audi dealer or authorized Audi
Service Facility before making a
purchase > A.
Because the spare tire* is differ-
ent from the regular tires instal-
led on the vehicle (such as winter
8S8012721BA
tires or wide tires), only use the
spare tire* temporarily in case of
emergency and drive carefully >
the required tools and replace-
ment parts.
247
Page 250 of 304
Wheels
while it is in use. It should be re-
placed with a regular tire as soon
as possible.
Applies to: vehicles with all wheel
drive: All four wheels must be
equipped with tires that are the
same brand and have the same
construction and tread pattern so
that the drive system is not dam-
aged by different wheel speeds.
For this reason, in case of emer-
gency, only use a spare tire* that
is the same circumference as the
regular tires.
Z\, WARNING
—Only use tire/rim combina-
tions and suitable wheel bolts
that have been approved by
Audi. Otherwise, damage to
the vehicle and an accident
could result.
—For technical reasons, it is not
possible to use tires from oth-
er vehicles. In some cases, you
cannot even use tires from the
same vehicle model.
—Make sure that the tires you
select have enough clearance
to the vehicle. Replacement
tires should not be chosen
simply based on the nominal
size, because tires with a dif-
248
ferent construction can differ
greatly even if they are the
same size. If there is not
enough clearance, the tires or
the vehicle can be damaged
and this can reduce driving
safety and increase the risk of
an accident.
—Only use tires that are more
than six years old when abso-
lutely necessary and drive
carefully when doing so.
—Do not use run-flat tires on
your vehicle. Using them when
not permitted can lead to ve-
hicle damage or accidents.
—If you install wheel covers on
the vehicle, make sure they al-
low enough air circulation to
cool the brake system. If they
do not, this could increase the
risk of an accident.
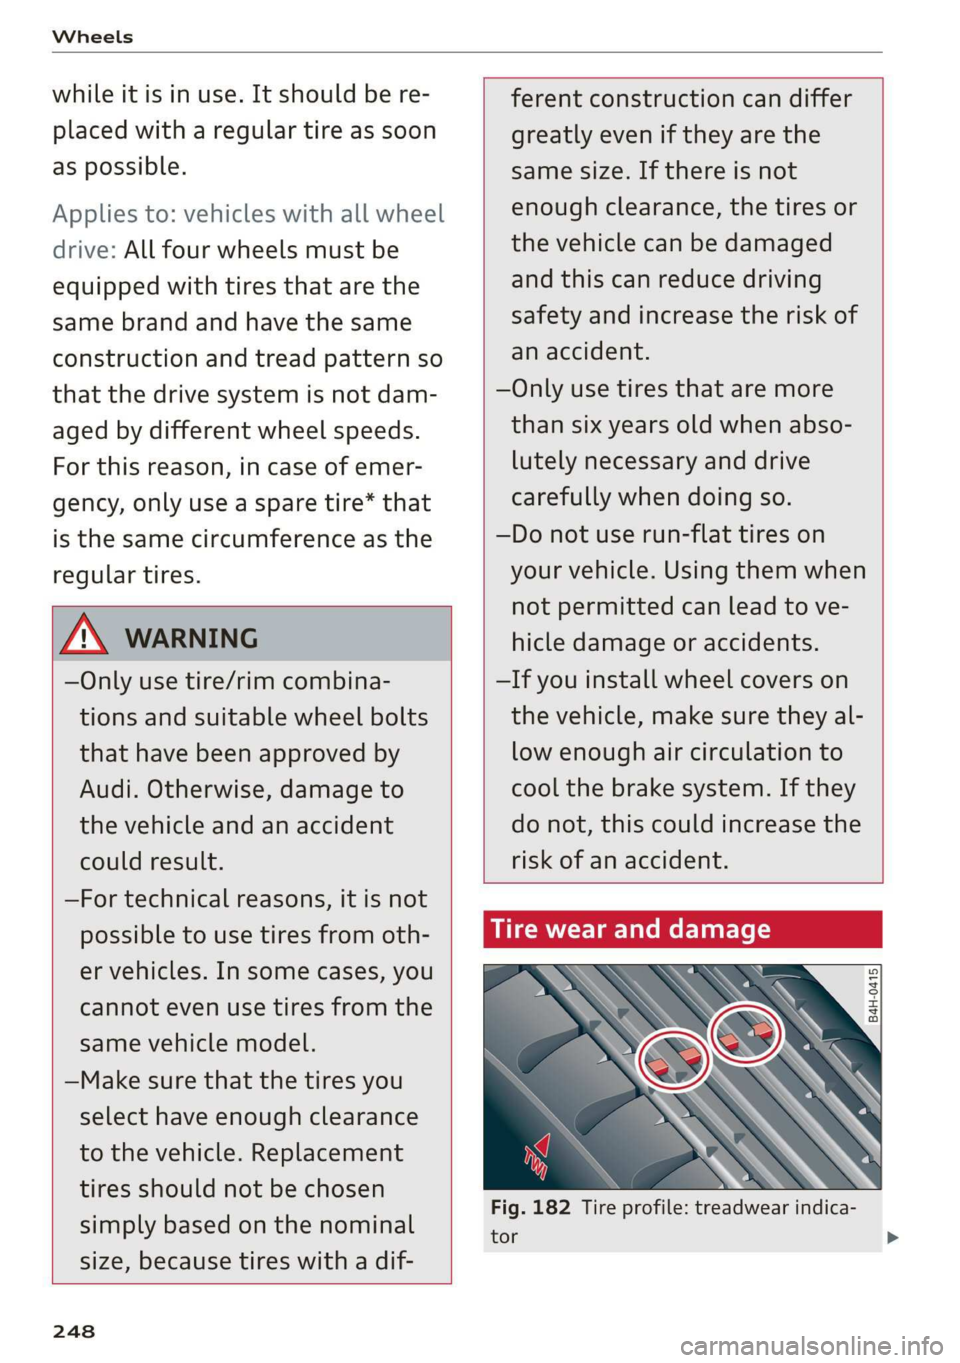
Tire wear and damage
B4H-0415
aa
Fig. 182 Tire profile: treadwear indica-
tor
Page 252 of 304
Wheels
the nearest authorized Audi deal-
er or authorized Audi Service Fa-
cility to have the vehicle inspect-
ed.
Z\ WARNING
Tread that has worn too low or
uneven tread depths on the
tires can reduce driving safety.
This can increase the risk of an
accident because it has a nega-
tive effect on handling, driving
through curves, and braking,
and because it increases the
risk of hydroplaning when driv-
ing through deep puddles.
SUT C=w yee)
BFV-0295
2)
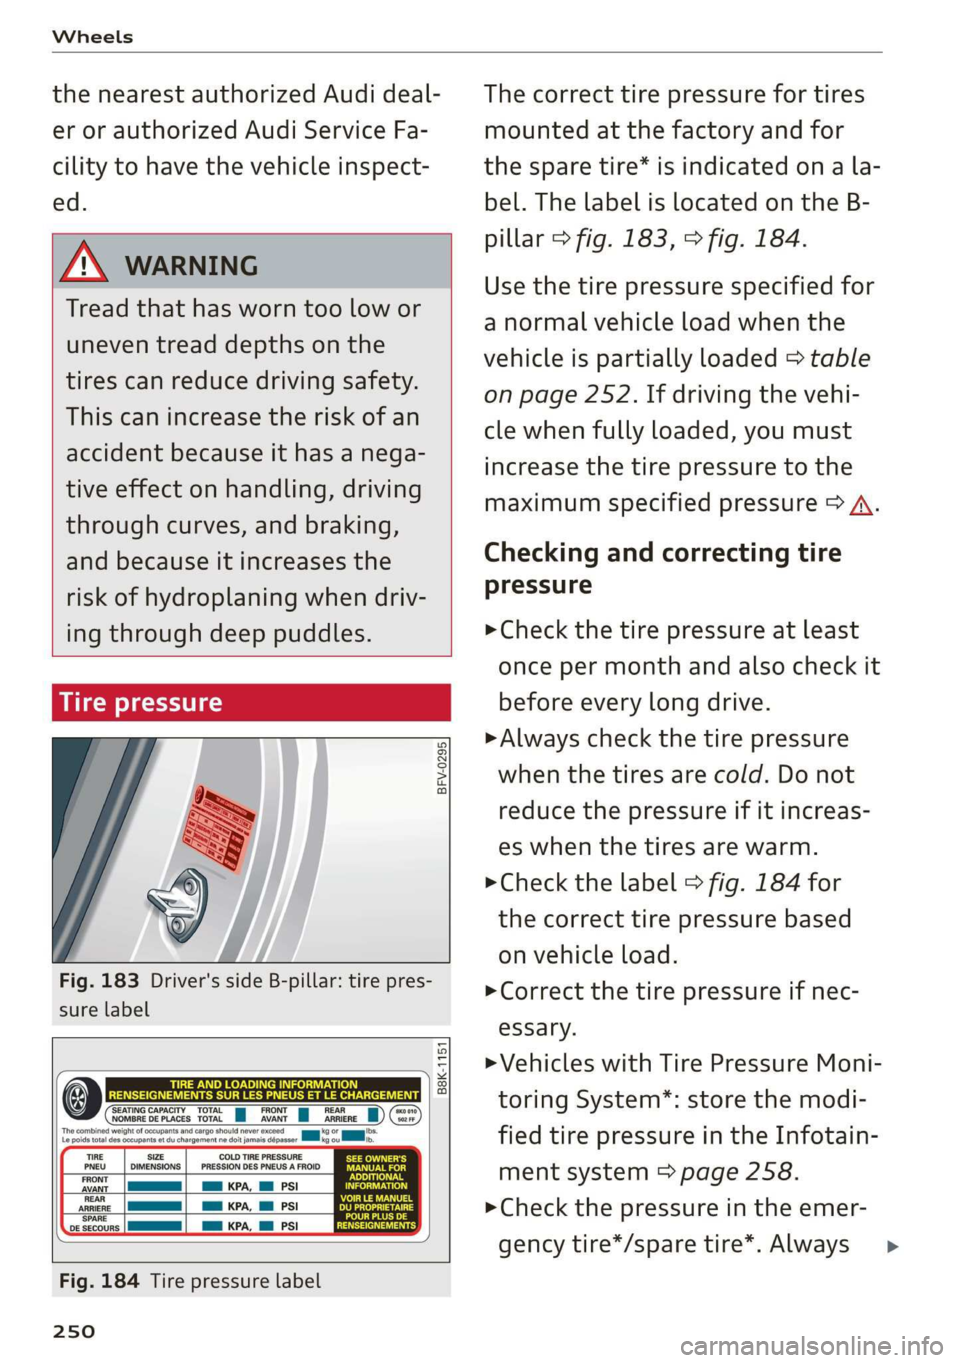
Fig. 183 Driver's side B-pillar: tire pres-
sure label
B8K-1151
‘SEATING CAPACITY TOTAL FRONT i REAR NOMBRE DE PLACES TOTAL AVANT ARRIERE
TIRE SIZE
DIMENSIONS
COLD TIRE PRESSURE
PRESSION DES PNEUS A FROID
am KPA, Ml PSI
a KPA, Ml PSI
REAR
ARRIERE
‘SPARE
a
SE
ve secours |
Fig. 184 Tire pressure label
250
The correct tire pressure for tires
mounted at the factory and for
the spare tire* is indicated on a la-
bel. The label is located on the B-
pillar > fig. 183, > fig. 184.
Use the tire pressure specified for
a normal vehicle load when the
vehicle is partially loaded > table
on page 252. If driving the vehi-
cle when fully loaded, you must
increase the tire pressure to the
maximum specified pressure > A.
Checking and correcting tire
pressure
>Check the tire pressure at least
once per month and also check it
before every long drive.
> Always check the tire pressure
when the tires are cold. Do not
reduce the pressure if it increas-
es when the tires are warm.
> Check the label > fig. 184 for
the correct tire pressure based
on vehicle load.
>Correct the tire pressure if nec-
esSary.
> Vehicles with Tire Pressure Moni-
toring System*: store the modi-
fied tire pressure in the Infotain-
ment system > page 258.
> Check the pressure in the emer-
gency tire*/spare tire*. Always >
Page 258 of 304
Wheels
— Temperature ABC
Quality grades can be found where applicable on
the tire side wall between tread shoulder and
maximum section width > page 241, fig. 181.
For example: Tread wear 200, Traction AA, Tem-
perature A.
All passenger car tires must conform to Federal
Safety Requirements in addition to these grades.
Tread wear
The tread wear grade is a comparative rating
based on the wear rate of the tire when tested
under controlled conditions on a specified gov-
ernment test course.
For example, a tire graded 150 would wear one
and one half (1 1/2) times as well on the govern-
ment course as a tire graded 100.
The relative performance of tires depends upon
the actual conditions of their use, however, and
may depart significantly from the norm due to
variations in driving habits, service practices and
differences in road characteristics and climate.
Traction
The traction grades, from highest to lowest, are
AA, A, B and C. Those grades represent the tire's
ability to stop on wet pavement as measured un-
der controlled conditions on specified govern-
ment test surfaces of asphalt and concrete. A tire
marked C may have poor traction performance
>A.
Temperature
The temperature grades are A (the highest), B,
and C, representing the tire's resistance to the
generation of heat and its ability to dissipate
heat when tested under controlled conditions on
a specified indoor laboratory test wheel.
Sustained high temperature can cause the mate-
rial of the tire to degenerate and reduce tire life,
and excessive temperature can lead to sudden
tire failure > A.
The grade C corresponds to a level of perform-
ance which all passenger car tires must meet un-
der the Federal Motor Vehicle Safety Standard
256
No. 109. Grades B and A represent higher levels
of performance on the laboratory test wheel than
the minimum required by law.
Z\ WARNING
The traction grade assigned to this tire is
based on straight-ahead braking traction
tests, and does not include acceleration, cor-
nering, hydroplaning or peak traction charac-
teristics.
ZA WARNING
The temperature grade for this tire is estab-
lished for a tire that is properly inflated and
not overloaded. Excessive speed, underinfla-
tion, or excessive loading, either separately or
in combination, can cause heat buildup and
possible tire failure.
ZA WARNING
Temperature grades apply to tires that are
properly inflated and not over or underinflat-
ed.
Tire pressure monitoring
system
(1) General notes
Each tire, including the spare (if provided),
should be checked monthly when cold and inflat-
ed to the inflation pressure recommended by the
vehicle manufacturer on the vehicle placard or
tire inflation pressure label. (If your vehicle has
tires of a different size than the size indicated on
the vehicle placard or tire inflation pressure la-
bel, you should determine the proper tire infla-
tion pressure for those tires).
As an added safety feature, your vehicle has been
equipped with a tire pressure monitoring system
(TPMS) that illuminates a low tire pressure tell-
tale when one or more of your tires is significant-
ly under-inflated. Accordingly, when the low tire
pressure telltale illuminates, you should stop and
check your tires as soon as possible, and inflate
them to the proper pressure. Driving ona signifi-
cantly under-inflated tire causes the tire to >
Page 259 of 304
8S8012721BA
Wheels
overheat and can lead to tire failure. Under-infla-
tion also reduces fuel efficiency and tire tread
life, and may affect the vehicle's handling and
stopping ability.
Please note that the TPMS is not a substitute for
proper tire maintenance, and it is the driver's re-
sponsibility to maintain correct tire pressure,
even if under-inflation has not reached the level
to trigger illumination of the TPMS low tire pres-
sure telltale.
Your vehicle has also been equipped with a TPMS
malfunction indicator to indicate when the sys-
tem is not operating properly. The TPMS mal-
function indicator is combined with the low tire
pressure telltale. When the system detects a
malfunction, the telltale will flash for approxi-
mately one minute and then remain continuously
illuminated. This sequence will continue upon
subsequent vehicle start-ups as long as the mal-
function exists.
When the malfunction indicator is illuminated,
the system may not be able to detect or signal
low tire pressure as intended. TPMS malfunctions
may occur for a variety of reasons, including the
installation of replacement or alternate tires or
wheels on the vehicle that prevent the TPMS
from functioning properly. Always check the
TPMS malfunction telltale after replacing one or
more tires or wheels on your vehicle to ensure
that the replacement or alternate tires and
wheels allow the TPMS to continue to function
properly.
If the Tire Pressure Monitoring System
indicator appears
Applies to: vehicles with Tire Pressure Monitoring System in-
dicator
The tire pressure indicator in the instrument
cluster informs you if the tire pressure is too low
or if there is a system malfunction.
Using the ABS sensors, the tire pressure monitor-
ing system compares the tire tread circumference
and vibration characteristics of the individual
tires. If the pressure changes in one or more
tires, this is indicated in the Infotainment system
display with an indicator light @ and a message.
If only one tire is affected, the location of that
tire will be indicated.
The tire pressures must be stored in the Infotain-
ment system again each time the pressures
change (switching between partial and full load
pressure) or after changing or replacing a tire on
your vehicle > page 258. The tire pressure moni-
toring system only monitors the tire pressure you
have stored. Refer to the tire pressure label for
the recommended tire pressure for your vehicle
=> page 250, fig. 184.
Tire tread circumference and vibration character-
istics can change and cause a tire pressure warn-
ing if:
— The tire pressure in one or more tires is too low
— The tire has structural damage
— The tire was replaced or the tire pressure was
changed and it was not stored > page 258
— The spare tire* is installed
Indicator lights
@® - Loss of pressure in at least one tire > A\.
Check the tires and replace or repair if necessary.
Check/correct the pressures of all four tires and
store the pressure again in the Infotainment sys-
tem > page 258.
ia (Tire Pressure Monitoring System) Tire pres-
sure: malfunction! See owner's manual - if io
appears after switching on the ignition or while
driving and then the @) indicator light in the in-
strument cluster also starts to blink for about
one minute and then stays on permanently, there
is a system malfunction. Try to store the correct
tire pressures > page 258. If the indicator light
does turn off or turns on again after a short peri-
od of time, drive to an authorized Audi dealer or
authorized Audi Service Facility immediately to
have the malfunction corrected.
ZA WARNING
— If the tire pressure indicator appears in the
display, reduce your speed immediately and
avoid any hard steering or braking maneu-
vers. Stop as soon as possible and check the
tires and their pressure.
257
Page 260 of 304
Wheels
— The driver is responsible for maintaining the
correct tire pressures. You must check the
tire pressures regularly.
— Under certain conditions (such as a sporty
driving style, winter conditions or unpaved
roads), the pressure monitor indicator may
be delayed.
— Do not use run-flat tires on your vehicle. Us-
ing them when not permitted can lead to ve-
hicle damage or accidents.
G) Tips
— The tire pressure monitoring system can al-
so stop working when there is an ESC mal-
function.
— Using snow chains may result in a system
malfunction.
— The tires with the identification “AO”
= page 247 have been matched with your
Audi tire pressure monitoring system. Using
these tires is recommended.
Storing tire pressures
Applies to: vehicles with Tire Pressure Monitoring System in-
dicator
If the tire pressure changes or a tire is replaced,
it must be confirmed in the Infotainment sys-
tem.
> Before storing the tire pressures, make sure the
tire pressures in all four tires meet the speci-
fied values and are adapted to the load
=> page 248.
> Switch the ignition on.
> Select in the Infotainment system: the
button > Vehicle > left control button > Service
& checks > Tire pressure monitoring.
G) Tips
Do not store the tire pressures if snow chains
are installed.
MENU
258
Tire pressure monitoring
system
(1) General notes
Each tire, including the spare (if provided),
should be checked monthly when cold and inflat-
ed to the inflation pressure recommended by the
vehicle manufacturer on the vehicle placard or
tire inflation pressure label. (If your vehicle has
tires of a different size than the size indicated on
the vehicle placard or tire inflation pressure la-
bel, you should determine the proper tire infla-
tion pressure for those tires).
As an added safety feature, your vehicle has been
equipped with a tire pressure monitoring system
(TPMS) that illuminates a low tire pressure tell-
tale when one or more of your tires is significant-
ly under-inflated. Accordingly, when the low tire
pressure telltale illuminates, you should stop and
check your tires as soon as possible, and inflate
them to the proper pressure. Driving on a signifi-
cantly under-inflated tire causes the tire to over-
heat and can lead to tire failure. Under-inflation
also reduces fuel efficiency and tire tread life,
and may affect the vehicle's handling and stop-
ping ability.
Please note that the TPMS is not a substitute for
proper tire maintenance, and it is the driver's re-
sponsibility to maintain correct tire pressure,
even if under-inflation has not reached the level
to trigger illumination of the TPMS low tire pres-
sure telltale.
Your vehicle has also been equipped with a TPMS
malfunction indicator to indicate when the sys-
tem is not operating properly. The TPMS mal-
function indicator is combined with the low tire
pressure telltale. When the system detects a
malfunction, the telltale will flash for approxi-
mately one minute and then remain continuously
illuminated. This sequence will continue upon
subsequent vehicle start-ups as long as the mal-
function exists.
When the malfunction indicator is illuminated,
the system may not be able to detect or signal
low
tire pressure as intended. TPMS malfunctions
may occur for a variety of reasons, including the >
Page 272 of 304
Emergency assistance
— Ifa tire pressure of 29 psi (200 kPA) cannot
reached after inflating for 6 minutes, then
the tire is too severely damaged. Do not con-
tinue driving.
— If the tire cannot be repaired with the tire
sealant, see an authorized Audi dealer or au-
thorized Audi Service Facility for assistance.
@) Tips
Do not operate the compressor for more than
six minutes continuously, or it can overheat.
Once the compressor has cooled, you can con-
tinue to use it.
fey CLL)
Applies to: vehicles with tire mobility kit
> Affix the sticker that says "max. 50 mph (max.
80 km/h)" that is provided with the tire mobili-
ty kit within the driver's field of vision.
> Stop the vehicle after driving for about 10 mi-
nutes and check the tire pressure.
> If the tire pressure is lower than 19 psi (130
kPA), then the tire is too severely damaged. Do
not continue driving.
ZA WARNING
Pay attention to the following after repairing
the tire:
— Do not drive faster than 50 mph (80 km/h).
— Avoid hard acceleration or braking and driv-
ing fast around curves.
— The vehicle may become more difficult to
control.
— If the tire is too severely damaged, see an
authorized Audi dealer or authorized Audi
Service Facility for assistance.
@ For the sake of the environment
You can give the used tire sealant bottle to an
authorized Audi dealer or authorized Audi
Service Facility for disposal.
@ Tips
Remember to obtain a new bottle of sealant
from an authorized Audi dealer or authorized
Audi Service Facility after repairing a tire.
270
Replacing wheels
You must complete the preparation before
changing a tire.
> Read and follow the important safety precau-
tions > page 268, General information.
> Set the parking brake.
> Select the "P" selector lever position.
> Lay out the vehicle tool kit > page 268 and the
spare tire > page 274.
ZA WARNING
When using the vehicle jack* on a road with a
steep hill or when offroad, you must take ex-
tra precautions to prevent the vehicle from
rolling. Use suitable objects to block the front
and back of the wheel that is diagonal from
the wheel with the flat tire.
Removing the cover
B4L-1521
Fig. 189 Wheel: wheel hub cover
V6
Es
al
Fig. 190 Wheel: wheel bolts with caps
B4L-1337
@
Wheel hub covers*
> Insert the hook (from the vehicle tool kit) into
the hole on the wheel hub cover > fig. 189. >