height BMW 128I 2013 Owners Manual
[x] Cancel search | Manufacturer: BMW, Model Year: 2013, Model line: 128I, Model: BMW 128I 2013Pages: 284, PDF Size: 6.93 MB
Page 40 of 284
39
Opening and closing
Controls
>
When there has been an interruption of
power supply from the battery
Depending on the market -specific version, the
alarm system briefly signals unauthorized entry
attempts by:
> An acoustic alarm
> Switching on the hazard warning flashers
Arming and disarming
General information
When you lock or unlock the vehicle, either with
the remote control or at the door lock, the alarm
system is armed or disarmed at the same time.
Door lock with armed alarm system
In some national-market versions, unlocking via
the door lock tr iggers the alarm.
To switch off this alarm, unlock the vehicle with
the remote control or sw itch on the ignition.
Trunk lid with the alarm system armed
The trunk lid can be opened via the remote
control even when the alarm system is armed.
Press the button on th e remote control for
approx. 1 second.
The trunk lid is locked and monitored again as
soon as it is closed.
Panic mode
You can trigger the alarm system if you find
yourself in a dangerous situation.
Press the button for at least three seconds.
To switch off the alarm: press any button.
Switching off an alarm
> Unlock the car with the remote control, refer
to page 34, or
> insert the remote contro l all the way into the
ignition lock.
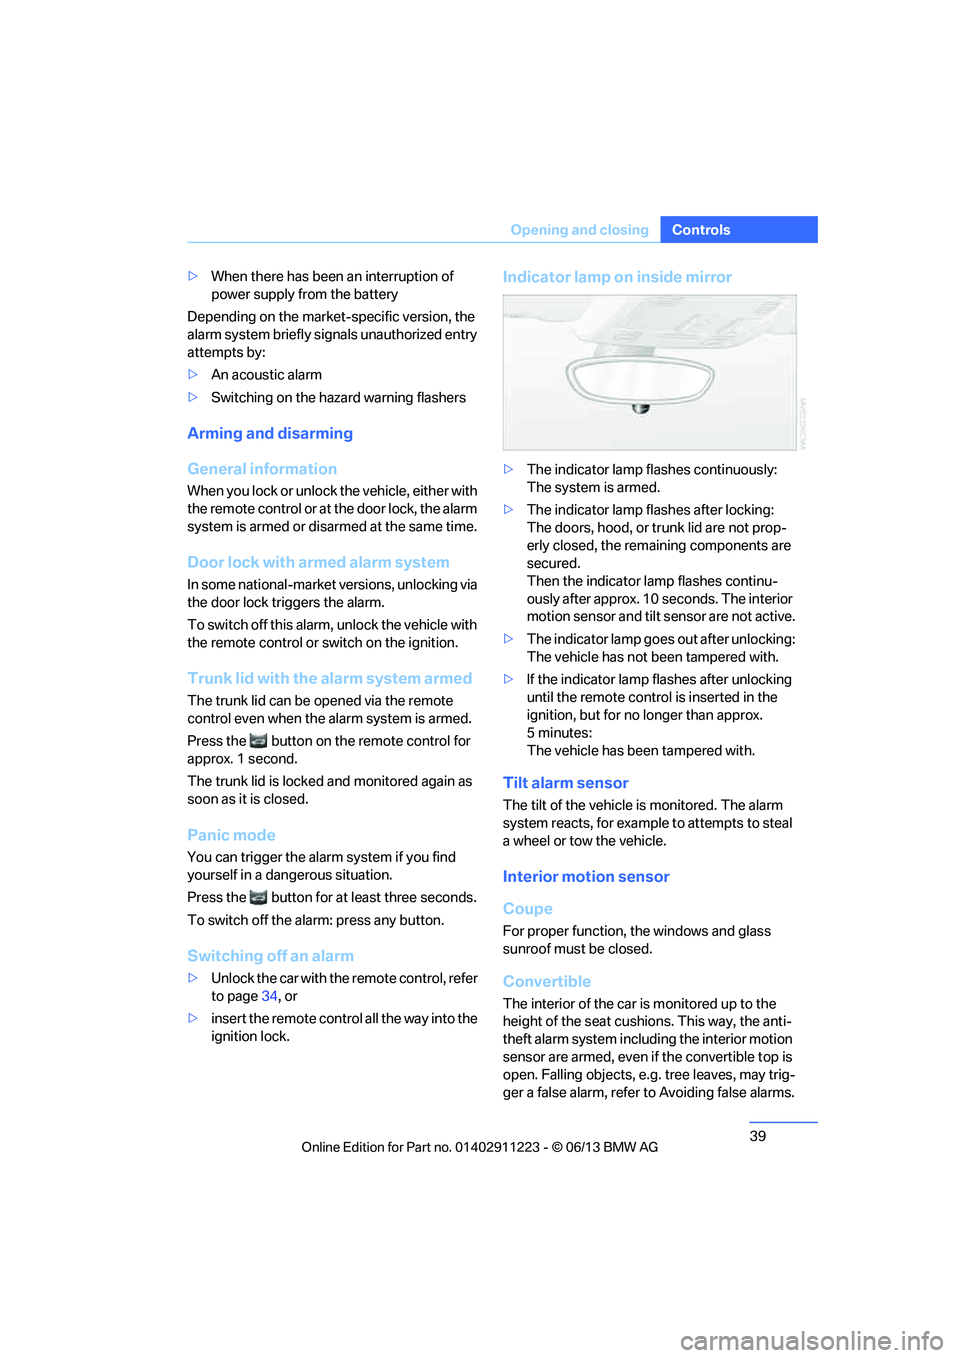
Indicator lamp on inside mirror
> The indicator lamp fl ashes continuously:
The system is armed.
> The indicator lamp fl ashes after locking:
The doors, hood, or trunk lid are not prop-
erly closed, the remaining components are
secured.
Then the indicator lamp flashes continu-
ously after approx. 10 seconds. The interior
motion sensor and tilt sensor are not active.
> The indicator lamp goes out after unlocking:
The vehicle has not been tampered with.
> If the indicator lamp flashes after unlocking
until the remote control is inserted in the
ignition, but for no longer than approx.
5minutes:
The vehicle has been tampered with.
Tilt alarm sensor
The tilt of the vehicle is monitored. The alarm
system reacts, for example to attempts to steal
a wheel or tow the vehicle.
Interior motion sensor
Coupe
For proper function, the windows and glass
sunroof must be closed.
Convertible
The interior of the car is monitored up to the
height of the seat cushio ns. This way, the anti-
theft alarm system including the interior motion
sensor are armed, even if the convertible top is
open. Falling objects, e.g. tree leaves, may trig-
ger a false alarm, refer to Avoiding false alarms.
00320051004F004C00510048000300280047004C0057004C005200510003
Page 51 of 284
50
ControlsAdjustments
injure your abdomen in the event of a frontal
collision. Avoid wearing bulky clothing and
regularly pull the belt in the upper-body area
taut; otherwise, its rest raining effect could be
impaired. <
Safety belts, refer to page 54.
Seats
Note before adjusting
Never attempt to adjust your seat while
the vehicle is moving. The seat could
respond with unexpected movement, and the
ensuing loss of vehicle co ntrol could lead to an
accident.
On the front passenger seat as well, do not
incline the backrest too fa r to the rear while the
vehicle is being driven; otherwise, there is a
danger in the event of an accident of sliding
under the safety belt, eliminating the protection
normally provided by the belt.<
Comply with the instructions on head restraint
height on page 52, and on damaged safety
belts on page 55.
Manual adjustment
Observe the adjustment instructions
above to ensure the best possible
personal protection. <
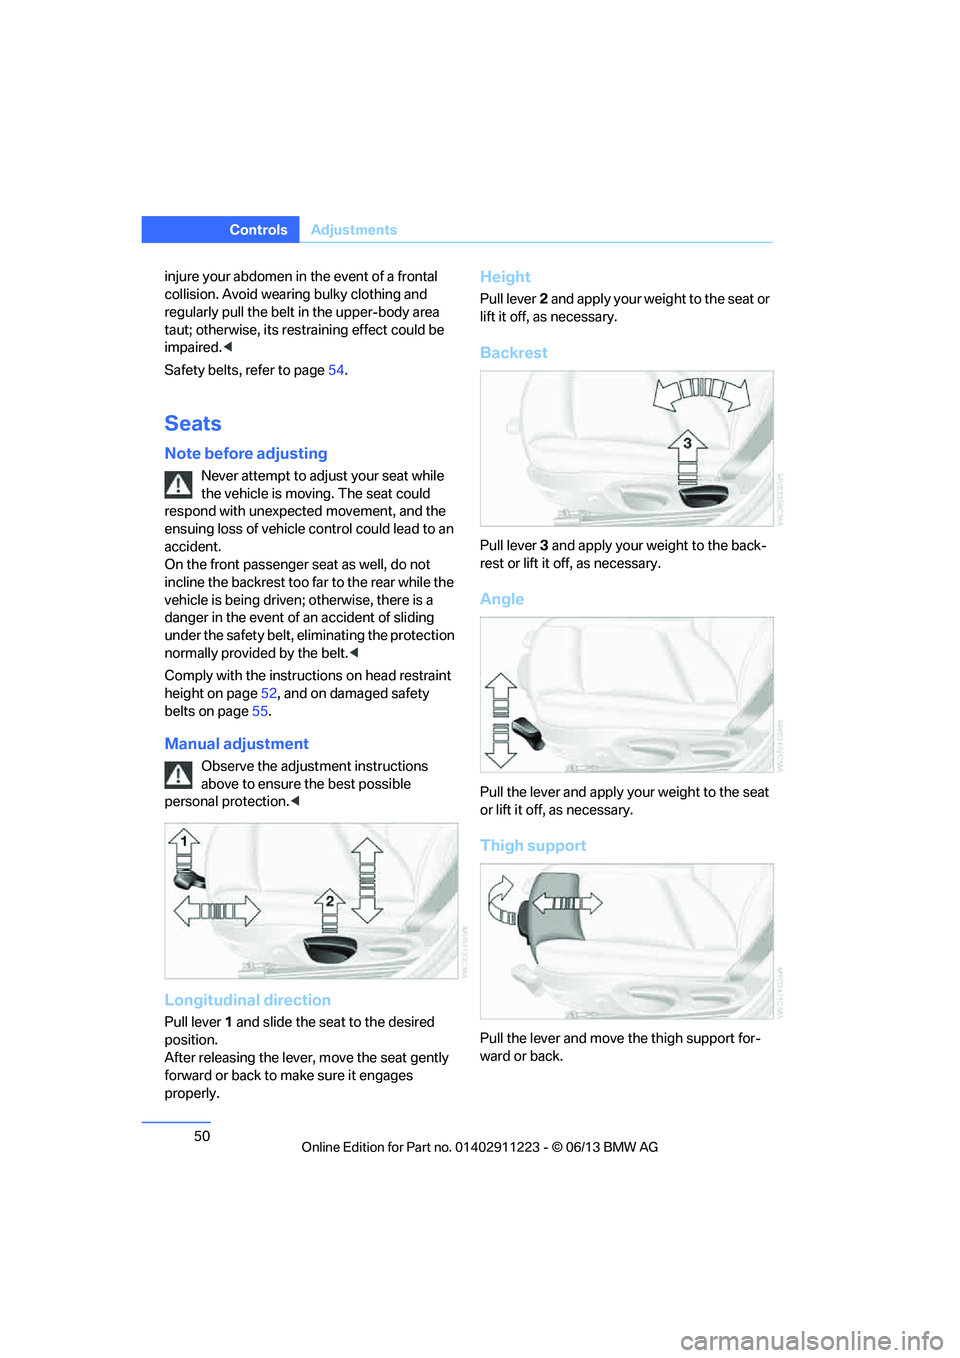
Longitudinal direction
Pull lever1 and slide the seat to the desired
position.
After releasing the lever, move the seat gently
forward or back to ma ke sure it engages
properly.
Height
Pull lever 2 and apply your weight to the seat or
lift it off, as necessary.
Backrest
Pull lever 3 and apply your we ight to the back-
rest or lift it off, as necessary.
Angle
Pull the lever and apply yo ur weight to the seat
or lift it off, as necessary.
Thigh support
Pull the lever and move the thigh support for-
ward or back.
00320051004F004C00510048000300280047004C0057004C005200510003
Page 52 of 284
51
Adjustments
Controls
Electrical adjustment
Observe the adjustment instructions
above to ensure the best possible per-
sonal protection. <
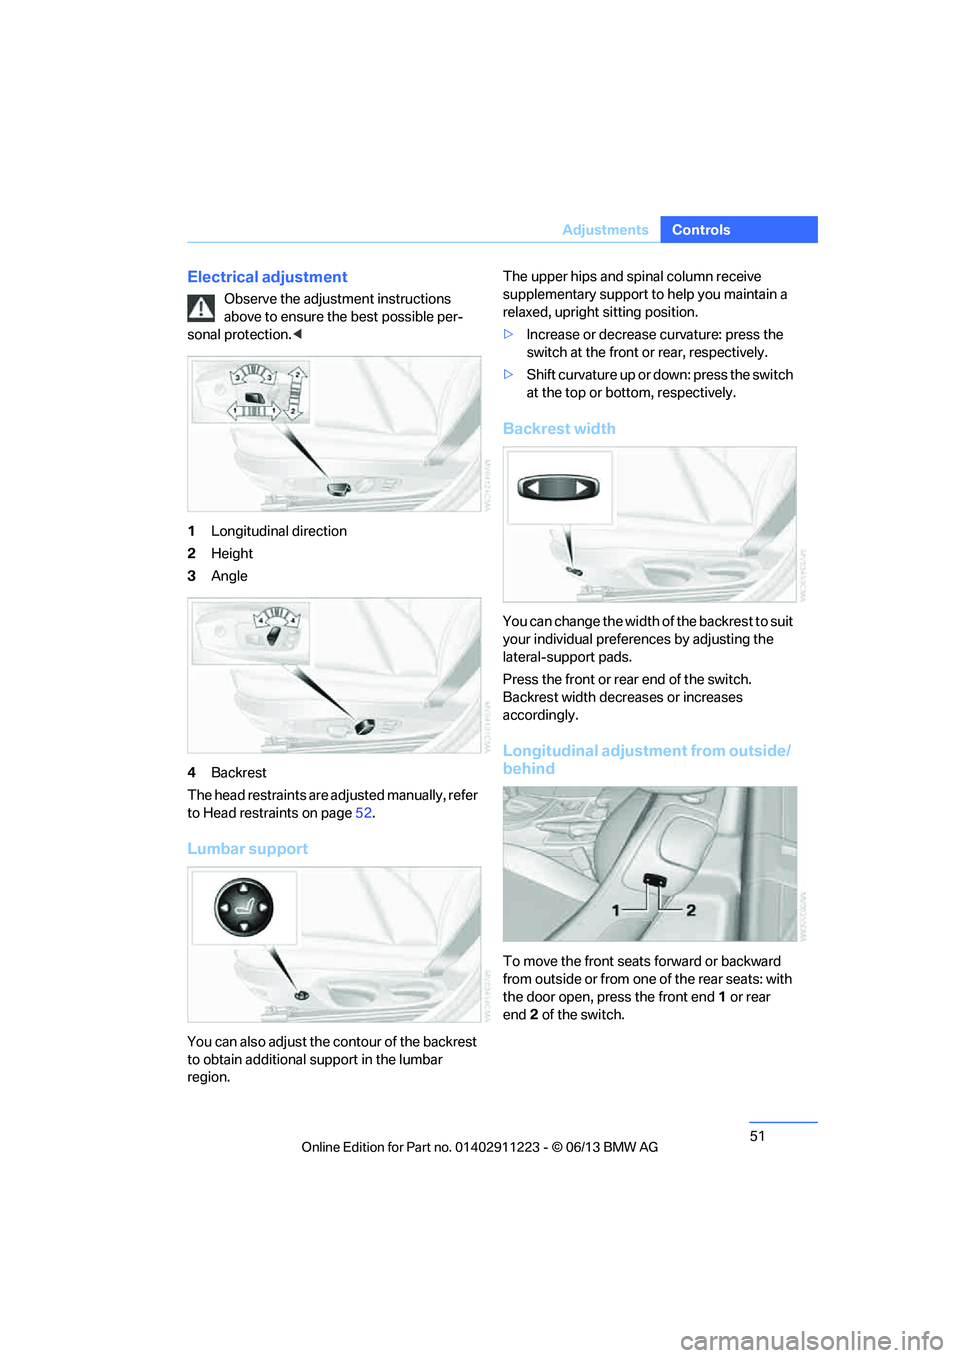
1 Longitudinal direction
2 Height
3 Angle
4 Backrest
The head restraints are adjusted manually, refer
to Head restraints on page 52.
Lumbar support
You can also adjust the contour of the backrest
to obtain additional support in the lumbar
region. The upper hips and spinal column receive
supplementary support to help you maintain a
relaxed, upright sitting position.
>
Increase or decrease curvature: press the
switch at the front or rear, respectively.
> Shift curvature up or down: press the switch
at the top or bottom, respectively.
Backrest width
You can change the width of the backrest to suit
your individual prefer ences by adjusting the
lateral-support pads.
Press the front or rear end of the switch.
Backrest width decreases or increases
accordingly.
Longitudinal adjustment from outside/
behind
To move the front seats forward or backward
from outside or from one of the rear seats: with
the door open, press the front end 1 or rear
end 2 of the switch.
00320051004F004C00510048000300280047004C0057004C005200510003
Page 53 of 284
52
ControlsAdjustments
Head restraints
Correctly adjusted head restraint
A correctly adjusted head restraint reduces the
risk of neck injury in the event of an accident.
Correctly adjust the head restraints of all
occupied seats; otherwise, there is an
increased risk of injury in an accident. <
Height
Adjust the head restraint so that its center is
approximately at ear level.
Distance
Adjust the distance so that the head restraint is
as close as possible to the back of the head.
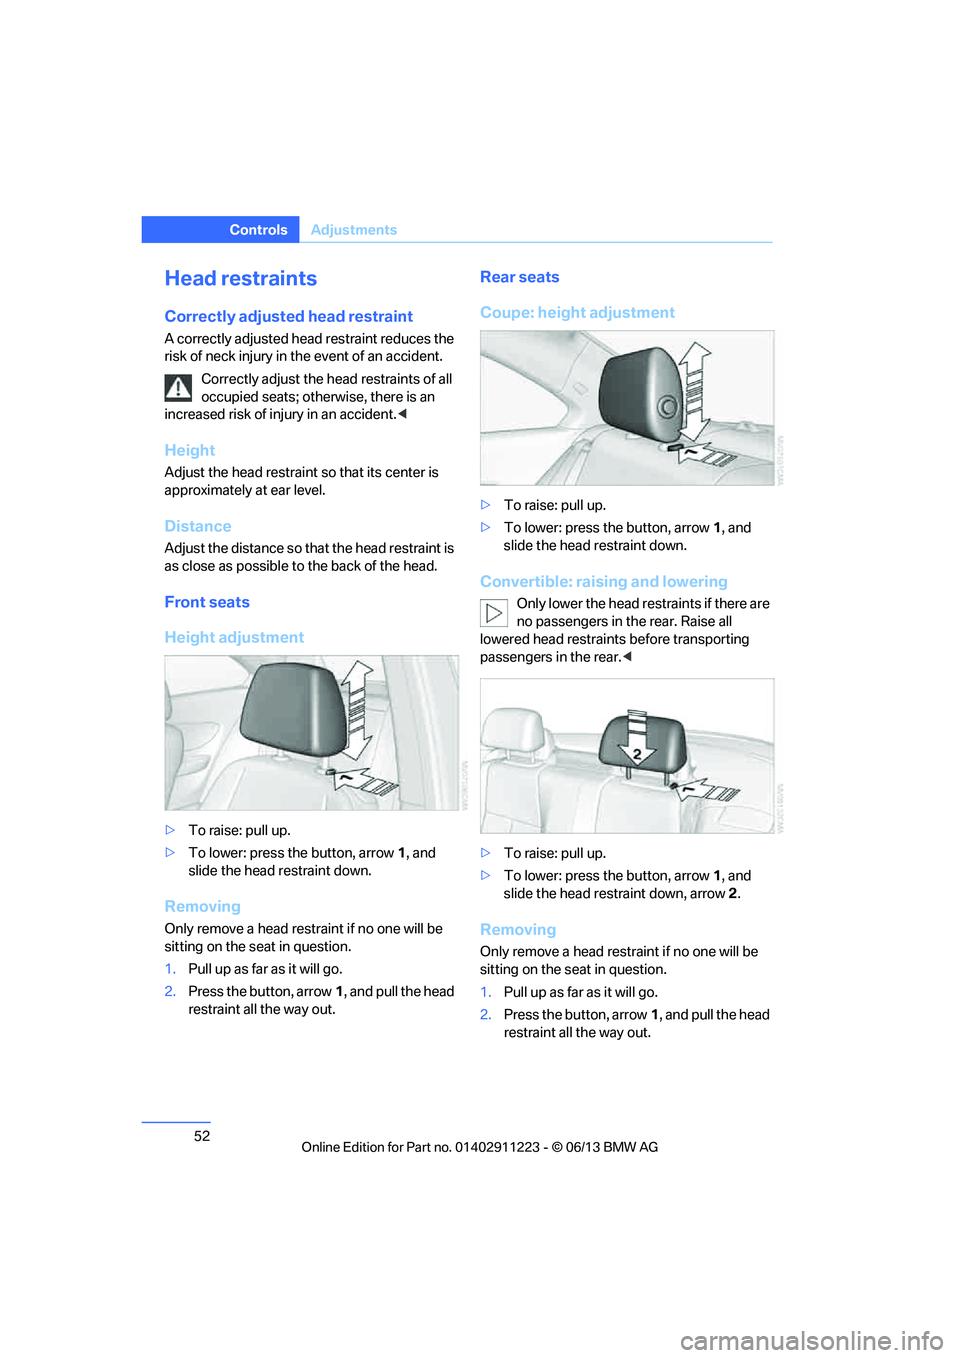
Front seats
Height adjustment
>To raise: pull up.
> To lower: press the button, arrow 1, and
slide the head restraint down.
Removing
Only remove a head rest raint if no one will be
sitting on the seat in question.
1. Pull up as far as it will go.
2. Press the button, arrow 1, and pull the head
restraint all the way out.
Rear seats
Coupe: height adjustment
> To raise: pull up.
> To lower: press the button, arrow 1, and
slide the head restraint down.
Convertible: raising and lowering
Only lower the head re straints if there are
no passengers in the rear. Raise all
lowered head restraints before transporting
passengers in the rear. <
> To raise: pull up.
> To lower: press the button, arrow 1, and
slide the head restraint down, arrow 2.
Removing
Only remove a head rest raint if no one will be
sitting on the seat in question.
1. Pull up as far as it will go.
2. Press the button, arrow 1, and pull the head
restraint all the way out.
00320051004F004C00510048000300280047004C0057004C005200510003
Page 58 of 284
57
Adjustments
Controls
Steering wheel
Adjustments
Do not adjust the steering wheel position
while the car is in motion; otherwise, there
is a risk of an accident due to unexpected
movement. <
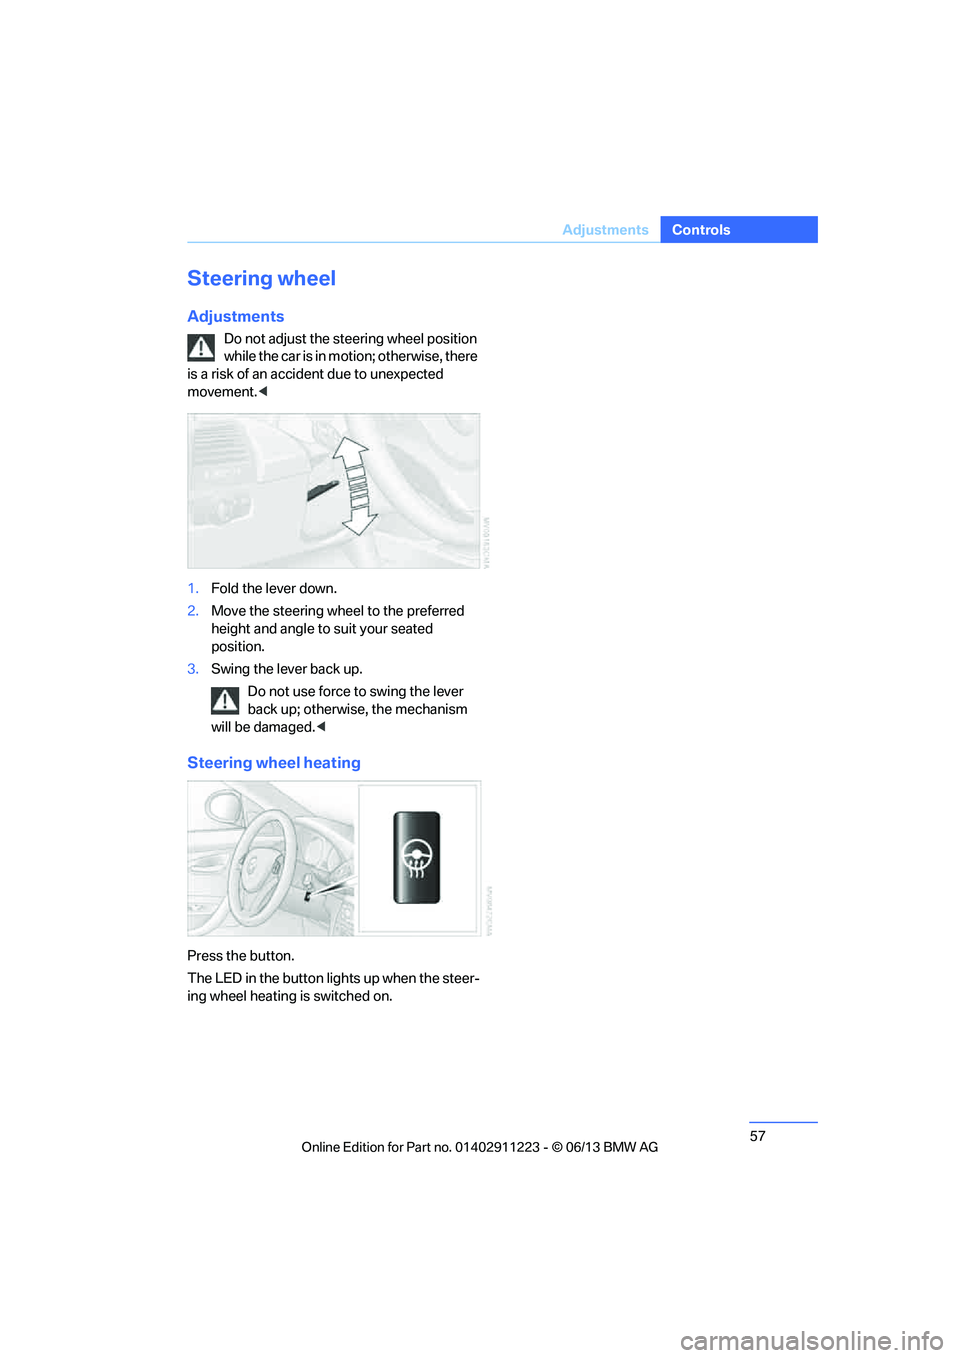
1. Fold the lever down.
2. Move the steering wheel to the preferred
height and angle to suit your seated
position.
3. Swing the lever back up.
Do not use force to swing the lever
back up; otherwise, the mechanism
will be damaged. <
Steering wheel heating
Press the button.
The LED in the button lights up when the steer-
ing wheel heating is switched on.
00320051004F004C00510048000300280047004C0057004C005200510003
Page 234 of 284
233
Engine compartment
Mobility
Releasing
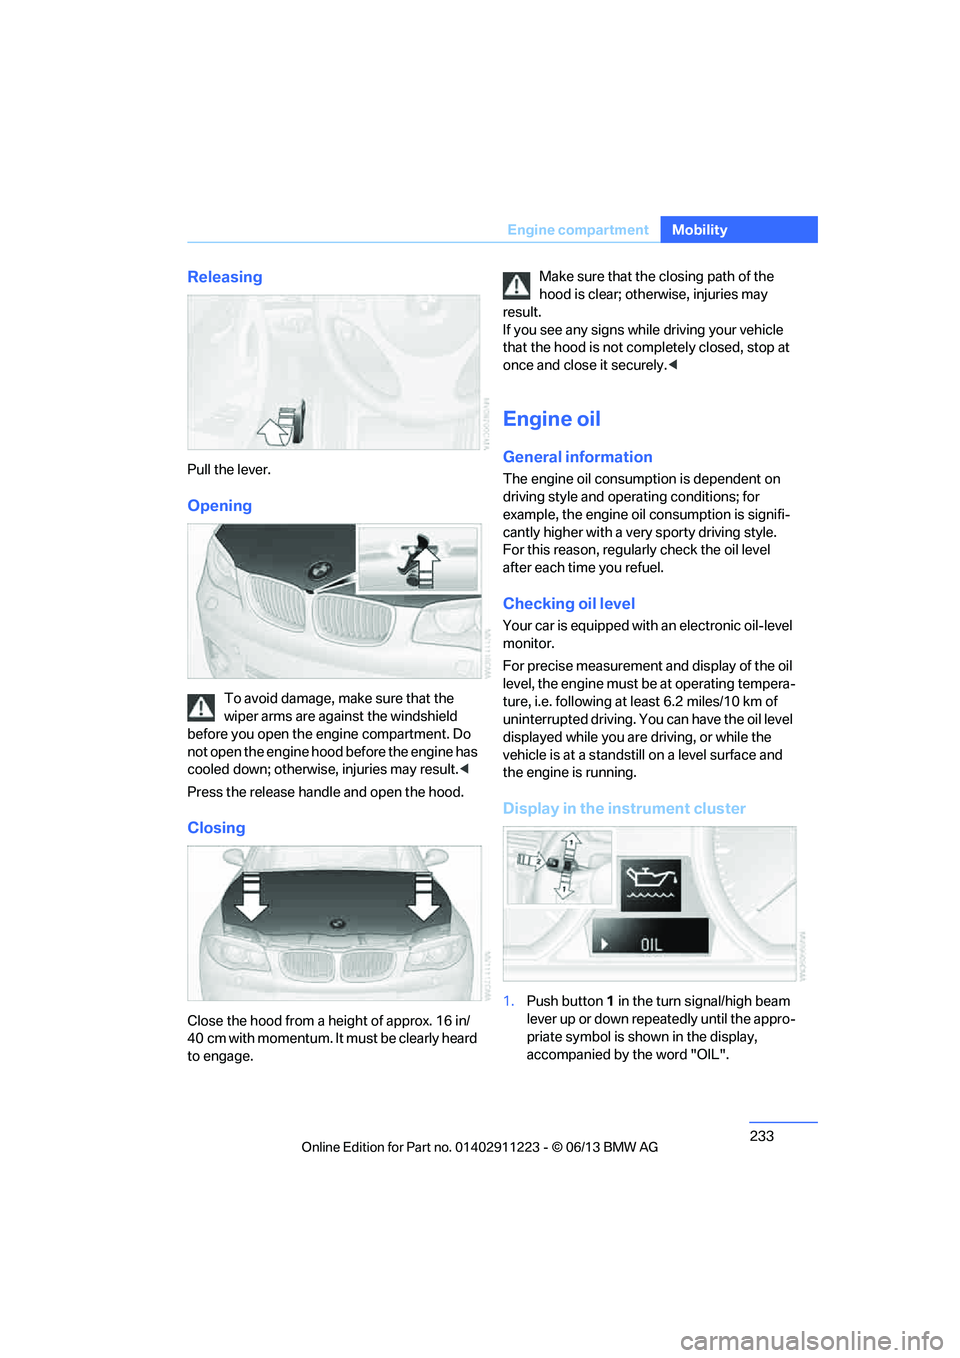
Pull the lever.
Opening
To avoid damage, make sure that the
wiper arms are against the windshield
before you open the engine compartment. Do
not open the engine hood before the engine has
cooled down; otherwise, injuries may result. <
Press the release handle and open the hood.
Closing
Close the hood from a height of approx. 16 in/
40 cm with momentum. It must be clearly heard
to engage. Make sure that the
closing path of the
hood is clear; otherwise, injuries may
result.
If you see any signs while driving your vehicle
that the hood is not comp letely closed, stop at
once and close it securely. <
Engine oil
General information
The engine oil consumption is dependent on
driving style and operating conditions; for
example, the engine oil consumption is signifi-
cantly higher with a very sporty driving style.
For this reason, regularly check the oil level
after each time you refuel.
Checking oil level
Your car is equipped with an electronic oil-level
monitor.
For precise measurement and display of the oil
level, the engine must be at operating tempera-
ture, i.e. following at least 6.2 miles/10 km of
uninterrupted driving. Yo u can have the oil level
displayed while you are driving, or while the
vehicle is at a standstill on a level surface and
the engine is running.
Display in the instrument cluster
1. Push button 1 in the turn signal/high beam
lever up or down repeatedly until the appro-
priate symbol is shown in the display,
accompanied by the word "OIL".
00320051004F004C00510048000300280047004C0057004C005200510003
Page 240 of 284
239
Care
Mobility
Care
Vehicle equipment
In this chapter, all production, country, and
optional equipment that is offered in the model
range is described. For this reason, descrip-
tions will be given of some equipment that may
not be available in a vehi
cle, for example due to
the special options or national-market version
selected. This also app lies to safety related
functions and systems.
Washing the vehicle
Notes
When using steam cleaners or high-pres-
sure cleaning jets, make sure to maintain
a sufficient distance and stay below a maximum
temperature of 140 7/60 6.
Too close a distance, too high a pressure, or too
high a temperature may cause damage or
preliminary damage that can then lead to long-
term damage.
Follow the operating inst ructions for the steam
jet or high-pressure washer. <
When using high-pressure washers, do
not spray the sensors, e.g. of the Park
Distance Control, for an extended period and
maintain a distance of at least 1 ft/30 cm from
them. <
Regularly remove foreign objects, e.g. leaves, in
the vicinity of the windsh ield when the hood is
open.
Wash the vehicle more frequently, particularly
in winter.
Heavy soiling and road salt can lead to vehicle
damage.
Automatic car washes
Notes
In car washes with high pressures and
nozzle positions, wate r may drip into the
vehicle around the windows. <
Please note the following:
> Give preference to car washes that use
cloth or soft brushes in order to avoid paint
damage.
> Wheels and tires must not be damaged by
transport devices.
> Fold in exterior mirror, refer to page 55; oth-
erwise, they can be damaged due to the
width of the vehicle.
> Deactivate the rain sensor, refer to page 72,
to prevent undesired wiper operation.
> In the convertible, do not treat the top with
wax. Ensure that a program is available that
does not apply wax or is designed specifi-
cally for Convertibles.
> Move rear wiper into its wiper park position,
deactivate it, and protect it from damage.
Ask the car wash operator about suitable
protective measures.
> Remove additional add-on parts, e.g. spoil-
ers or phone antennas, if they could be
damaged.
> Unscrew the rod antenna.
> Leave the remote cont rol in the ignition
lock.
Avoid car washes with guide rail heights
over 4 in/10 cm; otherwise, there is the
danger of damaging chassis parts. <
00320051004F004C00510048000300280047004C0057004C005200510003
Page 259 of 284
258
ReferenceTechnical data
Technical data
Vehicle equipment
In this chapter, all pr oduction, country, and
optional equipment that is offered in the model
range is described. For this reason, descrip- tions will be given of some equipment that may
not be available in a vehi
cle, for example due to
the special options or national-market version
selected. This also app lies to safety related
functions and systems.
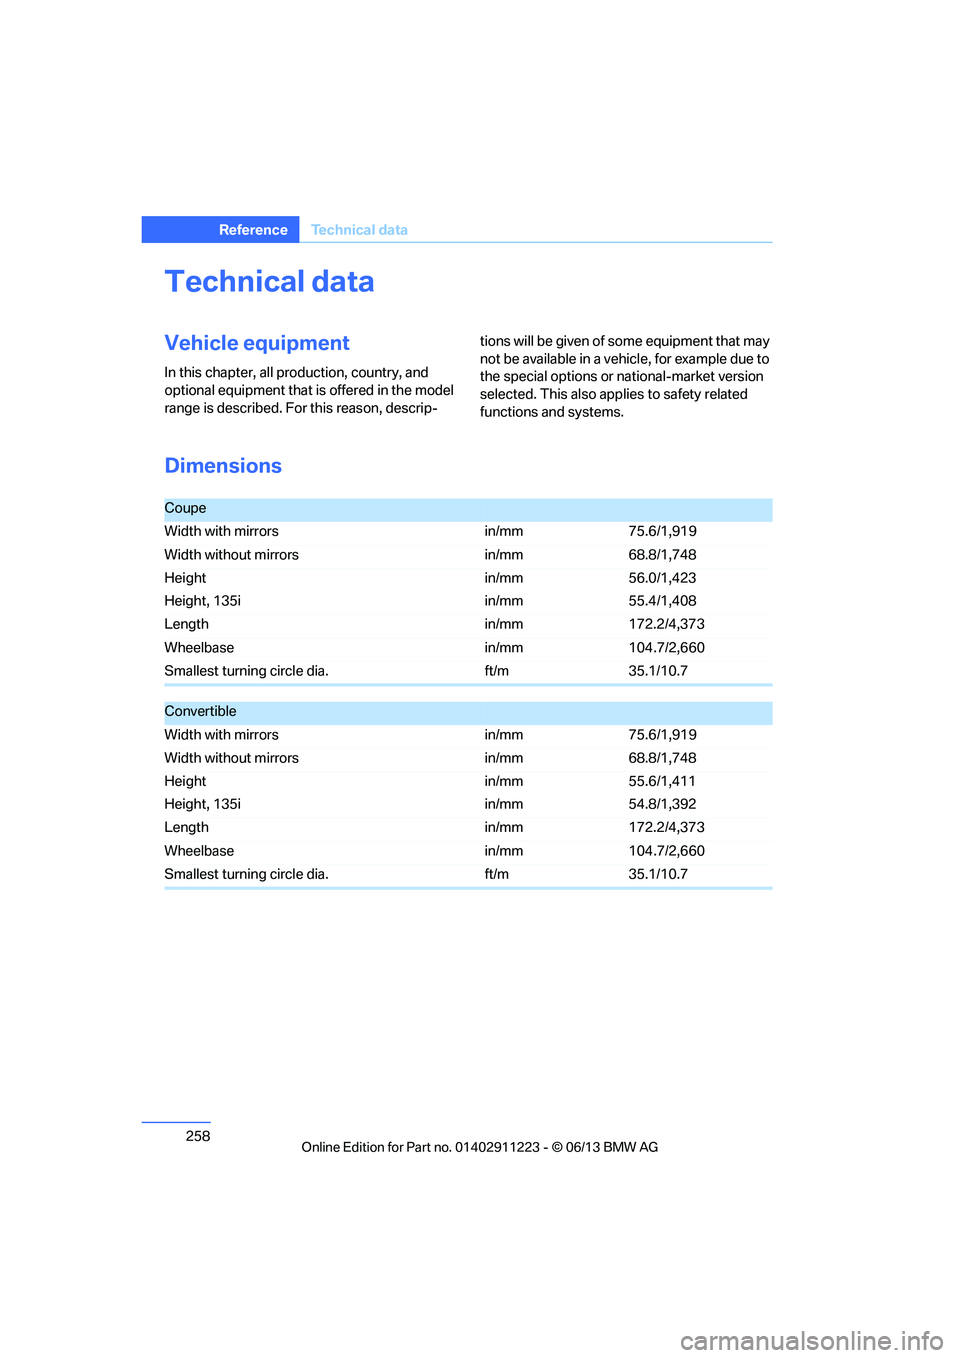
Dimensions
Coupe
Width with mirrors in/mm75.6/1,919
Width without mirrors in/mm68.8/1,748
Height
Height, 135i in/mm
in/mm56.0/1,423
55.4/1,408
Length in/mm172.2/4,373
Wheelbase in/mm104.7/2,660
Smallest turning circle dia. ft/m35.1/10.7
Convertible
Width with mirrors in/mm75.6/1,919
Width without mirrors in/mm68.8/1,748
Height
Height, 135i in/mm
in/mm55.6/1,411
54.8/1,392
Length in/mm172.2/4,373
Wheelbase in/mm104.7/2,660
Smallest turning circle dia. ft/m35.1/10.7
00320051004F004C00510048000300280047004C0057004C005200510003
Page 275 of 284
274
ReferenceEverything from A to Z
Headlamp control,
automatic 100
Headlamp cover 244
Headlamp flasher 71
– indicator lamp 15
Headlamps
– replacing bulbs 244
Head Light, refer to Adaptive
Light Control 101
Head restraints 52
Heated
– seats 54
– steering wheel 57
Heated mirrors 56
Heating
– mirrors 56
– seats 54
– steering wheel 57
Heating, rear window 109
Heating and ventilation 106
Heavy loads, refer to Stowing cargo 128
Height, refer to Dimensions 258
Height adjustment
– steering wheel 57
High-beam Assistant 102
High beams 102
– indicator lamp 15
– replacing bulbs 244
High beams and low beams,
automatic, refer to High-
beam Assistant 102
High-pressure washer 239
High water, refer to Driving through water 126
Highways, refer to Route
criteria 143
Hills 127
Holders for cups 116
Hood 232
Hot exhaust system 126
Hydraulic brake assist, refer to
Dynamic Brake Control 89
Hydroplaning 126I
IBOC, refer to HD radio 159
Ice warning, refer to Outside temperature warning 75
Identification marks
– tire coding 228
iDrive 20
– adjusting brightness 87
– changing date and time 83
– changing language 87
– menu guidance 21
– operating principle 20
– status information 23
Ignition 62
– switched off 62
– switched on 62
Ignition key, refer to Integrated key/remote
control 32
Ignition key position 1, refer to Radio readiness 61
Ignition key position 2, refer to Ignition on 62
Ignition lock 61
Incoming call 193
Indicator and warning lamps 15
– tire pressure monitor TPM 94
Individual settings, refer to
Personal Profile 32
Inflation pressure monitoring, refer to Tire Pressure
Monitor TPM 92
Initializing
– compass, refer to
Calibrating 114
– radio, refer to Storing stations 158
– refer to Setting the time and date 83
Initializing, Flat Tire Monitor
FTM 91 Instructions for navigation
system, refer to Voice
instructions 145
Instrument cluster 14
Instrument combination, refer
to Instrument cluster 14
Instrument lighting 104
Integrated key 32
Integrated universal remote control 111
Interactive map 139
Interior lamps 104
– remote control 35
Interior motion sensor 39
Interior rearview mirror 56
– automatic dimming
feature 56
– compass 113
Intermittent mode of the
wipers 72
Intersection, entering,
navigation 135
J
Jacking points
248
Jets, refer to Air vents 106
Jets, refer to Window washer
nozzles 72
Joystick, refer to iDrive 20
Jumpering, refer to Jump
starting 251
Jump starting 251
K
Key, refer to Integrated key/
remote control 32
Keyless go, refer to Comfort Access 40
Keyless opening and closing, refer to Comfort Access 40
Key Memory, refer to Personal
Profile 32
00320051004F004C00510048000300280047004C0057004C005200510003
Page 279 of 284
278
ReferenceEverything from A to Z
Retreaded tires 230
Reverse
– CD player 168
Reverse gear 67
– automatic transmission with
Steptronic 65
– manual transmission 64
Road map 145
Roadside Assistance 213,251
Roadside parking lamps 102
– replacing bulbs 245
Roadworthiness test, refer to Service requirements 80
Rollover protection system, Convertible 99
– resetting 99
Roof load capacity 259
Roof-mounted luggage
rack 129
Rope, refer to Tow-starting, towing away 254
Rotary/pushbutton control, refer to Controller 20
Route 143,144
– bypassing sections 144
– changing 143,144
– changing criteria 143
– displaying streets or towns/ cities 144
– map view 145
– selecting 143
Route instructions, refer to Destination guidance
through voice
instructions 145
Route map, refer to Map
view 145
Route section, changing 144
Route selection 143
RSC Runflat System Component, refer to
Run-flat tires 231
Runflat System Component RSC, refer to Run-flat
tires 231 Run-flat tires
231
– flat tire 92
– inflation pressure 223
– new tires 230
– remaining driving distance,
refer to Indication of a flat
tire 92
– tire replacement 230
– winter tires 231
Runflat tyres, refer to Run-flat tires 231
S
Safety-belt height
adjustment 55
Safety belts 54
– damage 55
– indicator lamp 55
– reminder 55
– sitting safely 49
Safety systems
– airbags 97
– antilock brake system ABS 89
– dynamic stability control DSC 89
– rollover protection system,
Convertible 99
– safety belts 54
Safety tires, re fer to Run-flat
tires 231
Satellite radio 161
– activating or deactivating
channels 161
– favorites 163
– selecting channels 162
– storing channels 162
– time shift 163
– traffic jump 165
Saving fuel 124
Screen, refer to iDrive 20
Screw thread for tow
fitting 253
SDARS, refer to satellite radio 161 Seat and mirror memory
54
Seat belt reminder, refer to
"Fasten safety belts"
reminder 55
Seats 50
– heating 54
– sitting safely 49
Securing cargo 119,120
Selecting a station
– radio 157
Selecting new scale for
navigation 146
Selector lever, automatic transmission with
Steptronic 64
Selector lever positions 67
Service, refer to Roadside Assistance 251
Service car, refer to Roadside
Assistance 251
Service data in remote control 237
Service Interval Display, refer to Condition Based Service
CBS 237
Service Request 215
Service requirements 80
Service status 216
Settings
– clock,
12h/24h format 83
– date format 84
– DVD 169
– language 87
Settings for the map view 146
Setting times, refer to Preselecting switch-on
times 110
Setting tone during audio operation, refer to Tone
control 155
Shifting 68
– 7-gear Sport automatic transmission with double
clutch 68
00320051004F004C00510048000300280047004C0057004C005200510003