navigation BMW 135I COUPE 2011 E82 Workshop Manual
[x] Cancel search | Manufacturer: BMW, Model Year: 2011, Model line: 135I COUPE, Model: BMW 135I COUPE 2011 E82Pages: 256, PDF Size: 8.41 MB
Page 103 of 256
Controls
101Reference
At a glance
Driving tips
Communications
Navigation
Entertainment
Mobility
Practical interior accessories
Integrated universal remote
control*
The concept
The integrated universal remote control can
replace as many as three hand-held transmit-
ters for various remote-controlled devices,
such as garage doors and gates or lighting sys-
tems. The integrated universal remote control
registers and stores signals from the original
hand-held transmitters.
The signal of an original hand-held transmitter
can be programmed on one of the three mem-
ory buttons1. After this, the programmed
memory button1 will operate the system in
question. The LED2 flashes to confirm trans-
mission of the signal.
Should you sell your vehicle one day, be sure to
delete the stored programs beforehand for your
safety, refer to page102.
To prevent possible damage or injury,
before programming or using the inte-
grated universal remote control, always inspect
the immediate area to make certain that no peo-
ple, animals or objects are within the pivoting or
travel range of the device being operated. Com-
ply also with the safety instructions supplied
with the original hand-held transmitter.<
Checking compatibility
If this symbol appears on the package
or in the instructions supplied with the
original hand-held transmitter, you can
assume that the radio remote control device will
be compatible with the integrated universal
remote control.
For additional information, please contact your
BMW center or call: 1-800-355-3515.
You can also obtain information on the Internet
at:
www.bmwusa.com or
www.homelink.com. HomeLink is a registered trademark of Johnson
Controls, Inc.
Programming
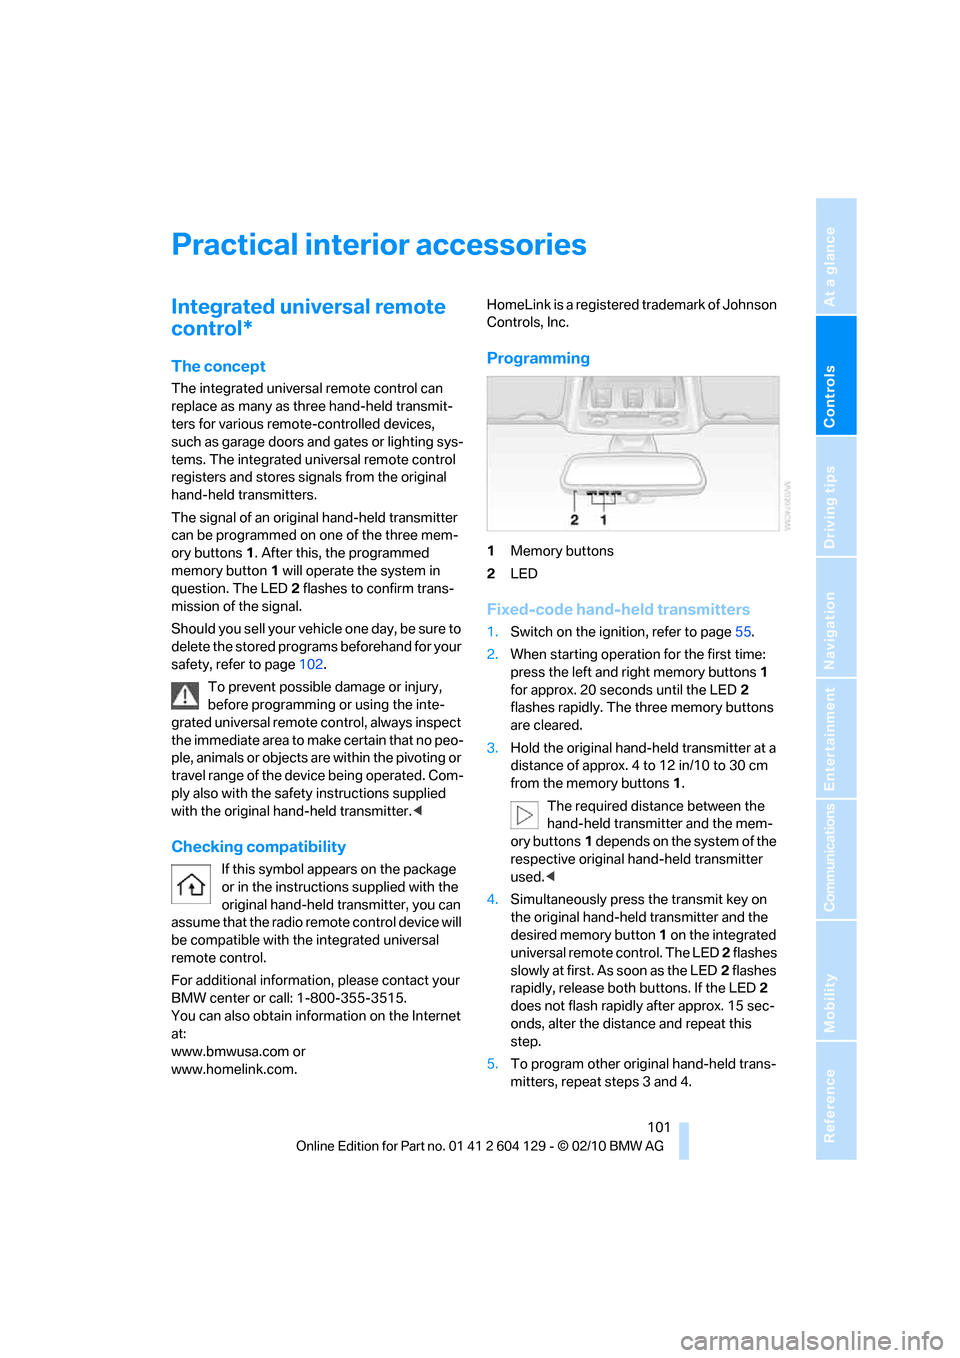
1Memory buttons
2LED
Fixed-code hand-held transmitters
1.Switch on the ignition, refer to page55.
2.When starting operation for the first time:
press the left and right memory buttons1
for approx. 20 seconds until the LED2
flashes rapidly. The three memory buttons
are cleared.
3.Hold the original hand-held transmitter at a
distance of approx. 4 to 12 in/10 to 30 cm
from the memory buttons1.
The required distance between the
hand-held transmitter and the mem-
ory buttons1 depends on the system of the
respective original hand-held transmitter
used.<
4.Simultaneously press the transmit key on
the original hand-held transmitter and the
desired memory button 1 on the integrated
universal remote control. The LED 2 flashes
slowly at first. As soon as the LED2 flashes
rapidly, release both buttons. If the LED2
does not flash rapidly after approx. 15 sec-
onds, alter the distance and repeat this
step.
5.To program other original hand-held trans-
mitters, repeat steps 3 and 4.
Page 105 of 256
Controls
103Reference
At a glance
Driving tips
Communications
Navigation
Entertainment
Mobility
Digital compass*
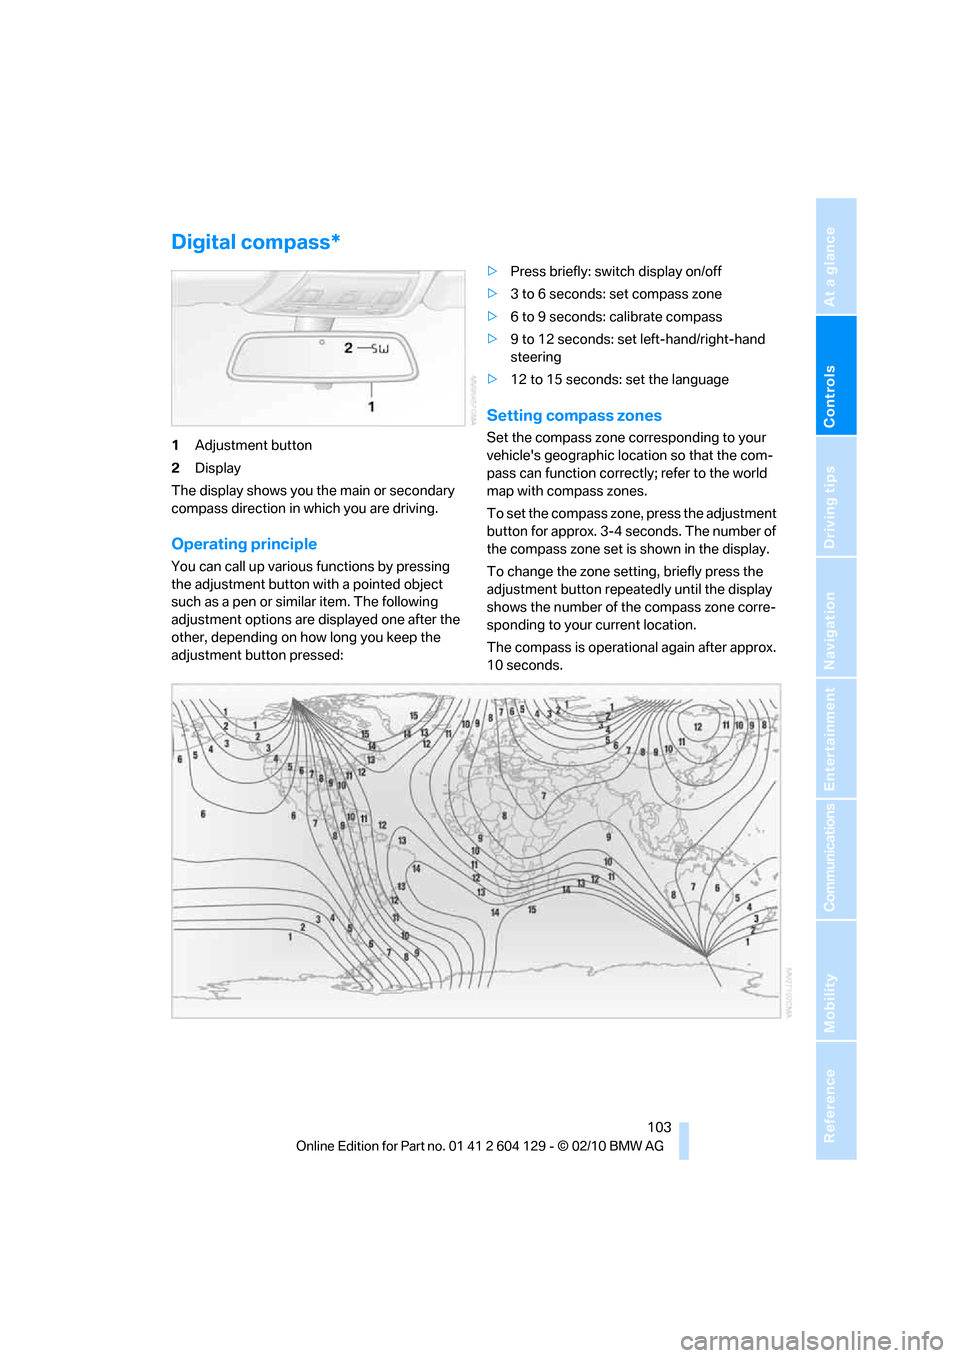
1Adjustment button
2Display
The display shows you the main or secondary
compass direction in which you are driving.
Operating principle
You can call up various functions by pressing
the adjustment button with a pointed object
such as a pen or similar item. The following
adjustment options are displayed one after the
other, depending on how long you keep the
adjustment button pressed:>Press briefly: switch display on/off
>3 to 6 seconds: set compass zone
>6 to 9 seconds: calibrate compass
>9 to 12 seconds: set left-hand/right-hand
steering
>12 to 15 seconds: set the language
Setting compass zones
Set the compass zone corresponding to your
vehicle's geographic location so that the com-
pass can function correctly; refer to the world
map with compass zones.
To set the compass zone, press the adjustment
button for approx. 3-4 seconds. The number of
the compass zone set is shown in the display.
To change the zone setting, briefly press the
adjustment button repeatedly until the display
shows the number of the compass zone corre-
sponding to your current location.
The compass is operational again after approx.
10 seconds.
Page 107 of 256
Controls
105Reference
At a glance
Driving tips
Communications
Navigation
Entertainment
Mobility
>Do not connect USB hard drives.
>Do not use the USB interface to recharge
external devices.
Center armrest
Storage compartment
The center armrest between the front seats
contains a credit card holder and, depending on
the equipment version, a compartment or a
snap-in adapter
*.
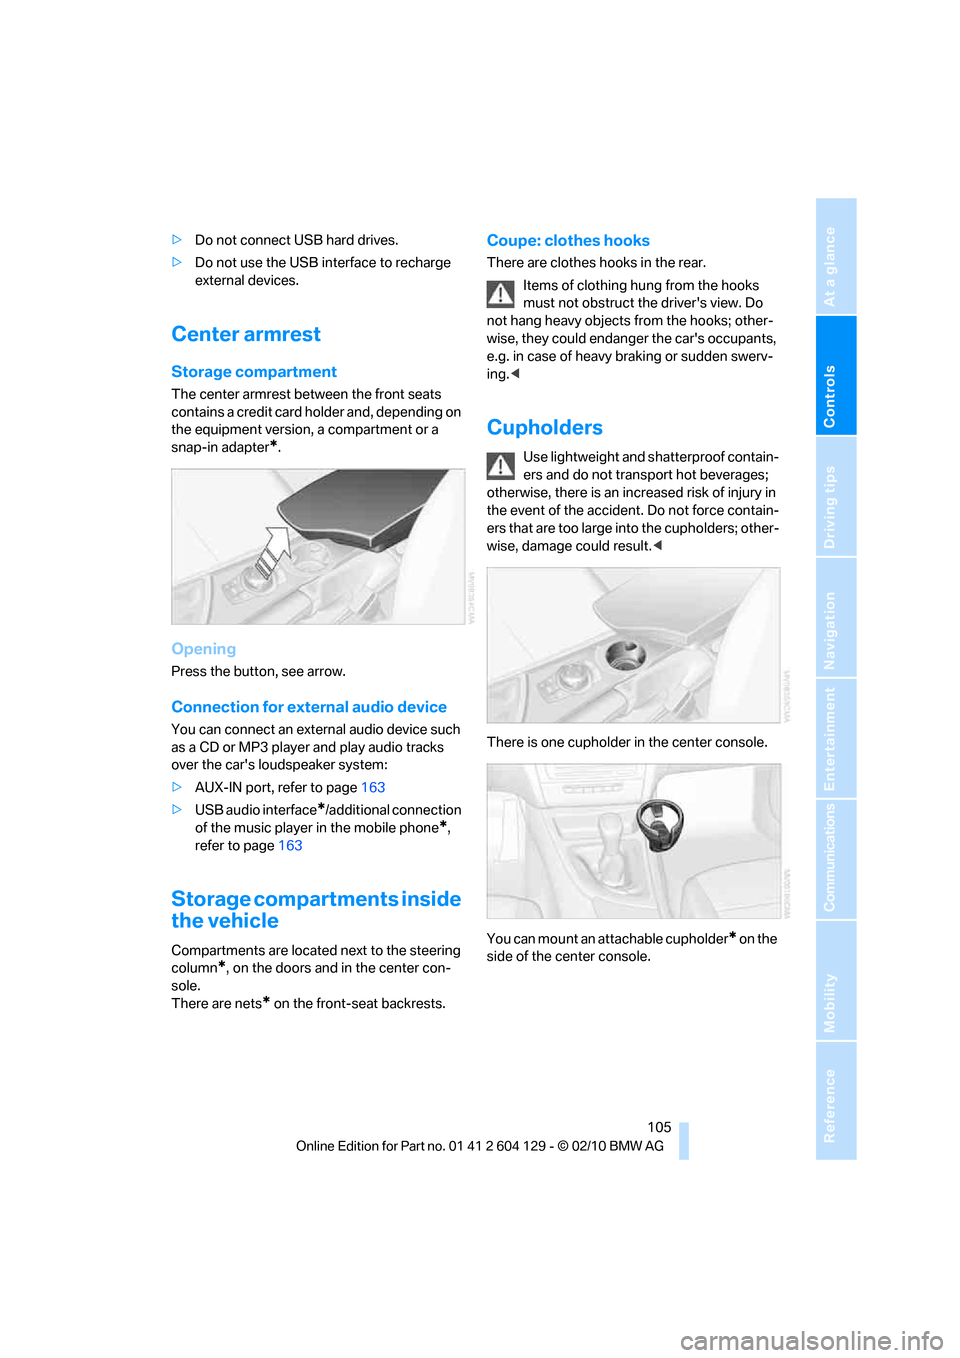
Opening
Press the button, see arrow.
Connection for external audio device
You can connect an external audio device such
as a CD or MP3 player and play audio tracks
over the car's loudspeaker system:
>AUX-IN port, refer to page163
>USB audio interface
*/additional connection
of the music player in the mobile phone
*,
refer to page163
Storage compartments inside
the vehicle
Compartments are located next to the steering
column
*, on the doors and in the center con-
sole.
There are nets
* on the front-seat backrests.
Coupe: clothes hooks
There are clothes hooks in the rear.
Items of clothing hung from the hooks
must not obstruct the driver's view. Do
not hang heavy objects from the hooks; other-
wise, they could endanger the car's occupants,
e.g. in case of heavy braking or sudden swerv-
ing.<
Cupholders
Use lightweight and shatterproof contain-
ers and do not transport hot beverages;
otherwise, there is an increased risk of injury in
the event of the accident. Do not force contain-
ers that are too large into the cupholders; other-
wise, damage could result.<
There is one cupholder in the center console.
You can mount an attachable cupholder
* on the
side of the center console.
Page 109 of 256
Controls
107Reference
At a glance
Driving tips
Communications
Navigation
Entertainment
Mobility
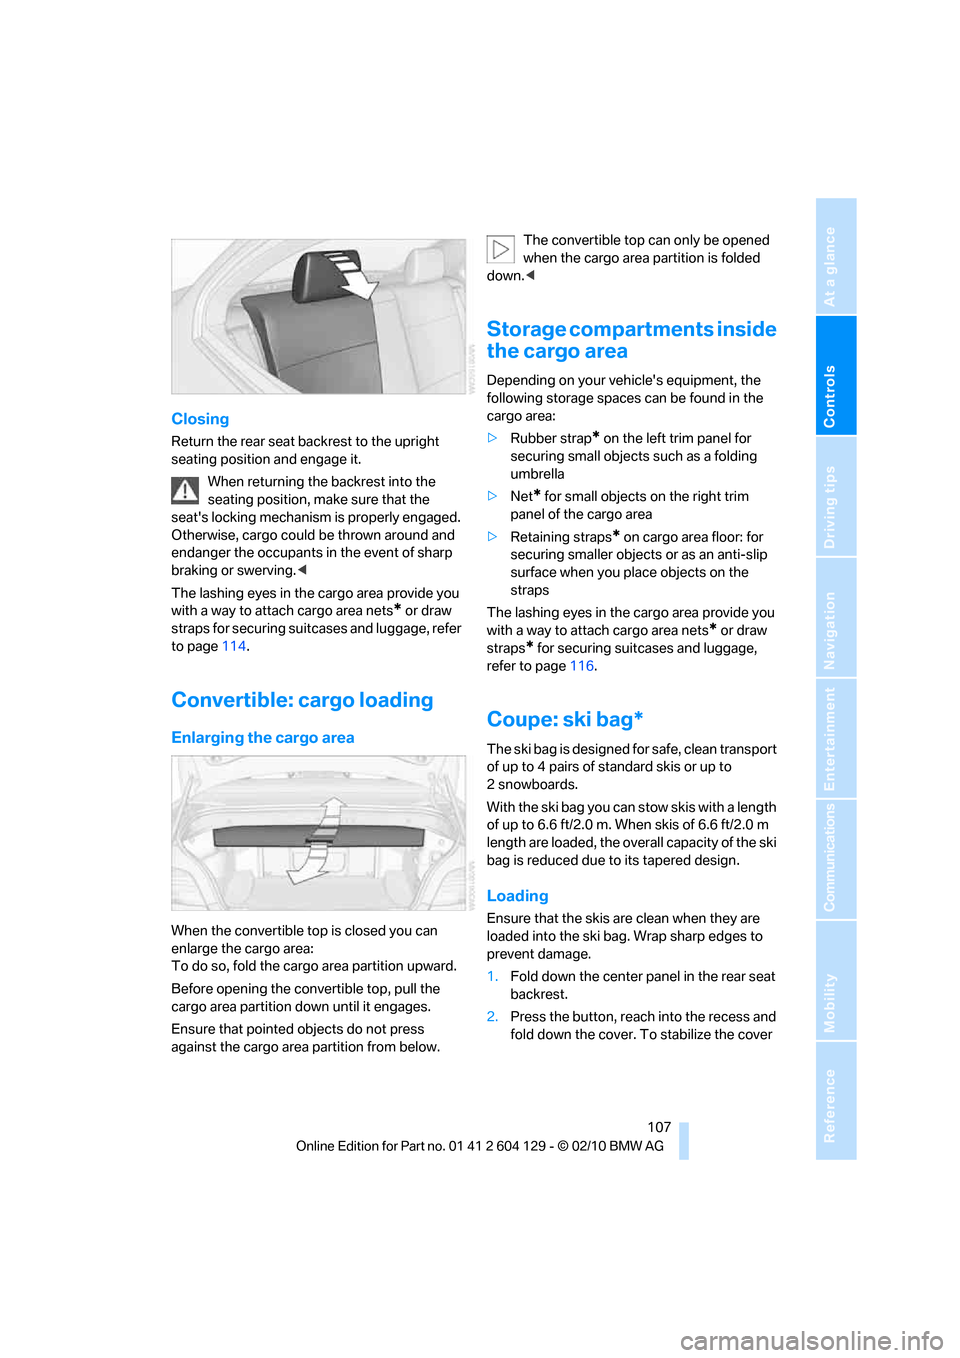
Closing
Return the rear seat backrest to the upright
seating position and engage it.
When returning the backrest into the
seating position, make sure that the
seat's locking mechanism is properly engaged.
Otherwise, cargo could be thrown around and
endanger the occupants in the event of sharp
braking or swerving.<
The lashing eyes in the cargo area provide you
with a way to attach cargo area nets
* or draw
straps for securing suitcases and luggage, refer
to page114.
Convertible: cargo loading
Enlarging the cargo area
When the convertible top is closed you can
enlarge the cargo area:
To do so, fold the cargo area partition upward.
Before opening the convertible top, pull the
cargo area partition down until it engages.
Ensure that pointed objects do not press
against the cargo area partition from below.The convertible top can only be opened
when the cargo area partition is folded
down.<
Storage compartments inside
the cargo area
Depending on your vehicle's equipment, the
following storage spaces can be found in the
cargo area:
>Rubber strap
* on the left trim panel for
securing small objects such as a folding
umbrella
>Net
* for small objects on the right trim
panel of the cargo area
>Retaining straps* on cargo area floor: for
securing smaller objects or as an anti-slip
surface when you place objects on the
straps
The lashing eyes in the cargo area provide you
with a way to attach cargo area nets
* or draw
straps
* for securing suitcases and luggage,
refer to page116.
Coupe: ski bag*
The ski bag is designed for safe, clean transport
of up to 4 pairs of standard skis or up to
2snowboards.
With the ski bag you can stow skis with a length
of up to 6.6ft/2.0m. When skis of 6.6ft/2.0m
length are loaded, the overall capacity of the ski
bag is reduced due to its tapered design.
Loading
Ensure that the skis are clean when they are
loaded into the ski bag. Wrap sharp edges to
prevent damage.
1.Fold down the center panel in the rear seat
backrest.
2.Press the button, reach into the recess and
fold down the cover. To stabilize the cover
Page 111 of 256
Controls
109Reference
At a glance
Driving tips
Communications
Navigation
Entertainment
Mobility
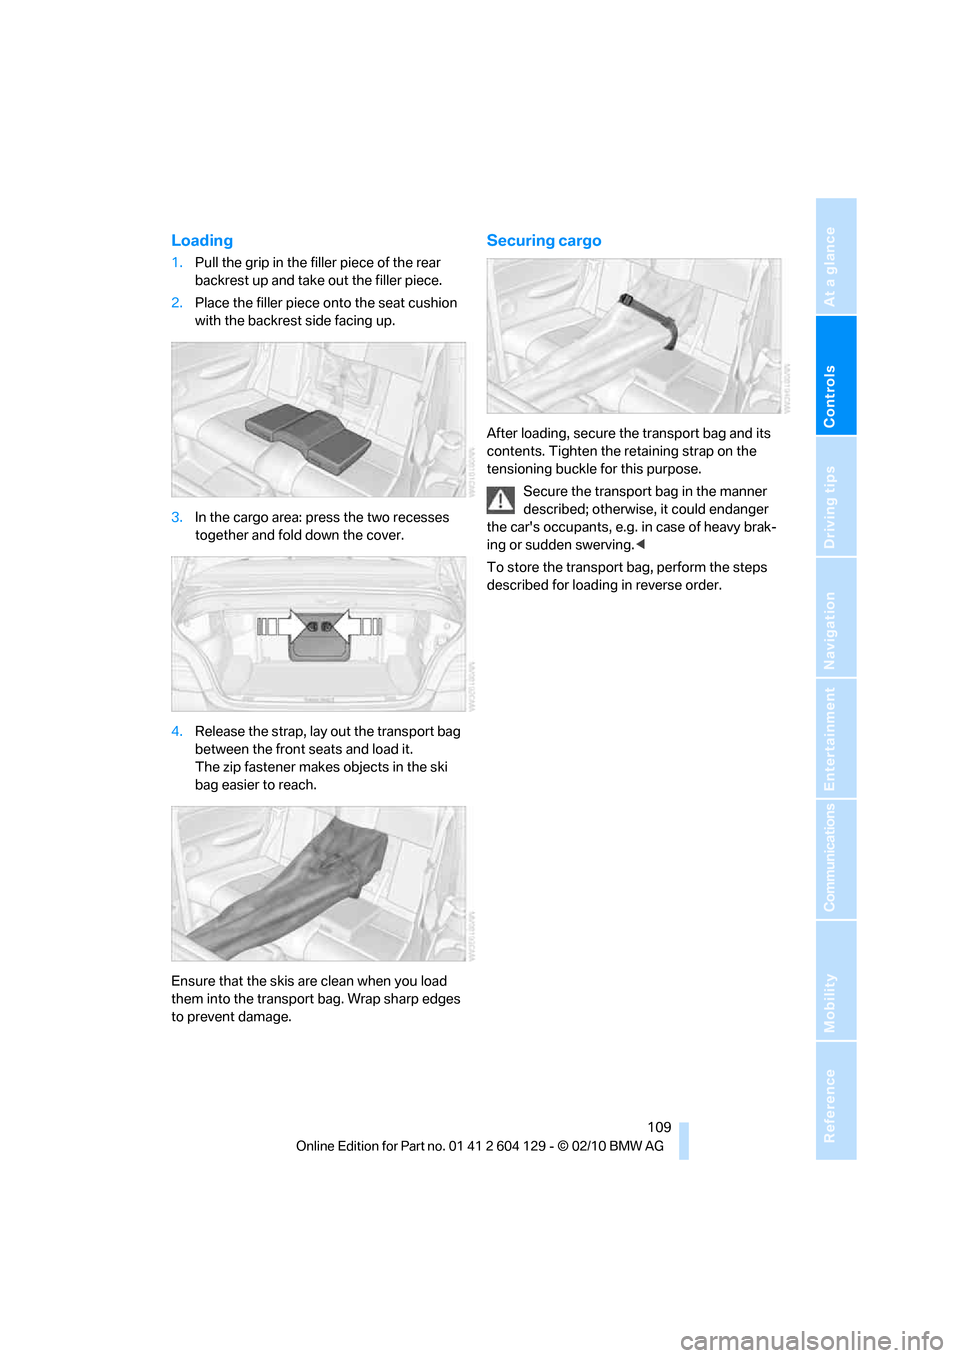
Loading
1.Pull the grip in the filler piece of the rear
backrest up and take out the filler piece.
2.Place the filler piece onto the seat cushion
with the backrest side facing up.
3.In the cargo area: press the two recesses
together and fold down the cover.
4.Release the strap, lay out the transport bag
between the front seats and load it.
The zip fastener makes objects in the ski
bag easier to reach.
Ensure that the skis are clean when you load
them into the transport bag. Wrap sharp edges
to prevent damage.
Securing cargo
After loading, secure the transport bag and its
contents. Tighten the retaining strap on the
tensioning buckle for this purpose.
Secure the transport bag in the manner
described; otherwise, it could endanger
the car's occupants, e.g. in case of heavy brak-
ing or sudden swerving.<
To store the transport bag, perform the steps
described for loading in reverse order.
Page 115 of 256
Driving tips
113Reference
At a glance
Controls
Communications
Navigation
Entertainment
Mobility
Drive defensively
Avoid unnecessary acceleration and braking
maneuvers. To do so, keep an adequate dis-
tance between you and the vehicle in front of
you. A defensive and smooth driving style
keeps fuel consumption down.
Avoid high engine speeds
Only use first gear when setting off. In second
and higher gears, accelerate without hesitation
or pauses. When accelerating, shift up before
reaching high engine speeds.
When you reach the desired speed, shift into
the highest applicable gear and drive with the
engine speed as low as possible and at a con-
stant speed.
As a rule: driving at low engine speeds lowers
fuel consumption and reduces wear.
Coasting
When approaching a red light, take your foot off
the accelerator and coast to a stop in the high-
est applicable gear.
O n a d o w n h il l s lo p e , t a k e y o u r f o o t o f f t h e a c c el -
erator and coast in a suitable gear.
The fuel supply is interrupted when coasting.
Switch off the engine during lengthy
stops
Switch off the engine when stopping for lengthy
periods, e.g. at traffic lights, railroad crossings
or in traffic congestions. You achieve fuel sav-
ings even if standing time is as short as approx.
4 seconds.
Switch off functions you do not need at
the moment
Functions such as the air conditioner, seat
heating or rear window defroster draw large
amounts of power and consume additional fuel.
Especially in city traffic and in stop-and-go driv-
ing they have a considerable impact. Therefore,
switch these functions off when they are not
really needed.
Have the vehicle serviced
Have the vehicle serviced regularly to achieve
good economy and a long vehicle life. BMW
recommends having the vehicle serviced at a
BMW center. Also note the BMW service sys-
tem, refer to page207.
General driving notes
Close the trunk lid
Operate the vehicle only when the trunk
lid is closed. Otherwise, exhaust fumes
could enter the interior of the vehicle.<
If the vehicle must be driven with the trunk lid
open:
1.Close all windows and the glass roof.
2.Greatly increase the air volume of the auto-
matic climate control system, refer to
page98.
Hot exhaust system
In all vehicles, extremely high tempera-
tures are generated in the exhaust sys-
tem. Do not remove the heat shields installed in
its vicinity, and never apply undercoating to
them. When driving, standing at idle and while
parking, take care to avoid possible contact
between the hot exhaust system and any highly
flammable materials such as hay, leaves, grass,
etc. Such contact could lead to a fire, with the
risk of serious personal injuries and property
damage. Do not touch hot exhaust tail pipes.
Otherwise, there is a risk of burns.<
Hydroplaning
When driving on wet or slushy roads,
reduce road speed. If you do not, a wedge
of water can form between tires and road sur-
face. This situation, known as hydroplaning,
means that the tire can completely lose contact
with the road surface, so that neither the car can
be steered nor the brake be properly applied.<
The risk of hydroplaning increases with declin-
ing tread depth on the tires, refer also to Mini-
mum tread depth on page199.
Page 117 of 256
Driving tips
115Reference
At a glance
Controls
Communications
Navigation
Entertainment
Mobility
develops inside the tires. In some cases, this
can result in sudden tire pressure loss.<
Make sure that no liquids are spilled or
leak from their containers in the cargo
area, as this could result in damage to the vehi-
cle.<
Determining loading limit
1.Locate the following statement on your
vehicle's placard
*:
The combined weight of occupants
and cargo should never exceed
XXX kg or YYY lbs. Otherwise, damage to
the vehicle and unstable driving conditions
may result.<
2.Determine the combined weight of the
driver and passengers that will be riding in
your vehicle.
3.Subtract the combined weight of the driver
and passengers from XXX kilograms or YYY
pounds.
4.The resulting figure equals the available
amount of cargo and luggage load capacity.
For example, if the YYY amount equals
1,400 lbs. and there will be five 150-lb. pas-
sengers in your vehicle, the amount of avail-
able cargo and luggage load capacity is
650 lbs:
1,400 lbs. minus 750 lbs. = 650 lbs.
5.Determine the combined weight of luggage
and cargo being loaded on the vehicle. That
weight may not safely exceed the available
cargo and luggage load capacity calculated
in step 4.
6.If your vehicle will be towing a trailer, part of
the load from your trailer will be transferred
to your vehicle. Consult the manual for transporting a trailer to determine how this
may reduce the available cargo and luggage
load capacity of your vehicle.
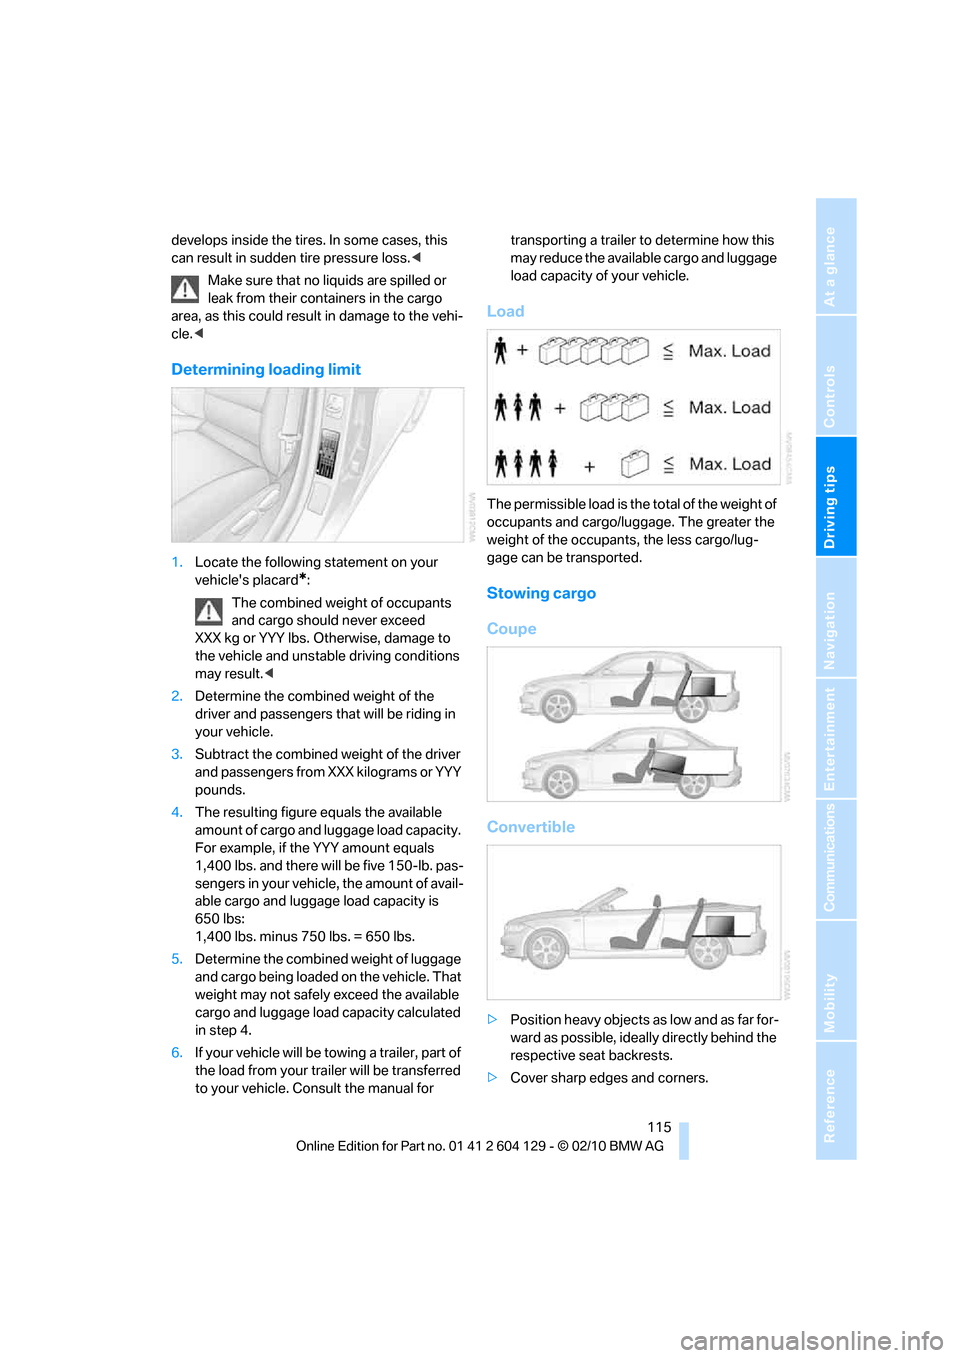
Load
The permissible load is the total of the weight of
occupants and cargo/luggage. The greater the
weight of the occupants, the less cargo/lug-
gage can be transported.
Stowing cargo
Coupe
Convertible
>Position heavy objects as low and as far for-
ward as possible, ideally directly behind the
respective seat backrests.
>Cover sharp edges and corners.
Page 119 of 256

Driving tips
117Reference
At a glance
Controls
Communications
Navigation
Entertainment
Mobility
Page 121 of 256
Navigation
This chapter describes how you can
enter destinations and specify your route
so that your navigation system guides you
reliably to your destination.
Navigation
Page 122 of 256
Navigation system
120
Navigation system
General information
With the help of satellites and vehicle sensors,
the navigation system is able to ascertain the
precise position of the vehicle and reliably guide
you to any destination you enter.
Enter data only when the vehicle is sta-
tionary, and always give priority to the
applicable traffic regulations in the event of any
contradiction between traffic and road condi-
tions and the instructions issued by the naviga-
tion system. Failure to take to this precaution
can place you in violation of the law and put
vehicle occupants and other road users in dan-
ger.<
Navigation data
General information
Navigation data are stored in the vehicle and
can be updated.
Navigation data and authorization codes are
available from your BMW center.
Depending on the data volume, a data update
may take several hours.
>The data are updated while you are driving.
>The update is resumed automatically when
a trip is continued after an interruption.
>Basic navigation functions are available
during the trip.
>The data are stored in the vehicle.
>After the update, the system restarts.
>The medium that holds the navigation data
can be removed after the update is com-
pleted.
Updating the navigation data
Inserting navigation DVD
1.Insert the navigation DVD into the DVD
player with the labeled side facing up.
2.Follow the instructions on the Control Dis-
play.
3.Enter the authorization code of the naviga-
tion DVD and change the DVD if needed.
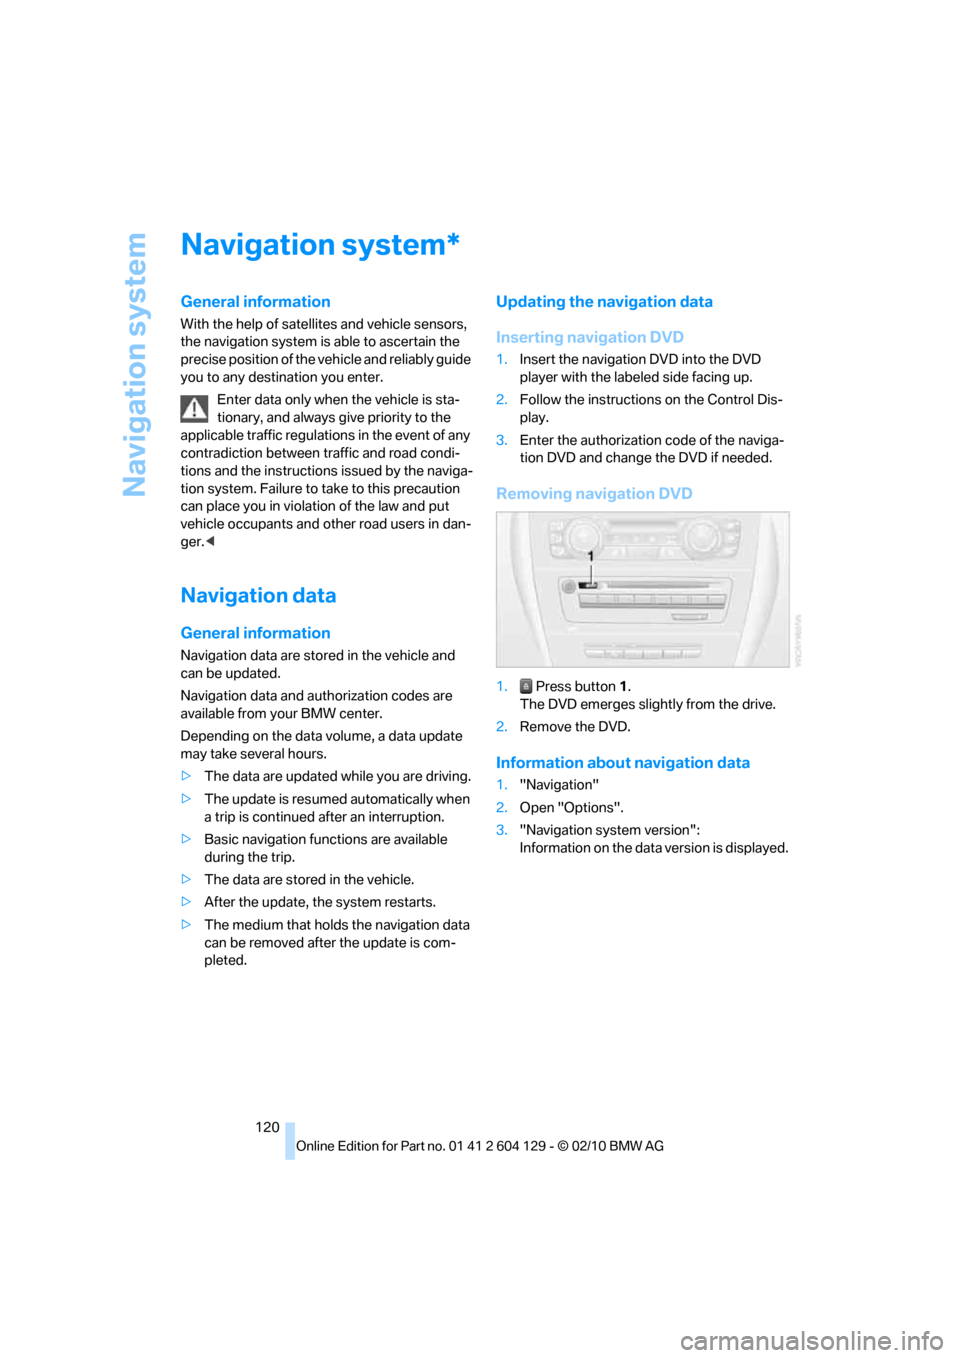
Removing navigation DVD
1. Press button1.
The DVD emerges slightly from the drive.
2.Remove the DVD.
Information about navigation data
1."Navigation"
2.Open "Options".
3."Navigation system version":
Information on the data version is displayed.
*