high beams BMW 135I COUPE 2011 E82 Owner's Manual
[x] Cancel search | Manufacturer: BMW, Model Year: 2011, Model line: 135I COUPE, Model: BMW 135I COUPE 2011 E82Pages: 256, PDF Size: 8.41 MB
Page 12 of 256
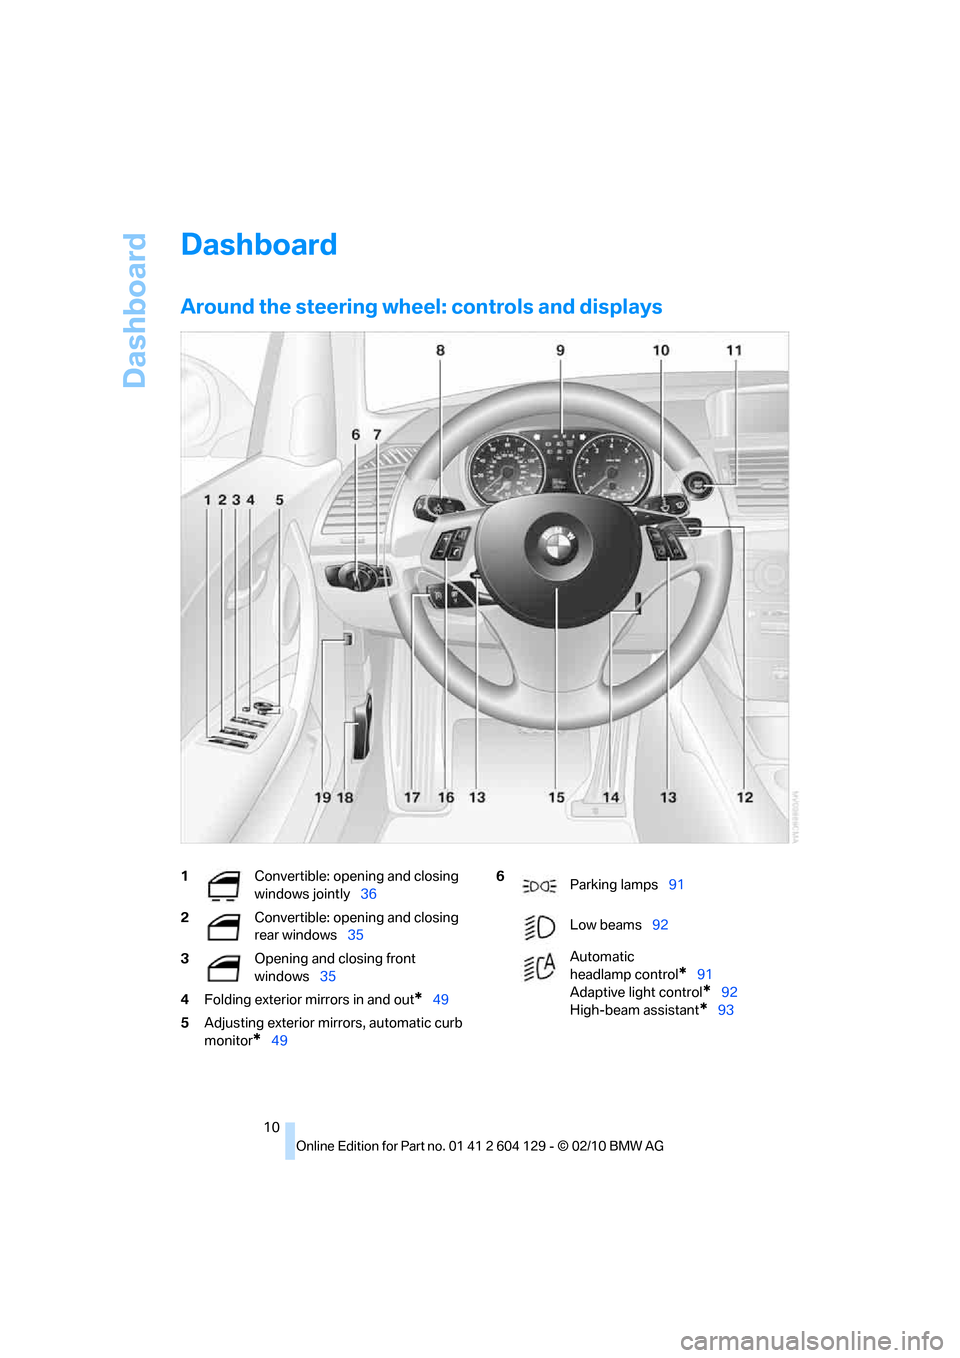
Dashboard
10
Dashboard
Around the steering wheel: controls and displays
1Convertible: opening and closing
windows jointly36
2Convertible: opening and closing
rear windows35
3Opening and closing front
windows35
4Folding exterior mirrors in and out
*49
5Adjusting exterior mirrors, automatic curb
monitor
*49
6
Parking lamps91
Low beams92
Automatic
headlamp control
*91
Adaptive light control
*92
High-beam assistant
*93
Page 13 of 256
At a glance
11Reference
Controls
Driving tips
Communications
Navigation
Entertainment
Mobility
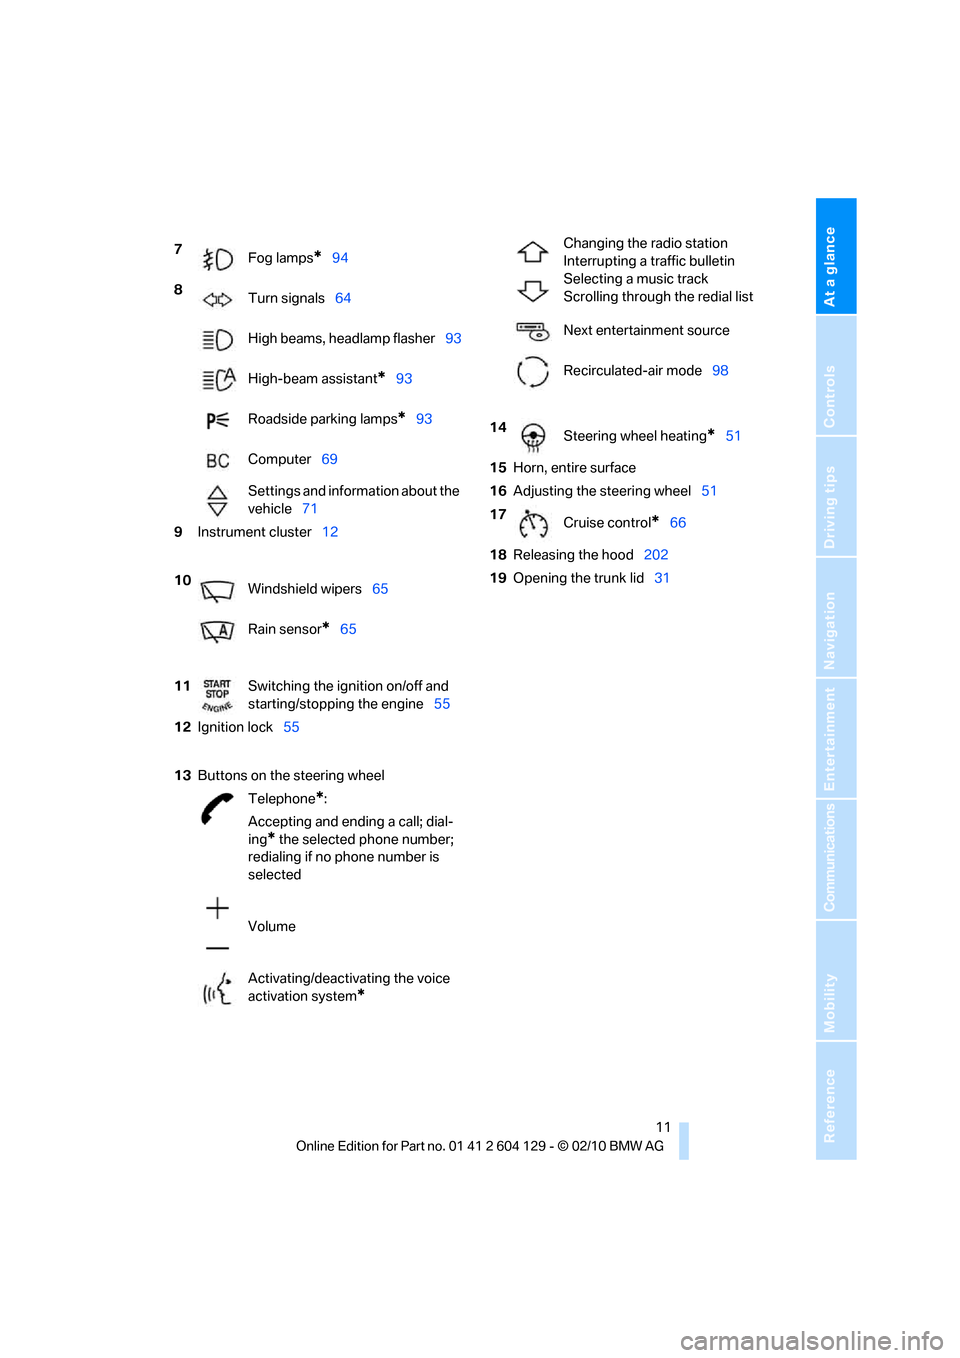
7
Fog lamps*94
8
Turn signals64
High beams, headlamp flasher93
High-beam assistant
*93
Roadside parking lamps
*93
Computer69
Settings and information about the
vehicle71
9Instrument cluster12
10
Windshield wipers65
Rain sensor
*65
11Switching the ignition on/off and
starting/stopping the engine55
12Ignition lock55
13Buttons
on the steering wheel
Telephone
*:
Accepting and ending a call; dial-
ing
* the selected phone number;
redialing if no phone number is
selected
Volume
Activating/deactivating the voice
activation system
*
Changing the radio station
Interrupting a traffic bulletin
Selecting a music track
Scrolling through the redial list
Next entertainment source
Recirculated-air mode98
14
Steering wheel heating
*51
15Horn, entire surface
16Adjusting the steering wheel51
17
Cruise control
*66
18Releasing the hood202
19Opening the trunk lid31
Page 15 of 256
At a glance
13Reference
Controls
Driving tips
Communications
Navigation
Entertainment
Mobility
Indicator and warning lamps
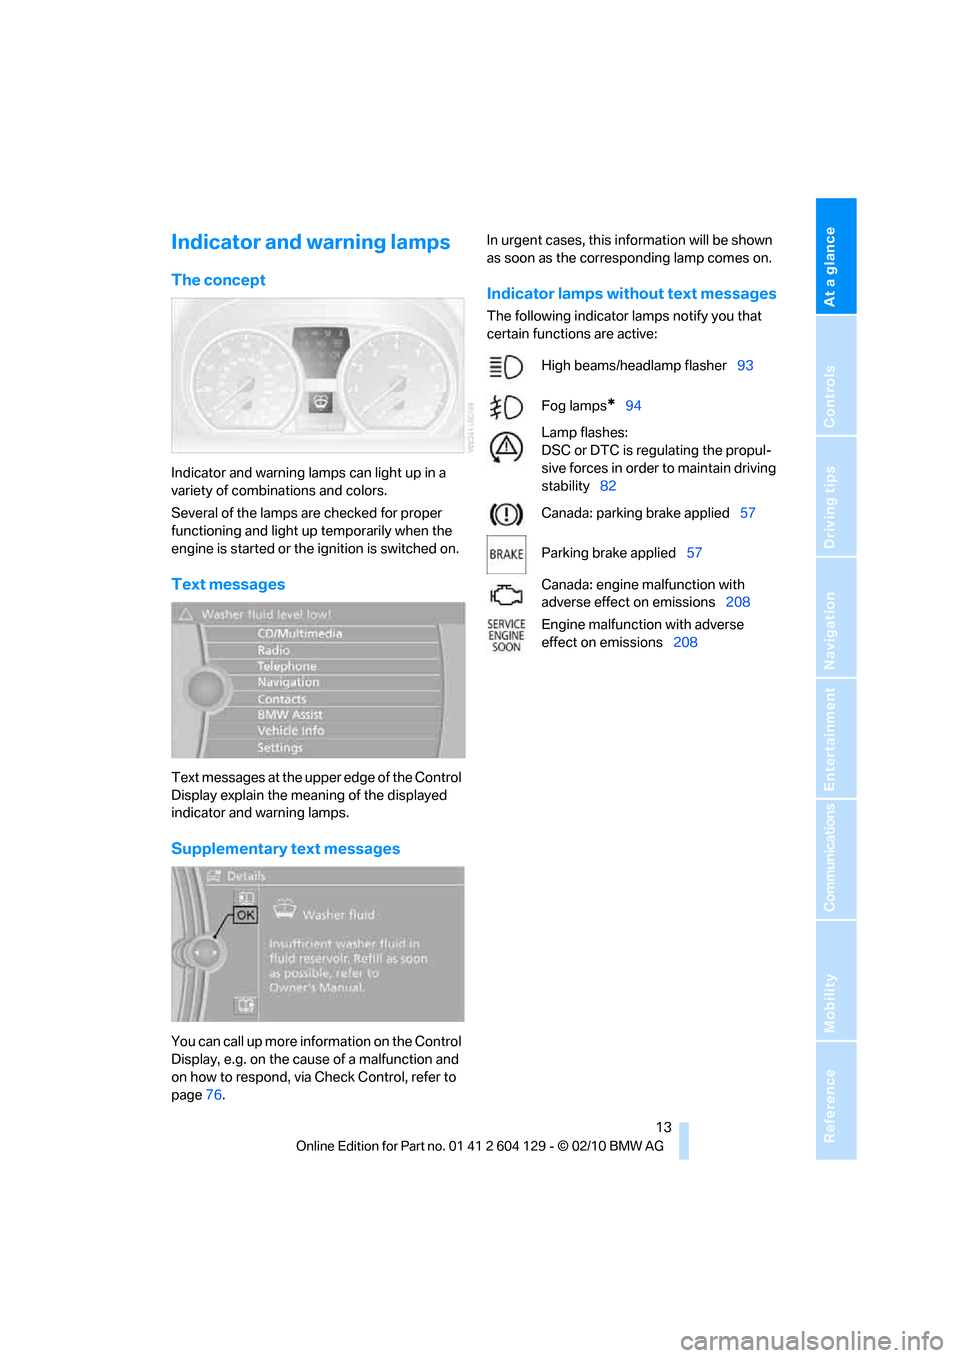
The concept
Indicator and warning lamps can light up in a
variety of combinations and colors.
Several of the lamps are checked for proper
functioning and light up temporarily when the
engine is started or the ignition is switched on.
Text messages
Text messages at the upper edge of the Control
Display explain the meaning of the displayed
indicator and warning lamps.
Supplementary text messages
You can call up more information on the Control
Display, e.g. on the cause of a malfunction and
on how to respond, via Check Control, refer to
page76.In urgent cases, this information will be shown
as soon as the corresponding lamp comes on.
Indicator lamps without text messages
The following indicator lamps notify you that
certain functions are active:
High beams/headlamp flasher93
Fog lamps
*94
Lamp flashes:
DSC or DTC is regulating the propul-
sive forces in order to maintain driving
stability82
Canada: parking brake applied57
Parking brake applied57
Canada: engine malfunction with
adverse effect on emissions208
Engine malfunction with adverse
effect on emissions208
Page 66 of 256
Driving
64
Launch Control
Launch Control enables an optimum accelera-
tion when starting off on a road surface with
good traction.
Do not use Launch Control too often; oth-
erwise, the powerful stresses on the vehi-
cle will lead to premature component wear.<
Launch Control is ready for use when the
engine is at operating temperature, i.e. after
uninterrupted travel of at least 6.2 miles/10 km.
1.With the engine running, step on the brake
with your left foot.
2.Activate Dynamic Traction Control (DTC),
refer to page, 82.
3.Activate Driving dynamics control, refer to
page62.
4.With the vehicle stationary, activate the
manual mode and select 1
stgear.
5.With your right foot, push the accelerator
pedal past the resistance point. The accel-
eration speed is adjusted. A flag symbol
appears in the instrument cluster.
6.When you release the brake pedal, the vehi-
cle accelerates. Keep the accelerator pedal
floored.
7.The upshifting occurs automatically as long
as you keep the accelerator pedal pressed
past the resistance point.
Launch Control will be ready for use again after
you drive a certain distance.
Launch Control is not available for use during
the break-in phase, refer to page112.
To maintain driving stability, keep DSC
activated whenever possible.<
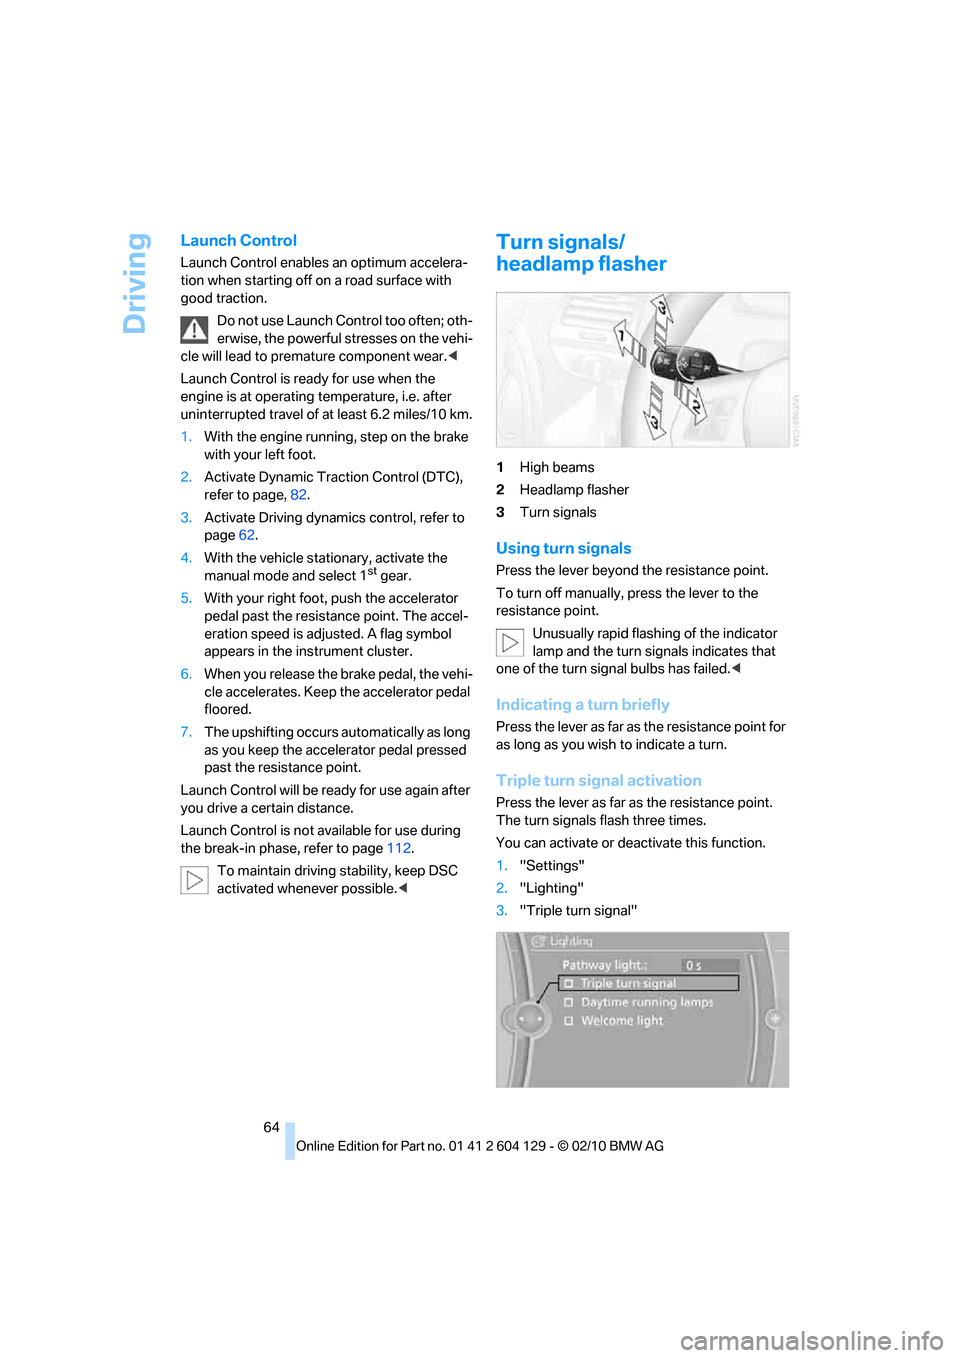
Turn signals/
headlamp flasher
1High beams
2Headlamp flasher
3Turn signals
Using turn signals
Press the lever beyond the resistance point.
To turn off manually, press the lever to the
resistance point.
Unusually rapid flashing of the indicator
lamp and the turn signals indicates that
one of the turn signal bulbs has failed.<
Indicating a turn briefly
Press the lever as far as the resistance point for
as long as you wish to indicate a turn.
Triple turn signal activation
Press the lever as far as the resistance point.
The turn signals flash three times.
You can activate or deactivate this function.
1."Settings"
2."Lighting"
3."Triple turn signal"
Page 93 of 256
Controls
91Reference
At a glance
Driving tips
Communications
Navigation
Entertainment
Mobility
Lamps
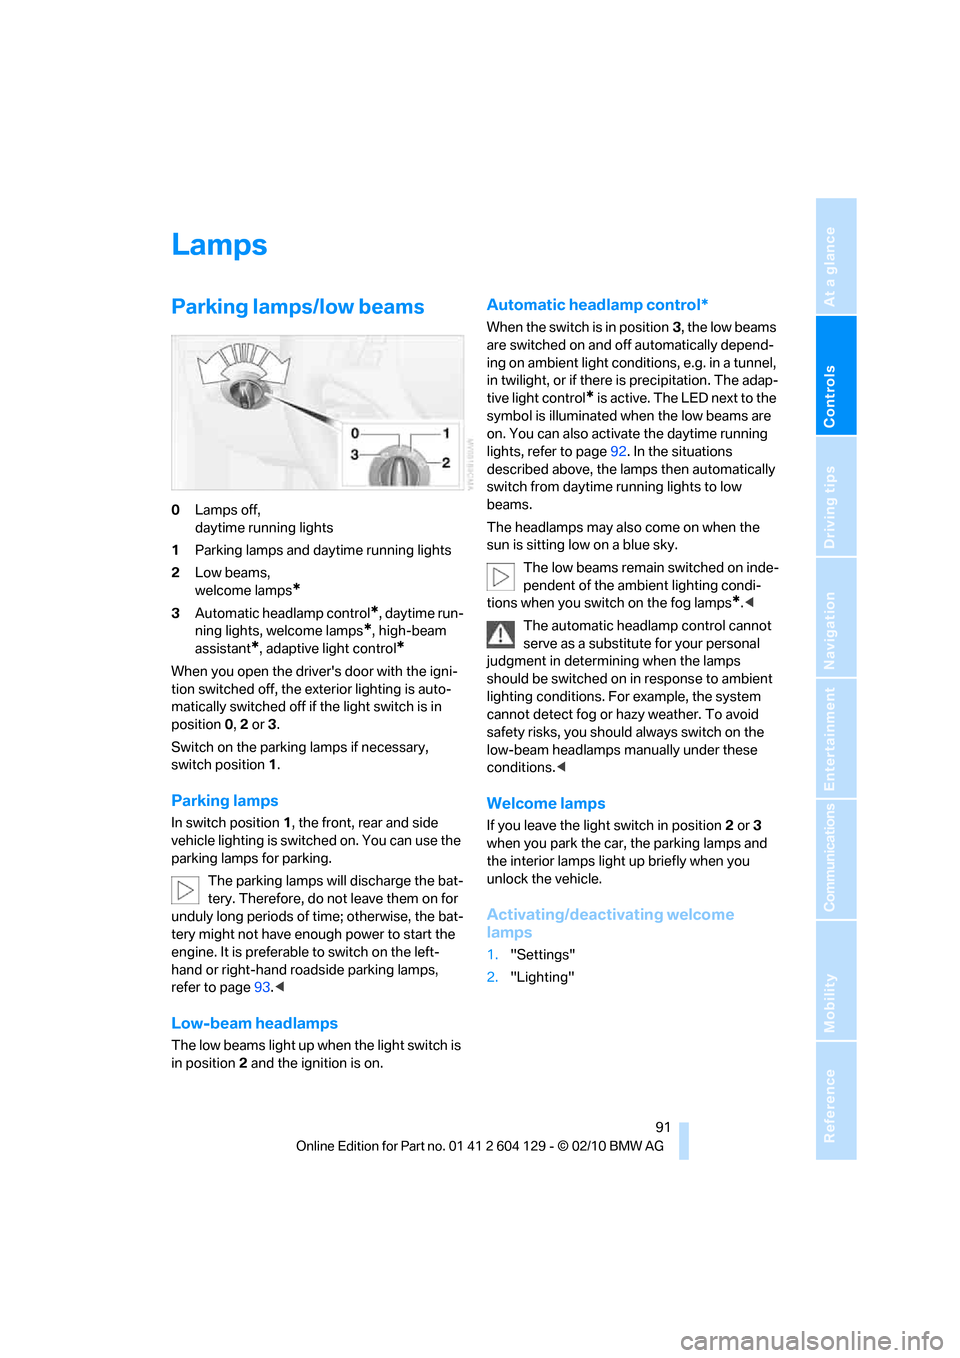
Parking lamps/low beams
0Lamps off,
daytime running lights
1Parking lamps and daytime running lights
2Low beams,
welcome lamps
*
3Automatic headlamp control*, daytime run-
ning lights, welcome lamps
*, high-beam
assistant
*, adaptive light control*
When you open the driver's door with the igni-
tion switched off, the exterior lighting is auto-
matically switched off if the light switch is in
position 0, 2 or 3.
Switch on the parking lamps if necessary,
switch position 1.
Parking lamps
In switch position1, the front, rear and side
vehicle lighting is switched on. You can use the
parking lamps for parking.
The parking lamps will discharge the bat-
tery. Therefore, do not leave them on for
unduly long periods of time; otherwise, the bat-
tery might not have enough power to start the
engine. It is preferable to switch on the left-
hand or right-hand roadside parking lamps,
refer to page93.<
Low-beam headlamps
The low beams light up when the light switch is
in position 2 and the ignition is on.
Automatic headlamp control*
When the switch is in position3, the low beams
are switched on and off automatically depend-
ing on ambient light conditions, e.g. in a tunnel,
in twilight, or if there is precipitation. The adap-
tive light control
* is active. The LED next to the
symbol is illuminated when the low beams are
on. You can also activate the daytime running
lights, refer to page92. In the situations
described above, the lamps then automatically
switch from daytime running lights to low
beams.
The headlamps may also come on when the
sun is sitting low on a blue sky.
The low beams remain switched on inde-
pendent of the ambient lighting condi-
tions when you switch on the fog lamps
*.<
The automatic headlamp control cannot
serve as a substitute for your personal
judgment in determining when the lamps
should be switched on in response to ambient
lighting conditions. For example, the system
cannot detect fog or hazy weather. To avoid
safety risks, you should always switch on the
low-beam headlamps manually under these
conditions.<
Welcome lamps
If you leave the light switch in position 2 or 3
when you park the car, the parking lamps and
the interior lamps light up briefly when you
unlock the vehicle.
Activating/deactivating welcome
lamps
1."Settings"
2."Lighting"
Page 95 of 256
Controls
93Reference
At a glance
Driving tips
Communications
Navigation
Entertainment
Mobility
Malfunction
The LED next to the symbol for automatic head-
lamp control flashes. Adaptive light control is
malfunctioning or has failed. Have the system
checked as soon as possible.
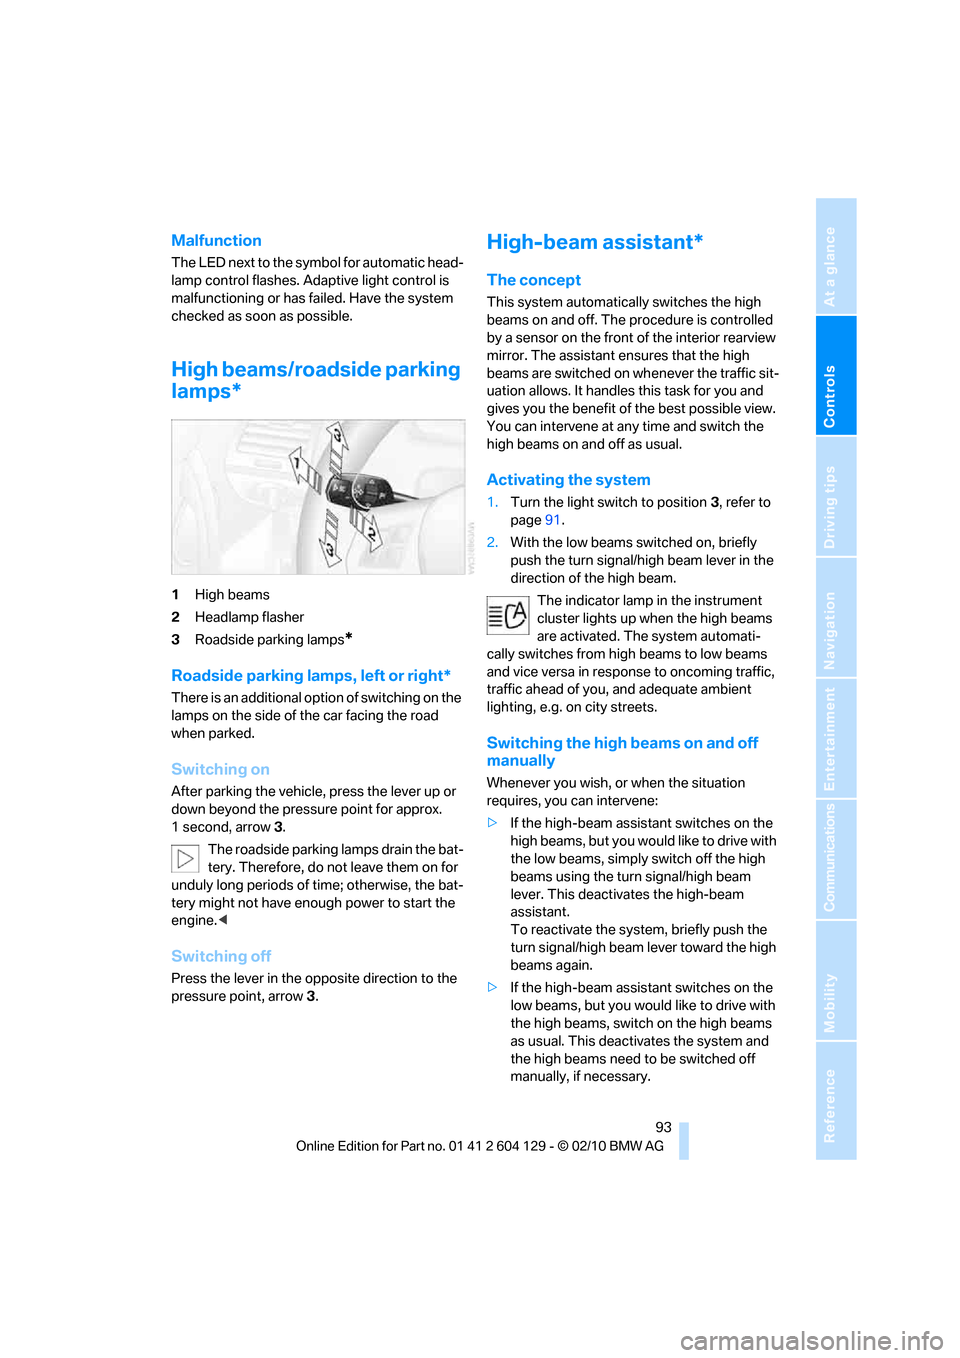
High beams/roadside parking
lamps*
1High beams
2Headlamp flasher
3Roadside parking lamps
*
Roadside parking lamps, left or right*
There is an additional option of switching on the
lamps on the side of the car facing the road
when parked.
Switching on
After parking the vehicle, press the lever up or
down beyond the pressure point for approx.
1 second, arrow 3.
The roadside parking lamps drain the bat-
tery. Therefore, do not leave them on for
unduly long periods of time; otherwise, the bat-
tery might not have enough power to start the
engine.<
Switching off
Press the lever in the opposite direction to the
pressure point, arrow 3.
High-beam assistant*
The concept
This system automatically switches the high
beams on and off. The procedure is controlled
by a sensor on the front of the interior rearview
mirror. The assistant ensures that the high
beams are switched on whenever the traffic sit-
uation allows. It handles this task for you and
gives you the benefit of the best possible view.
You can intervene at any time and switch the
high beams on and off as usual.
Activating the system
1.Turn the light switch to position3, refer to
page91.
2.With the low beams switched on, briefly
push the turn signal/high beam lever in the
direction of the high beam.
The indicator lamp in the instrument
cluster lights up when the high beams
are activated. The system automati-
cally switches from high beams to low beams
and vice versa in response to oncoming traffic,
traffic ahead of you, and adequate ambient
lighting, e.g. on city streets.
Switching the high beams on and off
manually
Whenever you wish, or when the situation
requires, you can intervene:
>If the high-beam assistant switches on the
high beams, but you would like to drive with
the low beams, simply switch off the high
beams using the turn signal/high beam
lever. This deactivates the high-beam
assistant.
To reactivate the system, briefly push the
turn signal/high beam lever toward the high
beams again.
>If the high-beam assistant switches on the
low beams, but you would like to drive with
the high beams, switch on the high beams
as usual. This deactivates the system and
the high beams need to be switched off
manually, if necessary.
Page 96 of 256
Lamps
94 To reactivate the system, briefly push the
turn signal/high beam lever toward the high
beams again.
>Use the headlamp flasher as usual with the
low beams switched on.
System limitations
The high-beam assistant cannot serve as
a substitute for the driver's personal judg-
ment of when to use the high beams. Therefore,
manually switch off the high beams in situations
where this is required to avoid a safety risk.<
The system is not fully functional in situations
such as the following, and driver intervention
may be necessary:
>In very unfavorable weather conditions,
such as fog or heavy precipitation
>In detecting poorly-lit road users, such as
pedestrians, cyclists, horseback riders and
wagons; when driving close to train or ship
traffic; and at animal crossings
>In tight curves, on hilltops or in depressions,
in cross traffic or half-obscured oncoming
traffic on highways
>In poorly lit towns and cities and in the pres-
ence of highly reflective signs
>At low speeds
>When the windshield in front of the interior
rearview mirror is fogged over, dirty or cov-
ered with stickers, etc.
>If the sensor is dirty. Clean the sensor on
the front of the interior rearview mirror using
a cloth moistened with a small amount of
glass cleaner.
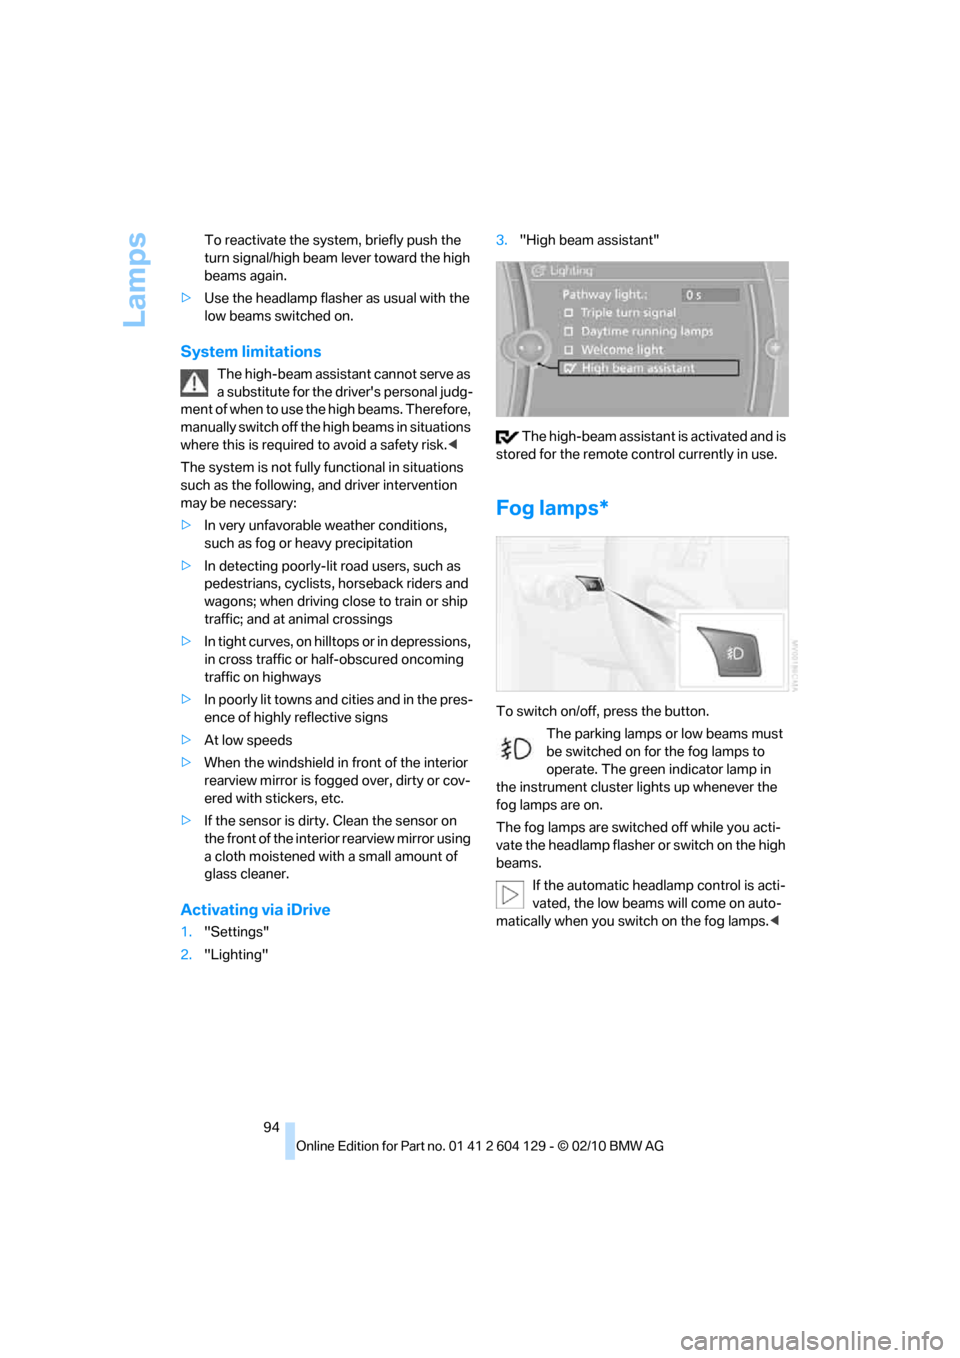
Activating via iDrive
1."Settings"
2."Lighting"3."High beam assistant"
The high-beam assistant is activated and is
stored for the remote control currently in use.
Fog lamps*
To switch on/off, press the button.
The parking lamps or low beams must
be switched on for the fog lamps to
operate. The green indicator lamp in
the instrument cluster lights up whenever the
fog lamps are on.
The fog lamps are switched off while you acti-
vate the headlamp flasher or switch on the high
beams.
If the automatic headlamp control is acti-
vated, the low beams will come on auto-
matically when you switch on the fog lamps.<
Page 97 of 256
Controls
95Reference
At a glance
Driving tips
Communications
Navigation
Entertainment
Mobility
Instrument lighting
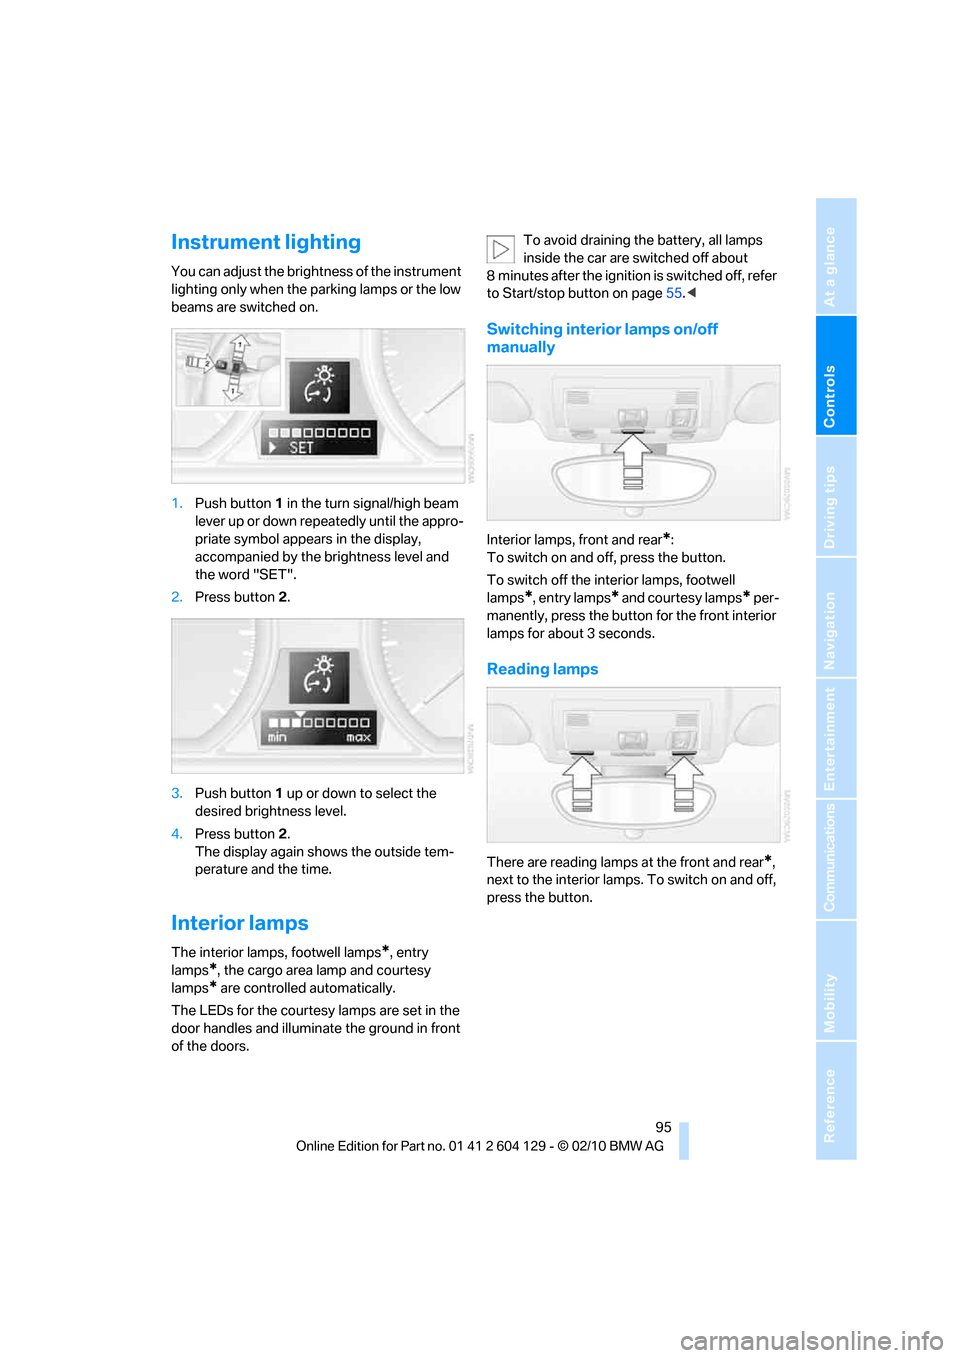
You can adjust the brightness of the instrument
lighting only when the parking lamps or the low
beams are switched on.
1.Push button1 in the turn signal/high beam
lever up or down repeatedly until the appro-
priate symbol appears in the display,
accompanied by the brightness level and
the word "SET".
2.Press button2.
3.Push button 1 up or down to select the
desired brightness level.
4.Press button2.
The display again shows the outside tem-
perature and the time.
Interior lamps
The interior lamps, footwell lamps*, entry
lamps
*, the cargo area lamp and courtesy
lamps
* are controlled automatically.
The LEDs for the courtesy lamps
are set in the
door handles and illuminate the ground in front
of the doors.To avoid draining the battery, all lamps
inside the car are switched off about
8 minutes after the ignition is switched off, refer
to Start/stop button on page55.<
Switching interior lamps on/off
manually
Interior lamps, front and rear*:
To switch on and off, press the button.
To switch off the interior lamps, footwell
lamps
*, entry lamps* and courtesy lamps* per-
manently, press the button for the front interior
lamps for about 3 seconds.
Reading lamps
There are reading lamps at the front and rear*,
next to the interior lamps. To switch on and off,
press the button.
Page 216 of 256
Replacing components
214
Xenon lamps*
These bulbs have a very long service life and are
highly unlikely to fail. If a xenon lamp fails never-
theless, switch on the fog lamps and continue
the journey with great care, provided that local
legislation does not prohibit this.
Have any work on the xenon lamp system,
including bulb replacements, performed
o n ly b y a BM W c e n t e r o r a w o r k s h o p t h a t w o r k s
according to BMW repair procedures with cor-
respondingly trained personnel. Otherwise, if
such work is carried out improperly, the high
voltage in the system presents the danger of
fatal injuries.<
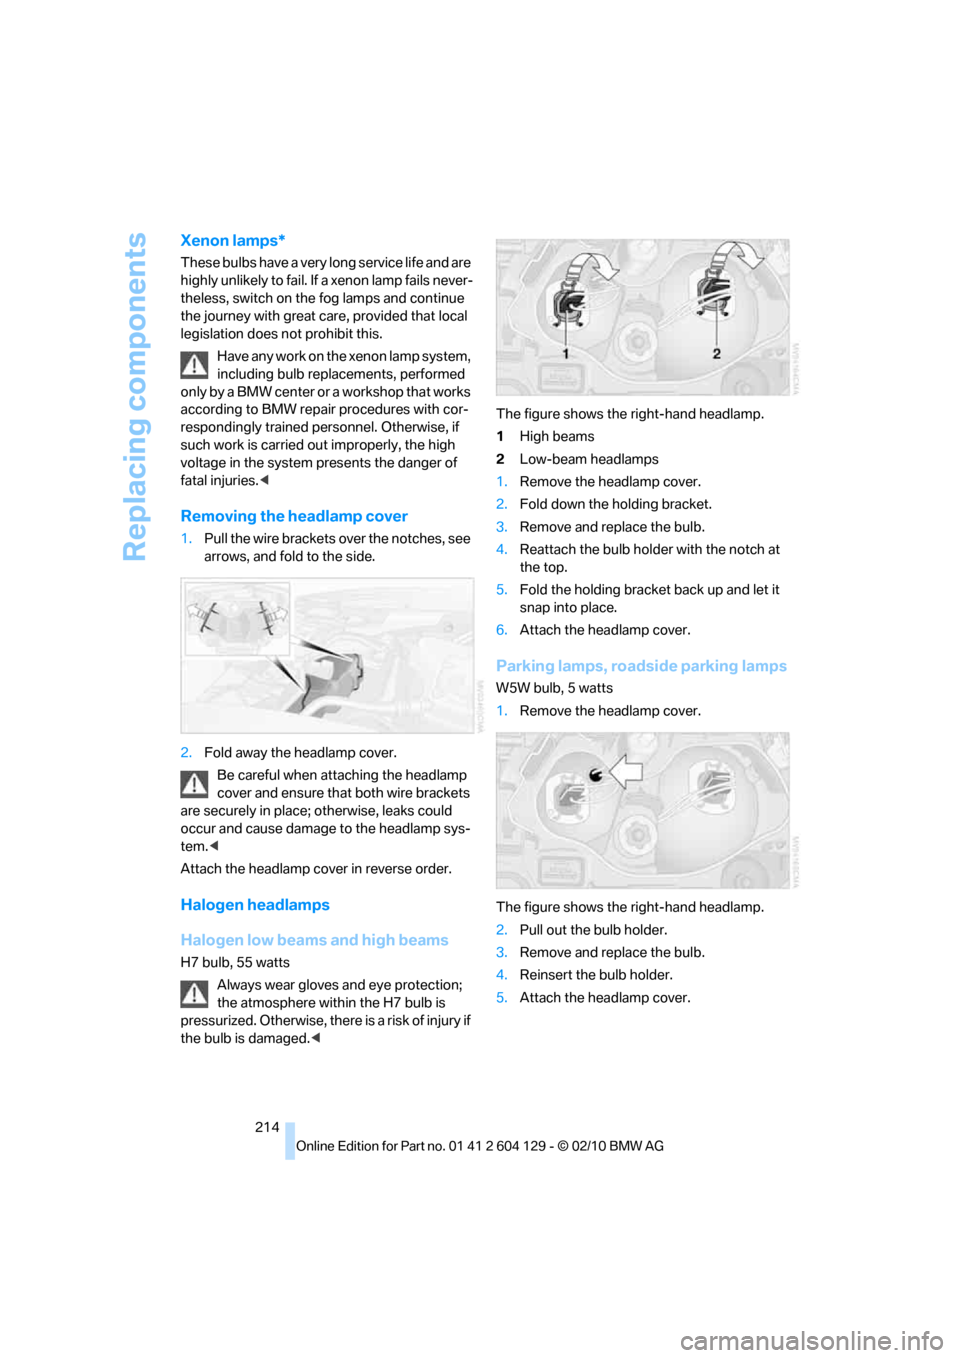
Removing the headlamp cover
1.Pull the wire brackets over the notches, see
arrows, and fold to the side.
2.Fold away the headlamp cover.
Be careful when attaching the headlamp
cover and ensure that both wire brackets
are securely in place; otherwise, leaks could
occur and cause damage to the headlamp sys-
tem.<
Attach the headlamp cover in reverse order.
Halogen headlamps
Halogen low beams and high beams
H7 bulb, 55 watts
Always wear gloves and eye protection;
the atmosphere within the H7 bulb is
pressurized. Otherwise, there is a risk of injury if
the bulb is damaged.
2Low-beam headlamps
1.Remove the headlamp cover.
2.Fold down the holding bracket.
3.Remove and replace the bulb.
4.Reattach the bulb holder with the notch at
the top.
5.Fold the holding bracket back up and let it
snap into place.
6.Attach the headlamp cover.
Parking lamps, roadside parking lamps
W5W bulb, 5 watts
1.Remove the headlamp cover.
The figure shows the right-hand headlamp.
2.Pull out the bulb holder.
3.Remove and replace the bulb.
4.Reinsert the bulb holder.
5.Attach the headlamp cover.
Page 240 of 256
Everything from A to Z
238
Everything from A to Z
Index
A
ABS Antilock Brake
System81
Acceleration assistant, refer to
Launch Control64
Accessories, refer to The
individual vehicle5
Accident, reporting, refer to
Emergency Request219
Activated-charcoal filter99
Activating
BMW Assist186,188
Active steering86
Adaptive light control92
Additives
– coolant205
– engine oil205
Address, entering121,127
Address for navigation
– entering121
Adjusting temperature97
Airbags88
– sitting safely43
– warning lamp89
Air conditioner96
Air distribution
– automatic97
Airing, refer to Ventilation99
Air outlets, refer to Air
vents96
Air pressure, checking, refer
to Tire inflation
pressure194
Air recirculation, refer to
Recirculated-air mode98
Air vents96
Air volume98
AKI, refer to Fuel
specifications193Alarm system32
– avoiding unintentional
alarms33
– interior motion sensor33
– switching off an alarm32
– tilt alarm sensor33
Albums of music
collection160
ALL program98
All-season tires, refer to
Winter tires201
AM, waveband143
Ambient air, refer to
Recirculated-air mode98
Antenna for mobile phone170
Antifreeze
– coolant205
– washer fluid66
Antilock Brake System
ABS81
Anti-theft alarm system, refer
to Alarm system
32
Anti-theft system27
Approved axle loads, refer to
Weights229
Approved engine oils205
Approved gross vehicle
weight, refer to Weights229
Armrest, refer to Center
armrest105
Arrival time
– computer70
Ashtray106
Assistance systems, refer to
Dynamic Stability Control
DSC81
AUC Automatic recirculated-
air control98
Audible instructions, refer to
Spoken instructions132Audio140
– controls140
– switching on/off140
– tone control140
– volume140
Automatic
– air distribution97
– air volume97
– cruise control66
– headlamp control91
Automatic car washes209
Automatic climate control96
Automatic curb monitor50
Automatic high beams and
low beams, refer to High-
beam assistant93
Automatic lamps
– refer to Welcome lamps91
Automatic recirculated-air
control AUC98
Automatic Service
Request188
Automatic transmission with
Steptronic57
– selector lever lock58
– shiftlock58
– towing221
– tow-starting221
AUTO program for automatic
climate control97
AUX-IN port163
Available services188
Average fuel consumption70
– setting the units72
Average speed70
Avoid highways in
navigation130
Avoiding unintentional
alarms33
Axle loads, refer to
Weights229