set time BMW 2 SERIES 2014 F22 Owner's Guide
[x] Cancel search | Manufacturer: BMW, Model Year: 2014, Model line: 2 SERIES, Model: BMW 2 SERIES 2014 F22Pages: 228, PDF Size: 5.73 MB
Page 163 of 228
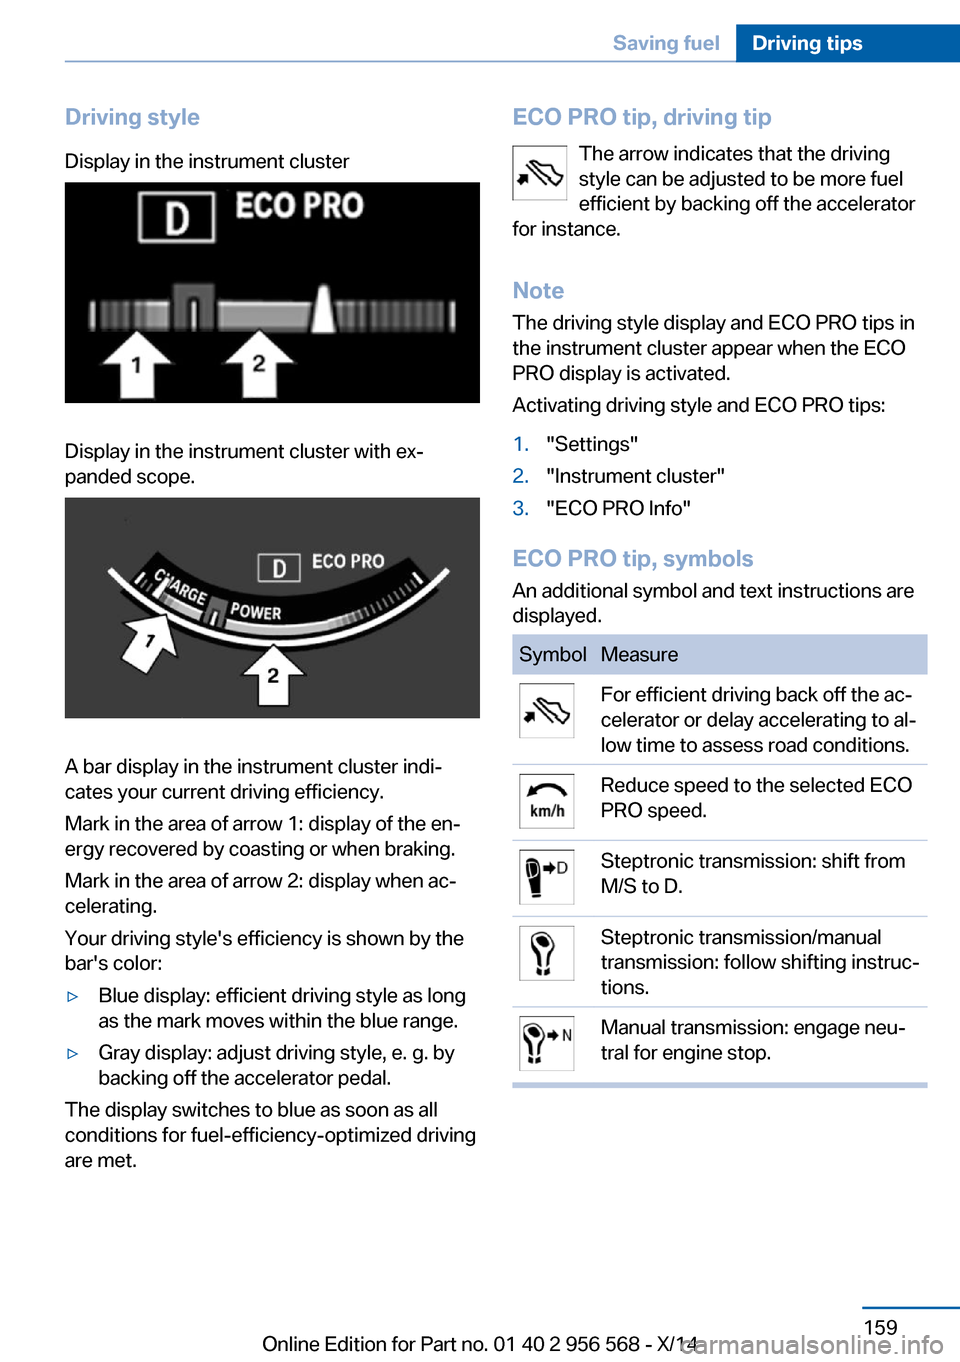
Driving styleDisplay in the instrument clusterDisplay in the instrument cluster with ex‐
panded scope.
A bar display in the instrument cluster indi‐
cates your current driving efficiency.
Mark in the area of arrow 1: display of the en‐
ergy recovered by coasting or when braking.
Mark in the area of arrow 2: display when ac‐
celerating.
Your driving style's efficiency is shown by the
bar's color:
▷Blue display: efficient driving style as long
as the mark moves within the blue range.▷Gray display: adjust driving style, e. g. by
backing off the accelerator pedal.
The display switches to blue as soon as all
conditions for fuel-efficiency-optimized driving
are met.
ECO PRO tip, driving tip
The arrow indicates that the driving
style can be adjusted to be more fuel
efficient by backing off the accelerator
for instance.
Note The driving style display and ECO PRO tips in
the instrument cluster appear when the ECO
PRO display is activated.
Activating driving style and ECO PRO tips:1."Settings"2."Instrument cluster"3."ECO PRO Info"
ECO PRO tip, symbols
An additional symbol and text instructions are
displayed.
SymbolMeasureFor efficient driving back off the ac‐
celerator or delay accelerating to al‐
low time to assess road conditions.Reduce speed to the selected ECO
PRO speed.Steptronic transmission: shift from
M/S to D.Steptronic transmission/manual
transmission: follow shifting instruc‐
tions.Manual transmission: engage neu‐
tral for engine stop.Seite 159Saving fuelDriving tips159
Online Edition for Part no. 01 40 2 956 568 - X/14
Page 164 of 228
Indications on the Control DisplayEfficientDynamics Information on fuel consumption and technol‐
ogy can be displayed while driving.1."Vehicle info"2."EfficientDynamics"
Displaying fuel consumption history
The average fuel consumption can be dis‐
played within an adjustable time frame.
Vertical bars show consumption for the se‐
lected time frame.
Trip interruptions are represented below the
bar on the time axis.
"Consumption history"
Adjusting fuel consumption history time frame
Select the symbol.
Resetting fuel consumption history
1.Open "Options".2."Reset consumption history"
Displaying EfficientDynamics info
The current efficiency can be displayed.
"EfficientDynamics info"
The following systems are displayed:
▷Automatic engine Start/Stop function.▷Energy recovery.▷Climate control output.▷Coasting.
Display ECO PRO tips
"ECO PRO Tips"
Settings are stored for the profile currently in
use.
Coasting
The concept The system helps to conserve fuel.
To do this, under certain conditions the engine
is automatically decoupled from the transmis‐
sion when selector lever position D is set. The
vehicle continues traveling with the engine idling to reduce fuel consumption. Selector
lever position D remains engaged.
This driving condition is referred to as coast‐
ing.
As soon as you step on the brake or accelera‐
tor pedal, the engine is automatically coupled
again.
Hints
Coasting is a component of the ECO PRO, re‐
fer to page 157, driving mode.
Coasting is automatically activated when ECO
PRO mode is called via the Driving Dynamics
Control.
The function is available in a certain speed
range.
A proactively driving style helps the driver to
use the function as often as possible and sup‐
ports the fuel-conserving effect of coasting.
Safety mode
The function is not available under one of the
following conditions.▷DSC OFF or TRACTION activated.▷Driving in the dynamic limit range and on
steep uphill or downhill grades.▷Battery charge status temporarily too low
or vehicle electrical system drawing exces‐
sive current.▷Cruise control activated.
Functional requirements
In ECO PRO mode, this function is available in
a speed range from approximately 30 mph, ap‐
Seite 160Driving tipsSaving fuel160
Online Edition for Part no. 01 40 2 956 568 - X/14
Page 192 of 228
Danger of burns
Only change bulbs when they are cool;
otherwise, there is a danger of getting
burned.◀
Working on the lighting system
When working on the lighting system,
you should always reel off the lights affected to
prevent short circuits.
To avoid possible injury or equipment damage
when replacing bulbs, observe any instructions
provided by the bulb manufacturer.◀
Do not perform work/bulb replacement
on xenon headlights
Have any work on the xenon lighting system,
including bulb replacement, performed only by
a service center. Due to the high voltage
present in the system, there is a danger of fatal
injuries if work is carried out improperly.◀
Do not touch the bulbs
Do not touch the glass of new bulbs with
your bare hands, as even minute amounts of
contamination will burn into the bulb's surface
and reduce its service life.
Use a clean tissue, cloth or something similar,
or hold the bulb by its base.◀
Light-emitting diodes (LEDs)
Some items of equipment use light-emitting
diodes installed behind a cover as a light
source.
These light-emitting diodes, which are related
to conventional lasers, are officially designated as Class 1 light-emitting diodes.
Do not remove the covers
Do not remove the covers, and never
stare into the unfiltered light for several hours;
otherwise, irritation of the retina could result.◀Headlight glass
Condensation can form on the inside of the ex‐
ternal lights in cool or humid weather. When
driving with the light switched on, the conden‐
sation evaporates after a short time. The head‐
light glass does not need to be changed.
If the headlights do not dim despite driving
with the light switched on, increasing humidity
forms, e. g. water droplets in the light, have the service center check this.
Headlight setting The headlight adjustments can be affected by
changing lights and bulbs. Have the head‐
lights' settings checked and corrected by serv‐
ice after a replacement.
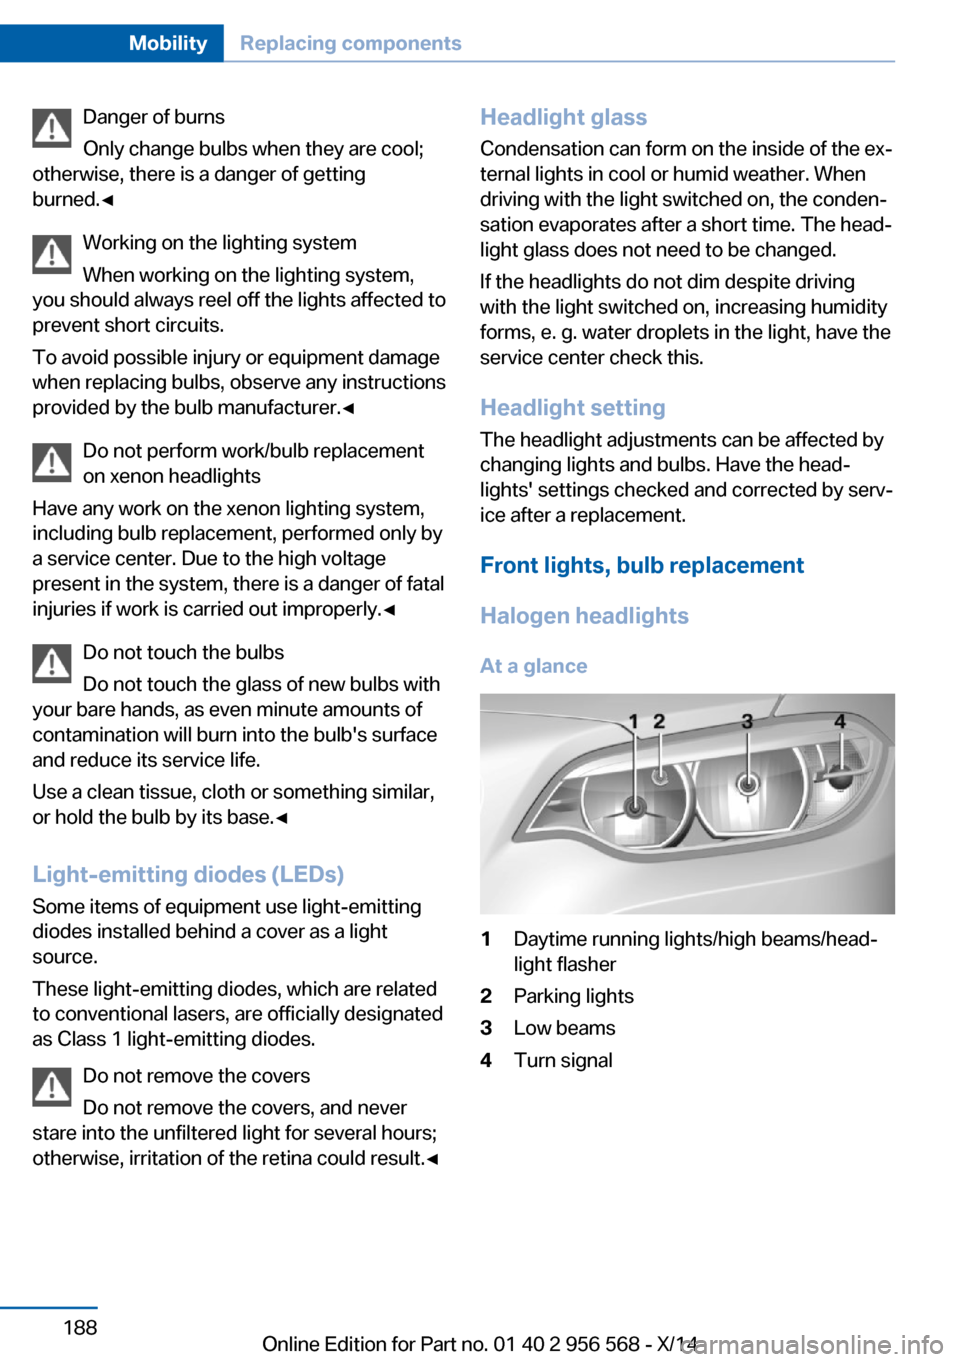
Front lights, bulb replacement
Halogen headlights
At a glance1Daytime running lights/high beams/head‐
light flasher2Parking lights3Low beams4Turn signalSeite 188MobilityReplacing components188
Online Edition for Part no. 01 40 2 956 568 - X/14
Page 198 of 228
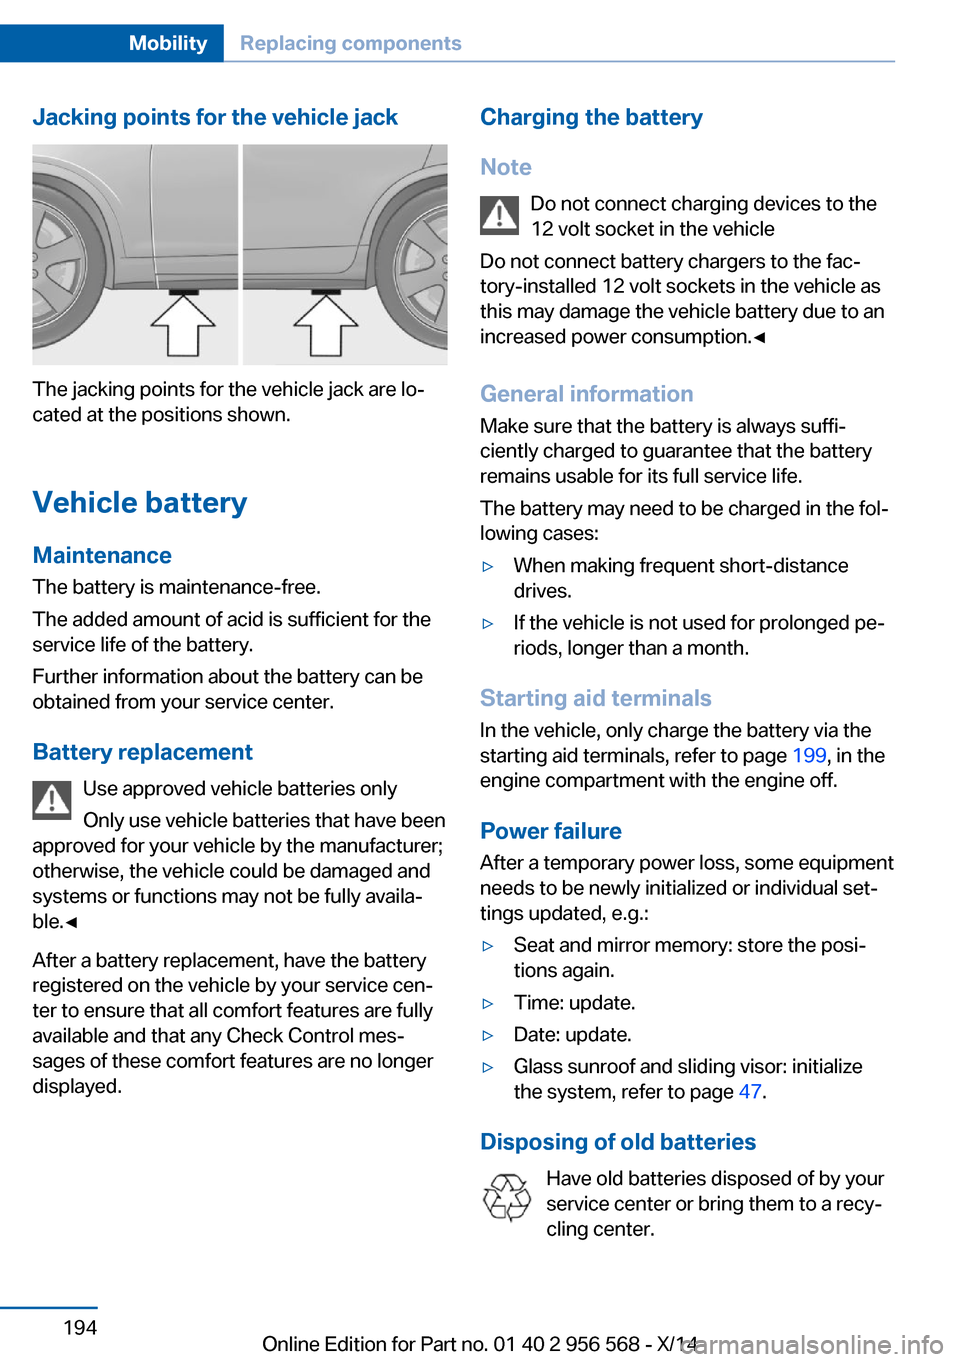
Jacking points for the vehicle jack
The jacking points for the vehicle jack are lo‐
cated at the positions shown.
Vehicle battery Maintenance
The battery is maintenance-free.
The added amount of acid is sufficient for the
service life of the battery.
Further information about the battery can be
obtained from your service center.
Battery replacement Use approved vehicle batteries only
Only use vehicle batteries that have been
approved for your vehicle by the manufacturer;
otherwise, the vehicle could be damaged and
systems or functions may not be fully availa‐
ble.◀
After a battery replacement, have the battery
registered on the vehicle by your service cen‐
ter to ensure that all comfort features are fully
available and that any Check Control mes‐
sages of these comfort features are no longer
displayed.
Charging the battery
Note Do not connect charging devices to the12 volt socket in the vehicle
Do not connect battery chargers to the fac‐
tory-installed 12 volt sockets in the vehicle as
this may damage the vehicle battery due to an
increased power consumption.◀
General information
Make sure that the battery is always suffi‐
ciently charged to guarantee that the battery
remains usable for its full service life.
The battery may need to be charged in the fol‐
lowing cases:▷When making frequent short-distance
drives.▷If the vehicle is not used for prolonged pe‐
riods, longer than a month.
Starting aid terminals
In the vehicle, only charge the battery via the
starting aid terminals, refer to page 199, in the
engine compartment with the engine off.
Power failure After a temporary power loss, some equipment
needs to be newly initialized or individual set‐
tings updated, e.g.:
▷Seat and mirror memory: store the posi‐
tions again.▷Time: update.▷Date: update.▷Glass sunroof and sliding visor: initialize
the system, refer to page 47.
Disposing of old batteries
Have old batteries disposed of by your
service center or bring them to a recy‐
cling center.
Seite 194MobilityReplacing components194
Online Edition for Part no. 01 40 2 956 568 - X/14
Page 219 of 228
Bulb replacement, rear 192
Bulbs and lights 187
Button, Start/Stop 63
Bypassing, refer to Jump- starting 198
C
California Proposition 65 Warning 7
Camera, care 206
Camera, rearview cam‐ era 122
Can holder, refer to Cu‐ pholder 145
Car battery 194
Car care products 204
Care, displays 206
Care, vehicle 204
Cargo 153
Cargo area, enlarging 141
Cargo area, storage compart‐ ments 145
Cargo, securing 154
Cargo straps, securing cargo 154
Car key, refer to Remote con‐ trol 34
Carpet, care 206
Car wash 203
Catalytic converter, refer to Hot exhaust system 151
CBS Condition Based Serv‐ ice 185
CD/Multimedia, see user's manual for Navigation, En‐
tertainment and Communi‐
cation
Center armrest 144
Center console 16
Central locking system 39
Central screen, refer to Con‐ trol Display 18
Changes, technical, refer to Safety 7
Changing parts 187 Changing wheels 193
Changing wheels/tires 176
Chassis number, see vehicle identification number 9
Check Control 77
Checking the oil level elec‐ tronically 181
Children, seating position 59
Children, transporting safely 59
Child restraint fixing sys‐ tem 59
Child restraint fixing system LATCH 60
Child restraint fixing systems, mounting 59
Child seat, mounting 59
Child seats 59
Chrome parts, care 205
Cigarette lighter 139
Cleaning displays 206
Climate control 128, 130
Clock 81
Closing/opening via door lock 38
Closing/opening with remote control 37
Clothes hooks 145
Coasting 160
Coasting with engine decou‐ pled, coasting 160
Coasting with idling en‐ gine 160
Cockpit 14
Combination reel, refer to Turn signals 67
Combination reel, refer to Wiper system 68
Comfort Access 41
COMFORT program, Dy‐ namic Driving Control 115
Compartments in the doors 144
Compass 137
Computer 85 Condensation on win‐
dows 132
Condensation under the vehi‐ cle 152
Condition Based Service CBS 185
Configuring driving pro‐ gram 115
Confirmation signal 43
ConnectedDrive, see user's manual for Navigation, En‐
tertainment and Communi‐
cation
ConnectedDrive Services
Connecting electrical devi‐ ces 139
Continued driving with a flat tire 99, 102
Control Display 18
Control Display, settings 87
Controller 18, 19
Control systems, driving sta‐ bility 111
Convenient opening with the remote control 37
Coolant 184
Coolant level 184
Coolant temperature 80
Cooling function 129, 131
Cooling, maximum 131
Cooling system 184
Corrosion on brake discs 152
Cosmetic mirror 139
Cruise control 117
Cruising range 81
Cupholder 145
Current fuel consumption 81
D
Damage, tires 176
Damping control, dy‐ namic 113
Data, technical 210
Date 81
Daytime running lights 90 Seite 215Everything from A to ZReference215
Online Edition for Part no. 01 40 2 956 568 - X/14
Page 225 of 228
SPORT program, DynamicDriving Control 114
Sport program, transmis‐ sion 72
Sport steering, variable 113
Stability control systems 111
Start/stop, automatic func‐ tion 65
Start/Stop button 63
Start function during malfunc‐ tion 35
Starting the engine 64
Status control display, tires 98
Status information, iDrive 23
Status of Owner's Manual 6
Steering assistance 113
Steering wheel, adjusting 57
Steering wheel heating 58
Steptronic Sport transmis‐ sion 73
Steptronic transmission 71
Stopping the engine 64
Storage compartment in the rear 145
Storage compartments 143
Storage compartments, loca‐ tions 143
Storage, tires 178
Storing the vehicle 206
Summer tires, tread 175
Sun visor 139
Supplementary text mes‐ sages 79
Switch for Dynamic Driv‐ ing 113
Switch-on times, parked-car ventilation 134
Switch, refer to Cockpit 14
Symbols 6
Symbols in the status field 23
T Tachometer 80
Tail lights 192 Technical changes, refer to
Safety 7
Technical data 210
Telephone, see user's manual for Navigation, Entertain‐
ment and Communication
Temperature, automatic cli‐ mate control 129, 131
Temperature display for ex‐ ternal temperature 81
Terminal, starting aid 199
Text messages, supplemen‐ tary 79
Theft alarm system, refer to Alarm system 43
Thigh support 50
Through-loading system 141
Tilt alarm sensor 44
Time of arrival 86
Tire damage 176
Tire identification marks 174
Tire inflation pressure 170
Tire inflation pressure moni‐ tor, refer to FTM 100
Tire Pressure Monitor TPM 97
Tires, changing 176
Tires, everything on wheels and tires 170
Tires, run-flat tires 178
Tire tread 175
Tone, see user's manual for Navigation, Entertainment
and Communication
Tool 187
Total vehicle weight 211
Touchpad 21
Tow fitting 201
Towing 200
Tow lug, see tow fitting 201
Tow-starting 200
Tow truck 200
TPM Tire Pressure Moni‐ tor 97
Traction control 112 TRACTION, driving dynam‐
ics 112
Transmission lock, electronic unlocking 74
Transmission, manual trans‐ mission 71
Transmission, Steptronic transmission 71
Transporting children safely 59
Tread, tires 175
Trip computer 86
Triple turn signal activa‐ tion 68
Trip odometer 80
Truck for tow-starting/ towing 200
Trunk lid closing 40
Trunk lid, emergency unlock‐ ing 41
Trunk lid, hotel function 40
Trunk lid opening 40
Trunk lid via remote con‐ trol 38
Turning circle lines, rearview camera 123
Turn signals, operation 67
Turn signals, rear, bulb re‐ placement 192
U
Unintentional alarm 44
Units of measure 88
Universal remote control 135
Unlock button, Steptronic transmission 72
Unlocking/locking via door lock 38
Unlocking/locking with re‐ mote control 37
Unlocking, settings 42
Updates made after the edito‐ rial deadline 6
Upholstery care 205
USB interface 140 Seite 221Everything from A to ZReference221
Online Edition for Part no. 01 40 2 956 568 - X/14