BMW 2 SERIES CONVERTIBLE 2015 F23 Workshop Manual
Manufacturer: BMW, Model Year: 2015, Model line: 2 SERIES CONVERTIBLE, Model: BMW 2 SERIES CONVERTIBLE 2015 F23Pages: 234, PDF Size: 5.93 MB
Page 51 of 234
Closing without the pinch protection
system
Keep the closing path clear
Monitor closing and make sure that the
closing path of the window is clear; otherwise,
injuries may result.◀
E.g. danger from the outside or ice might pre‐
vent window from closing properly - proceed
as follows:1.Pull the reel past the resistance point and
hold it there.
The pinch protection is limited and the
window reopens slightly if the closing force
exceeds a certain margin.2.Pull the reel past the resistance point again
within approx. 4 seconds and hold it there.
The window closes without jam protection.
Convertible top
General information The convertible top can be opened or closed
at speeds up to approx. 30 mph/50 km/h.
If the vehicle is accelerated above a speed of
approx. 30 mph/50 km/h while the convertible
top is being moved, the convertible top move‐
ment stops.
Hints
▷The trunk lid cannot be opened if the
convertible top is not fully opened or
closed.▷If possible, close the convertible top when
the vehicle is parked. A closed convertible
top protects it from weather-related dam‐
age and to some extent from theft.▷Event when the convertible top is closed,
only store valuables in the locked trunk.▷At higher speeds, vacuum produced in the
vehicle interior causes the convertible top
to begin to flutter. Increase the amount ofair via the automatic climate control so that
no vacuum is produced in the vehicle.▷It is not possible to start the engine and
operate the convertible top simultane‐
ously. When the engine is started using the
Start/Stop button or using the Auto Start/
Stop function, the convertible top move‐
ment is briefly interrupted.
Overview
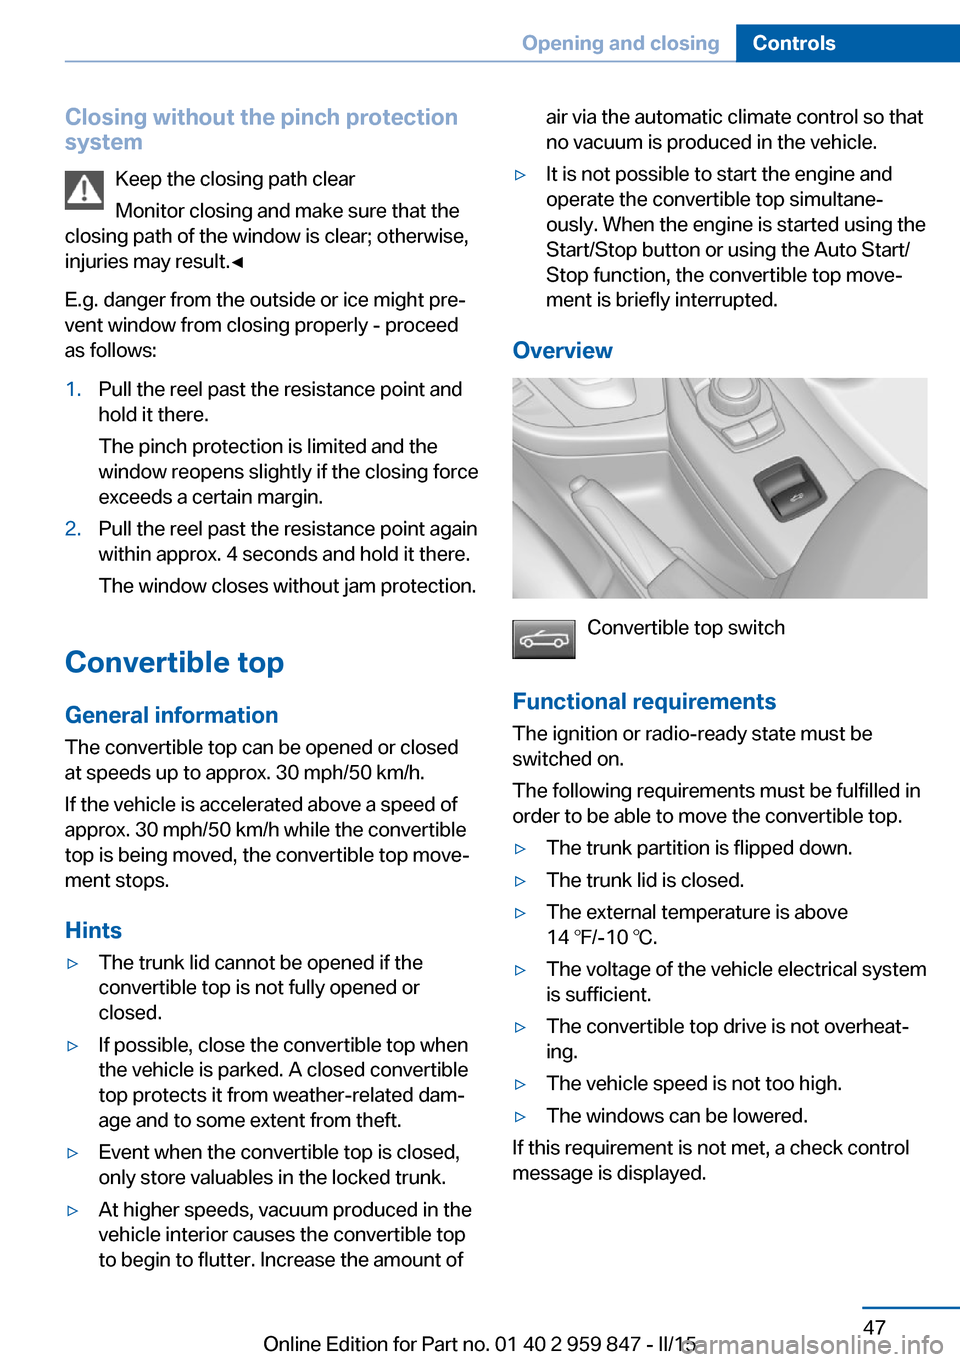
Convertible top switch
Functional requirements
The ignition or radio-ready state must be
switched on.
The following requirements must be fulfilled in
order to be able to move the convertible top.
▷The trunk partition is flipped down.▷The trunk lid is closed.▷The external temperature is above
14 ℉/-10 ℃.▷The voltage of the vehicle electrical system
is sufficient.▷The convertible top drive is not overheat‐
ing.▷The vehicle speed is not too high.▷The windows can be lowered.
If this requirement is not met, a check control
message is displayed.
Seite 47Opening and closingControls47
Online Edition for Part no. 01 40 2 959 847 - II/15
Page 52 of 234
Safety informationDo not open convertible top at low tem‐
peratures
With temperatures below +14 ℉/-10 ℃ do not
open the convertible top; otherwise damages
could result.◀
Allow wet convertible top to dry
Do not leave the open convertible top in
the convertible top well longer than one day
while the top is still wet; otherwise, damage
could result due to moisture.◀
Note the swivel range of the convertible
top
The convertible top pivots up during opening
and closing. When the top is moved, e.g., in
garages, make sure that there is a minimum
height of 79 inches/2 meters; otherwise, it
damages may result.◀
Do not place objects on the convertible
top
Do not place any objects on the convertible
top, otherwise, they could fall and cause dam‐
age or injuries.◀
No convertible top movement when roll‐
over protection is activated
Do not move the convertible top when rollover
protection is activated; otherwise, it may result
in damage to the convertible top.◀
Open and close convertible top com‐
pletely
Always open or close the convertible top com‐ pletely. Convertible top and convertible top
well storage cover are locked in the final posi‐
tions. Driving with the convertible top or
convertible top well storage cover unlocked
can result in damage.◀
Do not reach into the convertible top
mechanism
Do not reach into the convertible top mecha‐
nism during the opening and closing operation.Keep children away from the opening path of
the convertible top, otherwise, there is a risk of
injury.◀
Observe traffic during operation
When the convertible top is opened while
driving, be alert to traffic; otherwise, it may re‐
sult in an accident. If possible, do not move the
convertible top while driving in reverse be‐
cause rearward vision is severely impaired
while the convertible top is in motion. During
windy conditions, do not operate the
convertible top while driving.
Do not drive faster than 30 mph/50 km/h; oth‐
erwise, vehicle damage may occur.◀
Do not attach any roof carrier systems to
the convertible top
Do not attach any roof carrier systems; other‐
wise, an accident may occur.◀
Do not operate convertible top on un‐
even sections or road
Do not open or close convertible top on un‐
even sections of road. Otherwise, the vibra‐
tions can result in damage to the convertible
top.◀
Before opening and closing▷Follow the safety instructions for the
convertible top.▷Make sure that the trunk partition in the
trunk is folded down.▷Make sure that the cargo does not push
against the trunk partition from below.▷Make sure that the trunk lid is closed.
Opening and closing from the inside
In order to protect the battery, move the
convertible top only when the engine is run‐
ning if possible.
Before closing the convertible top, remove any
foreign objects from the windshield frame; oth‐
erwise, closing may be prevented.
Seite 48ControlsOpening and closing48
Online Edition for Part no. 01 40 2 959 847 - II/15
Page 53 of 234
▷Press and hold the switch. The
windows are rolled down, and the
convertible top opens as longs as the
switch is pressed.▷Pull the switch and hold it. The
windows are lowered, the
convertible top closes and the windows are
raised again as long as the switch is pulled.
Push or pull switch until the convertible top is
completely open or closed and the end of the
procedure is indicated by a corresponding
Check Control message. Always make sure
that the convertible top well storage cover is
completely closed. If the convertible top is
completely open or closed, convertible top and
convertible top well storage cover are latched.
Interruption Always open/close the convertible top
completely
A convertible top that is not opened or closed
completely is not locked and represents a haz‐
ard.◀
The convertible top movement is interrupted if
the switch is released. The sequence can be
continued in the desired direction using the
switch.
If there is a longer interruption with the ignition
switched on, convertible top and convertible
top well storage cover remain approx. 10 mi‐ nutes in the current position before they slowly
go down. If the ignition is switched off,
convertible top and convertible top well stor‐ age cover lower already after a short waiting
period.
The convertible top and the convertible top
well storage cover are not locked. Operate
switch again until the convertible operation is
terminated.
Convenient operation from outside
When equipped with Comfort Access the convertible top can also be operated from out‐
side.
▷Convenient opening, refer to page 37, via
the remote control.▷Convenient closing, refer to page 38, via
the remote control.
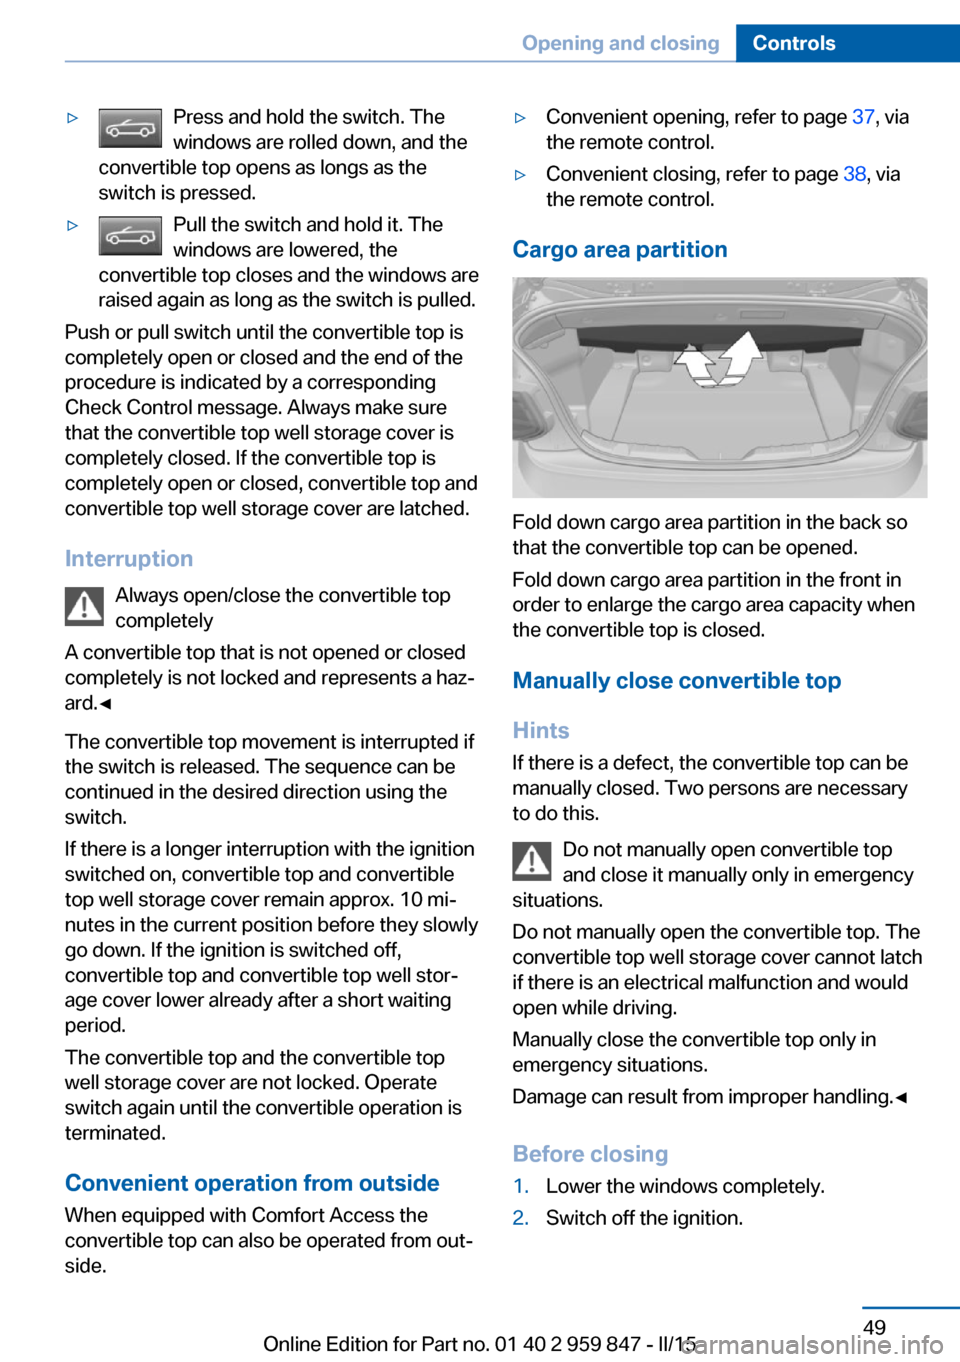
Cargo area partition
Fold down cargo area partition in the back so
that the convertible top can be opened.
Fold down cargo area partition in the front in
order to enlarge the cargo area capacity when
the convertible top is closed.
Manually close convertible top
Hints
If there is a defect, the convertible top can be
manually closed. Two persons are necessary
to do this.
Do not manually open convertible top
and close it manually only in emergency
situations.
Do not manually open the convertible top. The
convertible top well storage cover cannot latch
if there is an electrical malfunction and would
open while driving.
Manually close the convertible top only in
emergency situations.
Damage can result from improper handling.◀
Before closing
1.Lower the windows completely.2.Switch off the ignition.Seite 49Opening and closingControls49
Online Edition for Part no. 01 40 2 959 847 - II/15
Page 54 of 234
3.Carefully open the trunk lid, refer to
page 40, taking care not to damage the
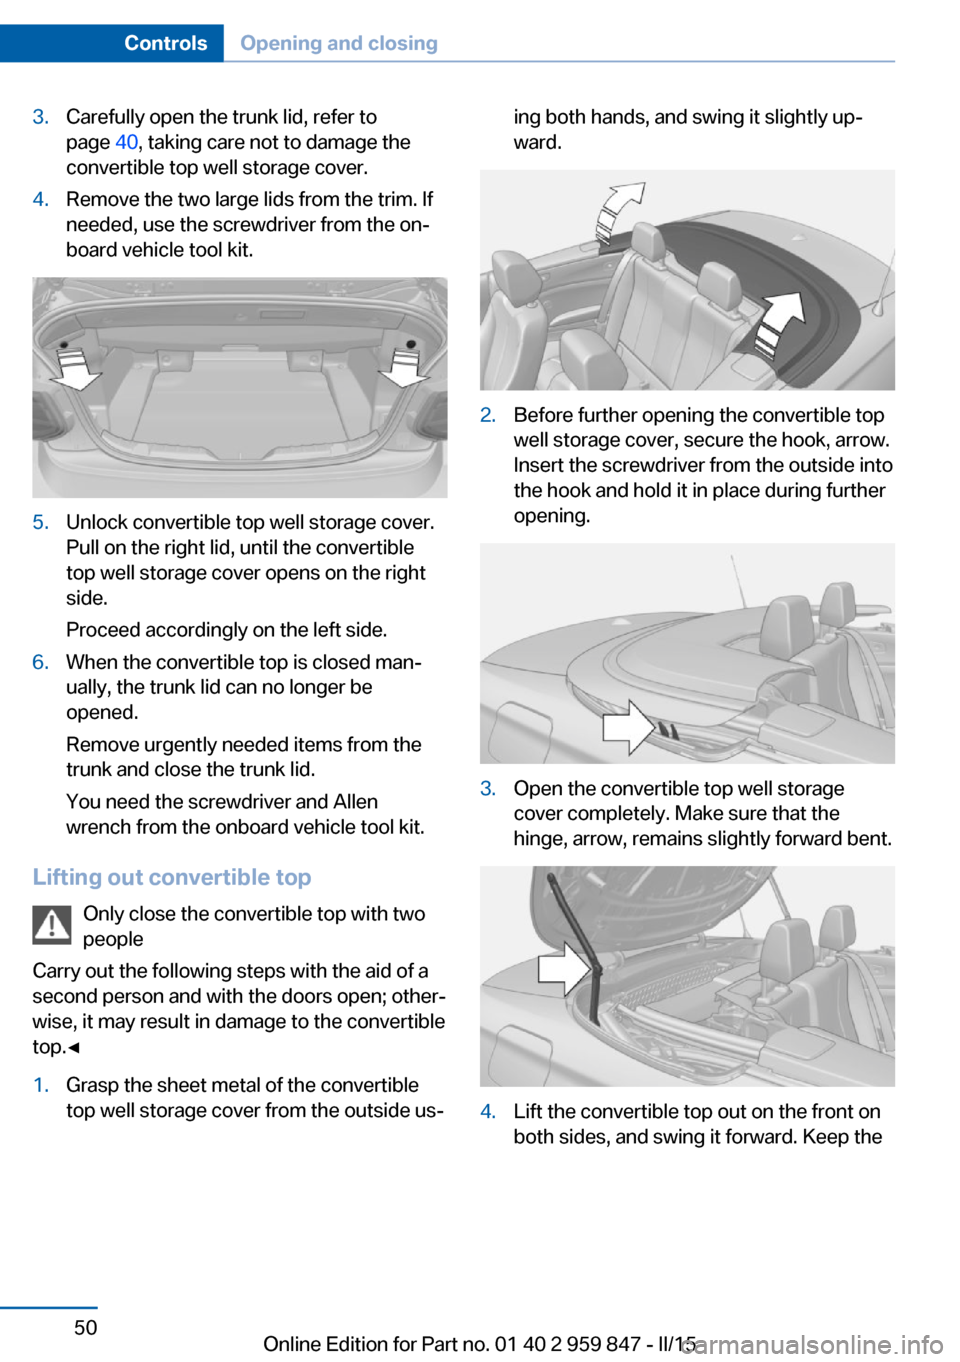
convertible top well storage cover.4.Remove the two large lids from the trim. If
needed, use the screwdriver from the on‐
board vehicle tool kit.5.Unlock convertible top well storage cover.
Pull on the right lid, until the convertible
top well storage cover opens on the right
side.
Proceed accordingly on the left side.6.When the convertible top is closed man‐
ually, the trunk lid can no longer be
opened.
Remove urgently needed items from the
trunk and close the trunk lid.
You need the screwdriver and Allen
wrench from the onboard vehicle tool kit.
Lifting out convertible top
Only close the convertible top with two
people
Carry out the following steps with the aid of a second person and with the doors open; other‐
wise, it may result in damage to the convertible
top.◀
1.Grasp the sheet metal of the convertible
top well storage cover from the outside us‐ing both hands, and swing it slightly up‐
ward.2.Before further opening the convertible top
well storage cover, secure the hook, arrow.
Insert the screwdriver from the outside into
the hook and hold it in place during further
opening.3.Open the convertible top well storage
cover completely. Make sure that the
hinge, arrow, remains slightly forward bent.4.Lift the convertible top out on the front on
both sides, and swing it forward. Keep theSeite 50ControlsOpening and closing50
Online Edition for Part no. 01 40 2 959 847 - II/15
Page 55 of 234
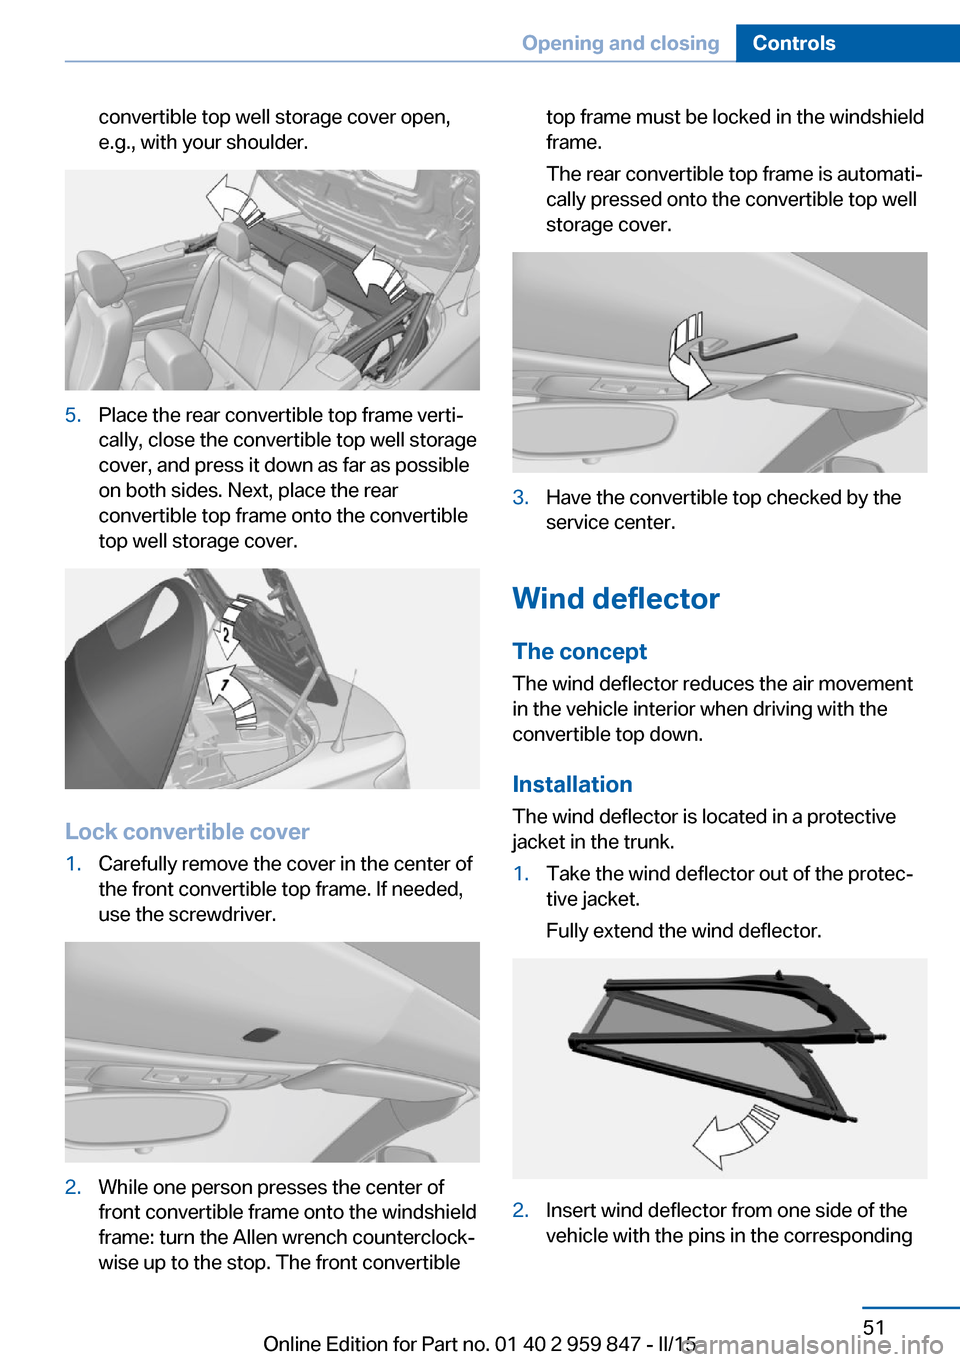
convertible top well storage cover open,
e.g., with your shoulder.5.Place the rear convertible top frame verti‐
cally, close the convertible top well storage
cover, and press it down as far as possible
on both sides. Next, place the rear
convertible top frame onto the convertible
top well storage cover.
Lock convertible cover
1.Carefully remove the cover in the center of
the front convertible top frame. If needed,
use the screwdriver.2.While one person presses the center of
front convertible frame onto the windshield
frame: turn the Allen wrench counterclock‐
wise up to the stop. The front convertibletop frame must be locked in the windshield
frame.
The rear convertible top frame is automati‐
cally pressed onto the convertible top well
storage cover.3.Have the convertible top checked by the
service center.
Wind deflector
The concept The wind deflector reduces the air movement
in the vehicle interior when driving with the
convertible top down.
Installation
The wind deflector is located in a protective
jacket in the trunk.
1.Take the wind deflector out of the protec‐
tive jacket.
Fully extend the wind deflector.2.Insert wind deflector from one side of the
vehicle with the pins in the correspondingSeite 51Opening and closingControls51
Online Edition for Part no. 01 40 2 959 847 - II/15
Page 56 of 234
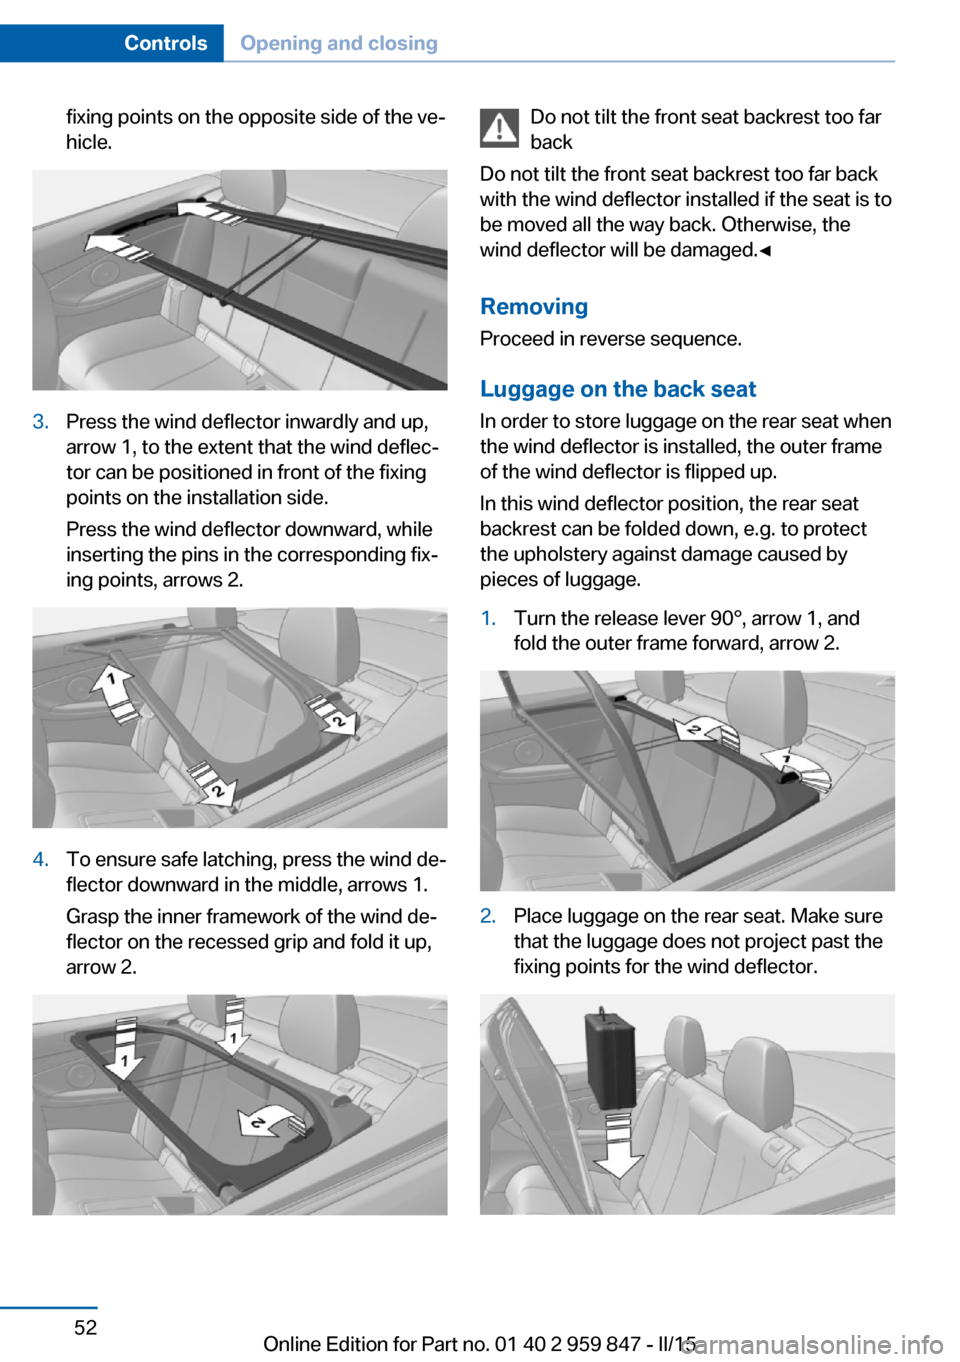
fixing points on the opposite side of the ve‐
hicle.3.Press the wind deflector inwardly and up,
arrow 1, to the extent that the wind deflec‐
tor can be positioned in front of the fixing
points on the installation side.
Press the wind deflector downward, while
inserting the pins in the corresponding fix‐
ing points, arrows 2.4.To ensure safe latching, press the wind de‐
flector downward in the middle, arrows 1.
Grasp the inner framework of the wind de‐
flector on the recessed grip and fold it up,
arrow 2.Do not tilt the front seat backrest too far
back
Do not tilt the front seat backrest too far back
with the wind deflector installed if the seat is to
be moved all the way back. Otherwise, the
wind deflector will be damaged.◀
RemovingProceed in reverse sequence.
Luggage on the back seat In order to store luggage on the rear seat when
the wind deflector is installed, the outer frame
of the wind deflector is flipped up.
In this wind deflector position, the rear seat
backrest can be folded down, e.g. to protect
the upholstery against damage caused by
pieces of luggage.1.Turn the release lever 90°, arrow 1, and
fold the outer frame forward, arrow 2.2.Place luggage on the rear seat. Make sure
that the luggage does not project past the
fixing points for the wind deflector.Seite 52ControlsOpening and closing52
Online Edition for Part no. 01 40 2 959 847 - II/15
Page 57 of 234
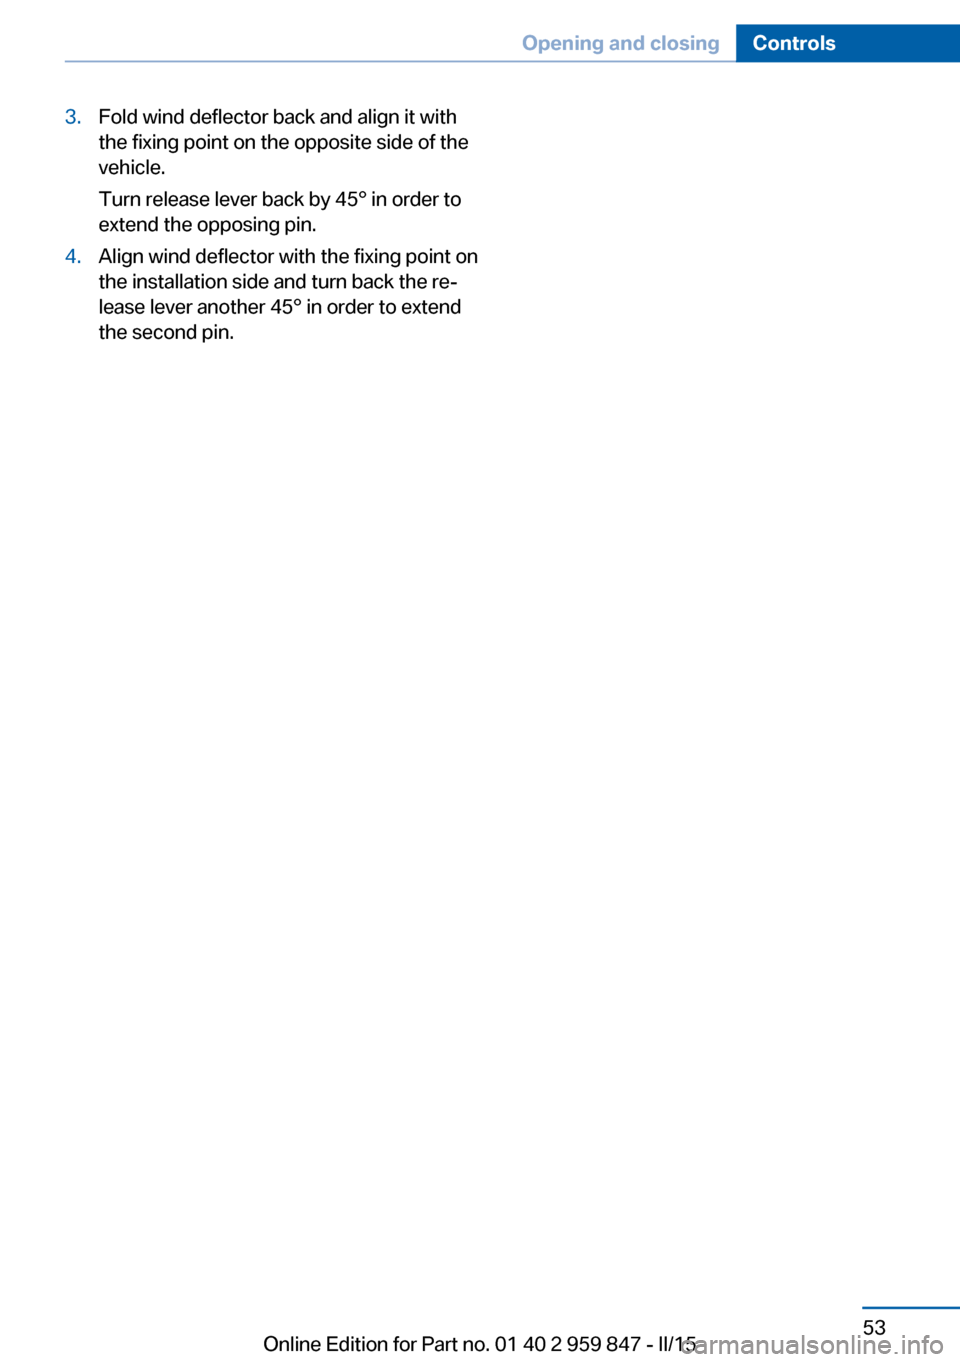
3.Fold wind deflector back and align it with
the fixing point on the opposite side of the
vehicle.
Turn release lever back by 45° in order to
extend the opposing pin.4.Align wind deflector with the fixing point on
the installation side and turn back the re‐
lease lever another 45° in order to extend
the second pin.Seite 53Opening and closingControls53
Online Edition for Part no. 01 40 2 959 847 - II/15
Page 58 of 234
AdjustingVehicle features and options
This chapter describes all standard, country-
specific and optional features offered with the
series. It also describes features that are not
necessarily available in your car, e. g., due to
the selected options or country versions. This
also applies to safety-related functions and
systems. The respectively applicable country
provisions must be observed when using the
respective features and systems.
Sitting safely The ideal seating position can make a vital
contribution to relaxed, fatigue-free driving.
The seating position plays an important role in
an accident in combination with:▷Safety belts, refer to page 58.▷Head restraints, refer to page 59.▷Airbags, refer to page 99.
Seats
Hints Do not adjust the seat while driving
Do not adjust the driver's seat while driv‐
ing, or the seat could respond with unexpected
movement and the ensuing loss of vehicle
control could lead to an accident.◀
Do not incline the backrest too far to the
rear
Do not incline the backrest too far to the rear
while driving, or there is a risk of slipping under
the safety belt in the event of an accident. This
would eliminate the protection normally pro‐
vided by the belt.◀
Keep the movement area unobstructed
When changing the seat position, keep
the seat's area of movement unobstructed;
otherwise, people might get injured or objects
damaged.◀
Manually adjustable seats
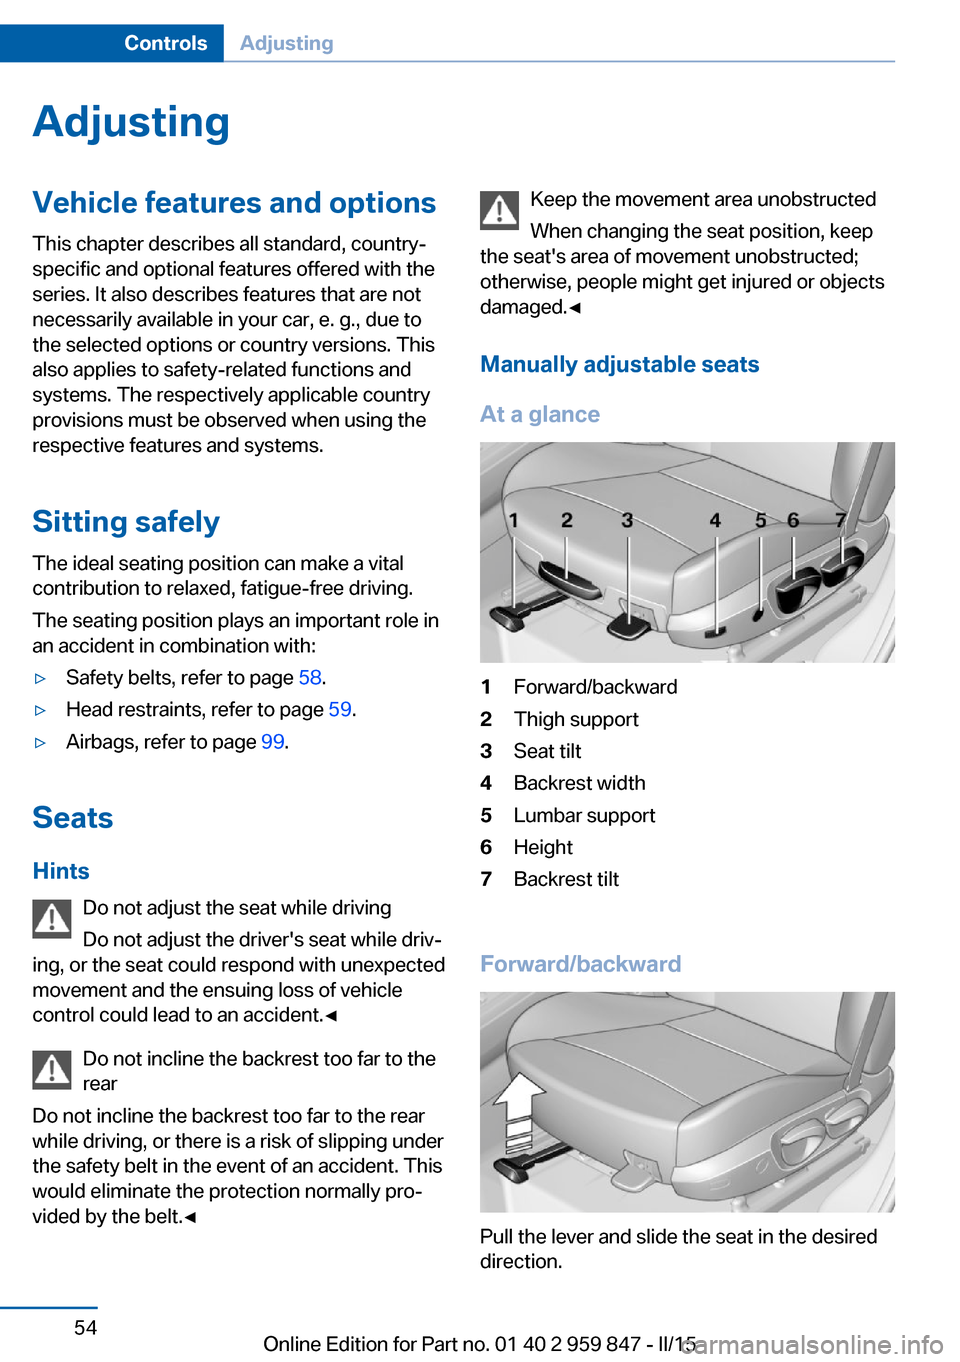
At a glance1Forward/backward2Thigh support3Seat tilt4Backrest width5Lumbar support6Height7Backrest tilt
Forward/backward
Pull the lever and slide the seat in the desired
direction.
Seite 54ControlsAdjusting54
Online Edition for Part no. 01 40 2 959 847 - II/15
Page 59 of 234
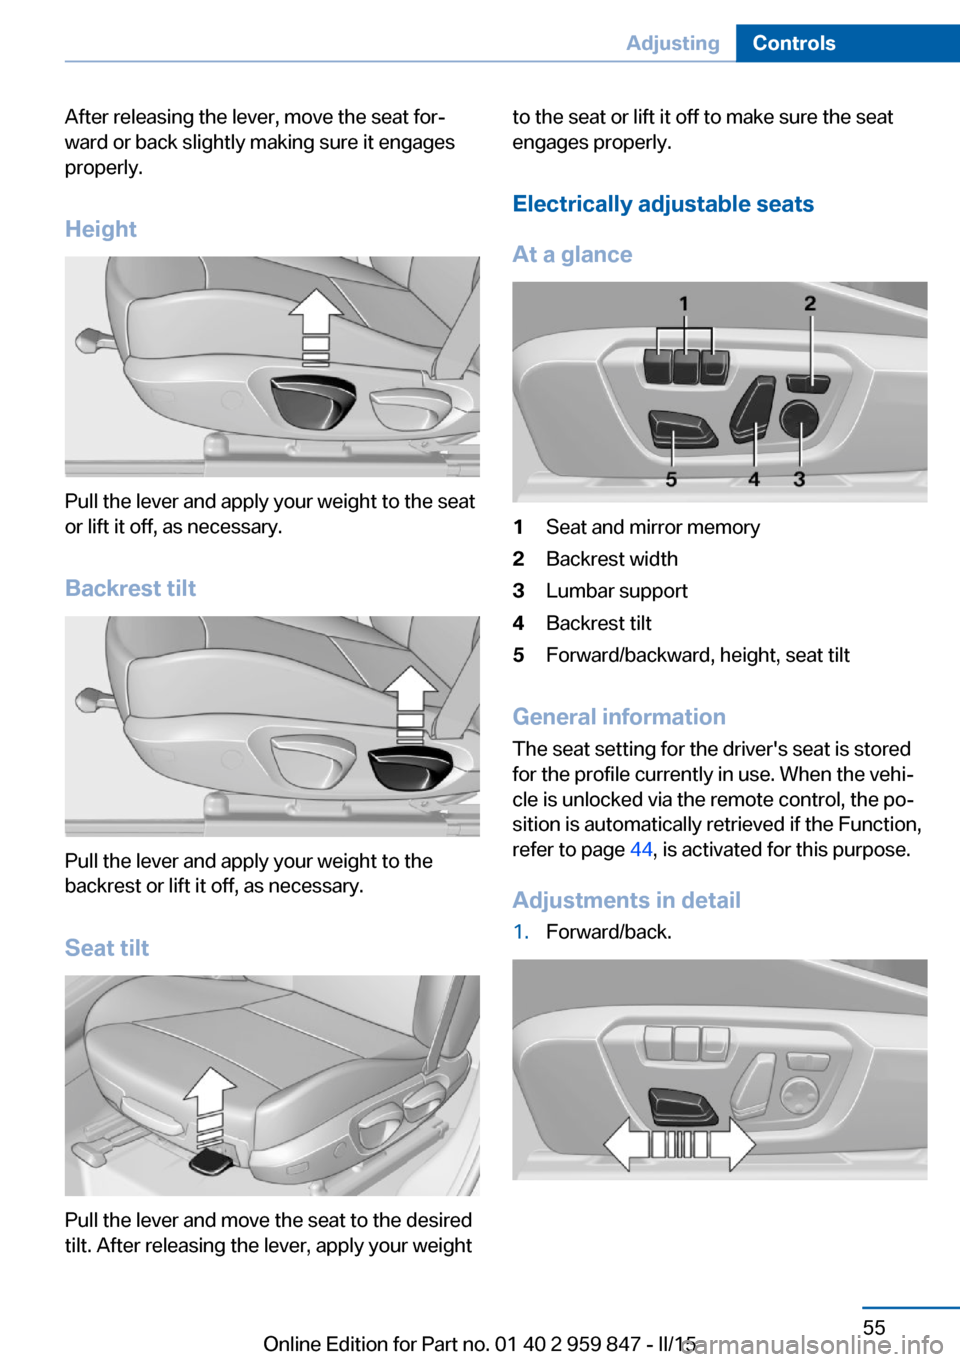
After releasing the lever, move the seat for‐
ward or back slightly making sure it engages
properly.
Height
Pull the lever and apply your weight to the seat
or lift it off, as necessary.
Backrest tilt
Pull the lever and apply your weight to the
backrest or lift it off, as necessary.
Seat tilt
Pull the lever and move the seat to the desired
tilt. After releasing the lever, apply your weight
to the seat or lift it off to make sure the seat
engages properly.
Electrically adjustable seats
At a glance1Seat and mirror memory2Backrest width3Lumbar support4Backrest tilt5Forward/backward, height, seat tilt
General information
The seat setting for the driver's seat is stored
for the profile currently in use. When the vehi‐
cle is unlocked via the remote control, the po‐
sition is automatically retrieved if the Function,
refer to page 44, is activated for this purpose.
Adjustments in detail
1.Forward/back.Seite 55AdjustingControls55
Online Edition for Part no. 01 40 2 959 847 - II/15
Page 60 of 234
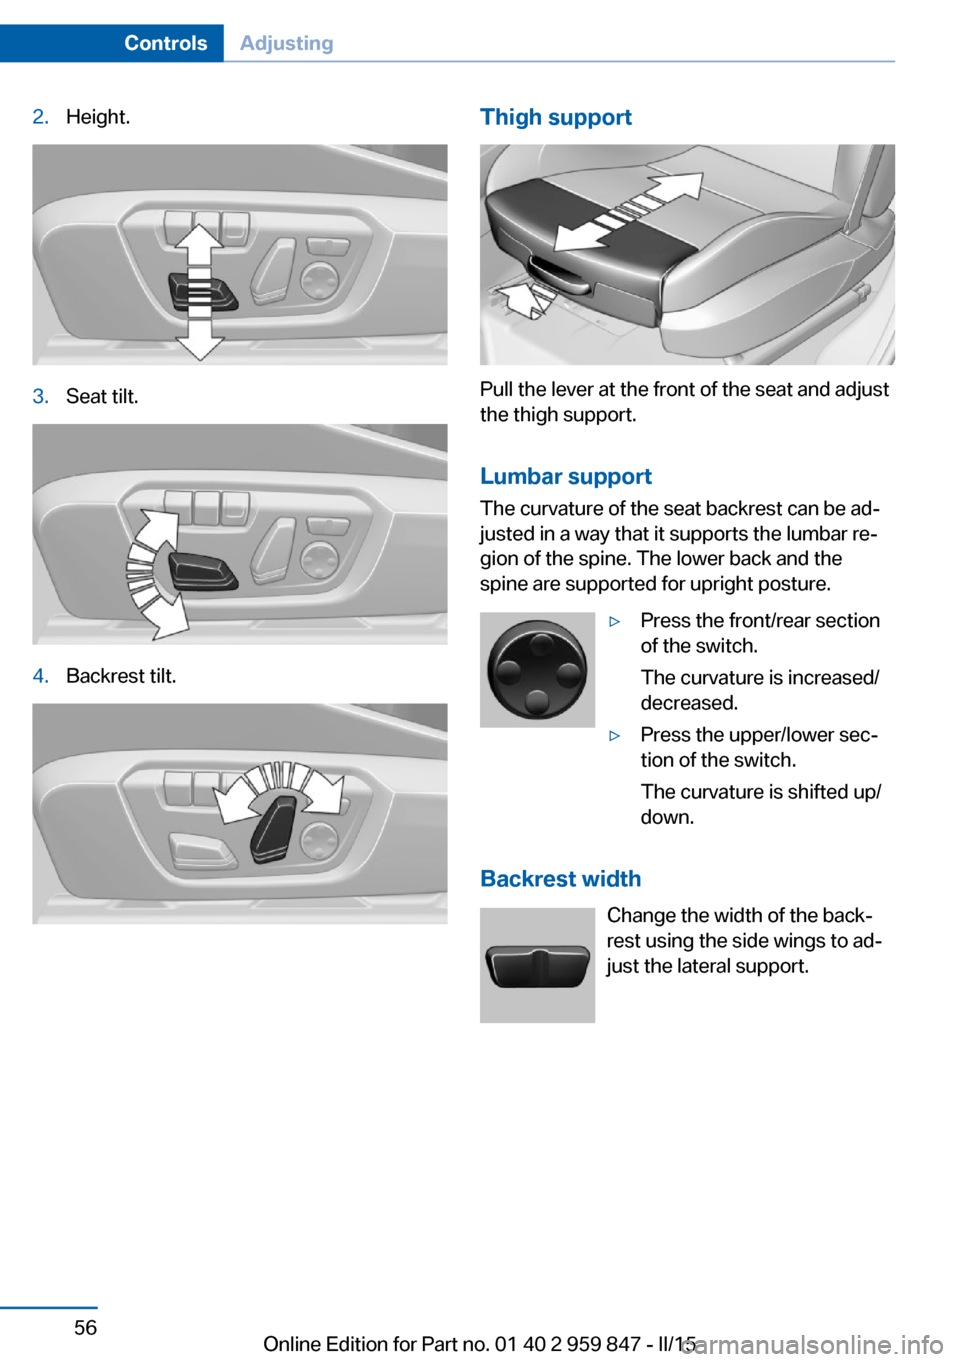
2.Height.3.Seat tilt.4.Backrest tilt.Thigh support
Pull the lever at the front of the seat and adjust
the thigh support.
Lumbar support The curvature of the seat backrest can be ad‐
justed in a way that it supports the lumbar re‐
gion of the spine. The lower back and the
spine are supported for upright posture.
▷Press the front/rear section
of the switch.
The curvature is increased/
decreased.▷Press the upper/lower sec‐
tion of the switch.
The curvature is shifted up/
down.
Backrest width
Change the width of the back‐
rest using the side wings to ad‐
just the lateral support.
Seite 56ControlsAdjusting56
Online Edition for Part no. 01 40 2 959 847 - II/15