tow BMW 3 SEDAN 2007 User Guide
[x] Cancel search | Manufacturer: BMW, Model Year: 2007, Model line: 3 SEDAN, Model: BMW 3 SEDAN 2007Pages: 268, PDF Size: 9.12 MB
Page 107 of 268
Controls
105Reference
At a glance
Driving tips
Communications
Navigation
Entertainment
Mobility
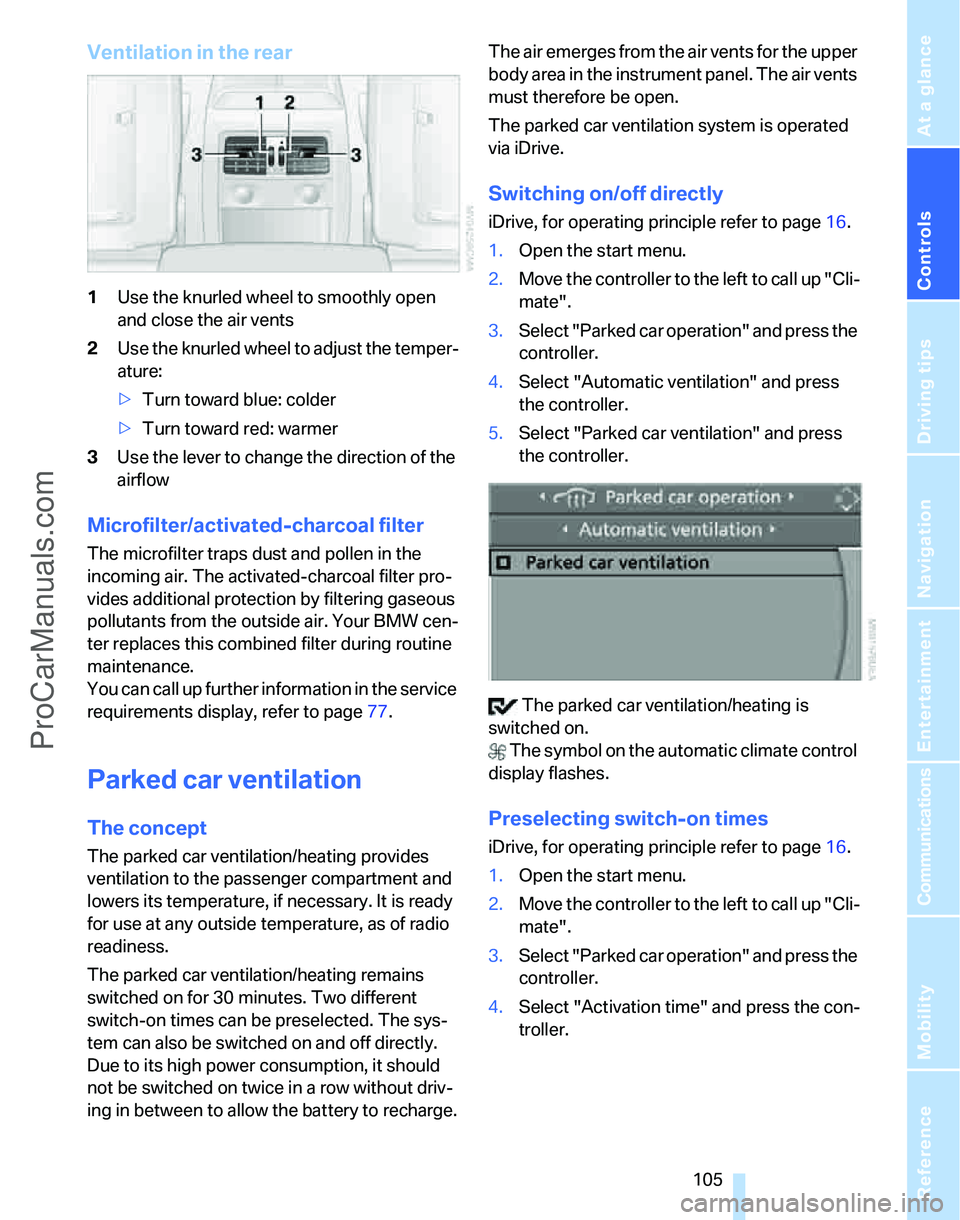
Ventilation in the rear
1Use the knurled wheel to smoothly open
and close the air vents
2Use the knurled wheel to adjust the temper-
ature:
>Turn toward blue: colder
>Turn toward red: warmer
3Use the lever to change the direction of the
airflow
Microfilter/activated-charcoal filter
The microfilter traps dust and pollen in the
incoming air. The activated-charcoal filter pro-
vides additional protection by filtering gaseous
pollutants from the outside air. Your BMW cen-
ter replaces this combined filter during routine
maintenance.
You can call up further information in the service
requirements display, refer to page77.
Parked car ventilation
The concept
The parked car ventilation/heating provides
ventilation to the passenger compartment and
lowers its temperature, if necessary. It is ready
for use at any outside temperature, as of radio
readiness.
The parked car ventilation/heating remains
switched on for 30 minutes. Two different
switch-on times can be preselected. The sys-
tem can also be switched on and off directly.
Due to its high power consumption, it should
not be switched on twice in a row without driv-
ing in between to allow the battery to recharge.The air emerges from the air vents for the upper
body area in the instrument panel. The air vents
must therefore be open.
The parked car ventilation system is operated
via iDrive.
Switching on/off directly
iDrive, for operating principle refer to page16.
1.Open the start menu.
2.Move the controller to the left to call up "Cli-
mate".
3.Select "Parked car operation" and press the
controller.
4.Select "Automatic ventilation" and press
the controller.
5.Select "Parked car ventilation" and press
the controller.
The parked car ventilation/heating is
switched on.
The symbol on the automatic climate control
display flashes.
Preselecting switch-on times
iDrive, for operating principle refer to page16.
1.Open the start menu.
2.Move the controller to the left to call up "Cli-
mate".
3.Select "Parked car operation" and press the
controller.
4.Select "Activation time" and press the con-
troller.
ProCarManuals.com
Page 119 of 268
Controls
117Reference
At a glance
Driving tips
Communications
Navigation
Entertainment
Mobility
>Hooks for hanging up shopping bags or tote
bags, for example, on the left and right-hand
sides of the cargo bay
>Net for small objects on the right trim panel
of the cargo bay
>Storage compartment under the floor panel
Depending on your vehicle's equipment, other
storage spaces can be found in the cargo bay:
>Net
* for securing smaller objects, to be
attached to the fixtures on the floor panel
>Net
* on the left side trim of the cargo bay
instead of the rubber strap
>Reversible cargo area floor panel with inte-
grated plastic cover
* for cargo bay or
bumper
>Folding, removable box
* under the floor
panel, e.g. for wet or dirty items
>Insertable dividers
* and removable storage
tray for the storage compartment under the
floor panel
Folding up the floor panel
Do not exceed the maximum permissible
load of 55 lbs/25 kg for the storage com-
partment under the floor panel, otherwise dam-
age could result.<
Sedan
Press the floor panel against the ceiling of the
cargo bay; a locking device holds the floor panel
in place. To detach the floor panel, pull it out of
the locking device.
Equipment version with drawer:
Take the retaining strap on the right-hand side
of the drawer out of the bracket and use it to fix
the floor panel in place.
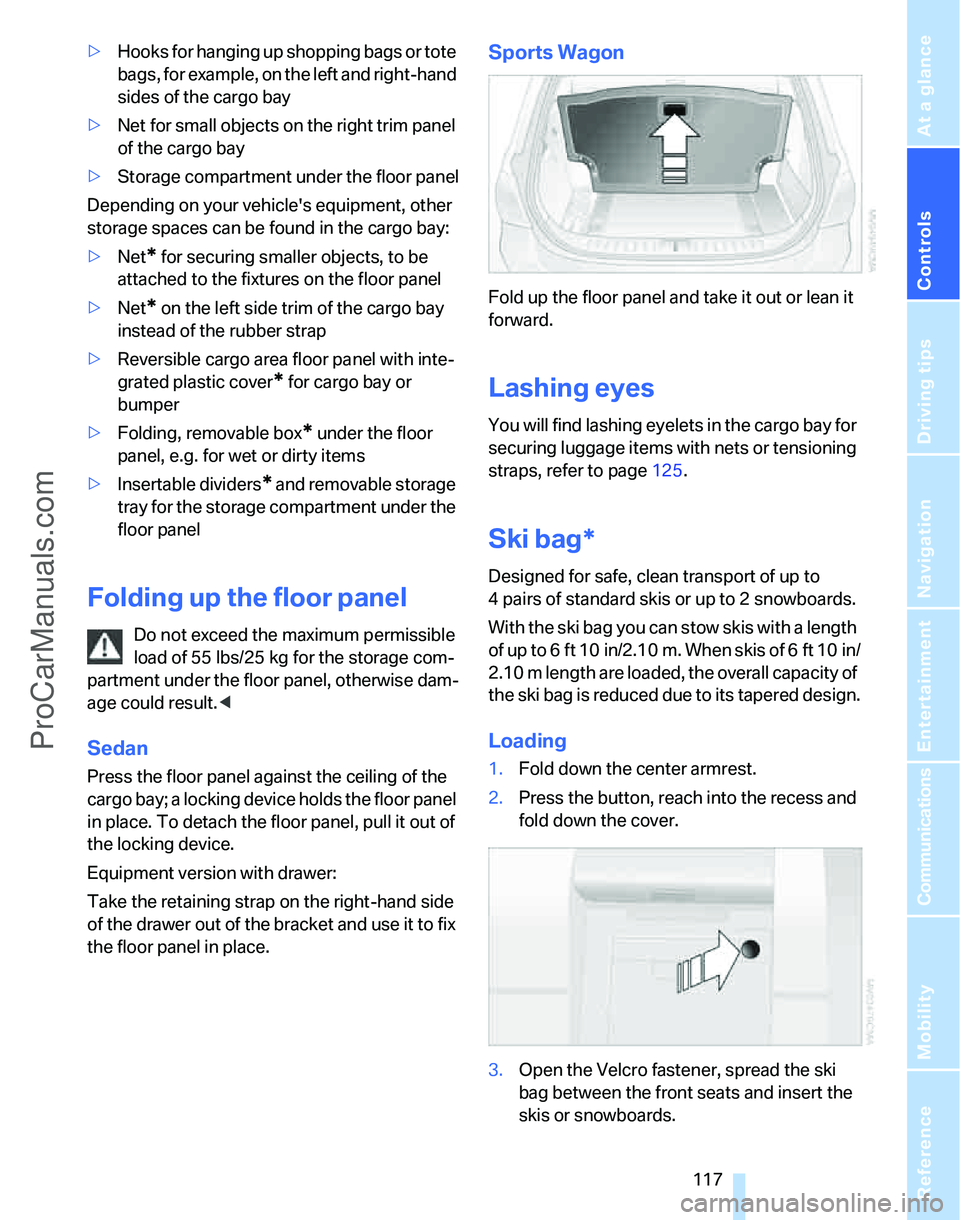
Sports Wagon
Fold up the floor panel and take it out or lean it
forward.
Lashing eyes
You will find lashing eyelets in the cargo bay for
securing luggage items with nets or tensioning
straps, refer to page125.
Ski bag*
Designed for safe, clean transport of up to
4 pairs of standard skis or up to 2 snowboards.
With the ski bag you can stow skis with a length
of up to 6ft 10in/2.10m. When skis of 6ft 10in/
2.10 m length are loaded, the overall capacity of
the ski bag is reduced due to its tapered design.
Loading
1.Fold down the center armrest.
2.Press the button, reach into the recess and
fold down the cover.
3.Open the Velcro fastener, spread the ski
bag between the front seats and insert the
skis or snowboards.
ProCarManuals.com
Page 126 of 268
Things to remember when driving
124
When the vehicle is parked
Condensation forms while the automatic cli-
mate control is in operation, and then exits
under the vehicle. Traces of condensed water
under the vehicle are therefore normal.
Before driving into a car wash
For general information about taking care of
your BMW, refer to the Caring for your vehicle
brochure.
Sports Wagon: rear window wiper
Driving through an automatic car wash can
result in damage to the rear window wiper. If
necessary, ask the operator of the car wash
about protective measures you should take.
With convenient access and automatic
transmission
Insert the remote control into the ignition
switch.
The engine can be switched off when the selec-
tor lever is in position N. Refer also to page38.
Cargo loading
To avoid loading the tires beyond their
approved carrying capacity, never over-
load the vehicle. Overloading can lead to over-
heating and increases the rate at which damage
develops inside the tires. The ultimate result
can assume the form of a sudden blow-out.<
Determining loading limit
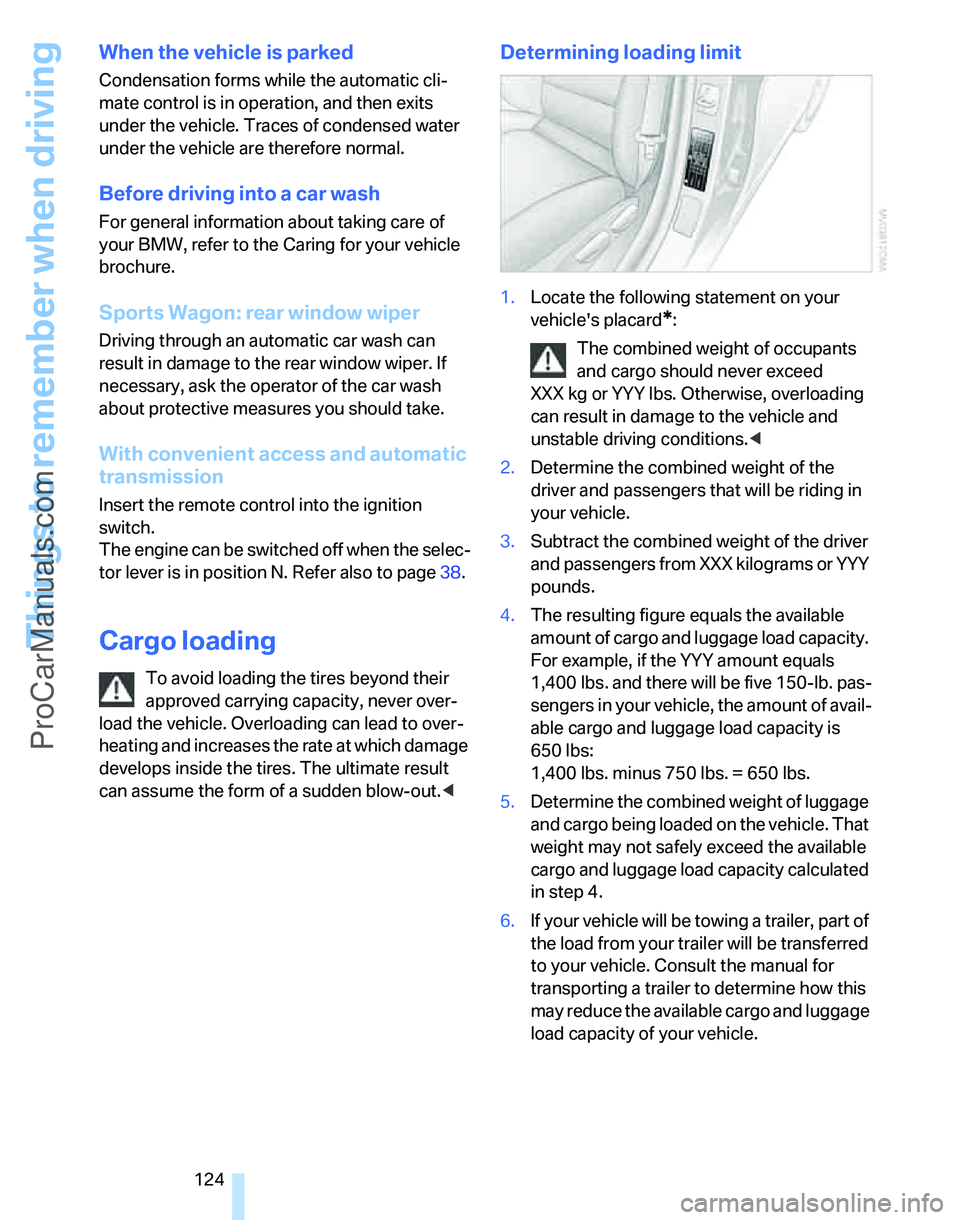
1.Locate the following statement on your
vehicle's placard
*:
The combined weight of occupants
and cargo should never exceed
XXX kg or YYY lbs. Otherwise, overloading
can result in damage to the vehicle and
unstable driving conditions.<
2.Determine the combined weight of the
driver and passengers that will be riding in
your vehicle.
3.Subtract the combined weight of the driver
and passengers from XXX kilograms or YYY
pounds.
4.The resulting figure equals the available
amount of cargo and luggage load capacity.
For example, if the YYY amount equals
1,400 lbs. and there will be five 150-lb. pas-
sengers in your vehicle, the amount of avail-
able cargo and luggage load capacity is
650 lbs:
1,400 lbs. minus 750 lbs. = 650 lbs.
5.Determine the combined weight of luggage
and cargo being loaded on the vehicle. That
weight may not safely exceed the available
cargo and luggage load capacity calculated
in step 4.
6.If your vehicle will be towing a trailer, part of
the load from your trailer will be transferred
to your vehicle. Consult the manual for
transporting a trailer to determine how this
may reduce the available cargo and luggage
load capacity of your vehicle.
ProCarManuals.com
Page 127 of 268
Driving tips
125Reference
At a glance
Controls
Communications
Navigation
Entertainment
Mobility
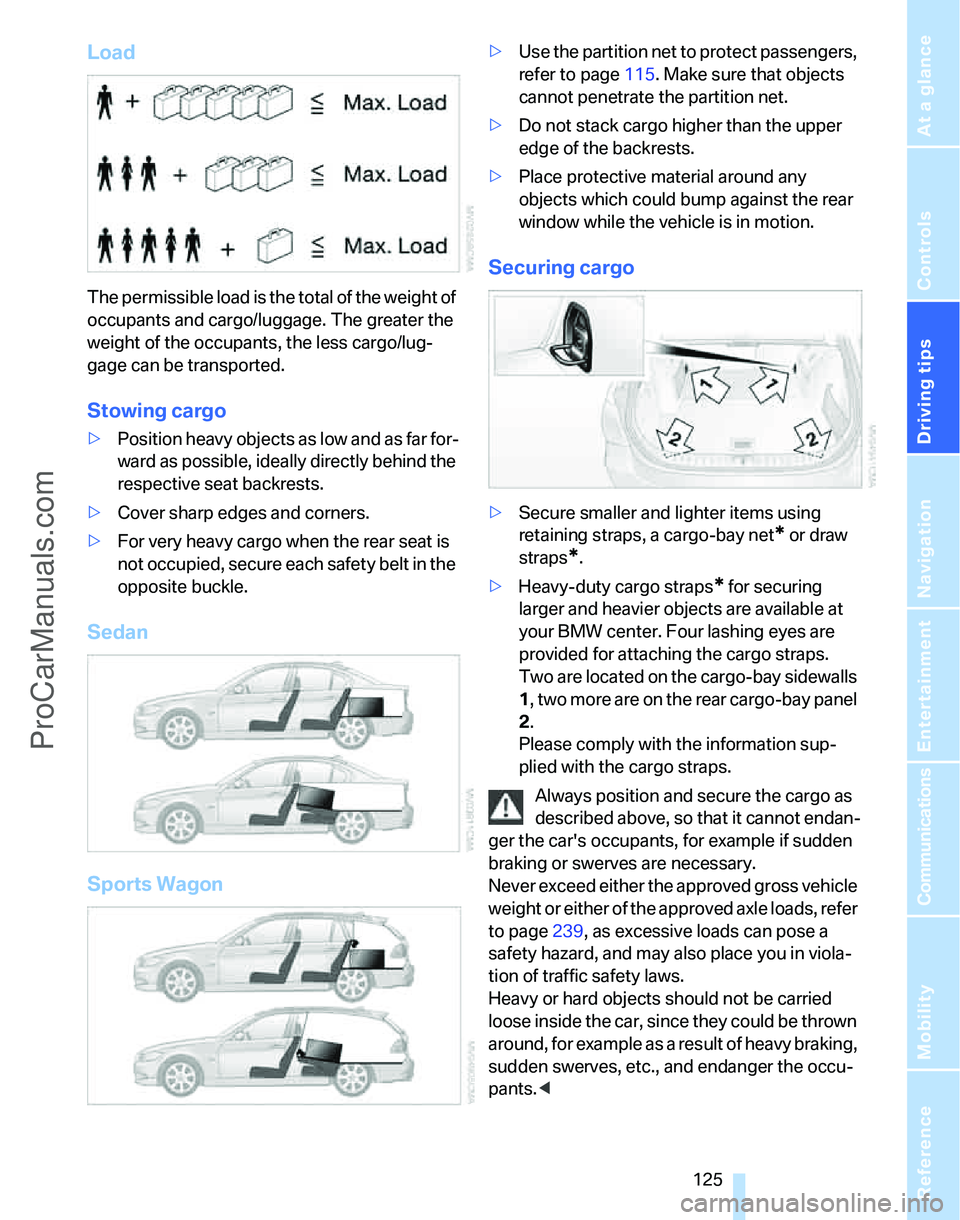
Load
The permissible load is the total of the weight of
occupants and cargo/luggage. The greater the
weight of the occupants, the less cargo/lug-
gage can be transported.
Stowing cargo
>Position heavy objects as low and as far for-
ward as possible, ideally directly behind the
respective seat backrests.
>Cover sharp edges and corners.
>For very heavy cargo when the rear seat is
not occupied, secure each safety belt in the
opposite buckle.
Sedan
Sports Wagon
>Use the partition net to protect passengers,
refer to page115. Make sure that objects
cannot penetrate the partition net.
>Do not stack cargo higher than the upper
edge of the backrests.
>Place protective material around any
objects which could bump against the rear
window while the vehicle is in motion.
Securing cargo
>Secure smaller and lighter items using
retaining straps, a cargo-bay net
* or draw
straps
*.
>Heavy-duty cargo straps
* for securing
larger and heavier objects are available at
your BMW center. Four lashing eyes are
provided for attaching the cargo straps.
Two are located on the cargo-bay sidewalls
1, two more are on the rear cargo-bay panel
2.
Please comply with the information sup-
plied with the cargo straps.
Always position and secure the cargo as
described above, so that it cannot endan-
ger the car's occupants, for example if sudden
braking or swerves are necessary.
Never exceed either the approved gross vehicle
weight or either of the approved axle loads, refer
to page239, as excessive loads can pose a
safety hazard, and may also place you in viola-
tion of traffic safety laws.
Heavy or hard objects should not be carried
loose inside the car, since they could be thrown
around, for example as a result of heavy braking,
sudden swerves, etc., and endanger the occu-
pants.<
ProCarManuals.com
Page 133 of 268
Navigation
Driving tips
131Reference
At a glance
Controls
Communications
Entertainment
Mobility
Destination entry
In entering your destination you can select from
the following options:
>Entering a destination manually, see below
>Entering a destination by voice com-
mands*, refer to page134
>Selecting destination using information,
refer to page137
>Selecting destination from a list, refer to
Destination list, page138
>Selecting destination from address book,
refer to page138
>Selecting home address, refer to page140
After selecting your destination you can pro-
ceed to start the destination guidance, refer to
page143.
Operating navigation system
Enter data only when the vehicle is sta-
tionary, and always give priority to the
applicable traffic regulations in the event of any
contradiction between traffic and road condi-
tions and the instructions issued by the naviga-
tion system. If you do not observe this precau-
tion, you may be in violation of the law, and can
endanger vehicle occupants and other road
users.<
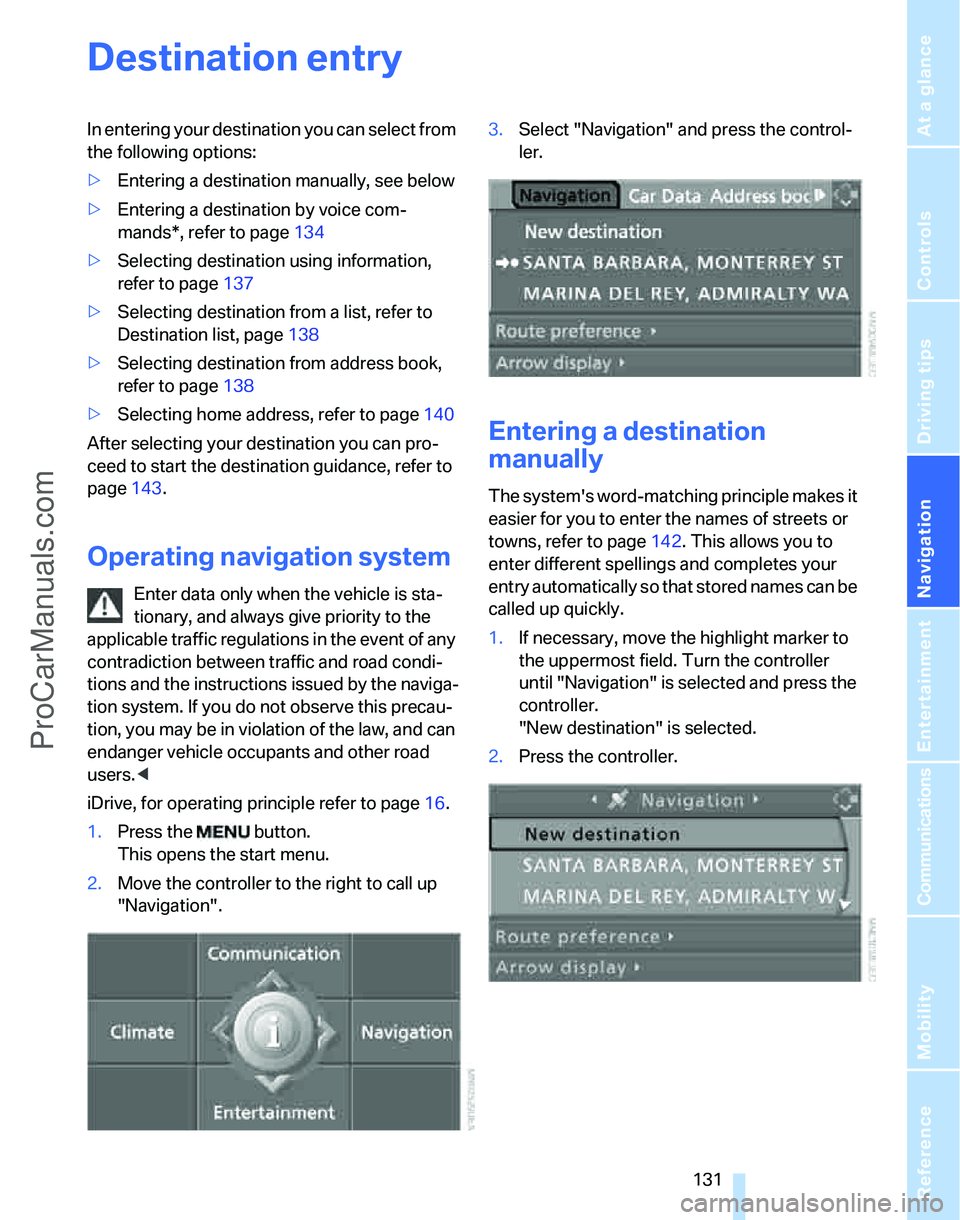
iDrive, for operating principle refer to page16.
1.Press the button.
This opens the start menu.
2.Move the controller to the right to call up
"Navigation".3.Select "Navigation" and press the control-
ler.
Entering a destination
manually
The system's word-matching principle makes it
easier for you to enter the names of streets or
towns, refer to page142. This allows you to
enter different spellings and completes your
entry automatically so that stored names can be
called up quickly.
1.If necessary, move the highlight marker to
the uppermost field. Turn the controller
until "Navigation" is selected and press the
controller.
"New destination" is selected.
2.Press the controller.
ProCarManuals.com
Page 134 of 268
Destination entry
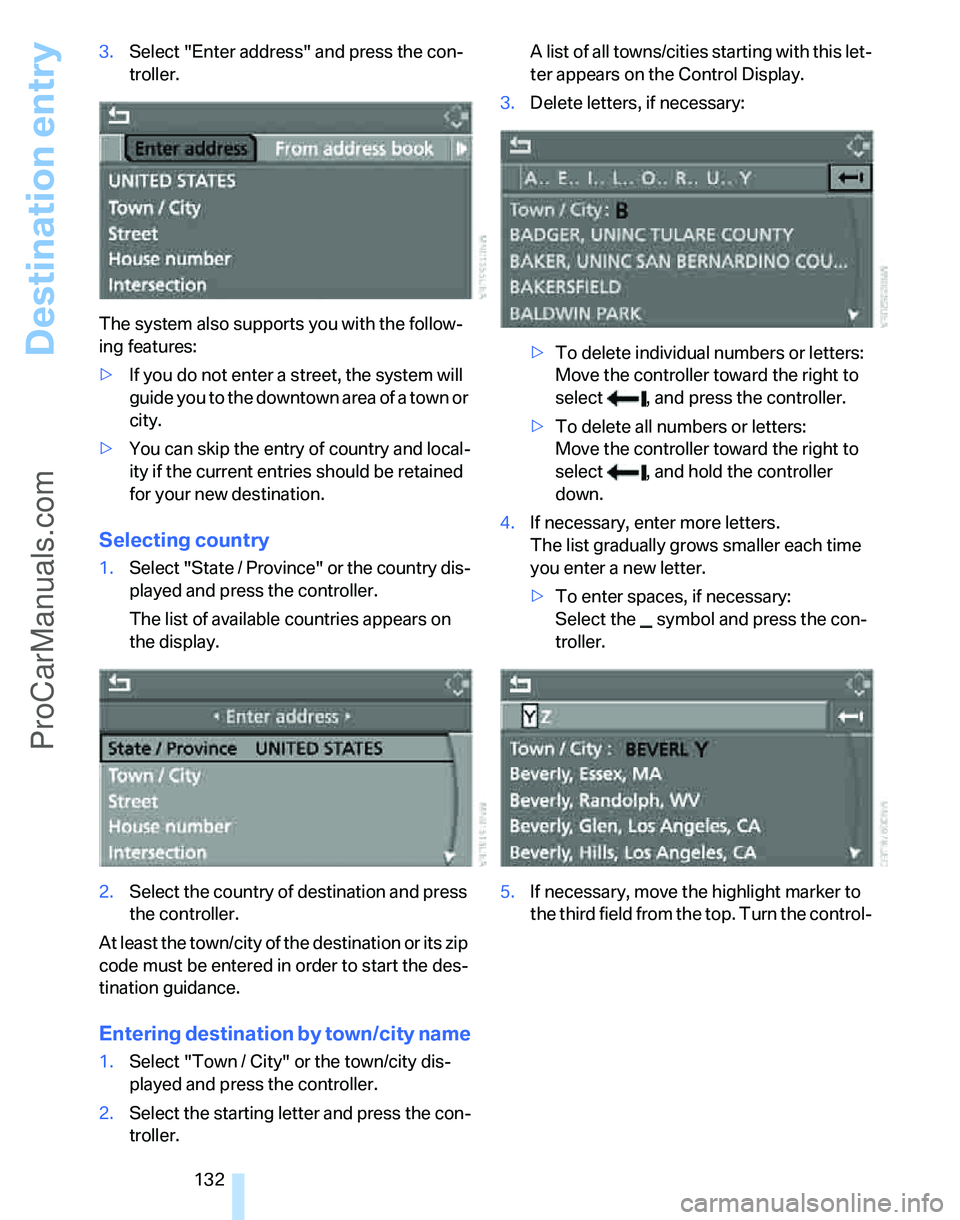
132 3.Select "Enter address" and press the con-
troller.
The system also supports you with the follow-
ing features:
>If you do not enter a street, the system will
guide you to the downtown area of a town or
city.
>You can skip the entry of country and local-
ity if the current entries should be retained
for your new destination.
Selecting country
1.Select "State / Province" or the country dis-
played and press the controller.
The list of available countries appears on
the display.
2.Select the country of destination and press
the controller.
At least the town/city of the destination or its zip
code must be entered in order to start the des-
tination guidance.
Entering destination by town/city name
1.Select "Town / City" or the town/city dis-
played and press the controller.
2.Select the starting letter and press the con-
troller.A list of all towns/cities starting with this let-
ter appears on the Control Display.
3.Delete letters, if necessary:
>To delete individual numbers or letters:
Move the controller toward the right to
select , and press the controller.
>To delete all numbers or letters:
Move the controller toward the right to
select , and hold the controller
down.
4.If necessary, enter more letters.
The list gradually grows smaller each time
you enter a new letter.
>To enter spaces, if necessary:
Select the symbol and press the con-
troller.
5.If necessary, move the highlight marker to
the third field from the top. Turn the control-
ProCarManuals.com
Page 135 of 268
Navigation
Driving tips
133Reference
At a glance
Controls
Communications
Entertainment
Mobility
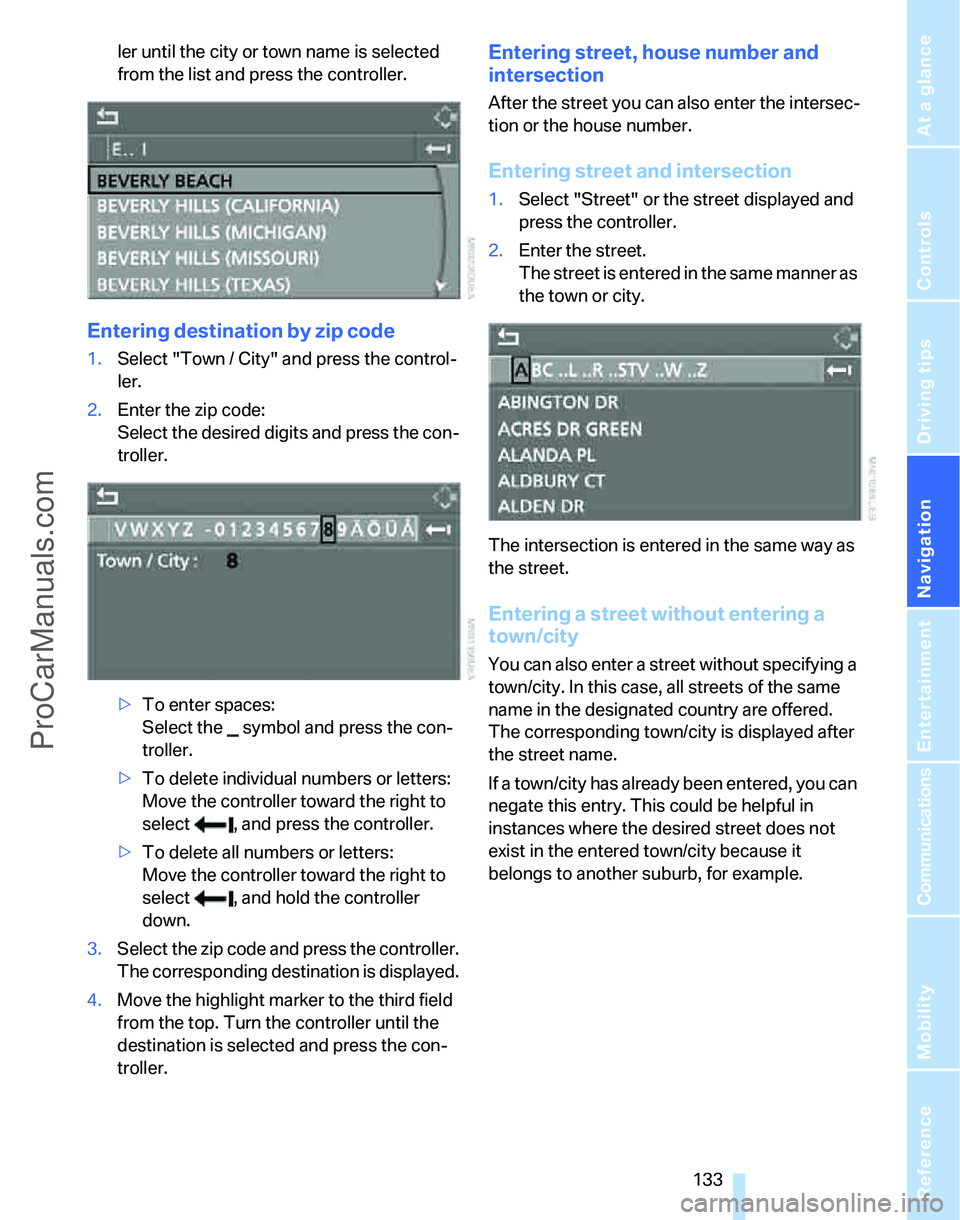
ler until the city or town name is selected
from the list and press the controller.
Entering destination by zip code
1.Select "Town / City" and press the control-
ler.
2.Enter the zip code:
Select the desired digits and press the con-
troller.
>To enter spaces:
Select the symbol and press the con-
troller.
>To delete individual numbers or letters:
Move the controller toward the right to
select , and press the controller.
>To delete all numbers or letters:
Move the controller toward the right to
select , and hold the controller
down.
3.Select the zip code and press the controller.
The corresponding destination is displayed.
4.Move the highlight marker to the third field
from the top. Turn the controller until the
destination is selected and press the con-
troller.
Entering street, house number and
intersection
After the street you can also enter the intersec-
tion or the house number.
Entering street and intersection
1.Select "Street" or the street displayed and
press the controller.
2.Enter the street.
The street is entered in the same manner as
the town or city.
The intersection is entered in the same way as
the street.
Entering a street without entering a
town/city
You can also enter a street without specifying a
town/city. In this case, all streets of the same
name in the designated country are offered.
The corresponding town/city is displayed after
the street name.
If a town/city has already been entered, you can
negate this entry. This could be helpful in
instances where the desired street does not
exist in the entered town/city because it
belongs to another suburb, for example.
ProCarManuals.com
Page 137 of 268
Navigation
Driving tips
135Reference
At a glance
Controls
Communications
Entertainment
Mobility
Selecting country
1.Wait for the system to ask for the country of
destination.
Say the name of the destination country in the
language of the voice command system.
Entering destination
The destination can be spelled or entered as an
entire word.
Spelling the destination
To enter a destination, spell it in the way it is
commonly spelled in the destination country.
Pronounce the letters smoothly and at normal
volume, avoiding excessive emphases and
pauses.
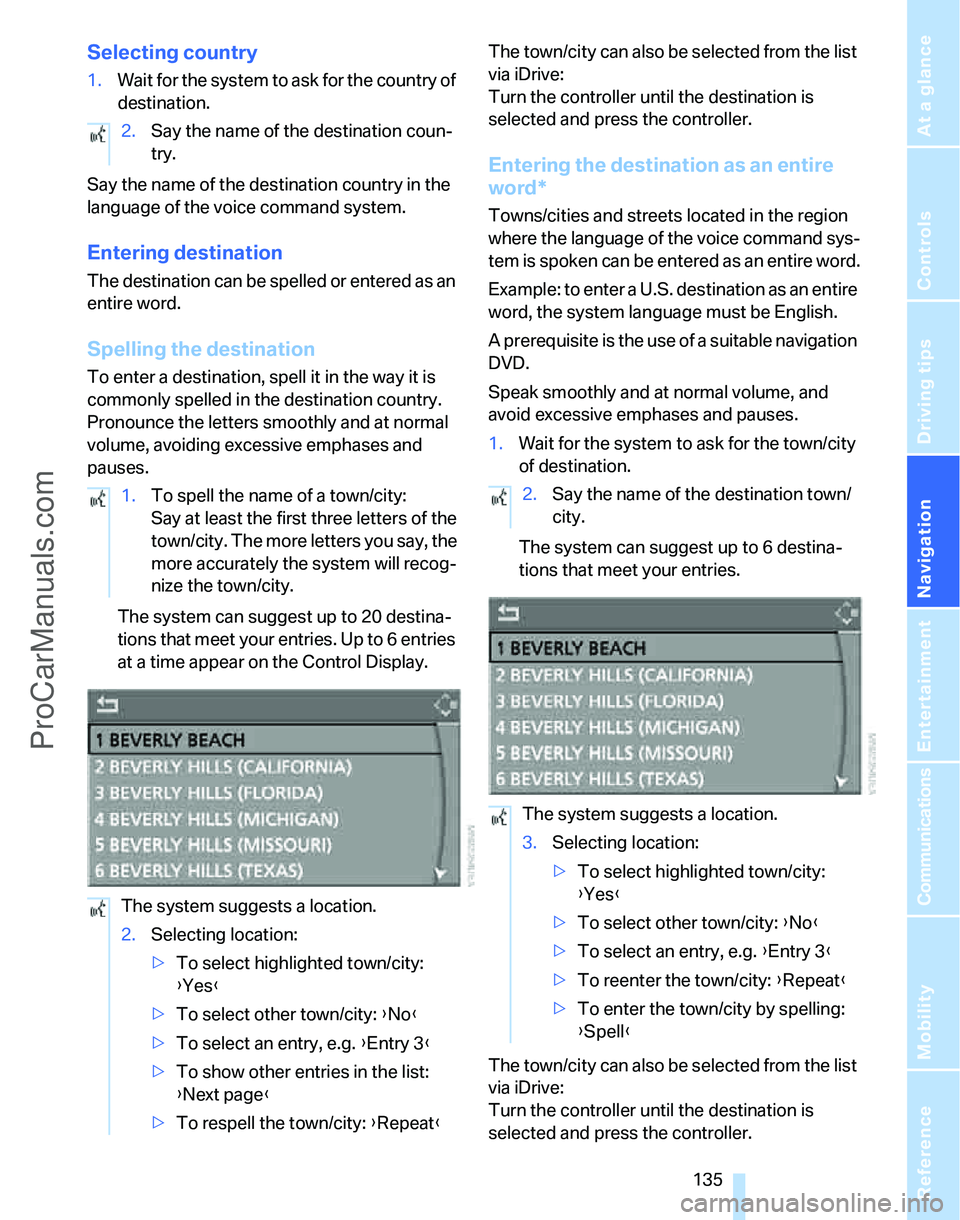
The system can suggest up to 20 destina-
tions that meet your entries. Up to 6 entries
at a time appear on the Control Display.The town/city can also be selected from the list
via iDrive:
Turn the controller until the destination is
selected and press the controller.
Entering the destination as an entire
word*
Towns/cities and streets located in the region
where the language of the voice command sys-
tem is spoken can be entered as an entire word.
Example: to enter a U.S. destination as an entire
word, the system language must be English.
A prerequisite is the use of a suitable navigation
DVD.
Speak smoothly and at normal volume, and
avoid excessive emphases and pauses.
1.Wait for the system to ask for the town/city
of destination.
The system can suggest up to 6 destina-
tions that meet your entries.
The town/city can also be selected from the list
via iDrive:
Turn the controller until the destination is
selected and press the controller. 2.Say the name of the destination coun-
try.
1.To spell the name of a town/city:
Say at least the first three letters of the
town/city. The more letters you say, the
more accurately the system will recog-
nize the town/city.
The system suggests a location.
2.Selecting location:
>To select highlighted town/city:
{Yes}
>To select other town/city: {No}
>To select an entry, e.g. {Entry 3}
>To show other entries in the list:
{Next page}
>To respell the town/city: {Repeat}
2.Say the name of the destination town/
city.
The system suggests a location.
3.Selecting location:
>To select highlighted town/city:
{Yes}
>To select other town/city: {No}
>To select an entry, e.g. {Entry 3}
>To reenter the town/city: {Repeat}
>To enter the town/city by spelling:
{Spell}
ProCarManuals.com
Page 138 of 268
Destination entry
136 Identical-sounding towns/cities that can-
not be distinguished by the system are
compiled in a separate list and shown as a des-
tination followed by three dots.
If applicable, select this entry with {Yes}. Then
select the desired town/city from that list.<
Entering street and house number
The street is entered in the same way as the
destination town/city.
To enter the house number:
House numbers of up to 4 digits can be entered.
Say the house number as individual digits.
Starting destination guidance
Destination guidance starts immediately.
Storing destinations
Destinations are added to the destination list or
can be stored in the address book.
Map-guided destination
selection
If you only know the location of the town or
street of the destination, then you can enter the
destination by using a map. You can use the
cross-hairs to select the destination on the map
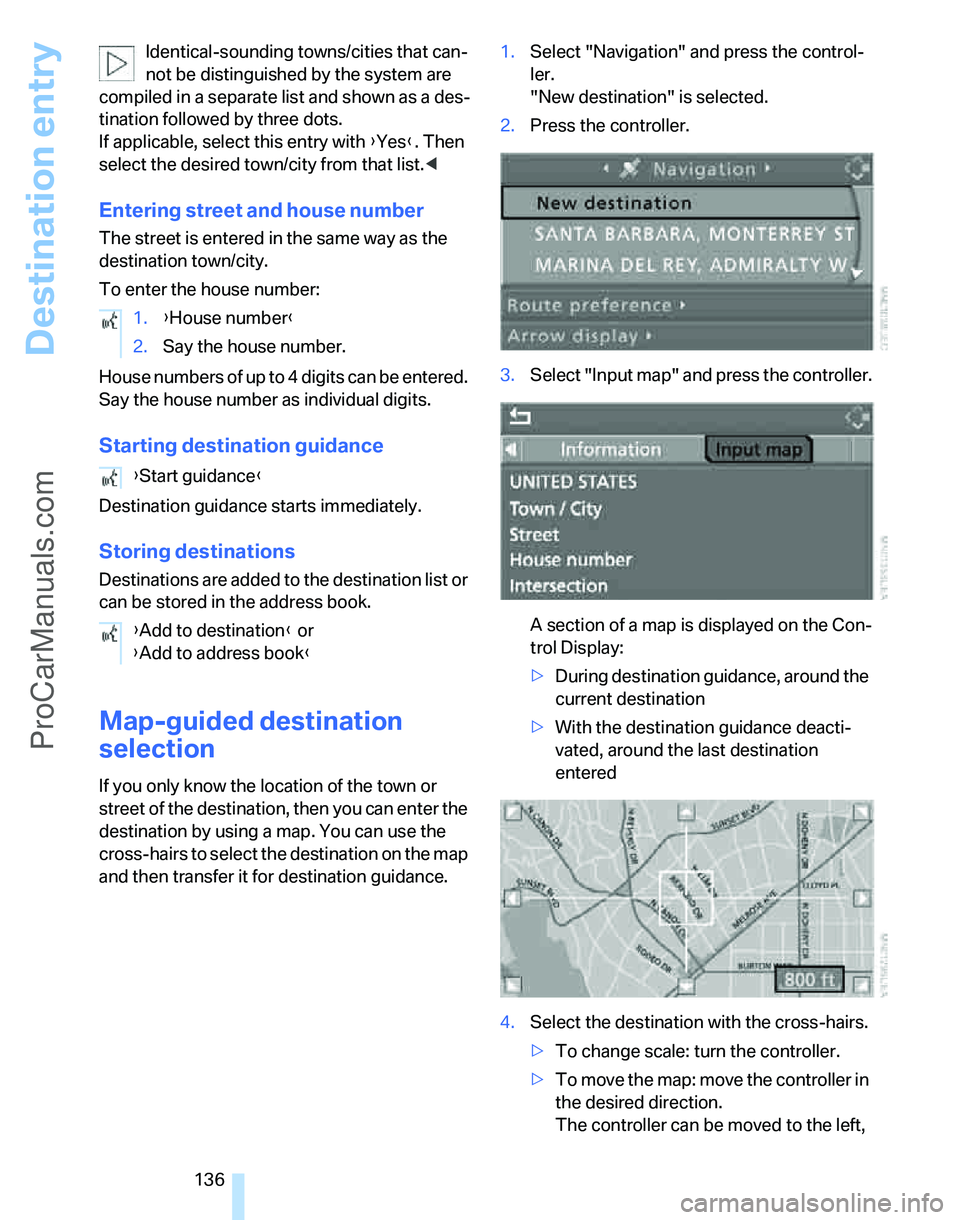
and then transfer it for destination guidance.1.Select "Navigation" and press the control-
ler.
"New destination" is selected.
2.Press the controller.
3.Select "Input map" and press the controller.
A section of a map is displayed on the Con-
trol Display:
>During destination guidance, around the
current destination
>With the destination guidance deacti-
vated, around the last destination
entered
4.Select the destination with the cross-hairs.
>To change scale: turn the controller.
>To move the map: move the controller in
the desired direction.
The controller can be moved to the left, 1.{House number}
2.Say the house number.
{Start guidance}
{Add to destination} or
{Add to address book}
ProCarManuals.com
Page 140 of 268
Destination entry
138 Select "Select as destination" and press
the controller.
>To establish a telephone connection:
Select "Call" and press the controller.
To exit from the menu:
Select the arrow and press the controller.
Destination list
The last 20 destinations entered into the sys-
tem are shown in the destination list. You can
call up these destinations and transfer them for
destination guidance.
If you are planning a longer journey, for exam-
ple, you can store all the destinations you wish
to drive to in the destination list in advance,
refer to Entering a destination manually on
page131.
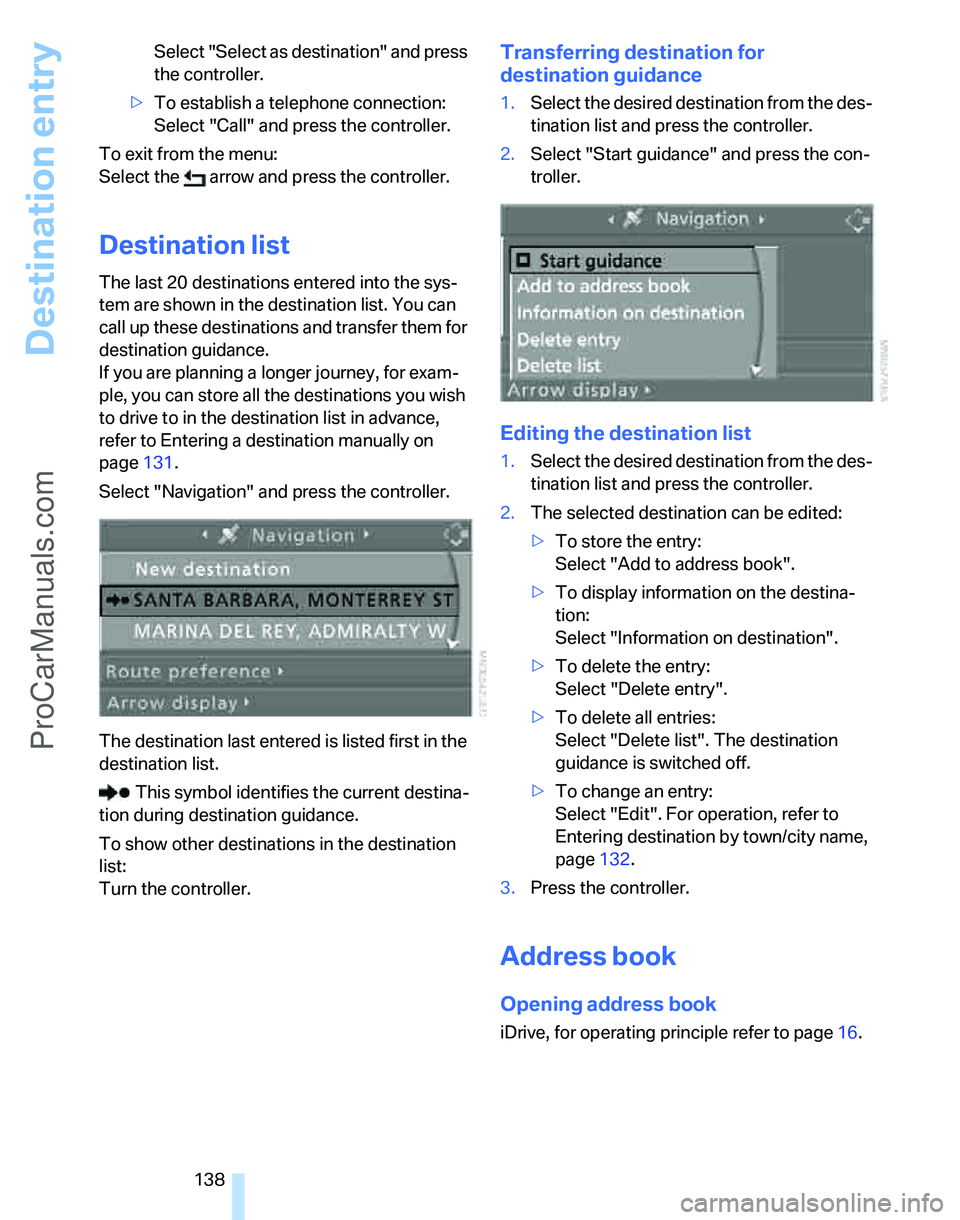
Select "Navigation" and press the controller.
The destination last entered is listed first in the
destination list.
This symbol identifies the current destina-
tion during destination guidance.
To show other destinations in the destination
list:
Turn the controller.
Transferring destination for
destination guidance
1.Select the desired destination from the des-
tination list and press the controller.
2.Select "Start guidance" and press the con-
troller.
Editing the destination list
1.Select the desired destination from the des-
tination list and press the controller.
2.The selected destination can be edited:
>To store the entry:
Select "Add to address book".
>To display information on the destina-
tion:
Select "Information on destination".
>To delete the entry:
Select "Delete entry".
>To delete all entries:
Select "Delete list". The destination
guidance is switched off.
>To change an entry:
Select "Edit". For operation, refer to
Entering destination by town/city name,
page132.
3.Press the controller.
Address book
Opening address book
iDrive, for operating principle refer to page16.
ProCarManuals.com