gauge BMW 3 SERIES 1983 E30 Owner's Manual
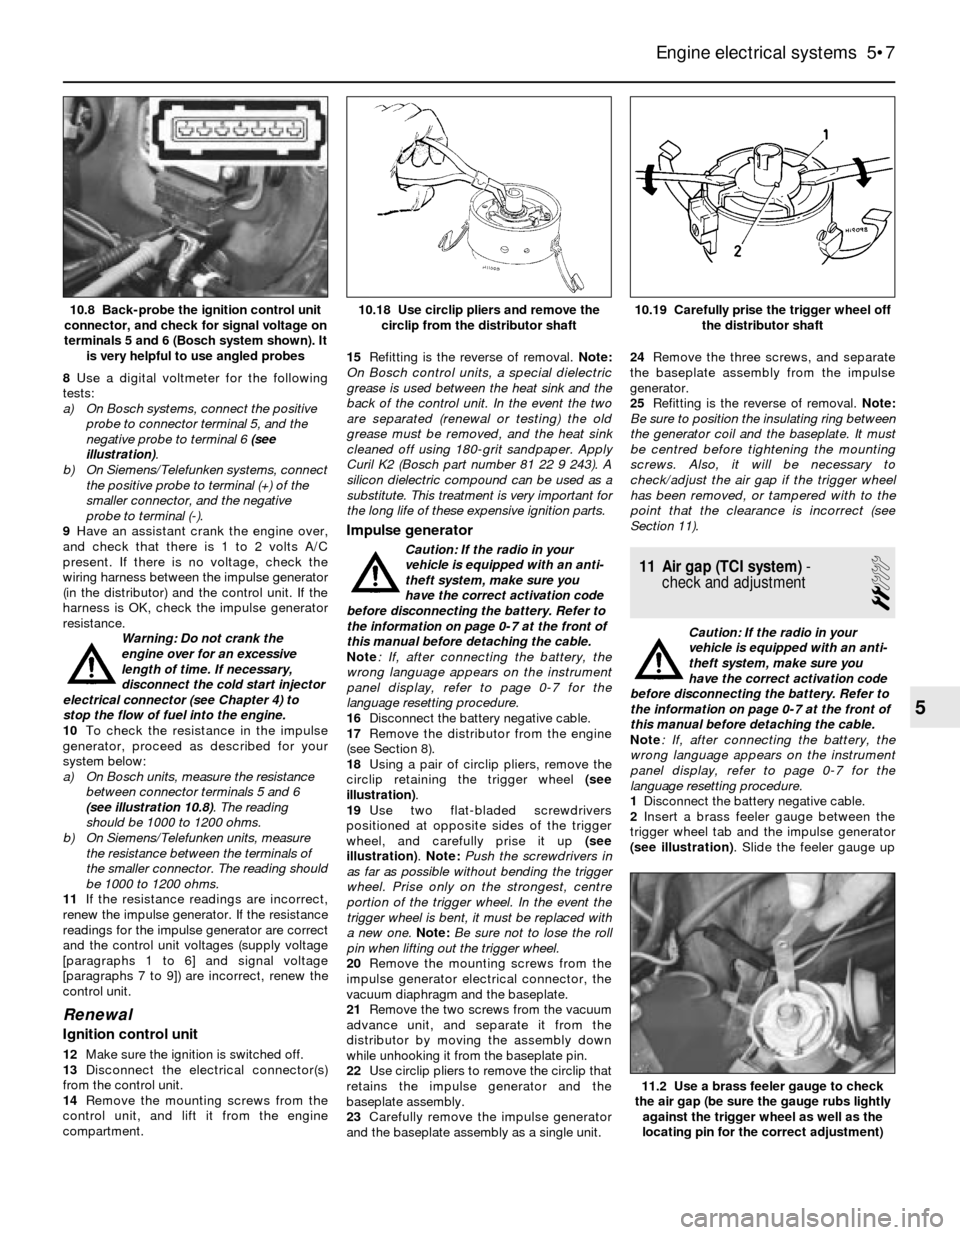
[x] Cancel search | Manufacturer: BMW, Model Year: 1983, Model line: 3 SERIES, Model: BMW 3 SERIES 1983 E30Pages: 228, PDF Size: 7.04 MB
Page 92 of 228
Note 3:The following checks assume the fuel
filter is in good condition. If you doubt the
condition of your fuel filter, renew it (see
Chapter 1).
Note 4:In order to get accurate test results, it
is recommended that the fuel pressure be
checked from both the main fuel pump and
transfer pump where applicable.
Fuel pump/transfer pump operational
check
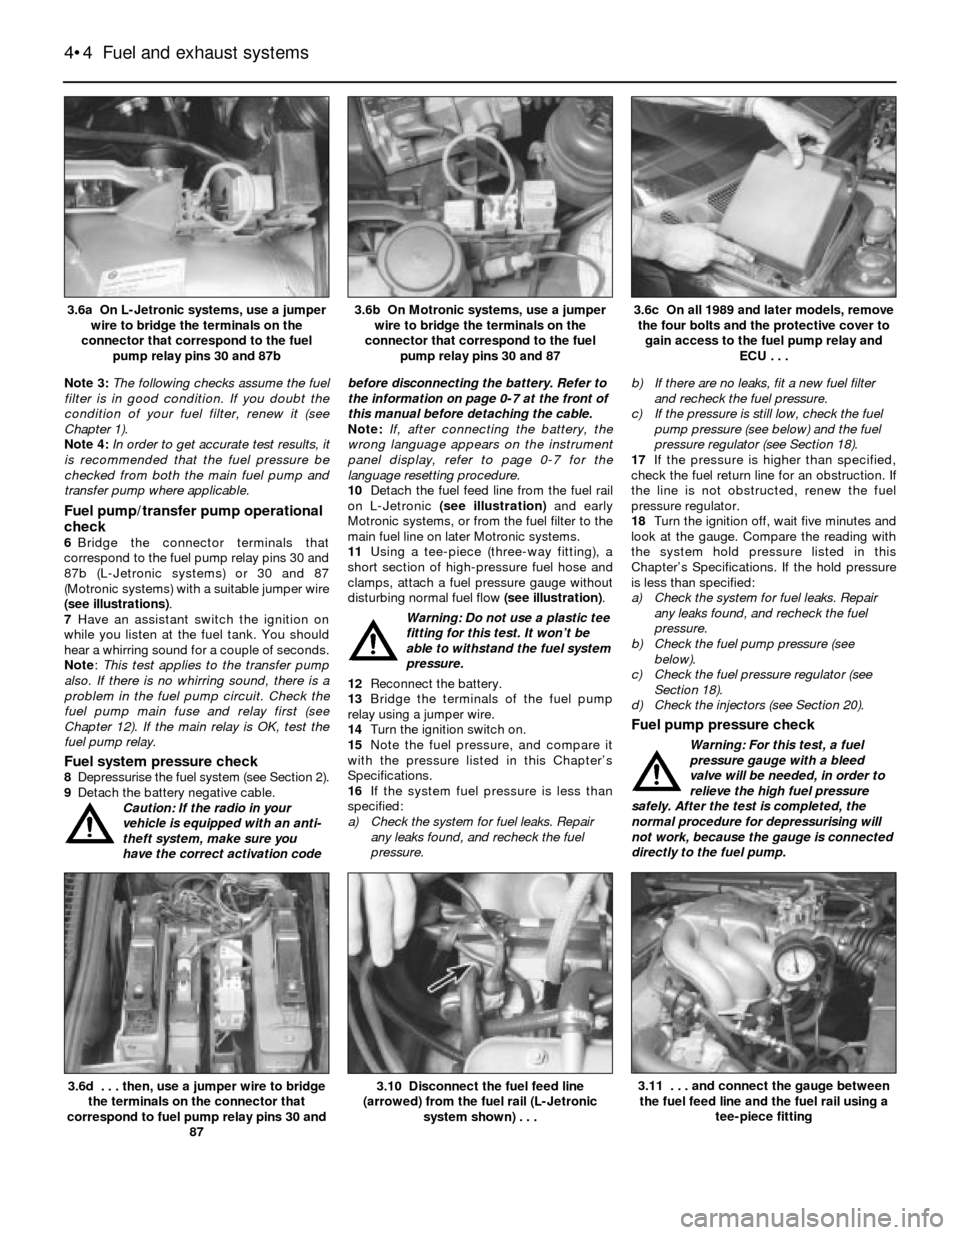
6Bridge the connector terminals that
correspond to the fuel pump relay pins 30 and
87b (L-Jetronic systems) or 30 and 87
(Motronic systems) with a suitable jumper wire
(see illustrations).
7Have an assistant switch the ignition on
while you listen at the fuel tank. You should
hear a whirring sound for a couple of seconds.
Note:This test applies to the transfer pump
also. If there is no whirring sound, there is a
problem in the fuel pump circuit. Check the
fuel pump main fuse and relay first (see
Chapter 12). If the main relay is OK, test the
fuel pump relay.
Fuel system pressure check8Depressurise the fuel system (see Section 2).
9Detach the battery negative cable.
Caution: If the radio in your
vehicle is equipped with an anti-
theft system, make sure you
have the correct activation codebefore disconnecting the battery. Refer to
the information on page 0-7 at the front of
this manual before detaching the cable.
Note: If, after connecting the battery, the
wrong language appears on the instrument
panel display, refer to page 0-7 for the
language resetting procedure.
10Detach the fuel feed line from the fuel rail
on L-Jetronic (see illustration)and early
Motronic systems, or from the fuel filter to the
main fuel line on later Motronic systems.
11Using a tee-piece (three-way fitting), a
short section of high-pressure fuel hose and
clamps, attach a fuel pressure gauge without
disturbing normal fuel flow (see illustration).
Warning: Do not use a plastic tee
fitting for this test. It won’t be
able to withstand the fuel system
pressure.
12Reconnect the battery.
13Bridge the terminals of the fuel pump
relay using a jumper wire.
14Turn the ignition switch on.
15Note the fuel pressure, and compare it
with the pressure listed in this Chapter’s
Specifications.
16If the system fuel pressure is less than
specified:
a) Check the system for fuel leaks. Repair
any leaks found, and recheck the fuel
pressure.b) If there are no leaks, fit a new fuel filter
and recheck the fuel pressure.
c) If the pressure is still low, check the fuel
pump pressure (see below) and the fuel
pressure regulator (see Section 18).
17If the pressure is higher than specified,
check the fuel return line for an obstruction. If
the line is not obstructed, renew the fuel
pressure regulator.
18Turn the ignition off, wait five minutes and
look at the gauge. Compare the reading with
the system hold pressure listed in this
Chapter’s Specifications. If the hold pressure
is less than specified:
a) Check the system for fuel leaks. Repair
any leaks found, and recheck the fuel
pressure.
b) Check the fuel pump pressure (see
below).
c) Check the fuel pressure regulator (see
Section 18).
d) Check the injectors (see Section 20).
Fuel pump pressure check
Warning: For this test, a fuel
pressure gauge with a bleed
valve will be needed, in order to
relieve the high fuel pressure
safely. After the test is completed, the
normal procedure for depressurising will
not work, because the gauge is connected
directly to the fuel pump.
4•4 Fuel and exhaust systems
3.10 Disconnect the fuel feed line
(arrowed) from the fuel rail (L-Jetronic
system shown) . . .3.6d . . . then, use a jumper wire to bridge
the terminals on the connector that
correspond to fuel pump relay pins 30 and
87
3.6c On all 1989 and later models, remove
the four bolts and the protective cover to
gain access to the fuel pump relay and
ECU . . .3.6b On Motronic systems, use a jumper
wire to bridge the terminals on the
connector that correspond to the fuel
pump relay pins 30 and 873.6a On L-Jetronic systems, use a jumper
wire to bridge the terminals on the
connector that correspond to the fuel
pump relay pins 30 and 87b
3.11 . . . and connect the gauge between
the fuel feed line and the fuel rail using a
tee-piece fitting
Page 93 of 228
19Depressurise the fuel system (see Sec-
tion 2).
20Detach the battery negative cable.
Caution: If the radio in your
vehicle is equipped with an anti-
theft system, make sure you
have the correct activation code
before disconnecting the battery. Refer to
the information on page 0-7 at the front of
this manual before detaching the cable.
Note: If, after connecting the battery, the
wrong language appears on the instrument
panel display, refer to page 0-7 for the
language resetting procedure.
21Detach the fuel feed hose from the fuel
rail, and attach a fuel pressure gauge directly
to the hose. Note:If the tee fitting is still
connected to the gauge, be sure to plug the
open end.
22Reconnect the battery.
23Using a jumper wire, bridge the terminals
of the fuel pump relay.
24Turn the ignition switch on to operate the
fuel pump.
25Note the pressure reading on the gauge,
and compare the reading to the fuel pump
pressure listed in this Chapter’s Specifica-
tions.
26If the indicated pressure is less than
specified, inspect the fuel line for leaks
between the pump and gauge. If no leaks are
found, renew the fuel pump.
27Turn the ignition off and wait five minutes.
Note the reading on the gauge, and compare
it to the fuel pump hold pressure listed in this
Chapter’s Specifications. If the hold pressure
is less than specified, check the fuel lines
between the pump and gauge for leaks. If no
leaks are found, renew the fuel pump.
28Remove the jumper wire. Relieve the fuel
pressure by opening the bleed valve on the
gauge and directing the fuel into a suitable
container. Remove the gauge and reconnect
the fuel line.
Transfer pump pressure check
29Depressurise the fuel system (see Sec-
tion 2).
30Detach the battery negative cable.
Caution: If the radio in your
vehicle is equipped with an anti-
theft system, make sure you
have the correct activation code
before disconnecting the battery. Refer to
the information on page 0-7 at the front of
this manual before detaching the cable.
Note: If, after connecting the battery, the
wrong language appears on the instrument
panel display, refer to page 0-7 for the
language resetting procedure.
31Remove the transfer pump access plate
(on some models, it’s located under the rear
seat cushion - on others, it’s located under
the carpet in the luggage compartment).
Disconnect the output hose from the transfer
pump, and connect a fuel pressure gauge to
the outlet pipe.
32Reconnect the battery.33Using a jumper wire, bridge the terminals
of the fuel pump relay.
34Turn the ignition switch on to operate the
fuel pump.
35Note the pressure reading on the gauge,
and compare to the value listed in this
Chapter’s Specifications.
36If the indicated pressure is less than
specified, renew the transfer pump.
Fuel pump relay check
37Switch on the ignition.
38Using a voltmeter, probe the following
terminals from the back of the relay electrical
connector. Check for battery voltage at
terminal 30 (M20 and M30 engines) or
terminal 15 (M10 and M40 engines). Note:If
there is no voltage on models with luggage
compartment-mounted batteries, check for a
faulty fusible link. The 50-amp link is about
6 inches from the battery, in a black wire.
39Turn the ignition off, and disconnect the
relay from the electrical connector. Using a
voltmeter, probe the connector terminals that
correspond to fuel pump relay pins 85 (-) and
86(+) on M20 and M30 engines, or terminal 50
and earth on M10 and M40 engines. Have an
assistant turn the engine over on the starter,
and observe the voltage reading. Battery
voltage should be indicated.
40If there is no voltage, check the fuse(s)
and the wiring circuit for the fuel pump relay. If
the voltage readings are correct, and the fuel
pump only runs with the jumper wire in place,
then renew the relay.
41If the fuel pump still does not run, check
for the proper voltage at the fuel pump
terminals (see Section 4). If necessary, renew
the fuel pump.
4 Fuel pump, transfer pump
and fuel level sender unit-
removal and refitting
2
Warning: Fuel is extremely
flammable, so take extra
precautions when you work on
any part of the fuel system. Don’t
smoke, or allow open flames or bare light
bulbs, near the work area. Also, don’t work
in a garage where a natural gas-type
appliance with a pilot light is present.
Fuel pump (carburettor engines)
1Disconnect the battery negative cable.
Disconnect both hoses from the pump, and
unscrew and remove the two securing nuts
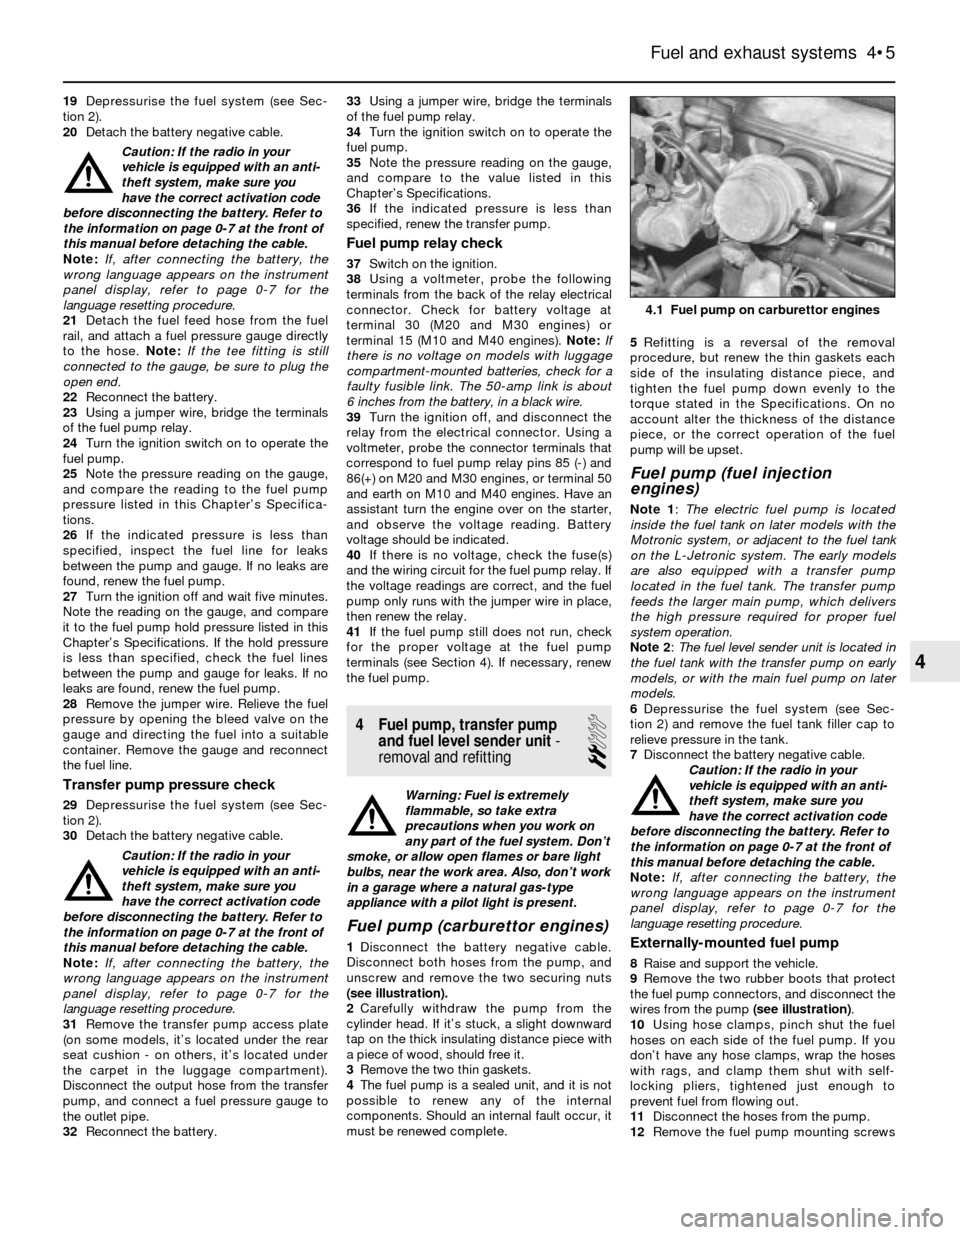
(see illustration).
2Carefully withdraw the pump from the
cylinder head. If it’s stuck, a slight downward
tap on the thick insulating distance piece with
a piece of wood, should free it.
3Remove the two thin gaskets.
4The fuel pump is a sealed unit, and it is not
possible to renew any of the internal
components. Should an internal fault occur, it
must be renewed complete.5Refitting is a reversal of the removal
procedure, but renew the thin gaskets each
side of the insulating distance piece, and
tighten the fuel pump down evenly to the
torque stated in the Specifications. On no
account alter the thickness of the distance
piece, or the correct operation of the fuel
pump will be upset.
Fuel pump (fuel injection
engines)
Note 1: The electric fuel pump is located
inside the fuel tank on later models with the
Motronic system, or adjacent to the fuel tank
on the L-Jetronic system. The early models
are also equipped with a transfer pump
located in the fuel tank. The transfer pump
feeds the larger main pump, which delivers
the high pressure required for proper fuel
system operation.
Note 2: The fuel level sender unit is located in
the fuel tank with the transfer pump on early
models, or with the main fuel pump on later
models.
6Depressurise the fuel system (see Sec-
tion 2) and remove the fuel tank filler cap to
relieve pressure in the tank.
7Disconnect the battery negative cable.
Caution: If the radio in your
vehicle is equipped with an anti-
theft system, make sure you
have the correct activation code
before disconnecting the battery. Refer to
the information on page 0-7 at the front of
this manual before detaching the cable.
Note: If, after connecting the battery, the
wrong language appears on the instrument
panel display, refer to page 0-7 for the
language resetting procedure.
Externally-mounted fuel pump
8Raise and support the vehicle.
9Remove the two rubber boots that protect
the fuel pump connectors, and disconnect the
wires from the pump (see illustration).
10Using hose clamps, pinch shut the fuel
hoses on each side of the fuel pump. If you
don’t have any hose clamps, wrap the hoses
with rags, and clamp them shut with self-
locking pliers, tightened just enough to
prevent fuel from flowing out.
11Disconnect the hoses from the pump.
12Remove the fuel pump mounting screws
Fuel and exhaust systems 4•5
4.1 Fuel pump on carburettor engines
4
Page 104 of 228
17 Throttle body- check,
removal and refitting
2
Check
1Detach the air intake duct from the throttle
body (see Section 8) and move the duct out of
the way.
2Have an assistant depress the throttle
pedal while you watch the throttle valve.
Check that the throttle valve moves smoothly
when the throttle is moved from closed (idle
position) to fully-open (wide-open throttle).
3If the throttle valve is not working properly,
renew the throttle body unit.
Warning: Wait until the engine is
completely cool before beginning
this procedure.
Caution: If the radio in your
vehicle is equipped with an anti-
theft system, make sure you
have the correct activation code
before disconnecting the battery. Refer to
the information on page 0-7 at the front of
this manual before detaching the cable.
Note: If, after connecting the battery, the
wrong language appears on the instrument
panel display, refer to page 0-7 for the
language resetting procedure.
Removal and refitting
4Detach the battery negative cable.
5Detach the air intake duct from the throttle
body, and place to one side.
6Detach the accelerator cable from the
throttle body (see Section 9).
7Detach the cruise control cable, if applicable.
8Clearly label all electrical connectors
(throttle position sensor, cold start injector,
idle air stabiliser, etc), then unplug them.
9Clearly label all vacuum hoses, then detach
them.
10Unscrew the radiator or expansion tank
cap to relieve any residual pressure in the
cooling system, then refit it. Clamp shut the
coolant hoses, then loosen the hose clamps
and detach the hoses. Be prepared for some
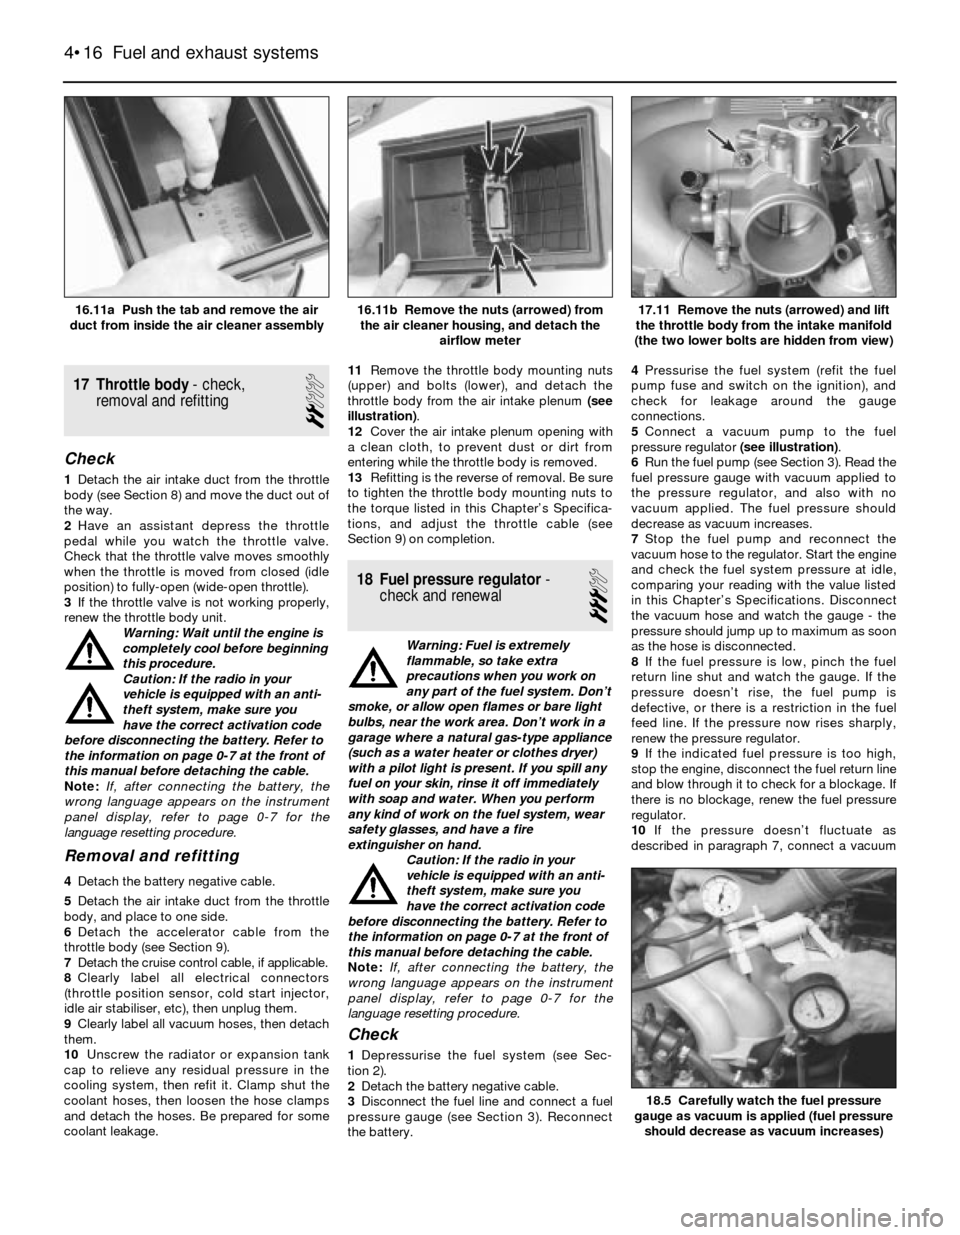
coolant leakage.11Remove the throttle body mounting nuts
(upper) and bolts (lower), and detach the
throttle body from the air intake plenum (see
illustration).
12Cover the air intake plenum opening with
a clean cloth, to prevent dust or dirt from
entering while the throttle body is removed.
13Refitting is the reverse of removal. Be sure
to tighten the throttle body mounting nuts to
the torque listed in this Chapter’s Specifica-
tions, and adjust the throttle cable (see
Section 9) on completion.
18 Fuel pressure regulator-
check and renewal
3
Warning: Fuel is extremely
flammable, so take extra
precautions when you work on
any part of the fuel system. Don’t
smoke, or allow open flames or bare light
bulbs, near the work area. Don’t work in a
garage where a natural gas-type appliance
(such as a water heater or clothes dryer)
with a pilot light is present. If you spill any
fuel on your skin, rinse it off immediately
with soap and water. When you perform
any kind of work on the fuel system, wear
safety glasses, and have a fire
extinguisher on hand.
Caution: If the radio in your
vehicle is equipped with an anti-
theft system, make sure you
have the correct activation code
before disconnecting the battery. Refer to
the information on page 0-7 at the front of
this manual before detaching the cable.
Note: If, after connecting the battery, the
wrong language appears on the instrument
panel display, refer to page 0-7 for the
language resetting procedure.
Check
1Depressurise the fuel system (see Sec-
tion 2).
2Detach the battery negative cable.
3Disconnect the fuel line and connect a fuel
pressure gauge (see Section 3). Reconnect
the battery.4Pressurise the fuel system (refit the fuel
pump fuse and switch on the ignition), and
check for leakage around the gauge
connections.
5Connect a vacuum pump to the fuel
pressure regulator (see illustration).
6Run the fuel pump (see Section 3). Read the
fuel pressure gauge with vacuum applied to
the pressure regulator, and also with no
vacuum applied. The fuel pressure should
decrease as vacuum increases.
7Stop the fuel pump and reconnect the
vacuum hose to the regulator. Start the engine
and check the fuel system pressure at idle,
comparing your reading with the value listed
in this Chapter’s Specifications. Disconnect
the vacuum hose and watch the gauge - the
pressure should jump up to maximum as soon
as the hose is disconnected.
8If the fuel pressure is low, pinch the fuel
return line shut and watch the gauge. If the
pressure doesn’t rise, the fuel pump is
defective, or there is a restriction in the fuel
feed line. If the pressure now rises sharply,
renew the pressure regulator.
9If the indicated fuel pressure is too high,
stop the engine, disconnect the fuel return line
and blow through it to check for a blockage. If
there is no blockage, renew the fuel pressure
regulator.
10If the pressure doesn’t fluctuate as
described in paragraph 7, connect a vacuum
4•16 Fuel and exhaust systems
18.5 Carefully watch the fuel pressure
gauge as vacuum is applied (fuel pressure
should decrease as vacuum increases)
17.11 Remove the nuts (arrowed) and lift
the throttle body from the intake manifold
(the two lower bolts are hidden from view)16.11b Remove the nuts (arrowed) from
the air cleaner housing, and detach the
airflow meter16.11a Push the tab and remove the air
duct from inside the air cleaner assembly
Page 105 of 228
gauge to the pressure regulator vacuum hose,
and check for vacuum (engine idling).
11If there is vacuum present, renew the fuel
pressure regulator.
12If there isn’t any reading on the gauge,
check the hose and its port for a leak or a
restriction.
Renewal
13Depressurise the fuel system (see Sec-
tion 2).
14Detach the battery negative cable.
Caution: If the radio in your
vehicle is equipped with an anti-
theft system, make sure you
have the correct activation code
before disconnecting the battery. Refer to
the information on page 0-7 at the front of
this manual before detaching the cable.
Note: If, after connecting the battery, the
wrong language appears on the instrument
panel display, refer to page 0-7 for the
language resetting procedure.
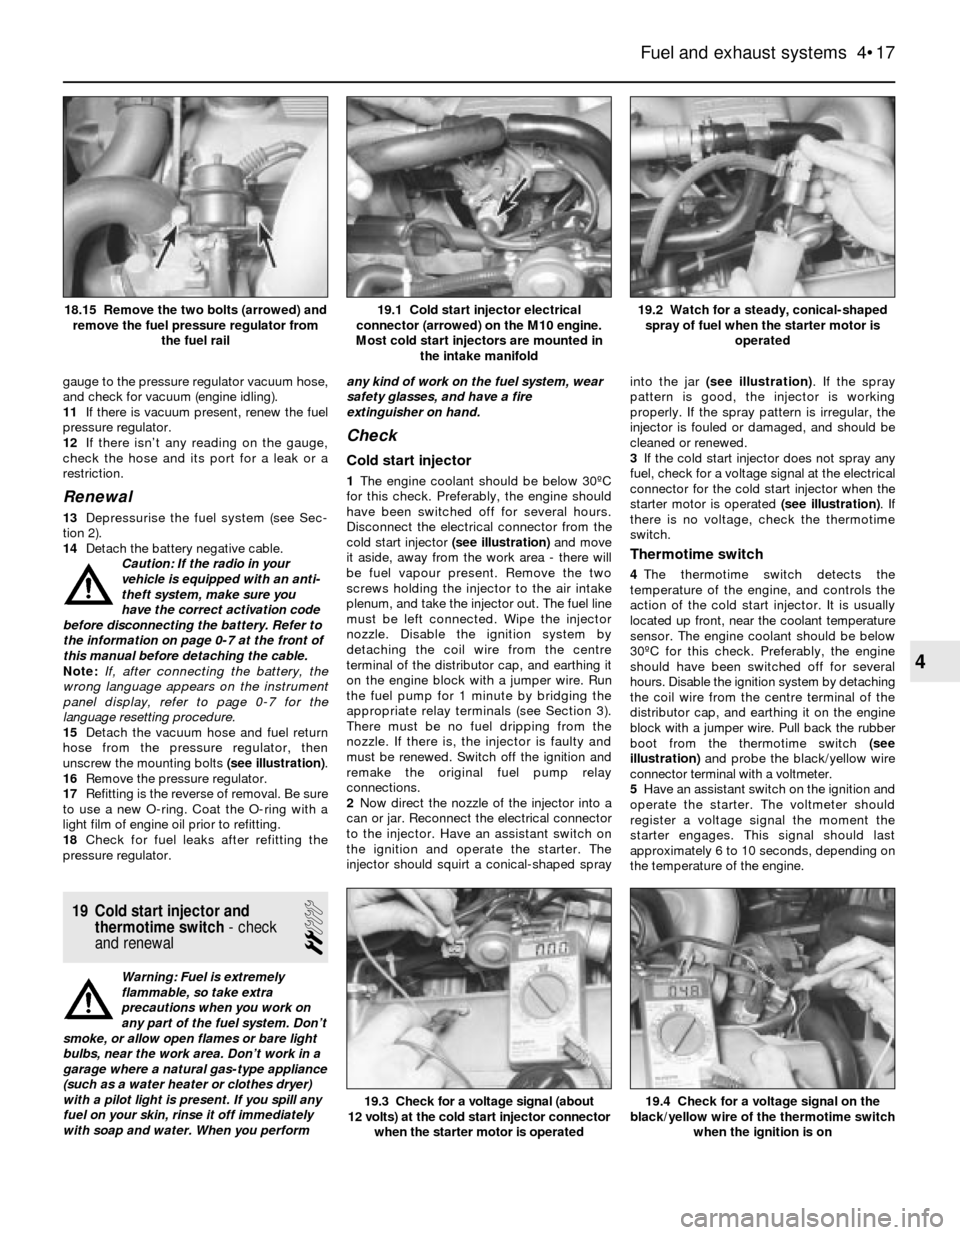
15Detach the vacuum hose and fuel return
hose from the pressure regulator, then
unscrew the mounting bolts (see illustration).
16Remove the pressure regulator.
17Refitting is the reverse of removal. Be sure
to use a new O-ring. Coat the O-ring with a
light film of engine oil prior to refitting.
18Check for fuel leaks after refitting the
pressure regulator.
19 Cold start injector and
thermotime switch- check
and renewal
2
Warning: Fuel is extremely
flammable, so take extra
precautions when you work on
any part of the fuel system. Don’t
smoke, or allow open flames or bare light
bulbs, near the work area. Don’t work in a
garage where a natural gas-type appliance
(such as a water heater or clothes dryer)
with a pilot light is present. If you spill any
fuel on your skin, rinse it off immediately
with soap and water. When you performany kind of work on the fuel system, wear
safety glasses, and have a fire
extinguisher on hand.
Check
Cold start injector
1The engine coolant should be below 30ºC
for this check. Preferably, the engine should
have been switched off for several hours.
Disconnect the electrical connector from the
cold start injector (see illustration)and move
it aside, away from the work area - there will
be fuel vapour present. Remove the two
screws holding the injector to the air intake
plenum, and take the injector out. The fuel line
must be left connected. Wipe the injector
nozzle. Disable the ignition system by
detaching the coil wire from the centre
terminal of the distributor cap, and earthing it
on the engine block with a jumper wire. Run
the fuel pump for 1 minute by bridging the
appropriate relay terminals (see Section 3).
There must be no fuel dripping from the
nozzle. If there is, the injector is faulty and
must be renewed. Switch off the ignition and
remake the original fuel pump relay
connections.
2Now direct the nozzle of the injector into a
can or jar. Reconnect the electrical connector
to the injector. Have an assistant switch on
the ignition and operate the starter. The
injector should squirt a conical-shaped sprayinto the jar (see illustration). If the spray
pattern is good, the injector is working
properly. If the spray pattern is irregular, the
injector is fouled or damaged, and should be
cleaned or renewed.
3If the cold start injector does not spray any
fuel, check for a voltage signal at the electrical
connector for the cold start injector when the
starter motor is operated (see illustration). If
there is no voltage, check the thermotime
switch.
Thermotime switch
4The thermotime switch detects the
temperature of the engine, and controls the
action of the cold start injector. It is usually
located up front, near the coolant temperature
sensor. The engine coolant should be below
30ºC for this check. Preferably, the engine
should have been switched off for several
hours. Disable the ignition system by detaching
the coil wire from the centre terminal of the
distributor cap, and earthing it on the engine
block with a jumper wire. Pull back the rubber
boot from the thermotime switch (see
illustration)and probe the black/yellow wire
connector terminal with a voltmeter.
5Have an assistant switch on the ignition and
operate the starter. The voltmeter should
register a voltage signal the moment the
starter engages. This signal should last
approximately 6 to 10 seconds, depending on
the temperature of the engine.
Fuel and exhaust systems 4•17
19.2 Watch for a steady, conical-shaped
spray of fuel when the starter motor is
operated19.1 Cold start injector electrical
connector (arrowed) on the M10 engine.
Most cold start injectors are mounted in
the intake manifold18.15 Remove the two bolts (arrowed) and
remove the fuel pressure regulator from
the fuel rail
19.4 Check for a voltage signal on the
black/yellow wire of the thermotime switch
when the ignition is on19.3 Check for a voltage signal (about
12 volts) at the cold start injector connector
when the starter motor is operated
4
Page 117 of 228
8Use a digital voltmeter for the following
tests:
a) On Bosch systems, connect the positive
probe to connector terminal 5, and the
negative probe to terminal 6 (see
illustration).
b) On Siemens/Telefunken systems, connect
the positive probe to terminal (+) of the
smaller connector, and the negative
probe to terminal (-).
9Have an assistant crank the engine over,
and check that there is 1 to 2 volts A/C
present. If there is no voltage, check the
wiring harness between the impulse generator
(in the distributor) and the control unit. If the
harness is OK, check the impulse generator
resistance.
Warning: Do not crank the
engine over for an excessive
length of time. If necessary,
disconnect the cold start injector
electrical connector (see Chapter 4) to
stop the flow of fuel into the engine.
10To check the resistance in the impulse
generator, proceed as described for your
system below:
a) On Bosch units, measure the resistance
between connector terminals 5 and 6
(see illustration 10.8). The reading
should be 1000 to 1200 ohms.
b) On Siemens/Telefunken units, measure
the resistance between the terminals of
the smaller connector. The reading should
be 1000 to 1200 ohms.
11If the resistance readings are incorrect,
renew the impulse generator. If the resistance
readings for the impulse generator are correct
and the control unit voltages (supply voltage
[paragraphs 1 to 6] and signal voltage
[paragraphs 7 to 9]) are incorrect, renew the
control unit.
Renewal
Ignition control unit
12Make sure the ignition is switched off.
13Disconnect the electrical connector(s)
from the control unit.
14Remove the mounting screws from the
control unit, and lift it from the engine
compartment.15Refitting is the reverse of removal. Note:
On Bosch control units, a special dielectric
grease is used between the heat sink and the
back of the control unit. In the event the two
are separated (renewal or testing) the old
grease must be removed, and the heat sink
cleaned off using 180-grit sandpaper. Apply
Curil K2 (Bosch part number 81 22 9 243). A
silicon dielectric compound can be used as a
substitute. This treatment is very important for
the long life of these expensive ignition parts.
Impulse generator
Caution: If the radio in your
vehicle is equipped with an anti-
theft system, make sure you
have the correct activation code
before disconnecting the battery. Refer to
the information on page 0-7 at the front of
this manual before detaching the cable.
Note: If, after connecting the battery, the
wrong language appears on the instrument
panel display, refer to page 0-7 for the
language resetting procedure.
16Disconnect the battery negative cable.
17Remove the distributor from the engine
(see Section 8).
18Using a pair of circlip pliers, remove the
circlip retaining the trigger wheel (see
illustration).
19Use two flat-bladed screwdrivers
positioned at opposite sides of the trigger
wheel, and carefully prise it up (see
illustration). Note: Push the screwdrivers in
as far as possible without bending the trigger
wheel. Prise only on the strongest, centre
portion of the trigger wheel. In the event the
trigger wheel is bent, it must be replaced with
a new one. Note:Be sure not to lose the roll
pin when lifting out the trigger wheel.
20Remove the mounting screws from the
impulse generator electrical connector, the
vacuum diaphragm and the baseplate.
21Remove the two screws from the vacuum
advance unit, and separate it from the
distributor by moving the assembly down
while unhooking it from the baseplate pin.
22Use circlip pliers to remove the circlip that
retains the impulse generator and the
baseplate assembly.
23Carefully remove the impulse generator
and the baseplate assembly as a single unit.24Remove the three screws, and separate
the baseplate assembly from the impulse
generator.
25Refitting is the reverse of removal. Note:
Be sure to position the insulating ring between
the generator coil and the baseplate. It must
be centred before tightening the mounting
screws. Also, it will be necessary to
check/adjust the air gap if the trigger wheel
has been removed, or tampered with to the
point that the clearance is incorrect (see
Section 11).
11 Air gap (TCI system)-
check and adjustment
2
Caution: If the radio in your
vehicle is equipped with an anti-
theft system, make sure you
have the correct activation code
before disconnecting the battery. Refer to
the information on page 0-7 at the front of
this manual before detaching the cable.
Note: If, after connecting the battery, the
wrong language appears on the instrument
panel display, refer to page 0-7 for the
language resetting procedure.
1Disconnect the battery negative cable.
2Insert a brass feeler gauge between the
trigger wheel tab and the impulse generator
(see illustration). Slide the feeler gauge up
Engine electrical systems 5•7
10.19 Carefully prise the trigger wheel off
the distributor shaft10.18 Use circlip pliers and remove the
circlip from the distributor shaft10.8 Back-probe the ignition control unit
connector, and check for signal voltage on
terminals 5 and 6 (Bosch system shown). It
is very helpful to use angled probes
11.2 Use a brass feeler gauge to check
the air gap (be sure the gauge rubs lightly
against the trigger wheel as well as the
locating pin for the correct adjustment)
5
Page 118 of 228
and down - you should feel a slight drag on
the feeler gauge as it is moved if the gap is
correct. The gap must be as given in this
Chapter’s Specifications.
3To adjust the gap, it is necessary to remove
the impulse generator and the baseplate
assembly from the distributor (see illus-
tration 10.1).
4Follow paragraphs 17 to 24 in Section 10
and loosen the screws that retain the impulse
generator to the baseplate assembly.
5Carefully insert the feeler gauge and tighten
the screws.
6Refit the assembly back into the distributor
and recheck the adjustment.12 Ignition sensors (Motronic
system)- check and renewal
2
Note:Some models are equipped with a TDC
sensor mounted on the front of the engine.
This sensor is strictly for the BMW service test
unit, and is not part of the Motronic ignition
system.
Speed and position sensors
Check
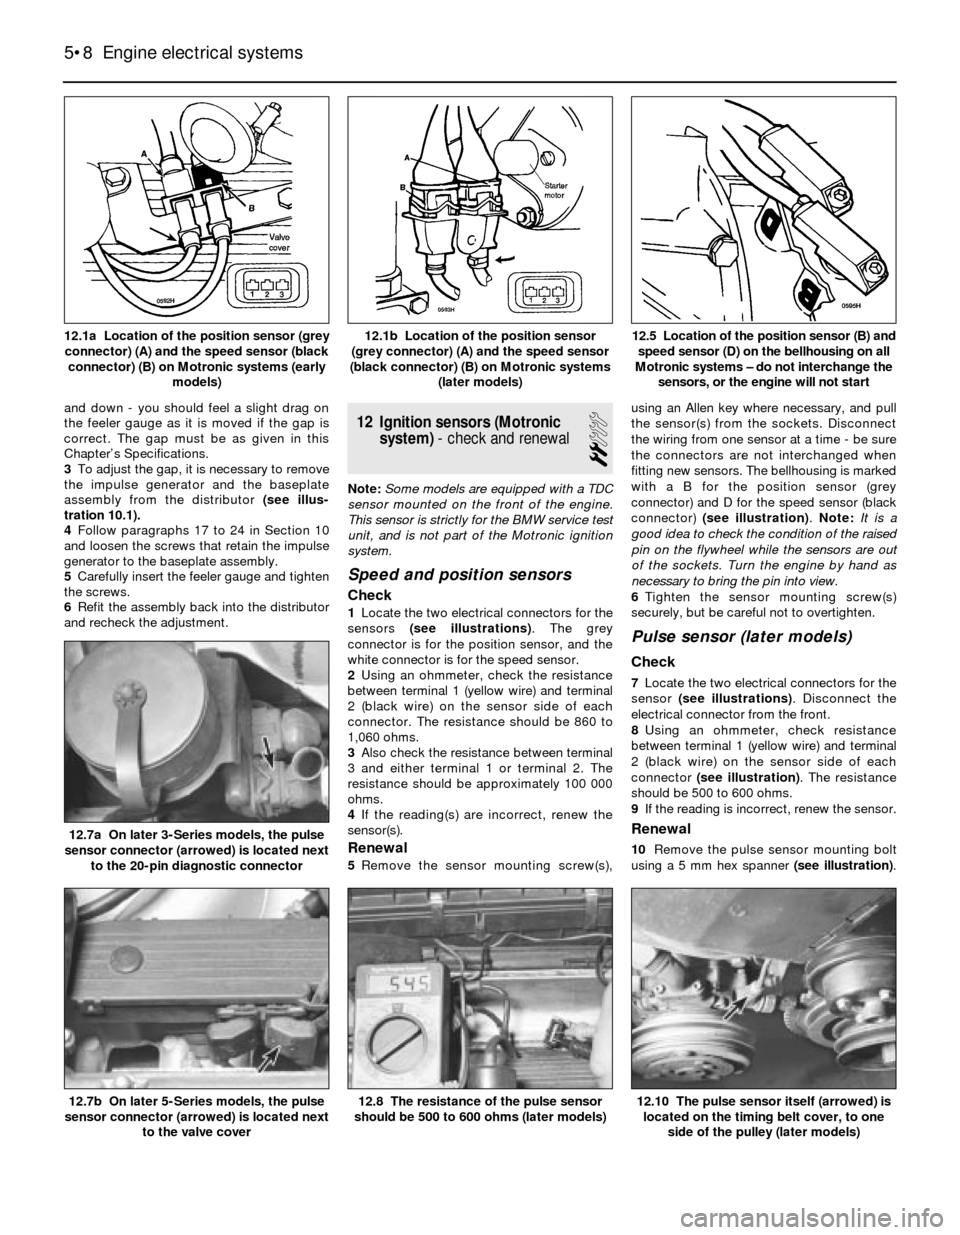
1Locate the two electrical connectors for the
sensors (see illustrations). The grey
connector is for the position sensor, and the
white connector is for the speed sensor.
2Using an ohmmeter, check the resistance
between terminal 1 (yellow wire) and terminal
2 (black wire) on the sensor side of each
connector. The resistance should be 860 to
1,060 ohms.
3Also check the resistance between terminal
3 and either terminal 1 or terminal 2. The
resistance should be approximately 100 000
ohms.
4If the reading(s) are incorrect, renew the
sensor(s).
Renewal
5Remove the sensor mounting screw(s),using an Allen key where necessary, and pull
the sensor(s) from the sockets. Disconnect
the wiring from one sensor at a time - be sure
the connectors are not interchanged when
fitting new sensors. The bellhousing is marked
with a B for the position sensor (grey
connector) and D for the speed sensor (black
connector) (see illustration). Note: It is a
good idea to check the condition of the raised
pin on the flywheel while the sensors are out
of the sockets. Turn the engine by hand as
necessary to bring the pin into view.
6Tighten the sensor mounting screw(s)
securely, but be careful not to overtighten.
Pulse sensor (later models)
Check
7Locate the two electrical connectors for the
sensor (see illustrations). Disconnect the
electrical connector from the front.
8Using an ohmmeter, check resistance
between terminal 1 (yellow wire) and terminal
2 (black wire) on the sensor side of each
connector (see illustration). The resistance
should be 500 to 600 ohms.
9If the reading is incorrect, renew the sensor.
Renewal
10Remove the pulse sensor mounting bolt
using a 5 mm hex spanner (see illustration).
5•8 Engine electrical systems
12.10 The pulse sensor itself (arrowed) is
located on the timing belt cover, to one
side of the pulley (later models)12.8 The resistance of the pulse sensor
should be 500 to 600 ohms (later models)12.7b On later 5-Series models, the pulse
sensor connector (arrowed) is located next
to the valve cover
12.7a On later 3-Series models, the pulse
sensor connector (arrowed) is located next
to the 20-pin diagnostic connector
12.5 Location of the position sensor (B) and
speed sensor (D) on the bellhousing on all
Motronic systems – do not interchange the
sensors, or the engine will not start12.1b Location of the position sensor
(grey connector) (A) and the speed sensor
(black connector) (B) on Motronic systems
(later models)12.1a Location of the position sensor (grey
connector) (A) and the speed sensor (black
connector) (B) on Motronic systems (early
models)
Page 119 of 228
Withdraw the sensor from its bracket and
remove it.
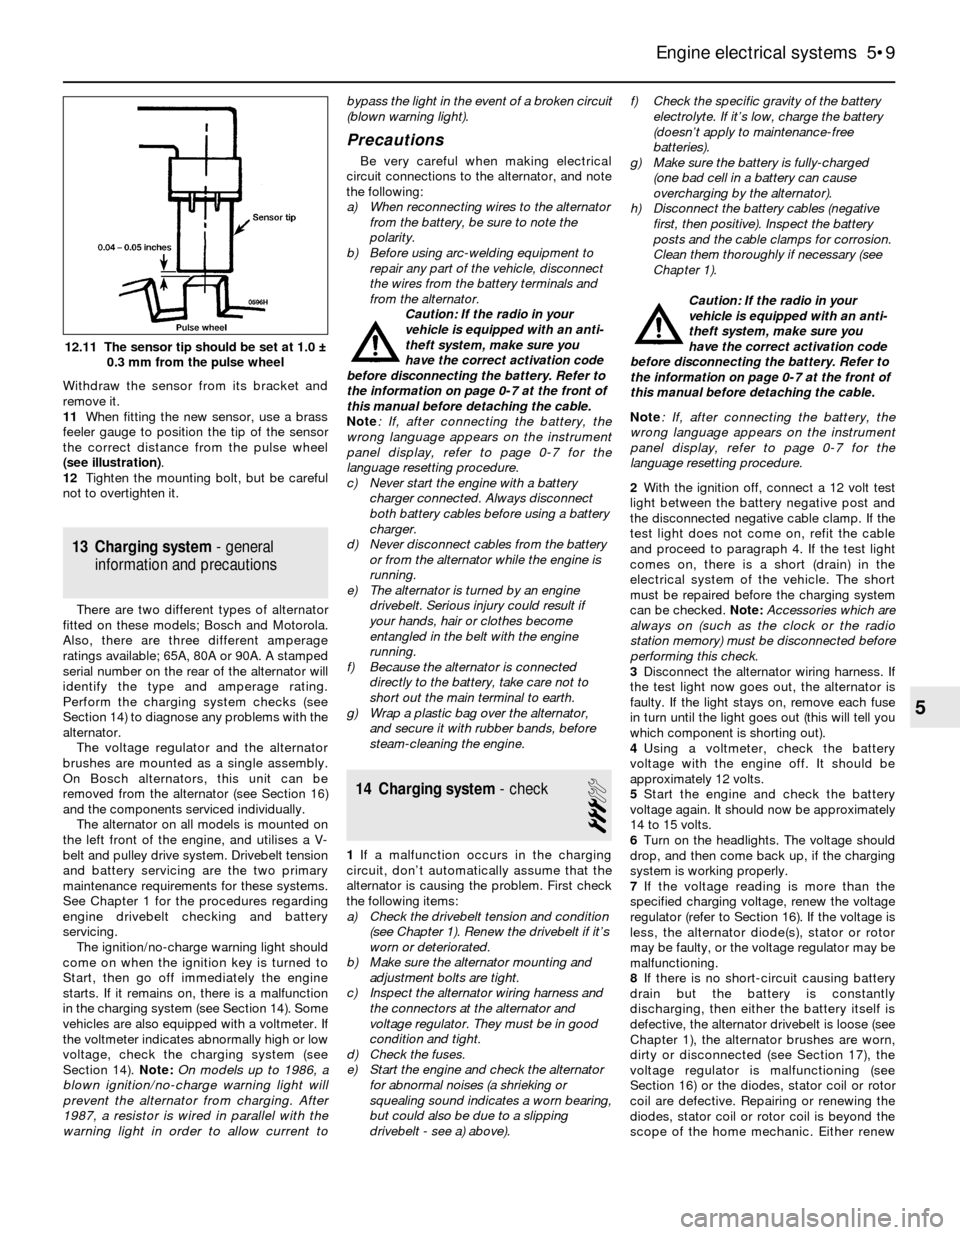
11When fitting the new sensor, use a brass
feeler gauge to position the tip of the sensor
the correct distance from the pulse wheel
(see illustration).
12Tighten the mounting bolt, but be careful
not to overtighten it.
13 Charging system- general
information and precautions
There are two different types of alternator
fitted on these models; Bosch and Motorola.
Also, there are three different amperage
ratings available; 65A, 80A or 90A. A stamped
serial number on the rear of the alternator will
identify the type and amperage rating.
Perform the charging system checks (see
Section 14) to diagnose any problems with the
alternator.
The voltage regulator and the alternator
brushes are mounted as a single assembly.
On Bosch alternators, this unit can be
removed from the alternator (see Section 16)
and the components serviced individually.
The alternator on all models is mounted on
the left front of the engine, and utilises a V-
belt and pulley drive system. Drivebelt tension
and battery servicing are the two primary
maintenance requirements for these systems.
See Chapter 1 for the procedures regarding
engine drivebelt checking and battery
servicing.
The ignition/no-charge warning light should
come on when the ignition key is turned to
Start, then go off immediately the engine
starts. If it remains on, there is a malfunction
in the charging system (see Section 14). Some
vehicles are also equipped with a voltmeter. If
the voltmeter indicates abnormally high or low
voltage, check the charging system (see
Section 14). Note:On models up to 1986, a
blown ignition/no-charge warning light will
prevent the alternator from charging. After
1987, a resistor is wired in parallel with the
warning light in order to allow current tobypass the light in the event of a broken circuit
(blown warning light).
Precautions
Be very careful when making electrical
circuit connections to the alternator, and note
the following:
a) When reconnecting wires to the alternator
from the battery, be sure to note the
polarity.
b) Before using arc-welding equipment to
repair any part of the vehicle, disconnect
the wires from the battery terminals and
from the alternator.
Caution: If the radio in your
vehicle is equipped with an anti-
theft system, make sure you
have the correct activation code
before disconnecting the battery. Refer to
the information on page 0-7 at the front of
this manual before detaching the cable.
Note: If, after connecting the battery, the
wrong language appears on the instrument
panel display, refer to page 0-7 for the
language resetting procedure.
c) Never start the engine with a battery
charger connected. Always disconnect
both battery cables before using a battery
charger.
d) Never disconnect cables from the battery
or from the alternator while the engine is
running.
e) The alternator is turned by an engine
drivebelt. Serious injury could result if
your hands, hair or clothes become
entangled in the belt with the engine
running.
f) Because the alternator is connected
directly to the battery, take care not to
short out the main terminal to earth.
g) Wrap a plastic bag over the alternator,
and secure it with rubber bands, before
steam-cleaning the engine.
14 Charging system- check
3
1If a malfunction occurs in the charging
circuit, don’t automatically assume that the
alternator is causing the problem. First check
the following items:
a) Check the drivebelt tension and condition
(see Chapter 1). Renew the drivebelt if it’s
worn or deteriorated.
b) Make sure the alternator mounting and
adjustment bolts are tight.
c) Inspect the alternator wiring harness and
the connectors at the alternator and
voltage regulator. They must be in good
condition and tight.
d) Check the fuses.
e) Start the engine and check the alternator
for abnormal noises (a shrieking or
squealing sound indicates a worn bearing,
but could also be due to a slipping
drivebelt - see a) above).f) Check the specific gravity of the battery
electrolyte. If it’s low, charge the battery
(doesn’t apply to maintenance-free
batteries).
g) Make sure the battery is fully-charged
(one bad cell in a battery can cause
overcharging by the alternator).
h) Disconnect the battery cables (negative
first, then positive). Inspect the battery
posts and the cable clamps for corrosion.
Clean them thoroughly if necessary (see
Chapter 1).
Caution: If the radio in your
vehicle is equipped with an anti-
theft system, make sure you
have the correct activation code
before disconnecting the battery. Refer to
the information on page 0-7 at the front of
this manual before detaching the cable.
Note: If, after connecting the battery, the
wrong language appears on the instrument
panel display, refer to page 0-7 for the
language resetting procedure.
2With the ignition off, connect a 12 volt test
light between the battery negative post and
the disconnected negative cable clamp. If the
test light does not come on, refit the cable
and proceed to paragraph 4. If the test light
comes on, there is a short (drain) in the
electrical system of the vehicle. The short
must be repaired before the charging system
can be checked. Note: Accessories which are
always on (such as the clock or the radio
station memory) must be disconnected before
performing this check.
3Disconnect the alternator wiring harness. If
the test light now goes out, the alternator is
faulty. If the light stays on, remove each fuse
in turn until the light goes out (this will tell you
which component is shorting out).
4Using a voltmeter, check the battery
voltage with the engine off. It should be
approximately 12 volts.
5Start the engine and check the battery
voltage again. It should now be approximately
14 to 15 volts.
6Turn on the headlights. The voltage should
drop, and then come back up, if the charging
system is working properly.
7If the voltage reading is more than the
specified charging voltage, renew the voltage
regulator (refer to Section 16). If the voltage is
less, the alternator diode(s), stator or rotor
may be faulty, or the voltage regulator may be
malfunctioning.
8If there is no short-circuit causing battery
drain but the battery is constantly
discharging, then either the battery itself is
defective, the alternator drivebelt is loose (see
Chapter 1), the alternator brushes are worn,
dirty or disconnected (see Section 17), the
voltage regulator is malfunctioning (see
Section 16) or the diodes, stator coil or rotor
coil are defective. Repairing or renewing the
diodes, stator coil or rotor coil is beyond the
scope of the home mechanic. Either renew
Engine electrical systems 5•9
12.11 The sensor tip should be set at 1.0 ±
0.3 mm from the pulse wheel
5
Page 173 of 228
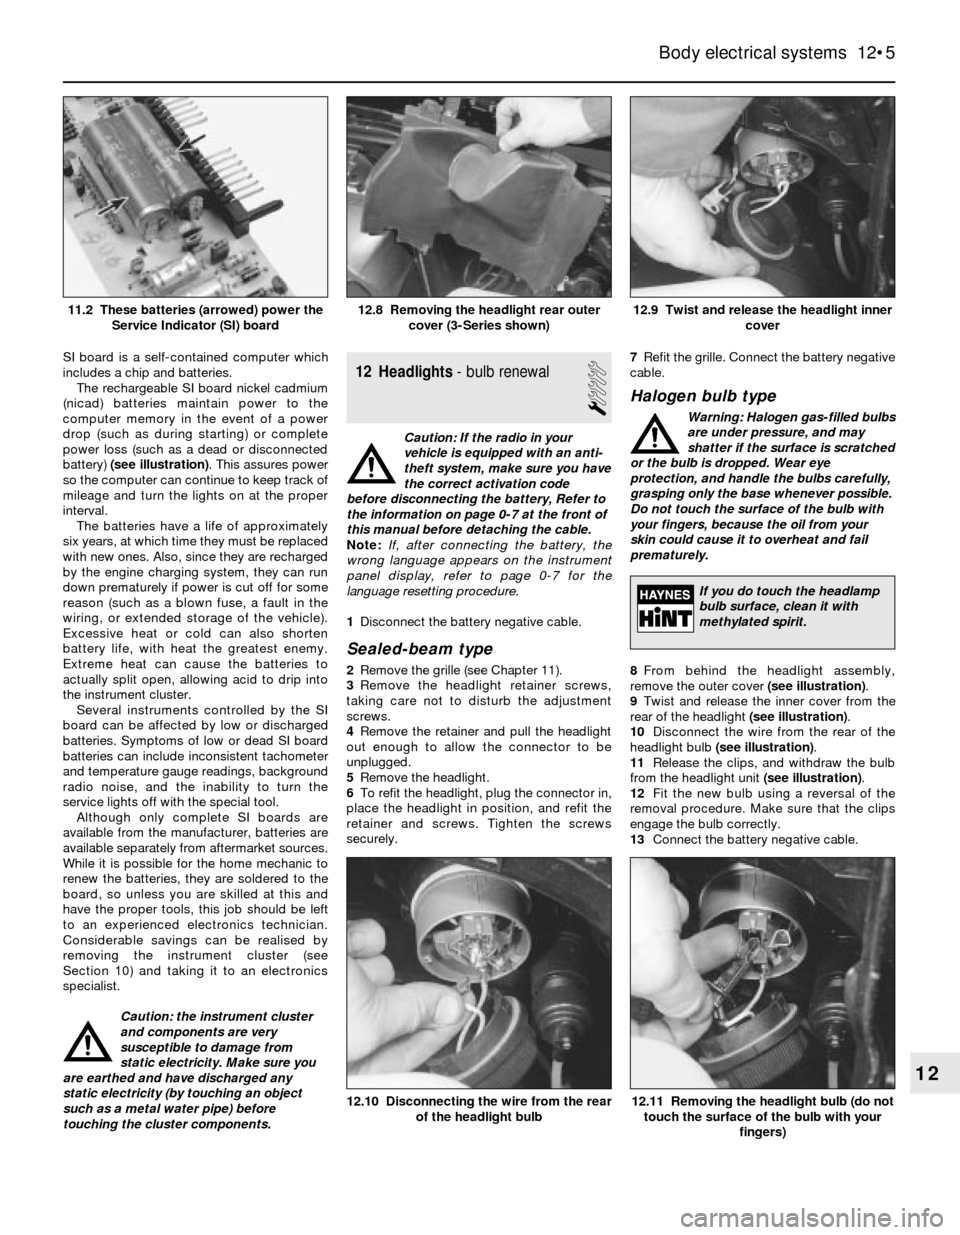
SI board is a self-contained computer which
includes a chip and batteries.
The rechargeable SI board nickel cadmium
(nicad) batteries maintain power to the
computer memory in the event of a power
drop (such as during starting) or complete
power loss (such as a dead or disconnected
battery) (see illustration). This assures power
so the computer can continue to keep track of
mileage and turn the lights on at the proper
interval.
The batteries have a life of approximately
six years, at which time they must be replaced
with new ones. Also, since they are recharged
by the engine charging system, they can run
down prematurely if power is cut off for some
reason (such as a blown fuse, a fault in the
wiring, or extended storage of the vehicle).
Excessive heat or cold can also shorten
battery life, with heat the greatest enemy.
Extreme heat can cause the batteries to
actually split open, allowing acid to drip into
the instrument cluster.
Several instruments controlled by the SI
board can be affected by low or discharged
batteries. Symptoms of low or dead SI board
batteries can include inconsistent tachometer
and temperature gauge readings, background
radio noise, and the inability to turn the
service lights off with the special tool.
Although only complete SI boards are
available from the manufacturer, batteries are
available separately from aftermarket sources.
While it is possible for the home mechanic to
renew the batteries, they are soldered to the
board, so unless you are skilled at this and
have the proper tools, this job should be left
to an experienced electronics technician.
Considerable savings can be realised by
removing the instrument cluster (see
Section 10) and taking it to an electronics
specialist.
Caution: the instrument cluster
and components are very
susceptible to damage from
static electricity. Make sure you
are earthed and have discharged any
static electricity (by touching an object
such as a metal water pipe) before
touching the cluster components.12 Headlights- bulb renewal
1
Caution: If the radio in your
vehicle is equipped with an anti-
theft system, make sure you have
the correct activation code
before disconnecting the battery, Refer to
the information on page 0-7 at the front of
this manual before detaching the cable.
Note: If, after connecting the battery, the
wrong language appears on the instrument
panel display, refer to page 0-7 for the
language resetting procedure.
1Disconnect the battery negative cable.
Sealed-beam type
2Remove the grille (see Chapter 11).
3Remove the headlight retainer screws,
taking care not to disturb the adjustment
screws.
4Remove the retainer and pull the headlight
out enough to allow the connector to be
unplugged.
5Remove the headlight.
6To refit the headlight, plug the connector in,
place the headlight in position, and refit the
retainer and screws. Tighten the screws
securely.7Refit the grille. Connect the battery negative
cable.
Halogen bulb type
Warning: Halogen gas-filled bulbs
are under pressure, and may
shatter if the surface is scratched
or the bulb is dropped. Wear eye
protection, and handle the bulbs carefully,
grasping only the base whenever possible.
Do not touch the surface of the bulb with
your fingers, because the oil from your
skin could cause it to overheat and fail
prematurely.
8From behind the headlight assembly,
remove the outer cover (see illustration).
9Twist and release the inner cover from the
rear of the headlight (see illustration).
10Disconnect the wire from the rear of the
headlight bulb (see illustration).
11Release the clips, and withdraw the bulb
from the headlight unit (see illustration).
12Fit the new bulb using a reversal of the
removal procedure. Make sure that the clips
engage the bulb correctly.
13Connect the battery negative cable.
Body electrical systems 12•5
12.9 Twist and release the headlight inner
cover12.8 Removing the headlight rear outer
cover (3-Series shown)11.2 These batteries (arrowed) power the
Service Indicator (SI) board
12.11 Removing the headlight bulb (do not
touch the surface of the bulb with your
fingers)12.10 Disconnecting the wire from the rear
of the headlight bulb
12
If you do touch the headlamp
bulb surface, clean it with
methylated spirit.
Page 206 of 228
Introduction
A selection of good tools is a fundamental
requirement for anyone contemplating the
maintenance and repair of a motor vehicle.
For the owner who does not possess any,
their purchase will prove a considerable
expense, offsetting some of the savings made
by doing-it-yourself. However, provided that
the tools purchased meet the relevant national
safety standards and are of good quality, they
will last for many years and prove an
extremely worthwhile investment.
To help the average owner to decide which
tools are needed to carry out the various tasks
detailed in this manual, we have compiled
three lists of tools under the following
headings: Maintenance and minor repair,
Repair and overhaul, and Special. Newcomers
to practical mechanics should start off with
the Maintenance and minor repairtool kit, and
confine themselves to the simpler jobs around
the vehicle. Then, as confidence and
experience grow, more difficult tasks can be
undertaken, with extra tools being purchased
as, and when, they are needed. In this way, a
Maintenance and minor repairtool kit can be
built up into a Repair and overhaultool kit over
a considerable period of time, without any
major cash outlays. The experienced do-it-
yourselfer will have a tool kit good enough for
most repair and overhaul procedures, and will
add tools from the Specialcategory when it is
felt that the expense is justified by the amount
of use to which these tools will be put.
Maintenance and minor repair
tool kit
The tools given in this list should be
considered as a minimum requirement if
routine maintenance, servicing and minor
repair operations are to be undertaken. We
recommend the purchase of combination
spanners (ring one end, open-ended the
other); although more expensive than open-
ended ones, they do give the advantages of
both types of spanner.
MCombination spanners:
Metric - 8, 9, 10, 11, 12, 13, 14, 15, 16, 17,
19, 21, 22, 24 & 26 mm
MAdjustable spanner - 35 mm jaw (approx)
MTransmission drain plug key (Allen type)
MSet of feeler gauges
MSpark plug spanner (with rubber insert)
MSpark plug gap adjustment tool
MBrake bleed nipple spanner
MScrewdrivers:
Flat blade - approx 100 mm long x 6 mm dia
Cross blade - approx 100 mm long x
6 mm dia
MCombination pliers
MHacksaw (junior)
MTyre pump
MTyre pressure gauge
MOil can
MOil filter removal tool
MFine emery cloth
MWire brush (small)
MFunnel (medium size)
Repair and overhaul tool kit
These tools are virtually essential for
anyone undertaking any major repairs to a
motor vehicle, and are additional to those
given in the Maintenance and minor repairlist.
Included in this list is a comprehensive set of
sockets. Although these are expensive, they
will be found invaluable as they are so
versatile - particularly if various drives are
included in the set. We recommend the half-
inch square-drive type, as this can be used
with most proprietary torque wrenches. If you
cannot afford a socket set, even bought
piecemeal, then inexpensive tubular box
spanners are a useful alternative.
The tools in this list will occasionally need
to be supplemented by tools from the Special
list:
MSockets (or box spanners) to cover range in
previous list
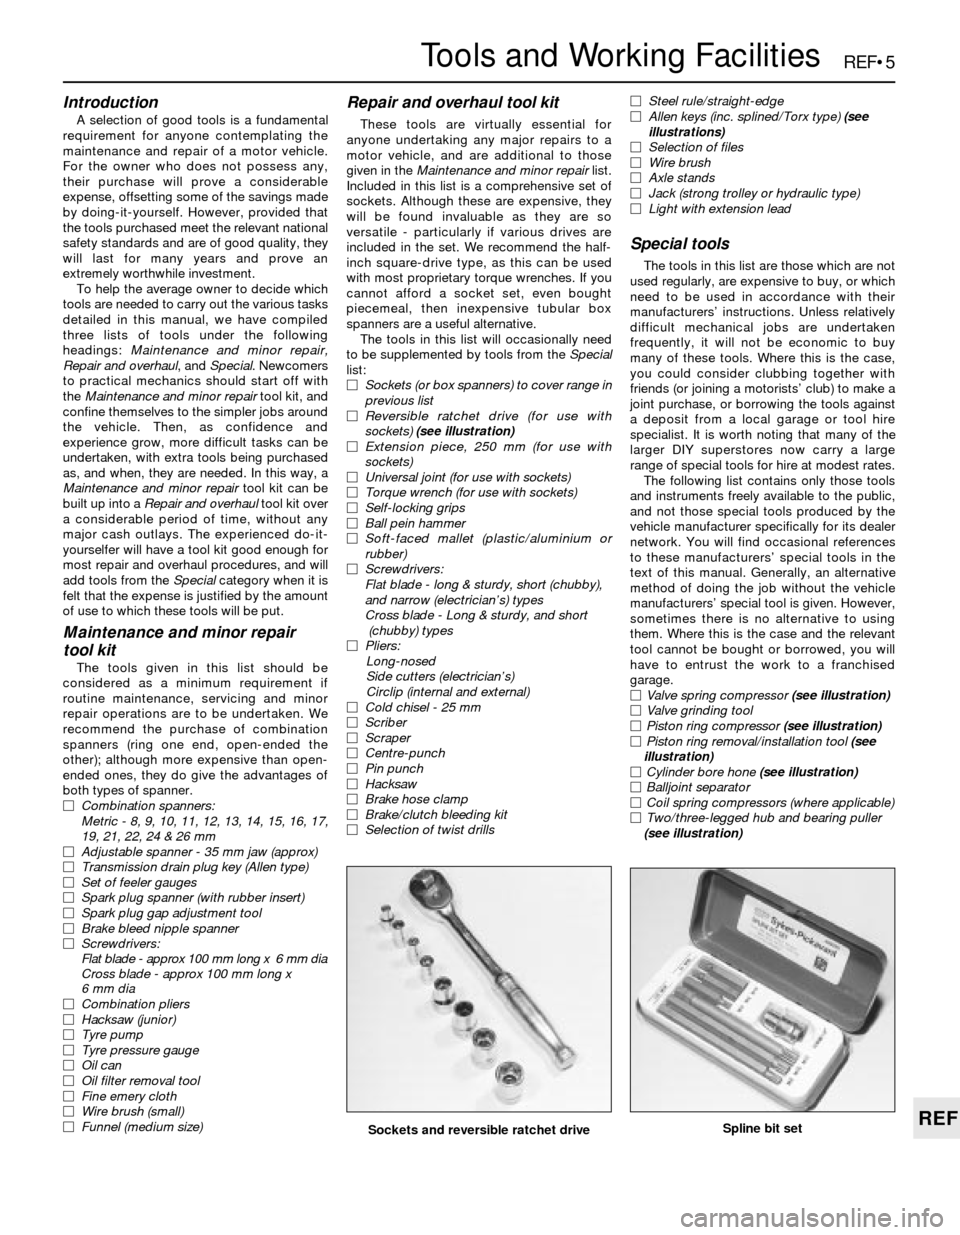
MReversible ratchet drive (for use with
sockets) (see illustration)
MExtension piece, 250 mm (for use with
sockets)
MUniversal joint (for use with sockets)
MTorque wrench (for use with sockets)
MSelf-locking grips
MBall pein hammer
MSoft-faced mallet (plastic/aluminium or
rubber)
MScrewdrivers:
Flat blade - long & sturdy, short (chubby),
and narrow (electrician’s) types
Cross blade - Long & sturdy, and short
(chubby) types
MPliers:
Long-nosed
Side cutters (electrician’s)
Circlip (internal and external)
MCold chisel - 25 mm
MScriber
MScraper
MCentre-punch
MPin punch
MHacksaw
MBrake hose clamp
MBrake/clutch bleeding kit
MSelection of twist drillsMSteel rule/straight-edge
MAllen keys (inc. splined/Torx type) (see
illustrations)
MSelection of files
MWire brush
MAxle stands
MJack (strong trolley or hydraulic type)
MLight with extension lead
Special tools
The tools in this list are those which are not
used regularly, are expensive to buy, or which
need to be used in accordance with their
manufacturers’ instructions. Unless relatively
difficult mechanical jobs are undertaken
frequently, it will not be economic to buy
many of these tools. Where this is the case,
you could consider clubbing together with
friends (or joining a motorists’ club) to make a
joint purchase, or borrowing the tools against
a deposit from a local garage or tool hire
specialist. It is worth noting that many of the
larger DIY superstores now carry a large
range of special tools for hire at modest rates.
The following list contains only those tools
and instruments freely available to the public,
and not those special tools produced by the
vehicle manufacturer specifically for its dealer
network. You will find occasional references
to these manufacturers’ special tools in the
text of this manual. Generally, an alternative
method of doing the job without the vehicle
manufacturers’ special tool is given. However,
sometimes there is no alternative to using
them. Where this is the case and the relevant
tool cannot be bought or borrowed, you will
have to entrust the work to a franchised
garage.
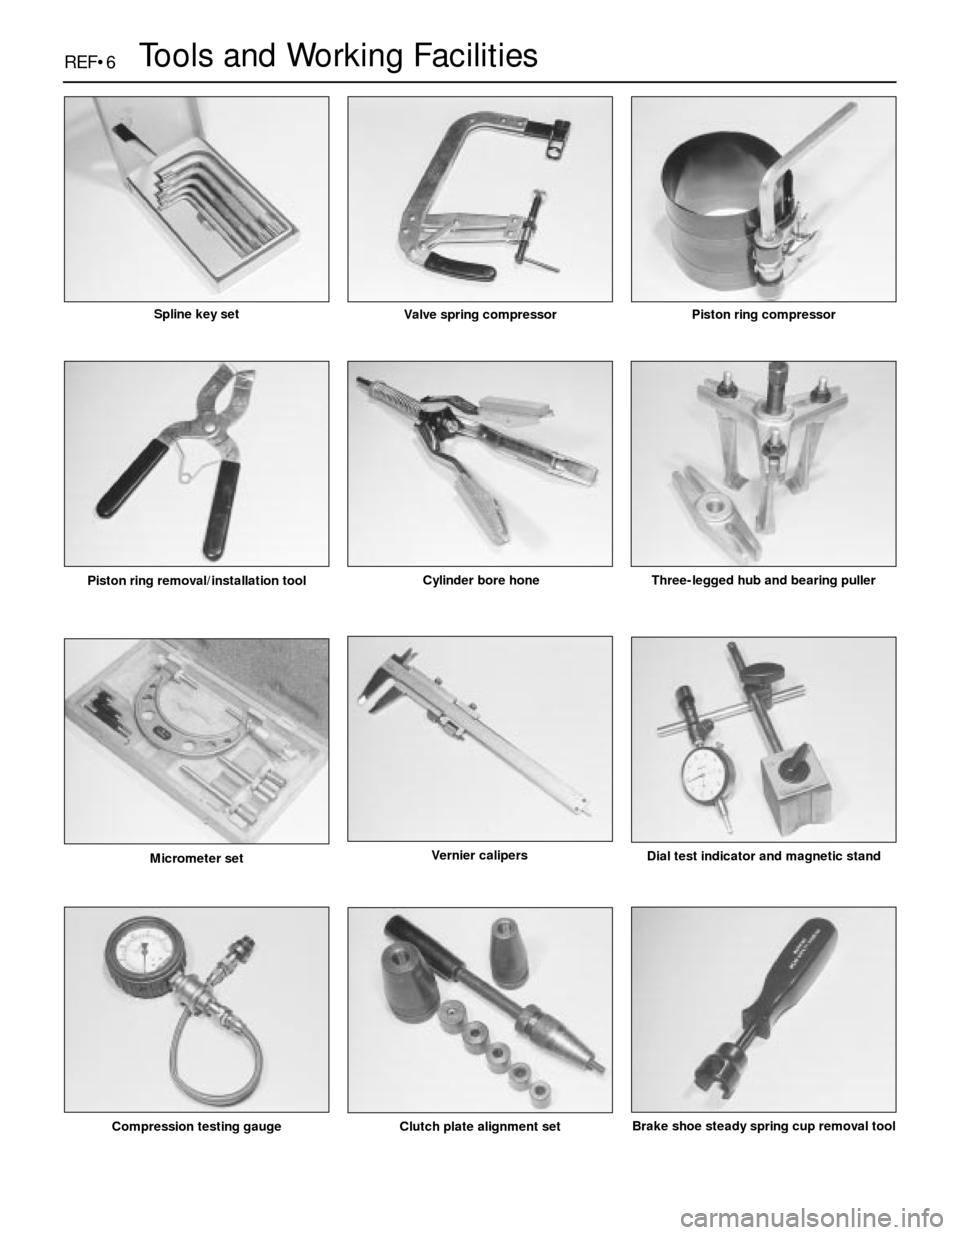
MValve spring compressor (see illustration)
MValve grinding tool
MPiston ring compressor (see illustration)
MPiston ring removal/installation tool (see
illustration)
MCylinder bore hone (see illustration)
MBalljoint separator
MCoil spring compressors (where applicable)
MTwo/three-legged hub and bearing puller
(see illustration)
REF•5
REF
Tools and Working Facilities
Sockets and reversible ratchet driveSpline bit set
Page 207 of 228
REF•6Tools and Working Facilities
Compression testing gauge Clutch plate alignment setBrake shoe steady spring cup removal tool
Micrometer setVernier calipers
Dial test indicator and magnetic stand
Piston ring removal/installation toolCylinder bore hone Three-legged hub and bearing puller
Valve spring compressorPiston ring compressorSpline key set