warning BMW 3 SERIES 1985 E30 Repair Manual
[x] Cancel search | Manufacturer: BMW, Model Year: 1985, Model line: 3 SERIES, Model: BMW 3 SERIES 1985 E30Pages: 228, PDF Size: 7.04 MB
Page 132 of 228
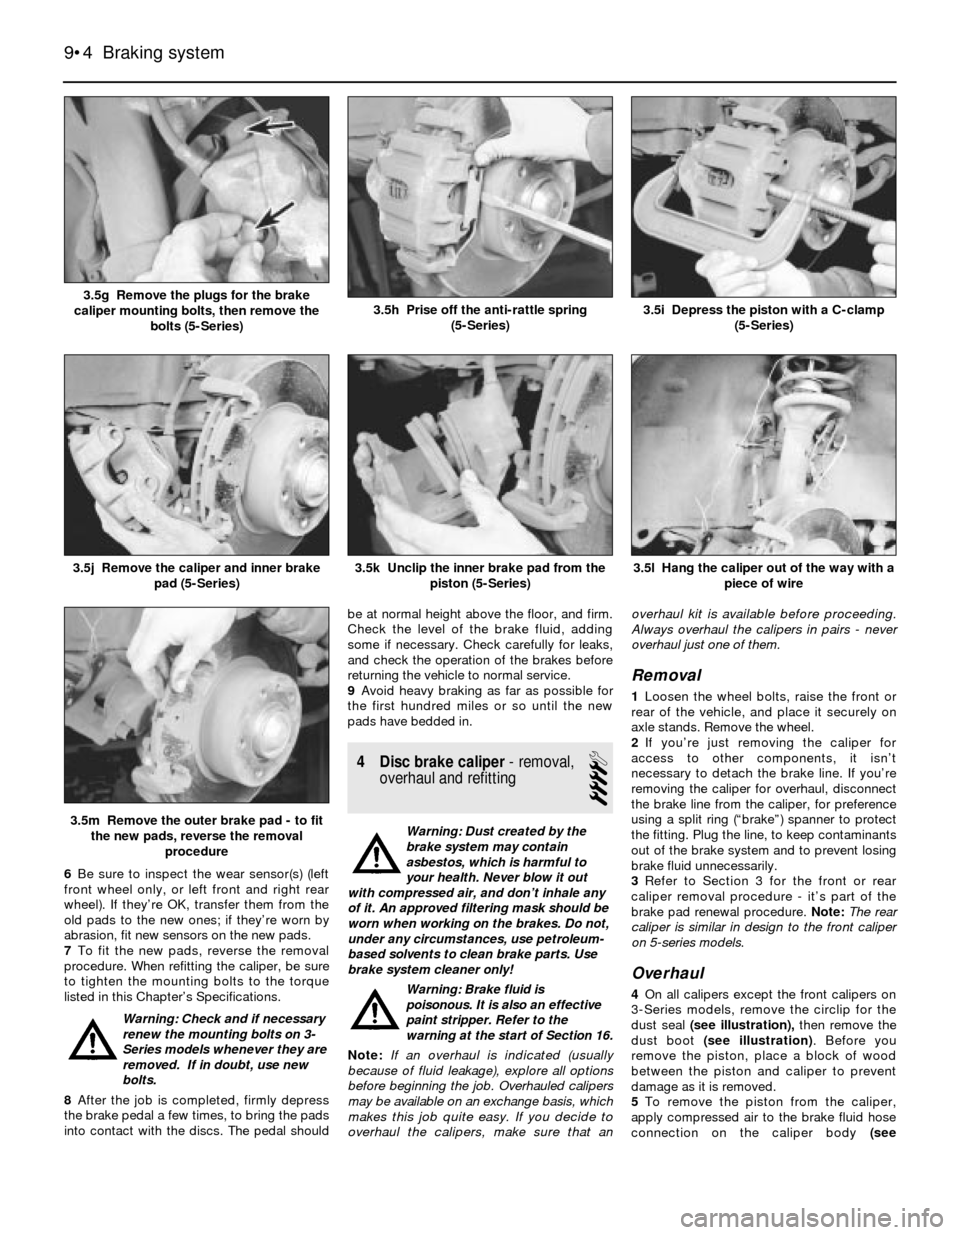
6Be sure to inspect the wear sensor(s) (left
front wheel only, or left front and right rear
wheel). If they’re OK, transfer them from the
old pads to the new ones; if they’re worn by
abrasion, fit new sensors on the new pads.
7To fit the new pads, reverse the removal
procedure. When refitting the caliper, be sure
to tighten the mounting bolts to the torque
listed in this Chapter’s Specifications.
Warning: Check and if necessary
renew the mounting bolts on 3-
Series models whenever they are
removed. If in doubt, use new
bolts.
8After the job is completed, firmly depress
the brake pedal a few times, to bring the pads
into contact with the discs. The pedal shouldbe at normal height above the floor, and firm.
Check the level of the brake fluid, adding
some if necessary. Check carefully for leaks,
and check the operation of the brakes before
returning the vehicle to normal service.
9Avoid heavy braking as far as possible for
the first hundred miles or so until the new
pads have bedded in.
4 Disc brake caliper- removal,
overhaul and refitting
4
Warning: Dust created by the
brake system may contain
asbestos, which is harmful to
your health. Never blow it out
with compressed air, and don’t inhale any
of it. An approved filtering mask should be
worn when working on the brakes. Do not,
under any circumstances, use petroleum-
based solvents to clean brake parts. Use
brake system cleaner only!
Warning: Brake fluid is
poisonous. It is also an effective
paint stripper. Refer to the
warning at the start of Section 16.
Note:If an overhaul is indicated (usually
because of fluid leakage), explore all options
before beginning the job. Overhauled calipers
may be available on an exchange basis, which
makes this job quite easy. If you decide to
overhaul the calipers, make sure that anoverhaul kit is available before proceeding.
Always overhaul the calipers in pairs - never
overhaul just one of them.
Removal
1Loosen the wheel bolts, raise the front or
rear of the vehicle, and place it securely on
axle stands. Remove the wheel.
2If you’re just removing the caliper for
access to other components, it isn’t
necessary to detach the brake line. If you’re
removing the caliper for overhaul, disconnect
the brake line from the caliper, for preference
using a split ring (“brake”) spanner to protect
the fitting. Plug the line, to keep contaminants
out of the brake system and to prevent losing
brake fluid unnecessarily.
3Refer to Section 3 for the front or rear
caliper removal procedure - it’s part of the
brake pad renewal procedure. Note:The rear
caliper is similar in design to the front caliper
on 5-series models.
Overhaul
4On all calipers except the front calipers on
3-Series models, remove the circlip for the
dust seal (see illustration),then remove the
dust boot (see illustration). Before you
remove the piston, place a block of wood
between the piston and caliper to prevent
damage as it is removed.
5To remove the piston from the caliper,
apply compressed air to the brake fluid hose
connection on the caliper body (see
9•4 Braking system
3.5l Hang the caliper out of the way with a
piece of wire
3.5m Remove the outer brake pad - to fit
the new pads, reverse the removal
procedure
3.5k Unclip the inner brake pad from the
piston (5-Series)3.5j Remove the caliper and inner brake
pad (5-Series)
3.5i Depress the piston with a C-clamp
(5-Series)3.5h Prise off the anti-rattle spring
(5-Series)3.5g Remove the plugs for the brake
caliper mounting bolts, then remove the
bolts (5-Series)
Page 133 of 228
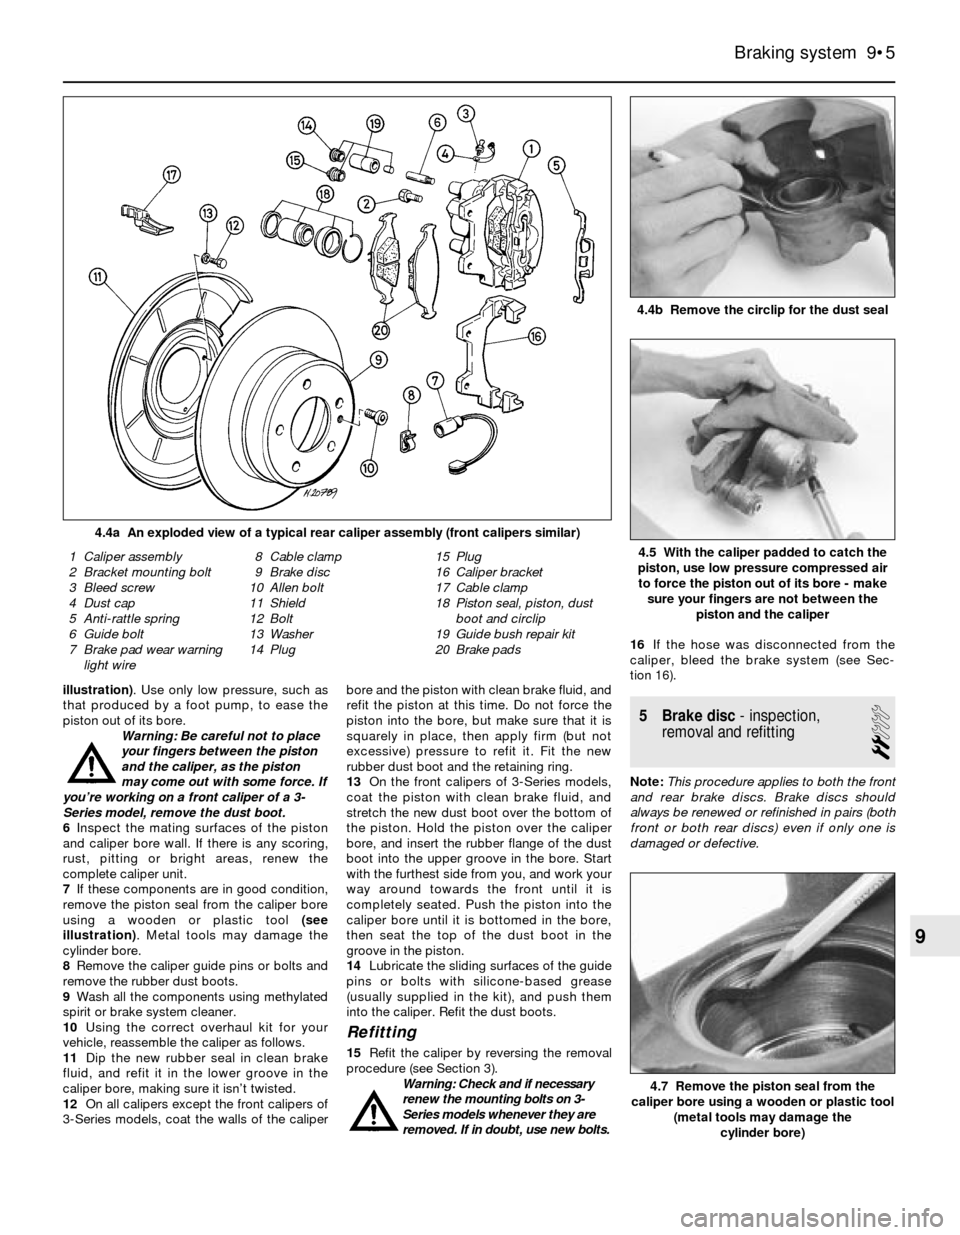
illustration). Use only low pressure, such as
that produced by a foot pump, to ease the
piston out of its bore.
Warning: Be careful not to place
your fingers between the piston
and the caliper, as the piston
may come out with some force. If
you’re working on a front caliper of a 3-
Series model, remove the dust boot.
6Inspect the mating surfaces of the piston
and caliper bore wall. If there is any scoring,
rust, pitting or bright areas, renew the
complete caliper unit.
7If these components are in good condition,
remove the piston seal from the caliper bore
using a wooden or plastic tool (see
illustration). Metal tools may damage the
cylinder bore.
8Remove the caliper guide pins or bolts and
remove the rubber dust boots.
9Wash all the components using methylated
spirit or brake system cleaner.
10Using the correct overhaul kit for your
vehicle, reassemble the caliper as follows.
11Dip the new rubber seal in clean brake
fluid, and refit it in the lower groove in the
caliper bore, making sure it isn’t twisted.
12On all calipers except the front calipers of
3-Series models, coat the walls of the caliperbore and the piston with clean brake fluid, and
refit the piston at this time. Do not force the
piston into the bore, but make sure that it is
squarely in place, then apply firm (but not
excessive) pressure to refit it. Fit the new
rubber dust boot and the retaining ring.
13On the front calipers of 3-Series models,
coat the piston with clean brake fluid, and
stretch the new dust boot over the bottom of
the piston. Hold the piston over the caliper
bore, and insert the rubber flange of the dust
boot into the upper groove in the bore. Start
with the furthest side from you, and work your
way around towards the front until it is
completely seated. Push the piston into the
caliper bore until it is bottomed in the bore,
then seat the top of the dust boot in the
groove in the piston.
14Lubricate the sliding surfaces of the guide
pins or bolts with silicone-based grease
(usually supplied in the kit), and push them
into the caliper. Refit the dust boots.
Refitting
15Refit the caliper by reversing the removal
procedure (see Section 3).
Warning: Check and if necessary
renew the mounting bolts on 3-
Series models whenever they are
removed. If in doubt, use new bolts.16If the hose was disconnected from the
caliper, bleed the brake system (see Sec-
tion 16).
5 Brake disc- inspection,
removal and refitting
2
Note:This procedure applies to both the front
and rear brake discs. Brake discs should
always be renewed or refinished in pairs (both
front or both rear discs) even if only one is
damaged or defective.
Braking system 9•5
4.4b Remove the circlip for the dust seal
4.4a An exploded view of a typical rear caliper assembly (front calipers similar)
4.7 Remove the piston seal from the
caliper bore using a wooden or plastic tool
(metal tools may damage the
cylinder bore)
1 Caliper assembly
2 Bracket mounting bolt
3 Bleed screw
4 Dust cap
5 Anti-rattle spring
6 Guide bolt
7 Brake pad wear warning
light wire8 Cable clamp
9 Brake disc
10 Allen bolt
11 Shield
12 Bolt
13 Washer
14 Plug15 Plug
16 Caliper bracket
17 Cable clamp
18 Piston seal, piston, dust
boot and circlip
19 Guide bush repair kit
20 Brake pads4.5 With the caliper padded to catch the
piston, use low pressure compressed air
to force the piston out of its bore - make
sure your fingers are not between the
piston and the caliper
9
Page 135 of 228
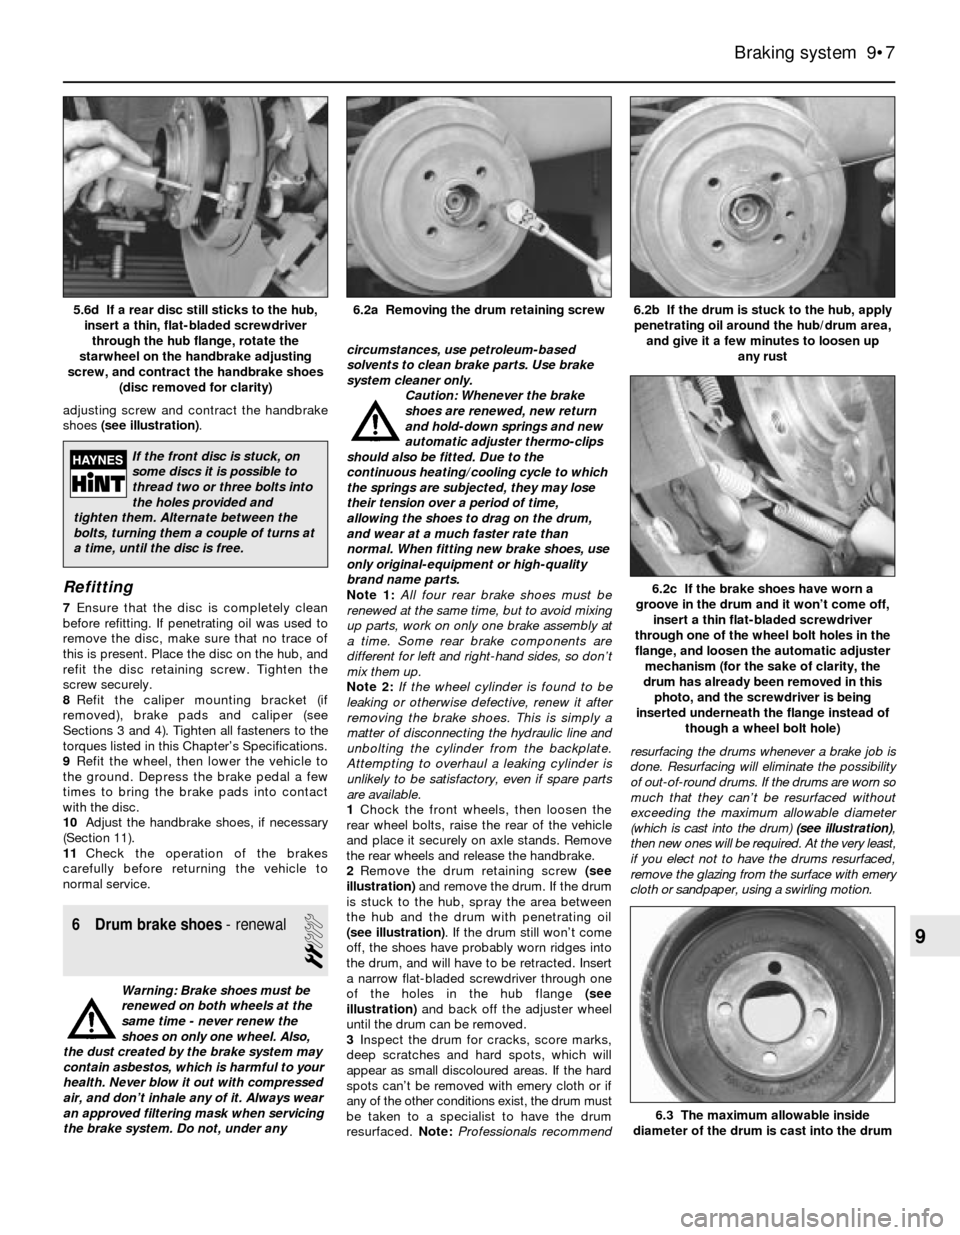
adjusting screw and contract the handbrake
shoes (see illustration).
Refitting
7Ensure that the disc is completely clean
before refitting. If penetrating oil was used to
remove the disc, make sure that no trace of
this is present. Place the disc on the hub, and
refit the disc retaining screw. Tighten the
screw securely.
8Refit the caliper mounting bracket (if
removed), brake pads and caliper (see
Sections 3 and 4). Tighten all fasteners to the
torques listed in this Chapter’s Specifications.
9Refit the wheel, then lower the vehicle to
the ground. Depress the brake pedal a few
times to bring the brake pads into contact
with the disc.
10Adjust the handbrake shoes, if necessary
(Section 11).
11Check the operation of the brakes
carefully before returning the vehicle to
normal service.
6 Drum brake shoes- renewal
2
Warning: Brake shoes must be
renewed on both wheels at the
same time - never renew the
shoes on only one wheel. Also,
the dust created by the brake system may
contain asbestos, which is harmful to your
health. Never blow it out with compressed
air, and don’t inhale any of it. Always wear
an approved filtering mask when servicing
the brake system. Do not, under anycircumstances, use petroleum-based
solvents to clean brake parts. Use brake
system cleaner only.
Caution: Whenever the brake
shoes are renewed, new return
and hold-down springs and new
automatic adjuster thermo-clips
should also be fitted. Due to the
continuous heating/cooling cycle to which
the springs are subjected, they may lose
their tension over a period of time,
allowing the shoes to drag on the drum,
and wear at a much faster rate than
normal. When fitting new brake shoes, use
only original-equipment or high-quality
brand name parts.
Note 1:All four rear brake shoes must be
renewed at the same time, but to avoid mixing
up parts, work on only one brake assembly at
a time. Some rear brake components are
different for left and right-hand sides, so don’t
mix them up.
Note 2:If the wheel cylinder is found to be
leaking or otherwise defective, renew it after
removing the brake shoes. This is simply a
matter of disconnecting the hydraulic line and
unbolting the cylinder from the backplate.
Attempting to overhaul a leaking cylinder is
unlikely to be satisfactory, even if spare parts
are available.
1Chock the front wheels, then loosen the
rear wheel bolts, raise the rear of the vehicle
and place it securely on axle stands. Remove
the rear wheels and release the handbrake.
2Remove the drum retaining screw (see
illustration)and remove the drum. If the drum
is stuck to the hub, spray the area between
the hub and the drum with penetrating oil
(see illustration). If the drum still won’t come
off, the shoes have probably worn ridges into
the drum, and will have to be retracted. Insert
a narrow flat-bladed screwdriver through one
of the holes in the hub flange (see
illustration)and back off the adjuster wheel
until the drum can be removed.
3Inspect the drum for cracks, score marks,
deep scratches and hard spots, which will
appear as small discoloured areas. If the hard
spots can’t be removed with emery cloth or if
any of the other conditions exist, the drum must
be taken to a specialist to have the drum
resurfaced. Note:Professionals recommendresurfacing the drums whenever a brake job is
done. Resurfacing will eliminate the possibility
of out-of-round drums. If the drums are worn so
much that they can’t be resurfaced without
exceeding the maximum allowable diameter
(which is cast into the drum) (see illustration),
then new ones will be required. At the very least,
if you elect not to have the drums resurfaced,
remove the glazing from the surface with emery
cloth or sandpaper, using a swirling motion.
Braking system 9•7
6.2b If the drum is stuck to the hub, apply
penetrating oil around the hub/drum area,
and give it a few minutes to loosen up
any rust6.2a Removing the drum retaining screw5.6d If a rear disc still sticks to the hub,
insert a thin, flat-bladed screwdriver
through the hub flange, rotate the
starwheel on the handbrake adjusting
screw, and contract the handbrake shoes
(disc removed for clarity)
6.3 The maximum allowable inside
diameter of the drum is cast into the drum
6.2c If the brake shoes have worn a
groove in the drum and it won’t come off,
insert a thin flat-bladed screwdriver
through one of the wheel bolt holes in the
flange, and loosen the automatic adjuster
mechanism (for the sake of clarity, the
drum has already been removed in this
photo, and the screwdriver is being
inserted underneath the flange instead of
though a wheel bolt hole)
9
If the front disc is stuck, on
some discs it is possible to
thread two or three bolts into
the holes provided and
tighten them. Alternate between the
bolts, turning them a couple of turns at
a time, until the disc is free.
Page 137 of 228
friction surfaces of the brake shoes or
drums.
12Make sure the adjuster assembly is
properly engaged with its respective notch in
the handbrake lever.
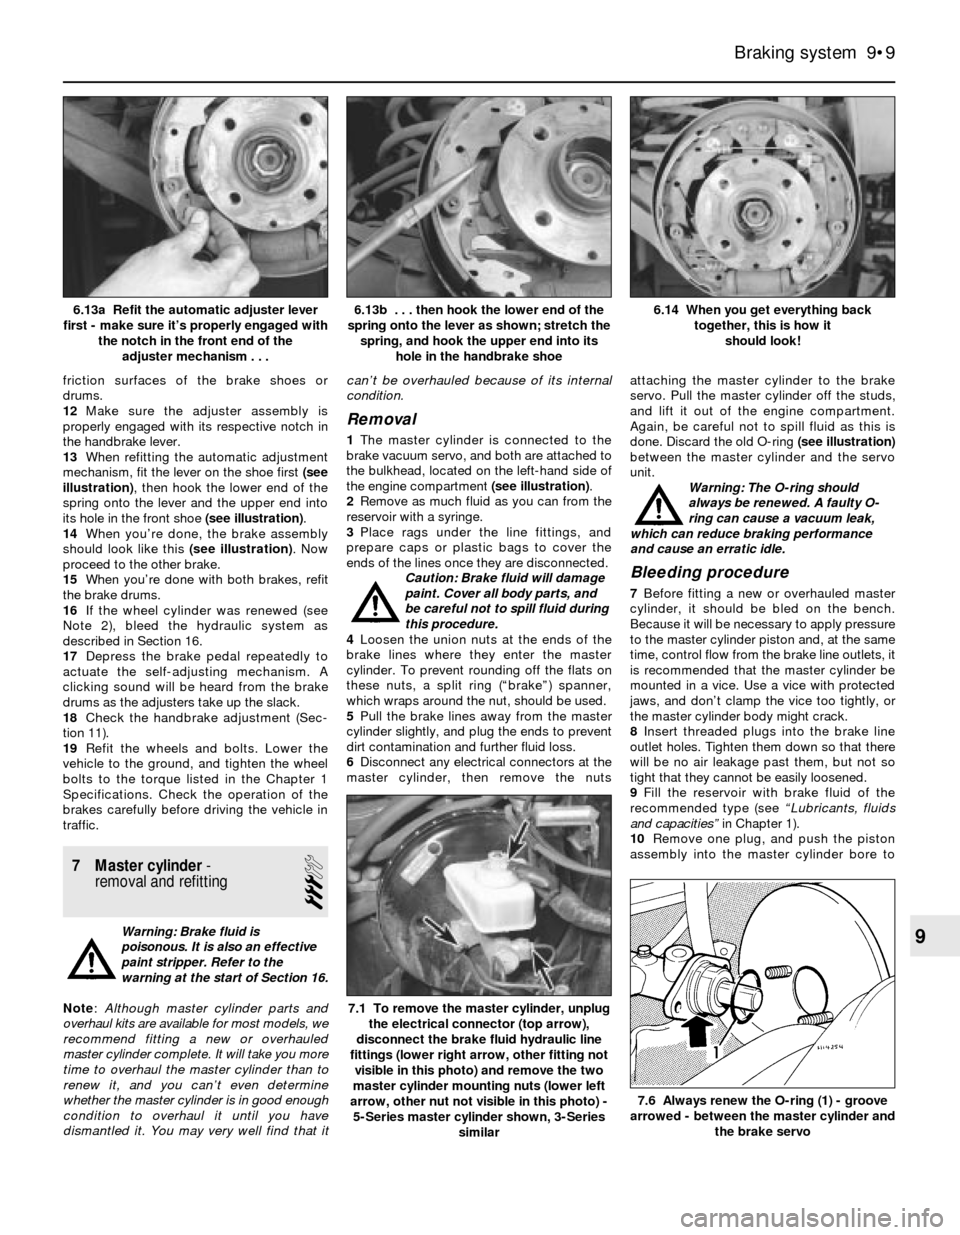
13When refitting the automatic adjustment
mechanism, fit the lever on the shoe first (see
illustration), then hook the lower end of the
spring onto the lever and the upper end into
its hole in the front shoe (see illustration).
14When you’re done, the brake assembly
should look like this (see illustration). Now
proceed to the other brake.
15When you’re done with both brakes, refit
the brake drums.
16If the wheel cylinder was renewed (see
Note 2), bleed the hydraulic system as
described in Section 16.
17Depress the brake pedal repeatedly to
actuate the self-adjusting mechanism. A
clicking sound will be heard from the brake
drums as the adjusters take up the slack.
18Check the handbrake adjustment (Sec-
tion 11).
19Refit the wheels and bolts. Lower the
vehicle to the ground, and tighten the wheel
bolts to the torque listed in the Chapter 1
Specifications. Check the operation of the
brakes carefully before driving the vehicle in
traffic.
7 Master cylinder-
removal and refitting
3
Warning: Brake fluid is
poisonous. It is also an effective
paint stripper. Refer to the
warning at the start of Section 16.
Note: Although master cylinder parts and
overhaul kits are available for most models, we
recommend fitting a new or overhauled
master cylinder complete. It will take you more
time to overhaul the master cylinder than to
renew it, and you can’t even determine
whether the master cylinder is in good enough
condition to overhaul it until you have
dismantled it. You may very well find that itcan’t be overhauled because of its internal
condition.
Removal
1The master cylinder is connected to the
brake vacuum servo, and both are attached to
the bulkhead, located on the left-hand side of
the engine compartment (see illustration).
2Remove as much fluid as you can from the
reservoir with a syringe.
3Place rags under the line fittings, and
prepare caps or plastic bags to cover the
ends of the lines once they are disconnected.
Caution: Brake fluid will damage
paint. Cover all body parts, and
be careful not to spill fluid during
this procedure.
4Loosen the union nuts at the ends of the
brake lines where they enter the master
cylinder. To prevent rounding off the flats on
these nuts, a split ring (“brake”) spanner,
which wraps around the nut, should be used.
5Pull the brake lines away from the master
cylinder slightly, and plug the ends to prevent
dirt contamination and further fluid loss.
6Disconnect any electrical connectors at the
master cylinder, then remove the nutsattaching the master cylinder to the brake
servo. Pull the master cylinder off the studs,
and lift it out of the engine compartment.
Again, be careful not to spill fluid as this is
done. Discard the old O-ring (see illustration)
between the master cylinder and the servo
unit.
Warning: The O-ring should
always be renewed. A faulty O-
ring can cause a vacuum leak,
which can reduce braking performance
and cause an erratic idle.
Bleeding procedure
7Before fitting a new or overhauled master
cylinder, it should be bled on the bench.
Because it will be necessary to apply pressure
to the master cylinder piston and, at the same
time, control flow from the brake line outlets, it
is recommended that the master cylinder be
mounted in a vice. Use a vice with protected
jaws, and don’t clamp the vice too tightly, or
the master cylinder body might crack.
8Insert threaded plugs into the brake line
outlet holes. Tighten them down so that there
will be no air leakage past them, but not so
tight that they cannot be easily loosened.
9Fill the reservoir with brake fluid of the
recommended type (see “Lubricants, fluids
and capacities” in Chapter 1).
10Remove one plug, and push the piston
assembly into the master cylinder bore to
Braking system 9•9
6.14 When you get everything back
together, this is how it
should look! 6.13b . . . then hook the lower end of the
spring onto the lever as shown; stretch the
spring, and hook the upper end into its
hole in the handbrake shoe6.13a Refit the automatic adjuster lever
first - make sure it’s properly engaged with
the notch in the front end of the
adjuster mechanism . . .
7.6 Always renew the O-ring (1) - groove
arrowed - between the master cylinder and
the brake servo
7.1 To remove the master cylinder, unplug
the electrical connector (top arrow),
disconnect the brake fluid hydraulic line
fittings (lower right arrow, other fitting not
visible in this photo) and remove the two
master cylinder mounting nuts (lower left
arrow, other nut not visible in this photo) -
5-Series master cylinder shown, 3-Series
similar
9
Page 139 of 228
the stop-light switch (see Section 13). Note:
On right-hand-drive models, the brake pedal
in on the right-hand side of the vehicle, and is
connected to the left-hand side by a cross-
shaft. The adjustment is carried out on the
pushrod at the left-hand side, but the
dimension is measured at the pedal on the
right-hand side.
14On 5-Series models, adjust the brake
pedal height and the stop-light switch (see
Section 13).
15Refit the master cylinder (see Section 7)
and attach the vacuum hose.
16Carefully test the operation of the brakes
before returning the vehicle to normal use
9 Hydraulic brake servo-
description, removal and
refitting
3
Warning: Brake fluid is
poisonous. It is also an effective
paint stripper. Refer to the
warning at the start of Section 16.
Description
1On 5-Series E28 (“old-shape”) models, a
hydraulic brake servo system is fitted. The
servo unit, located between the brake pedal
(left-hand-drive) or cross-shaft lever (right-
hand-drive) and the master cylinder, is
operated by hydraulic pressure generated by
the power steering pump. When the engine is
running, the power steering pump supplies
hydraulic pressure to a power flow regulator/
accumulator. The regulator/accumulator
stores and regulates the pressure to the
hydraulic brake servo. When you press the
brake pedal, the pressure in the servo helps
actuate the master cylinder, reducing pedal
effort.
2The hydraulic brake servo cannot be
overhauled; if it fails, a new one must be fitted.
Testing the system requires special tools, so
even fault diagnosis is beyond the scope of
the home mechanic. If the system fails, take it
to a dealer service department or other
qualified garage for repairs.
Removal and refitting
3With the engine off, discharge the hydraulic
accumulator by depressing the brake pedal
20 times or more.
4Remove the master cylinder (see Section 7).
5Clean the area around the return and
supply line fittings, then disconnect them.
Plug the lines, to prevent dirt from entering the
system, and to prevent further fluid loss.
Caution: Even a particle of dirt
can damage the servo, so be
extremely careful to prevent dirt
from entering the system while
the lines are disconnected.
6Working from inside the passenger
compartment, remove the lower left trim
panels above the brake pedal (left-hand-drive
models) or glovebox and trim (right-hand-drive models). On left-hand-drive models, also
disconnect the pedal return spring.
7Prise off the retaining clip, and disconnect
the pushrod from the brake pedal (see
illustration 8.9) or cross-shaft lever.
8Remove the four mounting nuts and
remove the brake servo (see illus-
tration 8.10).
9Refitting is the reverse of removal. Tighten
the hydraulic lines to the torque listed in this
Chapter’s Specifications. Note:Don’t try to
tighten these fittings without a torque wrench.
If they’re loose, they can leak, which can affect
system operation; if they’re tight, they can be
damaged, and they’ll also leak. You’ll need a
crowfoot-type split ring (“brake”) attachment
for your torque wrench to tighten the fittings
properly.
10When you’re done, bleed the brake
hydraulic system (Section 16) and adjust the
brake pedal travel and the stop-light switch
(see Section 13).
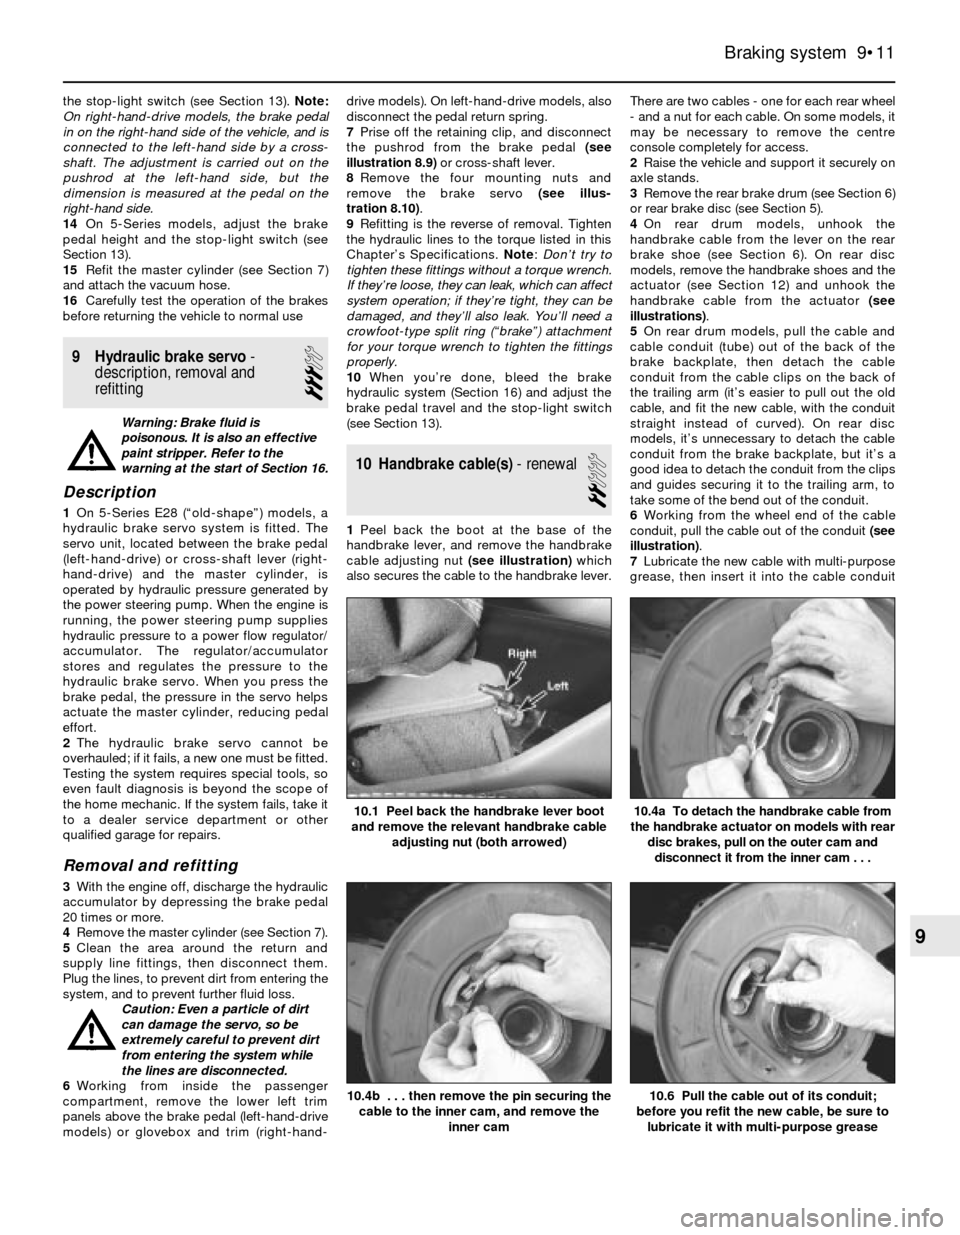
10 Handbrake cable(s)- renewal
2
1Peel back the boot at the base of the
handbrake lever, and remove the handbrake
cable adjusting nut (see illustration)which
also secures the cable to the handbrake lever.There are two cables - one for each rear wheel
- and a nut for each cable. On some models, it
may be necessary to remove the centre
console completely for access.
2Raise the vehicle and support it securely on
axle stands.
3Remove the rear brake drum (see Section 6)
or rear brake disc (see Section 5).
4On rear drum models, unhook the
handbrake cable from the lever on the rear
brake shoe (see Section 6). On rear disc
models, remove the handbrake shoes and the
actuator (see Section 12) and unhook the
handbrake cable from the actuator (see
illustrations).
5On rear drum models, pull the cable and
cable conduit (tube) out of the back of the
brake backplate, then detach the cable
conduit from the cable clips on the back of
the trailing arm (it’s easier to pull out the old
cable, and fit the new cable, with the conduit
straight instead of curved). On rear disc
models, it’s unnecessary to detach the cable
conduit from the brake backplate, but it’s a
good idea to detach the conduit from the clips
and guides securing it to the trailing arm, to
take some of the bend out of the conduit.
6Working from the wheel end of the cable
conduit, pull the cable out of the conduit (see
illustration).
7Lubricate the new cable with multi-purpose
grease, then insert it into the cable conduit
Braking system 9•11
10.1 Peel back the handbrake lever boot
and remove the relevant handbrake cable
adjusting nut (both arrowed)
10.6 Pull the cable out of its conduit;
before you refit the new cable, be sure to
lubricate it with multi-purpose grease10.4b . . . then remove the pin securing the
cable to the inner cam, and remove the
inner cam
10.4a To detach the handbrake cable from
the handbrake actuator on models with rear
disc brakes, pull on the outer cam and
disconnect it from the inner cam . . .
9
Page 140 of 228
and push it through until the forward end
comes out at the handbrake lever.
8Insert the cable conduit through the
backplate, and attach the rear end of the
cable to the handbrake lever (rear drum
models) or the actuator (rear disc models).
Make sure you don’t kink the cable while
connecting it.
9Refit the cable conduit to the clips on the
back of the trailing arm.
10On rear drum models, refit the brake
shoes and drum (see Section 6). On rear disc
models, refit the handbrake shoes and
actuator (see Section 12) and the rear brake
disc (see Section 5).
11Lower the vehicle, and refit the adjusting
nut at the handbrake lever. Adjust the
handbrake cable (see Section 11) and refit the
handbrake lever boot.
11 Handbrake- adjustment
2
Rear drum brake models
Note:Adjustment of the handbrake cable(s)
on models with rear drum brakes should only
be necessary when you renew a cable or
detach if from the rear brake assembly for
some reason. Failure of the handbrake system
to hold the vehicle usually indicates worn
brake shoes or a faulty self-adjusting
mechanism.
1Raise the rear of the vehicle, and place it
securely on axle stands.
2Fully release the handbrake lever, then
apply the brakes firmly several times with the
footbrake pedal.
3Pull the handbrake lever up five clicks.
4Tighten or loosen the adjusting nuts by
equal amounts until the rear brake shoes just
begin to drag on the brake drum. You should
feel the same amount of resistance at both
wheels when you rotate them.
5Release the handbrake lever, and verify that
the wheels rotate freely. If they don’t, re-
adjust them.
Rear disc brake models
Note: The handbrake system is not self-
adjusting on models with rear disc brakes. The
handbrake therefore requires periodic
adjustment to compensate for wear. It should
also be adjusted anytime either cable, brake
disc or handbrake assembly is renewed or
removed for some reason.
6Slowly apply the handbrake, and count the
number of clicks at the lever. If the lever can
be pulled up further than the eighth click,
adjust the handbrake cable as follows.
7Peel back the handbrake lever boot, and
loosen the cable adjusting nut (see
illustration 10.1). On some models, it may be
necessary to remove the centre console
completely for access.
8Loosen a single bolt in each rear wheel.Raise the vehicle and place it securely on axle
stands.
9Remove the bolt you loosened in each rear
wheel. Turn the wheel until, using a torch, you
can see the adjuster starwheel through the
bolt hole.
10Turn the adjuster - clockwise to expand
the shoes, anti-clockwise to retract them -
until the brake shoes just contact the brake
drum (see illustration 5.6d). Back off the
brake shoes so the wheel spins freely (three to
four teeth on the adjuster). Note:If the
adjuster starwheel is hard to turn, remove the
wheel and brake disc, lubricate the adjuster
wheel, and try again.
11With the disc fitted, apply the handbrake
three times to stretch and seat the cables,
then slowly pull up on the handbrake lever to
the fifth click. Tighten the cable adjusting nuts
by equal amounts until the rear brake shoes
just touch the brake drum. Verify that both
wheels have the same amount of resistance.
12Release the handbrake, and verify that
both rear wheels rotate freely.
13Tighten the wheel bolts to the torque
listed in Chapter 1 Specifications.
12 Handbrake assembly-
check, removal and refitting
2
Warning: The handbrake linings
on rear disc brake models may
be manufactured of asbestos-
based material. Refer to the
warning at the start of Section 6. When
servicing these components, do not create
dust by grinding or sanding the linings.
1The handbrake system should be checked
regularly. With the vehicle parked on a hill,
apply the handbrake, select neutral, and
check that the handbrake alone will hold the
vehicle when the footbrake is released (be
sure to stay in the vehicle during this check).
However, every 2 years (or whenever a fault is
suspected), the assembly itself should be
inspected.
2With the vehicle raised and supported onaxle stands, remove the rear wheels.
3On rear brake drum models, refer to
Chapter 1; checking the thickness of the
brake shoes is a routine maintenance
procedure.
4On rear disc brake models, remove the rear
discs as outlined in Section 5. Support the
caliper assemblies with a coat hanger or
heavy wire; do not disconnect the brake line
from the caliper.
5With the disc removed, the handbrake
components are visible, and can be inspected
for wear and damage. The linings should last
the life of the vehicle. However, they can wear
down if the handbrake system has been
improperly adjusted, or if the handbrake is
regularly used to stop the vehicle. There is no
minimum thickness specification for the
handbrake shoes, but as a rule of thumb, if
the shoe material is less than 1.5 mm thick,
you should renew them. Also check the
springs and adjuster mechanism and inspect
the drum for deep scratches and other
damage.
Removal and refitting
Note:The following procedure applies only to
models with rear disc brakes. The handbrake
system on models with rear drum brakes is an
integral part of the rear brake assembly (see
Section 6).
6Loosen the rear wheel bolts, raise the rear
of the vehicle and place it securely on axle
stands. Remove the rear wheels. Remove the
brake discs (see Section 5). Work on only one
side at a time, so you can use the other side
as a reference during reassembly, and to
avoid mixing up parts.
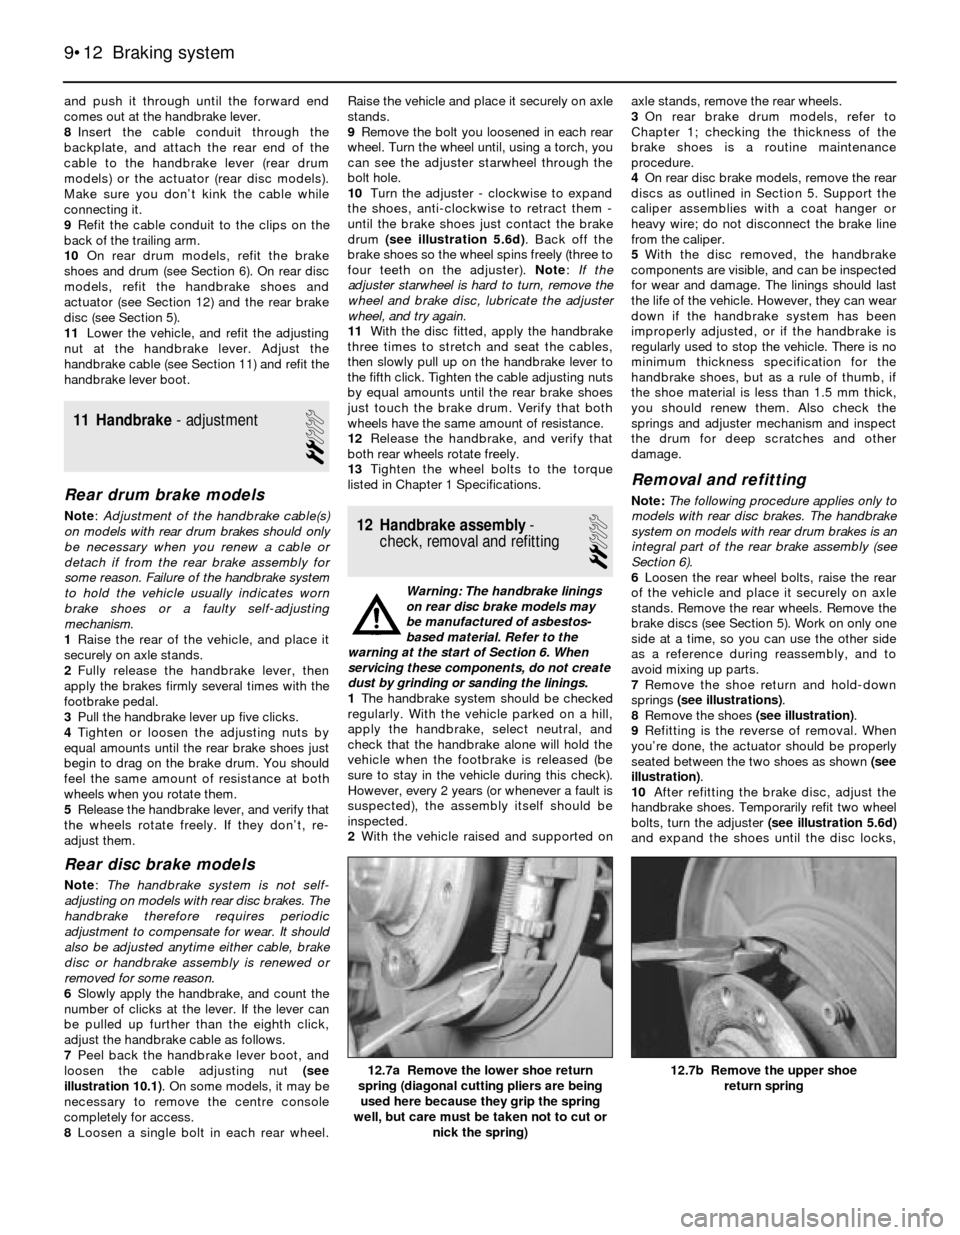
7Remove the shoe return and hold-down
springs (see illustrations).
8Remove the shoes (see illustration).
9Refitting is the reverse of removal. When
you’re done, the actuator should be properly
seated between the two shoes as shown (see
illustration).
10After refitting the brake disc, adjust the
handbrake shoes. Temporarily refit two wheel
bolts, turn the adjuster (see illustration 5.6d)
and expand the shoes until the disc locks,
9•12 Braking system
12.7b Remove the upper shoe
return spring12.7a Remove the lower shoe return
spring (diagonal cutting pliers are being
used here because they grip the spring
well, but care must be taken not to cut or
nick the spring)
Page 141 of 228
then back off the adjuster until the shoes
don’t drag (see Section 11). Refit the wheel
bolts, and tighten them to the torque given in
Chapter 1 Specifications.
13 Brake pedal- adjustment
1
Note:You should always adjust brake pedal
height after the master cylinder or brake servo
has been removed or renewed. You should
also adjust the stop-light switch (see Sec-
tion 14).
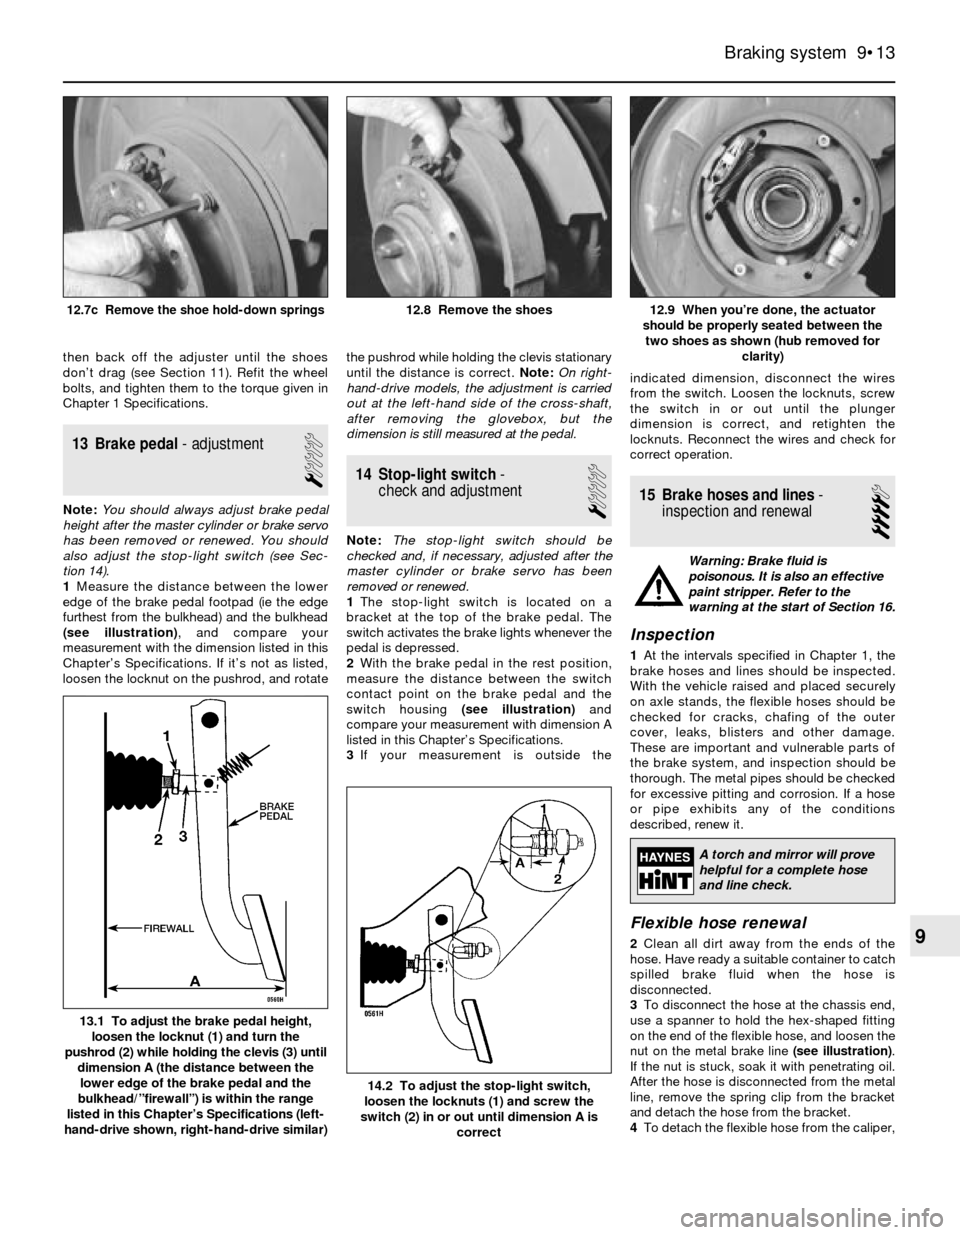
1Measure the distance between the lower
edge of the brake pedal footpad (ie the edge
furthest from the bulkhead) and the bulkhead
(see illustration), and compare your
measurement with the dimension listed in this
Chapter’s Specifications. If it’s not as listed,
loosen the locknut on the pushrod, and rotatethe pushrod while holding the clevis stationary
until the distance is correct. Note:On right-
hand-drive models, the adjustment is carried
out at the left-hand side of the cross-shaft,
after removing the glovebox, but the
dimension is still measured at the pedal.
14 Stop-light switch-
check and adjustment
1
Note:The stop-light switch should be
checked and, if necessary, adjusted after the
master cylinder or brake servo has been
removed or renewed.
1The stop-light switch is located on a
bracket at the top of the brake pedal. The
switch activates the brake lights whenever the
pedal is depressed.
2With the brake pedal in the rest position,
measure the distance between the switch
contact point on the brake pedal and the
switch housing (see illustration)and
compare your measurement with dimension A
listed in this Chapter’s Specifications.
3If your measurement is outside theindicated dimension, disconnect the wires
from the switch. Loosen the locknuts, screw
the switch in or out until the plunger
dimension is correct, and retighten the
locknuts. Reconnect the wires and check for
correct operation.
15 Brake hoses and lines-
inspection and renewal
4
Warning: Brake fluid is
poisonous. It is also an effective
paint stripper. Refer to the
warning at the start of Section 16.
Inspection
1At the intervals specified in Chapter 1, the
brake hoses and lines should be inspected.
With the vehicle raised and placed securely
on axle stands, the flexible hoses should be
checked for cracks, chafing of the outer
cover, leaks, blisters and other damage.
These are important and vulnerable parts of
the brake system, and inspection should be
thorough. The metal pipes should be checked
for excessive pitting and corrosion. If a hose
or pipe exhibits any of the conditions
described, renew it.
Flexible hose renewal
2Clean all dirt away from the ends of the
hose. Have ready a suitable container to catch
spilled brake fluid when the hose is
disconnected.
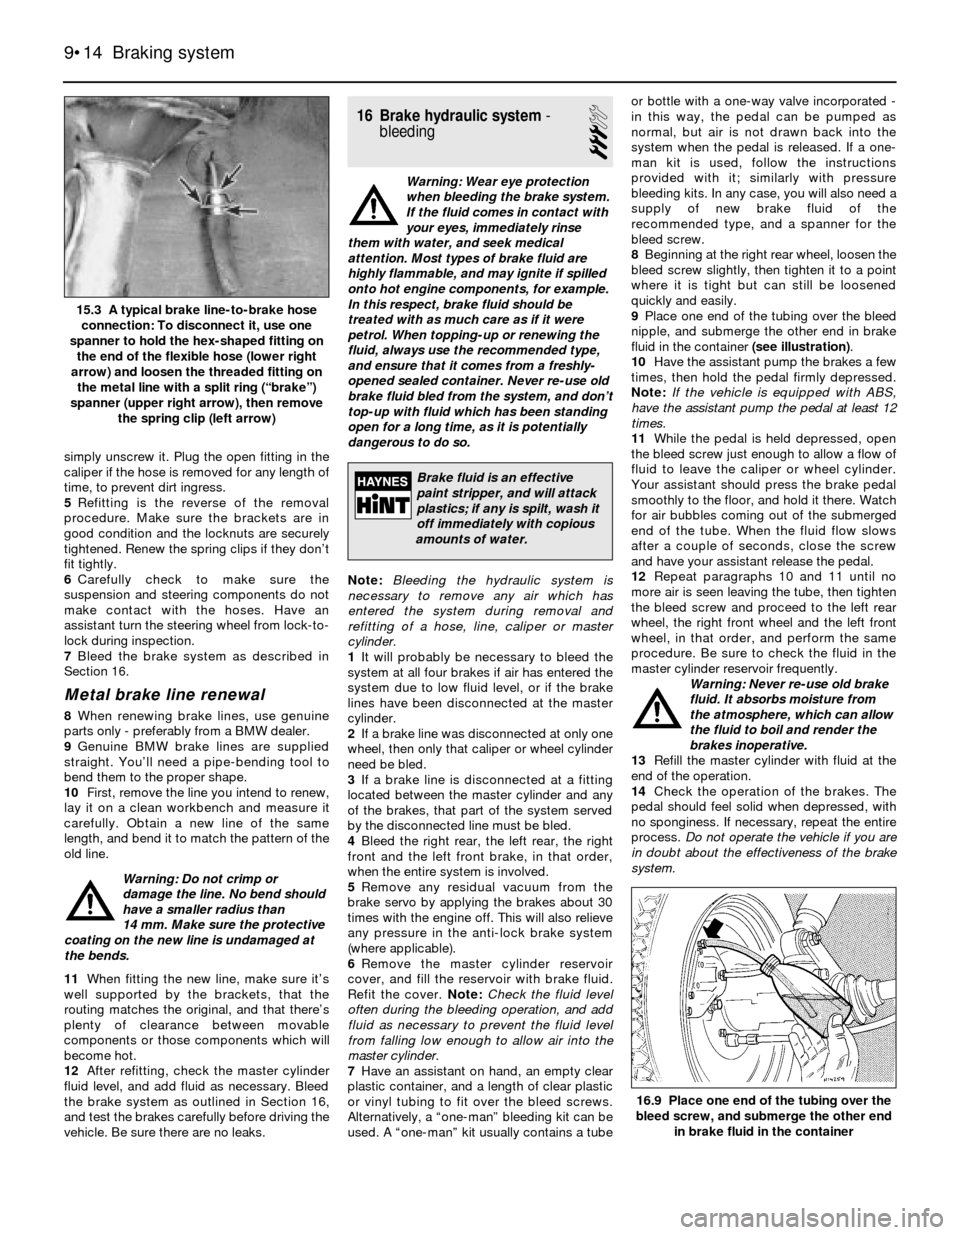
3To disconnect the hose at the chassis end,
use a spanner to hold the hex-shaped fitting
on the end of the flexible hose, and loosen the
nut on the metal brake line (see illustration).
If the nut is stuck, soak it with penetrating oil.
After the hose is disconnected from the metal
line, remove the spring clip from the bracket
and detach the hose from the bracket.
4To detach the flexible hose from the caliper,
Braking system 9•13
12.9 When you’re done, the actuator
should be properly seated between the
two shoes as shown (hub removed for
clarity)12.8 Remove the shoes12.7c Remove the shoe hold-down springs
14.2 To adjust the stop-light switch,
loosen the locknuts (1) and screw the
switch (2) in or out until dimension A is
correct
13.1 To adjust the brake pedal height,
loosen the locknut (1) and turn the
pushrod (2) while holding the clevis (3) until
dimension A (the distance between the
lower edge of the brake pedal and the
bulkhead/”firewall”) is within the range
listed in this Chapter’s Specifications (left-
hand-drive shown, right-hand-drive similar)
9
A torch and mirror will prove
helpful for a complete hose
and line check.
Page 142 of 228
simply unscrew it. Plug the open fitting in the
caliper if the hose is removed for any length of
time, to prevent dirt ingress.
5Refitting is the reverse of the removal
procedure. Make sure the brackets are in
good condition and the locknuts are securely
tightened. Renew the spring clips if they don’t
fit tightly.
6Carefully check to make sure the
suspension and steering components do not
make contact with the hoses. Have an
assistant turn the steering wheel from lock-to-
lock during inspection.
7Bleed the brake system as described in
Section 16.
Metal brake line renewal
8When renewing brake lines, use genuine
parts only - preferably from a BMW dealer.
9Genuine BMW brake lines are supplied
straight. You’ll need a pipe-bending tool to
bend them to the proper shape.
10First, remove the line you intend to renew,
lay it on a clean workbench and measure it
carefully. Obtain a new line of the same
length, and bend it to match the pattern of the
old line.
Warning: Do not crimp or
damage the line. No bend should
have a smaller radius than
14 mm. Make sure the protective
coating on the new line is undamaged at
the bends.
11When fitting the new line, make sure it’s
well supported by the brackets, that the
routing matches the original, and that there’s
plenty of clearance between movable
components or those components which will
become hot.
12After refitting, check the master cylinder
fluid level, and add fluid as necessary. Bleed
the brake system as outlined in Section 16,
and test the brakes carefully before driving the
vehicle. Be sure there are no leaks.
16 Brake hydraulic system-
bleeding
3
Warning: Wear eye protection
when bleeding the brake system.
If the fluid comes in contact with
your eyes, immediately rinse
them with water, and seek medical
attention. Most types of brake fluid are
highly flammable, and may ignite if spilled
onto hot engine components, for example.
In this respect, brake fluid should be
treated with as much care as if it were
petrol. When topping-up or renewing the
fluid, always use the recommended type,
and ensure that it comes from a freshly-
opened sealed container. Never re-use old
brake fluid bled from the system, and don’t
top-up with fluid which has been standing
open for a long time, as it is potentially
dangerous to do so.
Note:Bleeding the hydraulic system is
necessary to remove any air which has
entered the system during removal and
refitting of a hose, line, caliper or master
cylinder.
1It will probably be necessary to bleed the
system at all four brakes if air has entered the
system due to low fluid level, or if the brake
lines have been disconnected at the master
cylinder.
2If a brake line was disconnected at only one
wheel, then only that caliper or wheel cylinder
need be bled.
3If a brake line is disconnected at a fitting
located between the master cylinder and any
of the brakes, that part of the system served
by the disconnected line must be bled.
4Bleed the right rear, the left rear, the right
front and the left front brake, in that order,
when the entire system is involved.
5Remove any residual vacuum from the
brake servo by applying the brakes about 30
times with the engine off. This will also relieve
any pressure in the anti-lock brake system
(where applicable).
6Remove the master cylinder reservoir
cover, and fill the reservoir with brake fluid.
Refit the cover. Note:Check the fluid level
often during the bleeding operation, and add
fluid as necessary to prevent the fluid level
from falling low enough to allow air into the
master cylinder.
7Have an assistant on hand, an empty clear
plastic container, and a length of clear plastic
or vinyl tubing to fit over the bleed screws.
Alternatively, a “one-man” bleeding kit can be
used. A “one-man” kit usually contains a tubeor bottle with a one-way valve incorporated -
in this way, the pedal can be pumped as
normal, but air is not drawn back into the
system when the pedal is released. If a one-
man kit is used, follow the instructions
provided with it; similarly with pressure
bleeding kits. In any case, you will also need a
supply of new brake fluid of the
recommended type, and a spanner for the
bleed screw.
8Beginning at the right rear wheel, loosen the
bleed screw slightly, then tighten it to a point
where it is tight but can still be loosened
quickly and easily.
9Place one end of the tubing over the bleed
nipple, and submerge the other end in brake
fluid in the container (see illustration).
10Have the assistant pump the brakes a few
times, then hold the pedal firmly depressed.
Note:If the vehicle is equipped with ABS,
have the assistant pump the pedal at least 12
times.
11While the pedal is held depressed, open
the bleed screw just enough to allow a flow of
fluid to leave the caliper or wheel cylinder.
Your assistant should press the brake pedal
smoothly to the floor, and hold it there. Watch
for air bubbles coming out of the submerged
end of the tube. When the fluid flow slows
after a couple of seconds, close the screw
and have your assistant release the pedal.
12Repeat paragraphs 10 and 11 until no
more air is seen leaving the tube, then tighten
the bleed screw and proceed to the left rear
wheel, the right front wheel and the left front
wheel, in that order, and perform the same
procedure. Be sure to check the fluid in the
master cylinder reservoir frequently.
Warning: Never re-use old brake
fluid. It absorbs moisture from
the atmosphere, which can allow
the fluid to boil and render the
brakes inoperative.
13Refill the master cylinder with fluid at the
end of the operation.
14Check the operation of the brakes. The
pedal should feel solid when depressed, with
no sponginess. If necessary, repeat the entire
process. Do not operate the vehicle if you are
in doubt about the effectiveness of the brake
system.
9•14 Braking system
16.9 Place one end of the tubing over the
bleed screw, and submerge the other end
in brake fluid in the container
15.3 A typical brake line-to-brake hose
connection: To disconnect it, use one
spanner to hold the hex-shaped fitting on
the end of the flexible hose (lower right
arrow) and loosen the threaded fitting on
the metal line with a split ring (“brake”)
spanner (upper right arrow), then remove
the spring clip (left arrow)
Brake fluid is an effective
paint stripper, and will attack
plastics; if any is spilt, wash it
off immediately with copious
amounts of water.
Page 144 of 228
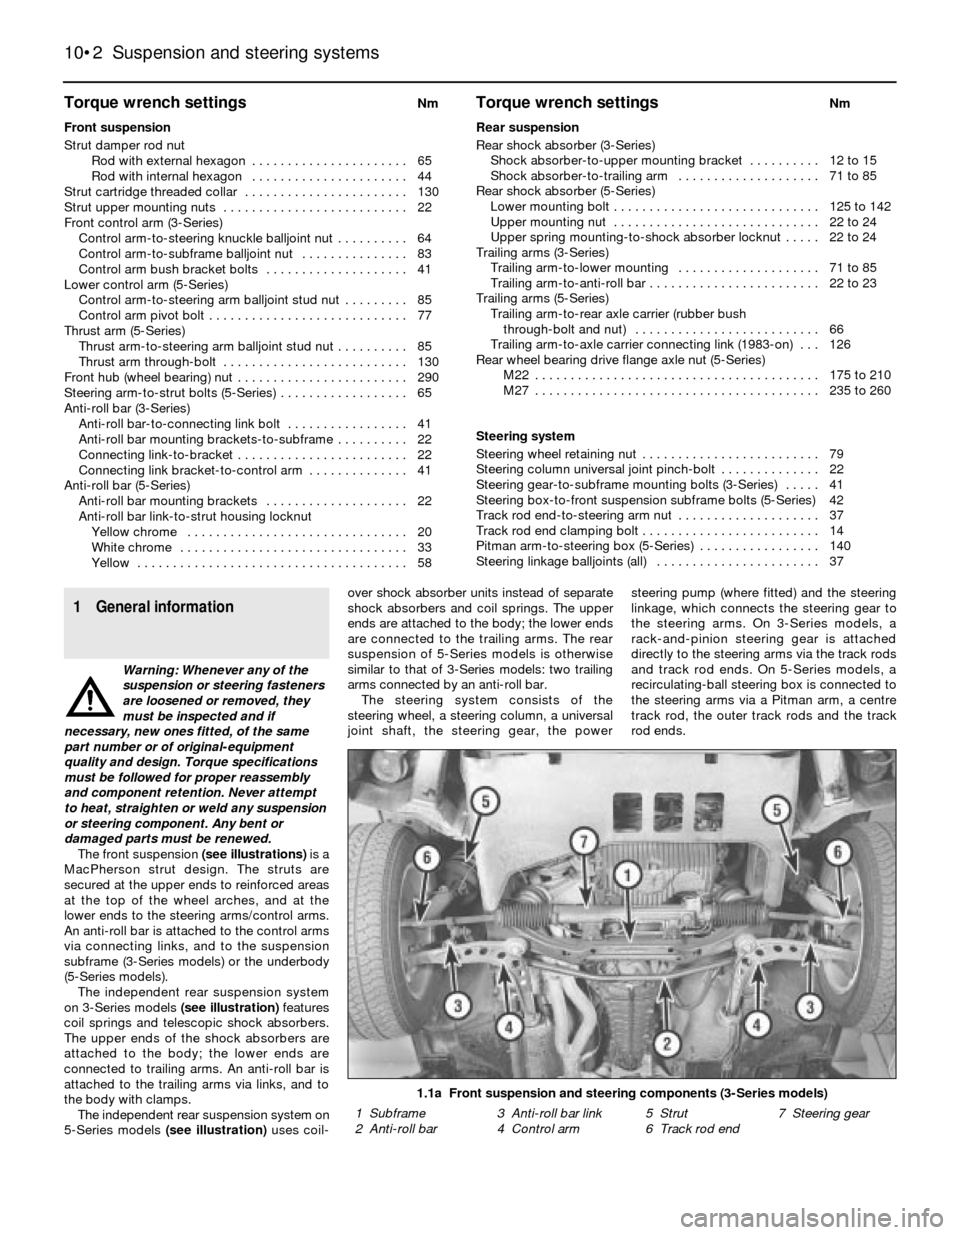
Torque wrench settingsNm
Front suspension
Strut damper rod nut
Rod with external hexagon . . . . . . . . . . . . . . . . . . . . . . 65
Rod with internal hexagon . . . . . . . . . . . . . . . . . . . . . . 44
Strut cartridge threaded collar . . . . . . . . . . . . . . . . . . . . . . . 130
Strut upper mounting nuts . . . . . . . . . . . . . . . . . . . . . . . . . . 22
Front control arm (3-Series)
Control arm-to-steering knuckle balljoint nut . . . . . . . . . . 64
Control arm-to-subframe balljoint nut . . . . . . . . . . . . . . . 83
Control arm bush bracket bolts . . . . . . . . . . . . . . . . . . . . 41
Lower control arm (5-Series)
Control arm-to-steering arm balljoint stud nut . . . . . . . . . 85
Control arm pivot bolt . . . . . . . . . . . . . . . . . . . . . . . . . . . . 77
Thrust arm (5-Series)
Thrust arm-to-steering arm balljoint stud nut . . . . . . . . . . 85
Thrust arm through-bolt . . . . . . . . . . . . . . . . . . . . . . . . . . 130
Front hub (wheel bearing) nut . . . . . . . . . . . . . . . . . . . . . . . . 290
Steering arm-to-strut bolts (5-Series) . . . . . . . . . . . . . . . . . . 65
Anti-roll bar (3-Series)
Anti-roll bar-to-connecting link bolt . . . . . . . . . . . . . . . . . 41
Anti-roll bar mounting brackets-to-subframe . . . . . . . . . . 22
Connecting link-to-bracket . . . . . . . . . . . . . . . . . . . . . . . . 22
Connecting link bracket-to-control arm . . . . . . . . . . . . . . 41
Anti-roll bar (5-Series)
Anti-roll bar mounting brackets . . . . . . . . . . . . . . . . . . . . 22
Anti-roll bar link-to-strut housing locknut
Yellow chrome . . . . . . . . . . . . . . . . . . . . . . . . . . . . . . . 20
White chrome . . . . . . . . . . . . . . . . . . . . . . . . . . . . . . . . 33
Yellow . . . . . . . . . . . . . . . . . . . . . . . . . . . . . . . . . . . . . . 58
10•2 Suspension and steering systems
Torque wrench settingsNm
Rear suspension
Rear shock absorber (3-Series)
Shock absorber-to-upper mounting bracket . . . . . . . . . . 12 to 15
Shock absorber-to-trailing arm . . . . . . . . . . . . . . . . . . . . 71 to 85
Rear shock absorber (5-Series)
Lower mounting bolt . . . . . . . . . . . . . . . . . . . . . . . . . . . . . 125 to 142
Upper mounting nut . . . . . . . . . . . . . . . . . . . . . . . . . . . . . 22 to 24
Upper spring mounting-to-shock absorber locknut . . . . . 22 to 24
Trailing arms (3-Series)
Trailing arm-to-lower mounting . . . . . . . . . . . . . . . . . . . . 71 to 85
Trailing arm-to-anti-roll bar . . . . . . . . . . . . . . . . . . . . . . . . 22 to 23
Trailing arms (5-Series)
Trailing arm-to-rear axle carrier (rubber bush
through-bolt and nut) . . . . . . . . . . . . . . . . . . . . . . . . . . 66
Trailing arm-to-axle carrier connecting link (1983-on) . . . 126
Rear wheel bearing drive flange axle nut (5-Series)
M22 . . . . . . . . . . . . . . . . . . . . . . . . . . . . . . . . . . . . . . . . 175 to 210
M27 . . . . . . . . . . . . . . . . . . . . . . . . . . . . . . . . . . . . . . . . 235 to 260
Steering system
Steering wheel retaining nut . . . . . . . . . . . . . . . . . . . . . . . . . 79
Steering column universal joint pinch-bolt . . . . . . . . . . . . . . 22
Steering gear-to-subframe mounting bolts (3-Series) . . . . . 41
Steering box-to-front suspension subframe bolts (5-Series) 42
Track rod end-to-steering arm nut . . . . . . . . . . . . . . . . . . . . 37
Track rod end clamping bolt . . . . . . . . . . . . . . . . . . . . . . . . . 14
Pitman arm-to-steering box (5-Series) . . . . . . . . . . . . . . . . . 140
Steering linkage balljoints (all) . . . . . . . . . . . . . . . . . . . . . . . 37
1 General information
Warning: Whenever any of the
suspension or steering fasteners
are loosened or removed, they
must be inspected and if
necessary, new ones fitted, of the same
part number or of original-equipment
quality and design. Torque specifications
must be followed for proper reassembly
and component retention. Never attempt
to heat, straighten or weld any suspension
or steering component. Any bent or
damaged parts must be renewed.
The front suspension (see illustrations)is a
MacPherson strut design. The struts are
secured at the upper ends to reinforced areas
at the top of the wheel arches, and at the
lower ends to the steering arms/control arms.
An anti-roll bar is attached to the control arms
via connecting links, and to the suspension
subframe (3-Series models) or the underbody
(5-Series models).
The independent rear suspension system
on 3-Series models (see illustration)features
coil springs and telescopic shock absorbers.
The upper ends of the shock absorbers are
attached to the body; the lower ends are
connected to trailing arms. An anti-roll bar is
attached to the trailing arms via links, and to
the body with clamps.
The independent rear suspension system on
5-Series models (see illustration)uses coil-over shock absorber units instead of separate
shock absorbers and coil springs. The upper
ends are attached to the body; the lower ends
are connected to the trailing arms. The rear
suspension of 5-Series models is otherwise
similar to that of 3-Series models: two trailing
arms connected by an anti-roll bar.
The steering system consists of the
steering wheel, a steering column, a universal
joint shaft, the steering gear, the powersteering pump (where fitted) and the steering
linkage, which connects the steering gear to
the steering arms. On 3-Series models, a
rack-and-pinion steering gear is attached
directly to the steering arms via the track rods
and track rod ends. On 5-Series models, a
recirculating-ball steering box is connected to
the steering arms via a Pitman arm, a centre
track rod, the outer track rods and the track
rod ends.
1.1a Front suspension and steering components (3-Series models)
1 Subframe 3 Anti-roll bar link 5 Strut 7 Steering gear
2 Anti-roll bar 4 Control arm 6 Track rod end
Page 149 of 228
6 Strut or shock absorber/coil
spring- renewal
4
Note:This section applies to all front strut
assemblies and, on 5-Series models, the rear
coil-over shock absorber assemblies.
1If the struts, shock absorbers or coil springs
exhibit the telltale signs of wear (leaking fluid,
loss of damping capability, chipped, sagging
or cracked coil springs) explore all options
before beginning any work. Strut or shock
absorber assemblies complete with springs
may be available on an exchange basis, which
eliminates much time and work. Whichever
route you choose to take, check on the cost
and availability of parts before dismantling the
vehicle.
Warning: Dismantling a strut or
coil-over shock absorber
assembly is a potentially
dangerous undertaking, and
utmost attention must be directed to the
job, or serious injury may result. Use only a
high-quality spring compressor, and
carefully follow the manufacturer’s
instructions supplied with the tool. After
removing the coil spring from the strut
assembly, set it aside in a safe, isolated
area.
2Remove the strut or shock absorber
assembly (see Section 5 or 11). Mount the
assembly in a vice. Line the vice jaws with
wood or rags to prevent damage to the unit,
and don’t tighten the vice excessively.
3Following the tool manufacturer’s
instructions, fit the spring compressor (these
can be obtained at most car accessory shops,
or it may be possible to hire one) on the
spring, and compress it sufficiently to relieve
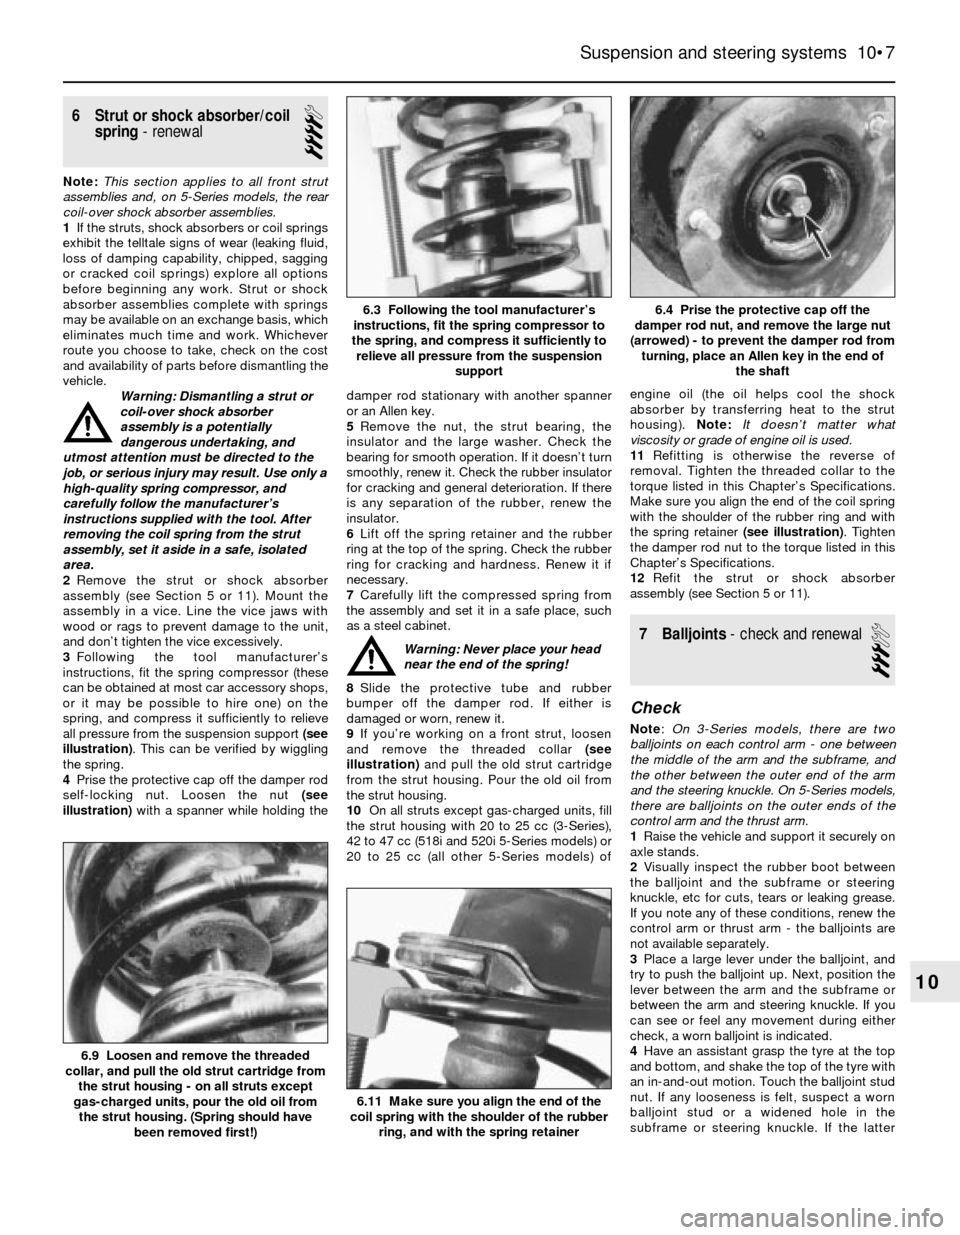
all pressure from the suspension support (see
illustration). This can be verified by wiggling
the spring.
4Prise the protective cap off the damper rod
self-locking nut. Loosen the nut (see
illustration)with a spanner while holding thedamper rod stationary with another spanner
or an Allen key.
5Remove the nut, the strut bearing, the
insulator and the large washer. Check the
bearing for smooth operation. If it doesn’t turn
smoothly, renew it. Check the rubber insulator
for cracking and general deterioration. If there
is any separation of the rubber, renew the
insulator.
6Lift off the spring retainer and the rubber
ring at the top of the spring. Check the rubber
ring for cracking and hardness. Renew it if
necessary.
7Carefully lift the compressed spring from
the assembly and set it in a safe place, such
as a steel cabinet.
Warning: Never place your head
near the end of the spring!
8Slide the protective tube and rubber
bumper off the damper rod. If either is
damaged or worn, renew it.
9If you’re working on a front strut, loosen
and remove the threaded collar (see
illustration)and pull the old strut cartridge
from the strut housing. Pour the old oil from
the strut housing.
10On all struts except gas-charged units, fill
the strut housing with 20 to 25 cc (3-Series),
42 to 47 cc (518i and 520i 5-Series models) or
20 to 25 cc (all other 5-Series models) ofengine oil (the oil helps cool the shock
absorber by transferring heat to the strut
housing). Note:It doesn’t matter what
viscosity or grade of engine oil is used.
11Refitting is otherwise the reverse of
removal. Tighten the threaded collar to the
torque listed in this Chapter’s Specifications.
Make sure you align the end of the coil spring
with the shoulder of the rubber ring and with
the spring retainer (see illustration). Tighten
the damper rod nut to the torque listed in this
Chapter’s Specifications.
12Refit the strut or shock absorber
assembly (see Section 5 or 11).
7 Balljoints- check and renewal
3
Check
Note:On 3-Series models, there are two
balljoints on each control arm - one between
the middle of the arm and the subframe, and
the other between the outer end of the arm
and the steering knuckle. On 5-Series models,
there are balljoints on the outer ends of the
control arm and the thrust arm.
1Raise the vehicle and support it securely on
axle stands.
2Visually inspect the rubber boot between
the balljoint and the subframe or steering
knuckle, etc for cuts, tears or leaking grease.
If you note any of these conditions, renew the
control arm or thrust arm - the balljoints are
not available separately.
3Place a large lever under the balljoint, and
try to push the balljoint up. Next, position the
lever between the arm and the subframe or
between the arm and steering knuckle. If you
can see or feel any movement during either
check, a worn balljoint is indicated.
4Have an assistant grasp the tyre at the top
and bottom, and shake the top of the tyre with
an in-and-out motion. Touch the balljoint stud
nut. If any looseness is felt, suspect a worn
balljoint stud or a widened hole in the
subframe or steering knuckle. If the latter
Suspension and steering systems 10•7
6.4 Prise the protective cap off the
damper rod nut, and remove the large nut
(arrowed) - to prevent the damper rod from
turning, place an Allen key in the end of
the shaft6.3 Following the tool manufacturer’s
instructions, fit the spring compressor to
the spring, and compress it sufficiently to
relieve all pressure from the suspension
support
6.11 Make sure you align the end of the
coil spring with the shoulder of the rubber
ring, and with the spring retainer
6.9 Loosen and remove the threaded
collar, and pull the old strut cartridge from
the strut housing - on all struts except
gas-charged units, pour the old oil from
the strut housing. (Spring should have
been removed first!)
10