warning BMW 3 SERIES 1987 E30 User Guide
[x] Cancel search | Manufacturer: BMW, Model Year: 1987, Model line: 3 SERIES, Model: BMW 3 SERIES 1987 E30Pages: 228, PDF Size: 7.04 MB
Page 27 of 228
terminals and cable clamps after they are
assembled.
9Make sure that the battery carrier is in good
condition, and that the hold-down clamp bolt
is tight. If the battery is removed (see Chap-
ter 5 for the removal and refitting procedure),
make sure that no parts remain in the bottom
of the carrier when it’s refitted. When refitting
the hold-down clamp, don’t overtighten the
bolt.
10Corrosion on the carrier, battery case and
surrounding areas can be removed with a
solution of water and baking soda. Apply the
mixture with a small brush, let it work, then
rinse it off with plenty of clean water.
11Any metal parts of the vehicle damaged
by corrosion should be coated with a zinc-
based primer, then painted.
12Additional information on the battery and
jump starting can be found in Chapter 5 and
the front of this manual.
Charging
Note: The manufacturer recommends the
battery be removed from the vehicle for
charging, because the gas which escapes
during this procedure can damage the paint or
interior, depending on the location of the
battery. Fast charging with the battery cables
connected can result in damage to the
electrical system.
13Remove all of the cell caps (if applicable),
and cover the holes with a clean cloth to
prevent spattering electrolyte. Disconnect thebattery negative cable, and connect the
battery charger leads to the battery posts
(positive to positive, negative to negative),
then plug in the charger. Make sure it is set at
12 volts if it has a selector switch.
Caution: If the radio in your
vehicle is equipped with an anti-
theft system, make sure you have
the correct activation code
before disconnecting the battery. Note: If,
after connecting the battery, the wrong
language appears on the instrument panel
display, refer to page 0-7 for the language
resetting procedure.
14If you’re using a charger with a rate higher
than two amps, check the battery regularly
during charging to make sure it doesn’t
overheat. If you’re using a trickle charger, you
can safely let the battery charge overnight
after you’ve checked it regularly for the first
couple of hours. Where a maintenance-free
battery is fitted, special precautions may be
necessary when charging it (for example, the
charge rate is normally very low). There may
be a warning label on the battery, but if not,
consult a BMW dealer or auto-electrician.
15If the battery has removable cell caps,
measure the specific gravity with a
hydrometer every hour during the last few
hours of the charging cycle. Hydrometers are
available inexpensively from car accessory
shops - follow the instructions that come with
the hydrometer. Consider the battery charged
when there’s no change in the specific gravity
reading for two hours, and the electrolyte in
the cells is gassing (bubbling) freely. The
specific gravity reading from each cell should
be very close to the others. If not, the battery
probably has a bad cell(s), and a new one
should be fitted.
16Some maintenance-free (sealed) batteries
have built-in hydrometers on the top,
indicating the state of charge by the colour
displayed in the hydrometer window.
Normally, a bright-coloured hydrometer
indicates a full charge, and a dark hydrometer
indicates the battery still needs charging.
Check the battery manufacturer’s instructions
to be sure you know what the colours mean.17If the battery is sealed and has no built-in
hydrometer, you can connect a digital
voltmeter across the battery terminals to
check the charge. A fully-charged battery
should read 12.6 volts or higher.
18Further information on the battery and
jump starting can be found in Chapter 5 and
at the front of this manual.
14 Spark plug check and
renewal
1
1Before beginning, obtain the necessary
tools, which will include a spark plug socket
and a set of feeler blades. Special spark plug
gap gauges can be obtained from certain
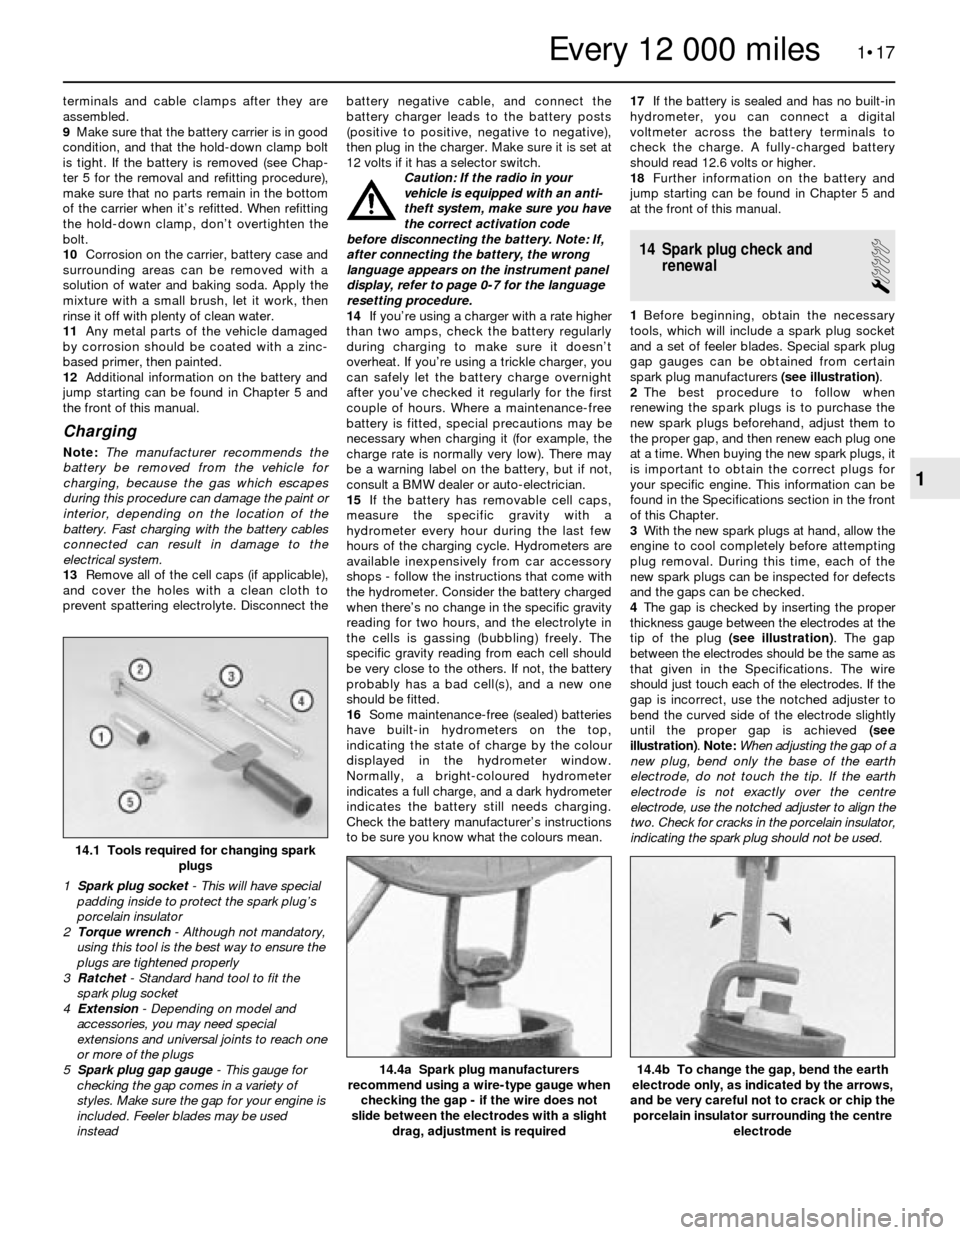
spark plug manufacturers (see illustration).
2The best procedure to follow when
renewing the spark plugs is to purchase the
new spark plugs beforehand, adjust them to
the proper gap, and then renew each plug one
at a time. When buying the new spark plugs, it
is important to obtain the correct plugs for
your specific engine. This information can be
found in the Specifications section in the front
of this Chapter.
3With the new spark plugs at hand, allow the
engine to cool completely before attempting
plug removal. During this time, each of the
new spark plugs can be inspected for defects
and the gaps can be checked.
4The gap is checked by inserting the proper
thickness gauge between the electrodes at the
tip of the plug (see illustration). The gap
between the electrodes should be the same as
that given in the Specifications. The wire
should just touch each of the electrodes. If the
gap is incorrect, use the notched adjuster to
bend the curved side of the electrode slightly
until the proper gap is achieved (see
illustration). Note: When adjusting the gap of a
new plug, bend only the base of the earth
electrode, do not touch the tip. If the earth
electrode is not exactly over the centre
electrode, use the notched adjuster to align the
two. Check for cracks in the porcelain insulator,
indicating the spark plug should not be used.
1•17
14.4b To change the gap, bend the earth
electrode only, as indicated by the arrows,
and be very careful not to crack or chip the
porcelain insulator surrounding the centre
electrode14.4a Spark plug manufacturers
recommend using a wire-type gauge when
checking the gap - if the wire does not
slide between the electrodes with a slight
drag, adjustment is required
14.1 Tools required for changing spark
plugs
1 Spark plug socket- This will have special
padding inside to protect the spark plug’s
porcelain insulator
2 Torque wrench - Although not mandatory,
using this tool is the best way to ensure the
plugs are tightened properly
3 Ratchet - Standard hand tool to fit the
spark plug socket
4 Extension - Depending on model and
accessories, you may need special
extensions and universal joints to reach one
or more of the plugs
5 Spark plug gap gauge- This gauge for
checking the gap comes in a variety of
styles. Make sure the gap for your engine is
included. Feeler blades may be used
instead
1
Every 12 000 miles
Page 30 of 228
drag when the feeler gauge is moved back
and forth.
6If the gap is too large or too small, loosen
the locknut, insert a hook made from large-
diameter metal wire, and rotate the eccentric
to obtain the correct gap (see illustration).
7Once the gap has been set, hold the
eccentric in position with the hook, and
retighten the locknut securely. Recheck the
clearance - sometimes it’ll change slightly
when the locknut is tightened. If so, re-adjust
until it’s correct.
8On the M10 engine, the valves are adjusted
in the firing order, which is 1-3-4-2. After
adjusting No 1 cylinder valves, rotate the
crankshaft half a turn (180º), then check and
adjust the valves on No 3 cylinder. Repeat the
procedure on the remaining cylinders.
9On M20 and M30 engines, the valves are
adjusted following the firing order, which is
1-5-3-6-2-4. After adjusting No 1 cylinder
valves, rotate the crankshaft a third of a turn
(120º), then check and adjust the valves on No
5 cylinder. Repeat the procedure for the
remaining cylinders.
10Refit the valve cover (use a new gasket)
and tighten the mounting nuts evenly and
securely.
11Start the engine and check for oil leakage
between the valve cover and the cylinder
head.19 Throttle linkage -
check and lubrication
1
1The throttle linkage should be checked and
lubricated periodically to ensure its proper
operation.
2Check the linkage to make sure it isn’t
binding.
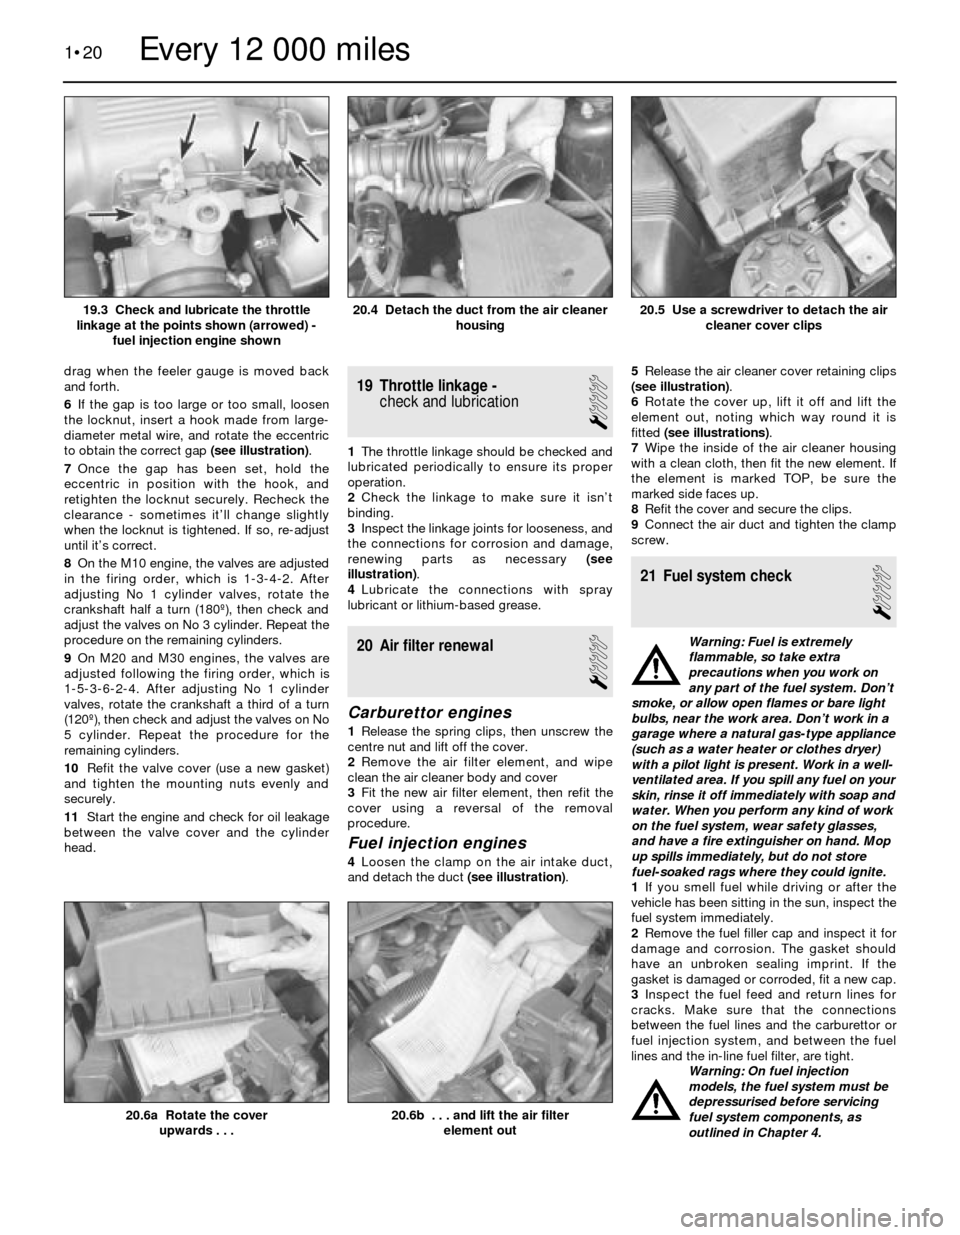
3Inspect the linkage joints for looseness, and
the connections for corrosion and damage,
renewing parts as necessary (see
illustration).
4Lubricate the connections with spray
lubricant or lithium-based grease.
20 Air filter renewal
1
Carburettor engines
1Release the spring clips, then unscrew the
centre nut and lift off the cover.
2Remove the air filter element, and wipe
clean the air cleaner body and cover
3Fit the new air filter element, then refit the
cover using a reversal of the removal
procedure.
Fuel injection engines
4Loosen the clamp on the air intake duct,
and detach the duct (see illustration).5Release the air cleaner cover retaining clips
(see illustration).
6Rotate the cover up, lift it off and lift the
element out, noting which way round it is
fitted (see illustrations).
7Wipe the inside of the air cleaner housing
with a clean cloth, then fit the new element. If
the element is marked TOP, be sure the
marked side faces up.
8Refit the cover and secure the clips.
9Connect the air duct and tighten the clamp
screw.
21 Fuel system check
1
Warning: Fuel is extremely
flammable, so take extra
precautions when you work on
any part of the fuel system. Don’t
smoke, or allow open flames or bare light
bulbs, near the work area. Don’t work in a
garage where a natural gas-type appliance
(such as a water heater or clothes dryer)
with a pilot light is present. Work in a well-
ventilated area. If you spill any fuel on your
skin, rinse it off immediately with soap and
water. When you perform any kind of work
on the fuel system, wear safety glasses,
and have a fire extinguisher on hand. Mop
up spills immediately, but do not store
fuel-soaked rags where they could ignite.
1If you smell fuel while driving or after the
vehicle has been sitting in the sun, inspect the
fuel system immediately.
2Remove the fuel filler cap and inspect it for
damage and corrosion. The gasket should
have an unbroken sealing imprint. If the
gasket is damaged or corroded, fit a new cap.
3Inspect the fuel feed and return lines for
cracks. Make sure that the connections
between the fuel lines and the carburettor or
fuel injection system, and between the fuel
lines and the in-line fuel filter, are tight.
Warning: On fuel injection
models, the fuel system must be
depressurised before servicing
fuel system components, as
outlined in Chapter 4.
1•20
20.6b . . . and lift the air filter
element out20.6a Rotate the cover
upwards . . .
20.5 Use a screwdriver to detach the air
cleaner cover clips20.4 Detach the duct from the air cleaner
housing19.3 Check and lubricate the throttle
linkage at the points shown (arrowed) -
fuel injection engine shown
Every 12 000 miles
Page 31 of 228
4Since some components of the fuel system
- the fuel tank and some of the fuel feed and
return lines, for example - are underneath the
vehicle, they can be inspected more easily
with the vehicle raised on a hoist. If that’s not
possible, raise the vehicle and support it on
axle stands or ramps.
5With the vehicle raised and safely
supported, inspect the fuel tank and filler neck
for punctures, cracks or other damage. The
connection between the filler neck and the
tank is particularly critical. Sometimes a
rubber filler neck will leak because of loose
clamps or deteriorated rubber. Inspect all fuel
tank mounting brackets and straps, to be sure
the tank is securely attached to the vehicle.
Warning: Do not, under any
circumstances, try to repair a fuel
tank (except rubber
components). A welding torch or
any naked flame can easily cause fuel
vapours inside the tank to explode.
6Carefully check all flexible hoses and metal
lines leading away from the fuel tank. Check
for loose connections, deteriorated hoses,
crimped lines, and other damage. Repair or
renew damaged sections as necessary (see
Chapter 4).
22 Cooling system check
1
1Many major engine failures can be
attributed to cooling system problems. If the
vehicle has automatic transmission, the
engine cooling system also plays an importantrole in prolonging transmission life, because it
cools the transmission fluid.
2The engine should be cold for the cooling
system check, so perform the following
procedure before the vehicle is driven for the
day, or after it has been switched off for at
leastthree hours.
3Remove the radiator cap, doing so slowly
and taking adequate precautions against
scalding if the engine is at all warm. Clean the
cap thoroughly, inside and out, with clean
water. Also clean the filler neck on the
radiator. The presence of rust or corrosion in
the filler neck means the coolant should be
changed (see Section 29). The coolant inside
the radiator should be relatively clean and
clear. If it’s rust-coloured, drain the system
and refill with new coolant.
4Carefully check the radiator hoses and the
smaller-diameter heater hoses. Inspect each
coolant hose along its entire length, renewing
any hose which is cracked, swollen or
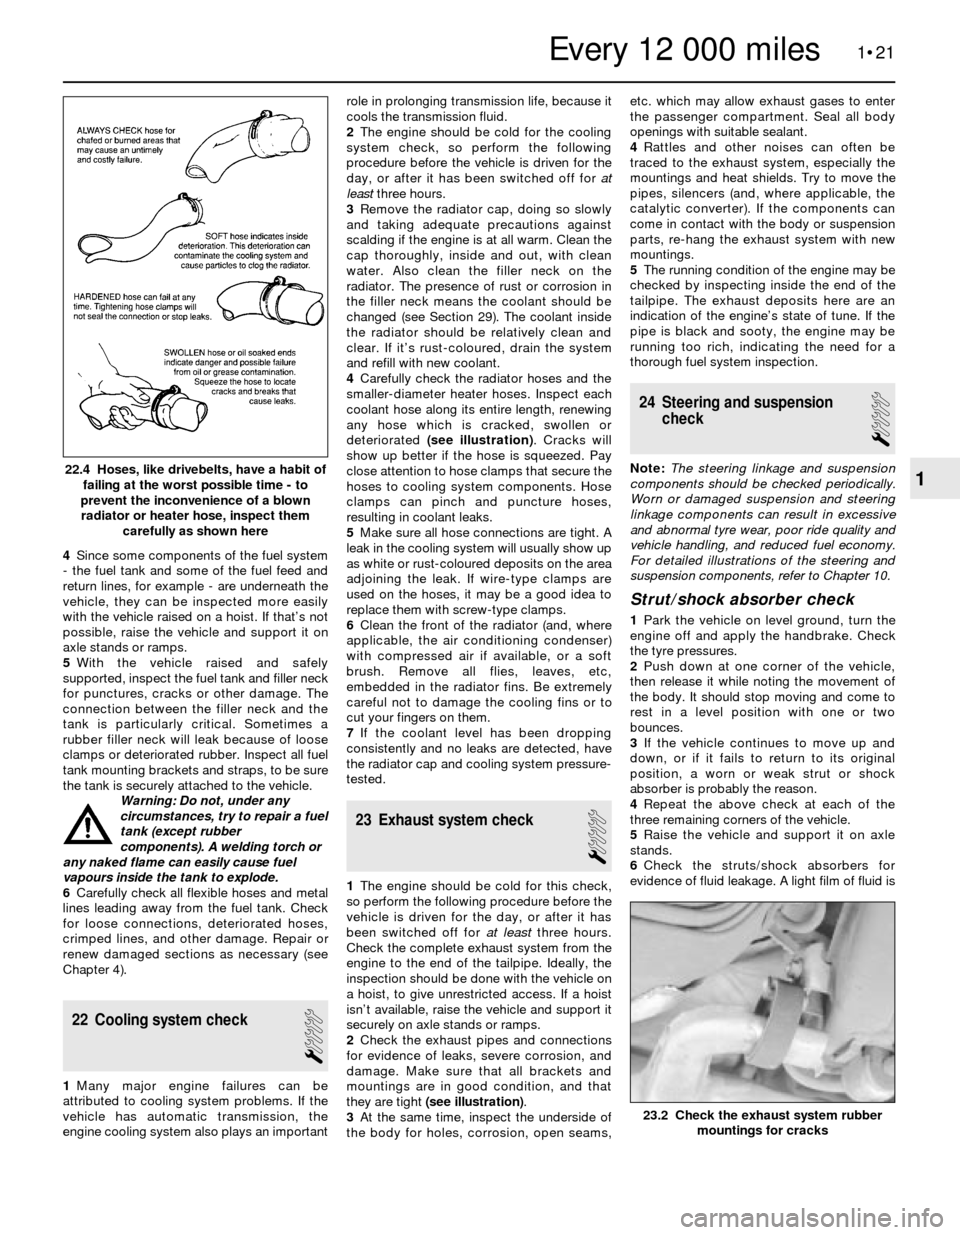
deteriorated (see illustration). Cracks will
show up better if the hose is squeezed. Pay
close attention to hose clamps that secure the
hoses to cooling system components. Hose
clamps can pinch and puncture hoses,
resulting in coolant leaks.
5Make sure all hose connections are tight. A
leak in the cooling system will usually show up
as white or rust-coloured deposits on the area
adjoining the leak. If wire-type clamps are
used on the hoses, it may be a good idea to
replace them with screw-type clamps.
6Clean the front of the radiator (and, where
applicable, the air conditioning condenser)
with compressed air if available, or a soft
brush. Remove all flies, leaves, etc,
embedded in the radiator fins. Be extremely
careful not to damage the cooling fins or to
cut your fingers on them.
7If the coolant level has been dropping
consistently and no leaks are detected, have
the radiator cap and cooling system pressure-
tested.
23 Exhaust system check
1
1The engine should be cold for this check,
so perform the following procedure before the
vehicle is driven for the day, or after it has
been switched off for at leastthree hours.
Check the complete exhaust system from the
engine to the end of the tailpipe. Ideally, the
inspection should be done with the vehicle on
a hoist, to give unrestricted access. If a hoist
isn’t available, raise the vehicle and support it
securely on axle stands or ramps.
2Check the exhaust pipes and connections
for evidence of leaks, severe corrosion, and
damage. Make sure that all brackets and
mountings are in good condition, and that
they are tight (see illustration).
3At the same time, inspect the underside of
the body for holes, corrosion, open seams,etc. which may allow exhaust gases to enter
the passenger compartment. Seal all body
openings with suitable sealant.
4Rattles and other noises can often be
traced to the exhaust system, especially the
mountings and heat shields. Try to move the
pipes, silencers (and, where applicable, the
catalytic converter). If the components can
come in contact with the body or suspension
parts, re-hang the exhaust system with new
mountings.
5The running condition of the engine may be
checked by inspecting inside the end of the
tailpipe. The exhaust deposits here are an
indication of the engine’s state of tune. If the
pipe is black and sooty, the engine may be
running too rich, indicating the need for a
thorough fuel system inspection.
24 Steering and suspension
check
1
Note: The steering linkage and suspension
components should be checked periodically.
Worn or damaged suspension and steering
linkage components can result in excessive
and abnormal tyre wear, poor ride quality and
vehicle handling, and reduced fuel economy.
For detailed illustrations of the steering and
suspension components, refer to Chapter 10.
Strut/shock absorber check
1Park the vehicle on level ground, turn the
engine off and apply the handbrake. Check
the tyre pressures.
2Push down at one corner of the vehicle,
then release it while noting the movement of
the body. It should stop moving and come to
rest in a level position with one or two
bounces.
3If the vehicle continues to move up and
down, or if it fails to return to its original
position, a worn or weak strut or shock
absorber is probably the reason.
4Repeat the above check at each of the
three remaining corners of the vehicle.
5Raise the vehicle and support it on axle
stands.
6Check the struts/shock absorbers for
evidence of fluid leakage. A light film of fluid is
1•21
22.4 Hoses, like drivebelts, have a habit of
failing at the worst possible time - to
prevent the inconvenience of a blown
radiator or heater hose, inspect them
carefully as shown here
23.2 Check the exhaust system rubber
mountings for cracks
1
Every 12 000 miles
Page 32 of 228
no cause for concern. Make sure that any fluid
noted is from the struts/shocks, and not from
any other source. If leakage is noted, renew
the struts or shock absorbers in axle pairs (or
as a full set).
7Check the struts/shock absorbers to be
sure that they are securely mounted and
undamaged. Check the upper mountings for
damage and wear. If damage or wear is
noted, renew the struts or shock absorbers.
8If the struts or shock absorbers must be
renewed, refer to Chapter 10 for the
procedure. Always renew both units on the
same axle, or the safety of the vehicle may be
compromised. If possible, renew all four as a
set.
Steering and suspension check
9Inspect the steering system components
for damage and distortion. Look for leaks and
damaged seals, boots and fittings.
10Clean the lower end of the steering
knuckle. Have an assistant grasp the lower
edge of the tyre and move the wheel in and
out, while you look for movement at the
steering knuckle-to-axle arm balljoints.
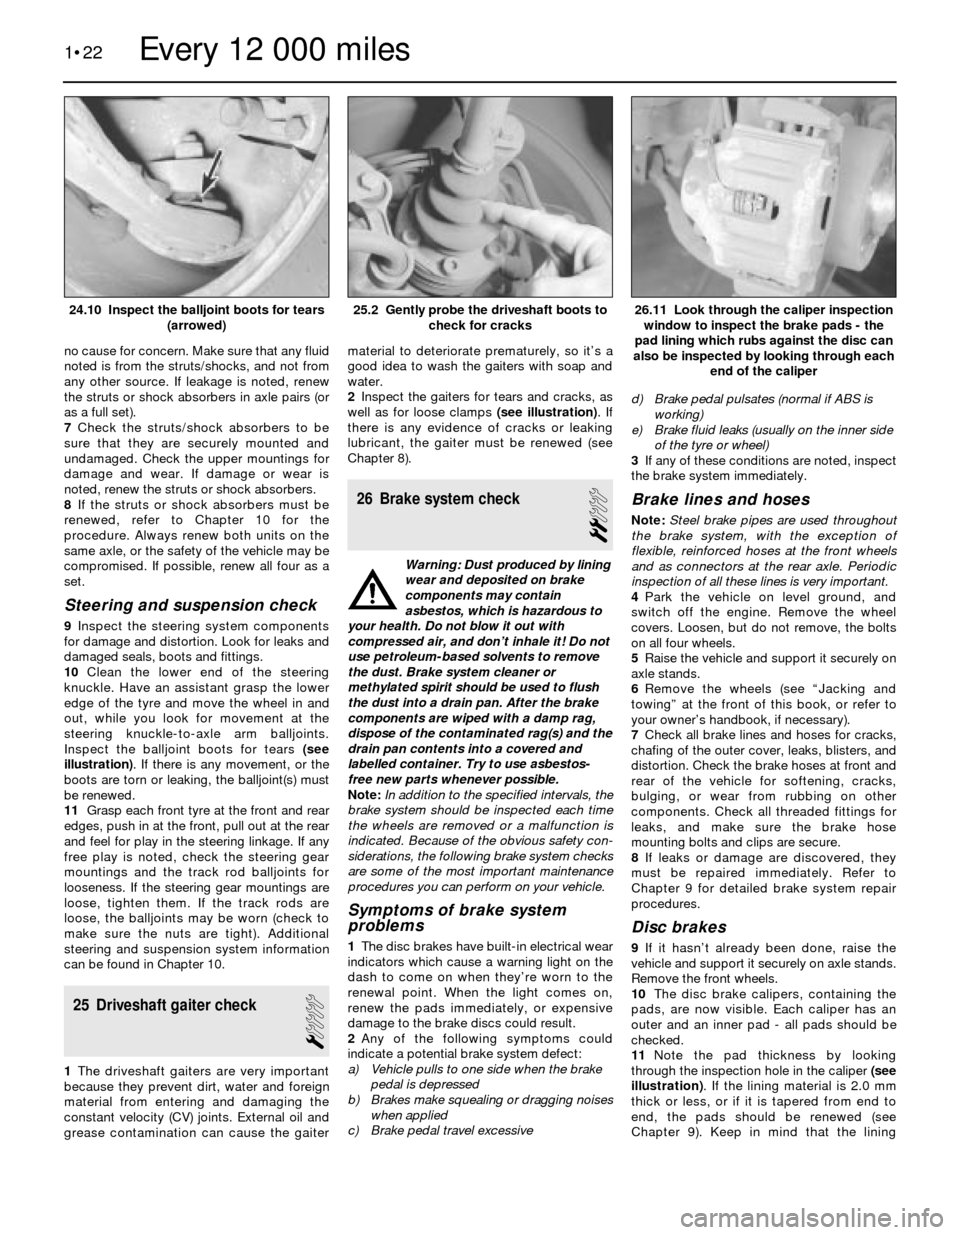
Inspect the balljoint boots for tears (see
illustration). If there is any movement, or the
boots are torn or leaking, the balljoint(s) must
be renewed.
11Grasp each front tyre at the front and rear
edges, push in at the front, pull out at the rear
and feel for play in the steering linkage. If any
free play is noted, check the steering gear
mountings and the track rod balljoints for
looseness. If the steering gear mountings are
loose, tighten them. If the track rods are
loose, the balljoints may be worn (check to
make sure the nuts are tight). Additional
steering and suspension system information
can be found in Chapter 10.
25 Driveshaft gaiter check
1
1The driveshaft gaiters are very important
because they prevent dirt, water and foreign
material from entering and damaging the
constant velocity (CV) joints. External oil and
grease contamination can cause the gaitermaterial to deteriorate prematurely, so it’s a
good idea to wash the gaiters with soap and
water.
2Inspect the gaiters for tears and cracks, as
well as for loose clamps (see illustration). If
there is any evidence of cracks or leaking
lubricant, the gaiter must be renewed (see
Chapter 8).
26 Brake system check
2
Warning: Dust produced by lining
wear and deposited on brake
components may contain
asbestos, which is hazardous to
your health. Do not blow it out with
compressed air, and don’t inhale it! Do not
use petroleum-based solvents to remove
the dust. Brake system cleaner or
methylated spirit should be used to flush
the dust into a drain pan. After the brake
components are wiped with a damp rag,
dispose of the contaminated rag(s) and the
drain pan contents into a covered and
labelled container. Try to use asbestos-
free new parts whenever possible.
Note:In addition to the specified intervals, the
brake system should be inspected each time
the wheels are removed or a malfunction is
indicated. Because of the obvious safety con-
siderations, the following brake system checks
are some of the most important maintenance
procedures you can perform on your vehicle.
Symptoms of brake system
problems
1The disc brakes have built-in electrical wear
indicators which cause a warning light on the
dash to come on when they’re worn to the
renewal point. When the light comes on,
renew the pads immediately, or expensive
damage to the brake discs could result.
2Any of the following symptoms could
indicate a potential brake system defect:
a) Vehicle pulls to one side when the brake
pedal is depressed
b) Brakes make squealing or dragging noises
when applied
c) Brake pedal travel excessived) Brake pedal pulsates (normal if ABS is
working)
e) Brake fluid leaks (usually on the inner side
of the tyre or wheel)
3If any of these conditions are noted, inspect
the brake system immediately.
Brake lines and hoses
Note: Steel brake pipes are used throughout
the brake system, with the exception of
flexible, reinforced hoses at the front wheels
and as connectors at the rear axle. Periodic
inspection of all these lines is very important.
4Park the vehicle on level ground, and
switch off the engine. Remove the wheel
covers. Loosen, but do not remove, the bolts
on all four wheels.
5Raise the vehicle and support it securely on
axle stands.
6Remove the wheels (see “Jacking and
towing” at the front of this book, or refer to
your owner’s handbook, if necessary).
7Check all brake lines and hoses for cracks,
chafing of the outer cover, leaks, blisters, and
distortion. Check the brake hoses at front and
rear of the vehicle for softening, cracks,
bulging, or wear from rubbing on other
components. Check all threaded fittings for
leaks, and make sure the brake hose
mounting bolts and clips are secure.
8If leaks or damage are discovered, they
must be repaired immediately. Refer to
Chapter 9 for detailed brake system repair
procedures.
Disc brakes
9If it hasn’t already been done, raise the
vehicle and support it securely on axle stands.
Remove the front wheels.
10The disc brake calipers, containing the
pads, are now visible. Each caliper has an
outer and an inner pad - all pads should be
checked.
11Note the pad thickness by looking
through the inspection hole in the caliper (see
illustration). If the lining material is 2.0 mm
thick or less, or if it is tapered from end to
end, the pads should be renewed (see
Chapter 9). Keep in mind that the lining
1•22
26.11 Look through the caliper inspection
window to inspect the brake pads - the
pad lining which rubs against the disc can
also be inspected by looking through each
end of the caliper25.2 Gently probe the driveshaft boots to
check for cracks24.10 Inspect the balljoint boots for tears
(arrowed)
Every 12 000 miles
Page 34 of 228
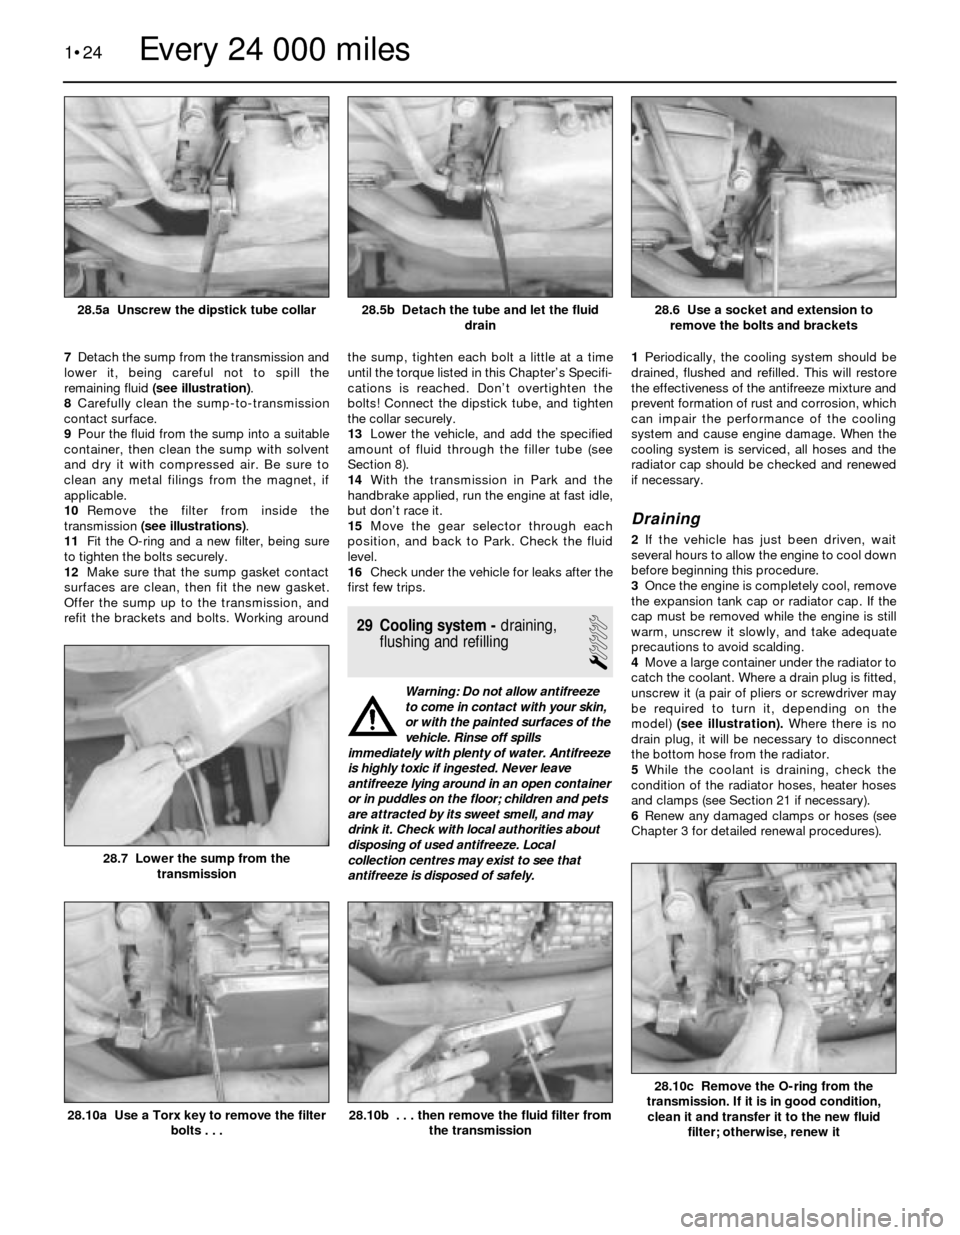
7Detach the sump from the transmission and
lower it, being careful not to spill the
remaining fluid (see illustration).
8Carefully clean the sump-to-transmission
contact surface.
9Pour the fluid from the sump into a suitable
container, then clean the sump with solvent
and dry it with compressed air. Be sure to
clean any metal filings from the magnet, if
applicable.
10Remove the filter from inside the
transmission (see illustrations).
11Fit the O-ring and a new filter, being sure
to tighten the bolts securely.
12Make sure that the sump gasket contact
surfaces are clean, then fit the new gasket.
Offer the sump up to the transmission, and
refit the brackets and bolts. Working aroundthe sump, tighten each bolt a little at a time
until the torque listed in this Chapter’s Specifi-
cations is reached. Don’t overtighten the
bolts! Connect the dipstick tube, and tighten
the collar securely.
13Lower the vehicle, and add the specified
amount of fluid through the filler tube (see
Section 8).
14With the transmission in Park and the
handbrake applied, run the engine at fast idle,
but don’t race it.
15Move the gear selector through each
position, and back to Park. Check the fluid
level.
16Check under the vehicle for leaks after the
first few trips.
29 Cooling system -draining,
flushing and refilling
1
Warning: Do not allow antifreeze
to come in contact with your skin,
or with the painted surfaces of the
vehicle. Rinse off spills
immediately with plenty of water. Antifreeze
is highly toxic if ingested. Never leave
antifreeze lying around in an open container
or in puddles on the floor; children and pets
are attracted by its sweet smell, and may
drink it. Check with local authorities about
disposing of used antifreeze. Local
collection centres may exist to see that
antifreeze is disposed of safely.1Periodically, the cooling system should be
drained, flushed and refilled. This will restore
the effectiveness of the antifreeze mixture and
prevent formation of rust and corrosion, which
can impair the performance of the cooling
system and cause engine damage. When the
cooling system is serviced, all hoses and the
radiator cap should be checked and renewed
if necessary.
Draining
2If the vehicle has just been driven, wait
several hours to allow the engine to cool down
before beginning this procedure.
3Once the engine is completely cool, remove
the expansion tank cap or radiator cap. If the
cap must be removed while the engine is still
warm, unscrew it slowly, and take adequate
precautions to avoid scalding.
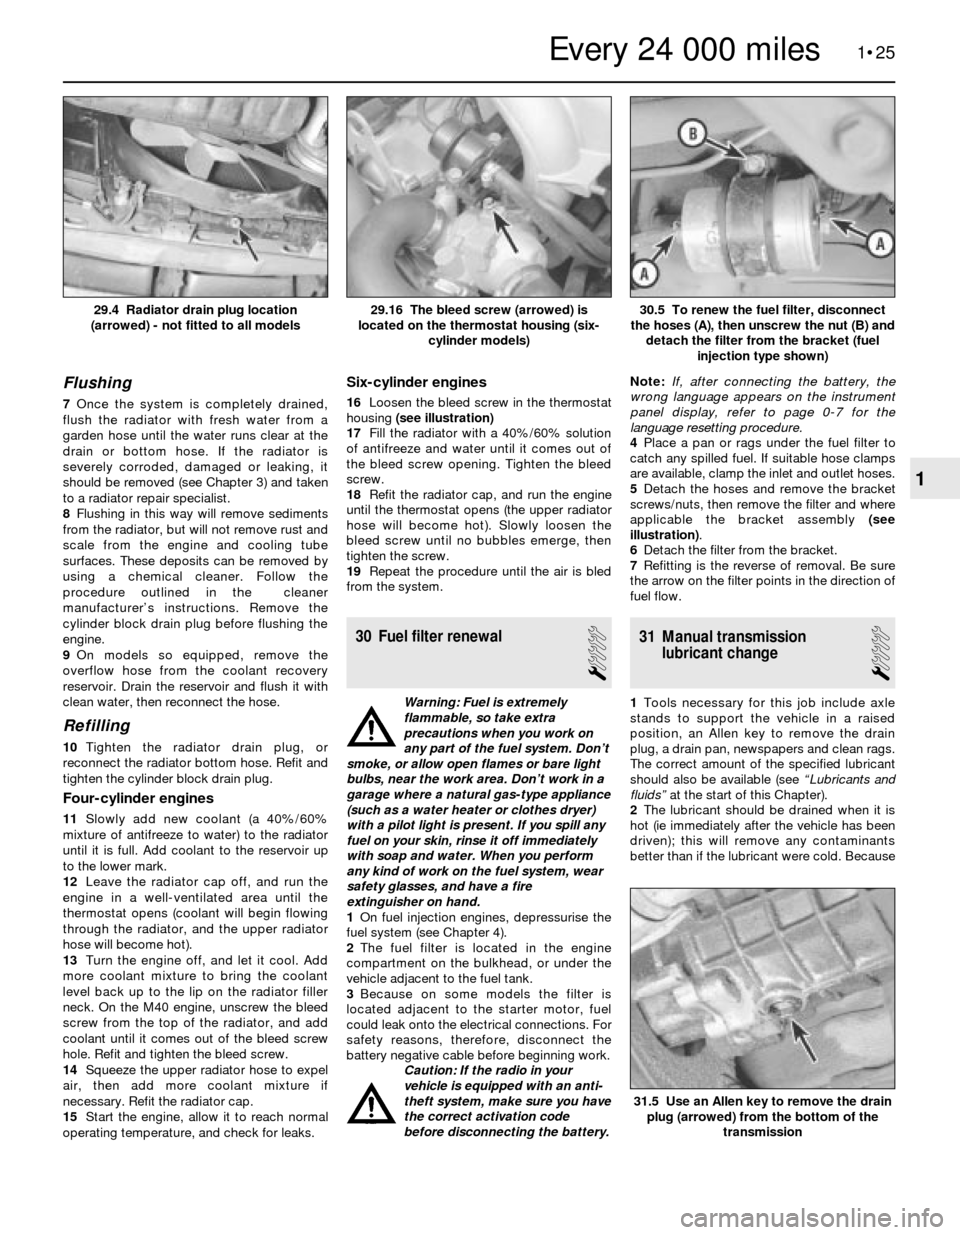
4Move a large container under the radiator to
catch the coolant. Where a drain plug is fitted,
unscrew it (a pair of pliers or screwdriver may
be required to turn it, depending on the
model) (see illustration). Where there is no
drain plug, it will be necessary to disconnect
the bottom hose from the radiator.
5While the coolant is draining, check the
condition of the radiator hoses, heater hoses
and clamps (see Section 21 if necessary).
6Renew any damaged clamps or hoses (see
Chapter 3 for detailed renewal procedures).
1•24
28.10c Remove the O-ring from the
transmission. If it is in good condition,
clean it and transfer it to the new fluid
filter; otherwise, renew it
28.10b . . . then remove the fluid filter from
the transmission28.10a Use a Torx key to remove the filter
bolts . . .
28.7 Lower the sump from the
transmission
28.6 Use a socket and extension to
remove the bolts and brackets28.5b Detach the tube and let the fluid
drain28.5a Unscrew the dipstick tube collar
Every 24 000 miles
Page 35 of 228
Flushing
7Once the system is completely drained,
flush the radiator with fresh water from a
garden hose until the water runs clear at the
drain or bottom hose. If the radiator is
severely corroded, damaged or leaking, it
should be removed (see Chapter 3) and taken
to a radiator repair specialist.
8Flushing in this way will remove sediments
from the radiator, but will not remove rust and
scale from the engine and cooling tube
surfaces. These deposits can be removed by
using a chemical cleaner. Follow the
procedure outlined in the cleaner
manufacturer’s instructions. Remove the
cylinder block drain plug before flushing the
engine.
9On models so equipped, remove the
overflow hose from the coolant recovery
reservoir. Drain the reservoir and flush it with
clean water, then reconnect the hose.
Refilling
10Tighten the radiator drain plug, or
reconnect the radiator bottom hose. Refit and
tighten the cylinder block drain plug.
Four-cylinder engines
11Slowly add new coolant (a 40%/60%
mixture of antifreeze to water) to the radiator
until it is full. Add coolant to the reservoir up
to the lower mark.
12Leave the radiator cap off, and run the
engine in a well-ventilated area until the
thermostat opens (coolant will begin flowing
through the radiator, and the upper radiator
hose will become hot).
13Turn the engine off, and let it cool. Add
more coolant mixture to bring the coolant
level back up to the lip on the radiator filler
neck. On the M40 engine, unscrew the bleed
screw from the top of the radiator, and add
coolant until it comes out of the bleed screw
hole. Refit and tighten the bleed screw.
14Squeeze the upper radiator hose to expel
air, then add more coolant mixture if
necessary. Refit the radiator cap.
15Start the engine, allow it to reach normal
operating temperature, and check for leaks.
Six-cylinder engines
16Loosen the bleed screw in the thermostat
housing (see illustration)
17Fill the radiator with a 40%/60% solution
of antifreeze and water until it comes out of
the bleed screw opening. Tighten the bleed
screw.
18Refit the radiator cap, and run the engine
until the thermostat opens (the upper radiator
hose will become hot). Slowly loosen the
bleed screw until no bubbles emerge, then
tighten the screw.
19Repeat the procedure until the air is bled
from the system.
30 Fuel filter renewal
1
Warning: Fuel is extremely
flammable, so take extra
precautions when you work on
any part of the fuel system. Don’t
smoke, or allow open flames or bare light
bulbs, near the work area. Don’t work in a
garage where a natural gas-type appliance
(such as a water heater or clothes dryer)
with a pilot light is present. If you spill any
fuel on your skin, rinse it off immediately
with soap and water. When you perform
any kind of work on the fuel system, wear
safety glasses, and have a fire
extinguisher on hand.
1On fuel injection engines, depressurise the
fuel system (see Chapter 4).
2The fuel filter is located in the engine
compartment on the bulkhead, or under the
vehicle adjacent to the fuel tank.
3Because on some models the filter is
located adjacent to the starter motor, fuel
could leak onto the electrical connections. For
safety reasons, therefore, disconnect the
battery negative cable before beginning work.
Caution: If the radio in your
vehicle is equipped with an anti-
theft system, make sure you have
the correct activation code
before disconnecting the battery.Note: If, after connecting the battery, the
wrong language appears on the instrument
panel display, refer to page 0-7 for the
language resetting procedure.
4Place a pan or rags under the fuel filter to
catch any spilled fuel. If suitable hose clamps
are available, clamp the inlet and outlet hoses.
5 Detach the hoses and remove the bracket
screws/nuts, then remove the filter and where
applicable the bracket assembly (see
illustration).
6Detach the filter from the bracket.
7Refitting is the reverse of removal. Be sure
the arrow on the filter points in the direction of
fuel flow.
31 Manual transmission
lubricant change
1
1Tools necessary for this job include axle
stands to support the vehicle in a raised
position, an Allen key to remove the drain
plug, a drain pan, newspapers and clean rags.
The correct amount of the specified lubricant
should also be available (see “Lubricants and
fluids”at the start of this Chapter).
2The lubricant should be drained when it is
hot (ie immediately after the vehicle has been
driven); this will remove any contaminants
better than if the lubricant were cold. Because
1•25
30.5 To renew the fuel filter, disconnect
the hoses (A), then unscrew the nut (B) and
detach the filter from the bracket (fuel
injection type shown)29.16 The bleed screw (arrowed) is
located on the thermostat housing (six-
cylinder models)29.4 Radiator drain plug location
(arrowed) - not fitted to all models
31.5 Use an Allen key to remove the drain
plug (arrowed) from the bottom of the
transmission
1
Every 24 000 miles
Page 36 of 228
the lubricant will be hot, it would be wise to
wear rubber gloves.
3Raise the vehicle and place it on axle
stands. Make sure it is safely supported, and
as level as possible.
4Move the necessary equipment under the
vehicle, being careful not to touch any of the
hot exhaust components.
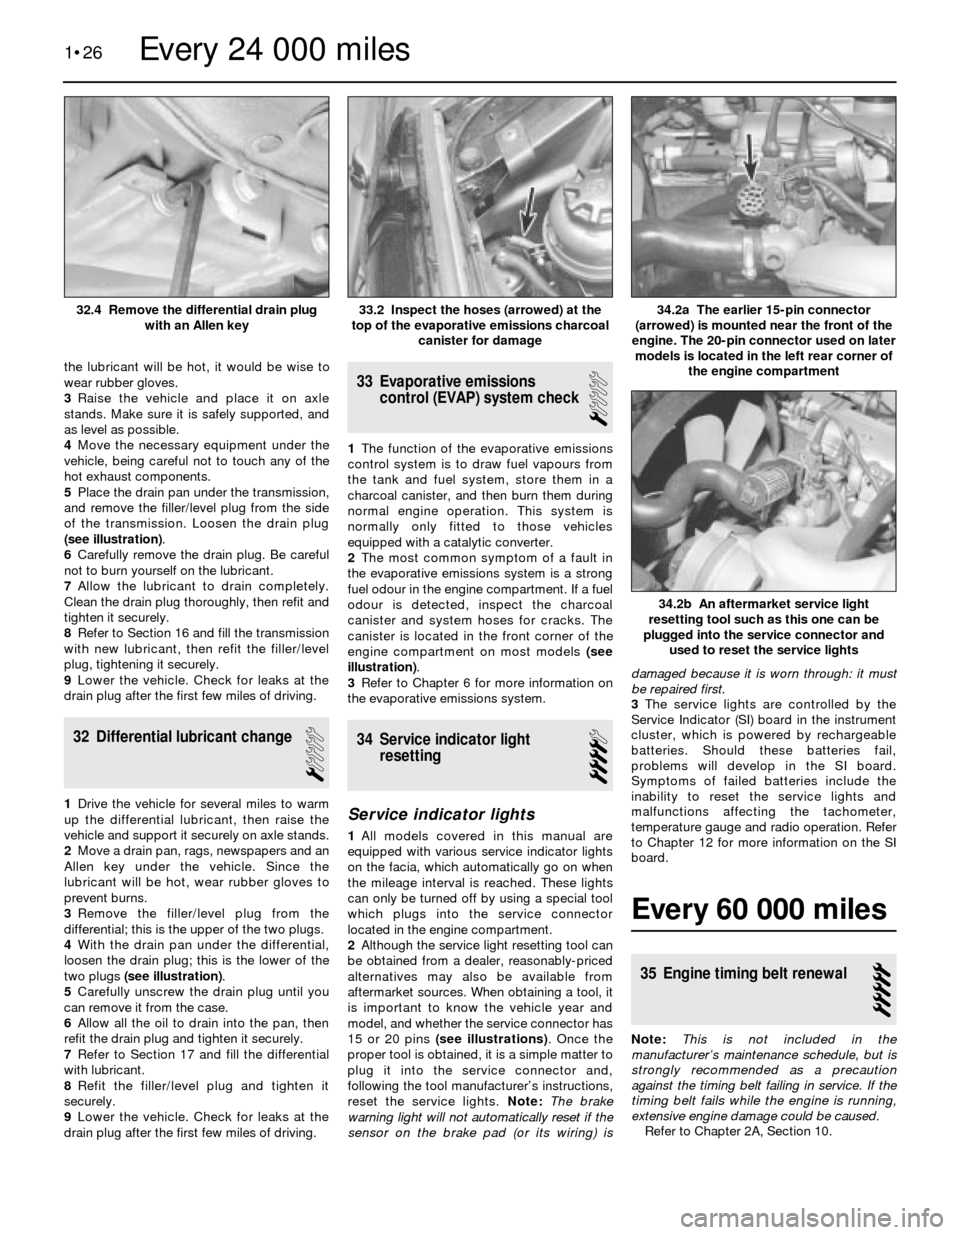
5Place the drain pan under the transmission,
and remove the filler/level plug from the side
of the transmission. Loosen the drain plug
(see illustration).
6Carefully remove the drain plug. Be careful
not to burn yourself on the lubricant.
7Allow the lubricant to drain completely.
Clean the drain plug thoroughly, then refit and
tighten it securely.
8Refer to Section 16 and fill the transmission
with new lubricant, then refit the filler/level
plug, tightening it securely.
9Lower the vehicle. Check for leaks at the
drain plug after the first few miles of driving.
32 Differential lubricant change
1
1Drive the vehicle for several miles to warm
up the differential lubricant, then raise the
vehicle and support it securely on axle stands.
2Move a drain pan, rags, newspapers and an
Allen key under the vehicle. Since the
lubricant will be hot, wear rubber gloves to
prevent burns.
3Remove the filler/level plug from the
differential; this is the upper of the two plugs.
4With the drain pan under the differential,
loosen the drain plug; this is the lower of the
two plugs (see illustration).
5Carefully unscrew the drain plug until you
can remove it from the case.
6Allow all the oil to drain into the pan, then
refit the drain plug and tighten it securely.
7Refer to Section 17 and fill the differential
with lubricant.
8Refit the filler/level plug and tighten it
securely.
9Lower the vehicle. Check for leaks at the
drain plug after the first few miles of driving.
33 Evaporative emissions
control (EVAP) system check
1
1The function of the evaporative emissions
control system is to draw fuel vapours from
the tank and fuel system, store them in a
charcoal canister, and then burn them during
normal engine operation. This system is
normally only fitted to those vehicles
equipped with a catalytic converter.
2The most common symptom of a fault in
the evaporative emissions system is a strong
fuel odour in the engine compartment. If a fuel
odour is detected, inspect the charcoal
canister and system hoses for cracks. The
canister is located in the front corner of the
engine compartment on most models (see
illustration).
3Refer to Chapter 6 for more information on
the evaporative emissions system.
34 Service indicator light
resetting
4
Service indicator lights
1All models covered in this manual are
equipped with various service indicator lights
on the facia, which automatically go on when
the mileage interval is reached. These lights
can only be turned off by using a special tool
which plugs into the service connector
located in the engine compartment.
2Although the service light resetting tool can
be obtained from a dealer, reasonably-priced
alternatives may also be available from
aftermarket sources. When obtaining a tool, it
is important to know the vehicle year and
model, and whether the service connector has
15 or 20 pins (see illustrations). Once the
proper tool is obtained, it is a simple matter to
plug it into the service connector and,
following the tool manufacturer’s instructions,
reset the service lights. Note: The brake
warning light will not automatically reset if the
sensor on the brake pad (or its wiring) isdamaged because it is worn through: it must
be repaired first.
3The service lights are controlled by the
Service Indicator (SI) board in the instrument
cluster, which is powered by rechargeable
batteries. Should these batteries fail,
problems will develop in the SI board.
Symptoms of failed batteries include the
inability to reset the service lights and
malfunctions affecting the tachometer,
temperature gauge and radio operation. Refer
to Chapter 12 for more information on the SI
board.
Every 60 000 miles
35 Engine timing belt renewal
5
Note:This is not included in the
manufacturer’s maintenance schedule, but is
strongly recommended as a precaution
against the timing belt failing in service. If the
timing belt fails while the engine is running,
extensive engine damage could be caused.
Refer to Chapter 2A, Section 10.
1•26
34.2b An aftermarket service light
resetting tool such as this one can be
plugged into the service connector and
used to reset the service lights
34.2a The earlier 15-pin connector
(arrowed) is mounted near the front of the
engine. The 20-pin connector used on later
models is located in the left rear corner of
the engine compartment33.2 Inspect the hoses (arrowed) at the
top of the evaporative emissions charcoal
canister for damage32.4 Remove the differential drain plug
with an Allen key
Every 24 000 miles
Page 42 of 228
6 Exhaust manifold-
removal and refitting
1
Warning: Make sure the engine is
completely cool before beginning
work on the exhaust system.
Caution: If the radio in your
vehicle is equipped with an anti-
theft system, make sure you
have the correct activation code
before disconnecting the battery.
Note: If, after connecting the battery, the
wrong language appears on the instrument
panel display, refer to page 0-7 for the
language resetting procedure.
1Disconnect the battery negative cable.
2On models where the air cleaner is on the
exhaust manifold side of the engine, remove
the air cleaner housing assembly and/or
airflow sensor to provide sufficient working
area (see Chapter 4, if necessary).
3Unplug the HT leads and set the spark plug
lead harness aside (see Chapter 1).
4Clearly label, then disconnect or remove, all
wires, hoses, fittings, etc. that are in the way.
Be sure to disconnect the oxygen sensor,
where fitted.
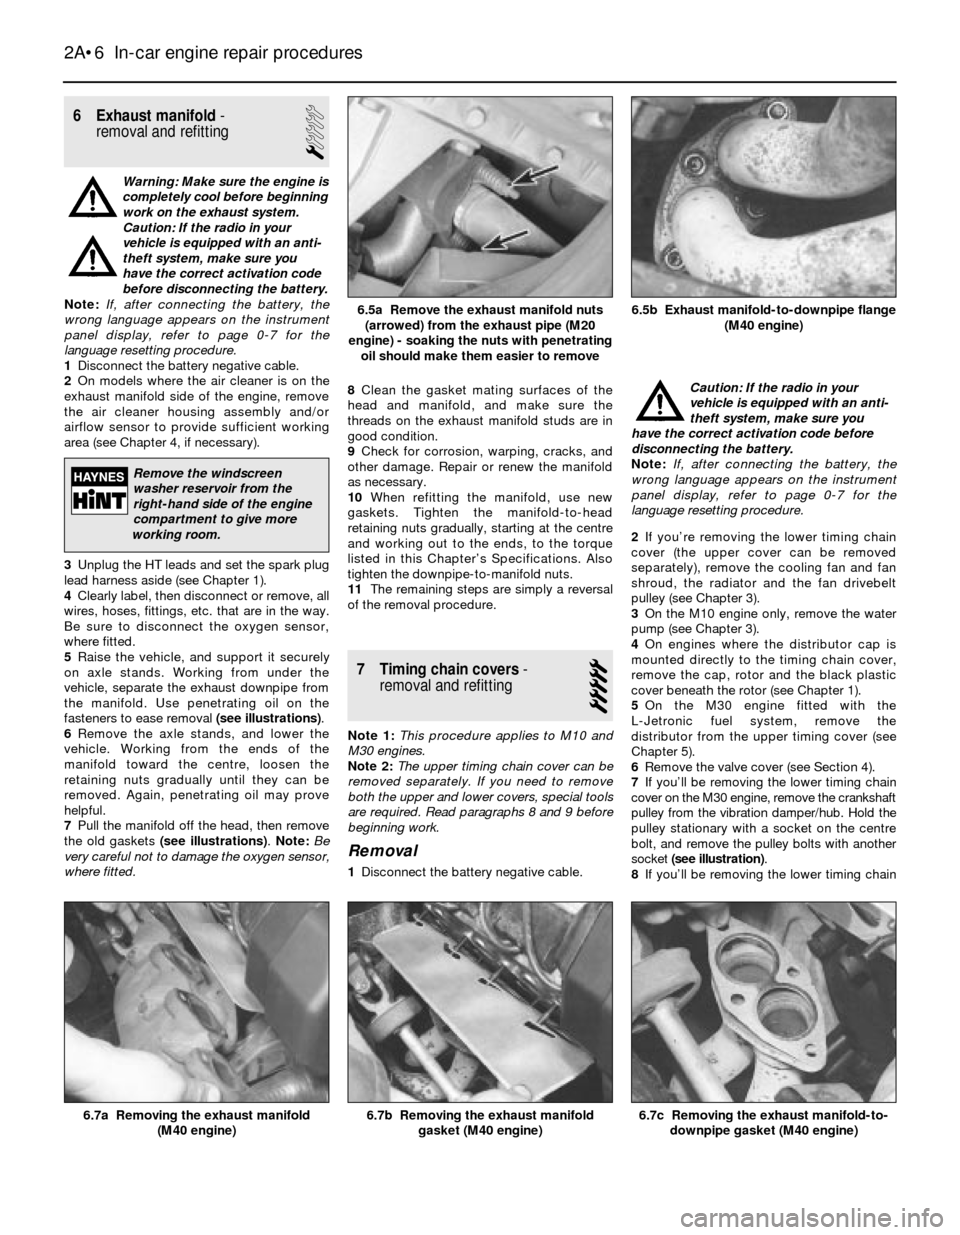
5Raise the vehicle, and support it securely
on axle stands. Working from under the
vehicle, separate the exhaust downpipe from
the manifold. Use penetrating oil on the
fasteners to ease removal (see illustrations).
6Remove the axle stands, and lower the
vehicle. Working from the ends of the
manifold toward the centre, loosen the
retaining nuts gradually until they can be
removed. Again, penetrating oil may prove
helpful.
7Pull the manifold off the head, then remove
the old gaskets (see illustrations). Note:Be
very careful not to damage the oxygen sensor,
where fitted.8Clean the gasket mating surfaces of the
head and manifold, and make sure the
threads on the exhaust manifold studs are in
good condition.
9Check for corrosion, warping, cracks, and
other damage. Repair or renew the manifold
as necessary.
10When refitting the manifold, use new
gaskets. Tighten the manifold-to-head
retaining nuts gradually, starting at the centre
and working out to the ends, to the torque
listed in this Chapter’s Specifications. Also
tighten the downpipe-to-manifold nuts.
11The remaining steps are simply a reversal
of the removal procedure.
7 Timing chain covers-
removal and refitting
5
Note 1:This procedure applies to M10 and
M30 engines.
Note 2:The upper timing chain cover can be
removed separately. If you need to remove
both the upper and lower covers, special tools
are required. Read paragraphs 8 and 9 before
beginning work.
Removal
1Disconnect the battery negative cable.Caution: If the radio in your
vehicle is equipped with an anti-
theft system, make sure you
have the correct activation code before
disconnecting the battery.
Note: If, after connecting the battery, the
wrong language appears on the instrument
panel display, refer to page 0-7 for the
language resetting procedure.
2If you’re removing the lower timing chain
cover (the upper cover can be removed
separately), remove the cooling fan and fan
shroud, the radiator and the fan drivebelt
pulley (see Chapter 3).
3On the M10 engine only, remove the water
pump (see Chapter 3).
4On engines where the distributor cap is
mounted directly to the timing chain cover,
remove the cap, rotor and the black plastic
cover beneath the rotor (see Chapter 1).
5On the M30 engine fitted with the
L-Jetronic fuel system, remove the
distributor from the upper timing cover (see
Chapter 5).
6Remove the valve cover (see Section 4).
7If you’ll be removing the lower timing chain
cover on the M30 engine, remove the crankshaft
pulley from the vibration damper/hub. Hold the
pulley stationary with a socket on the centre
bolt, and remove the pulley bolts with another
socket (see illustration).
8If you’ll be removing the lower timing chain
2A•6 In-car engine repair procedures
6.7c Removing the exhaust manifold-to-
downpipe gasket (M40 engine)6.7b Removing the exhaust manifold
gasket (M40 engine)6.7a Removing the exhaust manifold
(M40 engine)
6.5b Exhaust manifold-to-downpipe flange
(M40 engine)6.5a Remove the exhaust manifold nuts
(arrowed) from the exhaust pipe (M20
engine) - soaking the nuts with penetrating
oil should make them easier to remove
Remove the windscreen
washer reservoir from the
right-hand side of the engine
compartment to give more
working room.
Page 55 of 228
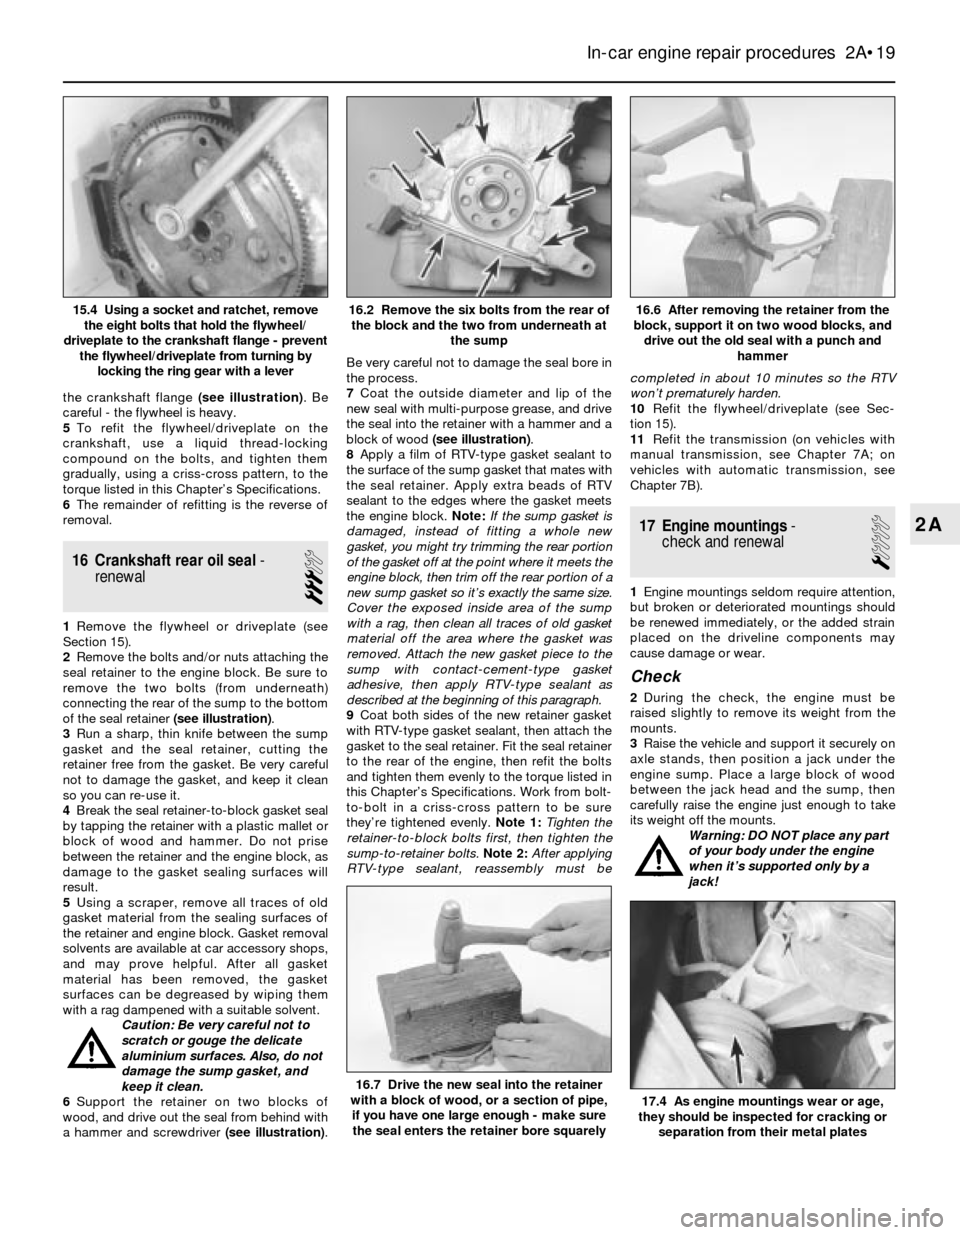
the crankshaft flange (see illustration). Be
careful - the flywheel is heavy.
5To refit the flywheel/driveplate on the
crankshaft, use a liquid thread-locking
compound on the bolts, and tighten them
gradually, using a criss-cross pattern, to the
torque listed in this Chapter’s Specifications.
6The remainder of refitting is the reverse of
removal.
16 Crankshaft rear oil seal-
renewal
3
1Remove the flywheel or driveplate (see
Section 15).
2Remove the bolts and/or nuts attaching the
seal retainer to the engine block. Be sure to
remove the two bolts (from underneath)
connecting the rear of the sump to the bottom
of the seal retainer (see illustration).
3Run a sharp, thin knife between the sump
gasket and the seal retainer, cutting the
retainer free from the gasket. Be very careful
not to damage the gasket, and keep it clean
so you can re-use it.
4Break the seal retainer-to-block gasket seal
by tapping the retainer with a plastic mallet or
block of wood and hammer. Do not prise
between the retainer and the engine block, as
damage to the gasket sealing surfaces will
result.
5Using a scraper, remove all traces of old
gasket material from the sealing surfaces of
the retainer and engine block. Gasket removal
solvents are available at car accessory shops,
and may prove helpful. After all gasket
material has been removed, the gasket
surfaces can be degreased by wiping them
with a rag dampened with a suitable solvent.
Caution: Be very careful not to
scratch or gouge the delicate
aluminium surfaces. Also, do not
damage the sump gasket, and
keep it clean.
6Support the retainer on two blocks of
wood, and drive out the seal from behind with
a hammer and screwdriver (see illustration).Be very careful not to damage the seal bore in
the process.
7Coat the outside diameter and lip of the
new seal with multi-purpose grease, and drive
the seal into the retainer with a hammer and a
block of wood (see illustration).
8Apply a film of RTV-type gasket sealant to
the surface of the sump gasket that mates with
the seal retainer. Apply extra beads of RTV
sealant to the edges where the gasket meets
the engine block. Note:If the sump gasket is
damaged, instead of fitting a whole new
gasket, you might try trimming the rear portion
of the gasket off at the point where it meets the
engine block, then trim off the rear portion of a
new sump gasket so it’s exactly the same size.
Cover the exposed inside area of the sump
with a rag, then clean all traces of old gasket
material off the area where the gasket was
removed. Attach the new gasket piece to the
sump with contact-cement-type gasket
adhesive, then apply RTV-type sealant as
described at the beginning of this paragraph.
9Coat both sides of the new retainer gasket
with RTV-type gasket sealant, then attach the
gasket to the seal retainer. Fit the seal retainer
to the rear of the engine, then refit the bolts
and tighten them evenly to the torque listed in
this Chapter’s Specifications. Work from bolt-
to-bolt in a criss-cross pattern to be sure
they’re tightened evenly.Note 1:Tighten the
retainer-to-block bolts first, then tighten the
sump-to-retainer bolts.Note 2:After applying
RTV-type sealant, reassembly must becompleted in about 10 minutes so the RTV
won’t prematurely harden.
10Refit the flywheel/driveplate (see Sec-
tion 15).
11Refit the transmission (on vehicles with
manual transmission, see Chapter 7A; on
vehicles with automatic transmission, see
Chapter 7B).
17 Engine mountings-
check and renewal
1
1Engine mountings seldom require attention,
but broken or deteriorated mountings should
be renewed immediately, or the added strain
placed on the driveline components may
cause damage or wear.
Check
2During the check, the engine must be
raised slightly to remove its weight from the
mounts.
3Raise the vehicle and support it securely on
axle stands, then position a jack under the
engine sump. Place a large block of wood
between the jack head and the sump, then
carefully raise the engine just enough to take
its weight off the mounts.
Warning: DO NOT place any part
of your body under the engine
when it’s supported only by a
jack!
In-car engine repair procedures 2A•19
16.6 After removing the retainer from the
block, support it on two wood blocks, and
drive out the old seal with a punch and
hammer16.2 Remove the six bolts from the rear of
the block and the two from underneath at
the sump15.4 Using a socket and ratchet, remove
the eight bolts that hold the flywheel/
driveplate to the crankshaft flange - prevent
the flywheel/driveplate from turning by
locking the ring gear with a lever
17.4 As engine mountings wear or age,
they should be inspected for cracking or
separation from their metal plates
16.7 Drive the new seal into the retainer
with a block of wood, or a section of pipe,
if you have one large enough - make sure
the seal enters the retainer bore squarely
2A
Page 61 of 228
otherwise a small brush or even a bicycle tyre
pump will work). The idea is to prevent dirt
from getting into the cylinders as the
compression check is being done.
3Remove all the spark plugs from the engine
(see Chapter 1).
4Block the throttle wide open, or have an
assistant hold the throttle pedal down.
5On carburettor models, disconnect the LT
lead from the coil. On fuel injection models,
disable the fuel pump and ignition circuit by
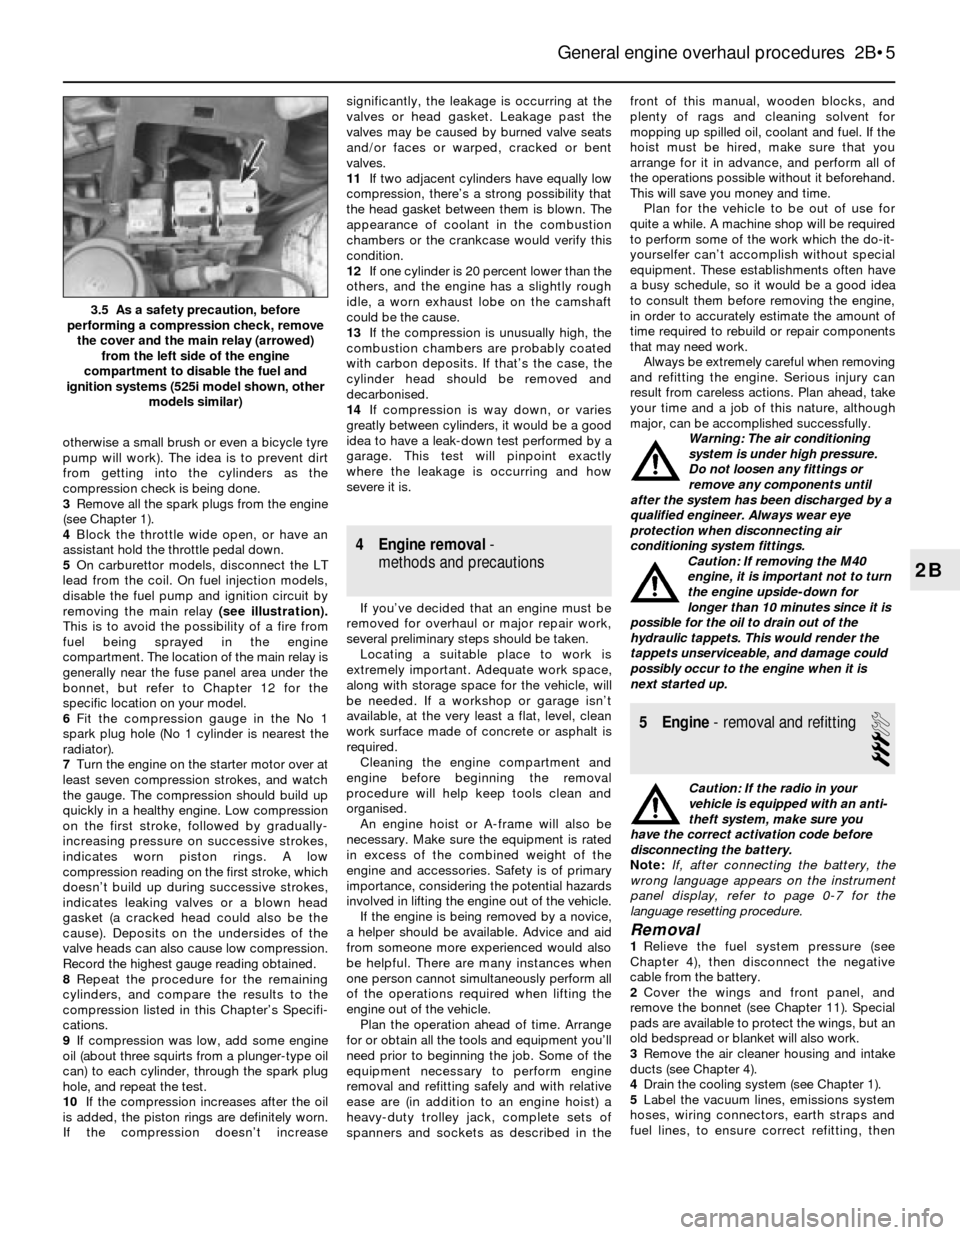
removing the main relay(see illustration).
This is to avoid the possibility of a fire from
fuel being sprayed in the engine
compartment. The location of the main relay is
generally near the fuse panel area under the
bonnet, but refer to Chapter 12 for the
specific location on your model.
6Fit the compression gauge in the No 1
spark plug hole (No 1 cylinder is nearest the
radiator).
7Turn the engine on the starter motor over at
least seven compression strokes, and watch
the gauge. The compression should build up
quickly in a healthy engine. Low compression
on the first stroke, followed by gradually-
increasing pressure on successive strokes,
indicates worn piston rings. A low
compression reading on the first stroke, which
doesn’t build up during successive strokes,
indicates leaking valves or a blown head
gasket (a cracked head could also be the
cause). Deposits on the undersides of the
valve heads can also cause low compression.
Record the highest gauge reading obtained.
8Repeat the procedure for the remaining
cylinders, and compare the results to the
compression listed in this Chapter’s Specifi-
cations.
9If compression was low, add some engine
oil (about three squirts from a plunger-type oil
can) to each cylinder, through the spark plug
hole, and repeat the test.
10If the compression increases after the oil
is added, the piston rings are definitely worn.
If the compression doesn’t increasesignificantly, the leakage is occurring at the
valves or head gasket. Leakage past the
valves may be caused by burned valve seats
and/or faces or warped, cracked or bent
valves.
11If two adjacent cylinders have equally low
compression, there’s a strong possibility that
the head gasket between them is blown. The
appearance of coolant in the combustion
chambers or the crankcase would verify this
condition.
12If one cylinder is 20 percent lower than the
others, and the engine has a slightly rough
idle, a worn exhaust lobe on the camshaft
could be the cause.
13If the compression is unusually high, the
combustion chambers are probably coated
with carbon deposits. If that’s the case, the
cylinder head should be removed and
decarbonised.
14If compression is way down, or varies
greatly between cylinders, it would be a good
idea to have a leak-down test performed by a
garage. This test will pinpoint exactly
where the leakage is occurring and how
severe it is.
4 Engine removal-
methods and precautions
If you’ve decided that an engine must be
removed for overhaul or major repair work,
several preliminary steps should be taken.
Locating a suitable place to work is
extremely important. Adequate work space,
along with storage space for the vehicle, will
be needed. If a workshop or garage isn’t
available, at the very least a flat, level, clean
work surface made of concrete or asphalt is
required.
Cleaning the engine compartment and
engine before beginning the removal
procedure will help keep tools clean and
organised.
An engine hoist or A-frame will also be
necessary. Make sure the equipment is rated
in excess of the combined weight of the
engine and accessories. Safety is of primary
importance, considering the potential hazards
involved in lifting the engine out of the vehicle.
If the engine is being removed by a novice,
a helper should be available. Advice and aid
from someone more experienced would also
be helpful. There are many instances when
one person cannot simultaneously perform all
of the operations required when lifting the
engine out of the vehicle.
Plan the operation ahead of time. Arrange
for or obtain all the tools and equipment you’ll
need prior to beginning the job. Some of the
equipment necessary to perform engine
removal and refitting safely and with relative
ease are (in addition to an engine hoist) a
heavy-duty trolley jack, complete sets of
spanners and sockets as described in thefront of this manual, wooden blocks, and
plenty of rags and cleaning solvent for
mopping up spilled oil, coolant and fuel. If the
hoist must be hired, make sure that you
arrange for it in advance, and perform all of
the operations possible without it beforehand.
This will save you money and time.
Plan for the vehicle to be out of use for
quite a while. A machine shop will be required
to perform some of the work which the do-it-
yourselfer can’t accomplish without special
equipment. These establishments often have
a busy schedule, so it would be a good idea
to consult them before removing the engine,
in order to accurately estimate the amount of
time required to rebuild or repair components
that may need work.
Always be extremely careful when removing
and refitting the engine. Serious injury can
result from careless actions. Plan ahead, take
your time and a job of this nature, although
major, can be accomplished successfully.
Warning: The air conditioning
system is under high pressure.
Do not loosen any fittings or
remove any components until
after the system has been discharged by a
qualified engineer. Always wear eye
protection when disconnecting air
conditioning system fittings.
Caution: If removing the M40
engine, it is important not to turn
the engine upside-down for
longer than 10 minutes since it is
possible for the oil to drain out of the
hydraulic tappets. This would render the
tappets unserviceable, and damage could
possibly occur to the engine when it is
next started up.
5 Engine- removal and refitting
3
Caution: If the radio in your
vehicle is equipped with an anti-
theft system, make sure you
have the correct activation code before
disconnecting the battery.
Note: If, after connecting the battery, the
wrong language appears on the instrument
panel display, refer to page 0-7 for the
language resetting procedure.
Removal1Relieve the fuel system pressure (see
Chapter 4), then disconnect the negative
cable from the battery.
2Cover the wings and front panel, and
remove the bonnet (see Chapter 11). Special
pads are available to protect the wings, but an
old bedspread or blanket will also work.
3Remove the air cleaner housing and intake
ducts (see Chapter 4).
4Drain the cooling system (see Chapter 1).
5Label the vacuum lines, emissions system
hoses, wiring connectors, earth straps and
fuel lines, to ensure correct refitting, then
General engine overhaul procedures 2B•5
3.5 As a safety precaution, before
performing a compression check, remove
the cover and the main relay (arrowed)
from the left side of the engine
compartment to disable the fuel and
ignition systems (525i model shown, other
models similar)
2B