gearbox BMW 3 SERIES 1987 E30 Workshop Manual
[x] Cancel search | Manufacturer: BMW, Model Year: 1987, Model line: 3 SERIES, Model: BMW 3 SERIES 1987 E30Pages: 228, PDF Size: 7.04 MB
Page 10 of 228

0•10Roadside Repairs
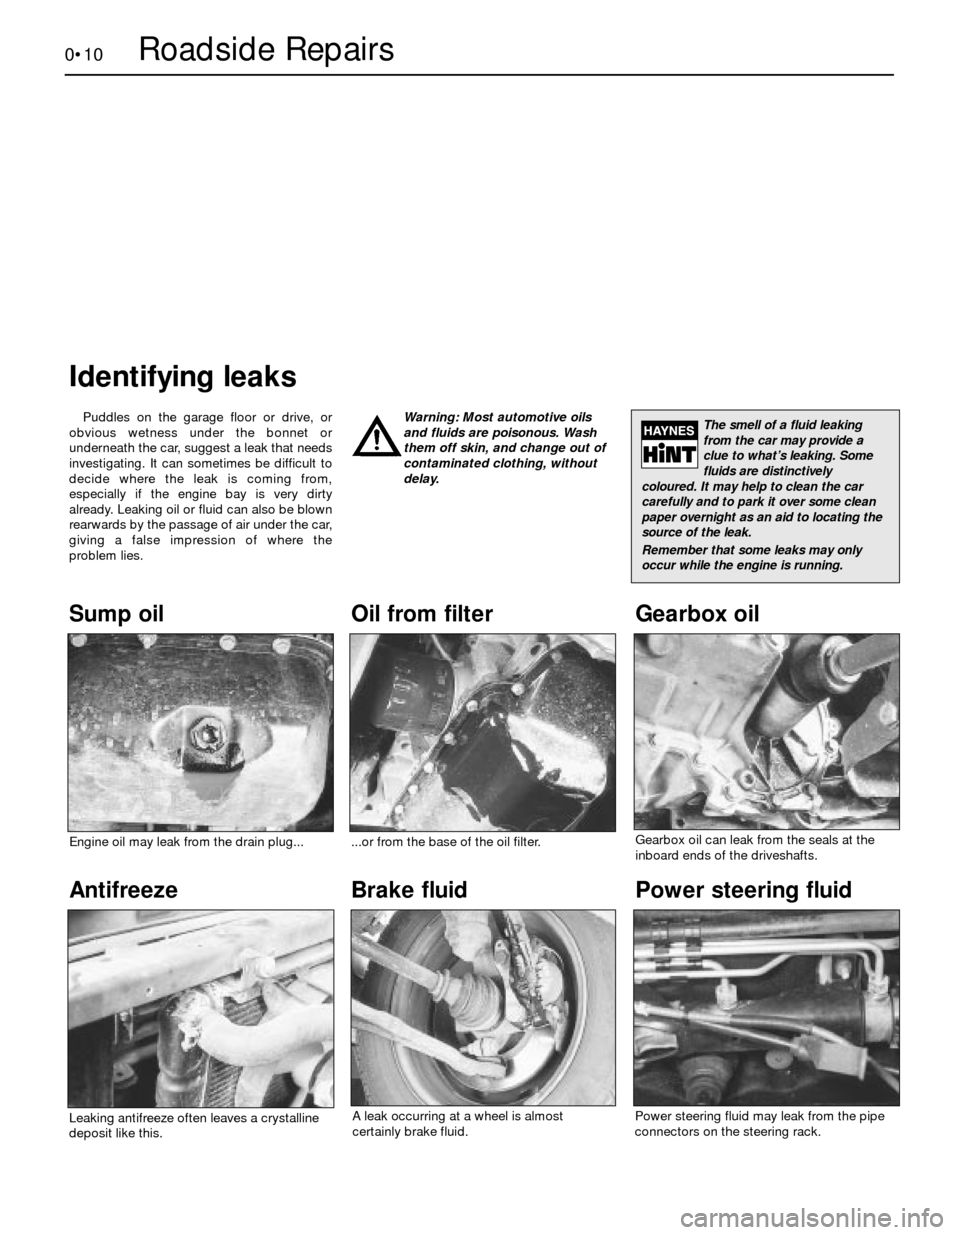
Puddles on the garage floor or drive, or
obvious wetness under the bonnet or
underneath the car, suggest a leak that needs
investigating. It can sometimes be difficult to
decide where the leak is coming from,
especially if the engine bay is very dirty
already. Leaking oil or fluid can also be blown
rearwards by the passage of air under the car,
giving a false impression of where the
problem lies.Warning: Most automotive oils
and fluids are poisonous. Wash
them off skin, and change out of
contaminated clothing, without
delay.
Identifying leaks
The smell of a fluid leaking
from the car may provide a
clue to what’s leaking. Some
fluids are distinctively
coloured. It may help to clean the car
carefully and to park it over some clean
paper overnight as an aid to locating the
source of the leak.
Remember that some leaks may only
occur while the engine is running.
Sump oil Gearbox oil
Brake fluid Power steering fluidOil from filter
Antifreeze
Engine oil may leak from the drain plug......or from the base of the oil filter.
Leaking antifreeze often leaves a crystalline
deposit like this.Gearbox oil can leak from the seals at the
inboard ends of the driveshafts.
A leak occurring at a wheel is almost
certainly brake fluid.Power steering fluid may leak from the pipe
connectors on the steering rack.
Page 46 of 228

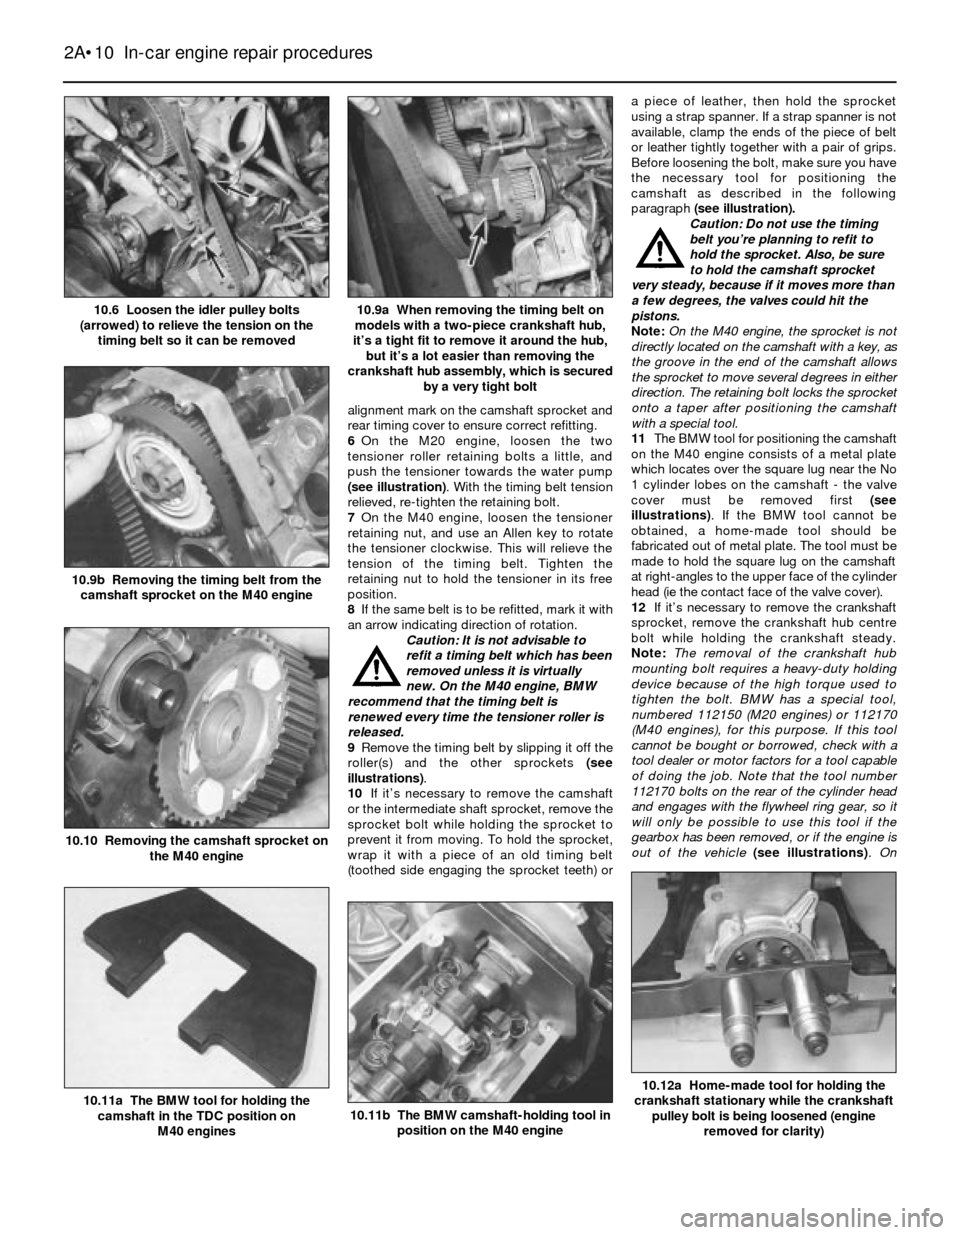
alignment mark on the camshaft sprocket and
rear timing cover to ensure correct refitting.
6On the M20 engine, loosen the two
tensioner roller retaining bolts a little, and
push the tensioner towards the water pump
(see illustration). With the timing belt tension
relieved, re-tighten the retaining bolt.
7On the M40 engine, loosen the tensioner
retaining nut, and use an Allen key to rotate
the tensioner clockwise. This will relieve the
tension of the timing belt. Tighten the
retaining nut to hold the tensioner in its free
position.
8If the same belt is to be refitted, mark it with
an arrow indicating direction of rotation.
Caution: It is not advisable to
refit a timing belt which has been
removed unless it is virtually
new. On the M40 engine, BMW
recommend that the timing belt is
renewed every time the tensioner roller is
released.
9Remove the timing belt by slipping it off the
roller(s) and the other sprockets (see
illustrations).
10If it’s necessary to remove the camshaft
or the intermediate shaft sprocket, remove the
sprocket bolt while holding the sprocket to
prevent it from moving. To hold the sprocket,
wrap it with a piece of an old timing belt
(toothed side engaging the sprocket teeth) ora piece of leather, then hold the sprocket
using a strap spanner. If a strap spanner is not
available, clamp the ends of the piece of belt
or leather tightly together with a pair of grips.
Before loosening the bolt, make sure you have
the necessary tool for positioning the
camshaft as described in the following
paragraph (see illustration).
Caution: Do not use the timing
belt you’re planning to refit to
hold the sprocket. Also, be sure
to hold the camshaft sprocket
very steady, because if it moves more than
a few degrees, the valves could hit the
pistons.
Note: On the M40 engine, the sprocket is not
directly located on the camshaft with a key, as
the groove in the end of the camshaft allows
the sprocket to move several degrees in either
direction. The retaining bolt locks the sprocket
onto a taper after positioning the camshaft
with a special tool.
11The BMW tool for positioning the camshaft
on the M40 engine consists of a metal plate
which locates over the square lug near the No
1 cylinder lobes on the camshaft - the valve
cover must be removed first (see
illustrations). If the BMW tool cannot be
obtained, a home-made tool should be
fabricated out of metal plate. The tool must be
made to hold the square lug on the camshaft
at right-angles to the upper face of the cylinder
head (ie the contact face of the valve cover).
12If it’s necessary to remove the crankshaft
sprocket, remove the crankshaft hub centre
bolt while holding the crankshaft steady.
Note:The removal of the crankshaft hub
mounting bolt requires a heavy-duty holding
device because of the high torque used to
tighten the bolt. BMW has a special tool,
numbered 112150 (M20 engines) or 112170
(M40 engines), for this purpose. If this tool
cannot be bought or borrowed, check with a
tool dealer or motor factors for a tool capable
of doing the job. Note that the tool number
112170 bolts on the rear of the cylinder head
and engages with the flywheel ring gear, so it
will only be possible to use this tool if the
gearbox has been removed, or if the engine is
out of the vehicle (see illustrations). On
2A•10 In-car engine repair procedures
10.12a Home-made tool for holding the
crankshaft stationary while the crankshaft
pulley bolt is being loosened (engine
removed for clarity)
10.11b The BMW camshaft-holding tool in
position on the M40 engine10.11a The BMW tool for holding the
camshaft in the TDC position on
M40 engines
10.10 Removing the camshaft sprocket on
the M40 engine
10.9b Removing the timing belt from the
camshaft sprocket on the M40 engine
10.9a When removing the timing belt on
models with a two-piece crankshaft hub,
it’s a tight fit to remove it around the hub,
but it’s a lot easier than removing the
crankshaft hub assembly, which is secured
by a very tight bolt10.6 Loosen the idler pulley bolts
(arrowed) to relieve the tension on the
timing belt so it can be removed
Page 226 of 228

REF•26Index
E
Earth check - 12•2
Electric fan - 3•4
Electric shock - 0•5
Electric windows - 12•9
Electrical equipment - REF•2
Electrical system fault finding - 12•1
Electronic control system - 4•3, 4•14
Electronic control unit (ECU) - 6•1
Engine fault finding - REF•10
Engine tune-up - 1•7
Engine electrical systems- 5•1et seq
Engine electrical systems fault finding -
REF•11
Engine management and emission control
systems- 6•1et seq
Engine oil - 1•3, 1•7, 1•11
Environmental considerations - REF•8
Evaporative emissions control (EVAP)
system - 1•26, 6•5
Evaporator - 3•10
Exhaust emission checks - REF•4
Exhaust manifold - 2A•6
Exhaust system - 1•21, 4•20, REF•3
F
Fan - 3•4, 3•5
Fault finding- REF•9et seq
Fault finding - automatic transmission -
7B•2, REF•13
Fault finding - braking system - REF•14
Fault finding - clutch - REF•12
Fault finding - cooling system - REF•12
Fault finding - electrical system - 12•1,
REF•11
Fault finding - engine - REF•10
Fault finding - fuel system - 4•21, REF•12
Fault finding - manual transmission -
REF•13
Fault finding - suspension and steering -
REF•15
Filling - 11•3
Final drive - 8•2, 8•10, 8•11
Final drive oil - 1•3, 1•19, 1•26
Fire - 0•5
Flexible coupling - 8•7
Fluid level checks - 1•7
Fluid seals - 7B•5
Flywheel - 2A•18
Fuel and exhaust systems- 1•20, 4•1et
seq,REF•4
Fuel system fault finding - REF•12
Fuel filter - 1•25
Fuel hoses - 1•14
Fuel injection system - 4•3, 4•14
Fuel injection system - fault finding - 4•21
Fuel injectors - 4•18
Fuel level sender unit - 4•5, 4•6
Fuel lines and fittings - 4•7
Fuel pressure - 4•3
Fuel pressure regulator - 4•16
Fuel pump - 4•3, 4•4, 4•5
Fuel tank - 4•7, 4•8
Fume or gas intoxication - 0•5
Fuses - 12•2
G
Gaiters - 1•22, 8•9, 10•13
Gashes in bodywork - 11•2
Gaskets - REF•8
Gear lever - 7A•1
Gearbox - SeeManual transmission
Gearbox oil - 1•3, 1•19, 1•25
General engine overhaul procedures-
2B•1et seq
Glass - 11•4, 11•8
Glossary of technical terms - REF•20
Grille - 11•4
H
Handbrake - 1•23, 9•2, 9•12, REF•1
Handbrake fault - REF•14
Handles - 11•8
Hazard warning flasher - 12•2
HC emissions - REF•4
Headlights - 12•3, 12•5, 12•6
Heated rear window - 12•8
Heater - 3•2, 3•7, 3•8
Hinges - 11•4
HT leads - 1•18
Hubs - 10•8, 10•11, REF•3
Hydraulic servo - 9•11
Hydraulic tappets - 2B•11
Hydrofluoric acid - 0•5
I
Idle air stabiliser valve - 4•18
Idle speed adjustment - 1•15
Ignition coil - 5•5
Ignition control unit - 5•6, 5•7
Ignition sensors - 5•8
Ignition switch - 12•3
Ignition system - 5•3
Ignition timing - 5•4
Ignition timing sensors - 6•4
Impulse generator - 5•6, 5•7
In-car engine repair procedures- 2A•1et
seq
Indicators - 12•2, 12•3
Information sensors - 6•2
Injectors - 4•18
Input shaft - 7A•2
Instrument cluster - 12•4
Instrument panel language display - 0•7
Intake manifold - 2A•4
Intermediate shaft - 2A•12, 2B•14, 2B•19
Introduction to the BMW 3- and 5-Series -
0•4
J
Jacking - 0•8
Joint mating faces - REF•8
Jump starting - 0•9
K
Kickdown cable - 7B•3
L
L-Jetronic fuel injection system - 4•14,
4•19
Language display - 0•7
Latch - 11•8
Leaks - 0•10, 7B•3, REF•12, REF•13
Locknuts, locktabs and washers - REF•8
Locks - 11•4, 11•8
Lubricants - REF•18
M
Main bearings - 2B•17, 2B•19
Manifolds - 2A•4, 2A•6
Manual transmission- 7A•1et seq
Manual transmission fault finding - REF•13
Manual transmission oil - 1•3, 1•19, 1•25
Master cylinder - 8•3, 9•9
Mechanical fan - 3•4, 3•5
Mirrors - 11•8, REF•1
Misfire - REF•11
Mixture - REF•4
MOT test checks- REF•1 et seq
Motronic engine management system -
6•1
Motronic fuel injection system - 4•14, 4•19
Mountings - 2A•19, 7A•3
O
Oil - differential - 1•19, 1•26
Oil - engine - 1•3, 1•7, 1•11
Oil - final drive - 1•3
Oil - manual transmission - 1•3, 1•19, 1•25
Oil filter - 1•11, 1•12
Oil pump - 2A•16
Oil seals - 2A•12, 2A•13, 2A•19, 2B•20,
7A•2, 7B•5, 8•10, 8•12, REF•8
Open-circuit - 12•2
Output shaft - 7A•2, 7B•5
Overcooling - REF•12
Overheating - REF•12
Oxygen sensor - 6•2
P
Pads - 9•2, 9•3
Pedals - 8•3, 9•13
Pinion oil - 8•12
Pinking - REF•11
Piston rings - 2B•18
Pistons - 2B•12, 2B•16, 2B•21
Plastic components - 11•3
Poisonous or irritant substances - 0•5
Position sensors - 5•8
Positive crankcase ventilation (PCV)
system - 6•4
Power steering - 1•14, 10•15, 10•16
Power steering fluid - 1•12
Propeller shaft - 8•2, 8•6, 8•8
Pulse sensor - 5•8
Purge valve - 6•5