Brake system BMW 3 SERIES 1988 E30 User Guide
[x] Cancel search | Manufacturer: BMW, Model Year: 1988, Model line: 3 SERIES, Model: BMW 3 SERIES 1988 E30Pages: 228, PDF Size: 7.04 MB
Page 22 of 228
Cartridge-type oil filter
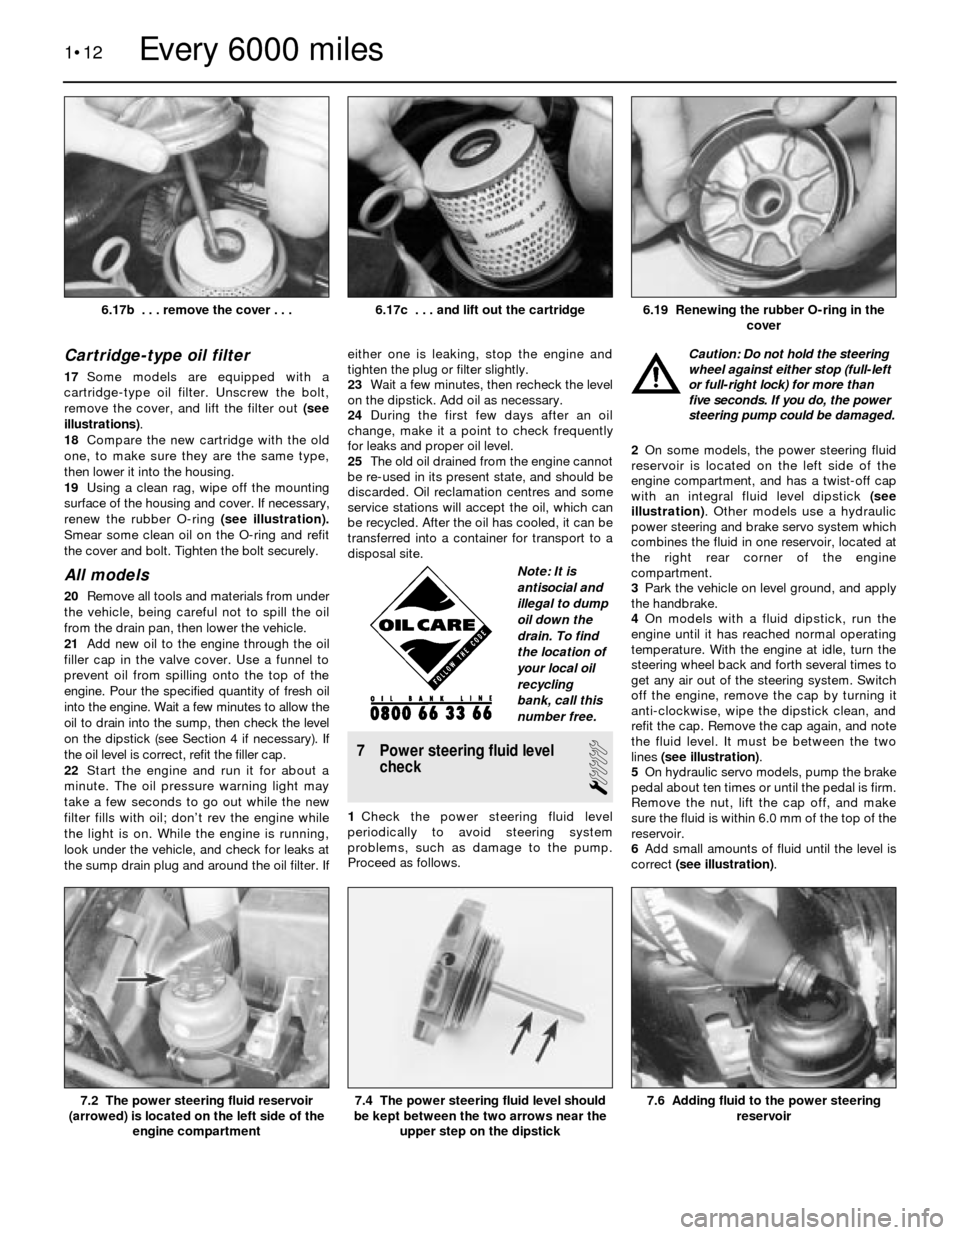
17Some models are equipped with a
cartridge-type oil filter. Unscrew the bolt,
remove the cover, and lift the filter out (see
illustrations).
18Compare the new cartridge with the old
one, to make sure they are the same type,
then lower it into the housing.
19Using a clean rag, wipe off the mounting
surface of the housing and cover. If necessary,
renew the rubber O-ring (see illustration).
Smear some clean oil on the O-ring and refit
the cover and bolt. Tighten the bolt securely.
All models
20Remove all tools and materials from under
the vehicle, being careful not to spill the oil
from the drain pan, then lower the vehicle.
21Add new oil to the engine through the oil
filler cap in the valve cover. Use a funnel to
prevent oil from spilling onto the top of the
engine. Pour the specified quantity of fresh oil
into the engine. Wait a few minutes to allow the
oil to drain into the sump, then check the level
on the dipstick (see Section 4 if necessary). If
the oil level is correct, refit the filler cap.
22Start the engine and run it for about a
minute. The oil pressure warning light may
take a few seconds to go out while the new
filter fills with oil; don’t rev the engine while
the light is on. While the engine is running,
look under the vehicle, and check for leaks at
the sump drain plug and around the oil filter. Ifeither one is leaking, stop the engine and
tighten the plug or filter slightly.
23Wait a few minutes, then recheck the level
on the dipstick. Add oil as necessary.
24During the first few days after an oil
change, make it a point to check frequently
for leaks and proper oil level.
25The old oil drained from the engine cannot
be re-used in its present state, and should be
discarded. Oil reclamation centres and some
service stations will accept the oil, which can
be recycled. After the oil has cooled, it can be
transferred into a container for transport to a
disposal site.
7 Power steering fluid level
check
1
1Check the power steering fluid level
periodically to avoid steering system
problems, such as damage to the pump.
Proceed as follows.Caution: Do not hold the steering
wheel against either stop (full-left
or full-right lock) for more than
five seconds. If you do, the power
steering pump could be damaged.
2On some models, the power steering fluid
reservoir is located on the left side of the
engine compartment, and has a twist-off cap
with an integral fluid level dipstick (see
illustration). Other models use a hydraulic
power steering and brake servo system which
combines the fluid in one reservoir, located at
the right rear corner of the engine
compartment.
3Park the vehicle on level ground, and apply
the handbrake.
4On models with a fluid dipstick, run the
engine until it has reached normal operating
temperature. With the engine at idle, turn the
steering wheel back and forth several times to
get any air out of the steering system. Switch
off the engine, remove the cap by turning it
anti-clockwise, wipe the dipstick clean, and
refit the cap. Remove the cap again, and note
the fluid level. It must be between the two
lines (see illustration).
5On hydraulic servo models, pump the brake
pedal about ten times or until the pedal is firm.
Remove the nut, lift the cap off, and make
sure the fluid is within 6.0 mm of the top of the
reservoir.
6Add small amounts of fluid until the level is
correct (see illustration).
1•12
7.6 Adding fluid to the power steering
reservoir7.4 The power steering fluid level should
be kept between the two arrows near the
upper step on the dipstick7.2 The power steering fluid reservoir
(arrowed) is located on the left side of the
engine compartment
6.19 Renewing the rubber O-ring in the
cover6.17c . . . and lift out the cartridge
Every 6000 miles
6.17b . . . remove the cover . . .
Note: It is
antisocial and
illegal to dump
oil down the
drain. To find
the location of
your local oil
recycling
bank, call this
number free.
Page 23 of 228
Caution: Do not overfill the
reservoir. If too much fluid is
added, remove the excess with a
clean syringe. Refit the cap.
7If frequent topping-up is needed, check the
power steering hoses and connections for
leaks and wear (see Section 10).
8Check the condition and tension of the
drivebelt (see Section 11).
8 Automatic transmission fluid
level check
1
Caution: The use of transmission
fluid other than the type listed in
this Chapter’s Specifications
could result in transmission
malfunctions or failure.
1The automatic transmission fluid should be
carefully maintained. Low fluid level can lead
to slipping or loss of drive, while overfilling
can cause foaming and loss of fluid. Either
condition can cause transmission damage.
2Since transmission fluid expands as it heats
up, the fluid level should only be checked
when the transmission is warm (at normal
operating temperature). If the vehicle has just
been driven over 20 miles (32 km), the
transmission can be considered warm. You
can also check the fluid level when the
transmission is cold. If the vehicle has not
been driven for over five hours and the fluid is
about room temperature (20°C), the
transmission is cold. However, the fluid level
is normally checked with the transmission
warm, to ensure accurate results.
Caution: If the vehicle has just
been driven for a long time at
high speed or in city traffic, in hot
weather, or if it has been pulling
a trailer, an accurate fluid level reading
cannot be obtained. Allow the trans-
mission to cool down for about 30 minutes.
3Immediately after driving the vehicle, park it
on a level surface, apply the handbrake and
start the engine. While the engine is idling,
depress the brake pedal and move theselector lever through all the gear ranges,
beginning and ending in Park.
4The automatic transmission dipstick tube is
located in the left rear corner of the engine
compartment.
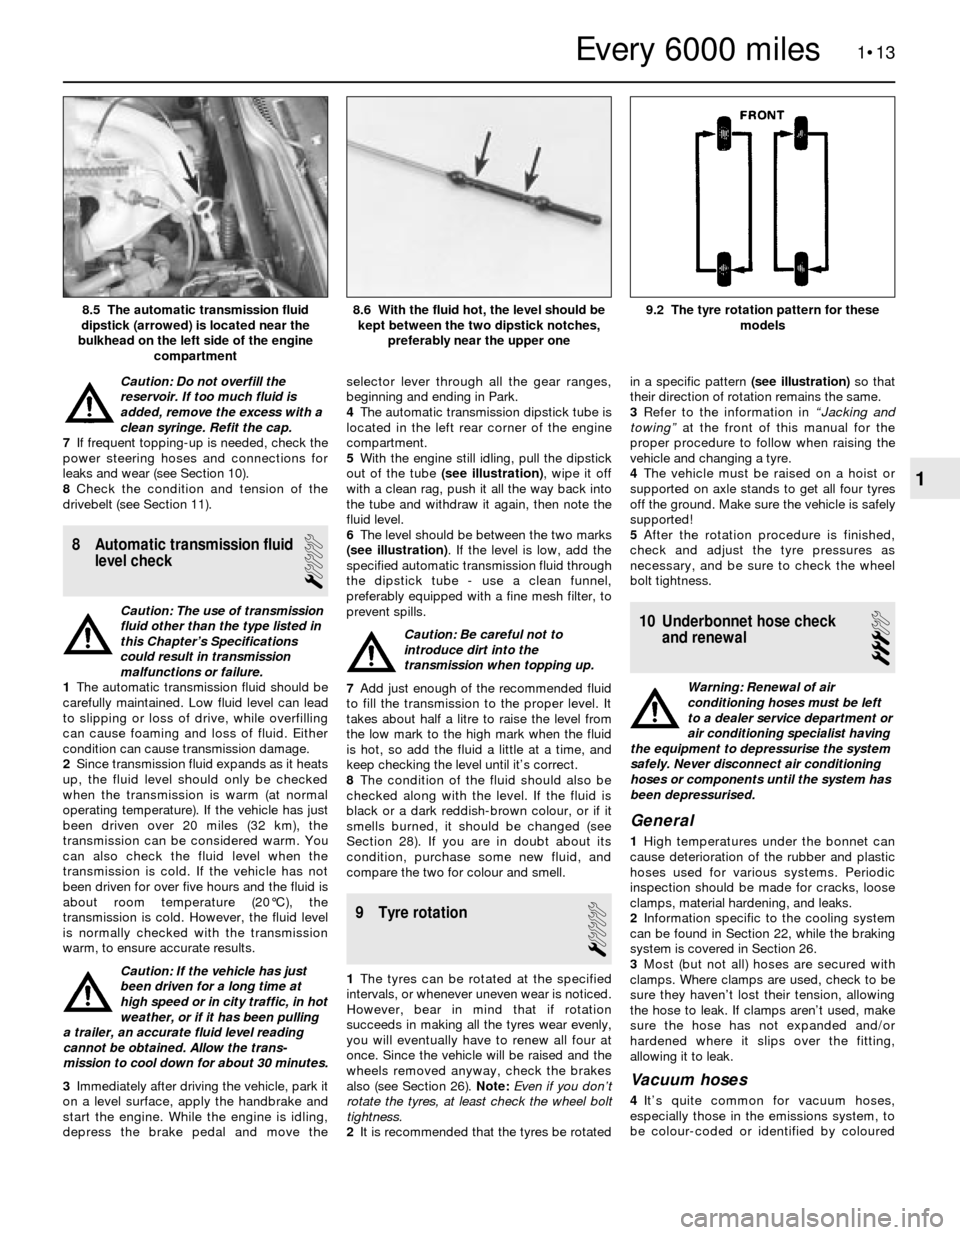
5With the engine still idling, pull the dipstick
out of the tube (see illustration), wipe it off
with a clean rag, push it all the way back into
the tube and withdraw it again, then note the
fluid level.
6The level should be between the two marks
(see illustration). If the level is low, add the
specified automatic transmission fluid through
the dipstick tube - use a clean funnel,
preferably equipped with a fine mesh filter, to
prevent spills.
Caution: Be careful not to
introduce dirt into the
transmission when topping up.
7Add just enough of the recommended fluid
to fill the transmission to the proper level. It
takes about half a litre to raise the level from
the low mark to the high mark when the fluid
is hot, so add the fluid a little at a time, and
keep checking the level until it’s correct.
8The condition of the fluid should also be
checked along with the level. If the fluid is
black or a dark reddish-brown colour, or if it
smells burned, it should be changed (see
Section 28). If you are in doubt about its
condition, purchase some new fluid, and
compare the two for colour and smell.
9 Tyre rotation
1
1The tyres can be rotated at the specified
intervals, or whenever uneven wear is noticed.
However, bear in mind that if rotation
succeeds in making all the tyres wear evenly,
you will eventually have to renew all four at
once. Since the vehicle will be raised and the
wheels removed anyway, check the brakes
also (see Section 26). Note: Even if you don’t
rotate the tyres, at least check the wheel bolt
tightness.
2It is recommended that the tyres be rotatedin a specific pattern (see illustration)so that
their direction of rotation remains the same.
3Refer to the information in “Jacking and
towing”at the front of this manual for the
proper procedure to follow when raising the
vehicle and changing a tyre.
4The vehicle must be raised on a hoist or
supported on axle stands to get all four tyres
off the ground. Make sure the vehicle is safely
supported!
5After the rotation procedure is finished,
check and adjust the tyre pressures as
necessary, and be sure to check the wheel
bolt tightness.
10 Underbonnet hose check
and renewal
3
Warning: Renewal of air
conditioning hoses must be left
to a dealer service department or
air conditioning specialist having
the equipment to depressurise the system
safely. Never disconnect air conditioning
hoses or components until the system has
been depressurised.
General
1High temperatures under the bonnet can
cause deterioration of the rubber and plastic
hoses used for various systems. Periodic
inspection should be made for cracks, loose
clamps, material hardening, and leaks.
2Information specific to the cooling system
can be found in Section 22, while the braking
system is covered in Section 26.
3Most (but not all) hoses are secured with
clamps. Where clamps are used, check to be
sure they haven’t lost their tension, allowing
the hose to leak. If clamps aren’t used, make
sure the hose has not expanded and/or
hardened where it slips over the fitting,
allowing it to leak.
Vacuum hoses
4It’s quite common for vacuum hoses,
especially those in the emissions system, to
be colour-coded or identified by coloured
1•13
9.2 The tyre rotation pattern for these
models8.6 With the fluid hot, the level should be
kept between the two dipstick notches,
preferably near the upper one8.5 The automatic transmission fluid
dipstick (arrowed) is located near the
bulkhead on the left side of the engine
compartment
1
Every 6000 miles
Page 24 of 228
stripes moulded into them. Various systems
require hoses with different wall thicknesses,
collapse resistance and temperature
resistance. When fitting new hoses, be sure
the new ones are made of the same material.
5Often the only effective way to check a
hose is to remove it completely from the
vehicle. If more than one hose is removed, be
sure to label the hoses and fittings to ensure
correct refitting.
6When checking vacuum hoses, be sure to
include any plastic T-fittings in the check.
Inspect the connections for cracks which
could cause leakage.
7A small piece of vacuum hose can be used
as a stethoscope to detect vacuum leaks.
Hold one end of the hose to your ear and
probe around vacuum hoses and fittings,
listening for the “hissing” sound characteristic
of a vacuum leak.
Warning: When probing with the
vacuum hose stethoscope, be
careful not to touch moving
engine components such as the
drivebelt, cooling fan, etc.
Fuel hoses
Warning: There are certain
precautions which must be taken
when servicing or inspecting fuel
system components. Work in a
well-ventilated area, and do not allow open
flames (cigarettes, appliance pilot lights,
etc.) or bare light bulbs near the work
area. Mop up any spills immediately, and
do not store fuel-soaked rags where they
could ignite. If you spill any fuel on your
skin, rinse it off immediately with soap and
water. When you perform any kind of work
on the fuel system, wear safety glasses,
and have a fire extinguisher on hand.
8The fuel hoses are usually under pressure,
so if any fuel hoses are to be disconnected,
be prepared to catch spilled fuel.
Warning: On vehicles equipped
with fuel injection, you must
depressurise the fuel system
before servicing the fuel hoses.
Refer to Chapter 4 for details.9Check all rubber fuel hoses for deterioration
and chafing. Check especially for cracks in
areas where the hose bends, and just before
connectors, such as where a hose attaches to
the fuel pump or fuel filter, for example.
10Only high-quality fuel hose should be
used. Never, under any circumstances, use
unreinforced vacuum hose, clear plastic
tubing or water hose for fuel hoses.
11Band-type clamps are commonly used on
fuel hoses. These clamps often lose their
tension over a period of time, and can be
“sprung” during removal. Renew all band-type
clamps with screw clamps whenever a hose is
renewed.
Metal lines
12Sections of metal line are often used
between the fuel pump and fuel injection
system. Check carefully to make sure the line
isn’t bent, crimped or cracked.
13If a section of metal line must be renewed,
use seamless steel tubing only, since copper
and aluminium tubing do not have the
strength necessary to withstand the vibration
caused by the engine.
14Check the metal brake lines where they
enter the master cylinder and brake
proportioning or ABS unit (if used) for cracks
in the lines and loose fittings. Any sign of
brake fluid leakage calls for an immediate
thorough inspection of the braking system.
Power steering hoses
15Check the power steering hoses for leaks,
loose connections and worn clamps. Tighten
loose connections. Worn clamps or leaky
hoses should be renewed.
11 Drivebelt check, adjustment
and renewal
1
Check
1The drivebelts, sometimes called V-belts or
simply “fan” belts, are located at the front of
the engine, and play an important role in the
overall operation of the vehicle and itscomponents. Due to their function and
material make-up, the belts are prone to
failure after a period of time, and should be
inspected and adjusted periodically to prevent
major engine damage.
2The number of belts used on a particular
vehicle depends on the accessories fitted.
Drivebelts are used to turn the alternator,
power steering pump, water pump, and air
conditioning compressor. Depending on the
pulley arrangement, a single belt may be used
to drive more than one of these components.
3With the engine switched off, open the
bonnet and locate the various belts at the
front of the engine. Using your fingers (and a
torch, if necessary), move along the belts,
checking for cracks and separation of the belt
plies. Also check for fraying and glazing,
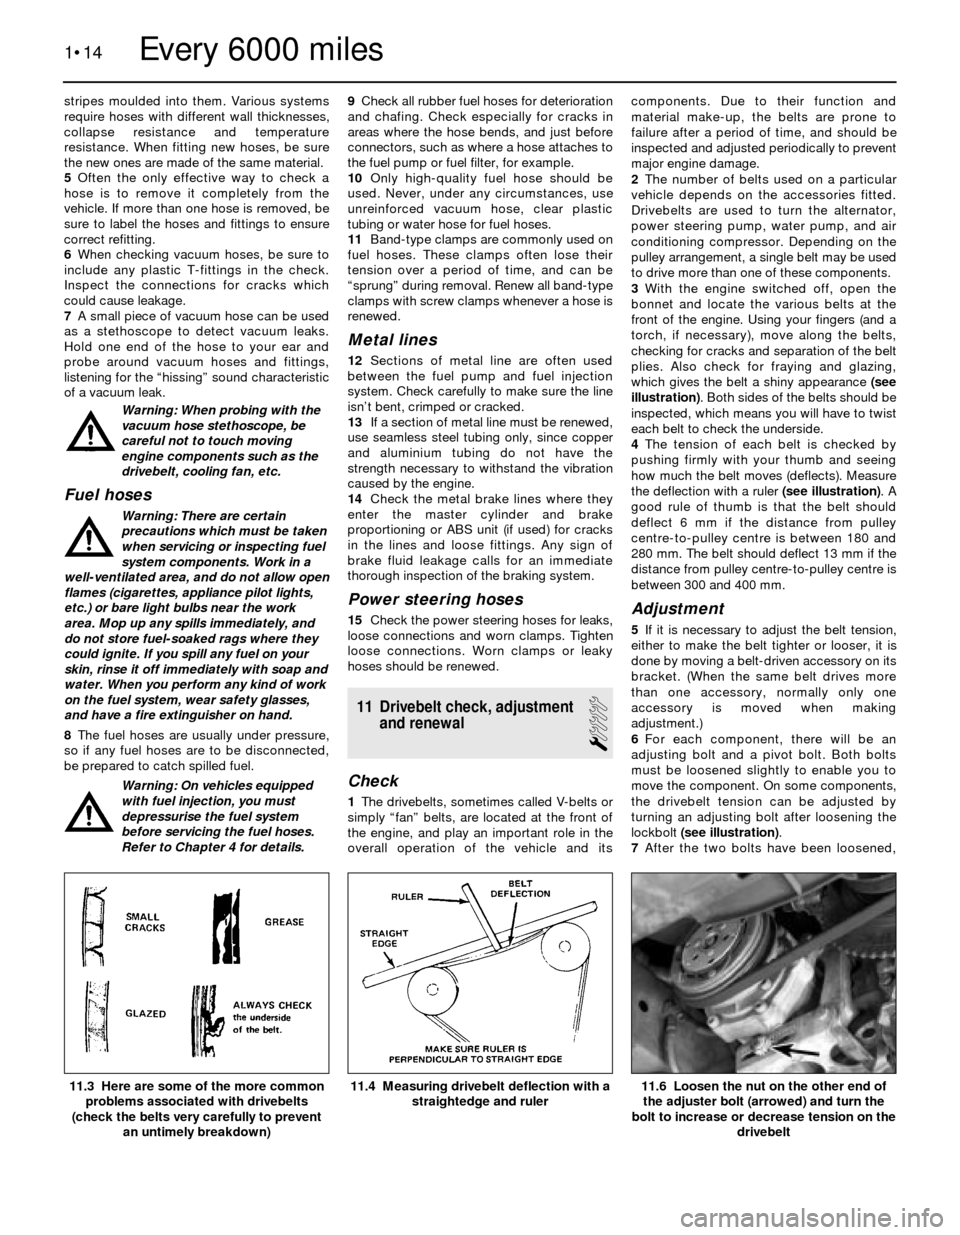
which gives the belt a shiny appearance (see
illustration). Both sides of the belts should be
inspected, which means you will have to twist
each belt to check the underside.
4The tension of each belt is checked by
pushing firmly with your thumb and seeing
how much the belt moves (deflects). Measure
the deflection with a ruler (see illustration). A
good rule of thumb is that the belt should
deflect 6 mm if the distance from pulley
centre-to-pulley centre is between 180 and
280 mm. The belt should deflect 13 mm if the
distance from pulley centre-to-pulley centre is
between 300 and 400 mm.
Adjustment
5If it is necessary to adjust the belt tension,
either to make the belt tighter or looser, it is
done by moving a belt-driven accessory on its
bracket. (When the same belt drives more
than one accessory, normally only one
accessory is moved when making
adjustment.)
6For each component, there will be an
adjusting bolt and a pivot bolt. Both bolts
must be loosened slightly to enable you to
move the component. On some components,
the drivebelt tension can be adjusted by
turning an adjusting bolt after loosening the
lockbolt (see illustration).
7After the two bolts have been loosened,
1•14
11.6 Loosen the nut on the other end of
the adjuster bolt (arrowed) and turn the
bolt to increase or decrease tension on the
drivebelt11.4 Measuring drivebelt deflection with a
straightedge and ruler11.3 Here are some of the more common
problems associated with drivebelts
(check the belts very carefully to prevent
an untimely breakdown)
Every 6000 miles
Page 31 of 228
4Since some components of the fuel system
- the fuel tank and some of the fuel feed and
return lines, for example - are underneath the
vehicle, they can be inspected more easily
with the vehicle raised on a hoist. If that’s not
possible, raise the vehicle and support it on
axle stands or ramps.
5With the vehicle raised and safely
supported, inspect the fuel tank and filler neck
for punctures, cracks or other damage. The
connection between the filler neck and the
tank is particularly critical. Sometimes a
rubber filler neck will leak because of loose
clamps or deteriorated rubber. Inspect all fuel
tank mounting brackets and straps, to be sure
the tank is securely attached to the vehicle.
Warning: Do not, under any
circumstances, try to repair a fuel
tank (except rubber
components). A welding torch or
any naked flame can easily cause fuel
vapours inside the tank to explode.
6Carefully check all flexible hoses and metal
lines leading away from the fuel tank. Check
for loose connections, deteriorated hoses,
crimped lines, and other damage. Repair or
renew damaged sections as necessary (see
Chapter 4).
22 Cooling system check
1
1Many major engine failures can be
attributed to cooling system problems. If the
vehicle has automatic transmission, the
engine cooling system also plays an importantrole in prolonging transmission life, because it
cools the transmission fluid.
2The engine should be cold for the cooling
system check, so perform the following
procedure before the vehicle is driven for the
day, or after it has been switched off for at
leastthree hours.
3Remove the radiator cap, doing so slowly
and taking adequate precautions against
scalding if the engine is at all warm. Clean the
cap thoroughly, inside and out, with clean
water. Also clean the filler neck on the
radiator. The presence of rust or corrosion in
the filler neck means the coolant should be
changed (see Section 29). The coolant inside
the radiator should be relatively clean and
clear. If it’s rust-coloured, drain the system
and refill with new coolant.
4Carefully check the radiator hoses and the
smaller-diameter heater hoses. Inspect each
coolant hose along its entire length, renewing
any hose which is cracked, swollen or
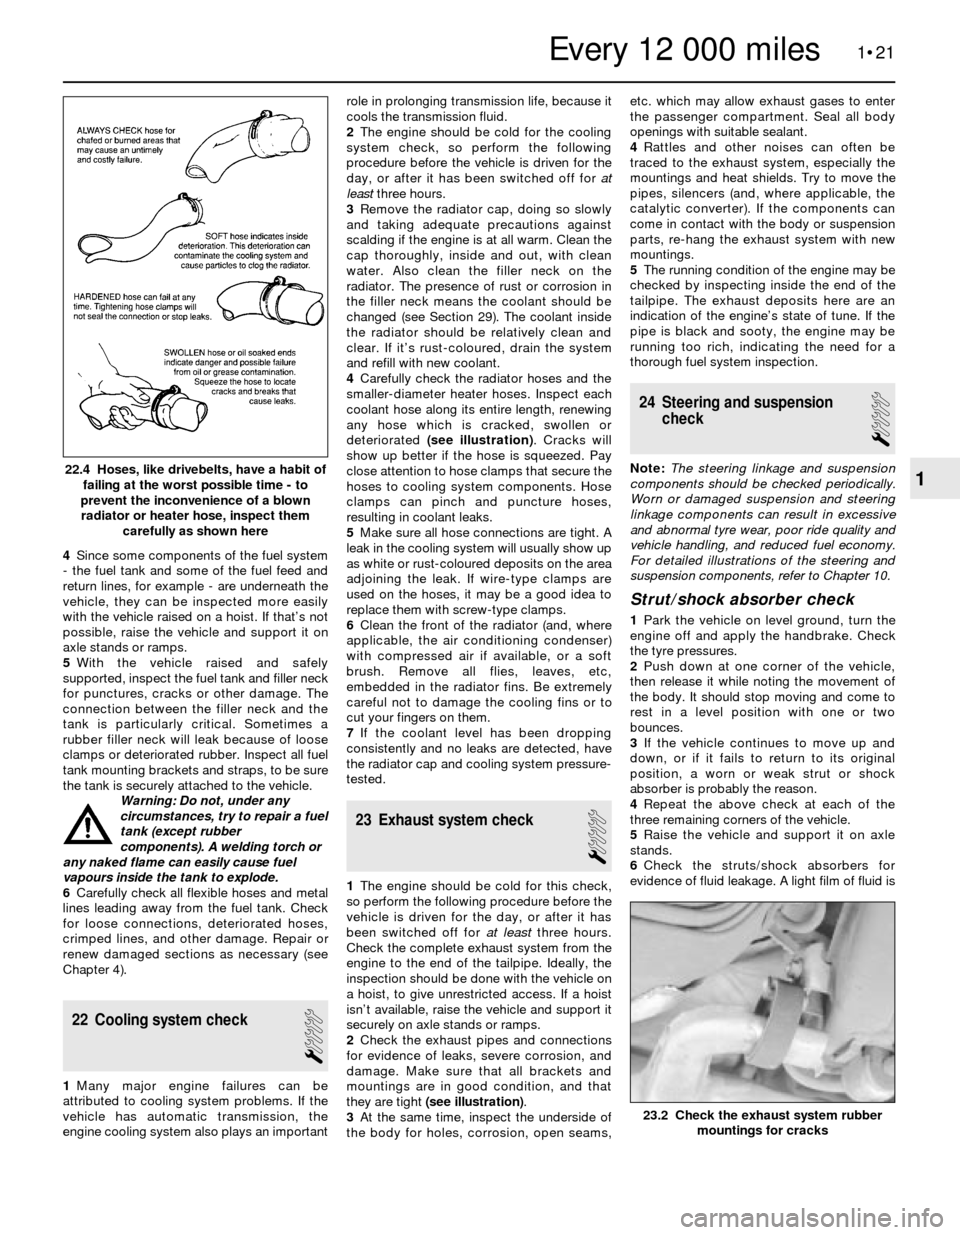
deteriorated (see illustration). Cracks will
show up better if the hose is squeezed. Pay
close attention to hose clamps that secure the
hoses to cooling system components. Hose
clamps can pinch and puncture hoses,
resulting in coolant leaks.
5Make sure all hose connections are tight. A
leak in the cooling system will usually show up
as white or rust-coloured deposits on the area
adjoining the leak. If wire-type clamps are
used on the hoses, it may be a good idea to
replace them with screw-type clamps.
6Clean the front of the radiator (and, where
applicable, the air conditioning condenser)
with compressed air if available, or a soft
brush. Remove all flies, leaves, etc,
embedded in the radiator fins. Be extremely
careful not to damage the cooling fins or to
cut your fingers on them.
7If the coolant level has been dropping
consistently and no leaks are detected, have
the radiator cap and cooling system pressure-
tested.
23 Exhaust system check
1
1The engine should be cold for this check,
so perform the following procedure before the
vehicle is driven for the day, or after it has
been switched off for at leastthree hours.
Check the complete exhaust system from the
engine to the end of the tailpipe. Ideally, the
inspection should be done with the vehicle on
a hoist, to give unrestricted access. If a hoist
isn’t available, raise the vehicle and support it
securely on axle stands or ramps.
2Check the exhaust pipes and connections
for evidence of leaks, severe corrosion, and
damage. Make sure that all brackets and
mountings are in good condition, and that
they are tight (see illustration).
3At the same time, inspect the underside of
the body for holes, corrosion, open seams,etc. which may allow exhaust gases to enter
the passenger compartment. Seal all body
openings with suitable sealant.
4Rattles and other noises can often be
traced to the exhaust system, especially the
mountings and heat shields. Try to move the
pipes, silencers (and, where applicable, the
catalytic converter). If the components can
come in contact with the body or suspension
parts, re-hang the exhaust system with new
mountings.
5The running condition of the engine may be
checked by inspecting inside the end of the
tailpipe. The exhaust deposits here are an
indication of the engine’s state of tune. If the
pipe is black and sooty, the engine may be
running too rich, indicating the need for a
thorough fuel system inspection.
24 Steering and suspension
check
1
Note: The steering linkage and suspension
components should be checked periodically.
Worn or damaged suspension and steering
linkage components can result in excessive
and abnormal tyre wear, poor ride quality and
vehicle handling, and reduced fuel economy.
For detailed illustrations of the steering and
suspension components, refer to Chapter 10.
Strut/shock absorber check
1Park the vehicle on level ground, turn the
engine off and apply the handbrake. Check
the tyre pressures.
2Push down at one corner of the vehicle,
then release it while noting the movement of
the body. It should stop moving and come to
rest in a level position with one or two
bounces.
3If the vehicle continues to move up and
down, or if it fails to return to its original
position, a worn or weak strut or shock
absorber is probably the reason.
4Repeat the above check at each of the
three remaining corners of the vehicle.
5Raise the vehicle and support it on axle
stands.
6Check the struts/shock absorbers for
evidence of fluid leakage. A light film of fluid is
1•21
22.4 Hoses, like drivebelts, have a habit of
failing at the worst possible time - to
prevent the inconvenience of a blown
radiator or heater hose, inspect them
carefully as shown here
23.2 Check the exhaust system rubber
mountings for cracks
1
Every 12 000 miles
Page 32 of 228
no cause for concern. Make sure that any fluid
noted is from the struts/shocks, and not from
any other source. If leakage is noted, renew
the struts or shock absorbers in axle pairs (or
as a full set).
7Check the struts/shock absorbers to be
sure that they are securely mounted and
undamaged. Check the upper mountings for
damage and wear. If damage or wear is
noted, renew the struts or shock absorbers.
8If the struts or shock absorbers must be
renewed, refer to Chapter 10 for the
procedure. Always renew both units on the
same axle, or the safety of the vehicle may be
compromised. If possible, renew all four as a
set.
Steering and suspension check
9Inspect the steering system components
for damage and distortion. Look for leaks and
damaged seals, boots and fittings.
10Clean the lower end of the steering
knuckle. Have an assistant grasp the lower
edge of the tyre and move the wheel in and
out, while you look for movement at the
steering knuckle-to-axle arm balljoints.
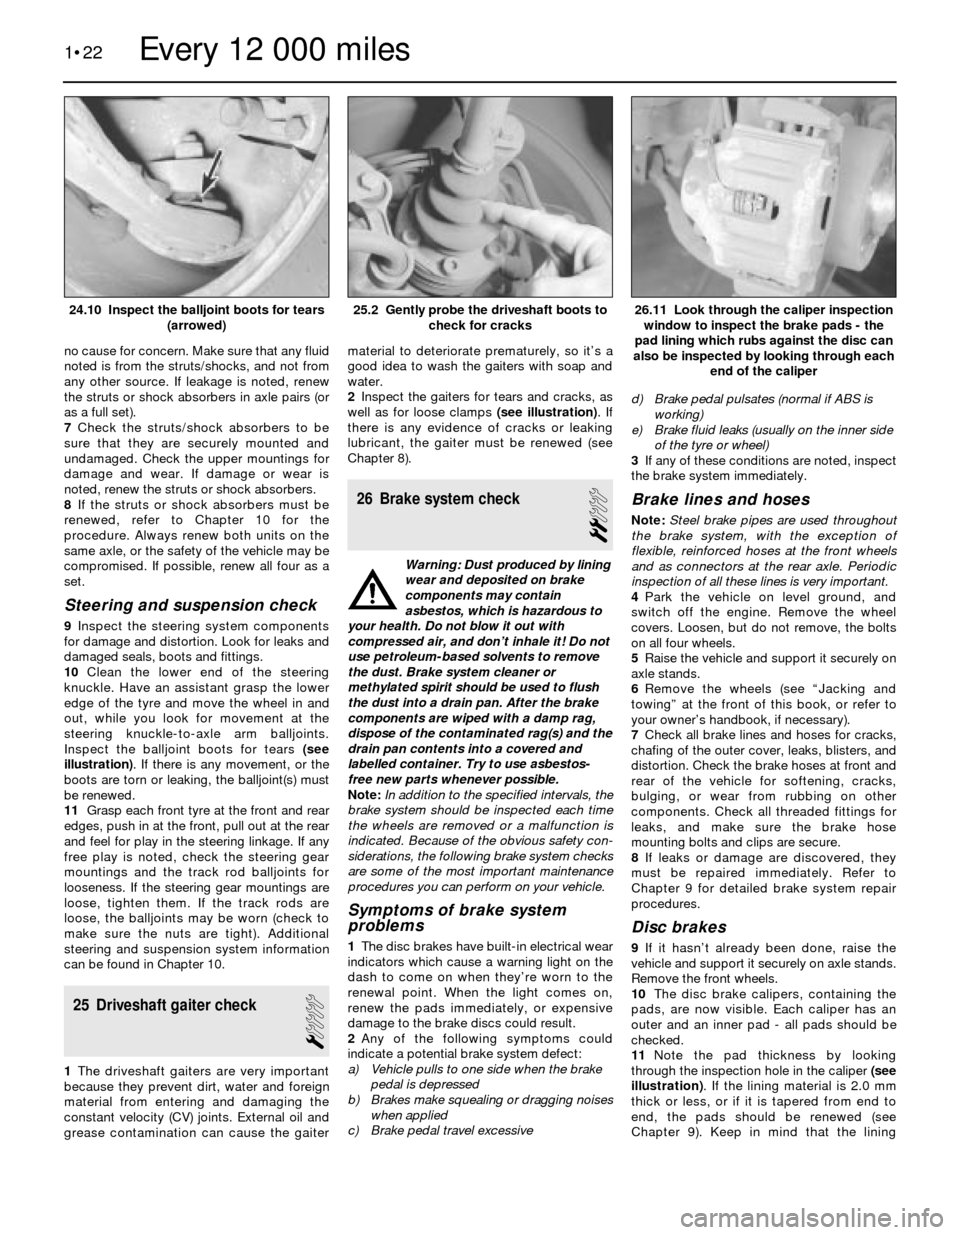
Inspect the balljoint boots for tears (see
illustration). If there is any movement, or the
boots are torn or leaking, the balljoint(s) must
be renewed.
11Grasp each front tyre at the front and rear
edges, push in at the front, pull out at the rear
and feel for play in the steering linkage. If any
free play is noted, check the steering gear
mountings and the track rod balljoints for
looseness. If the steering gear mountings are
loose, tighten them. If the track rods are
loose, the balljoints may be worn (check to
make sure the nuts are tight). Additional
steering and suspension system information
can be found in Chapter 10.
25 Driveshaft gaiter check
1
1The driveshaft gaiters are very important
because they prevent dirt, water and foreign
material from entering and damaging the
constant velocity (CV) joints. External oil and
grease contamination can cause the gaitermaterial to deteriorate prematurely, so it’s a
good idea to wash the gaiters with soap and
water.
2Inspect the gaiters for tears and cracks, as
well as for loose clamps (see illustration). If
there is any evidence of cracks or leaking
lubricant, the gaiter must be renewed (see
Chapter 8).
26 Brake system check
2
Warning: Dust produced by lining
wear and deposited on brake
components may contain
asbestos, which is hazardous to
your health. Do not blow it out with
compressed air, and don’t inhale it! Do not
use petroleum-based solvents to remove
the dust. Brake system cleaner or
methylated spirit should be used to flush
the dust into a drain pan. After the brake
components are wiped with a damp rag,
dispose of the contaminated rag(s) and the
drain pan contents into a covered and
labelled container. Try to use asbestos-
free new parts whenever possible.
Note:In addition to the specified intervals, the
brake system should be inspected each time
the wheels are removed or a malfunction is
indicated. Because of the obvious safety con-
siderations, the following brake system checks
are some of the most important maintenance
procedures you can perform on your vehicle.
Symptoms of brake system
problems
1The disc brakes have built-in electrical wear
indicators which cause a warning light on the
dash to come on when they’re worn to the
renewal point. When the light comes on,
renew the pads immediately, or expensive
damage to the brake discs could result.
2Any of the following symptoms could
indicate a potential brake system defect:
a) Vehicle pulls to one side when the brake
pedal is depressed
b) Brakes make squealing or dragging noises
when applied
c) Brake pedal travel excessived) Brake pedal pulsates (normal if ABS is
working)
e) Brake fluid leaks (usually on the inner side
of the tyre or wheel)
3If any of these conditions are noted, inspect
the brake system immediately.
Brake lines and hoses
Note: Steel brake pipes are used throughout
the brake system, with the exception of
flexible, reinforced hoses at the front wheels
and as connectors at the rear axle. Periodic
inspection of all these lines is very important.
4Park the vehicle on level ground, and
switch off the engine. Remove the wheel
covers. Loosen, but do not remove, the bolts
on all four wheels.
5Raise the vehicle and support it securely on
axle stands.
6Remove the wheels (see “Jacking and
towing” at the front of this book, or refer to
your owner’s handbook, if necessary).
7Check all brake lines and hoses for cracks,
chafing of the outer cover, leaks, blisters, and
distortion. Check the brake hoses at front and
rear of the vehicle for softening, cracks,
bulging, or wear from rubbing on other
components. Check all threaded fittings for
leaks, and make sure the brake hose
mounting bolts and clips are secure.
8If leaks or damage are discovered, they
must be repaired immediately. Refer to
Chapter 9 for detailed brake system repair
procedures.
Disc brakes
9If it hasn’t already been done, raise the
vehicle and support it securely on axle stands.
Remove the front wheels.
10The disc brake calipers, containing the
pads, are now visible. Each caliper has an
outer and an inner pad - all pads should be
checked.
11Note the pad thickness by looking
through the inspection hole in the caliper (see
illustration). If the lining material is 2.0 mm
thick or less, or if it is tapered from end to
end, the pads should be renewed (see
Chapter 9). Keep in mind that the lining
1•22
26.11 Look through the caliper inspection
window to inspect the brake pads - the
pad lining which rubs against the disc can
also be inspected by looking through each
end of the caliper25.2 Gently probe the driveshaft boots to
check for cracks24.10 Inspect the balljoint boots for tears
(arrowed)
Every 12 000 miles
Page 34 of 228
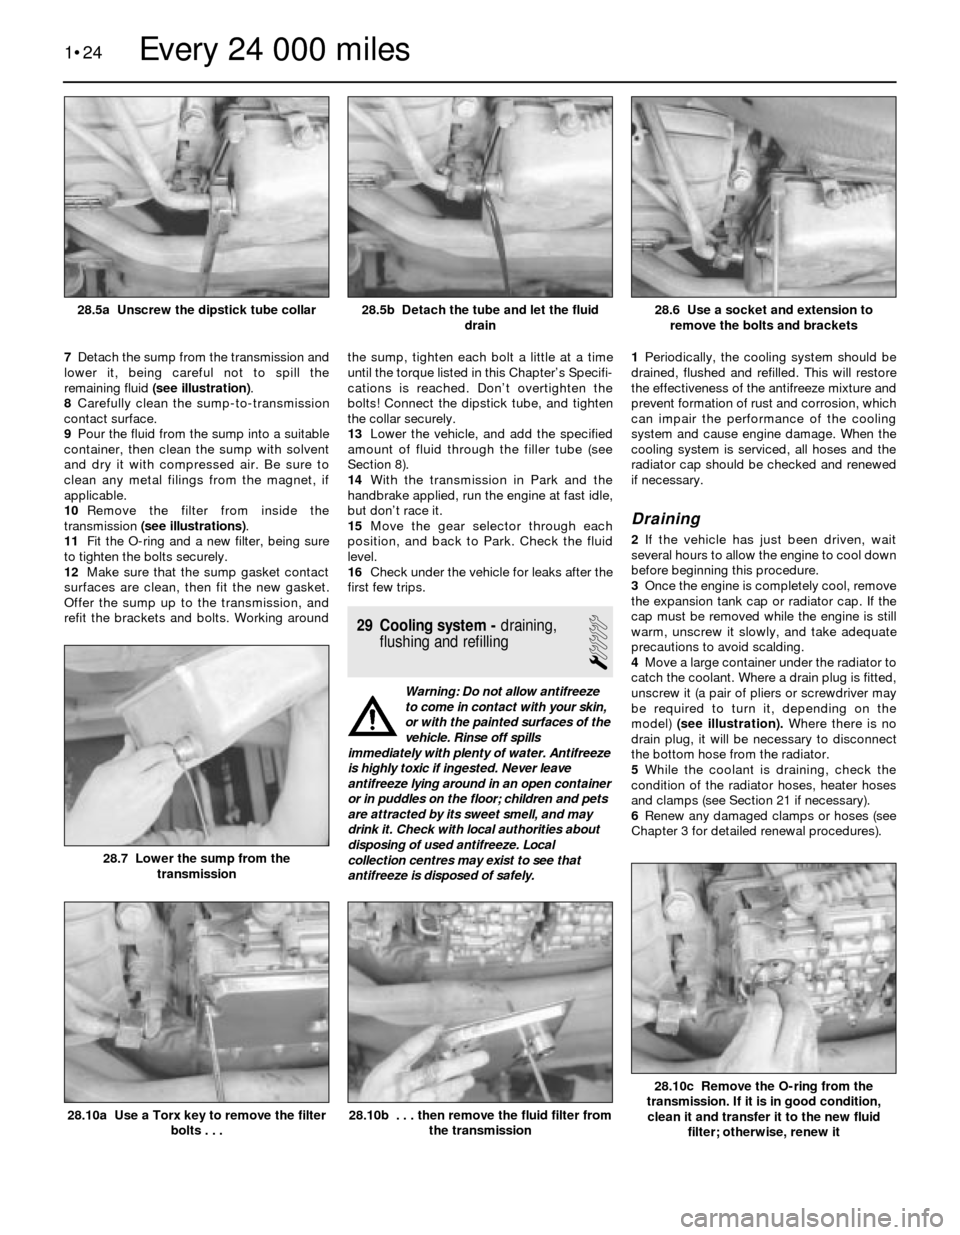
7Detach the sump from the transmission and
lower it, being careful not to spill the
remaining fluid (see illustration).
8Carefully clean the sump-to-transmission
contact surface.
9Pour the fluid from the sump into a suitable
container, then clean the sump with solvent
and dry it with compressed air. Be sure to
clean any metal filings from the magnet, if
applicable.
10Remove the filter from inside the
transmission (see illustrations).
11Fit the O-ring and a new filter, being sure
to tighten the bolts securely.
12Make sure that the sump gasket contact
surfaces are clean, then fit the new gasket.
Offer the sump up to the transmission, and
refit the brackets and bolts. Working aroundthe sump, tighten each bolt a little at a time
until the torque listed in this Chapter’s Specifi-
cations is reached. Don’t overtighten the
bolts! Connect the dipstick tube, and tighten
the collar securely.
13Lower the vehicle, and add the specified
amount of fluid through the filler tube (see
Section 8).
14With the transmission in Park and the
handbrake applied, run the engine at fast idle,
but don’t race it.
15Move the gear selector through each
position, and back to Park. Check the fluid
level.
16Check under the vehicle for leaks after the
first few trips.
29 Cooling system -draining,
flushing and refilling
1
Warning: Do not allow antifreeze
to come in contact with your skin,
or with the painted surfaces of the
vehicle. Rinse off spills
immediately with plenty of water. Antifreeze
is highly toxic if ingested. Never leave
antifreeze lying around in an open container
or in puddles on the floor; children and pets
are attracted by its sweet smell, and may
drink it. Check with local authorities about
disposing of used antifreeze. Local
collection centres may exist to see that
antifreeze is disposed of safely.1Periodically, the cooling system should be
drained, flushed and refilled. This will restore
the effectiveness of the antifreeze mixture and
prevent formation of rust and corrosion, which
can impair the performance of the cooling
system and cause engine damage. When the
cooling system is serviced, all hoses and the
radiator cap should be checked and renewed
if necessary.
Draining
2If the vehicle has just been driven, wait
several hours to allow the engine to cool down
before beginning this procedure.
3Once the engine is completely cool, remove
the expansion tank cap or radiator cap. If the
cap must be removed while the engine is still
warm, unscrew it slowly, and take adequate
precautions to avoid scalding.
4Move a large container under the radiator to
catch the coolant. Where a drain plug is fitted,
unscrew it (a pair of pliers or screwdriver may
be required to turn it, depending on the
model) (see illustration). Where there is no
drain plug, it will be necessary to disconnect
the bottom hose from the radiator.
5While the coolant is draining, check the
condition of the radiator hoses, heater hoses
and clamps (see Section 21 if necessary).
6Renew any damaged clamps or hoses (see
Chapter 3 for detailed renewal procedures).
1•24
28.10c Remove the O-ring from the
transmission. If it is in good condition,
clean it and transfer it to the new fluid
filter; otherwise, renew it
28.10b . . . then remove the fluid filter from
the transmission28.10a Use a Torx key to remove the filter
bolts . . .
28.7 Lower the sump from the
transmission
28.6 Use a socket and extension to
remove the bolts and brackets28.5b Detach the tube and let the fluid
drain28.5a Unscrew the dipstick tube collar
Every 24 000 miles
Page 36 of 228
the lubricant will be hot, it would be wise to
wear rubber gloves.
3Raise the vehicle and place it on axle
stands. Make sure it is safely supported, and
as level as possible.
4Move the necessary equipment under the
vehicle, being careful not to touch any of the
hot exhaust components.
5Place the drain pan under the transmission,
and remove the filler/level plug from the side
of the transmission. Loosen the drain plug
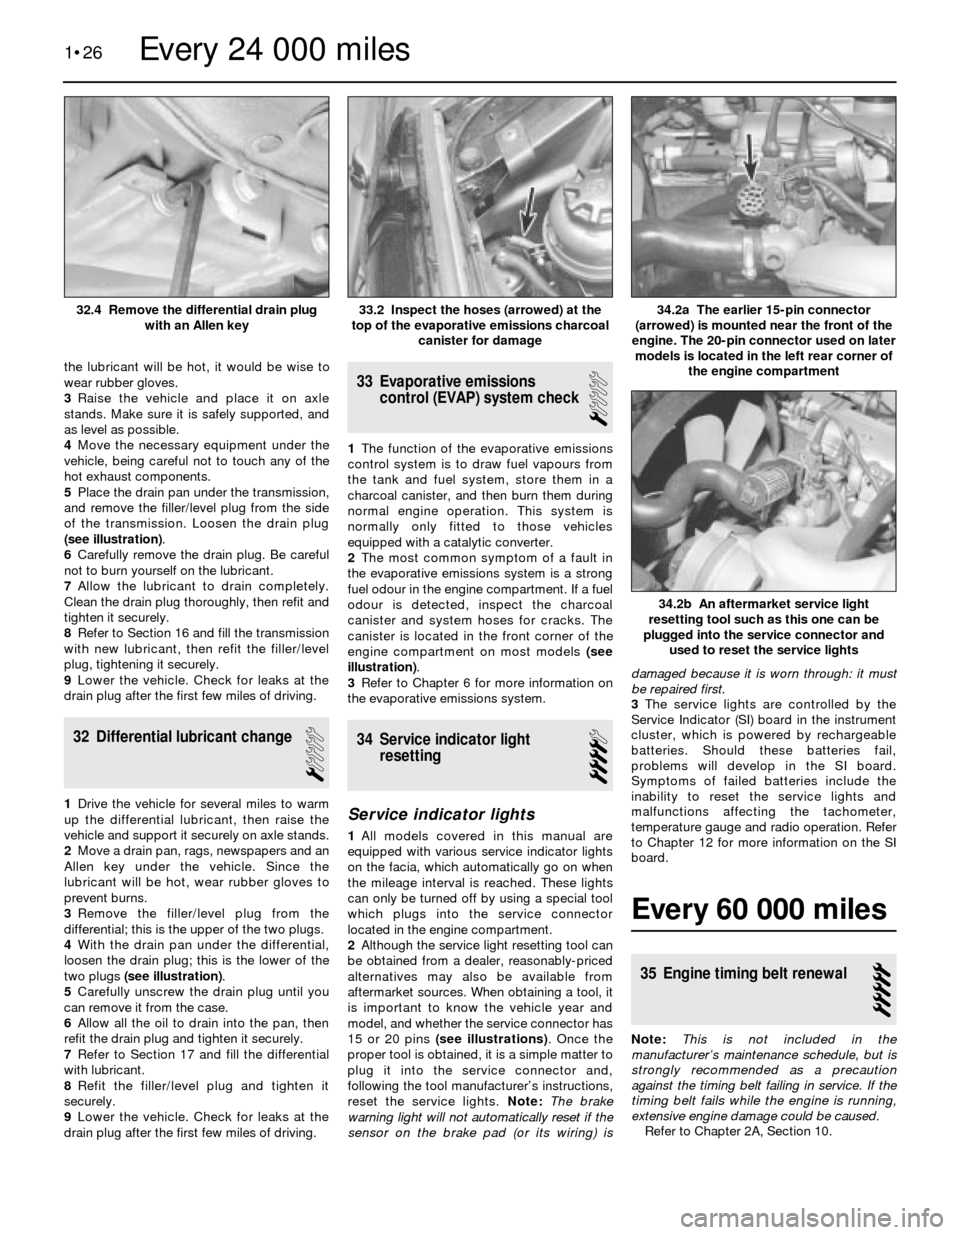
(see illustration).
6Carefully remove the drain plug. Be careful
not to burn yourself on the lubricant.
7Allow the lubricant to drain completely.
Clean the drain plug thoroughly, then refit and
tighten it securely.
8Refer to Section 16 and fill the transmission
with new lubricant, then refit the filler/level
plug, tightening it securely.
9Lower the vehicle. Check for leaks at the
drain plug after the first few miles of driving.
32 Differential lubricant change
1
1Drive the vehicle for several miles to warm
up the differential lubricant, then raise the
vehicle and support it securely on axle stands.
2Move a drain pan, rags, newspapers and an
Allen key under the vehicle. Since the
lubricant will be hot, wear rubber gloves to
prevent burns.
3Remove the filler/level plug from the
differential; this is the upper of the two plugs.
4With the drain pan under the differential,
loosen the drain plug; this is the lower of the
two plugs (see illustration).
5Carefully unscrew the drain plug until you
can remove it from the case.
6Allow all the oil to drain into the pan, then
refit the drain plug and tighten it securely.
7Refer to Section 17 and fill the differential
with lubricant.
8Refit the filler/level plug and tighten it
securely.
9Lower the vehicle. Check for leaks at the
drain plug after the first few miles of driving.
33 Evaporative emissions
control (EVAP) system check
1
1The function of the evaporative emissions
control system is to draw fuel vapours from
the tank and fuel system, store them in a
charcoal canister, and then burn them during
normal engine operation. This system is
normally only fitted to those vehicles
equipped with a catalytic converter.
2The most common symptom of a fault in
the evaporative emissions system is a strong
fuel odour in the engine compartment. If a fuel
odour is detected, inspect the charcoal
canister and system hoses for cracks. The
canister is located in the front corner of the
engine compartment on most models (see
illustration).
3Refer to Chapter 6 for more information on
the evaporative emissions system.
34 Service indicator light
resetting
4
Service indicator lights
1All models covered in this manual are
equipped with various service indicator lights
on the facia, which automatically go on when
the mileage interval is reached. These lights
can only be turned off by using a special tool
which plugs into the service connector
located in the engine compartment.
2Although the service light resetting tool can
be obtained from a dealer, reasonably-priced
alternatives may also be available from
aftermarket sources. When obtaining a tool, it
is important to know the vehicle year and
model, and whether the service connector has
15 or 20 pins (see illustrations). Once the
proper tool is obtained, it is a simple matter to
plug it into the service connector and,
following the tool manufacturer’s instructions,
reset the service lights. Note: The brake
warning light will not automatically reset if the
sensor on the brake pad (or its wiring) isdamaged because it is worn through: it must
be repaired first.
3The service lights are controlled by the
Service Indicator (SI) board in the instrument
cluster, which is powered by rechargeable
batteries. Should these batteries fail,
problems will develop in the SI board.
Symptoms of failed batteries include the
inability to reset the service lights and
malfunctions affecting the tachometer,
temperature gauge and radio operation. Refer
to Chapter 12 for more information on the SI
board.
Every 60 000 miles
35 Engine timing belt renewal
5
Note:This is not included in the
manufacturer’s maintenance schedule, but is
strongly recommended as a precaution
against the timing belt failing in service. If the
timing belt fails while the engine is running,
extensive engine damage could be caused.
Refer to Chapter 2A, Section 10.
1•26
34.2b An aftermarket service light
resetting tool such as this one can be
plugged into the service connector and
used to reset the service lights
34.2a The earlier 15-pin connector
(arrowed) is mounted near the front of the
engine. The 20-pin connector used on later
models is located in the left rear corner of
the engine compartment33.2 Inspect the hoses (arrowed) at the
top of the evaporative emissions charcoal
canister for damage32.4 Remove the differential drain plug
with an Allen key
Every 24 000 miles
Page 39 of 228
1 General information
This Part of Chapter 2 is devoted to in-
vehicle engine repair procedures. All
information concerning engine removal and
refitting and engine block and cylinder head
overhaul can be found in Chapter 2B.
The following repair procedures are based
on the assumption that the engine is still fitted
in the vehicle. If the engine has been removed
from the vehicle and mounted on a stand,
many of the steps outlined in this Part of
Chapter 2 will not apply.
The Specifications included in this Part of
Chapter 2 apply only to the procedures
contained in this Part. Chapter 2B contains
the Specifications necessary for cylinder head
and engine block rebuilding.
The single overhead camshaft four- and
six-cylinder engines covered in this manual
are very similar in design. Where there are
differences, they will be pointed out.
The means by which the overhead
camshaft is driven varies according to engine
type; M10 and M30 engines use a timing
chain, while M20 and M40 engines have a
timing belt.
2 Repair operations possible
with the engine in the vehicle
Many major repair operations can be
accomplished without removing the engine
from the vehicle.
Clean the engine compartment and the
exterior of the engine with some type of
degreaser before any work is done. It will
make the job easier, and help keep dirt out of
the internal areas of the engine.
Depending on the components involved, it
may be helpful to remove the bonnet to
improve access to the engine as repairs are
performed (see Chapter 11 if necessary).
Cover the wings to prevent damage to the
paint. Special pads are available, but an old
bedspread or blanket will also work.
If vacuum, exhaust, oil or coolant leaks
develop, indicating a need for gasket or seal
renewal, the repairs can generally be made
with the engine in the vehicle. The intake and
exhaust manifold gaskets, sump gasket,
crankshaft oil seals and cylinder head gasket
are all accessible with the engine in place.
Exterior components, such as the intake
and exhaust manifolds, the sump, the oil
pump, the water pump, the starter motor, the
alternator, the distributor and the fuel system
components, can be removed for repair with
the engine in place.
The cylinder head can be removed without
removing the engine, so this procedure is
covered in this Part of Chapter 2. Camshaft,
rocker arm and valve component servicing ismost easily accomplished with the cylinder
head removed; these procedures are covered
in Part B of this Chapter. Note, however, that
the camshaft on the M40 engine may be
removed with the engine in the vehicle since it
is retained by bearing caps.
In extreme cases caused by a lack of
necessary equipment, repair or renewal of
piston rings, pistons, connecting rods and
big-end bearings is possible with the engine in
the vehicle. However, this practice is not
recommended, because of the cleaning and
preparation work that must be done to the
components involved.
3 Top Dead Centre (TDC) for
No 1 piston- locating
2
Note 1:The following procedure is based on
the assumption that the distributor (if
applicable) is correctly fitted. If you are trying
to locate TDC to refit the distributor correctly,
piston position must be determined by feeling
for compression at the No 1 spark plug hole,
then aligning the ignition timing marks or
inserting the timing tool in the flywheel, as
applicable.
Note 2:The No 1 cylinder is the one closest to
the radiator.
1Top Dead Centre (TDC) is the highest point
in the cylinder that each piston reaches as it
travels up and down when the crankshaft
turns. Each piston reaches TDC on the
compression stroke and again on the exhaust
stroke, but TDC generally refers to piston
position on the compression stroke.
2Positioning the piston at TDC is an essential
part of many procedures, such as timing belt
or chain removal and distributor removal.
3Before beginning this procedure, be sure to
place the transmission in Neutral, and apply
the handbrake or chock the rear wheels. Also,
disable the ignition system by detaching the
coil wire from the centre terminal of the
distributor cap, and earthing it on the engine
block with a jumper wire. Remove the spark
plugs (see Chapter 1).
4In order to bring any piston to TDC, the
crankshaft must be turned using one of the
methods outlined below. When looking at the
front of the engine, normal crankshaft rotation
is clockwise.
(a) The preferred method is to turn the
crankshaft with a socket and ratchet
attached to the bolt threaded into the
front of the crankshaft.
(b) A remote starter switch, which may save
some time, can also be used. Follow the
instructions included with the switch.
Once the piston is close to TDC, use a
socket and ratchet as described in the
previous paragraph.
(c) If an assistant is available to turn the
ignition switch to the Start position in
short bursts, you can get the piston close
to TDC without a remote starter switch.Make sure your assistant is out of the
vehicle, away from the ignition switch,
then use a socket and ratchet as
described in (a) to complete the
procedure.
5Note the position of the terminal for the
No 1 spark plug lead on the distributor cap. If
the terminal isn’t marked, follow the plug lead
from the No 1 cylinder spark plug to the cap
(No 1 cylinder is nearest the radiator).
6Use a felt-tip pen or chalk to make a mark
directly below the No 1 terminal on the
distributor body or timing cover.
7Detach the distributor cap, and set it aside
(see Chapter 1 if necessary).
8Turn the crankshaft (see paragraph 4
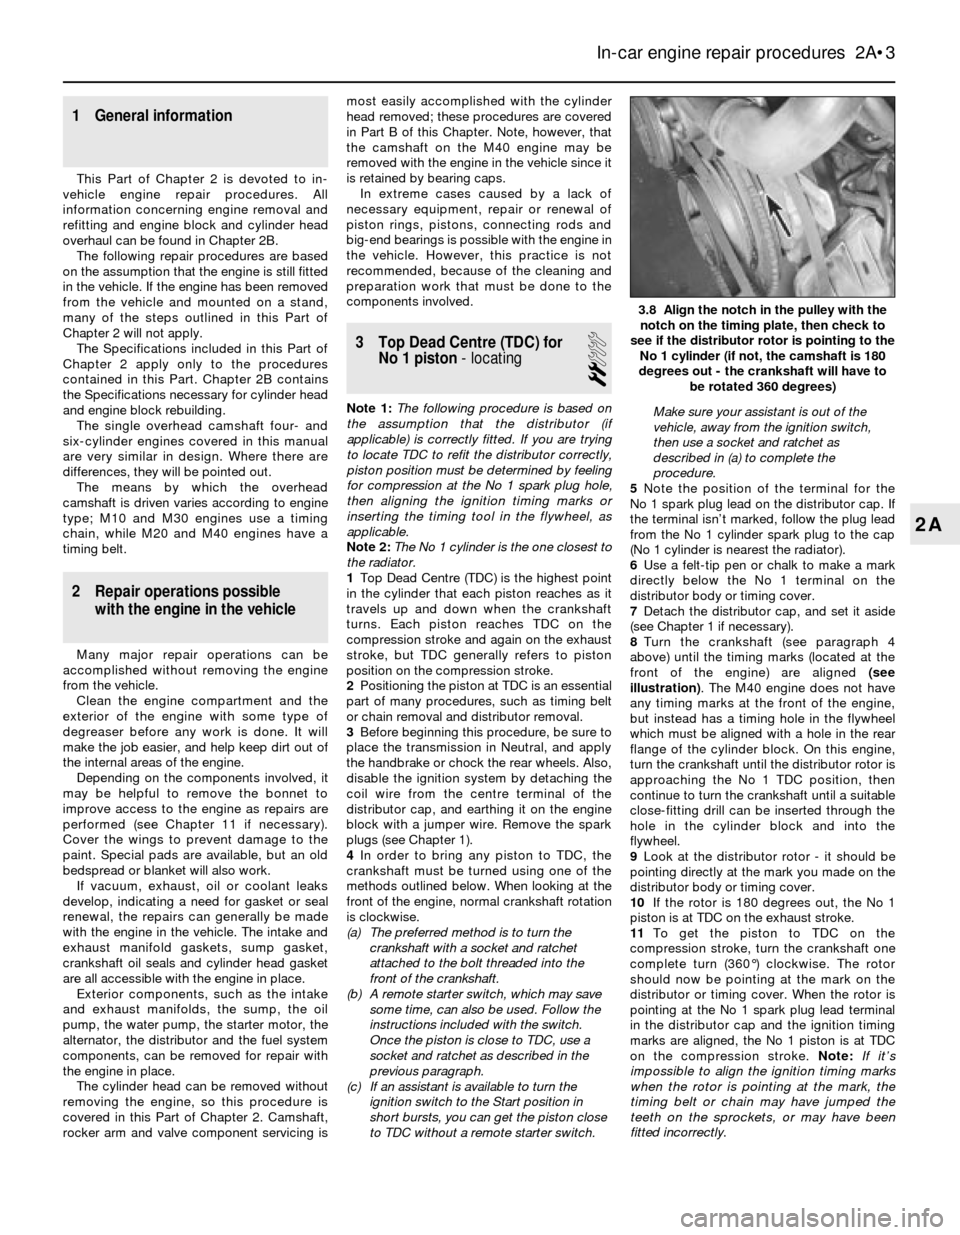
above) until the timing marks (located at the
front of the engine) are aligned (see
illustration). The M40 engine does not have
any timing marks at the front of the engine,
but instead has a timing hole in the flywheel
which must be aligned with a hole in the rear
flange of the cylinder block. On this engine,
turn the crankshaft until the distributor rotor is
approaching the No 1 TDC position, then
continue to turn the crankshaft until a suitable
close-fitting drill can be inserted through the
hole in the cylinder block and into the
flywheel.
9Look at the distributor rotor - it should be
pointing directly at the mark you made on the
distributor body or timing cover.
10If the rotor is 180 degrees out, the No 1
piston is at TDC on the exhaust stroke.
11To get the piston to TDC on the
compression stroke, turn the crankshaft one
complete turn (360°) clockwise. The rotor
should now be pointing at the mark on the
distributor or timing cover. When the rotor is
pointing at the No 1 spark plug lead terminal
in the distributor cap and the ignition timing
marks are aligned, the No 1 piston is at TDC
on the compression stroke. Note:If it’s
impossible to align the ignition timing marks
when the rotor is pointing at the mark, the
timing belt or chain may have jumped the
teeth on the sprockets, or may have been
fitted incorrectly.
In-car engine repair procedures 2A•3
3.8 Align the notch in the pulley with the
notch on the timing plate, then check to
see if the distributor rotor is pointing to the
No 1 cylinder (if not, the camshaft is 180
degrees out - the crankshaft will have to
be rotated 360 degrees)
2A
Page 110 of 228

Engine difficult to start, or fails to start (when cold)
Probable cause Corrective action
Cold start injector or thermotime switch
faulty (early Motronic system only) Test cold start injector and thermotime switch. Renew faulty components (see Section 19)
Fuel pump not running Check fuel pump fuse and fuel pump relay (see Sections 2 and 3)
Airflow meter flap (door) binding, or
stuck in open position Inspect the airflow meter for damage (see Section 16)
Fuel pressure incorrect Test system pressure (see Section 3)
Intake air leaks Inspect all vacuum lines, air ducts and oil filler and dipstick seals
Fuel injectors clogged or not operating Check fuel injectors (see Section 20) and wiring harness
Coolant temperature sensor faulty or Test coolant temperature sensor (see Chapter 6, Section 4)
wiring problem
TPS (throttle position sensor) incorrectly adjusted Check TPS adjustment (see Chapter 6, Section 4)
Dirt or other contaminants in fuel Check the fuel and drain the tank if necessary
Faulty ECU Have the ECU tested at a dealer service department or other specialist
Crankshaft position signal missing Faulty position sensor or flywheel, or reference pin missing (see Chapter 5)
Engine difficult to start, or fails to start (when warm)
Probable cause Corrective action
Cold start injector leaking or operating
continuously (early Motronic system only) Test cold start injector and thermotime switch (see Section 19)
Fuel pressure incorrect Test fuel pressure (see Section 3)
Insufficient residual fuel pressure Test fuel system hold pressure (see Section 3)
Fuel leak(s) Inspect fuel lines and fuel injectors for leaks. Correct leaks as necessary
Coolant temperature sensor faulty
or wiring problem Test coolant temperature sensor (see Chapter 6, Section 4)
Vapour lock (in warm weather) Check fuel pressure (see Section 3)
EVAP system faulty Check EVAP system (see Chapter 6, Section 6)
Faulty ECU Have the ECU tested at a dealer service department or other specialist
Idle speed control system faulty Test the idle air stabiliser valve (see Section 21)
Oxygen sensor faulty (where applicable) Check the oxygen sensor (see Chapter 6, Section 4)
Engine misses and hesitates under load
Probable cause Corrective action
Fuel injector clogged Test fuel injectors. Check for clogged injector lines. Renew faulty injectors (see Section 20)
Fuel pressure incorrect Test fuel system pressure (see Section 3). Test fuel pressure regulator (see Section 18)
Fuel leak(s) Inspect fuel lines and fuel injectors for leaks (see Chapter 4)
Engine maintenance Tune-up engine (see Chapter 1). Check the distributor cap, rotor, HT leads and spark
plugs, and renew any faulty components
Airflow meter flap (door) binding, or Inspect the airflow meter for damage (see Section 16)
stuck in open position
Intake air leaks Inspect all vacuum lines, air ducts, and oil filler and dipstick seals
Throttle position sensor (TPS) incorrectly adjusted Check TPS adjustment (see Chapter 6)
Engine idles too fast
Probable cause Corrective action
Accelerator pedal, cable or throttle valve binding Check for worn or broken components, kinked cable, or other damage. Renew faulty
components
Air leaking past throttle valve Inspect throttle valve, and adjust or renew as required
Engine has erratic idle speed
Probable cause Corrective action
Idle air stabiliser valve faulty Check the idle air stabiliser valve (see Section 21)
No power to the idle air stabiliser valve Check the idle air stabiliser relay and wiring circuit (see Chapter 12)
Idle speed control unit faulty Have the idle speed control unit checked by a dealer
Poor fuel economy
Probable cause Corrective action
Cold start injector leaking
(early Motronic system only) Test and, if necessary, renew cold start injector (see Section 19)
Oxygen sensor faulty (where applicable) Test the oxygen sensor (see Chapter 6, Section 4))
Sticking handbrake/binding brakes Check the handbrake/braking system (see Chapter 9)
Tyre pressures low Check tyre pressures (Chapter 1)
4•22 Fuel and exhaust systems
Page 114 of 228
7 Ignition timing (TCI system)-
check and adjustment
4
Warning: Keep hands, equipment
and wires well clear of the
viscous cooling fan during
adjustment of the ignition timing.
Note:This Section describes the procedure
for checking and adjusting the ignition timing
on engines fitted with the TCI system. On
engines fitted with the Motronic engine
management system, the ignition timing is
controlled by the electronic control unit, and
no adjustment is possible. The timing can be
checked using the following procedure, but no
ignition timing values were available at the
time of writing. If the timing is thought to be
incorrect, refer to a BMW dealer.
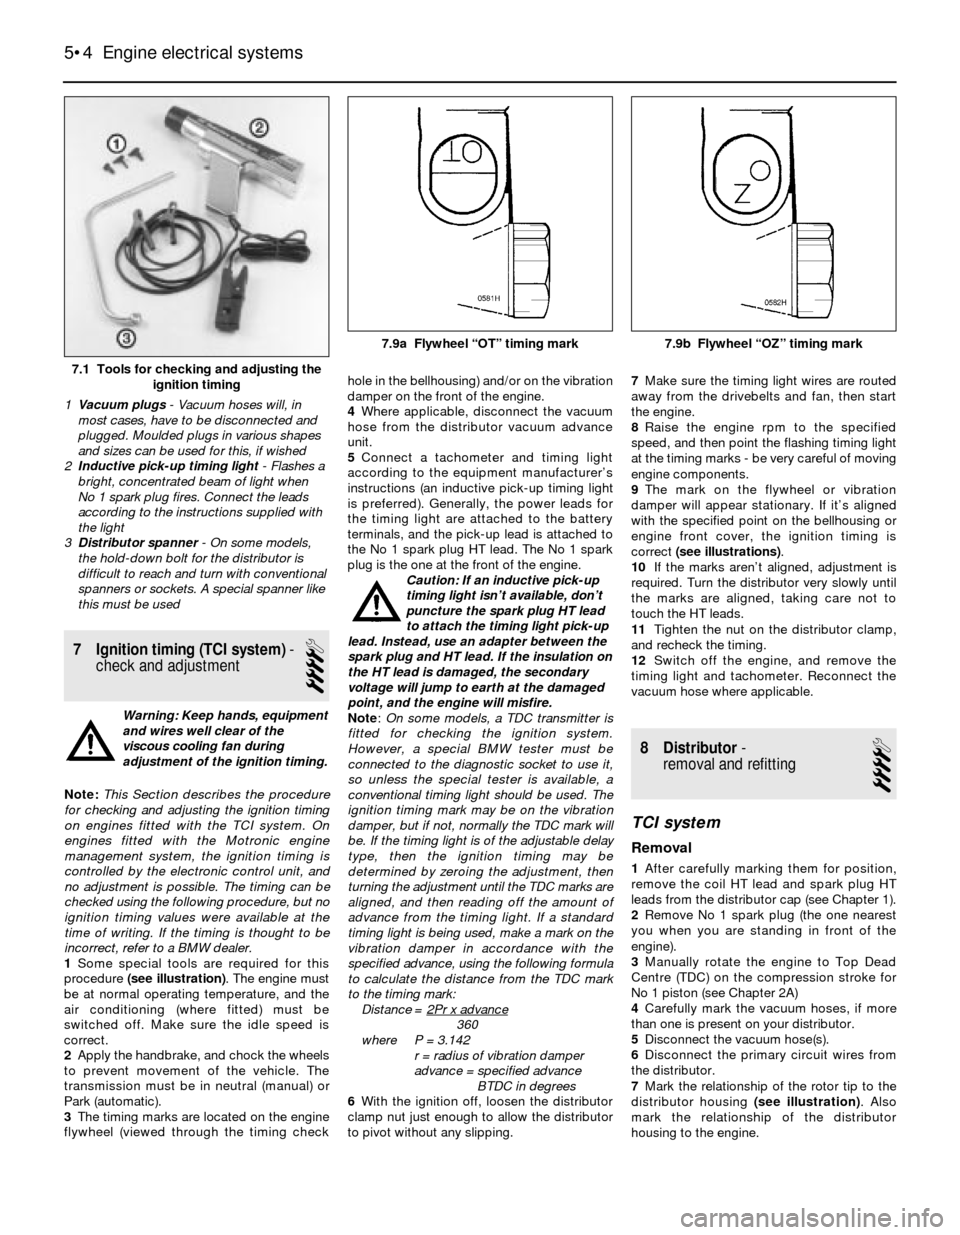
1Some special tools are required for this
procedure (see illustration). The engine must
be at normal operating temperature, and the
air conditioning (where fitted) must be
switched off. Make sure the idle speed is
correct.
2Apply the handbrake, and chock the wheels
to prevent movement of the vehicle. The
transmission must be in neutral (manual) or
Park (automatic).
3The timing marks are located on the engine
flywheel (viewed through the timing checkhole in the bellhousing) and/or on the vibration
damper on the front of the engine.
4Where applicable, disconnect the vacuum
hose from the distributor vacuum advance
unit.
5Connect a tachometer and timing light
according to the equipment manufacturer’s
instructions (an inductive pick-up timing light
is preferred). Generally, the power leads for
the timing light are attached to the battery
terminals, and the pick-up lead is attached to
the No 1 spark plug HT lead. The No 1 spark
plug is the one at the front of the engine.
Caution: If an inductive pick-up
timing light isn’t available, don’t
puncture the spark plug HT lead
to attach the timing light pick-up
lead. Instead, use an adapter between the
spark plug and HT lead. If the insulation on
the HT lead is damaged, the secondary
voltage will jump to earth at the damaged
point, and the engine will misfire.
Note:On some models, a TDC transmitter is
fitted for checking the ignition system.
However, a special BMW tester must be
connected to the diagnostic socket to use it,
so unless the special tester is available, a
conventional timing light should be used. The
ignition timing mark may be on the vibration
damper, but if not, normally the TDC mark will
be. If the timing light is of the adjustable delay
type, then the ignition timing may be
determined by zeroing the adjustment, then
turning the adjustment until the TDC marks are
aligned, and then reading off the amount of
advance from the timing light. If a standard
timing light is being used, make a mark on the
vibration damper in accordance with the
specified advance, using the following formula
to calculate the distance from the TDC mark
to the timing mark:
Distance = 2Pr x advance
360
where P = 3.142
r = radius of vibration damper
advance = specified advance
BTDC in degrees
6With the ignition off, loosen the distributor
clamp nut just enough to allow the distributor
to pivot without any slipping.7Make sure the timing light wires are routed
away from the drivebelts and fan, then start
the engine.
8Raise the engine rpm to the specified
speed, and then point the flashing timing light
at the timing marks - be very careful of moving
engine components.
9The mark on the flywheel or vibration
damper will appear stationary. If it’s aligned
with the specified point on the bellhousing or
engine front cover, the ignition timing is
correct (see illustrations).
10If the marks aren’t aligned, adjustment is
required. Turn the distributor very slowly until
the marks are aligned, taking care not to
touch the HT leads.
11Tighten the nut on the distributor clamp,
and recheck the timing.
12Switch off the engine, and remove the
timing light and tachometer. Reconnect the
vacuum hose where applicable.
8 Distributor-
removal and refitting
4
TCI system
Removal
1After carefully marking them for position,
remove the coil HT lead and spark plug HT
leads from the distributor cap (see Chapter 1).
2Remove No 1 spark plug (the one nearest
you when you are standing in front of the
engine).
3Manually rotate the engine to Top Dead
Centre (TDC) on the compression stroke for
No 1 piston (see Chapter 2A)
4Carefully mark the vacuum hoses, if more
than one is present on your distributor.
5Disconnect the vacuum hose(s).
6Disconnect the primary circuit wires from
the distributor.
7Mark the relationship of the rotor tip to the
distributor housing (see illustration). Also
mark the relationship of the distributor
housing to the engine.
5•4 Engine electrical systems
7.1 Tools for checking and adjusting the
ignition timing
1Vacuum plugs- Vacuum hoses will, in
most cases, have to be disconnected and
plugged. Moulded plugs in various shapes
and sizes can be used for this, if wished
2Inductive pick-up timing light- Flashes a
bright, concentrated beam of light when
No 1 spark plug fires. Connect the leads
according to the instructions supplied with
the light
3Distributor spanner - On some models,
the hold-down bolt for the distributor is
difficult to reach and turn with conventional
spanners or sockets. A special spanner like
this must be used
7.9a Flywheel “OT” timing mark 7.9b Flywheel “OZ” timing mark