Air flow BMW 3 SERIES 1988 E30 Workshop Manual
[x] Cancel search | Manufacturer: BMW, Model Year: 1988, Model line: 3 SERIES, Model: BMW 3 SERIES 1988 E30Pages: 228, PDF Size: 7.04 MB
Page 15 of 228
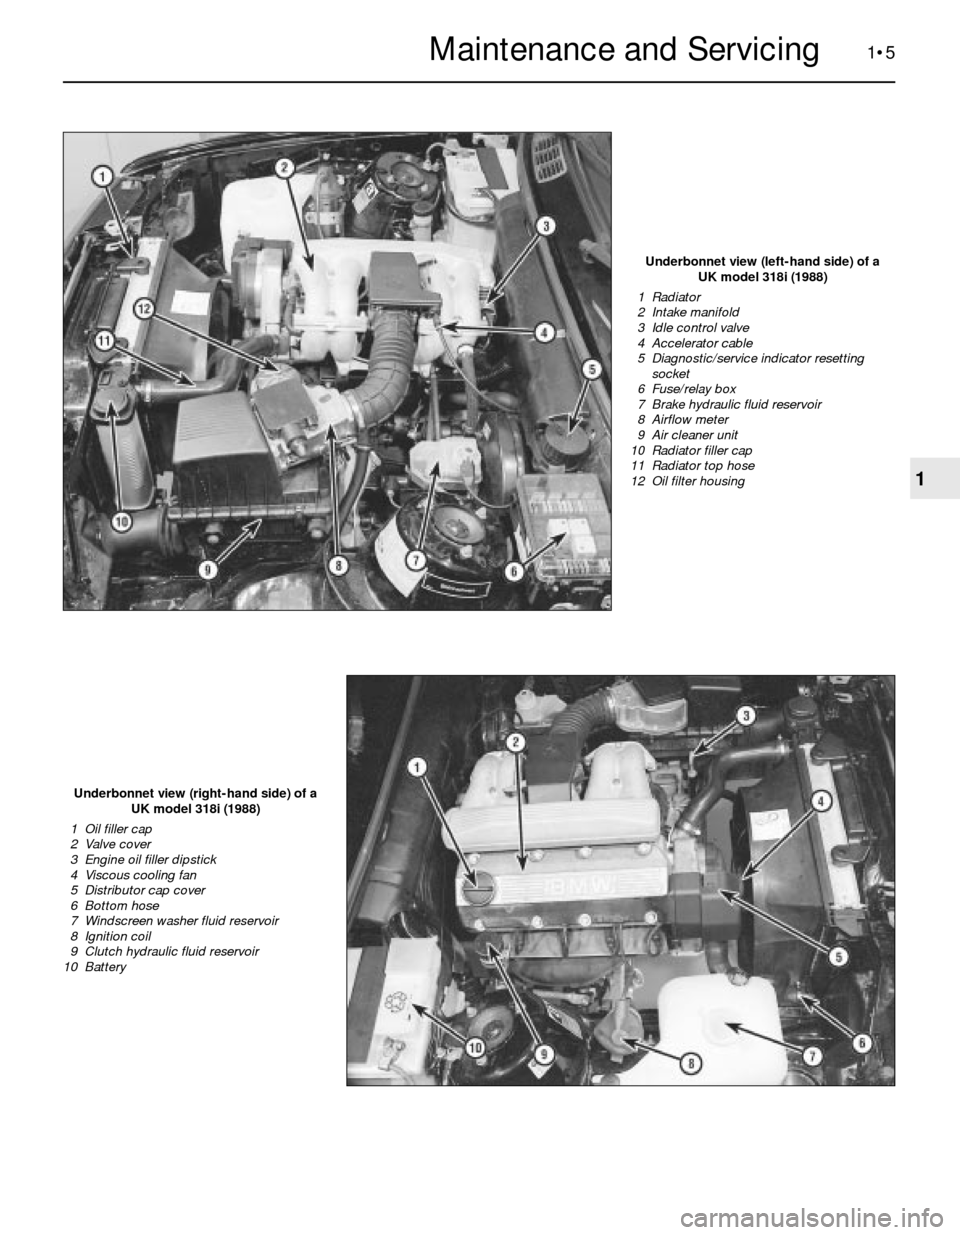
1•5
Underbonnet view (left-hand side) of a
UK model 318i (1988)
1 Radiator
2 Intake manifold
3 Idle control valve
4 Accelerator cable
5 Diagnostic/service indicator resetting
socket
6 Fuse/relay box
7 Brake hydraulic fluid reservoir
8 Airflow meter
9 Air cleaner unit
10 Radiator filler cap
11 Radiator top hose
12 Oil filter housing
Underbonnet view (right-hand side) of a
UK model 318i (1988)
1 Oil filler cap
2 Valve cover
3 Engine oil filler dipstick
4 Viscous cooling fan
5 Distributor cap cover
6 Bottom hose
7 Windscreen washer fluid reservoir
8 Ignition coil
9 Clutch hydraulic fluid reservoir
10 Battery
1
Maintenance and Servicing
Page 21 of 228
Every 6000 miles or 6 months, whichever comes first
1•11
6.17a Unscrew the bolt . . .
1
Every 6000 miles
6 Engine oil and filter change
1
Warning: Prolonged skin contact
with used engine oil is
hazardous. Use a barrier cream
and wear gloves during this procedure.
Change out of oil-soaked clothing
immediately.
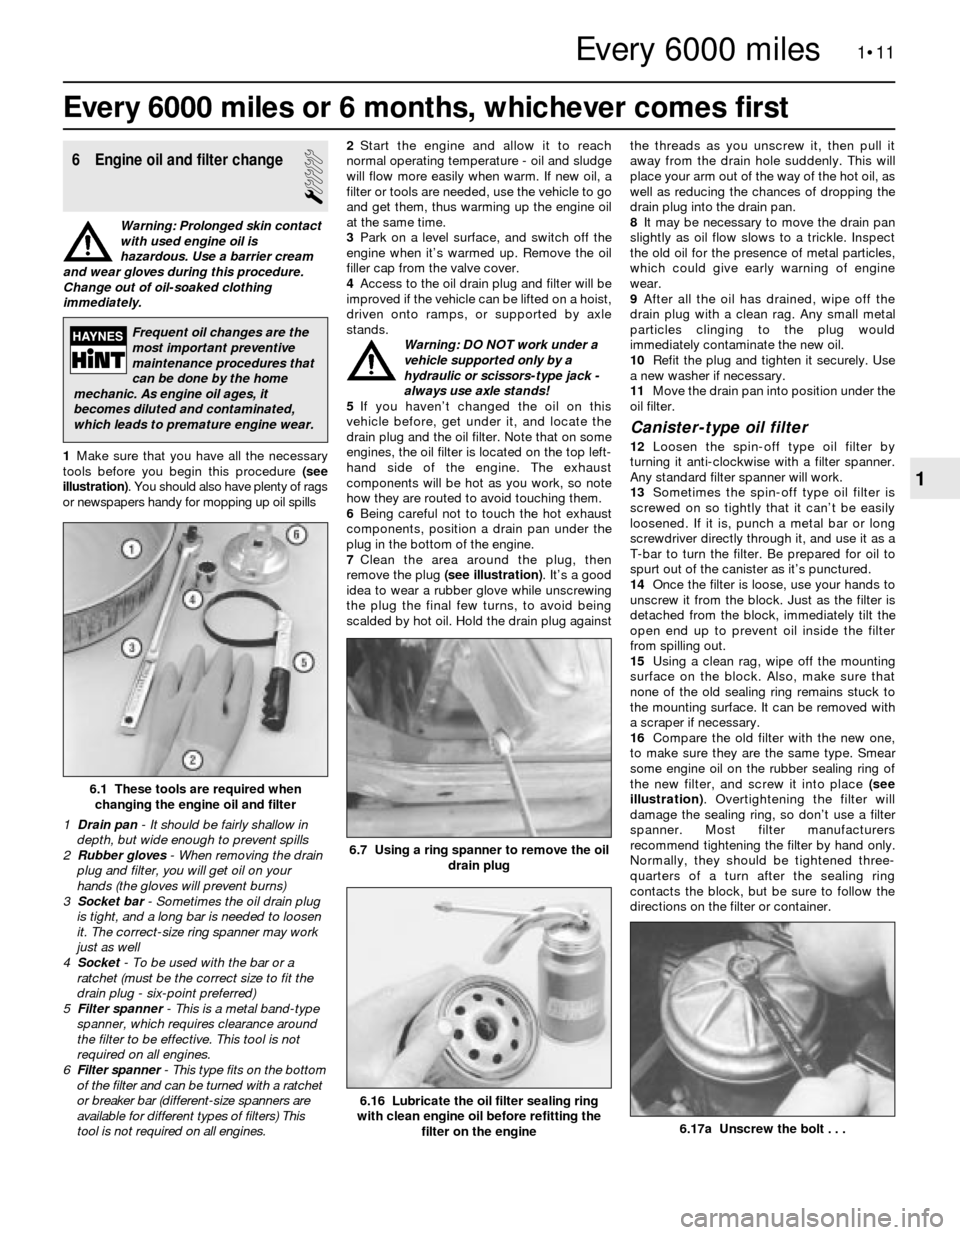
1Make sure that you have all the necessary
tools before you begin this procedure (see
illustration). You should also have plenty of rags
or newspapers handy for mopping up oil spills2Start the engine and allow it to reach
normal operating temperature - oil and sludge
will flow more easily when warm. If new oil, a
filter or tools are needed, use the vehicle to go
and get them, thus warming up the engine oil
at the same time.
3Park on a level surface, and switch off the
engine when it’s warmed up. Remove the oil
filler cap from the valve cover.
4Access to the oil drain plug and filter will be
improved if the vehicle can be lifted on a hoist,
driven onto ramps, or supported by axle
stands.
Warning: DO NOT work under a
vehicle supported only by a
hydraulic or scissors-type jack -
always use axle stands!
5If you haven’t changed the oil on this
vehicle before, get under it, and locate the
drain plug and the oil filter. Note that on some
engines, the oil filter is located on the top left-
hand side of the engine. The exhaust
components will be hot as you work, so note
how they are routed to avoid touching them.
6Being careful not to touch the hot exhaust
components, position a drain pan under the
plug in the bottom of the engine.
7Clean the area around the plug, then
remove the plug (see illustration). It’s a good
idea to wear a rubber glove while unscrewing
the plug the final few turns, to avoid being
scalded by hot oil. Hold the drain plug againstthe threads as you unscrew it, then pull it
away from the drain hole suddenly. This will
place your arm out of the way of the hot oil, as
well as reducing the chances of dropping the
drain plug into the drain pan.
8It may be necessary to move the drain pan
slightly as oil flow slows to a trickle. Inspect
the old oil for the presence of metal particles,
which could give early warning of engine
wear.
9After all the oil has drained, wipe off the
drain plug with a clean rag. Any small metal
particles clinging to the plug would
immediately contaminate the new oil.
10Refit the plug and tighten it securely. Use
a new washer if necessary.
11Move the drain pan into position under the
oil filter.
Canister-type oil filter
12Loosen the spin-off type oil filter by
turning it anti-clockwise with a filter spanner.
Any standard filter spanner will work.
13Sometimes the spin-off type oil filter is
screwed on so tightly that it can’t be easily
loosened. If it is, punch a metal bar or long
screwdriver directly through it, and use it as a
T-bar to turn the filter. Be prepared for oil to
spurt out of the canister as it’s punctured.
14Once the filter is loose, use your hands to
unscrew it from the block. Just as the filter is
detached from the block, immediately tilt the
open end up to prevent oil inside the filter
from spilling out.
15Using a clean rag, wipe off the mounting
surface on the block. Also, make sure that
none of the old sealing ring remains stuck to
the mounting surface. It can be removed with
a scraper if necessary.
16Compare the old filter with the new one,
to make sure they are the same type. Smear
some engine oil on the rubber sealing ring of
the new filter, and screw it into place (see
illustration). Overtightening the filter will
damage the sealing ring, so don’t use a filter
spanner. Most filter manufacturers
recommend tightening the filter by hand only.
Normally, they should be tightened three-
quarters of a turn after the sealing ring
contacts the block, but be sure to follow the
directions on the filter or container.
6.1 These tools are required when
changing the engine oil and filter
1 Drain pan- It should be fairly shallow in
depth, but wide enough to prevent spills
2 Rubber gloves- When removing the drain
plug and filter, you will get oil on your
hands (the gloves will prevent burns)
3 Socket bar - Sometimes the oil drain plug
is tight, and a long bar is needed to loosen
it. The correct-size ring spanner may work
just as well
4 Socket- To be used with the bar or a
ratchet (must be the correct size to fit the
drain plug - six-point preferred)
5 Filter spanner - This is a metal band-type
spanner, which requires clearance around
the filter to be effective. This tool is not
required on all engines.
6 Filter spanner- This type fits on the bottom
of the filter and can be turned with a ratchet
or breaker bar (different-size spanners are
available for different types of filters) This
tool is not required on all engines.
6.7 Using a ring spanner to remove the oil
drain plug
6.16 Lubricate the oil filter sealing ring
with clean engine oil before refitting the
filter on the engine
Frequent oil changes are the
most important preventive
maintenance procedures that
can be done by the home
mechanic. As engine oil ages, it
becomes diluted and contaminated,
which leads to premature engine wear.
Page 25 of 228
move the component away from the engine to
tighten the belt, or towards the engine to
loosen the belt. Hold the accessory in
position, and check the belt tension. If it is
correct, tighten the two bolts until just tight,
then recheck the tension. If the tension is still
correct, tighten the bolts.
8It will often be necessary to use some sort
of lever to move the accessory while the belt
is adjusted. If this must be done to gain the
proper leverage, be very careful not to
damage the component being moved, or the
part being prised against.
Renewal
9To renew a belt, follow the instructions
above for adjustment, but remove the belt
from the pulleys.
10In some cases, you will have to remove
more than one belt, because of their
arrangement on the front of the engine.
Because of this, and the fact that belts will
tend to fail at the same time, it is wise to
renew all belts together. Mark each belt and
its appropriate pulley groove, so all renewed
belts can be fitted in their proper positions.
11It is a good idea to take the old belts with
you when buying new ones, in order to make
a direct comparison for length, width and
design.
12Recheck the tension of new belts after a
few hundred miles.
12 Engine idle speed and CO
level check and adjustment
4
Note:The engine should be at normal
operating temperature, with correct ignition
timing and valve clearances (where
adjustable). The air filter should be in good
condition, and all electrical components
(including the air conditioning, where fitted)
should be switched off.
Carburettor
1Connect a tachometer and exhaust gas
analyser (CO meter) to the engine.
2Start the engine and allow it to idle.
3Check that the idle speed is as given in the
Specifications. Adjustment of the idle speed is
only possible on the 2B4 carburettor. Turn the
carburettor idle speed adjustment screw until
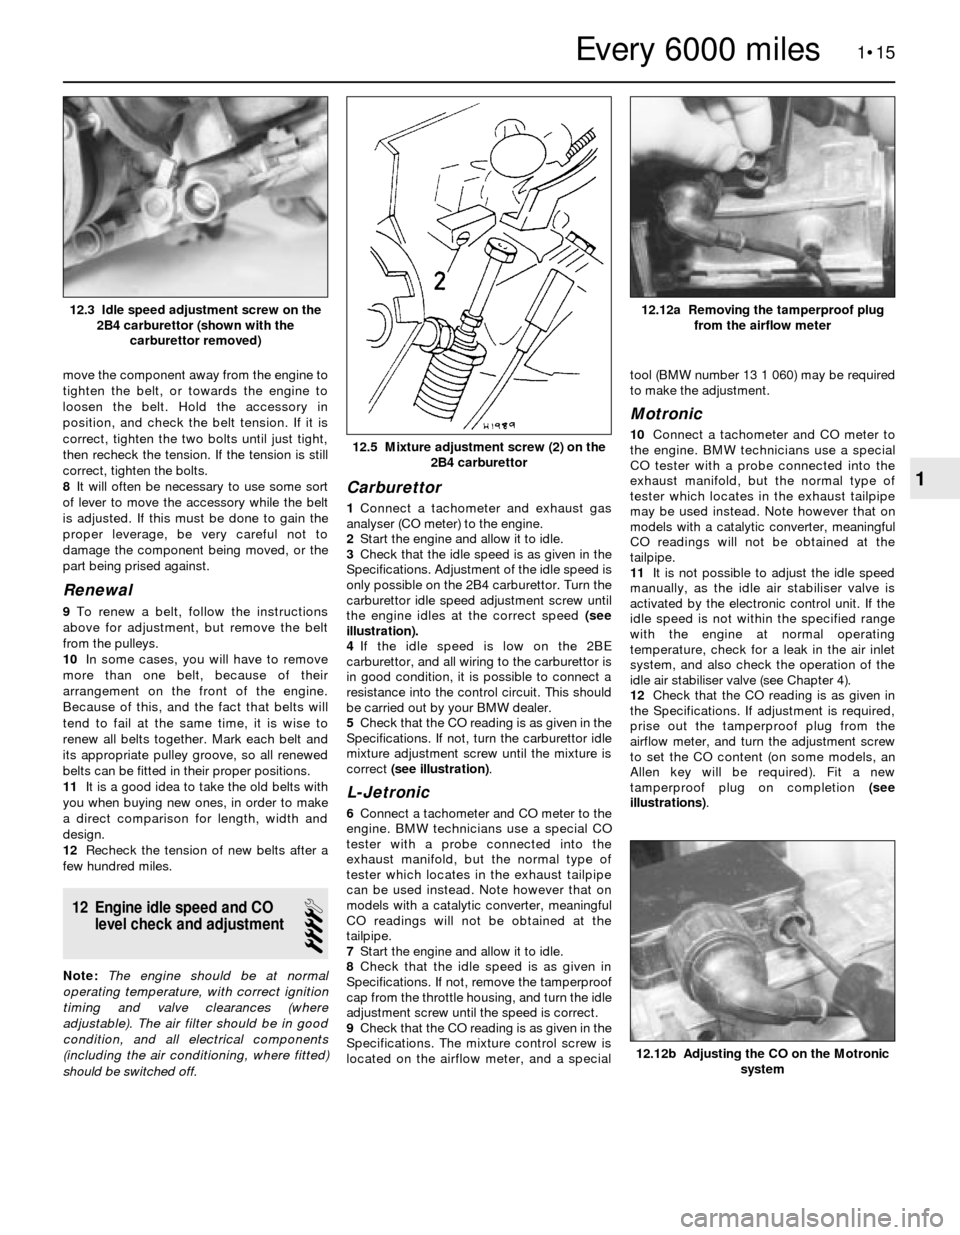
the engine idles at the correct speed (see
illustration).
4If the idle speed is low on the 2BE
carburettor, and all wiring to the carburettor is
in good condition, it is possible to connect a
resistance into the control circuit. This should
be carried out by your BMW dealer.
5Check that the CO reading is as given in the
Specifications. If not, turn the carburettor idle
mixture adjustment screw until the mixture is
correct (see illustration).
L-Jetronic
6Connect a tachometer and CO meter to the
engine. BMW technicians use a special CO
tester with a probe connected into the
exhaust manifold, but the normal type of
tester which locates in the exhaust tailpipe
can be used instead. Note however that on
models with a catalytic converter, meaningful
CO readings will not be obtained at the
tailpipe.
7Start the engine and allow it to idle.
8Check that the idle speed is as given in
Specifications. If not, remove the tamperproof
cap from the throttle housing, and turn the idle
adjustment screw until the speed is correct.
9Check that the CO reading is as given in the
Specifications. The mixture control screw is
located on the airflow meter, and a specialtool (BMW number 13 1 060) may be required
to make the adjustment.
Motronic
10Connect a tachometer and CO meter to
the engine. BMW technicians use a special
CO tester with a probe connected into the
exhaust manifold, but the normal type of
tester which locates in the exhaust tailpipe
may be used instead. Note however that on
models with a catalytic converter, meaningful
CO readings will not be obtained at the
tailpipe.
11It is not possible to adjust the idle speed
manually, as the idle air stabiliser valve is
activated by the electronic control unit. If the
idle speed is not within the specified range
with the engine at normal operating
temperature, check for a leak in the air inlet
system, and also check the operation of the
idle air stabiliser valve (see Chapter 4).
12Check that the CO reading is as given in
the Specifications. If adjustment is required,
prise out the tamperproof plug from the
airflow meter, and turn the adjustment screw
to set the CO content (on some models, an
Allen key will be required). Fit a new
tamperproof plug on completion (see
illustrations).
1•15
12.12a Removing the tamperproof plug
from the airflow meter
12.5 Mixture adjustment screw (2) on the
2B4 carburettor
12.3 Idle speed adjustment screw on the
2B4 carburettor (shown with the
carburettor removed)
12.12b Adjusting the CO on the Motronic
system
1
Every 6000 miles
Page 35 of 228
Flushing
7Once the system is completely drained,
flush the radiator with fresh water from a
garden hose until the water runs clear at the
drain or bottom hose. If the radiator is
severely corroded, damaged or leaking, it
should be removed (see Chapter 3) and taken
to a radiator repair specialist.
8Flushing in this way will remove sediments
from the radiator, but will not remove rust and
scale from the engine and cooling tube
surfaces. These deposits can be removed by
using a chemical cleaner. Follow the
procedure outlined in the cleaner
manufacturer’s instructions. Remove the
cylinder block drain plug before flushing the
engine.
9On models so equipped, remove the
overflow hose from the coolant recovery
reservoir. Drain the reservoir and flush it with
clean water, then reconnect the hose.
Refilling
10Tighten the radiator drain plug, or
reconnect the radiator bottom hose. Refit and
tighten the cylinder block drain plug.
Four-cylinder engines
11Slowly add new coolant (a 40%/60%
mixture of antifreeze to water) to the radiator
until it is full. Add coolant to the reservoir up
to the lower mark.
12Leave the radiator cap off, and run the
engine in a well-ventilated area until the
thermostat opens (coolant will begin flowing
through the radiator, and the upper radiator
hose will become hot).
13Turn the engine off, and let it cool. Add
more coolant mixture to bring the coolant
level back up to the lip on the radiator filler
neck. On the M40 engine, unscrew the bleed
screw from the top of the radiator, and add
coolant until it comes out of the bleed screw
hole. Refit and tighten the bleed screw.
14Squeeze the upper radiator hose to expel
air, then add more coolant mixture if
necessary. Refit the radiator cap.
15Start the engine, allow it to reach normal
operating temperature, and check for leaks.
Six-cylinder engines
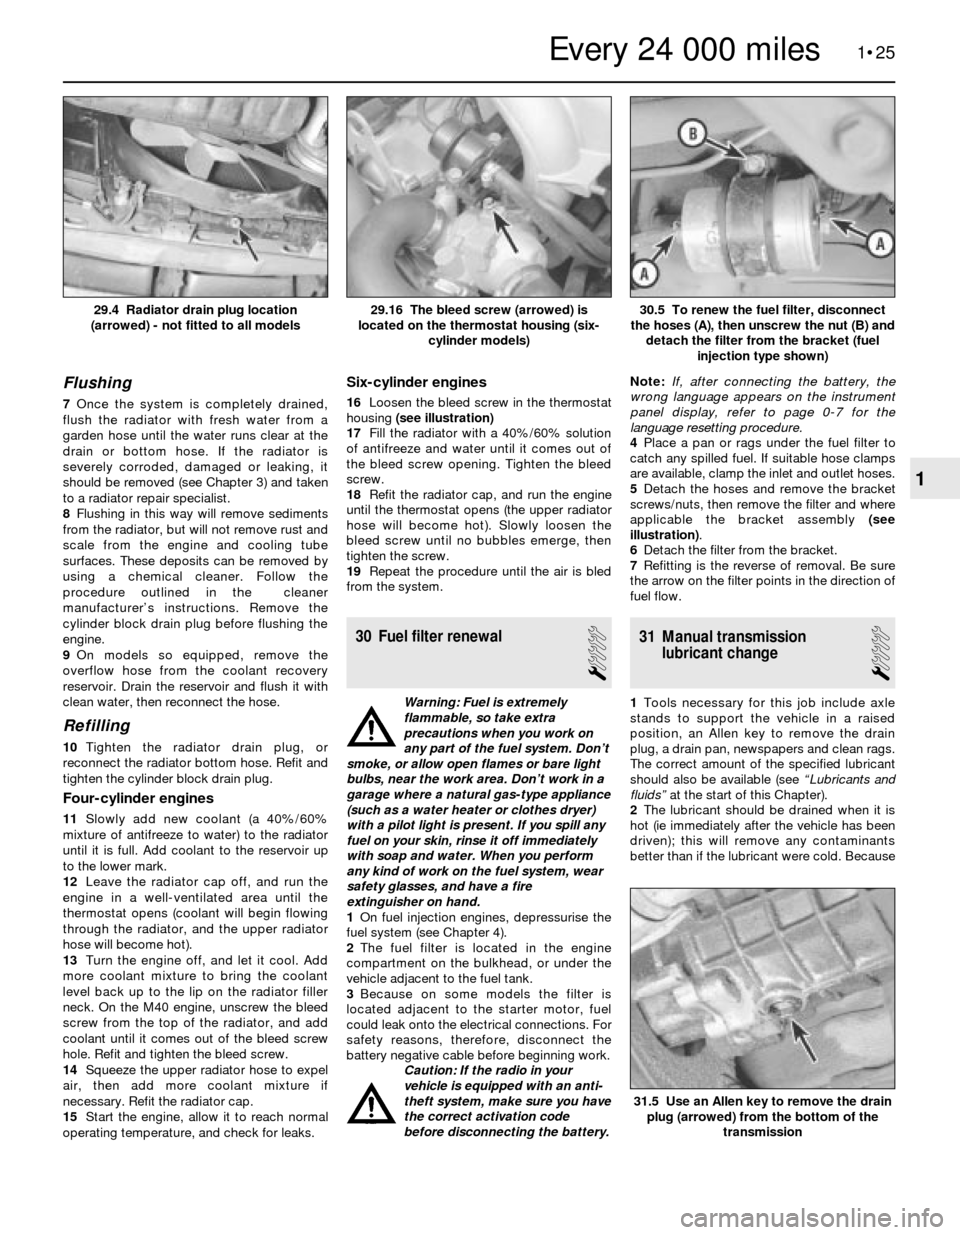
16Loosen the bleed screw in the thermostat
housing (see illustration)
17Fill the radiator with a 40%/60% solution
of antifreeze and water until it comes out of
the bleed screw opening. Tighten the bleed
screw.
18Refit the radiator cap, and run the engine
until the thermostat opens (the upper radiator
hose will become hot). Slowly loosen the
bleed screw until no bubbles emerge, then
tighten the screw.
19Repeat the procedure until the air is bled
from the system.
30 Fuel filter renewal
1
Warning: Fuel is extremely
flammable, so take extra
precautions when you work on
any part of the fuel system. Don’t
smoke, or allow open flames or bare light
bulbs, near the work area. Don’t work in a
garage where a natural gas-type appliance
(such as a water heater or clothes dryer)
with a pilot light is present. If you spill any
fuel on your skin, rinse it off immediately
with soap and water. When you perform
any kind of work on the fuel system, wear
safety glasses, and have a fire
extinguisher on hand.
1On fuel injection engines, depressurise the
fuel system (see Chapter 4).
2The fuel filter is located in the engine
compartment on the bulkhead, or under the
vehicle adjacent to the fuel tank.
3Because on some models the filter is
located adjacent to the starter motor, fuel
could leak onto the electrical connections. For
safety reasons, therefore, disconnect the
battery negative cable before beginning work.
Caution: If the radio in your
vehicle is equipped with an anti-
theft system, make sure you have
the correct activation code
before disconnecting the battery.Note: If, after connecting the battery, the
wrong language appears on the instrument
panel display, refer to page 0-7 for the
language resetting procedure.
4Place a pan or rags under the fuel filter to
catch any spilled fuel. If suitable hose clamps
are available, clamp the inlet and outlet hoses.
5 Detach the hoses and remove the bracket
screws/nuts, then remove the filter and where
applicable the bracket assembly (see
illustration).
6Detach the filter from the bracket.
7Refitting is the reverse of removal. Be sure
the arrow on the filter points in the direction of
fuel flow.
31 Manual transmission
lubricant change
1
1Tools necessary for this job include axle
stands to support the vehicle in a raised
position, an Allen key to remove the drain
plug, a drain pan, newspapers and clean rags.
The correct amount of the specified lubricant
should also be available (see “Lubricants and
fluids”at the start of this Chapter).
2The lubricant should be drained when it is
hot (ie immediately after the vehicle has been
driven); this will remove any contaminants
better than if the lubricant were cold. Because
1•25
30.5 To renew the fuel filter, disconnect
the hoses (A), then unscrew the nut (B) and
detach the filter from the bracket (fuel
injection type shown)29.16 The bleed screw (arrowed) is
located on the thermostat housing (six-
cylinder models)29.4 Radiator drain plug location
(arrowed) - not fitted to all models
31.5 Use an Allen key to remove the drain
plug (arrowed) from the bottom of the
transmission
1
Every 24 000 miles
Page 40 of 228
12After the No 1 piston has been positioned
at TDC on the compression stroke, TDC for
any of the remaining pistons can be located
by turning the crankshaft and following the
firing order. Mark the remaining spark plug
lead terminal locations just like you did for the
No 1 terminal, then number the marks to
correspond with the cylinder numbers. As you
turn the crankshaft, the rotor will also turn.
When it’s pointing directly at one of the marks
on the distributor, the piston for that particular
cylinder is at TDC on the compression stroke.
4 Valve cover-
removal and refitting
1
Caution: If the radio in your
vehicle is equipped with an anti-
theft system, make sure you
have the correct activation code
before disconnecting the battery.
Note: If, after connecting the battery, the
wrong language appears on the instrument
panel display, refer to page 0-7 for the
language resetting procedure.
Removal
1Disconnect the battery negative cable.
2Detach the breather hose from the valve
cover.
3On M20 engines, unbolt and remove the
intake manifold support bracket and, if
applicable, the bracket for the engine sensors
or idle air stabiliser (it will probably be
necessary to disconnect the electrical
connectors from the sensors and stabiliser).
4On M30 engines, disconnect the electrical
connector for the airflow sensor. Unclip the
electrical harness, moving it out of the way.
5Where necessary on M30 engines, remove
the hoses and fittings from the intake air hose,
then loosen the clamp and separate the hose
from the throttle body. Unscrew the mounting
nuts for the air cleaner housing, and remove
the housing together with the air hose and
airflow sensor.
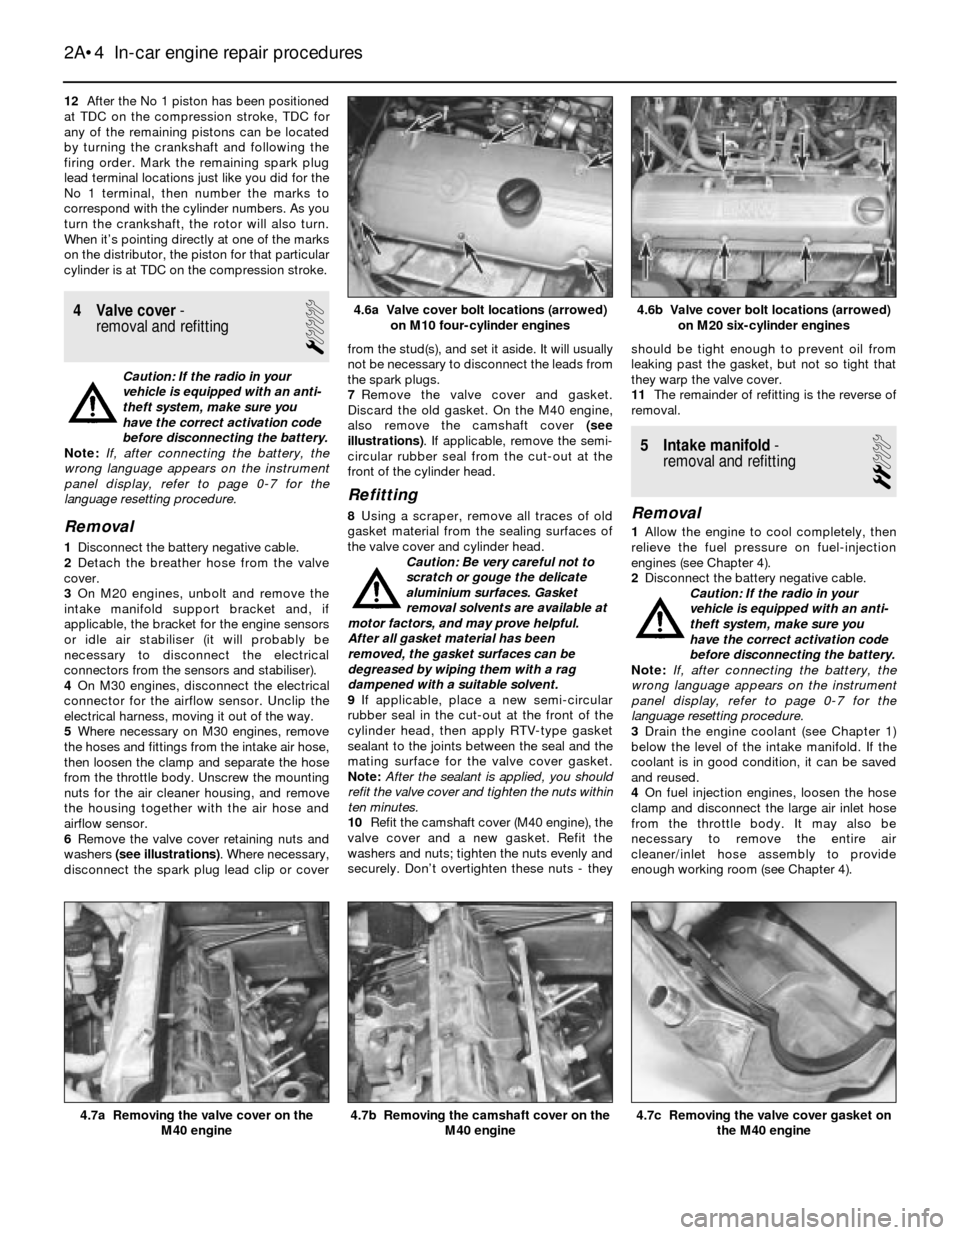
6Remove the valve cover retaining nuts and
washers (see illustrations). Where necessary,
disconnect the spark plug lead clip or coverfrom the stud(s), and set it aside. It will usually
not be necessary to disconnect the leads from
the spark plugs.
7Remove the valve cover and gasket.
Discard the old gasket. On the M40 engine,
also remove the camshaft cover (see
illustrations). If applicable, remove the semi-
circular rubber seal from the cut-out at the
front of the cylinder head.
Refitting
8Using a scraper, remove all traces of old
gasket material from the sealing surfaces of
the valve cover and cylinder head.
Caution: Be very careful not to
scratch or gouge the delicate
aluminium surfaces. Gasket
removal solvents are available at
motor factors, and may prove helpful.
After all gasket material has been
removed, the gasket surfaces can be
degreased by wiping them with a rag
dampened with a suitable solvent.
9If applicable, place a new semi-circular
rubber seal in the cut-out at the front of the
cylinder head, then apply RTV-type gasket
sealant to the joints between the seal and the
mating surface for the valve cover gasket.
Note:After the sealant is applied, you should
refit the valve cover and tighten the nuts within
ten minutes.
10Refit the camshaft cover (M40 engine), the
valve cover and a new gasket. Refit the
washers and nuts; tighten the nuts evenly and
securely. Don’t overtighten these nuts - theyshould be tight enough to prevent oil from
leaking past the gasket, but not so tight that
they warp the valve cover.
11The remainder of refitting is the reverse of
removal.
5 Intake manifold-
removal and refitting
2
Removal
1Allow the engine to cool completely, then
relieve the fuel pressure on fuel-injection
engines (see Chapter 4).
2Disconnect the battery negative cable.
Caution: If the radio in your
vehicle is equipped with an anti-
theft system, make sure you
have the correct activation code
before disconnecting the battery.
Note: If, after connecting the battery, the
wrong language appears on the instrument
panel display, refer to page 0-7 for the
language resetting procedure.
3Drain the engine coolant (see Chapter 1)
below the level of the intake manifold. If the
coolant is in good condition, it can be saved
and reused.
4On fuel injection engines, loosen the hose
clamp and disconnect the large air inlet hose
from the throttle body. It may also be
necessary to remove the entire air
cleaner/inlet hose assembly to provide
enough working room (see Chapter 4).
2A•4 In-car engine repair procedures
4.7b Removing the camshaft cover on the
M40 engine4.7a Removing the valve cover on the
M40 engine4.7c Removing the valve cover gasket on
the M40 engine
4.6b Valve cover bolt locations (arrowed)
on M20 six-cylinder engines4.6a Valve cover bolt locations (arrowed)
on M10 four-cylinder engines
Page 42 of 228
6 Exhaust manifold-
removal and refitting
1
Warning: Make sure the engine is
completely cool before beginning
work on the exhaust system.
Caution: If the radio in your
vehicle is equipped with an anti-
theft system, make sure you
have the correct activation code
before disconnecting the battery.
Note: If, after connecting the battery, the
wrong language appears on the instrument
panel display, refer to page 0-7 for the
language resetting procedure.
1Disconnect the battery negative cable.
2On models where the air cleaner is on the
exhaust manifold side of the engine, remove
the air cleaner housing assembly and/or
airflow sensor to provide sufficient working
area (see Chapter 4, if necessary).
3Unplug the HT leads and set the spark plug
lead harness aside (see Chapter 1).
4Clearly label, then disconnect or remove, all
wires, hoses, fittings, etc. that are in the way.
Be sure to disconnect the oxygen sensor,
where fitted.
5Raise the vehicle, and support it securely
on axle stands. Working from under the
vehicle, separate the exhaust downpipe from
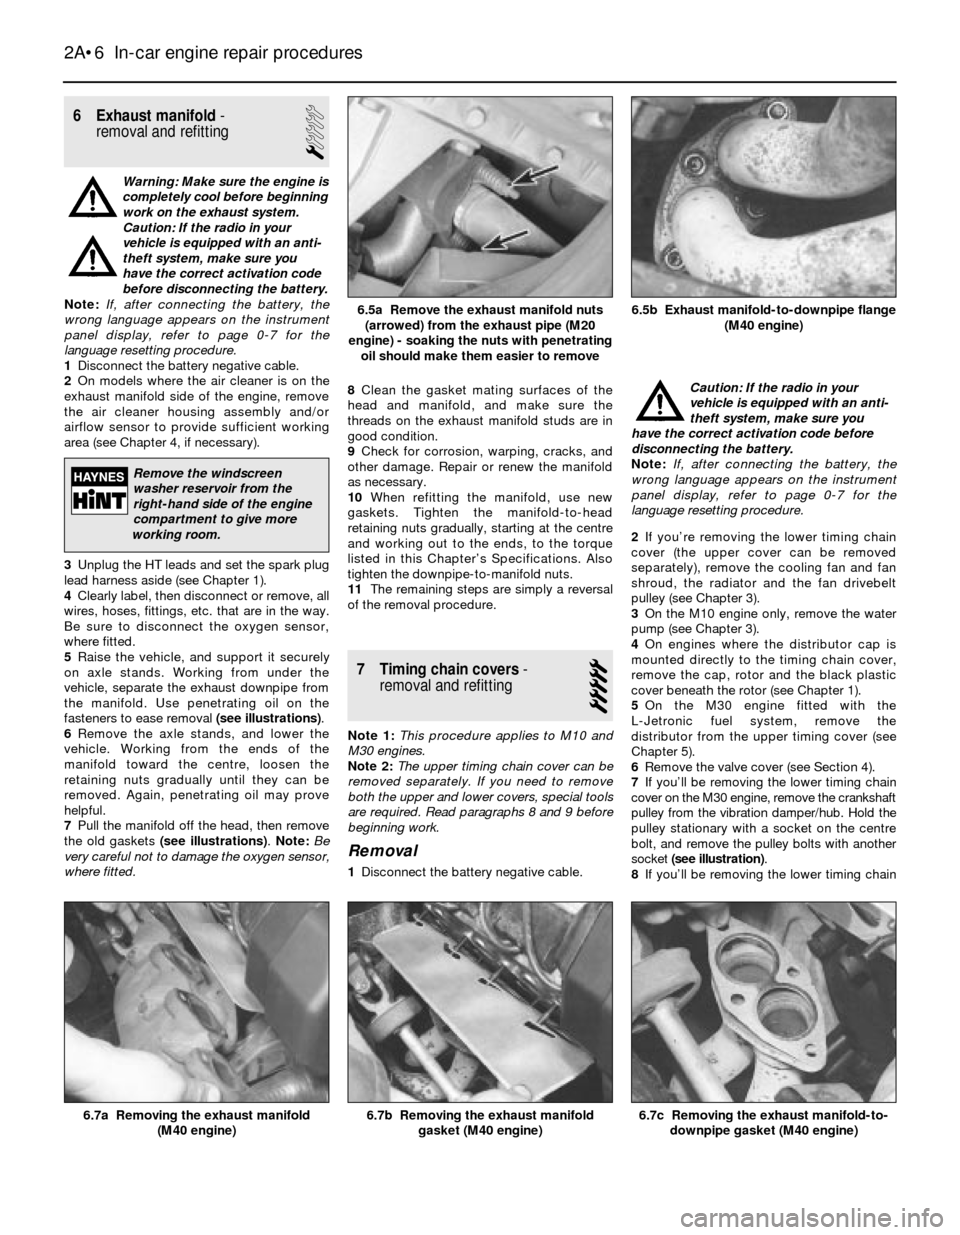
the manifold. Use penetrating oil on the
fasteners to ease removal (see illustrations).
6Remove the axle stands, and lower the
vehicle. Working from the ends of the
manifold toward the centre, loosen the
retaining nuts gradually until they can be
removed. Again, penetrating oil may prove
helpful.
7Pull the manifold off the head, then remove
the old gaskets (see illustrations). Note:Be
very careful not to damage the oxygen sensor,
where fitted.8Clean the gasket mating surfaces of the
head and manifold, and make sure the
threads on the exhaust manifold studs are in
good condition.
9Check for corrosion, warping, cracks, and
other damage. Repair or renew the manifold
as necessary.
10When refitting the manifold, use new
gaskets. Tighten the manifold-to-head
retaining nuts gradually, starting at the centre
and working out to the ends, to the torque
listed in this Chapter’s Specifications. Also
tighten the downpipe-to-manifold nuts.
11The remaining steps are simply a reversal
of the removal procedure.
7 Timing chain covers-
removal and refitting
5
Note 1:This procedure applies to M10 and
M30 engines.
Note 2:The upper timing chain cover can be
removed separately. If you need to remove
both the upper and lower covers, special tools
are required. Read paragraphs 8 and 9 before
beginning work.
Removal
1Disconnect the battery negative cable.Caution: If the radio in your
vehicle is equipped with an anti-
theft system, make sure you
have the correct activation code before
disconnecting the battery.
Note: If, after connecting the battery, the
wrong language appears on the instrument
panel display, refer to page 0-7 for the
language resetting procedure.
2If you’re removing the lower timing chain
cover (the upper cover can be removed
separately), remove the cooling fan and fan
shroud, the radiator and the fan drivebelt
pulley (see Chapter 3).
3On the M10 engine only, remove the water
pump (see Chapter 3).
4On engines where the distributor cap is
mounted directly to the timing chain cover,
remove the cap, rotor and the black plastic
cover beneath the rotor (see Chapter 1).
5On the M30 engine fitted with the
L-Jetronic fuel system, remove the
distributor from the upper timing cover (see
Chapter 5).
6Remove the valve cover (see Section 4).
7If you’ll be removing the lower timing chain
cover on the M30 engine, remove the crankshaft
pulley from the vibration damper/hub. Hold the
pulley stationary with a socket on the centre
bolt, and remove the pulley bolts with another
socket (see illustration).
8If you’ll be removing the lower timing chain
2A•6 In-car engine repair procedures
6.7c Removing the exhaust manifold-to-
downpipe gasket (M40 engine)6.7b Removing the exhaust manifold
gasket (M40 engine)6.7a Removing the exhaust manifold
(M40 engine)
6.5b Exhaust manifold-to-downpipe flange
(M40 engine)6.5a Remove the exhaust manifold nuts
(arrowed) from the exhaust pipe (M20
engine) - soaking the nuts with penetrating
oil should make them easier to remove
Remove the windscreen
washer reservoir from the
right-hand side of the engine
compartment to give more
working room.
Page 44 of 228
8 Timing chain and
sprockets- removal,
inspection and refitting
5
Note:This procedure applies to M10 and M30
engines.
Caution: Once the engine is set
at TDC, do not rotate the
camshaft or crankshaft until the
timing chain is reinstalled. If the
crankshaft or camshaft is rotated with the
timing chain removed, the valves could hit
the pistons, causing expensive internal
engine damage.
Removal
1Position the No 1 cylinder at Top Dead
Centre (TDC) on the compression stroke (see
Section 3).
2Remove the valve cover (see Section 4).
Double-check that the No 1 cylinder is at TDC
on the compression stroke by making sure the
No 1 cylinder rocker arms are loose (not
compressing their valve springs).
3Remove the upper timing chain cover (see
Section 7). Note the location of the camshaft
timing marks, which should now be aligned.
On four-cylinder (M10) engines, there’s
usually a stamped line on the camshaft flange
that aligns with a cast mark on the top of the
cylinder head; also, the camshaft sprocket
dowel pin hole will be at its lowest point. On
six-cylinder (M30) engines, a line drawn
through two of the camshaft sprocket bolts
opposite each other would be exactly vertical,
while a line drawn through the other two bolts
would be horizontal. Additionally, the locating
pin should be in the lower left corner (between
the 7 and 8 o’clock positions). Be sure you’ve
identified the correct camshaft TDC position
before dismantling, because correct valve
timing depends on you aligning them exactly
on reassembly. Note:As the engine is
mounted in the engine compartment at anangle, all references to horizontal and vertical
whilst timing the camshafts are in relation to
the crankshaft, and not the ground.
4Hold the crankshaft stationary with a socket
and ratchet on the vibration damper centre bolt,
then loosen (but don’t unscrew completely) the
four bolts attaching the camshaft sprocket to
the camshaft. Be very careful not to rotate the
camshaft or crankshaft. Note:Some earlier
models may have locking tabs for the camshaft
sprocket bolts. Bend the tabs down before
loosening the bolts. The tabs are no longer
available from the manufacturer, and do not
have to be used on refitting.
5Remove the lower timing chain cover (see
Section 7).
6Unscrew and remove the four camshaft
sprocket bolts, then disengage the chain from
the crankshaft sprocket and carefully remove
the chain and camshaft sprocket from the
engine. It may be necessary to gently prise
the camshaft sprocket loose from the
camshaft with a screwdriver.
Inspection
Timing sprockets
7Examine the teeth on both the crankshaft
sprocket and the camshaft sprocket for wear.
Each tooth forms an inverted V. If worn, the
side of each tooth under tension will be
slightly concave in shape when compared
with the other side of the tooth (i.e. one side of
the inverted V will be concave when
compared with the other, giving the teeth a
hooked appearance). If the teeth appear to be
worn, the sprockets must be renewed. Note:
The crankshaft sprocket is a press fit on the
crankshaft, and can be removed with a jaw-
type puller after the Woodruff key and oil
pump are removed (see Section 14). However,
BMW recommends the new sprocket be
pressed onto the crankshaft after being
heated to 80°C (175°F) on the M10 engine, or
to 200°C(390°F) on the M30 engine. For this
reason, if the crankshaft sprocket requires
renewal, we recommend removing the
crankshaft (see Part B of this Chapter) and
taking it to an engineering works to have the
old sprocket pressed off and a new one
pressed on.
Timing chain
8The chain should be renewed if the
sprockets are worn or if the chain is loose
(indicated by excessive noise in operation).
It’s a good idea to renew the chain anyway if
the engine is stripped down for overhaul. The
rollers on a very badly worn chain may be
slightly grooved. To avoid future problems, if
there’s any doubt at all about the chain’s
condition, renew it.
Chain rail and tensioner
9Inspect the chain guide rail and tensioner
rail for deep grooves caused by chain contact.
Renew them if they are excessively worn. The
rails can be renewed after removing the
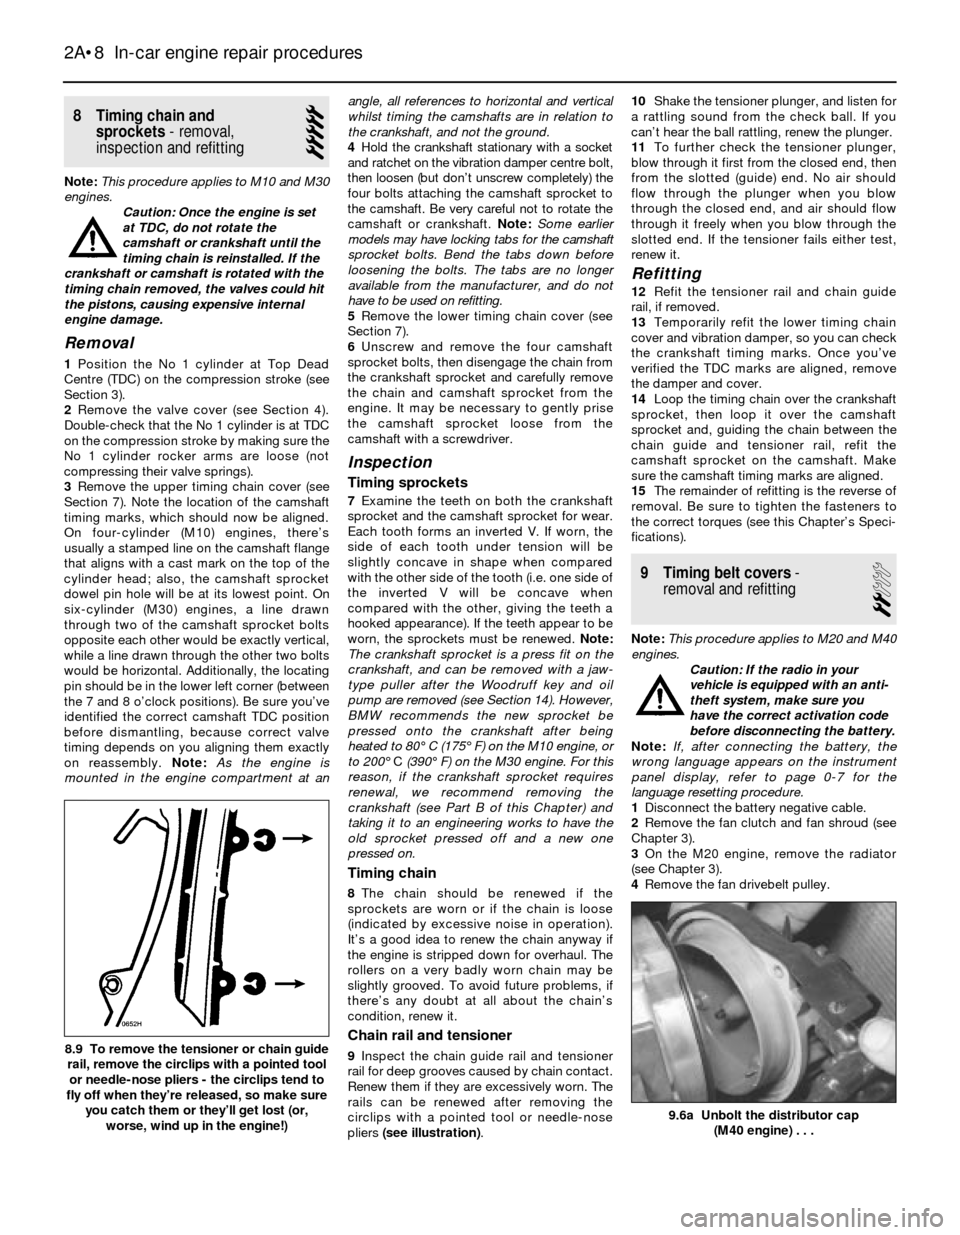
circlips with a pointed tool or needle-nose
pliers (see illustration).10Shake the tensioner plunger, and listen for
a rattling sound from the check ball. If you
can’t hear the ball rattling, renew the plunger.
11To further check the tensioner plunger,
blow through it first from the closed end, then
from the slotted (guide) end. No air should
flow through the plunger when you blow
through the closed end, and air should flow
through it freely when you blow through the
slotted end. If the tensioner fails either test,
renew it.
Refitting
12Refit the tensioner rail and chain guide
rail, if removed.
13Temporarily refit the lower timing chain
cover and vibration damper, so you can check
the crankshaft timing marks. Once you’ve
verified the TDC marks are aligned, remove
the damper and cover.
14Loop the timing chain over the crankshaft
sprocket, then loop it over the camshaft
sprocket and, guiding the chain between the
chain guide and tensioner rail, refit the
camshaft sprocket on the camshaft. Make
sure the camshaft timing marks are aligned.
15The remainder of refitting is the reverse of
removal. Be sure to tighten the fasteners to
the correct torques (see this Chapter’s Speci-
fications).
9 Timing belt covers-
removal and refitting
2
Note:This procedure applies to M20 and M40
engines.
Caution: If the radio in your
vehicle is equipped with an anti-
theft system, make sure you
have the correct activation code
before disconnecting the battery.
Note: If, after connecting the battery, the
wrong language appears on the instrument
panel display, refer to page 0-7 for the
language resetting procedure.
1Disconnect the battery negative cable.
2Remove the fan clutch and fan shroud (see
Chapter 3).
3On the M20 engine, remove the radiator
(see Chapter 3).
4Remove the fan drivebelt pulley.
2A•8 In-car engine repair procedures
9.6a Unbolt the distributor cap
(M40 engine) . . .
8.9 To remove the tensioner or chain guide
rail, remove the circlips with a pointed tool
or needle-nose pliers - the circlips tend to
fly off when they’re released, so make sure
you catch them or they’ll get lost (or,
worse, wind up in the engine!)
Page 79 of 228
3General
Coolant capacity . . . . . . . . . . . . . . . . . . . . . . . . . . . . . . . . . . . . . . . . . . . See Chapter 1
Thermostat rating
Opening temperature . . . . . . . . . . . . . . . . . . . . . . . . . . . . . . . . . . . . . 80°C (176°F)
Fully open at . . . . . . . . . . . . . . . . . . . . . . . . . . . . . . . . . . . . . . . . . . . . 100°C (212°F)
Cooling fan thermo-switch - switching temperatures
Low-speed . . . . . . . . . . . . . . . . . . . . . . . . . . . . . . . . . . . . . . . . . . . . . 91°C (196°F)
High-speed . . . . . . . . . . . . . . . . . . . . . . . . . . . . . . . . . . . . . . . . . . . . . 99°C (210°F)
Torque wrench settingsNm
Mechanical cooling fan clutch-to-water pump securing
nut (left-hand thread) . . . . . . . . . . . . . . . . . . . . . . . . . . . . . . . . . . . . 40
Mechanical cooling fan-to-clutch bolts . . . . . . . . . . . . . . . . . . . . . . . . . 10
Water pump bolts
Small bolts (M6) . . . . . . . . . . . . . . . . . . . . . . . . . . . . . . . . . . . . . . . . . 10
Large bolts (M8) . . . . . . . . . . . . . . . . . . . . . . . . . . . . . . . . . . . . . . . . . 22
Thermostat housing bolts . . . . . . . . . . . . . . . . . . . . . . . . . . . . . . . . . . . . 10
Chapter 3
Cooling, heating and air conditioning systems
Air conditioner receiver-drier - removal and refitting . . . . . . . . . . . . 16
Air conditioning blower motor (E28/”old-shape” 5-series
models) - removal and refitting . . . . . . . . . . . . . . . . . . . . . . . . . . . 14
Air conditioning compressor - removal and refitting . . . . . . . . . . . . . 13
Air conditioning condenser - removal and refitting . . . . . . . . . . . . . . 15
Air conditioning system - precautions and maintenance . . . . . . . . . 12
Antifreeze - general information . . . . . . . . . . . . . . . . . . . . . . . . . . . . 2
Coolant level check . . . . . . . . . . . . . . . . . . . . . . . . . . See Chapter 1
Coolant temperature sender unit - check and renewal . . . . . . . . . . . 8
Cooling system check . . . . . . . . . . . . . . . . . . . . . . . . See Chapter 1
Cooling system servicing (draining, flushing and refilling)See Chapter 1Engine cooling fan(s) and clutch - check, removal and refitting . . . . 5
Evaporator matrix - removal and refitting . . . . . . . . . . . . . . . . . . . . . 17
General information . . . . . . . . . . . . . . . . . . . . . . . . . . . . . . . . . . . . . . 1
Heater and air conditioner control assembly - removal and refitting 10
Heater and air conditioning blower motor - removal,testing and
refitting . . . . . . . . . . . . . . . . . . . . . . . . . . . . . . . . . . . . . . . . . . . . . . 9
Heater matrix - removal and refitting . . . . . . . . . . . . . . . . . . . . . . . . 11
Radiator - removal and refitting . . . . . . . . . . . . . . . . . . . . . . . . . . . . 4
Thermostat - check and renewal . . . . . . . . . . . . . . . . . . . . . . . . . . . 3
Water pump - check . . . . . . . . . . . . . . . . . . . . . . . . . . . . . . . . . . . . . 6
Water pump - removal and refitting . . . . . . . . . . . . . . . . . . . . . . . . . 7
3•1
Easy,suitable for
novice with little
experienceFairly easy,suitable
for beginner with
some experienceFairly difficult,
suitable for competent
DIY mechanic
Difficult,suitable for
experienced DIY
mechanicVery difficult,
suitable for expert
DIY or professional
Degrees of difficulty
Specifications Contents
1 General information
Engine cooling system
All vehicles covered by this manual employ
a pressurised engine cooling system, with
thermostatically-controlled coolant circulation.
An impeller-type water pump mounted on
the front of the block pumps coolant through
the engine. The coolant flows around each
cylinder, and towards the rear of the engine.
Cast-in coolant passages direct coolantaround the intake and exhaust ports, near the
spark plug areas, and in close proximity to the
exhaust valve guides.
A wax-pellet-type thermostat is located in-
line in the bottom hose on M10 engines, in a
housing near the front of the engine on M20
and M30 engines, or behind an elbow under
the timing belt upper cover (on the front of the
cylinder head) on M40 engines. During warm-
up, the closed thermostat prevents coolant
from circulating through the radiator. As the
engine nears normal operating temperature,
the thermostat opens and allows hot coolant
to travel through the radiator, where it’s
cooled before returning to the engine.The pressure in the system raises the
boiling point of the coolant, and increases the
cooling efficiency of the radiator. The cooling
system is sealed by a pressure-type cap. If
the system pressure exceeds the cap
pressure relief value, the excess pressure in
the system forces the spring-loaded valve
inside the cap off its seat, and allows the
coolant to escape through the overflow tube.
The pressure cap on four-cylinder models is
on the top of the radiator; on six-cylinder models,
it’s on top of a translucent plastic expansion
tank. The cap pressure rating is moulded into the
top of the cap. The pressure rating is either
1.0 bar (14 psi) or 1.2 bars (17 psi).
Page 80 of 228
Warning: Do not remove the
pressure cap from the radiator or
expansion tank until the engine
has cooled completely and
there’s no pressure remaining in the
cooling system. Removing the cap from a
hot engine risks personal injury by
scalding.
Heating system
The heating system consists of a blower fan
and heater matrix located in the heater box,
with hoses connecting the heater matrix to the
engine cooling system, and the heater/air
conditioning control head on the dashboard.
Hot engine coolant is circulated through the
heater matrix passages all the time the engine
is running. Switching the heater on opens a
flap door to direct air through the heater
matrix, and the warmed air enters the
passenger compartment. A fan switch on the
control head activates the blower motor,
which forces more air through the heater
matrix, giving additional heater output for
demisting, etc.
Air conditioning system
The air conditioning system consists of a
condenser mounted in front of the radiator, an
evaporator mounted adjacent to the heater
matrix, a compressor mounted on the engine,
a filter-drier (receiver-drier) which contains a
high-pressure relief valve, and the plumbing
connecting all of the above components.
A blower fan forces the warmer air of the
passenger compartment through the
evaporator matrix (a radiator-in-reverse),
transferring the heat from the air to the
refrigerant. The liquid refrigerant boils off into
low-pressure vapour, taking the heat with it
when it leaves the evaporator.
Note: Refer to the precautions at the start
of Section 12 concerning the potential
dangers associated with the air conditioning
system.
2 Antifreeze-
general information
Warning: Do not allow antifreeze
to come in contact with your skin
or painted surfaces of the
vehicle. Rinse off spills
immediately with plenty of water. If
consumed, antifreeze can be fatal;
children and pets are attracted by its
sweet taste, so wipe up garage floor and
drip pan coolant spills immediately. Keep
antifreeze containers covered, and repair
leaks in your cooling system as soon as
they are noticed.
The cooling system should be filled with a
60/40% water/ethylene-glycol-based anti-
freeze solution, which will prevent freezing
down to approximately -27°C (-17°F). The
antifreeze also raises the boiling point of thecoolant, and (if of good quality) provides
protection against corrosion.
The cooling system should be drained,
flushed and refilled at the specified intervals
(see Chapter 1). Old or contaminated
antifreeze solutions are likely to cause
damage, and encourage the formation of rust
and scale in the system. Use distilled water
with the antifreeze, if available, or clean
rainwater. Tap water will do, but not if the
water in your area is at all “hard”.
Before adding antifreeze, check all hose
connections, because antifreeze tends to
search out and leak through very minute
openings. Engines don’t normally consume
coolant, so if the level goes down, find the
cause and correct it.
The antifreeze mixture should be
maintained at its correct proportions; adding
too much antifreeze reduces the efficiency of
the cooling system. If necessary, consult the
mixture ratio chart on the antifreeze container
before adding coolant. Hydrometers are
available at most car accessory shops to test
the coolant. Use antifreeze which meets the
vehicle manufacturer’s specifications.
3 Thermostat-
check and renewal
1
Warning: Do not remove the
radiator cap, drain the coolant, or
renew the thermostat until the
engine has cooled completely.
Check
1Before assuming the thermostat is to blame
for a cooling system problem, check the
coolant level, drivebelt tension (see Chapter 1)
and temperature gauge (or warning light)
operation.
2If the engine seems to be taking a long time
to warm up (based on heater output or
temperature gauge operation), the thermostat
is probably stuck open. Renew the
thermostat.
3If the engine runs hot, use your hand to
check the temperature of the upper radiator
hose. If the hose isn’t hot, but the engine is,
the thermostat is probably stuck closed,preventing the coolant inside the engine from
circulating to the radiator. Renew the
thermostat.
Caution: Don’t drive the vehicle
without a thermostat. The engine
will be very slow to warm-up in
cold conditions, resulting in poor
fuel economy and driveability. A new
thermostat is normally an inexpensive
component anyway.
4If the upper radiator hose is hot, it means
that the coolant is flowing and the thermostat
is at least partly open. Consult the “Fault
finding” Section at the rear of this manual for
cooling system diagnosis.
Renewal
All models
5Disconnect the negative cable from the
battery.
Caution: If the radio in your
vehicle is equipped with an anti-
theft system, make sure you
have the correct activation code
before disconnecting the battery.
Note: If, after connecting the battery, the
wrong language appears on the instrument
panel display, refer to page 0-7 for the
language resetting procedure.
6Drain the cooling system (see Chapter 1). If
the coolant is relatively new or in good
condition, save it and re-use it.
M10 engines
7The thermostat is located in the bottom
hose. First remove the cooling fan.
8Note the fitted position of the thermostat,
then unscrew the hose clamps and withdraw
the thermostat from the hose connections
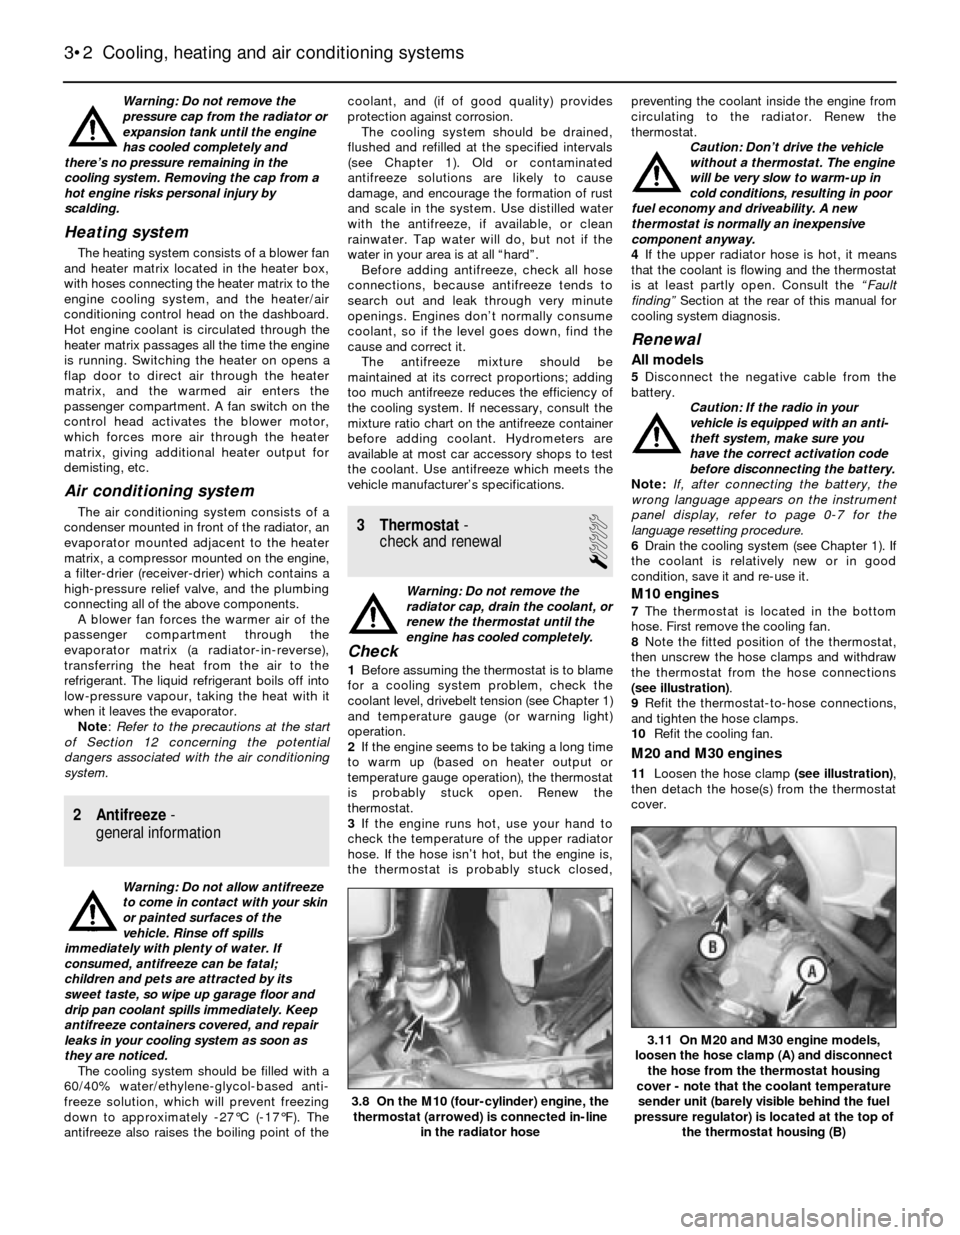
(see illustration).
9Refit the thermostat-to-hose connections,
and tighten the hose clamps.
10Refit the cooling fan.
M20 and M30 engines
11Loosen the hose clamp (see illustration),
then detach the hose(s) from the thermostat
cover.
3•2 Cooling, heating and air conditioning systems
3.11 On M20 and M30 engine models,
loosen the hose clamp (A) and disconnect
the hose from the thermostat housing
cover - note that the coolant temperature
sender unit (barely visible behind the fuel
pressure regulator) is located at the top of
the thermostat housing (B)
3.8 On the M10 (four-cylinder) engine, the
thermostat (arrowed) is connected in-line
in the radiator hose
Page 89 of 228

4
Carburettor (Solex 2B4)
Main jet
Stage 1 . . . . . . . . . . . . . . . . . . . . . . . . . . . . . . . . . . . . . . . . . . . . . . . . X120
Stage 2 . . . . . . . . . . . . . . . . . . . . . . . . . . . . . . . . . . . . . . . . . . . . . . . . X90
Air correction jet
Stage 1 . . . . . . . . . . . . . . . . . . . . . . . . . . . . . . . . . . . . . . . . . . . . . . . . 135
Stage 2 . . . . . . . . . . . . . . . . . . . . . . . . . . . . . . . . . . . . . . . . . . . . . . . . 75
Venturi diameter
Stage 1 . . . . . . . . . . . . . . . . . . . . . . . . . . . . . . . . . . . . . . . . . . . . . . . . 24 mm
Stage 2 . . . . . . . . . . . . . . . . . . . . . . . . . . . . . . . . . . . . . . . . . . . . . . . . 28 mm
Idle/air jet
Stage 1 . . . . . . . . . . . . . . . . . . . . . . . . . . . . . . . . . . . . . . . . . . . . . . . . 50/120
Stage 2 . . . . . . . . . . . . . . . . . . . . . . . . . . . . . . . . . . . . . . . . . . . . . . . . 40/125
Float needle valve diameter . . . . . . . . . . . . . . . . . . . . . . . . . . . . . . . . . . 2.0 mm
Choke gap (pulldown) . . . . . . . . . . . . . . . . . . . . . . . . . . . . . . . . . . . . . . . 4.0 to 5.5 mm
Throttle positioner spring preload . . . . . . . . . . . . . . . . . . . . . . . . . . . . . 22.0 to 24.0 mm
Float level
Stage 1 float chamber . . . . . . . . . . . . . . . . . . . . . . . . . . . . . . . . . . . . 27.0 to 29.0 mm
Stage 2 float chamber . . . . . . . . . . . . . . . . . . . . . . . . . . . . . . . . . . . . 29.0 to 31.0 mm
Chapter 4 Fuel and exhaust systems
Accelerator cable - check, adjustment and renewal . . . . . . . . . . . . . 9
Air cleaner assembly - removal and refitting . . . . . . . . . . . . . . . . . . . 8
Air filter renewal . . . . . . . . . . . . . . . . . . . . . . . . . . . . . See Chapter 1
Airflow meter - check, removal and refitting . . . . . . . . . . . . . . . . . . . 16
Carburettor - cleaning and adjustment . . . . . . . . . . . . . . . . . . . . . . . 12
Carburettor - general information . . . . . . . . . . . . . . . . . . . . . . . . . . . 10
Carburettor - removal and refitting . . . . . . . . . . . . . . . . . . . . . . . . . . 11
Cold start injector and thermotime switch -
checkand renewal . . . . . . . . . . . . . . . . . . . . . . . . . . . . . . . . . . . . . 19
Engine idle speed check and adjustment . . . . . . . . . See Chapter 1
Exhaust system check . . . . . . . . . . . . . . . . . . . . . . . . See Chapter 1
Exhaust system servicing - general information . . . . . . . . . . . . . . . . 22
Fuel filter renewal . . . . . . . . . . . . . . . . . . . . . . . . . . . See Chapter 1
Fuel injection system - check . . . . . . . . . . . . . . . . . . . . . . . . . . . . . . 15
Fuel injection system - depressurising . . . . . . . . . . . . . . . . . . . . . . . 2Fuel injection system - fault finding . . . . . . . . . . . . See end of Chapter
Fuel injection - general information . . . . . . . . . . . . . . . . . . . . . . . . . . 13
Fuel injection systems . . . . . . . . . . . . . . . . . . . . . . . . . . . . . . . . . . . . 14
Fuel injectors - check and renewal . . . . . . . . . . . . . . . . . . . . . . . . . . 20
Fuel lines and fittings - repair and renewal . . . . . . . . . . . . . . . . . . . . 5
Fuel pressure regulator - check and renewal . . . . . . . . . . . . . . . . . . 18
Fuel pump, transfer pump and fuel level sender unit -
removal and refitting . . . . . . . . . . . . . . . . . . . . . . . . . . . . . . . . . . . 4
Fuel pump/fuel pressure - check . . . . . . . . . . . . . . . . . . . . . . . . . . . 3
Fuel system check . . . . . . . . . . . . . . . . . . . . . . . . . . . See Chapter 1
Fuel tank - removal and refitting . . . . . . . . . . . . . . . . . . . . . . . . . . . . 6
Fuel tank cleaning and repair - general information . . . . . . . . . . . . . 7
General information . . . . . . . . . . . . . . . . . . . . . . . . . . . . . . . . . . . . . . 1
Idle air stabiliser valve - check, adjustment and renewal . . . . . . . . . 21
Throttle body - check, removal and refitting . . . . . . . . . . . . . . . . . . . 17
4•1
Easy,suitable for
novice with little
experienceFairly easy,suitable
for beginner with
some experienceFairly difficult,
suitable for competent
DIY mechanic
Difficult,suitable for
experienced DIY
mechanicVery difficult,
suitable for expert
DIY or professional
Degrees of difficulty
Specifications Contents