Page 7B 1 BMW 3 SERIES 1991 E30 Repair Manual
[x] Cancel search | Manufacturer: BMW, Model Year: 1991, Model line: 3 SERIES, Model: BMW 3 SERIES 1991 E30Pages: 228, PDF Size: 7.04 MB
Page 175 of 228

16 Windscreen/tailgate wiper
motor- removal and refitting
2
Caution: If the radio in your
vehicle is equipped with an anti-
theft system, make sure you have
the correct activation code
before disconnecting the battery, Refer to
the information on page 0-7 at the front of
this manual before detaching the cable.
Note: If, after connecting the battery, the
wrong language appears on the instrument
panel display, refer to page 0-7 for the
language resetting procedure.
1Disconnect the battery negative cable.
Windscreen wiper motor
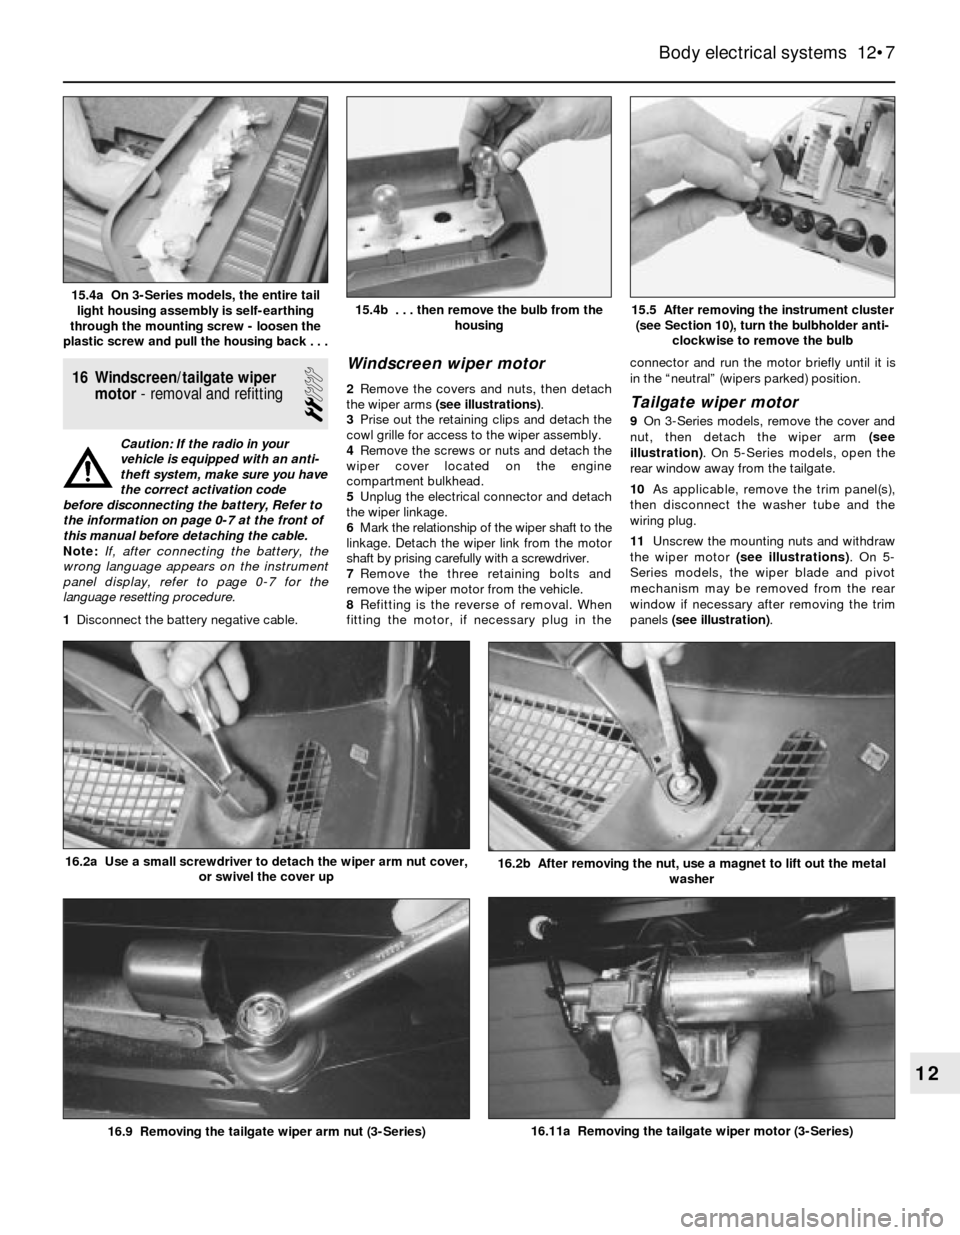
2Remove the covers and nuts, then detach
the wiper arms (see illustrations).
3Prise out the retaining clips and detach the
cowl grille for access to the wiper assembly.
4Remove the screws or nuts and detach the
wiper cover located on the engine
compartment bulkhead.
5Unplug the electrical connector and detach
the wiper linkage.
6Mark the relationship of the wiper shaft to the
linkage. Detach the wiper link from the motor
shaft by prising carefully with a screwdriver.
7Remove the three retaining bolts and
remove the wiper motor from the vehicle.
8Refitting is the reverse of removal. When
fitting the motor, if necessary plug in theconnector and run the motor briefly until it is
in the “neutral” (wipers parked) position.Tailgate wiper motor
9On 3-Series models, remove the cover and
nut, then detach the wiper arm (see
illustration). On 5-Series models, open the
rear window away from the tailgate.
10As applicable, remove the trim panel(s),
then disconnect the washer tube and the
wiring plug.
11Unscrew the mounting nuts and withdraw
the wiper motor (see illustrations). On 5-
Series models, the wiper blade and pivot
mechanism may be removed from the rear
window if necessary after removing the trim
panels (see illustration).
Body electrical systems 12•7
15.5 After removing the instrument cluster
(see Section 10), turn the bulbholder anti-
clockwise to remove the bulb15.4b . . . then remove the bulb from the
housing15.4a On 3-Series models, the entire tail
light housing assembly is self-earthing
through the mounting screw - loosen the
plastic screw and pull the housing back . . .
16.11a Removing the tailgate wiper motor (3-Series)
16.2b After removing the nut, use a magnet to lift out the metal
washer16.2a Use a small screwdriver to detach the wiper arm nut cover,
or swivel the cover up
16.9 Removing the tailgate wiper arm nut (3-Series)
12
Page 225 of 228

REF•25
REF
Index
Note: References throughout this index relate to Chapter•page number
A
ABS - 9•2
Accelerator cable - 4•9
Acknowledgements - 0•4
Aerial - 12•4
Air bags - 0•5
Air cleaner - 4•8
Air conditioning system - 3•2, 3•7, 3•8,
3•9, 3•10
Air filter - 1•20
Air gap - 5•7
Air intake system - 4•2, 4•14
Airflow meter - 4•15, 6•4
Alternator - 5•10
Anti-lock Braking system (ABS) - 9•2
Anti-roll bar - 10•4, 10•9
Anti-theft audio system - 0•7
Antifreeze - 1•3, 1-8, 3•2
Asbestos - 0•5
ATF - 1•3, 1•13, 1•23
Automatic choke - 4•13
Automatic transmission- 7B•1et seq
Automatic transmission fault finding -
7B•4, REF•13
Automatic transmission fluid - 1•3, 1•13,
1•23
B
Backfire - REF•11
Balljoints - 10•7
Battery - 0•5, 1•16, 5•2
Battery fault - REF•11
Big-end bearings - 2B•17, 2B•21
Bleeding brakes - 9•14
Bleeding clutch - 8•4
Bleeding power steering - 10•16Block - 2B•14, 2B•15
Blower motor - 3•7
Body corrosion - REF•4
Body electrical systems- 12•1et seq
Bodywork and fittings- 11•1et seq
Bonnet - 11•4
Boot lid - 11•6
Boots - 8•9, 10•13
Brake fluid - 1•3, 1•9
Brake lines and hoses - 1•22, 9•13
Braking system- 1•22, 9•1et seq,REF•1,
REF•2, REF•3
Braking system fault finding - REF•14
Bulbs - 12•6
Bumpers - 11•6
Burning - 0•5
C
Cables - 4•9, 5•2, 7B•3, 9•12
Calipers - 9•4
Cam followers - 2B•11
Camshaft - 2A•12, 2B•11
Carburettor - 4•10, 4•11
Carpets - 11•2
Catalytic converter - 4•20, 6•6
Central locking - 12•8
Charging - 1•17, 5•9
Chemicals - REF•18
Choke - 4•13
Clutch and driveline- 8•1et seq
Clutch fault finding - REF•12
Clutch fluid - 1•3, 1•9
CO level adjustment - 1•15, REF•4
Coil - 5•5
Coil springs - 10•7, 10•9
Cold start injectors - 4•17, 4•18
Compression check - 2B•4Compressor - 3•8
Condenser - 3•9
Connecting rods -2B•12, 2B•16, 2B•21
Constant velocity (CV) joint - 8•2, 8•8, 8•9
Continuity check - 12•2
Control arm - 10•4, 10•5
Conversion factors - REF•17
Coolant - 1•3, 1•8
Coolant pump - 3•5
Coolant temperature sender unit - 3•6
Coolant temperature sensor - 6•2
Cooling fan - 3•4
Cooling, heating and air conditioning
systems- 1•21, 1•24, 3•1et seq
Cooling system fault finding - REF•12
Crankshaft - 2A•12, 2A•13, 2A•19, 2B•13,
2B•17, 2B•19, 2B•20
Cruise control - 12•3, 12•8
Crushing - 0•5
Cushion - 11•9
CV joints - 8•2, 8•8, 8•9
Cylinder head - 2A•13, 2B•7, 2B•10, 2B•12
Cylinder honing - 2B•15
D
Dents in bodywork - 11•2
Differential (final drive) - 8•2, 8•10, 8•11
Differential oil -1•3, 1•19, 1•26
Direction indicators - 12•2, 12•3
Discs - 1•22, 9•5
Distributor - 1•18, 5•4
Door - 11•6, 11•8, REF•2
Drivebelts - 1•14
Driveplate - 2A•18
Driveshafts - 1•22, 8•2, 8•9
Drums - 1•23