Lift gate BMW 3 SERIES 1991 E30 Workshop Manual
[x] Cancel search | Manufacturer: BMW, Model Year: 1991, Model line: 3 SERIES, Model: BMW 3 SERIES 1991 E30Pages: 228, PDF Size: 7.04 MB
Page 163 of 228

7 Hinges and locks-
maintenance
1
Every six months or so, the hinges and lock
assemblies on the doors, bonnet and the boot
lid/tailgate should be given a few drops of
light oil or lock lubricant. The door or tailgate
lock strikers should also be lubricated with a
thin coat of grease, to reduce wear and
ensure free movement.
8 Fixed glass- renewal
5
Renewal of the windscreen and fixed glass
requires the use of special fast-setting
adhesive materials, and some specialised
tools and techniques. These operations
should be left to a dealer service department
or windscreen specialist.
9 Radiator grille-
removal and refitting
1
3-Series
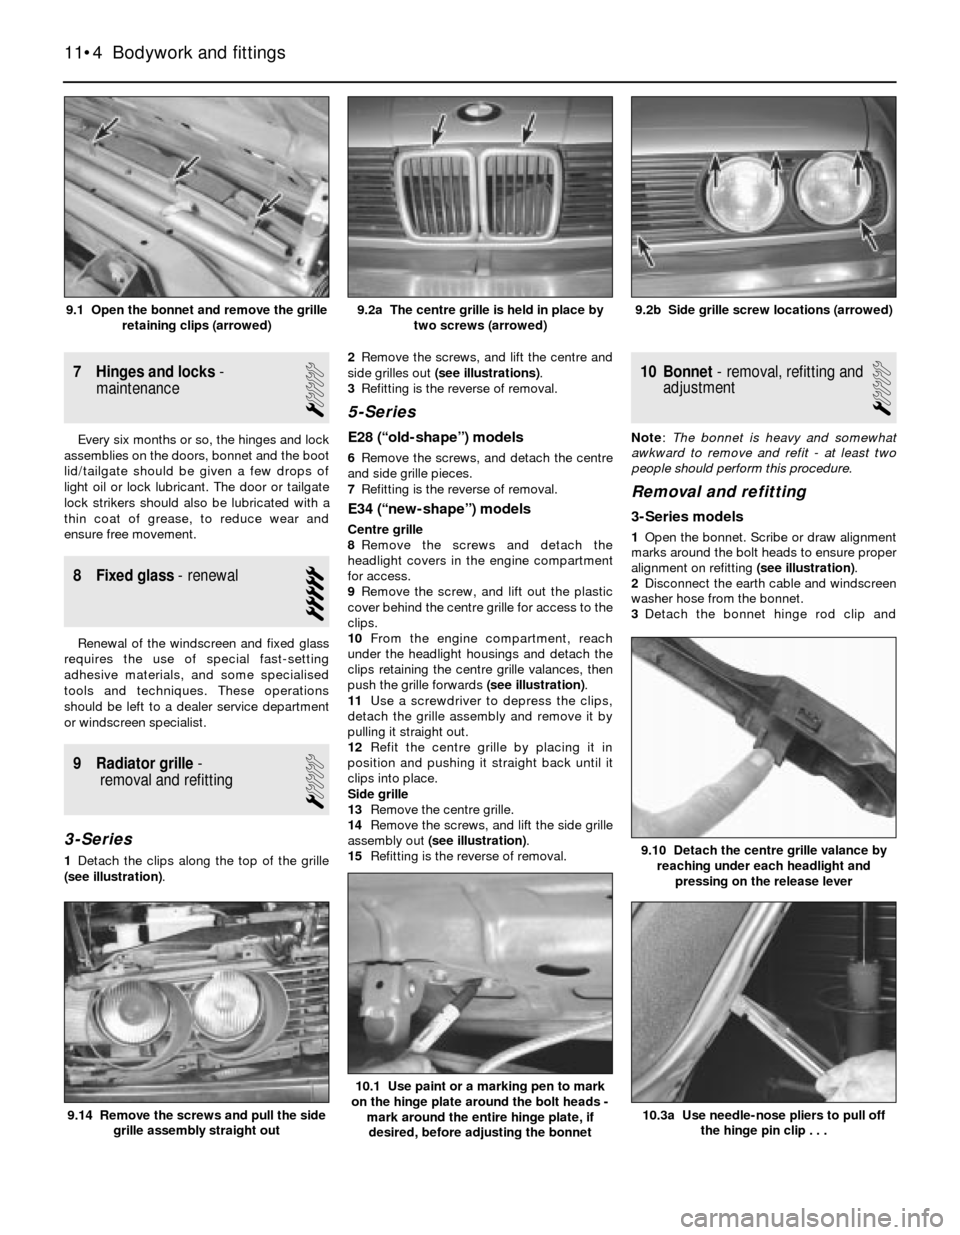
1Detach the clips along the top of the grille
(see illustration).2Remove the screws, and lift the centre and
side grilles out (see illustrations).
3Refitting is the reverse of removal.
5-Series
E28 (“old-shape”) models
6Remove the screws, and detach the centre
and side grille pieces.
7Refitting is the reverse of removal.
E34 (“new-shape”) models
Centre grille
8Remove the screws and detach the
headlight covers in the engine compartment
for access.
9Remove the screw, and lift out the plastic
cover behind the centre grille for access to the
clips.
10From the engine compartment, reach
under the headlight housings and detach the
clips retaining the centre grille valances, then
push the grille forwards (see illustration).
11Use a screwdriver to depress the clips,
detach the grille assembly and remove it by
pulling it straight out.
12Refit the centre grille by placing it in
position and pushing it straight back until it
clips into place.
Side grille
13Remove the centre grille.
14Remove the screws, and lift the side grille
assembly out (see illustration).
15Refitting is the reverse of removal.
10 Bonnet- removal, refitting and
adjustment
1
Note: The bonnet is heavy and somewhat
awkward to remove and refit - at least two
people should perform this procedure.
Removal and refitting
3-Series models
1Open the bonnet. Scribe or draw alignment
marks around the bolt heads to ensure proper
alignment on refitting (see illustration).
2Disconnect the earth cable and windscreen
washer hose from the bonnet.
3Detach the bonnet hinge rod clip and
11•4 Bodywork and fittings
10.3a Use needle-nose pliers to pull off
the hinge pin clip . . .
10.1 Use paint or a marking pen to mark
on the hinge plate around the bolt heads -
mark around the entire hinge plate, if
desired, before adjusting the bonnet
9.14 Remove the screws and pull the side
grille assembly straight out
9.10 Detach the centre grille valance by
reaching under each headlight and
pressing on the release lever
9.2b Side grille screw locations (arrowed)9.2a The centre grille is held in place by
two screws (arrowed)9.1 Open the bonnet and remove the grille
retaining clips (arrowed)
Page 165 of 228

19After adjustment, screw the stop pads in
or out to support the bonnet in its new
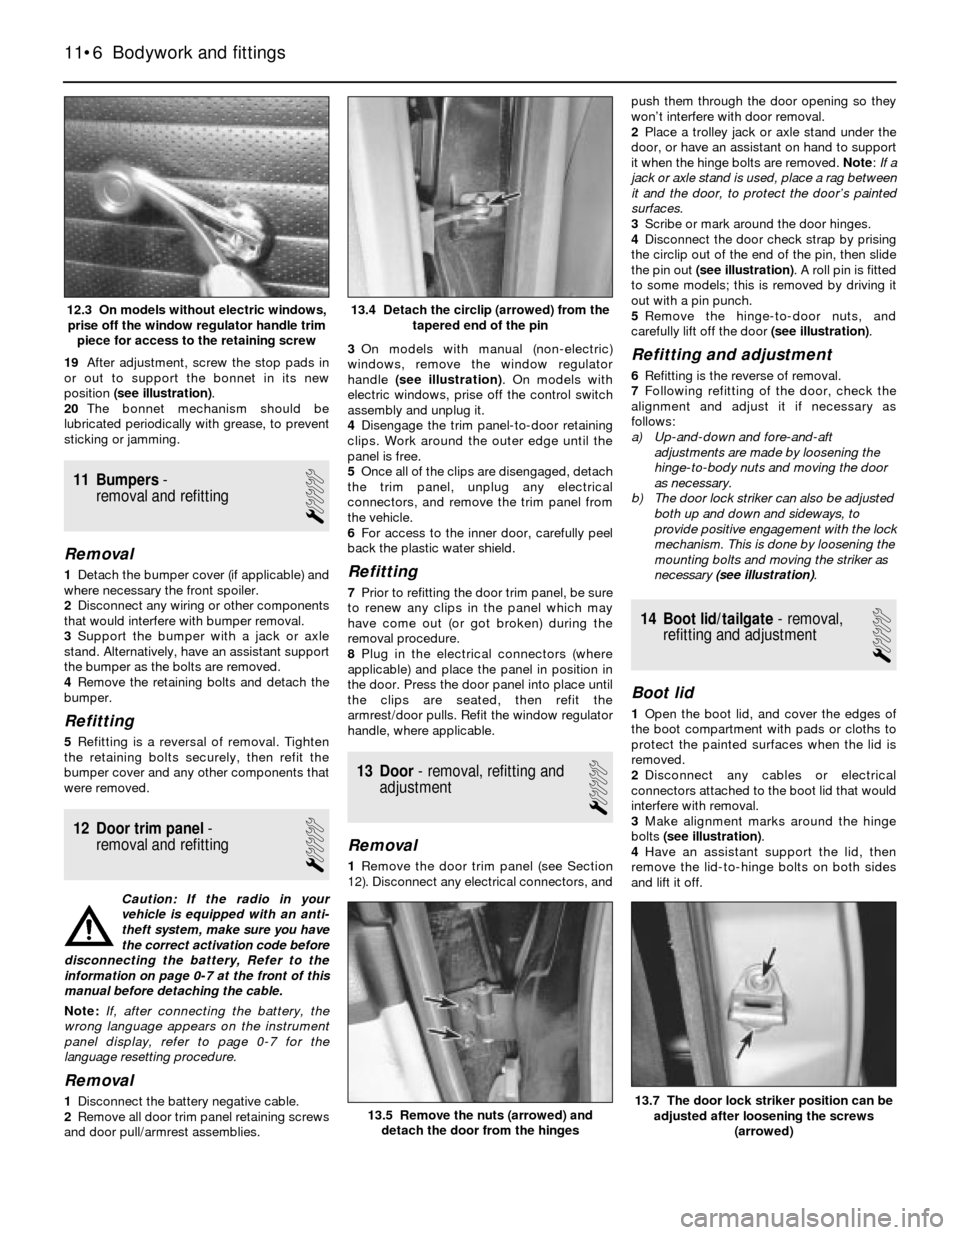
position (see illustration).
20The bonnet mechanism should be
lubricated periodically with grease, to prevent
sticking or jamming.
11 Bumpers-
removal and refitting
1
Removal
1Detach the bumper cover (if applicable) and
where necessary the front spoiler.
2Disconnect any wiring or other components
that would interfere with bumper removal.
3Support the bumper with a jack or axle
stand. Alternatively, have an assistant support
the bumper as the bolts are removed.
4Remove the retaining bolts and detach the
bumper.
Refitting
5Refitting is a reversal of removal. Tighten
the retaining bolts securely, then refit the
bumper cover and any other components that
were removed.
12 Door trim panel-
removal and refitting
1
Caution: If the radio in your
vehicle is equipped with an anti-
theft system, make sure you have
the correct activation code before
disconnecting the battery, Refer to the
information on page 0-7 at the front of this
manual before detaching the cable.
Note: If, after connecting the battery, the
wrong language appears on the instrument
panel display, refer to page 0-7 for the
language resetting procedure.
Removal
1Disconnect the battery negative cable.
2Remove all door trim panel retaining screws
and door pull/armrest assemblies.3On models with manual (non-electric)
windows, remove the window regulator
handle (see illustration). On models with
electric windows, prise off the control switch
assembly and unplug it.
4Disengage the trim panel-to-door retaining
clips. Work around the outer edge until the
panel is free.
5Once all of the clips are disengaged, detach
the trim panel, unplug any electrical
connectors, and remove the trim panel from
the vehicle.
6For access to the inner door, carefully peel
back the plastic water shield.
Refitting
7Prior to refitting the door trim panel, be sure
to renew any clips in the panel which may
have come out (or got broken) during the
removal procedure.
8Plug in the electrical connectors (where
applicable) and place the panel in position in
the door. Press the door panel into place until
the clips are seated, then refit the
armrest/door pulls. Refit the window regulator
handle, where applicable.
13 Door- removal, refitting and
adjustment
1
Removal
1Remove the door trim panel (see Section
12). Disconnect any electrical connectors, andpush them through the door opening so they
won’t interfere with door removal.
2Place a trolley jack or axle stand under the
door, or have an assistant on hand to support
it when the hinge bolts are removed. Note: If a
jack or axle stand is used, place a rag between
it and the door, to protect the door’s painted
surfaces.
3Scribe or mark around the door hinges.
4Disconnect the door check strap by prising
the circlip out of the end of the pin, then slide
the pin out (see illustration). A roll pin is fitted
to some models; this is removed by driving it
out with a pin punch.
5Remove the hinge-to-door nuts, and
carefully lift off the door (see illustration).
Refitting and adjustment
6Refitting is the reverse of removal.
7Following refitting of the door, check the
alignment and adjust it if necessary as
follows:
a) Up-and-down and fore-and-aft
adjustments are made by loosening the
hinge-to-body nuts and moving the door
as necessary.
b) The door lock striker can also be adjusted
both up and down and sideways, to
provide positive engagement with the lock
mechanism. This is done by loosening the
mounting bolts and moving the striker as
necessary (see illustration).
14 Boot lid/tailgate- removal,
refitting and adjustment
1
Boot lid
1Open the boot lid, and cover the edges of
the boot compartment with pads or cloths to
protect the painted surfaces when the lid is
removed.
2Disconnect any cables or electrical
connectors attached to the boot lid that would
interfere with removal.
3Make alignment marks around the hinge
bolts (see illustration).
4Have an assistant support the lid, then
remove the lid-to-hinge bolts on both sides
and lift it off.
11•6 Bodywork and fittings
13.7 The door lock striker position can be
adjusted after loosening the screws
(arrowed)13.5 Remove the nuts (arrowed) and
detach the door from the hinges
13.4 Detach the circlip (arrowed) from the
tapered end of the pin12.3 On models without electric windows,
prise off the window regulator handle trim
piece for access to the retaining screw
Page 172 of 228

8 Radio- removal and refitting
1
Caution: If the radio in your
vehicle is equipped with an anti-
theft system, make sure you have
the correct activation code
before disconnecting the battery, Refer to
the information on page 0-7 at the front of
this manual before detaching the cable.
Note: If, after connecting the battery, the
wrong language appears on the instrument
panel display, refer to page 0-7 for the
language resetting procedure.
Removal
1Disconnect the battery negative cable.
2The radios on most models are held in place
by internal clips which are usually located at
the sides or corners of the unit faceplate.
Removal requires a special tool which is
inserted into the holes to release the clips so
the radio can be pulled out. These tools can be
fabricated from heavy wire, or are available
from your dealer or a car audio specialist. On
anti-theft radios, the clips are moved in and
out by internal screws which require another
type of tool. Insert the tool into the holes until
the clips release, then withdraw the radio from
the dash panel. Disconnect the wiring from the
radio and remove it.3On some models, the radio is held in place
by screws located beneath the faceplate. The
control knobs must be pulled off before the
faceplate can be withdrawn.
Refitting
4Refitting is the reverse of removal.
9 Aerial- removal and refitting
1
Caution: If the radio in your
vehicle is equipped with an anti-
theft system, make sure you have
the correct activation code
before disconnecting the battery, Refer to
the information on page 0-7 at the front of
this manual before detaching the cable.
Note: If, after connecting the battery, the
wrong language appears on the instrument
panel display, refer to page 0-7 for the
language resetting procedure.
Removal
1Disconnect the battery negative cable.
2Use circlip pliers to unscrew the aerial
mounting nut.
3Open the boot lid/tailgate and remove the
left side trim panel. On some models, the jack
and tail light cluster cover will have to be
removed first.
4Unplug the aerial power and radio lead
connectors (as applicable), remove the
retaining bolts, and remove the aerial and
motor assembly.
Refitting
5Refitting is the reverse of removal.
10 Instrument cluster-
removal and refitting
2
Caution: The instrument cluster
and components are very
susceptible to damage from
static electricity. Make sure you
are earthed and have dischargedany static electricity (by touching an object
such as a metal water pipe) before
touching the cluster or components.
Caution: If the radio in your
vehicle is equipped with an anti-
theft system, make sure you have
the correct activation code
before disconnecting the battery, Refer to
the information on page 0-7 at the front of
this manual before detaching the cable.
Note: If, after connecting the battery, the
wrong language appears on the instrument
panel display, refer to page 0-7 for the
language resetting procedure.
Removal
1Disconnect the battery negative cable.
2As necessary, remove the steering column
shrouds and lower trim panel (see Chap-
ter 11).
3Remove the screws holding the cluster to
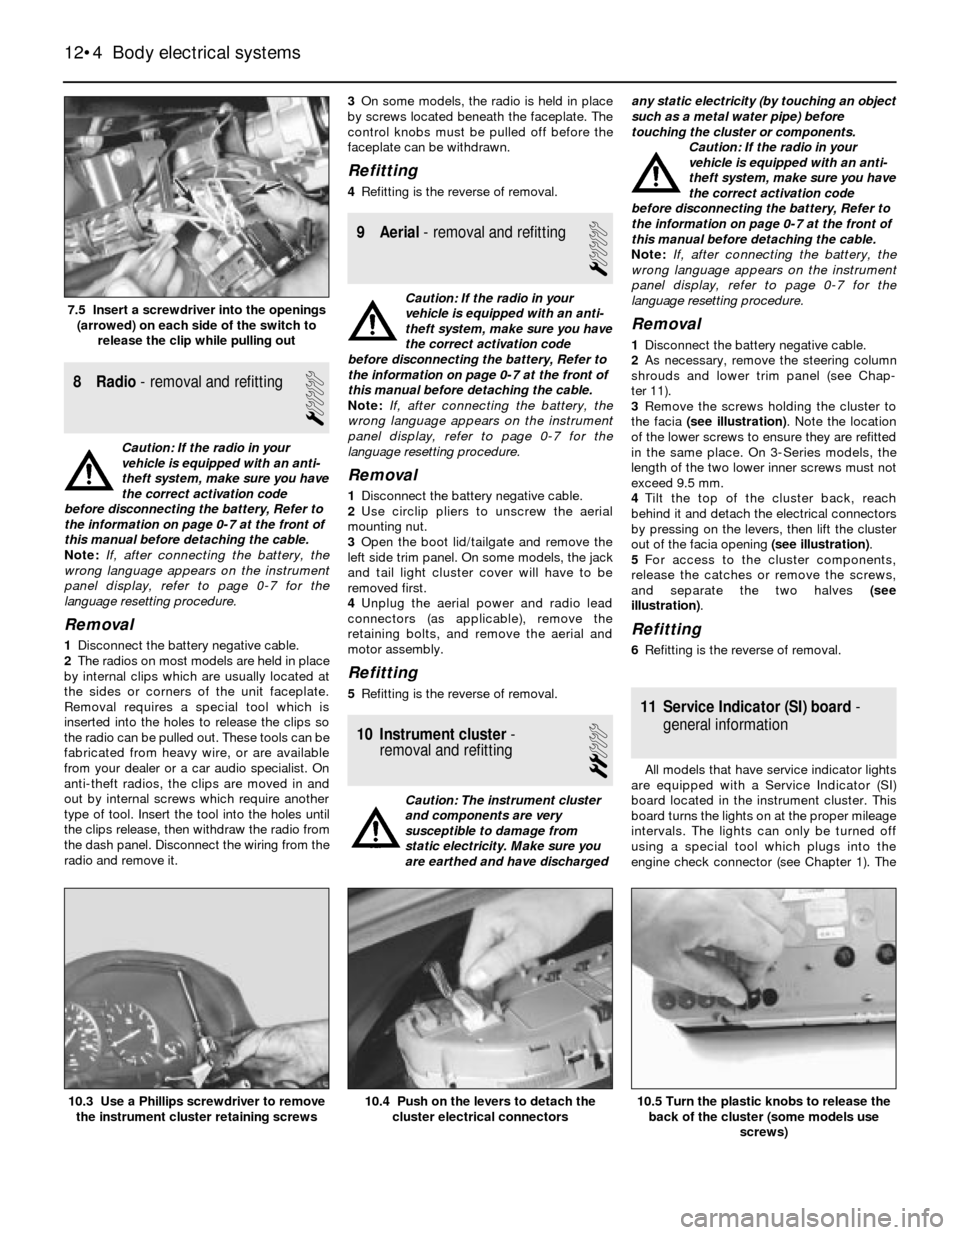
the facia (see illustration). Note the location
of the lower screws to ensure they are refitted
in the same place. On 3-Series models, the
length of the two lower inner screws must not
exceed 9.5 mm.
4Tilt the top of the cluster back, reach
behind it and detach the electrical connectors
by pressing on the levers, then lift the cluster
out of the facia opening (see illustration).
5For access to the cluster components,
release the catches or remove the screws,
and separate the two halves (see
illustration).
Refitting
6Refitting is the reverse of removal.
11 Service Indicator (SI) board-
general information
All models that have service indicator lights
are equipped with a Service Indicator (SI)
board located in the instrument cluster. This
board turns the lights on at the proper mileage
intervals. The lights can only be turned off
using a special tool which plugs into the
engine check connector (see Chapter 1). The
12•4 Body electrical systems
10.5 Turn the plastic knobs to release the
back of the cluster (some models use
screws)10.4 Push on the levers to detach the
cluster electrical connectors10.3 Use a Phillips screwdriver to remove
the instrument cluster retaining screws
7.5 Insert a screwdriver into the openings
(arrowed) on each side of the switch to
release the clip while pulling out
Page 175 of 228

16 Windscreen/tailgate wiper
motor- removal and refitting
2
Caution: If the radio in your
vehicle is equipped with an anti-
theft system, make sure you have
the correct activation code
before disconnecting the battery, Refer to
the information on page 0-7 at the front of
this manual before detaching the cable.
Note: If, after connecting the battery, the
wrong language appears on the instrument
panel display, refer to page 0-7 for the
language resetting procedure.
1Disconnect the battery negative cable.
Windscreen wiper motor
2Remove the covers and nuts, then detach
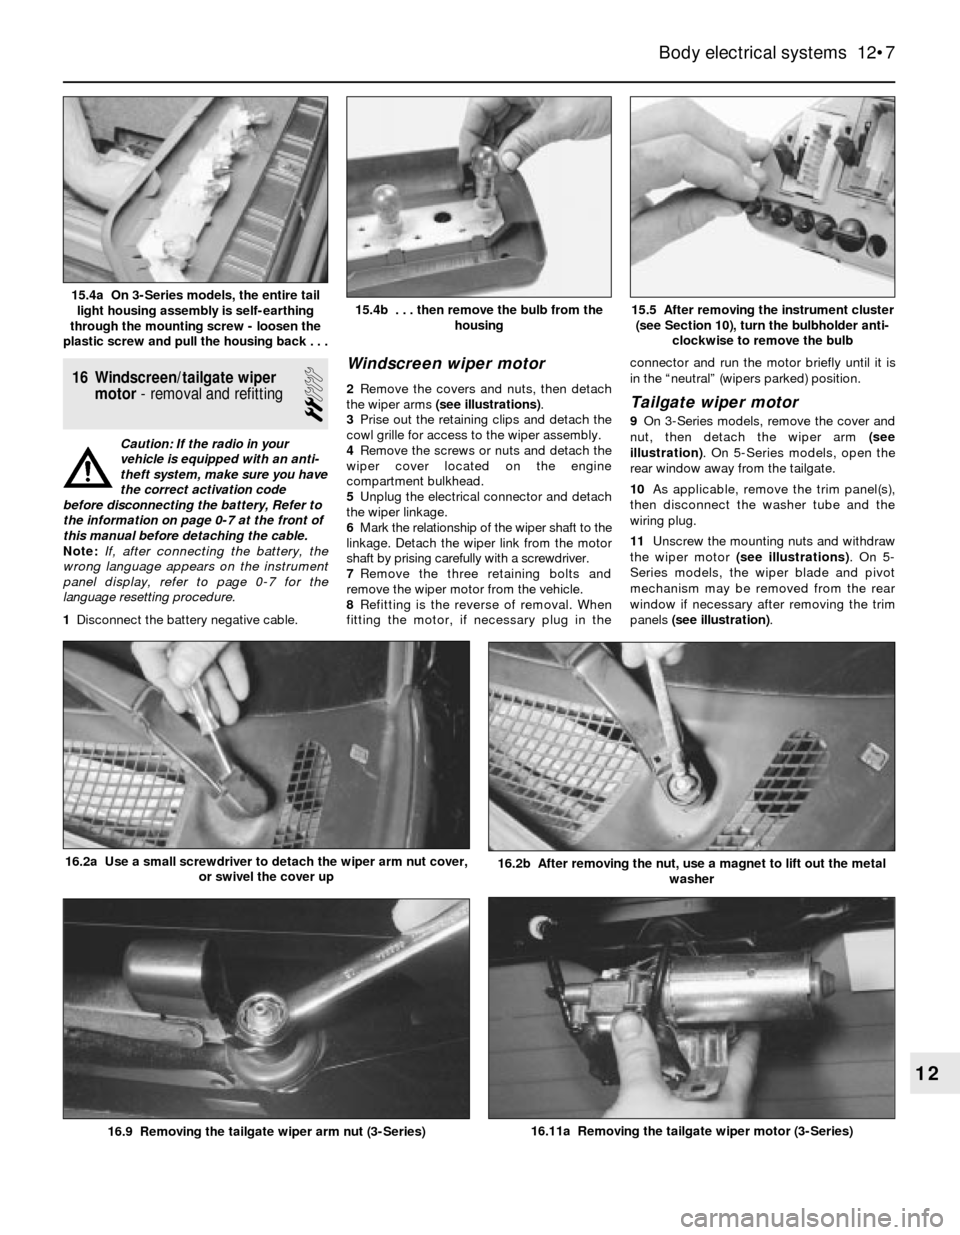
the wiper arms (see illustrations).
3Prise out the retaining clips and detach the
cowl grille for access to the wiper assembly.
4Remove the screws or nuts and detach the
wiper cover located on the engine
compartment bulkhead.
5Unplug the electrical connector and detach
the wiper linkage.
6Mark the relationship of the wiper shaft to the
linkage. Detach the wiper link from the motor
shaft by prising carefully with a screwdriver.
7Remove the three retaining bolts and
remove the wiper motor from the vehicle.
8Refitting is the reverse of removal. When
fitting the motor, if necessary plug in theconnector and run the motor briefly until it is
in the “neutral” (wipers parked) position.Tailgate wiper motor
9On 3-Series models, remove the cover and
nut, then detach the wiper arm (see
illustration). On 5-Series models, open the
rear window away from the tailgate.
10As applicable, remove the trim panel(s),
then disconnect the washer tube and the
wiring plug.
11Unscrew the mounting nuts and withdraw
the wiper motor (see illustrations). On 5-
Series models, the wiper blade and pivot
mechanism may be removed from the rear
window if necessary after removing the trim
panels (see illustration).
Body electrical systems 12•7
15.5 After removing the instrument cluster
(see Section 10), turn the bulbholder anti-
clockwise to remove the bulb15.4b . . . then remove the bulb from the
housing15.4a On 3-Series models, the entire tail
light housing assembly is self-earthing
through the mounting screw - loosen the
plastic screw and pull the housing back . . .
16.11a Removing the tailgate wiper motor (3-Series)
16.2b After removing the nut, use a magnet to lift out the metal
washer16.2a Use a small screwdriver to detach the wiper arm nut cover,
or swivel the cover up
16.9 Removing the tailgate wiper arm nut (3-Series)
12