phone BMW 3 SERIES 2011 User Guide
[x] Cancel search | Manufacturer: BMW, Model Year: 2011, Model line: 3 SERIES, Model: BMW 3 SERIES 2011Pages: 325, PDF Size: 12.94 MB
Page 40 of 325

2.Move foot in the direction of travel under‐
neath the bumper and immediately back.
The trunk lid opens, regardless of whether it was
previously locked or unlocked.
Malfunction
Comfort Access may not function properly if it
experiences interference from external sources
such as mobile phones, metal objects, overhead
power lines, transmission towers, etc.
In this case, open or close the vehicle using the
buttons on the remote control or use the
integrated key in the door lock.
If there is a malfunction, open the trunk lid with
the remote control button or with the button on
the trunk lid.
Alarm system
The concept
The vehicle alarm system responds to:
▷Opening of a door, the hood or the trunk lid.
▷Movements in the vehicle.
▷Changes in the vehicle tilt, e.g., during at‐
tempts to steal a wheel or when towing the
car.
▷Interruptions in battery voltage.
The alarm system briefly indicates tampering:
▷By sounding an acoustic alarm.
▷By switching on the hazard warning system.
▷By flashing the daytime running lights.
Arming and disarming the alarm
system
General information
When you lock or unlock the vehicle, either with
the remote control or at the door lock, the alarm
system is armed or disarmed at the same time.
Door lock and armed alarm system
The alarm system is triggered when the door is
opened, if the vehicle is unlocked via the door
lock.
In order to terminate this alarm, unlock vehicle
with the remote control or switch on the ignition,
if necessary, by emergency detection of the re‐
mote control.
Trunk lid and armed alarm system
The trunk lid can be opened using the remote
control, even if the alarm system is armed.
Press the button on the remote control
for approx. 1 second.
After the trunk lid is closed, it is locked and
monitored again by the alarm system. The haz‐
ard warning system flashes once.
In some vehicle equipment variants, the trunk lid
can only be opened using the remote control if
the vehicle was unlocked first.
Panic mode
Press the button on the remote control
for at least 3 seconds.
Switching off the alarm
▷Unlock the vehicle using the remote control.
▷With Comfort Access: if you are carrying the
remote control with you, pull on the door
handle.
Seite 40
ControlsOpening and closing
40Online Edition for Part no. 01 40 2 608 633 - 11 09 490
Page 80 of 325

System limits
Personal judgment
The system cannot serve as a substitute
for the driver's personal judgment of the traffic
situation.
The system assists the driver and does not re‐
place the human eye.◀
The system may not be fully functional and may
provide incorrect information in the following
situations:
▷In heavy fog, rain or snowfall.
▷When signs are concealed by objects.
▷When driving very close to the vehicle in
front of you.
▷When driving toward bright lights.
▷When the windshield behind the interior
rearview mirror is fogged over, dirty or cov‐
ered by a sticker, etc.
▷In the event of incorrect detection by the
camera.
▷If the speed limits stored in the navigation
system are incorrect.
▷In areas not covered by the navigation sys‐
tem.
▷When roads differ from the navigation, e.g.
due to changes in the road network.
▷When passing buses or trucks with a speed
sticker.
▷If the traffic signs are non-conforming.
▷During the calibration process of the camera
immediately after vehicle shipment.
Camera
The camera is located near the base of the mir‐
ror.
Keep windshield clean and clear in the area in
front of the interior rear view mirror.
Selection lists in the
instrument cluster
The concept
The following can be displayed or operated us‐
ing the buttons and the thumbwheel on the
steering wheel and the display in the instrument
cluster:
▷Current audio source.
▷Programs of the Driving Experience Switch.
▷Redial on telephone.
▷Activation of the voice activation system.
Display
Instrument cluster
Seite 80
ControlsDisplays
80Online Edition for Part no. 01 40 2 608 633 - 11 09 490
Page 92 of 325

Protective action
Airbags are not triggered in every impact situa‐
tion, e.g., in less severe accidents or rear-end
collisions.
Information on how to ensure the optimal
protective effect of the airbags
▷Keep at a distance from the airbags.
▷Always grasp the steering wheel on the
steering wheel rim, holding your hands at
the 3 o'clock and 9 o'clock positions, to keep
the danger of injury to your hands or arms as
low as possible if the airbag is triggered.
▷There should be no people, animals, or ob‐
jects between an airbag and a person.
▷Do not use the cover of the front airbag on
the front passenger side as a storage area.
▷Keep the dashboard and window on the
front passenger side clear, i.e., do not cover
with adhesive labels or coverings, and do not
attach holders such as for navigation instru‐
ments and mobile phones.
▷Make sure that the front passenger is sitting
correctly, i.e., keeps his or her feet and legs
in the footwell; otherwise, leg injuries can
occur if the front airbag is triggered.
▷Do not place slip covers, seat cushions or
other objects on the front passenger seat
that are not approved specifically for seats
with integrated side airbags.
▷Do not hang pieces of clothing, such as jack‐
ets, over the backrests.
▷Make sure that occupants keep their heads
away from the side airbag and do not rest
against the head airbag; otherwise, injuries
can occur if the airbags are triggered.
▷Do not remove the airbag restraint system.
▷Do not remove the steering wheel.
▷Do not apply adhesive materials to the air‐
bag cover panels, cover them or modify
them in any way.
▷Never modify either the individual compo‐
nents or the wiring in the airbag system. This
also applies to steering wheel covers, the
dashboard, the seats, the roof pillars and the
sides of the headliner.◀
Even when all instructions are followed closely,
injury from contact with the airbags cannot be
ruled out in certain situations.
The ignition and inflation noise may lead to
short-term and, in most cases, temporary hear‐
ing impairment in sensitive individuals.
In the case of a malfunction, deactivation
and after triggering of the airbags
Do not touch the individual components imme‐
diately after the system has been triggered; oth‐
erwise, there is the danger of burns.
Only have the airbags checked, repaired or dis‐
mantled and the airbag generator scrapped by
your service center or a workshop that has the
necessary authorization for handling explosives.
Non-professional attempts to service the sys‐
tem could lead to failure in an emergency or un‐
desired triggering of the airbag, either of which
could result in injury.◀
Warnings and information on the airbags are
also found on the sun visors.
Functional readiness of the airbag
system
When the ignition is switch on, the warn‐
ing lamp in the instrument cluster lights
up briefly and thereby indicates the op‐
erational readiness of the entire airbag system
and the belt tensioner.
Airbag system malfunctioning
▷Warning lamp does not come on when the
ignition is turned on.
▷The warning lamp lights up continuously.
Seite 92
ControlsSafety
92Online Edition for Part no. 01 40 2 608 633 - 11 09 490
Page 157 of 325

Do not remove the heat shields installed and
never apply undercoating to them. When driv‐
ing, standing at idle and while parking, take care
to avoid possible contact between the hot ex‐
haust system and any highly flammable materi‐
als such as hay, leaves, grass, etc. Such contact
could lead to a fire, and with it the risk of serious
personal injury as well as property damage.
Do not touch hot exhaust pipes; otherwise, there
is the danger of getting burned.◀
Mobile communication devices in the
vehicle
Mobile communication devices in the ve‐
hicle
It is advised that you do not use mobile commu‐
nication devices, e.g., mobile phones, inside the
vehicle without connecting them directly to the
external antenna. Otherwise, the vehicle elec‐
tronics and mobile communication devices can
interfere with each other. In addition, there is no
assurance that the radiation generated during
transmission will be discharged from the vehicle
interior.◀
Hydroplaning
On wet or slushy roads, a wedge of water can
form between the tires and road surface.
This phenomenon is referred to as hydroplan‐
ing. It is characterized by a partial or complete
loss of contact between the tires and the road
surface, ultimately undermining your ability to
steer and brake the vehicle.
Hydroplaning
When driving on wet or slushy roads, re‐
duce your speed to prevent hydroplaning.◀
Driving through water
Drive though calm water only if it is not deeper
than 9.8 inches/25 cm and at this height, no
faster than walking speed, up to 6 mph/10 km/h.
Adhere to water depth and speed limita‐
tions
Do not exceed this water depth and walking
speed; otherwise, the vehicle's engine, the elec‐
trical systems and the transmission may be
damaged.◀
Braking safely
Your vehicle is equipped with ABS as a standard
feature.
Applying the brakes fully is the most effective
way of braking in situations when this is neces‐
sary.
The vehicle maintains steering responsiveness.
You can still avoid any obstacles with a minimum
of steering effort.
Pulsation of the brake pedal and sounds from
the hydraulic circuits indicate that ABS is in its
active mode.
Objects in the area around the pedals
No objects in the area around the pedals
Keep floor mats, carpets, and any other
objects out of the area of motion of the pedals;
otherwise, the function of the pedals could be
impeded while driving
Do not place additional floor mats over existing
mats or other objects.
Only use floor mats that have been approved for
the vehicle and can be properly fixed in place.
Ensure that the floor mats are securely fastened
again after they were removed for cleaning, for
example.◀
Driving in wet conditions
When roads are wet or there is heavy rain, briefly
exert gentle pressure on the brake pedal every
few miles.
Ensure that this action does not endanger other
road users.
The heat generated in this process helps dry the
brake discs and pads.
Seite 157
Things to remember when drivingDriving tips
157Online Edition for Part no. 01 40 2 608 633 - 11 09 490
Page 170 of 325

Starting destination guidance after
entering the destination
1."Accept destination"
2."Start guidance" or "Add as another
destination"
Add, refer to page 175, a destination as a
further destination.
Address book
Selecting a destination from the
address book
1."Navigation"
2."Address book"
Contacts with addresses are displayed if
these have been checked as destinations.
If the mobile phone does not display the
contacts with addresses, they must first be
checked as a destination, refer to
page 248.
3.Select a contact in the list or, if desired, with
"A-Z search".
4."Business address" or "Home address"
Storing the destination in the address
book
After entering the destination, store the desti‐
nation in the address book.
1."Navigation"
2."Map"
3. "Guidance"
4."Options" Open.
5."Store as new contact" or "Add to existing
contact"
6.Select an existing contact, if available.
7."Business address" or "Home address"
8.Enter "Last name" and, if necessary, "First
name".
9."Store in vehicle"
Storing the position
The current position can be stored in the ad‐
dress book.
1."Navigation"
2."Options" Open.
3."Store position as contact" or "Add position
to contact"
4.Depending on the selection, choose an ex‐
isting contact from the list. Select the type
of address and enter the first and last names.
5."Store in vehicle"
Editing or deleting an address
1."Navigation"
2."Address book"
Seite 170
NavigationNavigation system
170Online Edition for Part no. 01 40 2 608 633 - 11 09 490
Page 172 of 325

3. Select the symbol.
4."Start guidance"
A-Z search
1."A-Z search"
2."Town/City"
Select or enter the town/city.
3."Category"
4.Select the category.
5."Category details"
For some special destinations, multiple cat‐
egory details can be selected. Move the
controller to the left to leave the category
details.
6."Keyword"
7.Enter the keyword.
A list of the special destinations is displayed.
8.Select a special destination.
Details are displayed.
If multiple details are stored, you can leaf
through the pages.
If a phone number is available, a connection
can be established if necessary.
9. Select the symbol.
"Start guidance" or "Add as another
destination"
Add, refer to page 175, a destination as a
further destination.
"Start search": if a search term is not entered,
the search is repeated with the previous search
term.
Category search
1."Category search"
2."Town/City"
Select or enter the town/city.
3."Category"
4.Select the category.
5."Category details"
For some special destinations, multiple cat‐
egory details can be selected. Move the
controller to the left to leave the category
details.
6."Start search"
A list of the special destinations is displayed.
7.Select a special destination.
Details are displayed.
If multiple details are stored, you can leaf
through the pages.
If a phone number is available, a connection
can be established if necessary.
8. Select the symbol.
"Start guidance" or "Add as another
destination"
Add, refer to page 175, a destination as a
further destination.
Display of special destinations
List of special destinations: special destinations
are organized by distance and are displayed with
a directional arrow to the special destination.
On the split screen, special destinations of the
selected category are displayed in the map view
as symbols. The display depends on the scale
of the map and the category.
Destination entry via BMW Assist
A connection is established to the Concierge
service, refer to page 251.
1."Navigation"
2."Enter address"
3."Options" Open.
4."BMW Assist dest. entry"
Seite 172
NavigationNavigation system
172Online Edition for Part no. 01 40 2 608 633 - 11 09 490
Page 179 of 325

Lines in the map
Streets and routes are displayed in different col‐
ors and styles depending on their classification.
Dashed lines represent railways and ferry con‐
nections. Country borders are indicated by thin
lines.
Traffic obstructions
Small triangles along the planned route indicate
route sections with traffic obstructions, depend‐
ing on the map scale. The direction of the trian‐
gles indicates the direction of the obstruction.
The traffic signs indicate the significance of the
obstruction.
▷Red traffic sign: the obstruction affects the
planned route or direction.
▷Gray traffic sign: the obstruction does not
affect the planned route or direction.
Traffic bulletins, refer to page 180.
Planned route
After destination guidance is started, the plan‐
ned route is displayed on the map.
Status fields
Show/hide: press the controller.
▷Upper status field: time, telephone, and en‐
tertainment details.
▷Lower status field: symbol for active desti‐
nation guidance, status of traffic bulletins,
time of arrival, and distance to destination.
Function bar
The following functions are available in the func‐
tion bar:
Symbol Function
Start/end destination guidance.
Switch spoken instructions on/
off.
Change the route criteria.
Symbol Function
Search for a special destination.
Display traffic bulletins.
Interactive map.
Set the map view.
Change the scale.
To change to the function bar, move the con‐
troller to the left.
Changing the map section
"Interactive map"
▷To shift the map: move the controller in the
required direction.
▷To shift the map diagonally: move the con‐
troller in the required direction and turn it.
Changing the scale
1. Select the symbol.
2.To change the scale: turn the controller.
Automatically scaled map scale
In the map view facing north, turn the controller
in any direction until the AUTO scale is dis‐
played. The map shows the entire route be‐
tween the current location and the destination.
Settings for the map view
The settings are stored for the remote control
currently in use.
1."Navigation"
2."Map"
3."Options" Open.
4."Settings"
Set the map view.
▷"Day/night mode"
Select and create the necessary settings
depending on the light conditions.
Seite 179
Navigation systemNavigation
179Online Edition for Part no. 01 40 2 608 633 - 11 09 490
Page 189 of 325
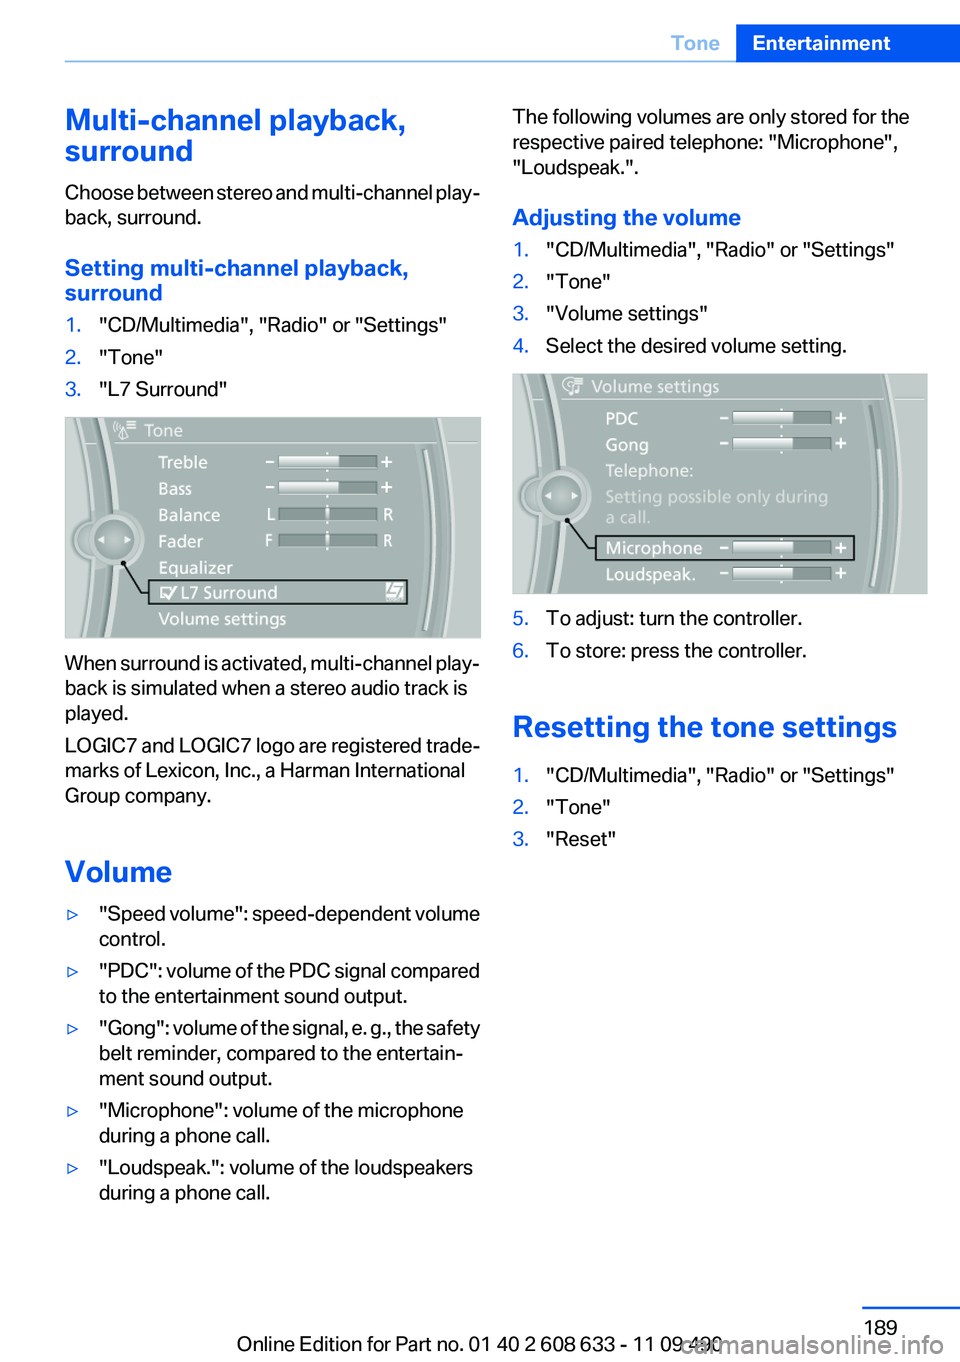
Multi-channel playback,
surround
Choose between stereo and multi-channel play‐
back, surround.
Setting multi-channel playback,
surround
1."CD/Multimedia", "Radio" or "Settings"
2."Tone"
3."L7 Surround"
When surround is activated, multi-channel play‐
back is simulated when a stereo audio track is
played.
LOGIC7 and LOGIC7 logo are registered trade‐
marks of Lexicon, Inc., a Harman International
Group company.
Volume
▷"Speed volume": speed-dependent volume
control.
▷"PDC": volume of the PDC signal compared
to the entertainment sound output.
▷"Gong": volume of the signal, e. g., the safety
belt reminder, compared to the entertain‐
ment sound output.
▷"Microphone": volume of the microphone
during a phone call.
▷"Loudspeak.": volume of the loudspeakers
during a phone call.
The following volumes are only stored for the
respective paired telephone: "Microphone",
"Loudspeak.".
Adjusting the volume
1."CD/Multimedia", "Radio" or "Settings"
2."Tone"
3."Volume settings"
4.Select the desired volume setting.
5.To adjust: turn the controller.
6.To store: press the controller.
Resetting the tone settings
1."CD/Multimedia", "Radio" or "Settings"
2."Tone"
3."Reset"
Seite 189
ToneEntertainment
189Online Edition for Part no. 01 40 2 608 633 - 11 09 490
Page 192 of 325

Activating/deactivating digital radio
reception
1."Radio"
2."FM" or "AM"
3."Options" Open.
4."HD Radio Reception"
The setting is stored for the remote control cur‐
rently in use.
This symbol is displayed in the status line
when the audio signal is digital.
When setting a station with a digital signal, it may
take a few seconds before the station plays in
HD quality.
In areas in which the station is not continuously
received in digital mode, the playback switches
between analog and digital reception. In this
case, switch off digital radio reception.
Displaying additional information
Some stations broadcast additional information
on the current track, such as the name of the ar‐
tist.
1.Select the desired station.
2."Options" Open.
3."Station info"
Selecting a substation
This symbol indicates that a main station also
broadcasts additional substations. The station
name of the main station ends in HD1. Station
names of the substations end in HD2, HD3, etc.
1.Select the desired station.
2.Press the controller.
3.Select the substation.
When reception is poor, the substation is muted.
Satellite radio
General information
The channels are offered in predefined pack‐
ages. The packages must be enabled by tele‐
phone.
Navigation bar overview
Symbol Function
Change the list view.
Select the category.
Direct channel entry
Timeshift
Open the My Favorites category/
open a favorite.
Manage the favorites.
Traffic Jump
With navigation system: the functions of the
navigation bar symbols can also be stored on the
programmable memory buttons, refer to
page 21.
They are stored.
Managing a subscription
To be able to enable or unsubscribe from the
channels, you must have reception. It is usually
at its best when you have an unobstructed view
of the sky. The channel name is displayed in the
status line.
Enabling channels
The Unsubscribed Channels category contains
all disabled channels.
1."Radio"
2."Satellite radio"
Seite 192
EntertainmentRadio
192Online Edition for Part no. 01 40 2 608 633 - 11 09 490
Page 193 of 325

3. "Category"
4.Select the Unsubscribed Channels cate‐
gory.
5.Select the desired channel.
The phone number and an electronic serial
number, ESN, are displayed.
6.Call the phone number to have the channel
enabled.
You can unsubscribe from the channels again
via this phone number.
Unsubscribing from channels
1."Radio"
2."Satellite radio"
3."Options" Open.
4."Manage subscription"
5.The phone number and an electronic serial
number, ESN, are displayed.
6.Call Sirius to unsubscribe from the chan‐
nels.
Selecting channels
You can only listen to enabled channels.
The selected channel is stored for the remote
control currently in use.
Via iDrive
1."Radio"
2."Satellite radio"
3.Select "All channels" or the desired cate‐
gory.
4.Select the desired channel.
Via the buttons on the center console
Press the button.
The next channel is selected.
Seite 193
RadioEntertainment
193Online Edition for Part no. 01 40 2 608 633 - 11 09 490