turn signal BMW 3 SERIES 2011 User Guide
[x] Cancel search | Manufacturer: BMW, Model Year: 2011, Model line: 3 SERIES, Model: BMW 3 SERIES 2011Pages: 325, PDF Size: 12.94 MB
Page 99 of 325

Continued driving with a flat tire
If continuing to drive with a damaged tire:
1.Avoid sudden braking and steering maneu‐
vers.
2.Do not exceed a speed of 50 mph/80 km/h.
3.Check the air pressure in all four tires at the
next opportunity.
If the tire inflation pressure in all four tires is
correct, the Flat Tire Monitor may not have
been initialized. In this case, initialize the
system.
Possible driving distance with complete loss of
tire inflation pressure:
The possible driving distance after a loss of tire
inflation pressure depends on the cargo load
and the driving style and conditions.
For a vehicle containing an average load, the
possible driving distance is approx. 50 miles/
80 km.
When the vehicle is driven with a damaged tire,
its handling characteristics change, e.g., re‐
duced lane stability during braking, a longer
braking distance, and altered self-steering
properties. Adjust your driving style accord‐
ingly. Avoid abrupt steering maneuvers or driv‐
ing over obstacles, e.g., curbs, potholes, etc.
Because the possible driving distance depends
on how the vehicle is used during the trip, the
actual distance may be smaller or greater de‐
pending on the driving speed, road conditions,
external temperature, cargo load, etc.
Continued driving with a flat tire
Drive moderately and do not exceed a
speed of 50 mph/80 km/h.
A loss of tire inflation pressure results in a
change in the handling characteristics, e.g., re‐
duced lane stability during braking, a longer
braking distance and altered self-steering prop‐
erties.◀
Final tire failure
Vibrations or loud noises while driving can
indicate the final failure of the tire. Reduce speed
and stop; otherwise, pieces of the tire could
come loose and cause an accident. Do not con‐
tinue driving, and contact your service center.◀
Lane departure warning
The concept
Starting at a specific speed, this system alerts
you when the vehicle on streets with lane mark‐
ings is about to leave the lane. Depending on the
country-specific version of the vehicle, the
speed is between 35 mph/55 km/h and 45 mph/
70 km/h. When switching on the system below
this speed, a message appears in the instrument
cluster.
The steering wheel begins vibrating gently in the
event of warnings. The time of the warning may
vary depending on the current driving situation.
The system does not provide a warning if the
turn signal is set before leaving the lane.
Switching on/off
Press the button.
▷On: the LED lights up.
▷Off: the LED goes out.
The state is stored for the remote control cur‐
rently in use.
Seite 99
SafetyControls
99Online Edition for Part no. 01 40 2 608 633 - 11 09 490
Page 100 of 325

Display
▷Lines, arrow 1: the system is activated.
▷Arrows, arrow 2: at least one lane marking
was detected and warnings can be issued.
Issued warning
If you leave the lane and if a lane marking has
been detected, the steering wheel begins vi‐
brating.
If the turn signal is set before changing the lane,
a warning is not issued.
End of warning
The warning ends:
▷Automatically after approx. 3 seconds.
▷When returning to your own lane.
▷When braking hard.
▷When using the turn signal.
System limits
Personal responsibility
The system cannot serve as a substitute
for the driver's personal judgment of the course
of the road and the traffic situation.
In the event of a warning, do not jerk the steering
wheel, as you may lose control of the vehicle.◀
The system may not be fully functional in the
following situations:
▷In heavy fog, rain or snowfall.
▷In the event of worn, poorly visible, merging,
diverging, or multiple lane markings such as
in construction areas.
▷When lane markings are covered in snow,
ice, dirt or water.
▷In tight curves or on narrow lanes.
▷When the lane markings are covered by ob‐
jects.
▷When driving very close to the vehicle in
front of you.
▷When driving toward bright lights.
▷When the windshield behind the interior
rearview mirror is fogged over, dirty or cov‐
ered with stickers, etc.
▷During the calibration process of the camera
immediately after vehicle shipment.
Camera
The camera is located near the base of the mir‐
ror.
Keep windshield clean and clear in the area in
front of the interior rear view mirror.
Seite 100
ControlsSafety
100Online Edition for Part no. 01 40 2 608 633 - 11 09 490
Page 101 of 325

Active Blind Spot Detection
The concept
Two radar sensors below the rear bumper mon‐
itor the area behind and next to the vehicle at
speeds above approx. 30 mph/50 km/h.
The system indicates whether there are vehicles
in the blind spot, arrow 1, or approaching from
behind on the adjacent lane, arrow 2.
The lamp in the exterior mirror housing lights up
dimly.
Before you change lanes after setting the turn
signal, the system issues a warning in the situa‐
tions described above.
The lamp in the housing of the exterior mirror
flashes and the steering wheel vibrates.
Switching on/off
Press the button.
▷On: the LED lights up.
▷Off: the LED goes out.
The system can issue warnings at speeds above
approx. 30 mph/50 km/h.
The state is stored for the remote control cur‐
rently in use.
Display
Information stage
The dimmed lamp in the mirror housing indi‐
cates when there are vehicles in the blind spot
or approaching from behind.
Warning
If the turn signal is set while a vehicle is in the
critical zone, the steering wheel vibrates briefly
and the lamp in the mirror housing flashes
brightly.
The warning stops when the turn signal is
switched off, or the other vehicle leaves the crit‐
ical zone.
System limits
Personal responsibility
The system cannot serve as a substitute
for the driver's personal judgment of the traffic
situation.
In the event of a warning, do not jerk the steering
wheel, as you may lose control over the vehi‐
cle.◀
The system may not be fully functional in the
following situations:
▷When a vehicle is approaching at a speed
much faster than your own.
▷In heavy fog, rain or snowfall.
▷In tight curves or on narrow lanes.
Seite 101
SafetyControls
101Online Edition for Part no. 01 40 2 608 633 - 11 09 490
Page 132 of 325

movement after the gear change when the
vehicle is stationary.
▷When parking in parking spaces on the driv‐
er's side, the corresponding turn signal must
be set.
Interrupting manually
The parking assistant can be interrupted at any
time by:
▷Grasping the steering wheel and steering
yourself.
▷ "Parking Assistant" Select the symbol on
the Control Display.
Interrupting automatically
The procedure is interrupted automatically:
▷If the vehicle speed exceeds approx. 6 mph/
10 km/h.
▷On snow-covered or slippery road surfaces
if necessary.
▷If doors are open.
A Check Control message is displayed.
Continuing
An interrupted parking procedure can be con‐
tinued if necessary.
Follow the instructions on the Control Display to
do this.
Switching off
The system can be deactivated as follows:
▷Press the button.
▷Switch off the ignition.
Malfunction
A Check Control message is displayed.
The parking assistant failed. Have the system
checked.
System limits
Changes to the parking space
Changes to the parking space after it was
measured are not taken into account by the sys‐
tem.
Therefore, always be alert and ready to inter‐
vene; otherwise, there is the danger of an acci‐
dent occurring.◀
Transporting loads
Loads that extend beyond the perimeter
of the vehicle are not taken into account by the
system during the parking procedure.
Therefore, always be alert and ready to inter‐
vene; otherwise, there is the danger of an acci‐
dent occurring.◀
Curbs
The parking assistant may steer the vehi‐
cle over or onto curbs.
Therefore, always be alert and ready to inter‐
vene; otherwise, the wheels, tires, or the vehicle
may become damaged.◀
No parking assistance
The parking assistant does not provide assis‐
tance in parking.
▷In tight curves.
Functional limitations
The system may not be fully functional in the
following situations:
▷When sensors are dirty or iced over.
▷In heavy fog, rain or snowfall.
▷On bumpy road surfaces such as gravel
roads.
▷When leaves or snow has collected in the
parking space.
Limits of ultrasonic measurement
The detection of objects can reach the physical
limits of ultrasonic measurement, e.g.:
Seite 132
ControlsDriving comfort
132Online Edition for Part no. 01 40 2 608 633 - 11 09 490
Page 143 of 325

ror has been programmed. The system can
then be controlled by the button on the in‐
terior rearview mirror.
If the LED does not flash faster after at least
60 seconds, change the distance and repeat
the step. Several more attempts at different
distances may be necessary. Wait at least
15 seconds between attempts.
Canada: if programming with the hand-held
transmitter was interrupted, hold down the
interior rearview mirror button and repeat‐
edly press and release the hand-held trans‐
mitter button for 2 seconds.
Controls
Before operation
Before operating a system using the
integrated universal remote control, ensure that
there are no people, animals, or objects within
the range of movement of the remote-controlled
system; otherwise, there is a risk of injury or
damage.
Also follow the safety instructions of the hand-
held transmitter.◀
The system, such as the garage door, can be
operated using the button on the interior rear‐
view mirror while the engine is running or when
the ignition is started. To do this, hold down the
button within receiving range of the system until
the function is activated. The interior rearview
mirror LED stays lit while the wireless signal is
being transmitted.
Deleting stored functions
Press and hold the left and right button on the
interior rearview mirror simultaneously for ap‐
proximately 20 seconds until the LED flashes
rapidly. All stored functions are deleted. The
functions cannot be deleted individually.
Digital compass
At a glance
1Control button
2Mirror display
Mirror display
The point of the compass is displayed in the
mirror when driving straight.
Operating concept
Various functions can be called up by pressing
the control button with a pointed object, such as
the tip of a ballpoint pen or similar object. The
following setting options are displayed in suc‐
cession, depending on how long the control but‐
ton is pressed:
▷Pressed briefly: turns display on/off.
▷3 to 6 seconds: compass zone setting.
▷6 to 9 seconds: compass calibration.
▷9 to 12 seconds: left/right-hand steering
setting.
▷12 to 15 seconds: language setting.
Setting the compass zones
Sets the particular compass zones on the vehi‐
cle so that the compass operates correctly; refer
to World map with compass zones.
Seite 143
Interior equipmentControls
143Online Edition for Part no. 01 40 2 608 633 - 11 09 490
Page 189 of 325
Multi-channel playback,
surround
Choose between stereo and multi-channel play‐
back, surround.
Setting multi-channel playback,
surround
1."CD/Multimedia", "Radio" or "Settings"
2."Tone"
3."L7 Surround"
When surround is activated, multi-channel play‐
back is simulated when a stereo audio track is
played.
LOGIC7 and LOGIC7 logo are registered trade‐
marks of Lexicon, Inc., a Harman International
Group company.
Volume
▷"Speed volume": speed-dependent volume
control.
▷"PDC": volume of the PDC signal compared
to the entertainment sound output.
▷"Gong": volume of the signal, e. g., the safety
belt reminder, compared to the entertain‐
ment sound output.
▷"Microphone": volume of the microphone
during a phone call.
▷"Loudspeak.": volume of the loudspeakers
during a phone call.
The following volumes are only stored for the
respective paired telephone: "Microphone",
"Loudspeak.".
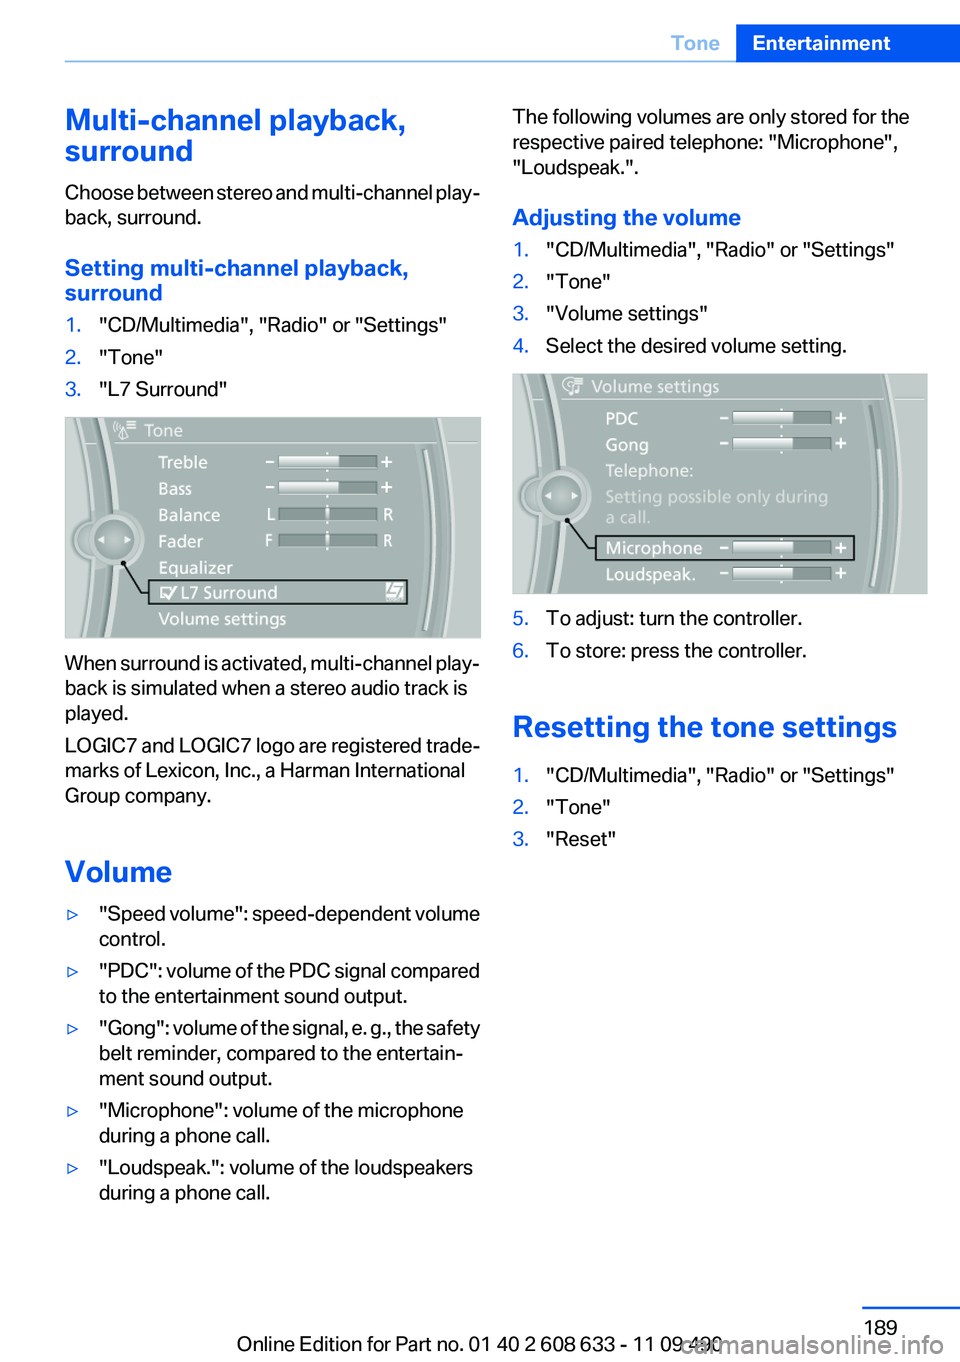
Adjusting the volume
1."CD/Multimedia", "Radio" or "Settings"
2."Tone"
3."Volume settings"
4.Select the desired volume setting.
5.To adjust: turn the controller.
6.To store: press the controller.
Resetting the tone settings
1."CD/Multimedia", "Radio" or "Settings"
2."Tone"
3."Reset"
Seite 189
ToneEntertainment
189Online Edition for Part no. 01 40 2 608 633 - 11 09 490
Page 191 of 325

3.Highlight the desired station.
4.Press the controller for an extended period.
5.Select the desired memory location.
The stations are stored for the remote control
currently in use.
With navigation system: the stations can also be
stored on the programmable memory buttons,
refer to page 21.
Selecting a station manually
Station selection via the frequency.
1."Radio"
2."FM" or "AM"
3."Manual"
4.To select the frequency: turn the controller.
To store the station: press the controller for an
extended period.
Renaming a station
A station with changing station names can be
renamed.
1."Radio"
2."FM" or "AM"
3.Select the desired station.
4."Options" Open.
5."Rename to:"
If necessary, wait until the desired name ap‐
pears.
The selected station name is copied to the list
of current stations and stored stations.
RDS
RDS broadcasts additional information, such as
the station name, in the FM wave band.
Switching the RDS on/off
1."Radio"
2."FM"
3."Options" Open.
4."RDS"
The setting is stored for the remote control cur‐
rently in use.
HD Radio™ reception
Many stations broadcast both analog and digital
signals.
License conditions
HD Radio™ technology manufactured under li‐
cense from iBiquity Digital Corp. U. S. and For‐
eign Patents. HD Radio™ and the HD and HD
Radio logos are proprietary trademarks of iBiq‐
uity Digital Corp.
Seite 191
RadioEntertainment
191Online Edition for Part no. 01 40 2 608 633 - 11 09 490
Page 194 of 325

Via direct channel entry
1."Radio"
2."Satellite radio"
3. "Set channel"
4.Turn the controller until the desired channel
is reached and press the controller.
Storing a channel
1."Radio"
2."Satellite radio"
3.If necessary, open "All channels" or the de‐
sired category.
4.Select the desired channel.
5.Press the controller again.
6.Press the controller again to confirm the
highlighted channel.
7.Select the desired memory location.
The channels are stored for the remote control
currently in use.
With navigation system: the stations can also be
stored on the programmable memory buttons,
refer to page 21.
Changing the list view
The list view changes every time the first symbol
on the navigation bar is pressed.
Information on the channel is displayed.
Symbol Meaning
Channel name
Artist
Track
Selecting a category
1."Radio"
2."Satellite radio"
3. "Category"
4.Select the desired category.
Timeshift
Approx. one hour of the program being broad‐
cast on the channel currently being listened to
is stored in a buffer. Prerequisite: the signal must
be available.
The stored audio track can be played with a de‐
lay following the live broadcast. When the buffer
is full, the older tracks are overwritten. The buf‐
fer is cleared when a new channel is selected.
Opening the timeshift function
1."Radio"
2."Satellite radio"
3. "Replay - Time shift"
▷The red arrow shows the current playback
position.
▷The time difference to the live broadcast is
displayed next to the buffer bar.
For live transmissions: "live".
Seite 194
EntertainmentRadio
194Online Edition for Part no. 01 40 2 608 633 - 11 09 490
Page 232 of 325

notes? Reduce the data volume of the con‐
tact.
▷Is the mobile phone connected as an audio
source or additional telephone? The mobile
phone must be connected as a telephone.
The phone connection quality is poor.
▷The strength of the Bluetooth signal on the
mobile phone can be adjusted, depending
on the mobile phone.
▷Insert the mobile phone into the snap-in
adapter or place it in the area of the center
console.
▷Adjust the volume of the microphone and
loudspeakers separately.
If all points in this list have been checked and the
required function is still not available, contact
the hotline or service center.
Controls
Adjusting the volume
Turn the knob until the desired volume is se‐
lected. The setting is stored for the remote con‐
trol currently in use.
The vehicle automatically adjusts the volume of
the microphone on the telephone and the vol‐
ume of the called party. Depending on the mo‐
bile phone, the volumes may need to be ad‐
justed. The settings can only be created during
a call and must be adjusted separately for each
telephone. The settings are deleted when the
telephone is unpaired.
1."Settings"
2."Tone"
3."Volume settings"
4.Select the desired setting: "Microphone" or
"Loudspeak."
5.To adjust: turn the controller.
6.To store: press the controller.
Incoming call
Receiving calls
If the number of the caller is stored in the phone
book and is transmitted by the network, the
name of the contact is displayed. Otherwise,
only the phone number is displayed.
If more than one phone number is assigned to a
contact, only the name of the contact is dis‐
played.
For calls on the additional telephone, the num‐
ber is only displayed if it is transmitted by the
network.
An incoming call to the additional telephone is
automatically rejected if there is an active call on
the other telephone.
Accepting a call
Via iDrive
"Accept"
Via the button on the steering wheel
Press the button.
Via the instrument cluster
"Accept"
Rejecting a call
Via iDrive
"Reject"
Seite 232
CommunicationProfessional mobile phone preparation package
232Online Edition for Part no. 01 40 2 608 633 - 11 09 490
Page 280 of 325

Working on the lighting system
When working on the lighting system, you
should always switch off the lights affected to
prevent short circuits.
To avoid possible injury or equipment damage
when replacing bulbs, observe any instructions
provided by the bulb manufacturer.◀
Do not perform work/bulb replacement on
xenon headlamps
Have any work on the xenon lighting system, in‐
cluding bulb replacement, performed only by a
service center. Due to the high voltage present
in the system, there is the danger of fatal injuries
if work is carried out improperly.◀
Do not touch the bulbs
Do not touch the glass of new bulbs with
your bare hands, as even minute amounts of
contamination will burn into the bulb's surface
and reduce its service life.
Use a clean tissue, cloth or something similar, or
hold the bulb by its base.◀
Light-emitting diodes (LEDs)
Light-emitting diodes installed behind a cover
serve as the light source for controls, display el‐
ements and other equipment.
These light-emitting diodes, which are related
to conventional lasers, are officially designated
as Class 1 light-emitting diodes.
Do not remove the covers
Do not remove the covers, and never stare
into the unfiltered light for several hours; other‐
wise, irritation of the retina could result.◀
Headlamp glass
Condensation can form on the inside of the ex‐
ternal lamps in cool or humid weather. When
driving with the light switched on, the conden‐
sation evaporates after a short time. The head‐
lamp glasses do not need to be changed.
If the headlamps do not dim despite driving with
the light switched on, increasing humidity forms,
e. g. water droplets in the light, have the service
center check this.
Front lamps, bulb replacement
Halogen headlamps
1Parking lamps
2High beams/headlamp flasher
3Low beams
4Turn signal
5Daytime running lights
Accessing the turn signals and low beams
Follow the General instructions on lamps and
bulbs, refer to page 279.
1.In the wheel house, loosen the two brackets
and remove the cover.
Seite 280
MobilityReplacing components
280Online Edition for Part no. 01 40 2 608 633 - 11 09 490