Control check BMW 3 SERIES CONVERTIBLE 2013 E93 Owner's Manual
[x] Cancel search | Manufacturer: BMW, Model Year: 2013, Model line: 3 SERIES CONVERTIBLE, Model: BMW 3 SERIES CONVERTIBLE 2013 E93Pages: 311, PDF Size: 7.05 MB
Page 7 of 311
Addendum
Booklet for US models and
Warranty and Service Guide
Booklet for Canadian models,” the
second paragraph should be
disregarded and the following text
read in lieu thereof:
The manufacturer of your vehicle
recommends that you have
maintenance and repair performed
by your BMW dealer’s service
center or another service center or
repair shop that employs trained
personnel that can perform
maintenance and repair work on
your vehicle in accordance with
BMW specifications. The
manufacturer of your vehicle
recommends that you maintain
records of all maintenance and
repair work performed on your
vehicle.
17.At page 267, under the heading
“Xenon lamps,” where it reads:
“[h]ave all work on the xenon lamp
system . . . ,” the following words
should be read as preceding that
passage: “It is strongly suggested
that you . . . .”
18.At page 270, under the “Battery
replacing” section, the text should
be disregarded and in lieu thereof
the following text should be read:
Use of recommended vehicle
batteries
The manufacturer of your vehicle
recommends that you use vehicle
batteries that it has tested and
recommends for use in your vehicle;
otherwise the vehicle could be
damaged and systems or functions
may not be fully available.
After a battery replacement, the
manufacturer of your vehicle
recommends that you have the
battery registered on your vehicle
by a service center to ensure that all
comfort functions are fully available,
and that any “check control”
messages of these comfort
functions are no longer displayed.
Page 19 of 311
14
At a glanceDashboard
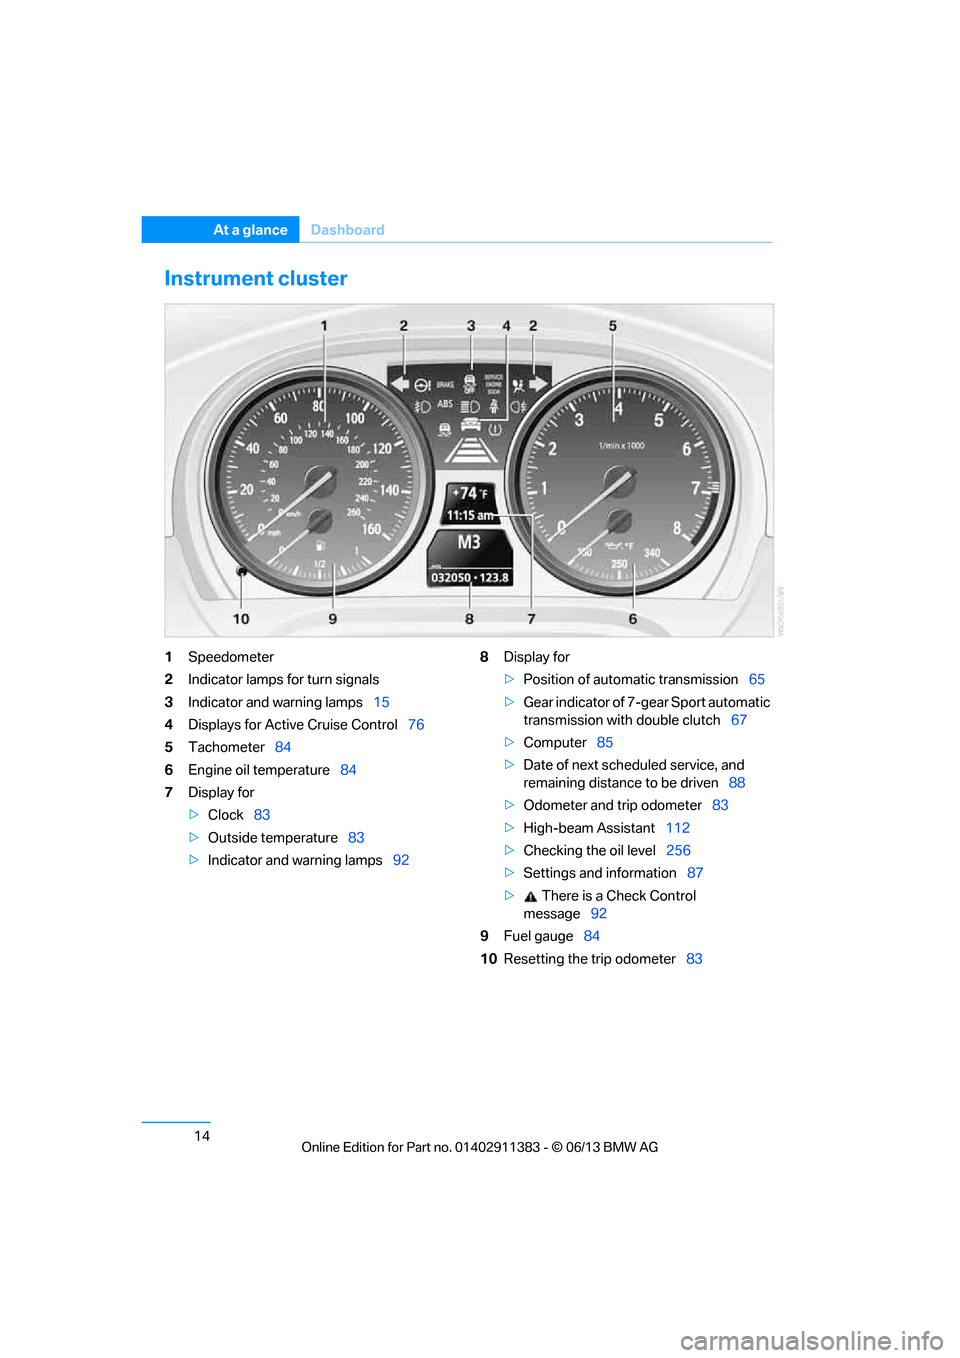
Instrument cluster
1Speedometer
2 Indicator lamps for turn signals
3 Indicator and warning lamps 15
4 Displays for Active Cruise Control 76
5 Tachometer 84
6 Engine oil temperature 84
7 Display for
>Clock 83
> Outside temperature 83
> Indicator and warning lamps 928
Display for
>Position of automatic transmission 65
> Gear indicator of 7-gear Sport automatic
transmission with double clutch 67
> Computer 85
> Date of next scheduled service, and
remaining distance to be driven 88
> Odometer and trip odometer 83
> High-beam Assistant 112
> Checking the oil level 256
> Settings and information 87
> There is a Check Control
message 92
9 Fuel gauge 84
10 Resetting the trip odometer 83
00320051004F004C00510048000300280047004C0057004C005200510003
Page 20 of 311
15
Dashboard
At a glance
Indicator and warning lamps
The concept
Indicator and warning lamps can light up in a
variety of combinations and colors.
Several of the lamps are checked for proper
functioning and light up temporarily when the
engine is started or the ignition is switched on.
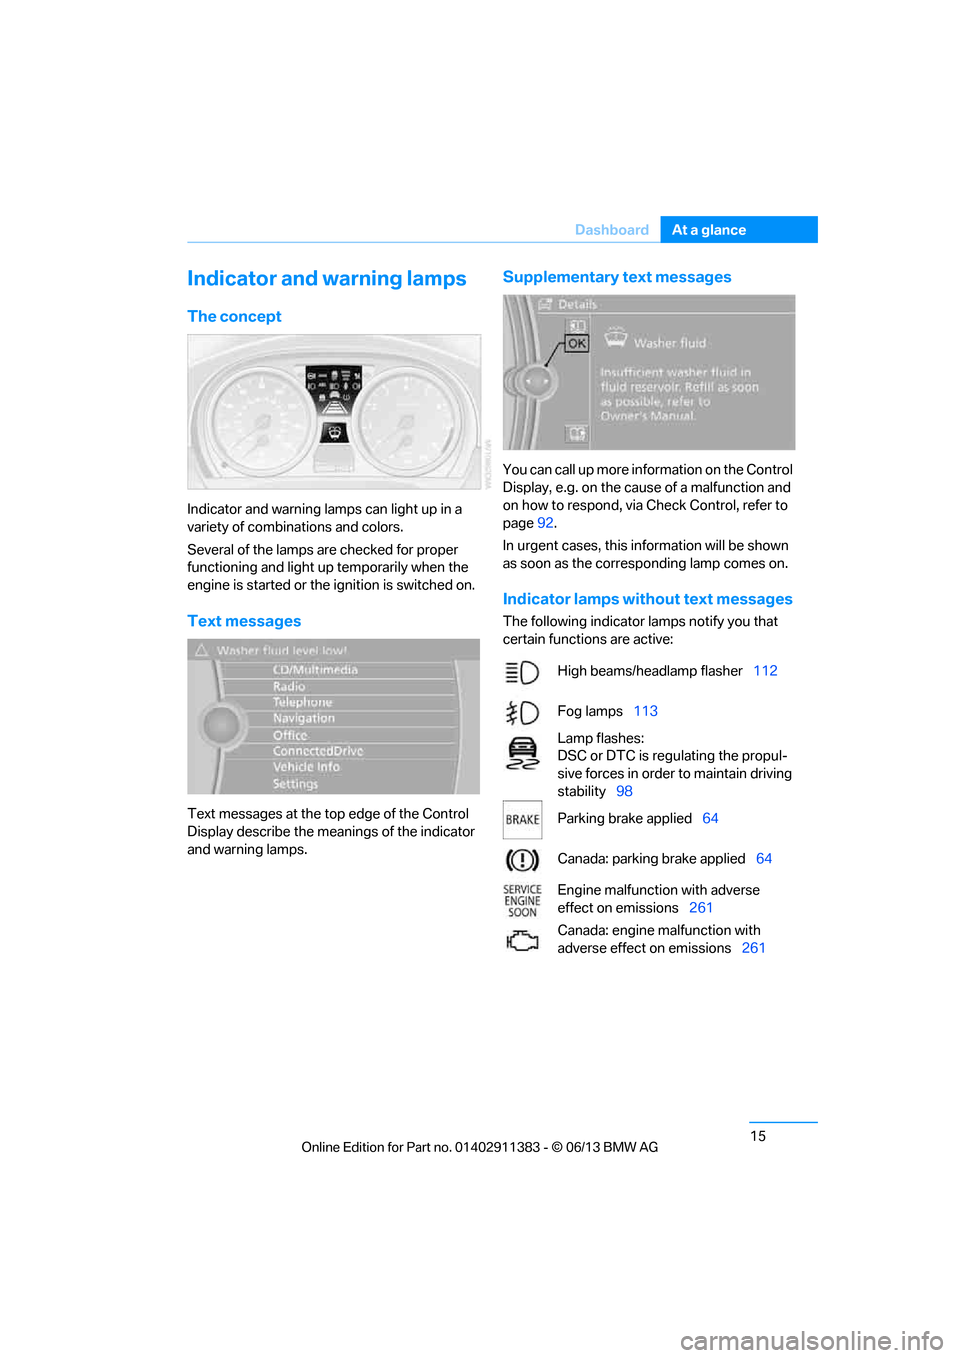
Text messages
Text messages at the to
p edge of the Control
Display describe the mean ings of the indicator
and warning lamps.
Supplementary text messages
You can call up more information on the Control
Display, e.g. on the cause of a malfunction and
on how to respond, via Check Control, refer to
page 92.
In urgent cases, this information will be shown
as soon as the corresponding lamp comes on.
Indicator lamps without text messages
The following indicator lamps notify you that
certain functions are active:
High beams/headlamp flasher 112
Fog lamps 113
Lamp flashes:
DSC or DTC is regulating the propul-
sive forces in order to maintain driving
stability 98
Parking brake applied 64
Canada: parking brake applied 64
Engine malfunction with adverse
effect on emissions 261
Canada: engine malfunction with
adverse effect on emissions 261
00320051004F004C00510048000300280047004C0057004C005200510003
Page 28 of 311
23
iDrive
At a glance
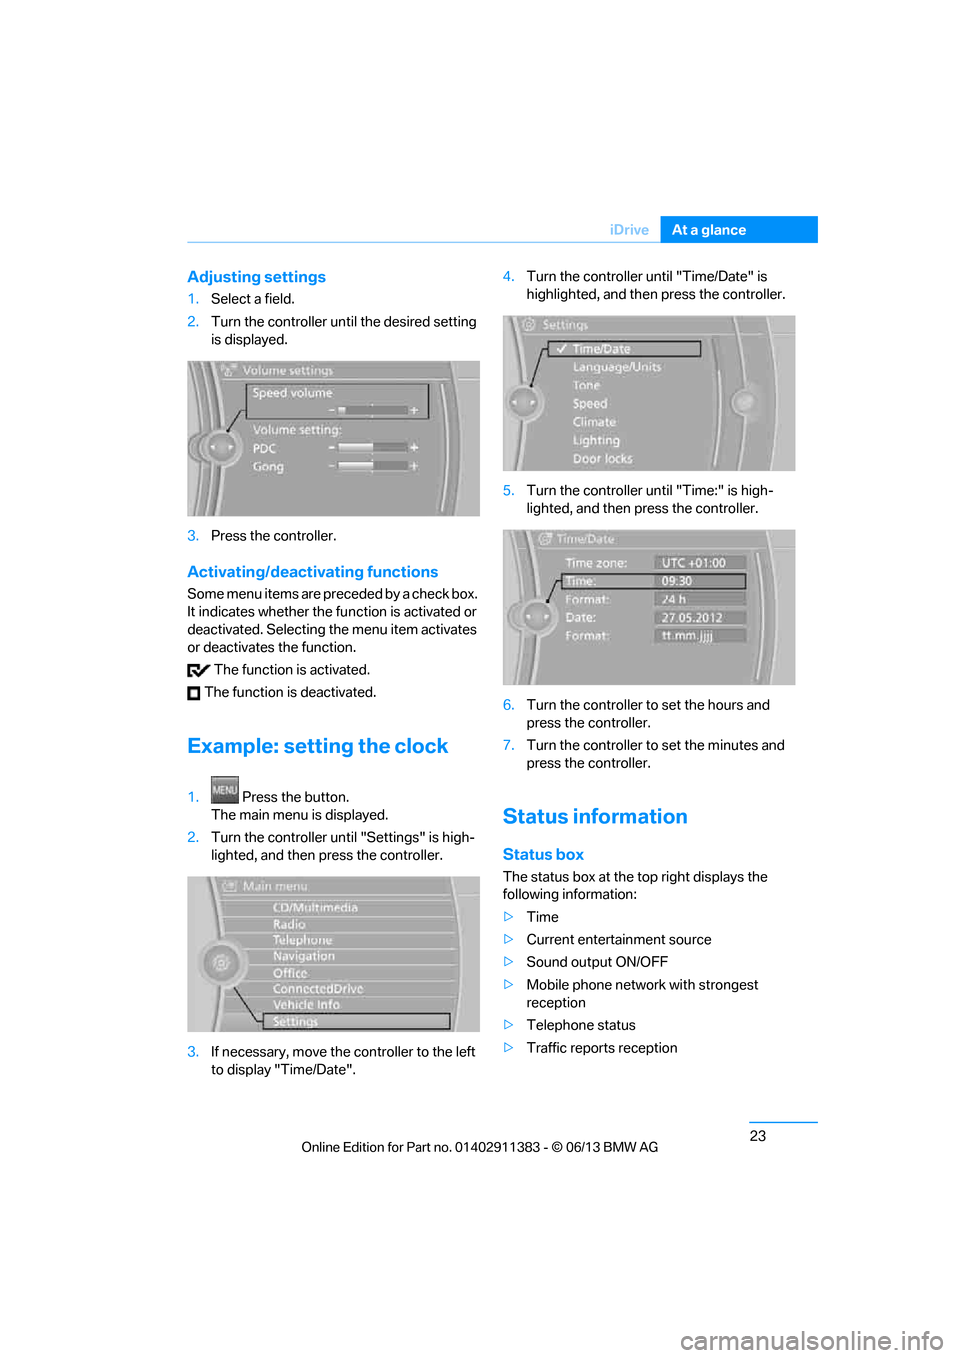
Adjusting settings
1.
Select a field.
2. Turn the controller until the desired setting
is displayed.
3. Press the controller.
Activating/deactivating functions
Some menu items are preceded by a check box.
It indicates whether the fu nction is activated or
deactivated. Selecting the menu item activates
or deactivates the function.
The function is activated.
The function is deactivated.
Example: setting the clock
1. Press the button.
The main menu is displayed.
2. Turn the controller until "Settings" is high-
lighted, and then press the controller.
3. If necessary, move the controller to the left
to display "Time/Date". 4.
Turn the controller until "Time/Date" is
highlighted, and then press the controller.
5. Turn the controller until "Time:" is high-
lighted, and then press the controller.
6. Turn the controller to set the hours and
press the controller.
7. Turn the controller to set the minutes and
press the controller.
Status information
Status box
The status box at the top right displays the
following information:
> Time
> Current entertainment source
> Sound output ON/OFF
> Mobile phone network with strongest
reception
> Telephone status
> Traffic reports reception
00320051004F004C00510048000300280047004C0057004C005200510003
Page 29 of 311
24
At a glanceiDrive
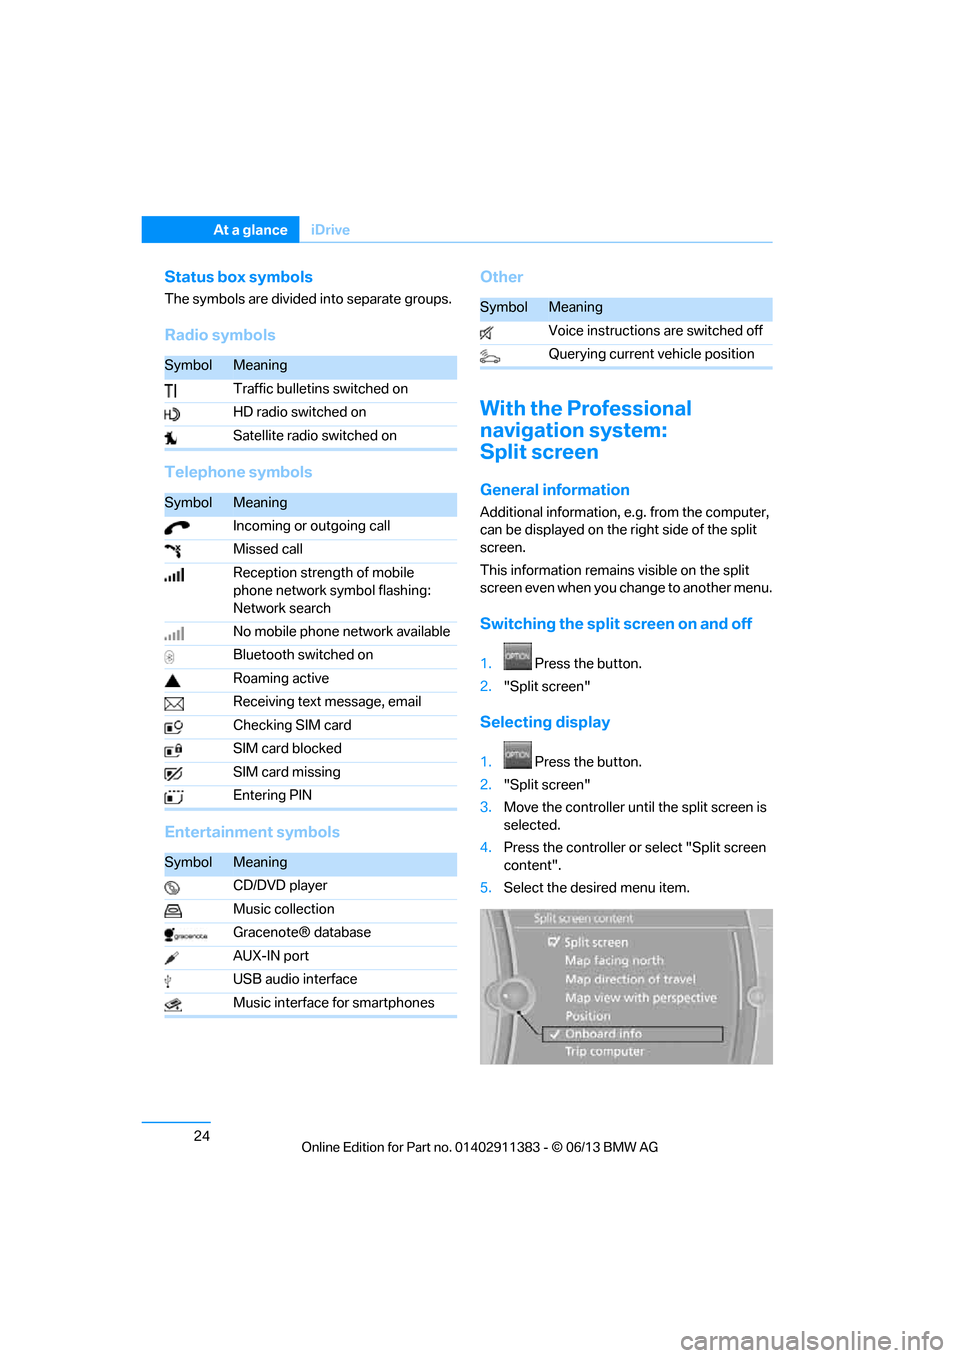
Status box symbols
The symbols are divided into separate groups.
Radio symbols
Telephone symbols
Entertainment symbols Other
With the Professional
navigation system:
Split screen
General information
Additional information, e.g. from the computer,
can be displayed on the right side of the split
screen.
This information remains visible on the split
screen even when you change to another menu.
Switching the split
screen on and off
1.Press the button.
2. "Split screen"
Selecting display
1. Press the button.
2. "Split screen"
3. Move the controller until the split screen is
selected.
4. Press the controller or select "Split screen
content".
5. Select the desired menu item.
SymbolMeaning
Traffic bulletins switched on
HD radio switched on
Satellite radio switched on
SymbolMeaning
Incoming or outgoing call
Missed call
Reception strength of mobile
phone network symbol flashing:
Network search
No mobile phone network available
Bluetooth switched on
Roaming active
Receiving text message, email
Checking SIM card
SIM card blocked
SIM card missing
Entering PIN
SymbolMeaning
CD/DVD player
Music collection
Gracenote® database
AUX-IN port
USB audio interface
Music interface for smartphones
SymbolMeaning
Voice instructions are switched off
Querying current vehicle position
00320051004F004C00510048000300280047004C0057004C005200510003
Page 40 of 311
35
Opening and closing
Controls
The trunk lid swings back and up when
opened. Ensure that there is sufficient
clearance. To avoid lo cking yourself out by
accident, do not place th e remote control in the
trunk. A previously locked trunk lid is locked
again after closing.
Before and after each tr ip, check that the trunk
lid has not been inad vertently unlocked.<
Convertible: convenient loading
When you are close to the vehicle, the remote
control for Comfort Access can be used to
partially raise the op en hardtop for more
convenient loading of the trunk.
1. Briefly press the butto n and, within one
second, press again and hold until the
retractable hardtop stop s in an intermediate
position. The trunk lid opens slightly.
2. Open the trunk lid, press the trunk partition
upward and stow the cargo in the trunk.
3. Press down the trunk partition until it
engages on both sides and close the
trunk lid.
4. Press the button for a longer period to
fold the retractable hardtop back in.
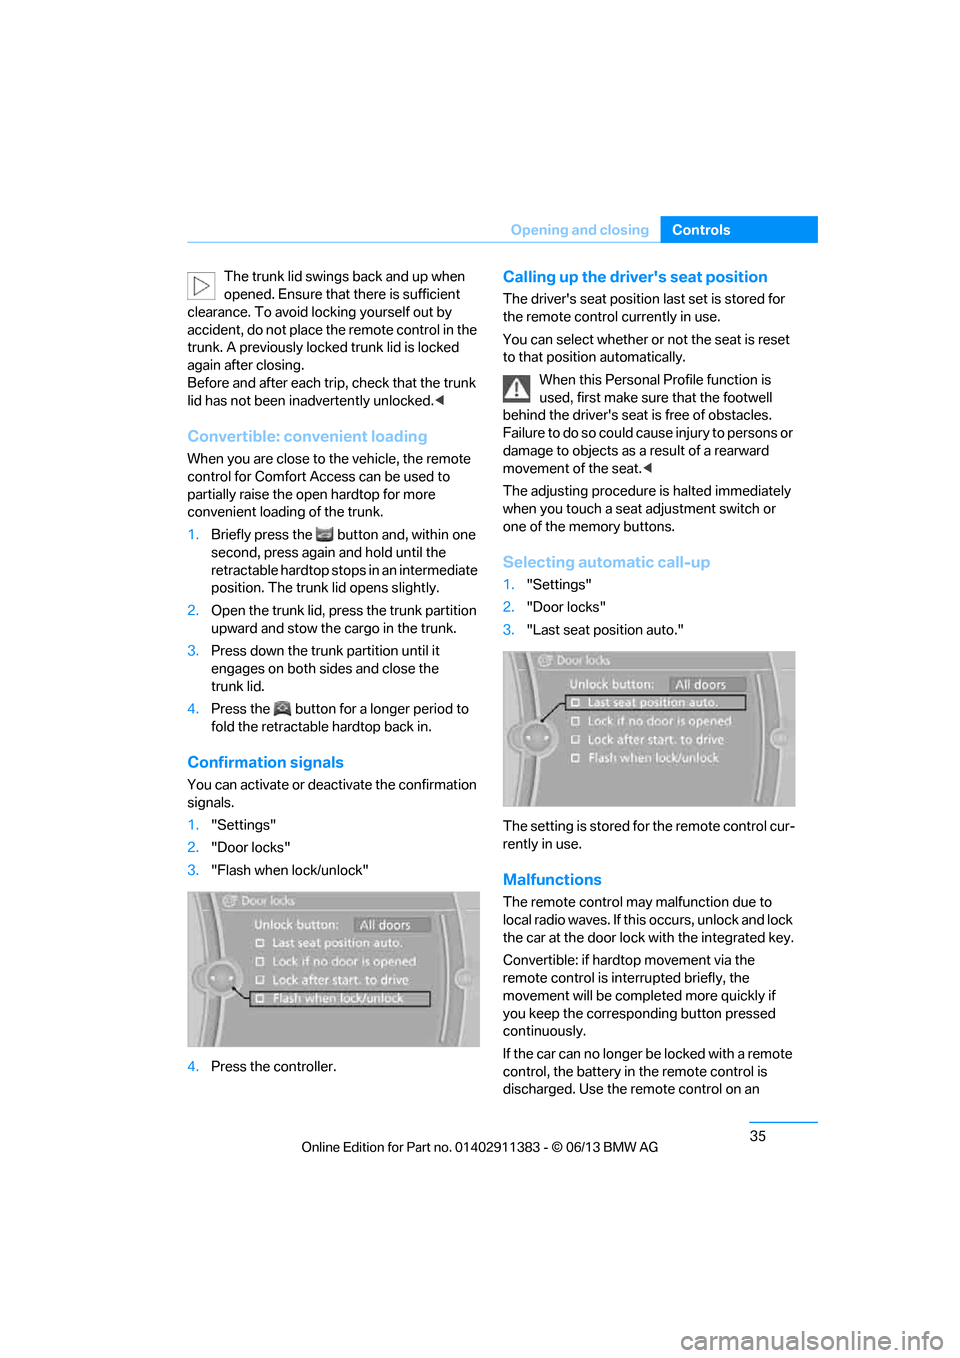
Confirmation signals
You can activate or deac tivate the confirmation
signals.
1. "Settings"
2. "Door locks"
3. "Flash when lock/unlock"
4. Press the controller.
Calling up the driver's seat position
The driver's seat position last set is stored for
the remote control currently in use.
You can select whether or not the seat is reset
to that position automatically.
When this Personal Profile function is
used, first make sure that the footwell
behind the driver's seat is free of obstacles.
Failure to do so could ca use injury to persons or
damage to objects as a result of a rearward
movement of the seat. <
The adjusting procedure is halted immediately
when you touch a seat adjustment switch or
one of the memory buttons.
Selecting automatic call-up
1. "Settings"
2. "Door locks"
3. "Last seat position auto."
The setting is stored fo r the remote control cur-
rently in use.
Malfunctions
The remote control ma y malfunction due to
local radio waves. If this occurs, unlock and lock
the car at the door lock with the integrated key.
Convertible: if hardtop movement via the
remote control is inte rrupted briefly, the
movement will be completed more quickly if
you keep the correspo nding button pressed
continuously.
If the car can no longer be locked with a remote
control, the battery in the remote control is
discharged. Use the remote control on an
00320051004F004C00510048000300280047004C0057004C005200510003
Page 45 of 311
40
ControlsOpening and closing
Switching off tilt alarm sensor and
interior motion sensor
Once the vehicle is locked, press the
button on the remote control again
within approx. 10 seconds.
The indicator lamp light s up briefly and then
flashes continuously. The tilt alarm sensor and
the interior motion sensor are switched off until
the next time the vehicle is unlocked and subse-
quently locked again.
Comfort Access
The concept
It is possible to access the vehicle without actu-
ating the remote control. It is sufficient to have
the remote control with you, for example in your
jacket pocket. The vehicle automatically
detects the remote control in the vicinity or in
the passenger compartment.
Comfort Access supports the following
functions:
> Unlocking/locking the vehicle
> Convenient closing
> Unlocking the trunk lid separately
> Engine starting
Functional requirement
>There are no external sources of interfer-
ence in the vicinity.
> The remote control mu st be outside the
vehicle to lock it.
> The next unlocking and locking cycle is not
possible until after approx. 2 seconds.
> It is only possible to start the engine if the
remote control is inside the vehicle.
Comparison to the standard remote
control
The above functions can be controlled by
pressing the remote control buttons or by using
Comfort Access. If you notice a brief delay while opening or
closing windows, the glass roof or retract-
able hardtop, the system is checking whether a
remote control is inside the vehicle. Please
repeat the opening or closing procedure, if
necessary. <
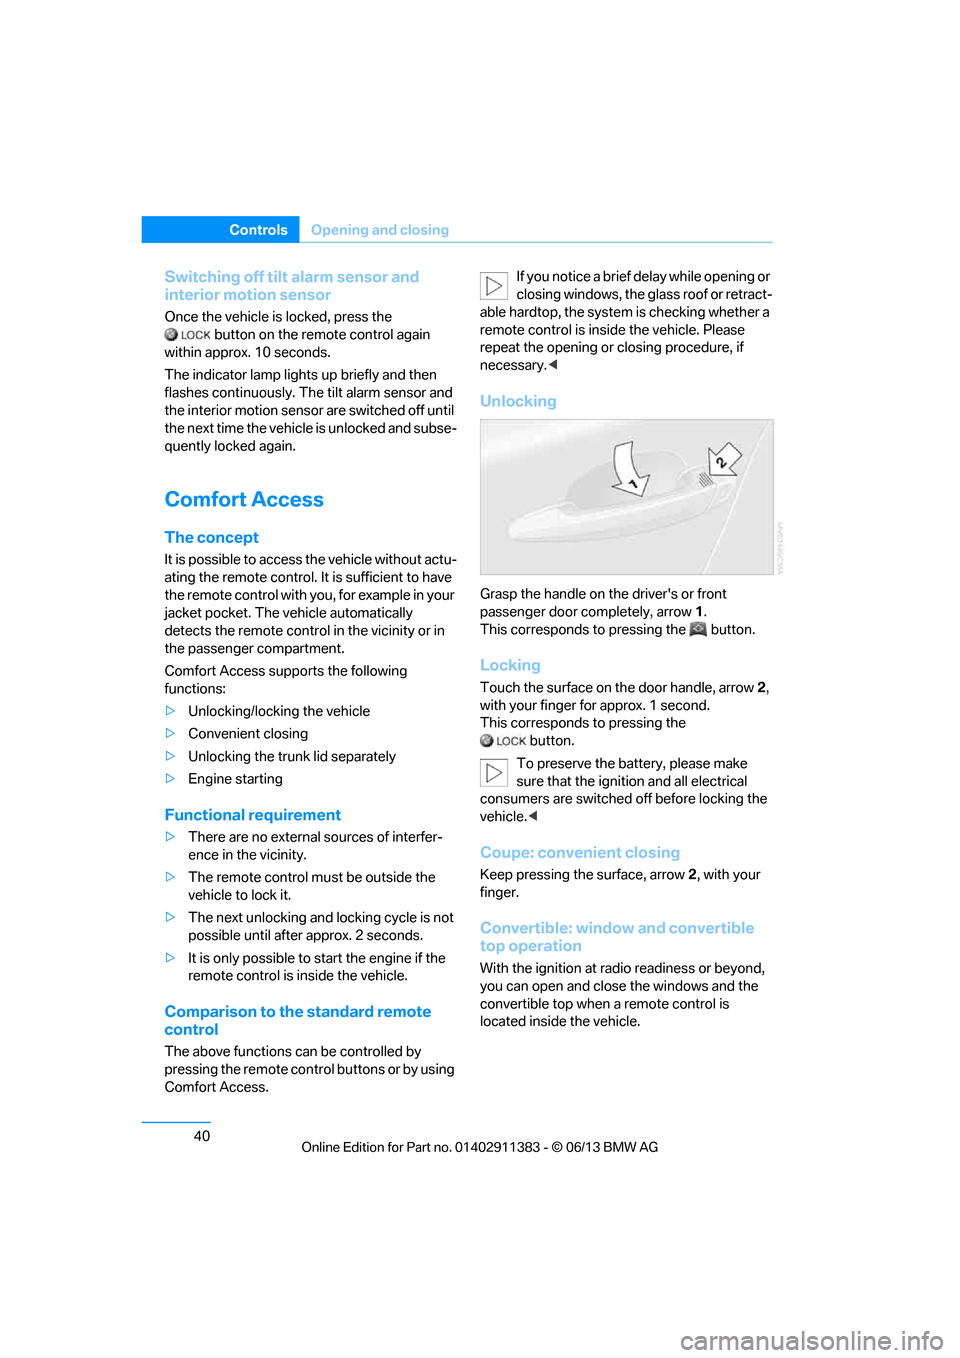
Unlocking
Grasp the handle on the driver's or front
passenger door completely, arrow 1 .
This corresponds to pressing the button.
Locking
Touch the surface on the door handle, arrow 2,
with your finger for approx. 1 second.
This corresponds to pressing the
button.
To preserve the battery, please make
sure that the ignition and all electrical
consumers are switched off before locking the
vehicle. <
Coupe: convenient closing
Keep pressing the surface, arrow 2, with your
finger.
Convertible: window and convertible
top operation
With the ignition at ra dio readiness or beyond,
you can open and close the windows and the
convertible top when a remote control is
located inside the vehicle.
00320051004F004C00510048000300280047004C0057004C005200510003
Page 46 of 311
41
Opening and closing
Controls
Unlocking the trunk lid separately
Press the button on the ou
tside of the trunk lid.
This corresponds to pressing the button.
If the vehicle detects that a remote
control has been accide ntally left inside
the locked vehicle's trunk after the trunk lid is
closed, the lid will reopen. The hazard warning
flashers flash and a signal sounds. <
Switching on radio readiness
Pressing the Start/Stop button switches on
radio readiness.
Do not depress the brake or the clutch; other-
wise, the engine will start immediately.
Starting the engine
The engine can be started or the ignition can be
switched on when a remote control is inside the
vehicle. It is not necessa ry to insert a remote
control into the ignition lock, refer to page 62.
Switching off the engine in cars with
automatic transmission
The engine can only be switched off when the
selector lever is in po sition P, refer to page 64.
To switch the engine off when the selector lever
is in position N, the remote control must be in
the ignition lock.
Malfunction
Local radio waves can in terfere with the func-
tion of Comfort Access, for example when a
mobile phone is in the immediate vicinity of the
remote control or by when a mobile phone is
being charged in the vehicle.
If this happens, open or close the vehicle via the
buttons on the remote co ntrol or using the inte-
grated key. To start the engine afterward, insert
the remote control into the ignition lock.
Warning lamps
The warning lamp in the instrument
cluster lights up when you attempt to
start the engine: the engine cannot
be started. The remote co ntrol is not inside the
vehicle or is malfunctioning. Take the remote contro
l with you inside the
vehicle or have it checked. If necessary, insert
another remote control in to the ignition lock.
The warning lamp in the instrument
cluster lights up wh ile the engine is
running: the remote control is no
longer inside the vehicle. After the engine is
switched off, the engine can only be restarted
within approx. 10 seconds.
The indicator lamp in the instrument
cluster lights up and a message
appears on the Control Display:
replace the battery in the remote control.
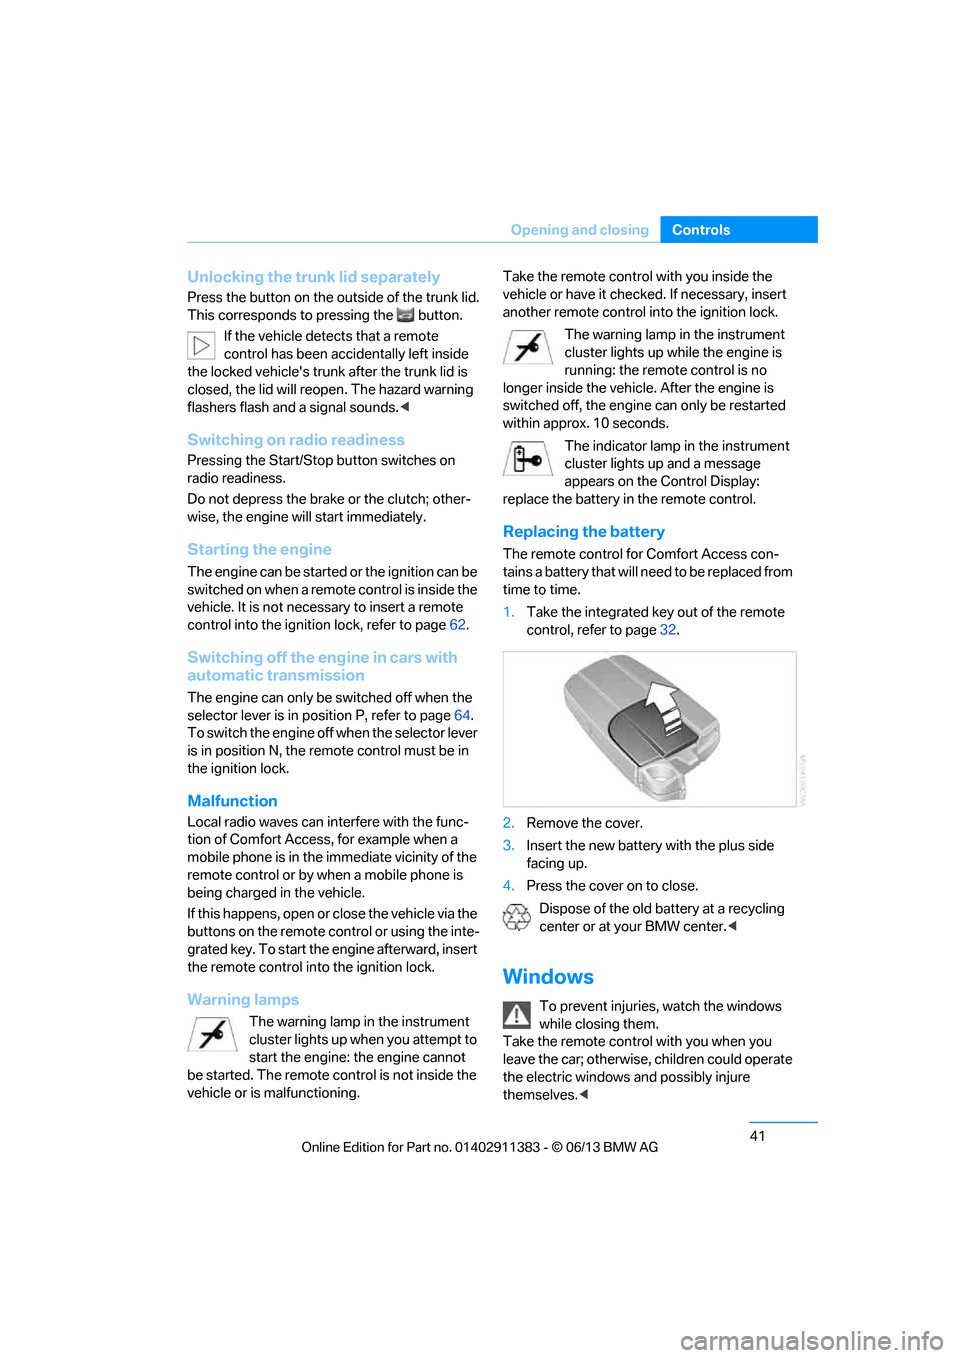
Replacing the battery
The remote control for Comfort Access con-
tains a battery that will need to be replaced from
time to time.
1. Take the integrated ke y out of the remote
control, refer to page 32.
2. Remove the cover.
3. Insert the new battery with the plus side
facing up.
4. Press the cover on to close.
Dispose of the old battery at a recycling
center or at your BMW center. <
Windows
To prevent injuries, watch the windows
while closing them.
Take the remote contro l with you when you
leave the car; otherwise, children could operate
the electric windows and possibly injure
themselves. <
00320051004F004C00510048000300280047004C0057004C005200510003
Page 47 of 311
42
ControlsOpening and closing
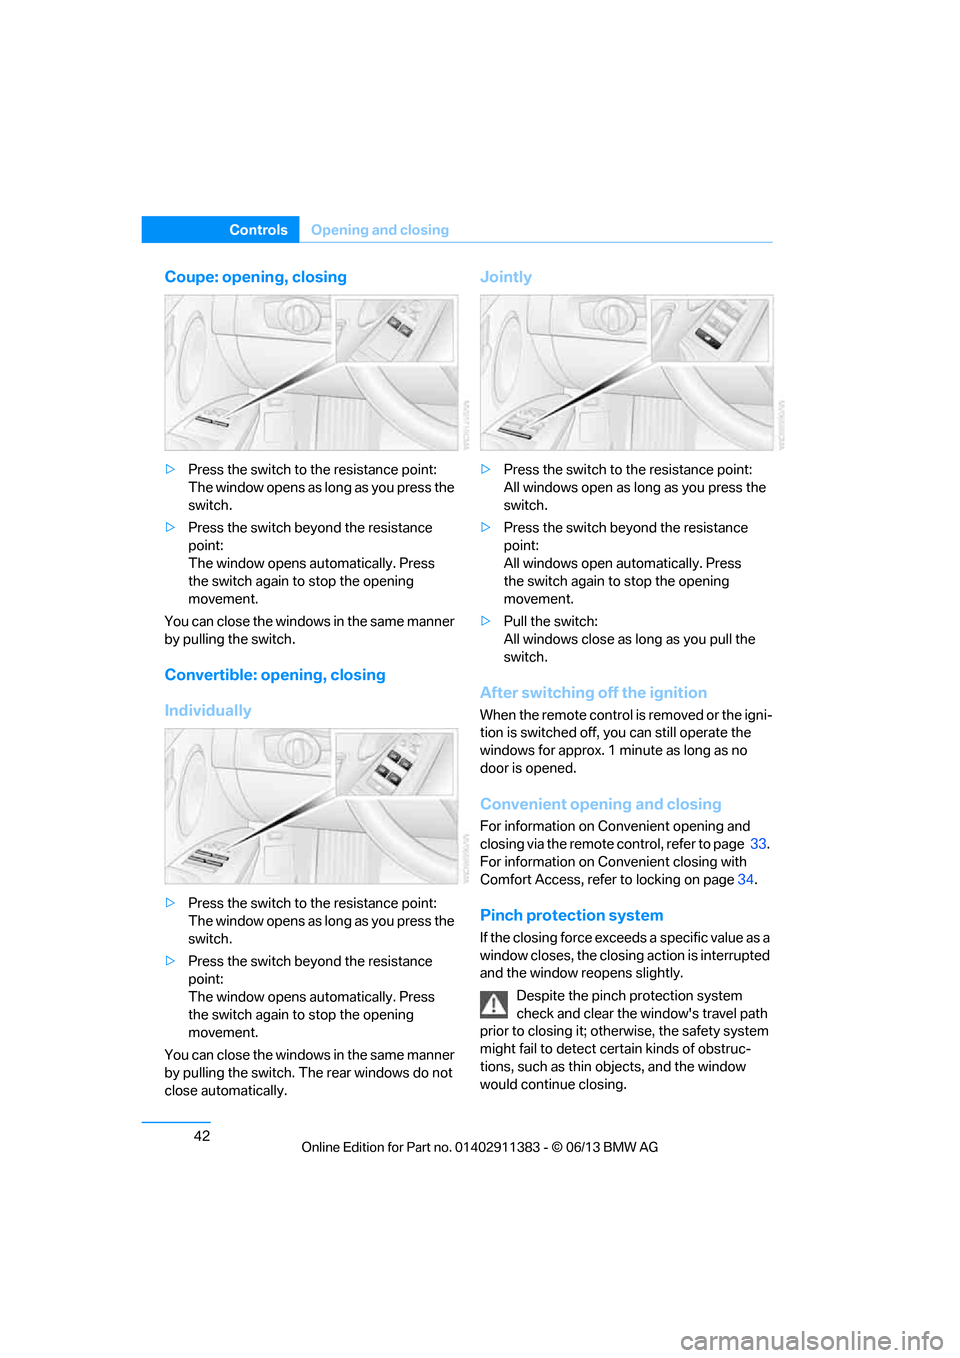
Coupe: opening, closing
>Press the switch to the resistance point:
The window opens as long as you press the
switch.
> Press the switch beyond the resistance
point:
The window opens automatically. Press
the switch again to stop the opening
movement.
You can close the windows in the same manner
by pulling the switch.
Convertible: opening, closing
Individually
> Press the switch to the resistance point:
The window opens as long as you press the
switch.
> Press the switch beyond the resistance
point:
The window opens automatically. Press
the switch again to stop the opening
movement.
You can close the windows in the same manner
by pulling the switch. The rear windows do not
close automatically.
Jointly
> Press the switch to the resistance point:
All windows open as lo ng as you press the
switch.
> Press the switch beyond the resistance
point:
All windows open automatically. Press
the switch again to stop the opening
movement.
> Pull the switch:
All windows close as long as you pull the
switch.
After switching off the ignition
When the remote control is removed or the igni-
tion is switched off, you can still operate the
windows for approx. 1 minute as long as no
door is opened.
Convenient opening and closing
For information on Convenient opening and
closing via the remote control, refer to page 33.
For information on Convenient closing with
Comfort Access, refer to locking on page 34.
Pinch protection system
If the closing force exceeds a specific value as a
window closes, the closing action is interrupted
and the window reopens slightly.
Despite the pinch protection system
check and clear the window's travel path
prior to closing it; otherw ise, the safety system
might fail to detect certain kinds of obstruc-
tions, such as thin objects, and the window
would continue closing.
00320051004F004C00510048000300280047004C0057004C005200510003
Page 48 of 311
43
Opening and closing
Controls
Do not install any accessories that might inter-
fere with window movement. Otherwise, the
pinch protection system could be impaired.
Convertible: the rear windows are not equipped
with pinch protection. Therefore, watch them
closely when closing to avoid personal injury.
<
Closing without pinch protection
If there is an external danger, or if ice on the
windows, etc., prevents you from closing the
windows normally, proceed as follows:
1.Pull the switch past the resistance point and
hold it there. Pinch protection is limited and
the window reopens slightly if the closing
force exceeds a certain value.
2. Pull the switch again past the resistance
point within approx. 4 seconds and hold it
there. The window closes without pinch
protection.
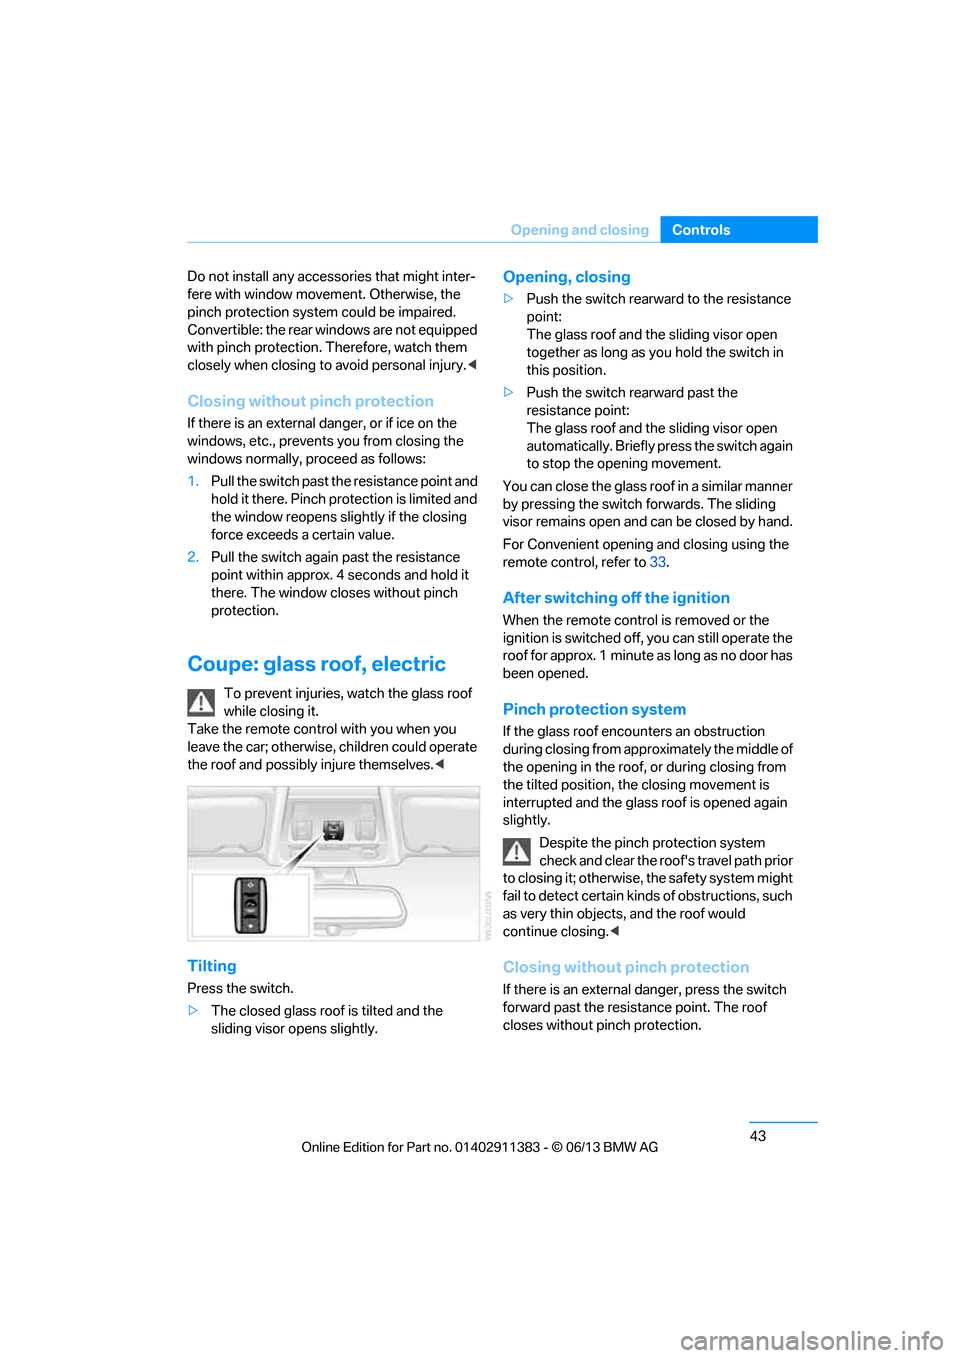
Coupe: glass roof, electric
To prevent injuries, watch the glass roof
while closing it.
Take the remote contro l with you when you
leave the car; otherwise, children could operate
the roof and possibly injure themselves. <
Tilting
Press the switch.
>The closed glass roof is tilted and the
sliding visor opens slightly.
Opening, closing
>Push the switch rearward to the resistance
point:
The glass roof and the sliding visor open
together as long as you hold the switch in
this position.
> Push the switch rearward past the
resistance point:
The glass roof and the sliding visor open
automatically. Briefly press the switch again
to stop the opening movement.
You can close the glass roof in a similar manner
by pressing the switch forwards. The sliding
visor remains open and can be closed by hand.
For Convenient opening and closing using the
remote control, refer to 33.
After switching off the ignition
When the remote contro l is removed or the
ignition is switched off, you can still operate the
roof for approx. 1 minute as long as no door has
been opened.
Pinch protection system
If the glass roof encounters an obstruction
during closing from approximately the middle of
the opening in the roof, or during closing from
the tilted position, the closing movement is
interrupted and the glass roof is opened again
slightly.
Despite the pinch protection system
check and clear the roof's travel path prior
to closing it; otherwise, the safety system might
fail to detect certain kinds of obstructions, such
as very thin objects, and the roof would
continue closing. <
Closing without pinch protection
If there is an external danger, press the switch
forward past the resistance point. The roof
closes without pinch protection.
00320051004F004C00510048000300280047004C0057004C005200510003