Hard drive BMW 3 SERIES CONVERTIBLE 2013 E93 Owner's Manual
[x] Cancel search | Manufacturer: BMW, Model Year: 2013, Model line: 3 SERIES CONVERTIBLE, Model: BMW 3 SERIES CONVERTIBLE 2013 E93Pages: 311, PDF Size: 7.05 MB
Page 22 of 311
17
Dashboard
At a glance
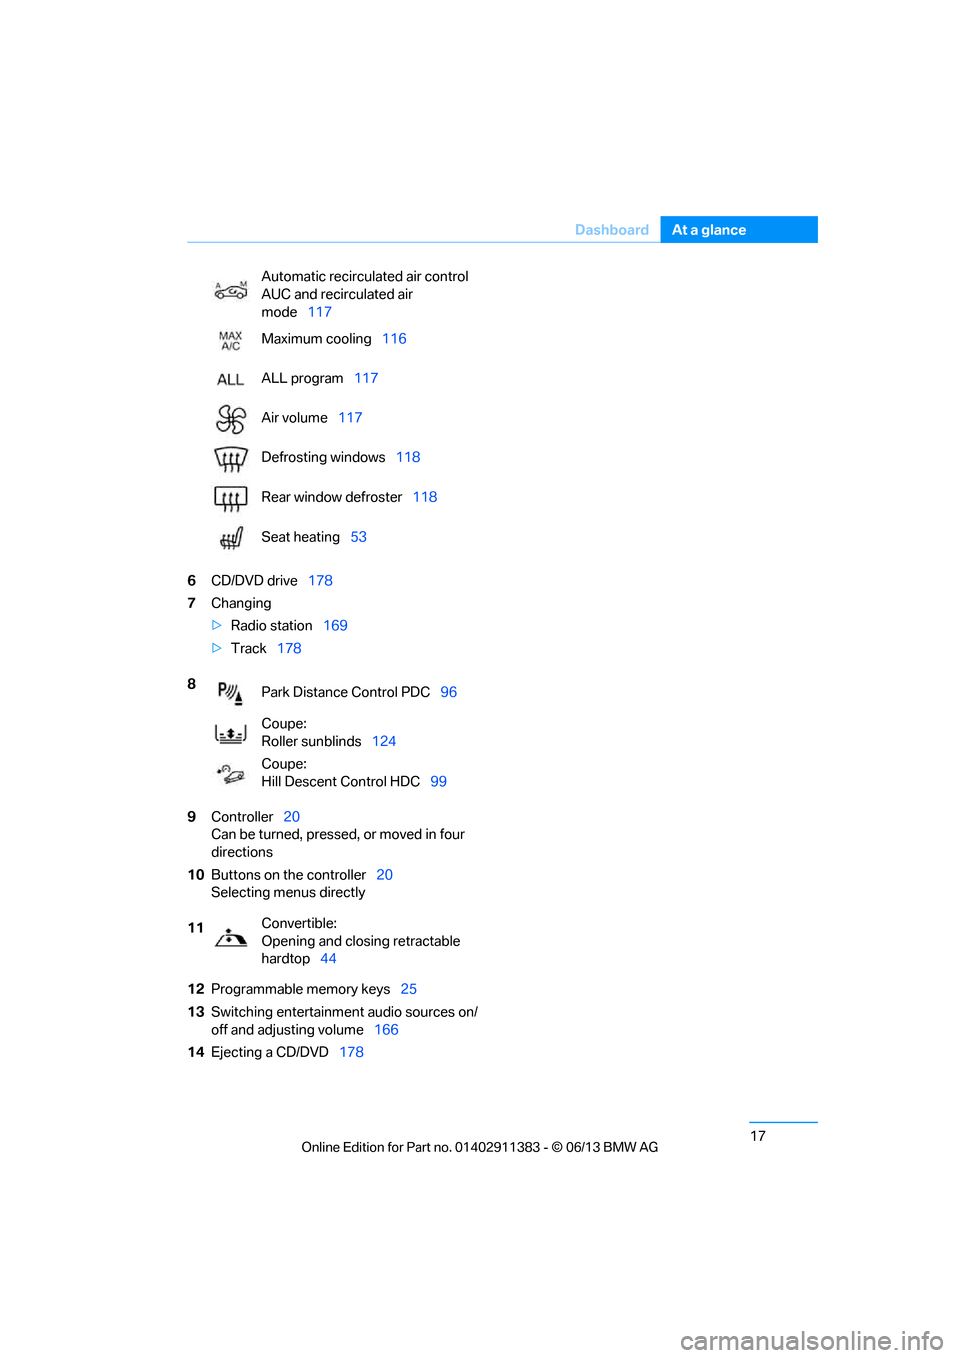
6
CD/DVD drive 178
7 Changing
>Radio station 169
> Track 178
9 Controller 20
Can be turned, pressed, or moved in four
directions
10 Buttons on the controller 20
Selecting menus directly
12 Programmable memory keys 25
13 Switching entertainment audio sources on/
off and adjusting volume 166
14 Ejecting a CD/DVD 178
Automatic recirculated air control
AUC and recirculated air
mode
117
Maximum cooling 116
ALL program 117
Air volume 117
Defrosting windows 118
Rear window defroster 118
Seat heating 53
8 Park Distance Control PDC 96
Coupe:
Roller sunblinds 124
Coupe:
Hill Descent Control HDC 99
11 Convertible:
Opening and closing retractable
hardtop
44
00320051004F004C00510048000300280047004C0057004C005200510003
Page 39 of 311
34
ControlsOpening and closing
Convertible: to operate the retractable
hardtop with the re mote control, the
doors and trunk lid must be closed and the
trunk partition must be folded down and
engaged on both sides. Refer also to page 44.<
Unlocking
Press the button.
The interior lamps, the courtesy lighting of the
doors, and the welcome lamps come on.
Setting unlocking characteristics
You can set whether only the driver's door or
the entire vehicle is to be unlocked when the
button is pressed for the first time.
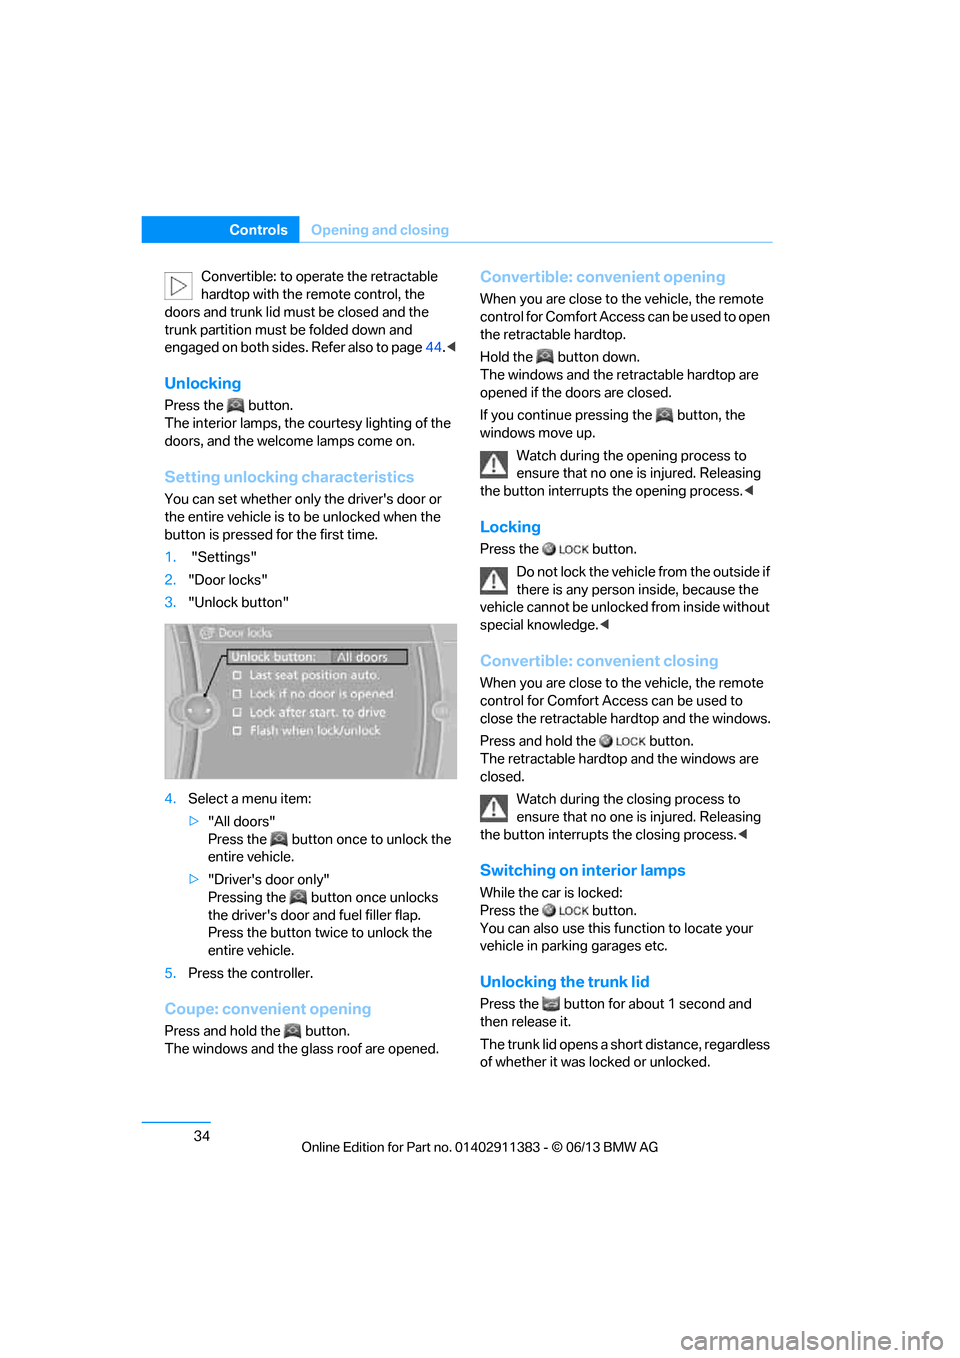
1. "Settings"
2. "Door locks"
3. "Unlock button"
4. Select a menu item:
>"All doors"
Press the button once to unlock the
entire vehicle.
> "Driver's door only"
Pressing the button once unlocks
the driver's door and fuel filler flap.
Press the button twice to unlock the
entire vehicle.
5. Press the controller.
Coupe: convenient opening
Press and hold the button.
The windows and the glass roof are opened.
Convertible: convenient opening
When you are close to the vehicle, the remote
control for Comfort Access can be used to open
the retracta ble hardtop.
Hold the button down.
The windows and the re tractable hardtop are
opened if the doors are closed.
If you continue pressing the button, the
windows move up.
Watch during the opening process to
ensure that no one is injured. Releasing
the button interrupts the opening process. <
Locking
Press the button.
Do not lock the vehicl e from the outside if
there is any person inside, because the
vehicle cannot be unlocked from inside without
special knowledge. <
Convertible: convenient closing
When you are close to the vehicle, the remote
control for Comfort Access can be used to
close the retractable ha rdtop and the windows.
Press and hold the button.
The retractable hardto p and the windows are
closed.
Watch during the closing process to
ensure that no one is injured. Releasing
the button interrupts the closing process. <
Switching on interior lamps
While the car is locked:
Press the button.
You can also use this function to locate your
vehicle in parking garages etc.
Unlocking the trunk lid
Press the button for about 1 second and
then release it.
The trunk lid opens a short distance, regardless
of whether it was locked or unlocked.
00320051004F004C00510048000300280047004C0057004C005200510003
Page 40 of 311
35
Opening and closing
Controls
The trunk lid swings back and up when
opened. Ensure that there is sufficient
clearance. To avoid lo cking yourself out by
accident, do not place th e remote control in the
trunk. A previously locked trunk lid is locked
again after closing.
Before and after each tr ip, check that the trunk
lid has not been inad vertently unlocked.<
Convertible: convenient loading
When you are close to the vehicle, the remote
control for Comfort Access can be used to
partially raise the op en hardtop for more
convenient loading of the trunk.
1. Briefly press the butto n and, within one
second, press again and hold until the
retractable hardtop stop s in an intermediate
position. The trunk lid opens slightly.
2. Open the trunk lid, press the trunk partition
upward and stow the cargo in the trunk.
3. Press down the trunk partition until it
engages on both sides and close the
trunk lid.
4. Press the button for a longer period to
fold the retractable hardtop back in.
Confirmation signals
You can activate or deac tivate the confirmation
signals.
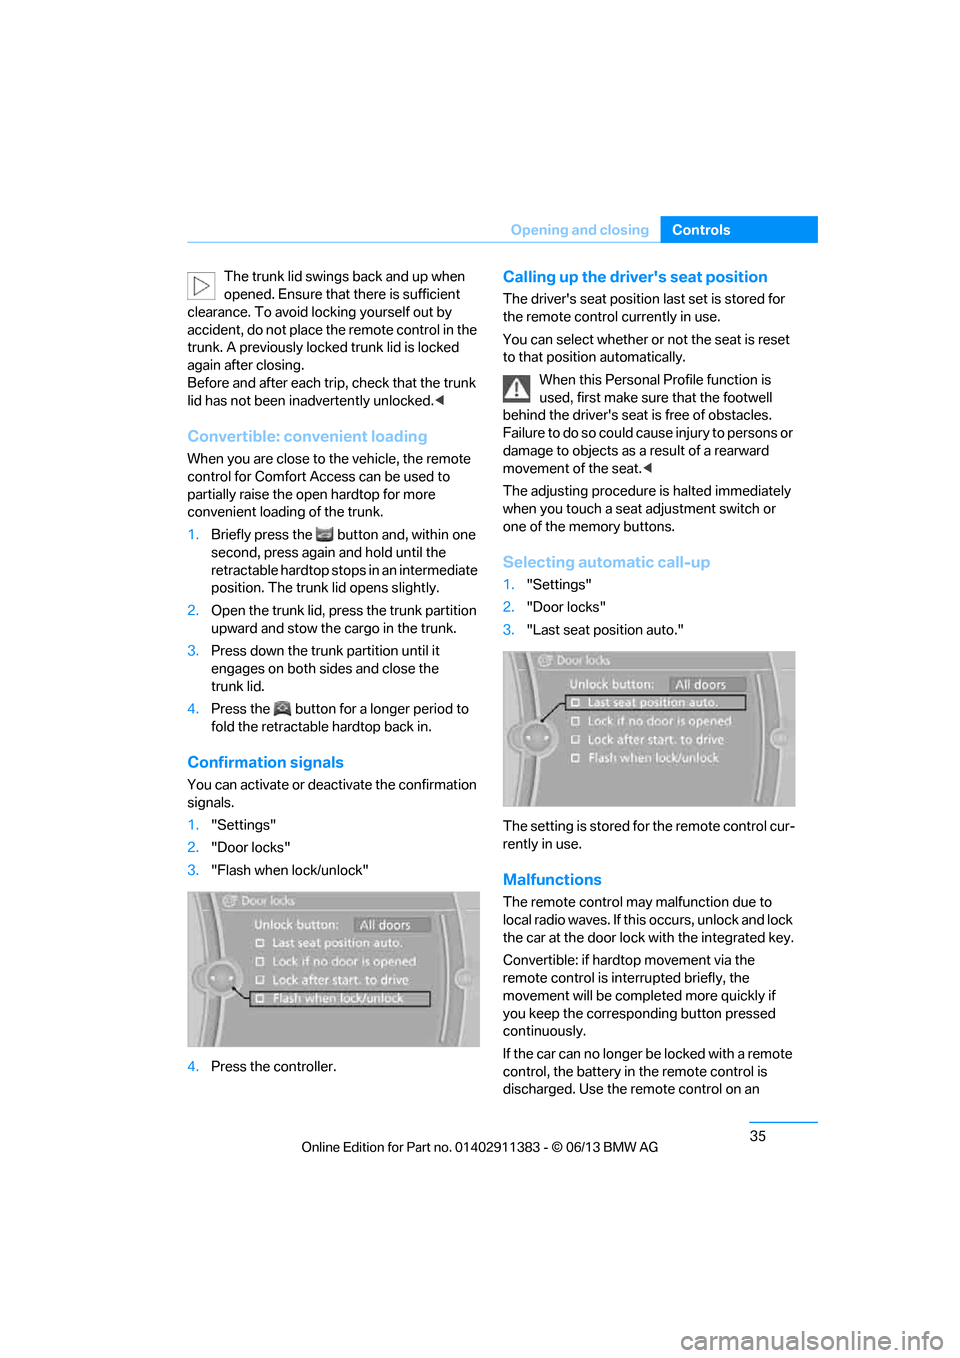
1. "Settings"
2. "Door locks"
3. "Flash when lock/unlock"
4. Press the controller.
Calling up the driver's seat position
The driver's seat position last set is stored for
the remote control currently in use.
You can select whether or not the seat is reset
to that position automatically.
When this Personal Profile function is
used, first make sure that the footwell
behind the driver's seat is free of obstacles.
Failure to do so could ca use injury to persons or
damage to objects as a result of a rearward
movement of the seat. <
The adjusting procedure is halted immediately
when you touch a seat adjustment switch or
one of the memory buttons.
Selecting automatic call-up
1. "Settings"
2. "Door locks"
3. "Last seat position auto."
The setting is stored fo r the remote control cur-
rently in use.
Malfunctions
The remote control ma y malfunction due to
local radio waves. If this occurs, unlock and lock
the car at the door lock with the integrated key.
Convertible: if hardtop movement via the
remote control is inte rrupted briefly, the
movement will be completed more quickly if
you keep the correspo nding button pressed
continuously.
If the car can no longer be locked with a remote
control, the battery in the remote control is
discharged. Use the remote control on an
00320051004F004C00510048000300280047004C0057004C005200510003
Page 45 of 311
40
ControlsOpening and closing
Switching off tilt alarm sensor and
interior motion sensor
Once the vehicle is locked, press the
button on the remote control again
within approx. 10 seconds.
The indicator lamp light s up briefly and then
flashes continuously. The tilt alarm sensor and
the interior motion sensor are switched off until
the next time the vehicle is unlocked and subse-
quently locked again.
Comfort Access
The concept
It is possible to access the vehicle without actu-
ating the remote control. It is sufficient to have
the remote control with you, for example in your
jacket pocket. The vehicle automatically
detects the remote control in the vicinity or in
the passenger compartment.
Comfort Access supports the following
functions:
> Unlocking/locking the vehicle
> Convenient closing
> Unlocking the trunk lid separately
> Engine starting
Functional requirement
>There are no external sources of interfer-
ence in the vicinity.
> The remote control mu st be outside the
vehicle to lock it.
> The next unlocking and locking cycle is not
possible until after approx. 2 seconds.
> It is only possible to start the engine if the
remote control is inside the vehicle.
Comparison to the standard remote
control
The above functions can be controlled by
pressing the remote control buttons or by using
Comfort Access. If you notice a brief delay while opening or
closing windows, the glass roof or retract-
able hardtop, the system is checking whether a
remote control is inside the vehicle. Please
repeat the opening or closing procedure, if
necessary. <
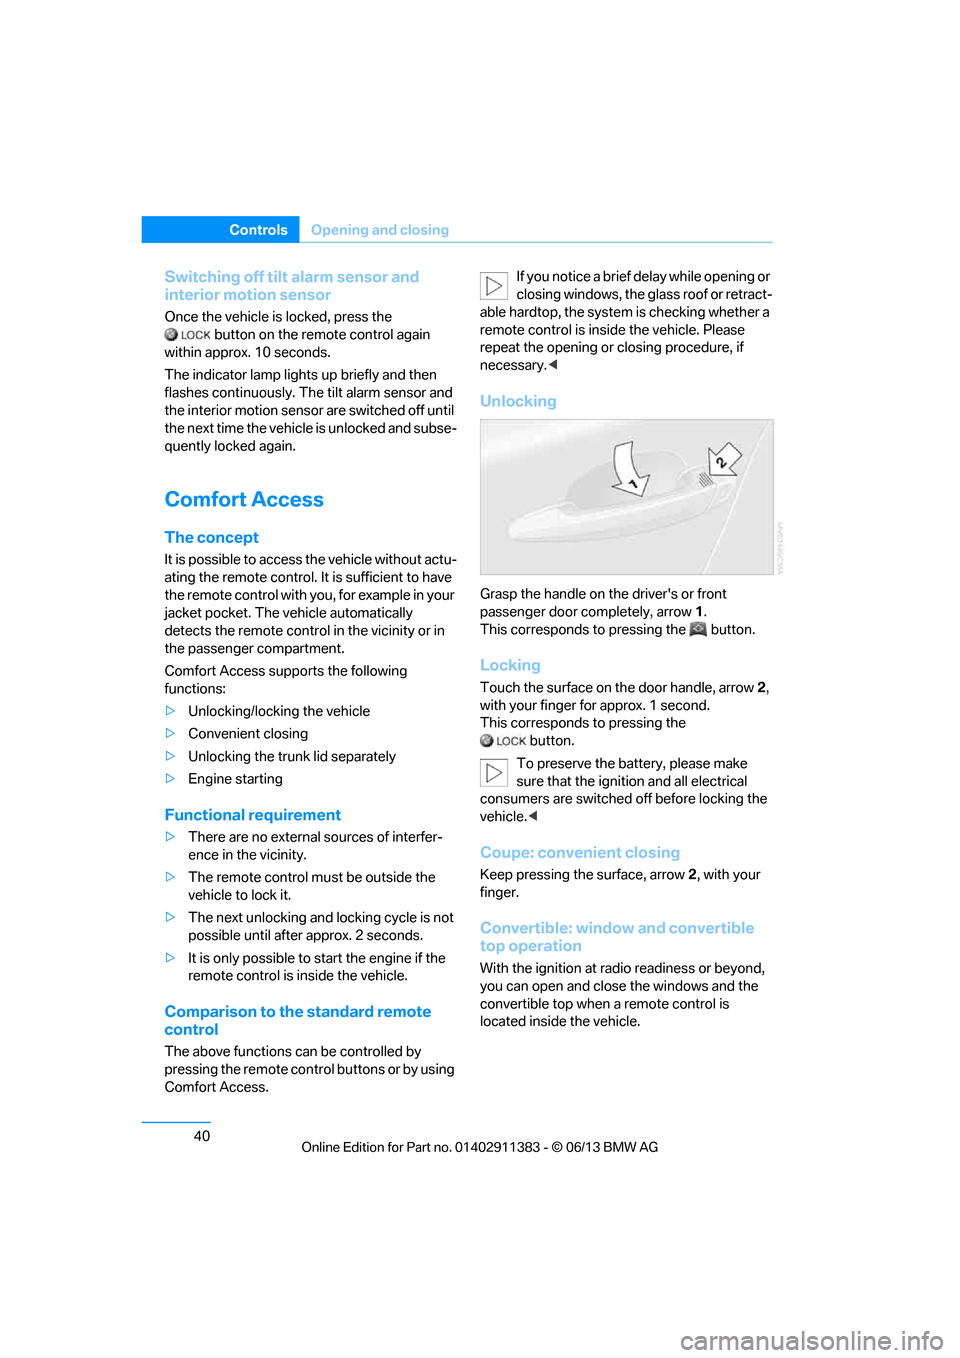
Unlocking
Grasp the handle on the driver's or front
passenger door completely, arrow 1 .
This corresponds to pressing the button.
Locking
Touch the surface on the door handle, arrow 2,
with your finger for approx. 1 second.
This corresponds to pressing the
button.
To preserve the battery, please make
sure that the ignition and all electrical
consumers are switched off before locking the
vehicle. <
Coupe: convenient closing
Keep pressing the surface, arrow 2, with your
finger.
Convertible: window and convertible
top operation
With the ignition at ra dio readiness or beyond,
you can open and close the windows and the
convertible top when a remote control is
located inside the vehicle.
00320051004F004C00510048000300280047004C0057004C005200510003
Page 49 of 311
44
ControlsOpening and closing
Following interruptions in electrical
power supply
After a power failure, there is a possibility that
the glass roof can only be tilted. The system
must be initialized. BMW recommends having
this work performed by your BMW center.
Convertible: retractable
hardtop
The retractable hardto p combines reliable
weather protection with simple and convenient
operation.
The following tips will enhance your driving
pleasure in your Convertible:
> It is advisable that you close the retractable
hardtop when you park the vehicle. Not only
does the closed hardtop protect the vehicle
interior against unanticipated weather dam-
age, it also offers theft protection. However,
even when the hardtop is closed, valuables
should only be stored in the locked trunk.
> Do not attach roof rack systems to the
retractable hardtop, and in particular do not
attach magnetic racks.
> Do not attach rack sy stems to the trunk lid,
and in particular do not attach magnetic
racks.
> When the retractable hardtop is operated,
the trunk lid swings back and up. Before
operating the retracta ble hardtop, ensure
that there is enough clearance, e.g. when
parked in front of a wall.
> If you open the hardtop while it is wet, e.g.
after driving in the rain, water may drip into
the trunk. If necessary, remove items from
the trunk beforehand to avoid water stains
or soiling. Do not place any objects on the retract-
able hardtop or on
the trunk lid; other-
wise, they could fall du ring movements of the
retractable hardtop and cause damage or injury.
Never move the retractable hardtop when the
rollover protection system is in the activated
position.
Driving when the hardtop is not fully opened or
closed may result in damage or injury.
Do not reach into the mechanism during the
opening or closing procedure. Keep children
away from the swiveling area of the retractable
hardtop. <
The retractabl e hardtop cannot be moved
at temperatures below + 14 7/–10 6.
A message appears on the Control Display. <
The retractable hard top can only be
opened and closed when the vehicle is
stationary. To avoid causing damage, do not
drive off until the hardtop has stopped
moving. <
Before opening and closing
>Comply with the safety precautions
described above.
> Ensure that the trunk partition is folded
down and engaged on both sides, refer to
page 128; otherwise, it will not be possible
to open the retractable hardtop.
> Do not place any objects near or on the
trunk partition, refer to page 128.
> Close the storage compartment on the left
side of the trunk.
> Observe the maximum loading height under
the trunk partition.
> Ensure that the trunk lid is closed.
> The vehicle should be pa rked on fairly level
ground. Excessive angle is indicated by a
lamp.
00320051004F004C00510048000300280047004C0057004C005200510003
Page 53 of 311
48
ControlsAdjustments
Adjustments
Vehicle equipment
In this chapter, all pr oduction, country, and
optional equipment that is offered in the model
range is described. As a result, some equip-
ment described may not be available in a partic-
ular vehicle, for example due to the options or
national-market version selected. This also
applies to safety related functions and systems.
Sitting safely
The ideal sitting position can make a vital
contribution to relaxed, fatigue-free driving. In
conjunction with the safety belts, the head
restraints and the airbags, the seated position
has a major influence on your safety in the event
of an accident. To ensure that the safety sys-
tems operate with optimal efficiency, we
strongly urge you to observe the instructions
contained in the following section.
For additional information on transporting
children safely, refer to page 58.
Airbags
Always maintain an adequate distance
between yourself and the airbags. Always
grip the steering wheel on the rim, with your
hands in the 3 o'clock and 9 o'clock positions,
to minimize the risk of injury to the hands or
arms in the event of the airbag being triggered
off.
No one and nothing shou ld come between the
airbags and the seat occupant.
Do not use the cover of the front airbag on the
front passenger side as a storage area. Make
sure that the front passeng er is sitting correctly,
e.g. not resting feet or legs on the dashboard;
otherwise, leg injuries can occur if the front
airbag deploys.
Make sure that passengers keep their heads
away from the side airbag and do not lean against the cover of the head airbag; otherwise,
serious injuries can result if the airbag
deploys.
<
Even if you follow all the instructions, injuries
resulting from contact with airbags cannot be
fully excluded, depending on the circum-
stances. The ignition and inflation noise may
provoke a mild hearing loss in extremely sensi-
tive individuals. This effect is usually only
temporary.
For airbag locations and additional information
on airbags, refer to page 107.
Head restraint
A correctly adjusted head restraint reduces the
risk of neck injury in the event of an accident.
Adjust the head restraint in such a way
that its center is at approx. ear level.
Otherwise, there is an increased risk of injury in
the event of an accident. <
Head restraints, refer to page 51.
Safety belt
Before every drive, make sure that all occupants
wear their safety belts. Airbags complement the
safety belt as an additi onal safety device, but
they do not repres ent a substitute.
Your vehicle has four seats, each of which is
equipped with a safety belt.
Never allow more than one person to
wear a single safety belt. Never allow
infants or small children to ride in a passenger's
lap. Make sure that the be lt in the lap area sits
low across the hips and does not press against
the abdomen.
The safety belt must not rest against the throat,
run across sharp edges, pass over hard or frag-
ile objects or be pinched. Fasten the safety belt
so that it sits as snugly as possible against the
lap and shoulder without being twisted. Other-
wise, the belt could slide over your hips and
00320051004F004C00510048000300280047004C0057004C005200510003
Page 69 of 311
64
ControlsDriving
Switching off the engine
When leaving the vehicle, always take
along the remote contro l; this precaution
prevents children from starting the engine, for
example. <
When parking, apply the parking brake
forcefully; otherwise, the vehicle could
begin to roll. On steep uphill and downhill
inclines, also secure the vehicle by turning the
wheels toward the curb, for example. <
Manual transmission
1.With the car at a standstill, press the
Start/Stop button.
2. Shift into first gear or reverse.
3. Forcefully apply the parking brake.
4. Removing the remote control from the
ignition lock, refer to page 62.
Automatic transmission
1.With the car at a standstill, move the
selector lever to position P.
2. Press the Start/Stop button.
3. Forcefully apply the parking brake.
4. Removing the remote control from the
ignition lock, refer to page 62.
Sport automatic transmission with
double clutch
1.With the car at a standstill, press the
Start/Stop button.
If the transmission is shifted into N when
the engine is switched off, you will be
notified visually and acoustically of this
fact.
2. Forcefully apply the parking brake.
3. Remove remote control from the ignition
lock, refer to page 62. The transmission is
automatically shifted into transmission
position P.
Parking brake
The parking brake is primarily intended to pre-
vent the vehicle from rolling while parked; it
brakes the rear wheels.
Also follow the instructions on page 64, under
Switching off the engine.
Indicator lamp
The indicator lamp is lit, and when you
drive off an acoustic signal sounds in
addition. The parking brake is still
applied.
Indicator lamp for Canadian models.
Applying
The lever locks in po sition automatically.
Releasing
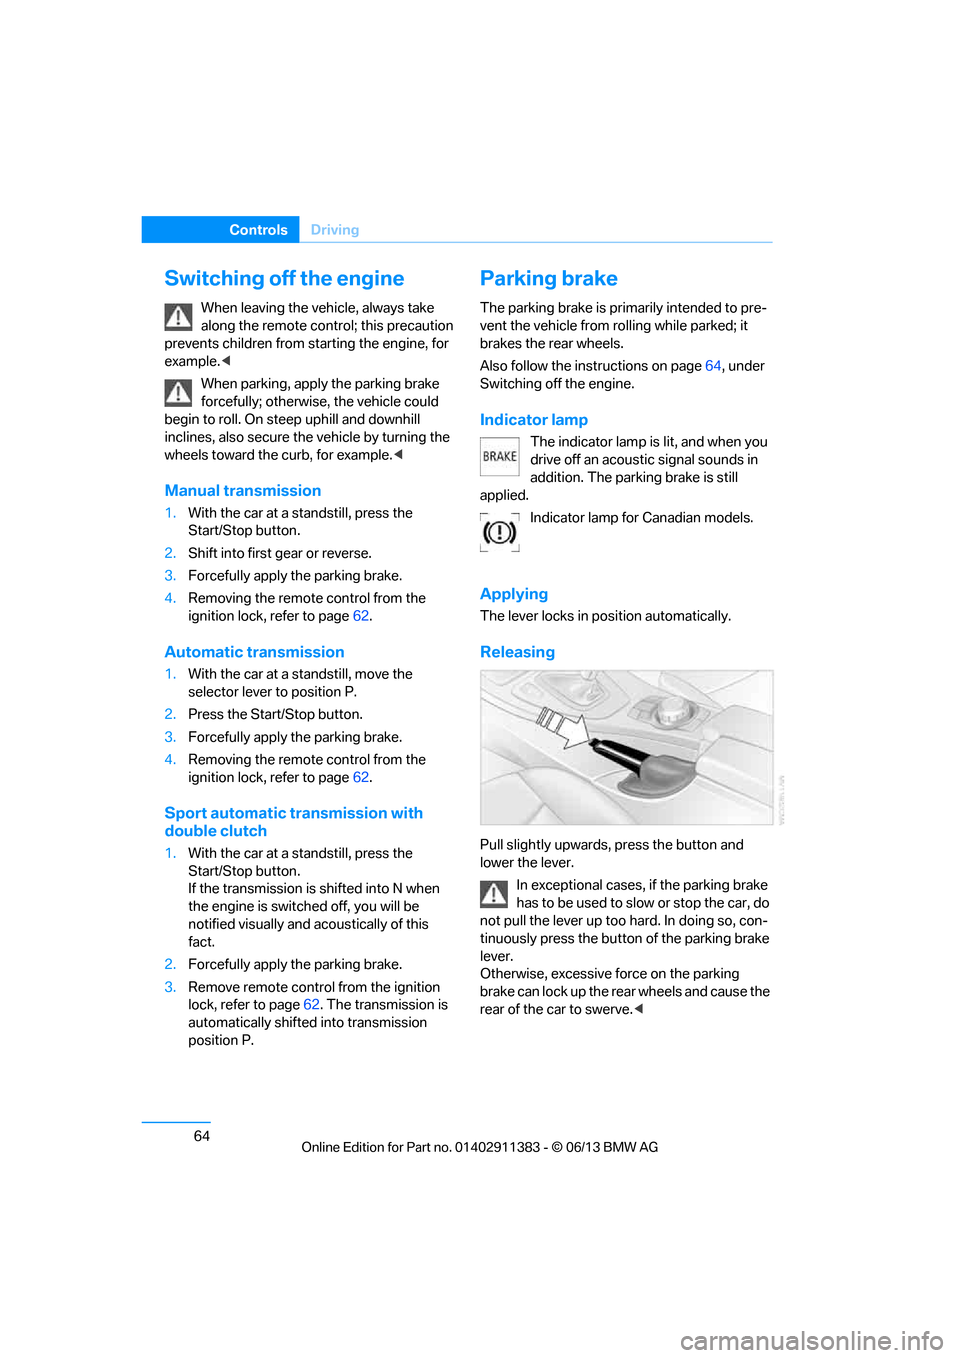
Pull slightly upwards, press the button and
lower the lever.
In exceptional cases, if the parking brake
has to be used to slow or stop the car, do
not pull the lever up too hard. In doing so, con-
tinuously press the button of the parking brake
lever.
Otherwise, excessive force on the parking
brake can lock up the rear wheels and cause the
rear of the car to swerve. <
00320051004F004C00510048000300280047004C0057004C005200510003
Page 122 of 311
117
Climate
Controls
Pressing the AUTO
button automatically
switches on the air conditioning.
At the same time, a condensation sensor
controls the program so as to prevent window
condensation as much as possible.
The program is switched off when the air distri-
bution is set manually or the button is pressed
again.
Intensity of the AUTO program
With the AUTO program switched on, auto-
matic control of the air volume and air distribu-
tion can be adjusted:
Press the left side of the button to
reduce the intensity. Press the
right side of the button to
increase it.
The selected intensity is shown on the display
of the automatic climate control.
Convertible program
The Convertible program is active when the
hardtop is open and the AUTO program is
switched on. In the Convertible program, the
automatic climate control is optimized for driv-
ing with the hardtop open . In addition, the air
volume is increased as vehicle speed increases.
The effectiveness of the Convertible pro-
gram can be enhanced considerably by
installing the wind deflector. <
Adjusting air volume manually
To be able to manually adjust the air volume,
switch off the AUTO program first.
Press the left side of the button to
reduce the air volume. Press the
right side of the button to
increase it.
The air flow rate is lowered or switched off
entirely to reduce the drain on the battery. The
display remains the same.
Automatic recirculated air control
AUC/Recirculated air mode
You can respond to unpl easant odors or pollut-
ants in the immediate environment by tempo-
rarily suspending the supply of outside air. The
system then recirculates the air currently within
the vehicle.
Press the button repeatedly to
select an operating mode:
> LED off: outside air flows in continuously.
> Left-hand LED on, AUC mode: a sensor
detects pollutants in the outside air and
controls the shut-off automatically.
> Right-hand LED on, re circulated air mode:
the supply of outside air is permanently
shut off. If the windows fog over, switch off
recirculated air mode and increase the air
volume, if necessary. Make sure that air can
flow onto the windshield.
The recirculated air mode should not be
used over an extended period of time;
otherwise, the air quality inside the car will
deteriorate continuously. <
Via the button on the steering wheel
You can switch quickly between the recircu-
lated air mode and the previous mode using a
button on the steering wheel, refer to page 13.
ALL program
Press the button.
The current temperature setting
on the driver's side is transferred to
the front passenger side.
If the temperature setting on the driver's side is
changed, the temperature on the front passen-
ger side is changed as well.
The program is switched off when the setting
is adjusted on the front passenger side or the
button is pressed again.
00320051004F004C00510048000300280047004C0057004C005200510003
Page 128 of 311
123
Practical interior accessories
Controls
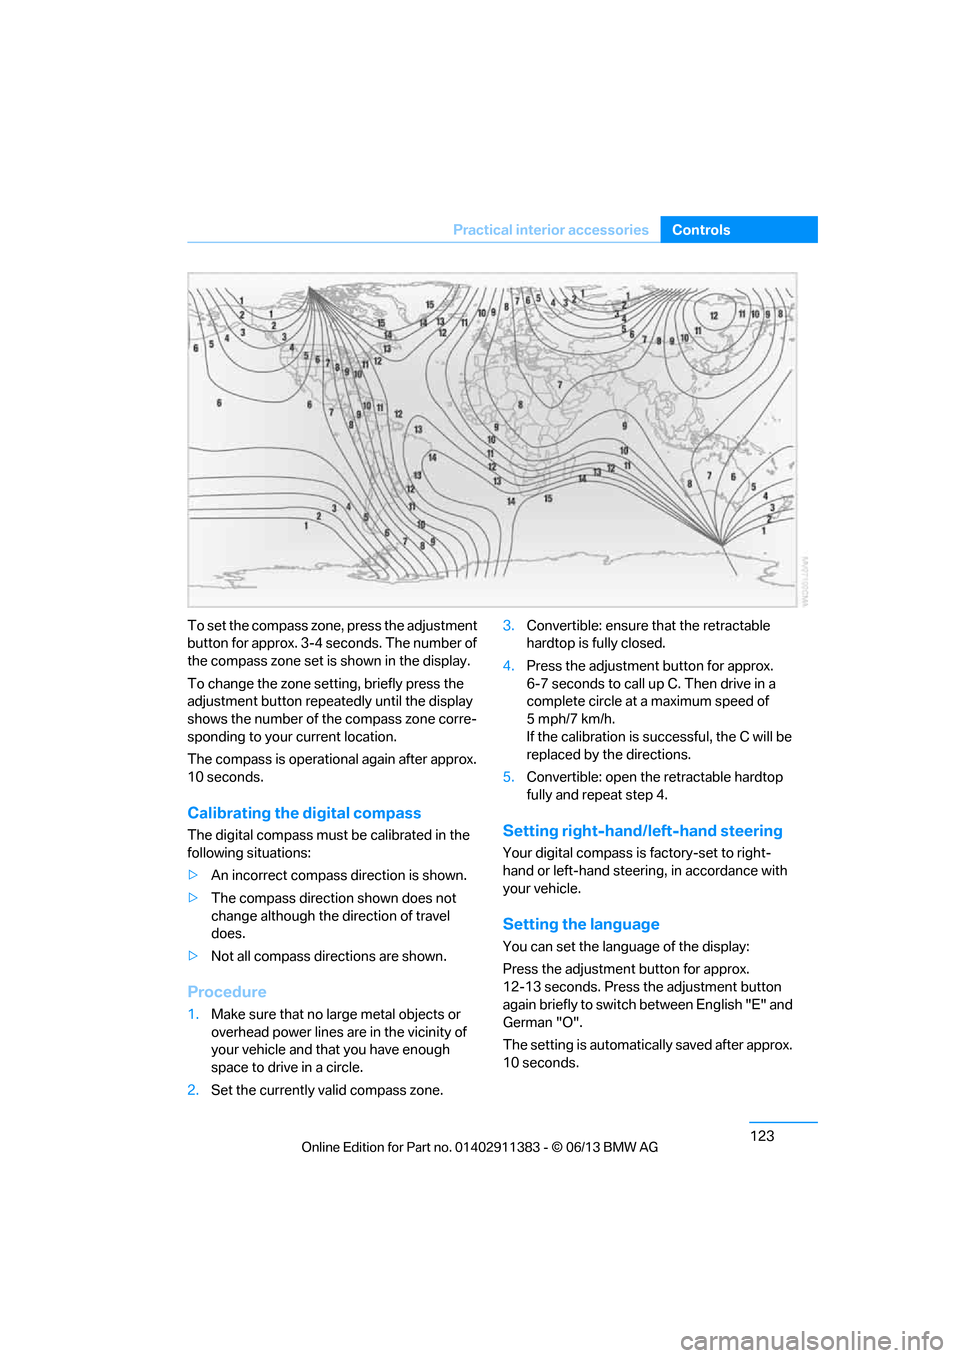
To set the compass zone, press the adjustment
button for approx. 3-4 seconds. The number of
the compass zone set is shown in the display.
To change the zone se
tting, briefly press the
adjustment button repeat edly until the display
shows the number of the compass zone corre-
sponding to your current location.
The compass is operational again after approx.
10 seconds.
Calibrating the digital compass
The digital compass must be calibrated in the
following situations:
> An incorrect compass direction is shown.
> The compass direction shown does not
change although the direction of travel
does.
> Not all compass directions are shown.
Procedure
1.Make sure that no large metal objects or
overhead power lines are in the vicinity of
your vehicle and that you have enough
space to drive in a circle.
2. Set the currently va lid compass zone. 3.
Convertible: ensure that the retractable
hardtop is fully closed.
4. Press the adjustment button for approx.
6-7 seconds to call up C. Then drive in a
complete circle at a maximum speed of
5mph/7km/h.
If the calibration is successful, the C will be
replaced by the directions.
5. Convertible: open the retractable hardtop
fully and repeat step 4.
Setting right-hand/left-hand steering
Your digital compass is factory-set to right-
hand or left-hand steering, in accordance with
your vehicle.
Setting the language
You can set the language of the display:
Press the adjustment button for approx.
12-13 seconds. Press the adjustment button
again briefly to switch between English "E" and
German "O".
The setting is automatica lly saved after approx.
10 seconds.
00320051004F004C00510048000300280047004C0057004C005200510003
Page 129 of 311
124
ControlsPractical interior accessories
Coupe:
Roller sunblinds
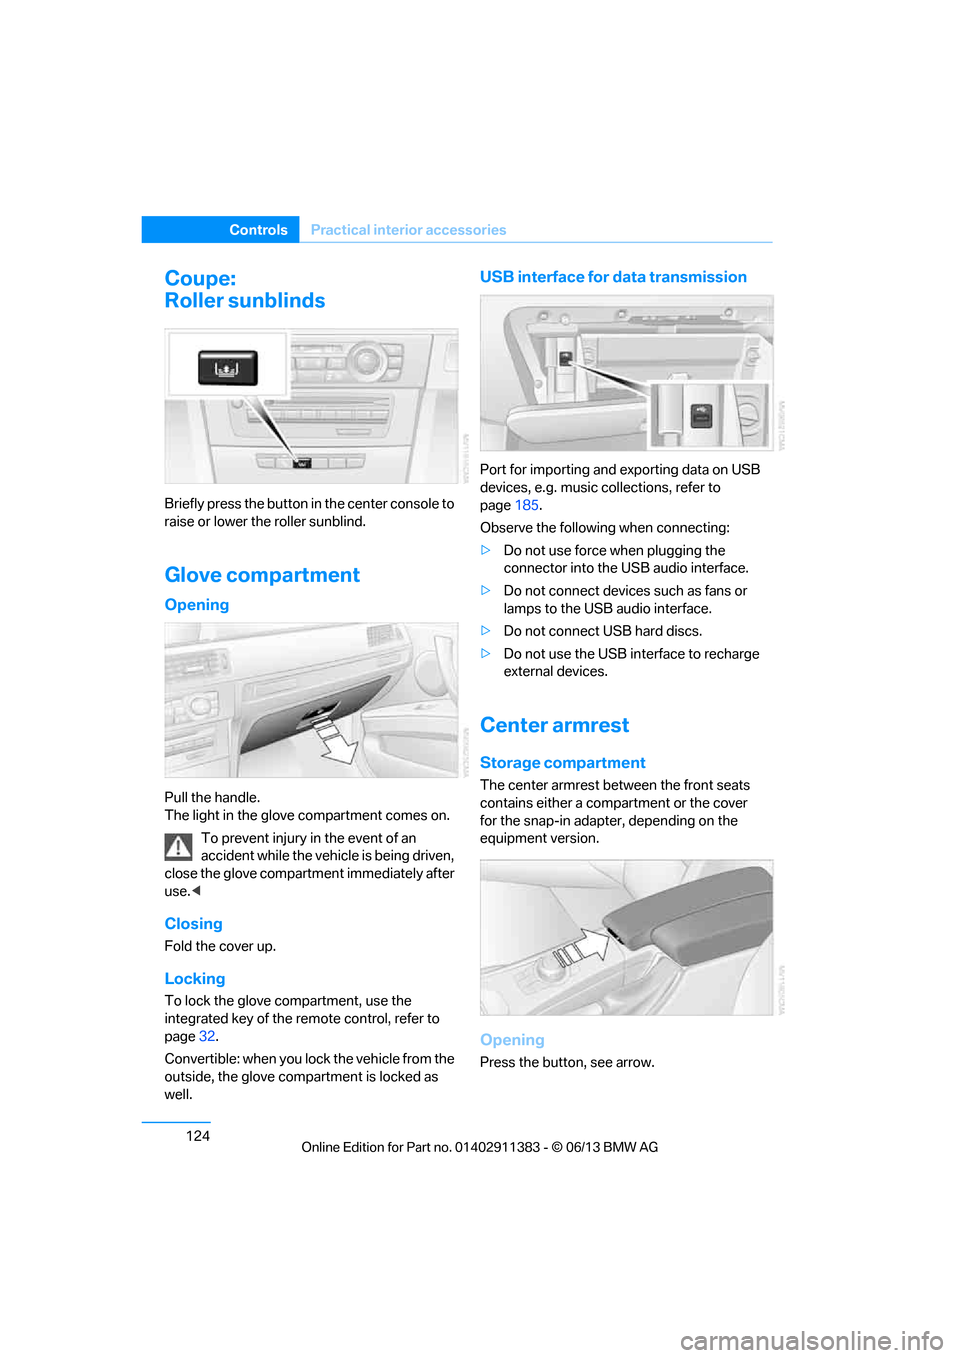
Briefly press the button in the center console to
raise or lower the roller sunblind.
Glove compartment
Opening
Pull the handle.
The light in the glove compartment comes on.
To prevent injury in the event of an
accident while the vehicle is being driven,
close the glove compartment immediately after
use. <
Closing
Fold the cover up.
Locking
To lock the glove compartment, use the
integrated key of the re mote control, refer to
page 32.
Convertible: when you lock the vehicle from the
outside, the glove comp artment is locked as
well.
USB interface for data transmission
Port for importing and exporting data on USB
devices, e.g. music collections, refer to
page 185.
Observe the following when connecting:
> Do not use force when plugging the
connector into the USB audio interface.
> Do not connect devices such as fans or
lamps to the USB audio interface.
> Do not connect USB hard discs.
> Do not use the USB in terface to recharge
external devices.
Center armrest
Storage compartment
The center armrest between the front seats
contains either a compartment or the cover
for the snap-in adapter, depending on the
equipment version.
Opening
Press the button, see arrow.
00320051004F004C00510048000300280047004C0057004C005200510003