width BMW 3 SERIES CONVERTIBLE 2013 E93 Owner's Manual
[x] Cancel search | Manufacturer: BMW, Model Year: 2013, Model line: 3 SERIES CONVERTIBLE, Model: BMW 3 SERIES CONVERTIBLE 2013 E93Pages: 311, PDF Size: 7.05 MB
Page 55 of 311
50
ControlsAdjustments
Electrical adjustment
Observe the adjustment instructions on
page49 to ensure the best possible
personal protection. <
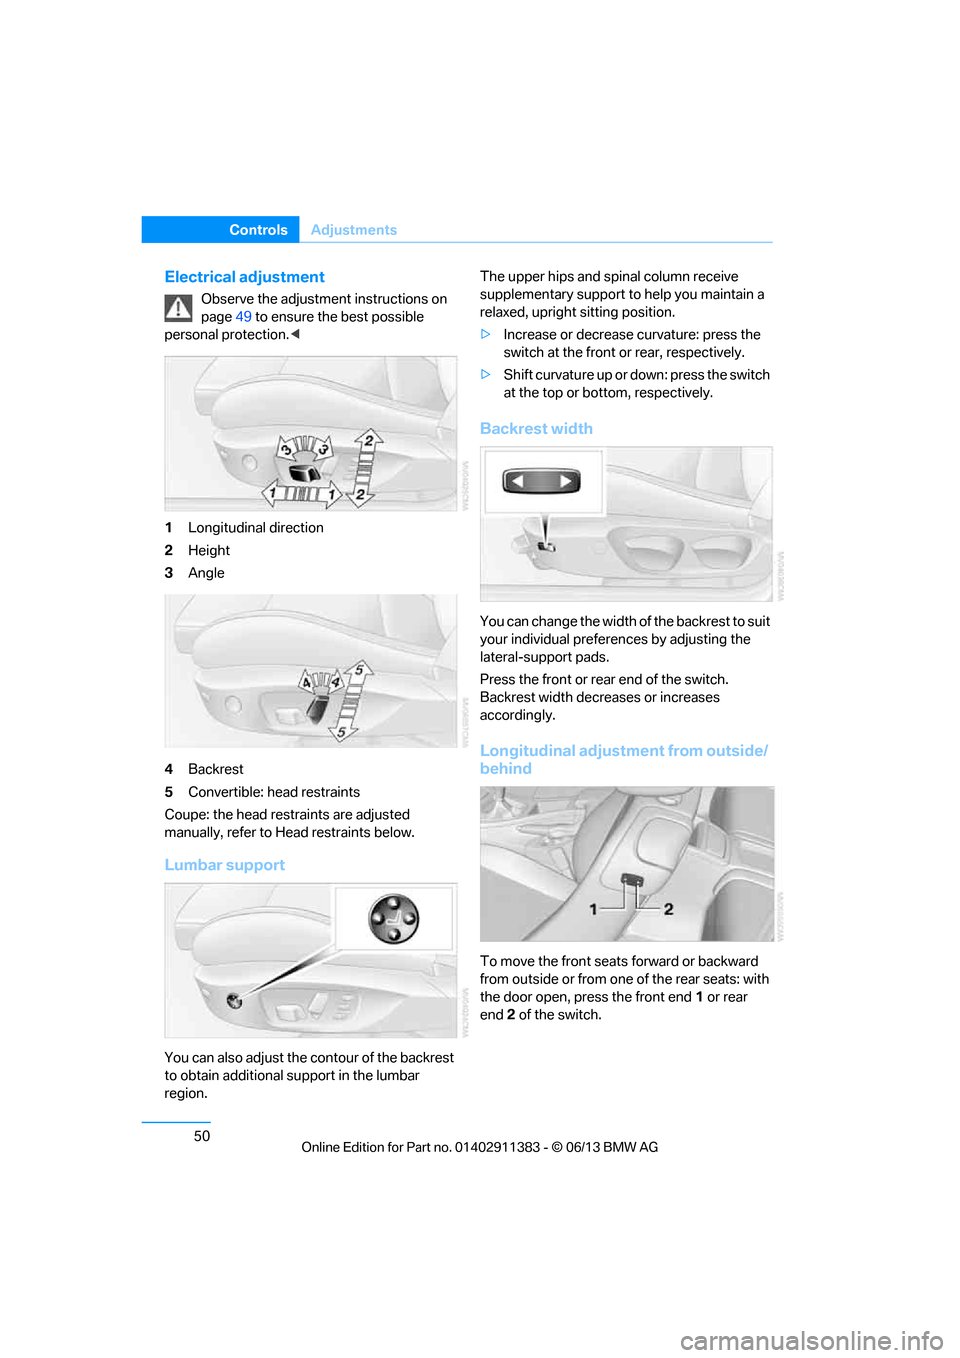
1 Longitudinal direction
2 Height
3 Angle
4 Backrest
5 Convertible: head restraints
Coupe: the head restraints are adjusted
manually, refer to He ad restraints below.
Lumbar support
You can also adjust the contour of the backrest
to obtain additional support in the lumbar
region. The upper hips and spinal column receive
supplementary support to help you maintain a
relaxed, upright sitting position.
>
Increase or decrease curvature: press the
switch at the front or rear, respectively.
> Shift curvature up or down: press the switch
at the top or botto m, respectively.
Backrest width
You can change the width of the backrest to suit
your individual prefer ences by adjusting the
lateral-support pads.
Press the front or rear end of the switch.
Backrest width decr eases or increases
accordingly.
Longitudinal adjustment from outside/
behind
To move the front seat s forward or backward
from outside or from one of the rear seats: with
the door open, press the front end 1 or rear
end 2 of the switch.
00320051004F004C00510048000300280047004C0057004C005200510003
Page 58 of 311
53
Adjustments
Controls
Easy entry
The easy entry feature includes a memory
function for the longitudinal adjustment and
backrest angle.
1.
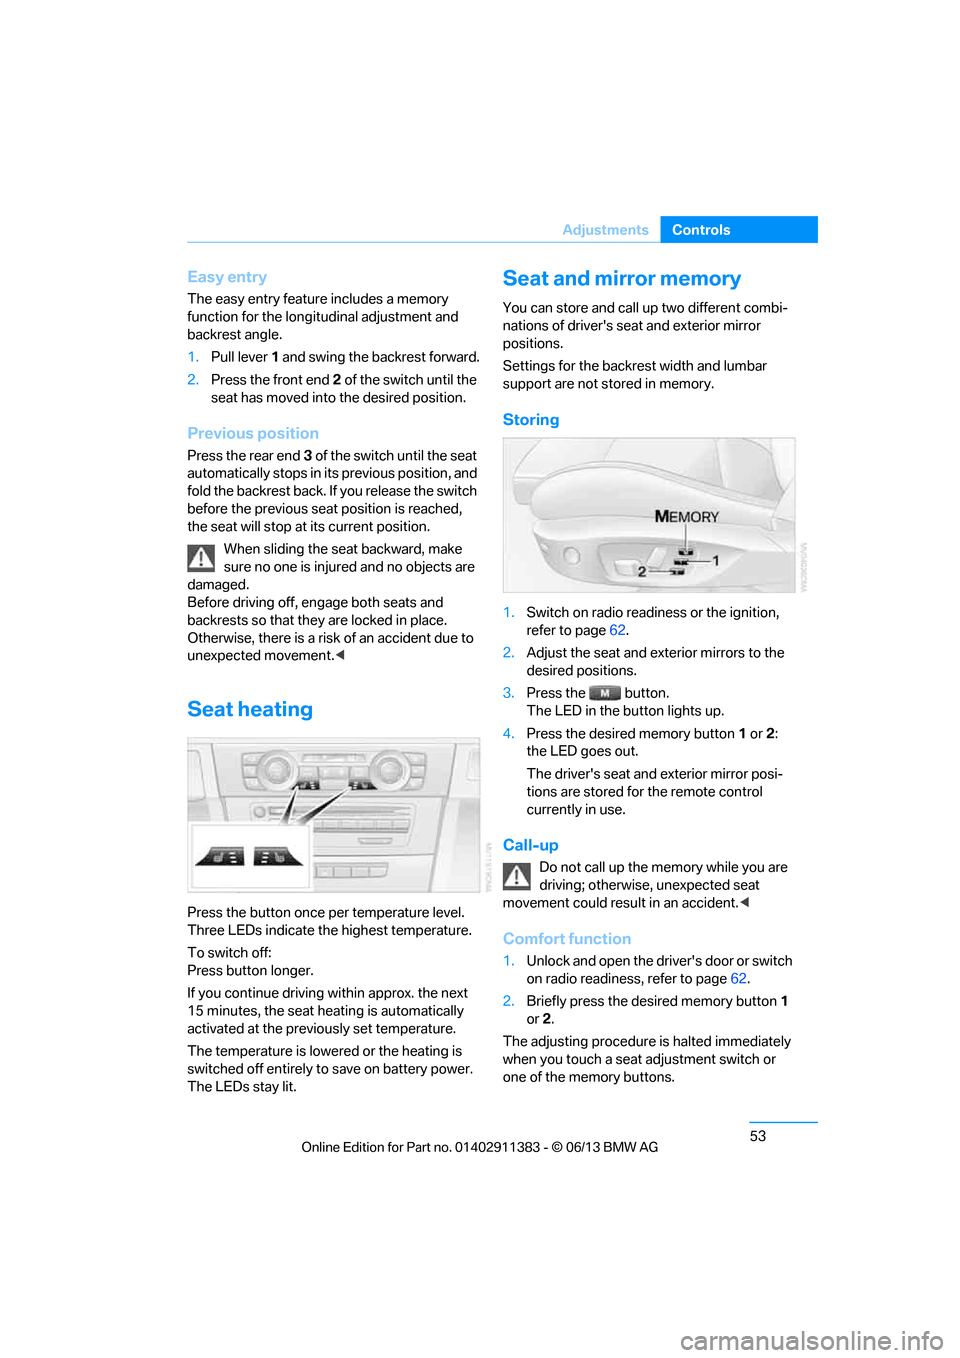
Pull lever 1 and swing the backrest forward.
2. Press the front end 2 of the switch until the
seat has moved into the desired position.
Previous position
Press the rear end 3 of the switch until the seat
automatically stops in its previous position, and
fold the backrest back. If you release the switch
before the previous seat position is reached,
the seat will stop at its current position.
When sliding the seat backward, make
sure no one is injure d and no objects are
damaged.
Before driving off, engage both seats and
backrests so that they are locked in place.
Otherwise, there is a risk of an accident due to
unexpected movement. <
Seat heating
Press the button once per temperature level.
Three LEDs indicate the highest temperature.
To switch off:
Press button longer.
If you continue driving within approx. the next
15 minutes, the seat heating is automatically
activated at the previo usly set temperature.
The temperature is lowered or the heating is
switched off entirely to save on battery power.
The LEDs stay lit.
Seat and mirror memory
You can store and call up two different combi-
nations of driver's seat and exterior mirror
positions.
Settings for the backrest width and lumbar
support are not stored in memory.
Storing
1. Switch on radio readiness or the ignition,
refer to page 62.
2. Adjust the seat and exterior mirrors to the
desired positions.
3. Press the button.
The LED in the button lights up.
4. Press the desired memory button 1 or 2:
the LED goes out.
The driver's seat and exterior mirror posi-
tions are stored for the remote control
currently in use.
Call-up
Do not call up the memory while you are
driving; otherwise, unexpected seat
movement could result in an accident. <
Comfort function
1.Unlock and open the driver's door or switch
on radio readiness, refer to page 62.
2. Briefly press the desired memory button 1
or 2.
The adjusting procedure is halted immediately
when you touch a seat adjustment switch or
one of the memory buttons.
00320051004F004C00510048000300280047004C0057004C005200510003
Page 60 of 311
55
Adjustments
Controls
Even if you have not yet fastened your safety
belt, the belt hand-over will retract if you:
>
Wait for more than approx. one minute
> Open the corresponding door
> Start driving.
Closing the respective do or reactivates the belt
hand-over if the ignition or radio readiness is on.
Front passenger seat
The belt hand-over will exte nd only if the seat is
occupied and after the front passenger door is
closed.
Pinch protection system
If the belt hand-over en counters resistance on
moving in or out, it moves back slightly in the
opposite direction and stops in this position. To
reactivate the belt hand -over: open and close
the door or switch the ignition off and on.
Although there is a pinch protection sys-
tem, always check that the maneuvering
area of the belt hand-ove r is clear. Otherwise it
cannot be ensured that the system will stop
moving in certain extreme situations. <
Mirrors
Exterior mirrors
The front passenger's mirror is more con-
vex than the driver's mirror. The objects
seen in the mirror are closer than they appear.
Do not gauge your distan ce from traffic behind you on the basis of what you see in the mirror;
otherwise, there is an increased risk of an
accident.
<
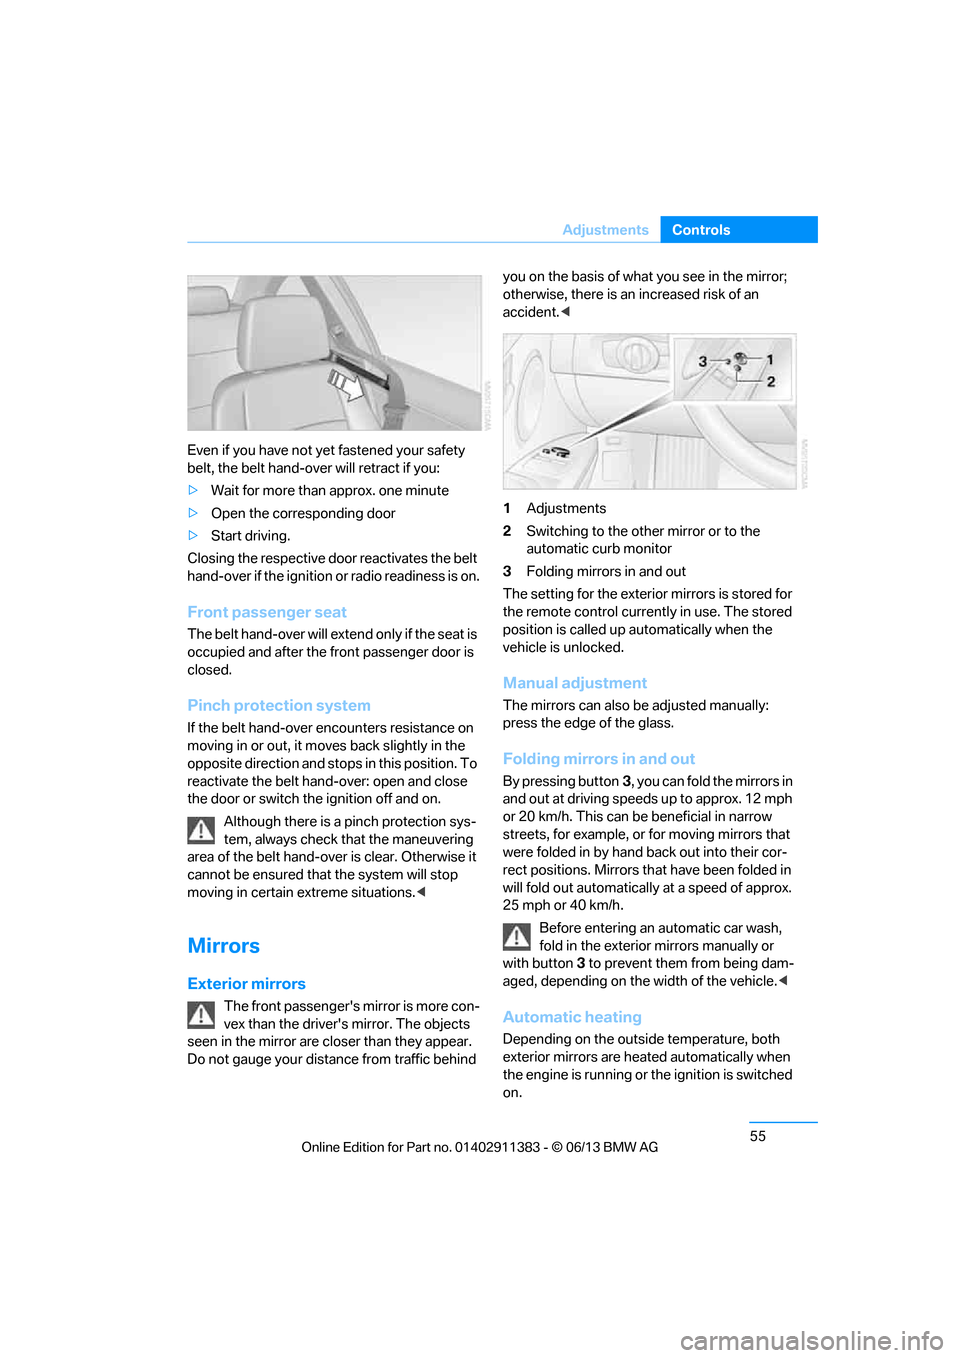
1 Adjustments
2 Switching to the other mirror or to the
automatic curb monitor
3 Folding mirrors in and out
The setting for the exterior mirrors is stored for
the remote control currently in use. The stored
position is called up automatically when the
vehicle is unlocked.
Manual adjustment
The mirrors can also be adjusted manually:
press the edge of the glass.
Folding mirrors in and out
By pressing button 3, you can fold the mirrors in
and out at driving speeds up to approx. 12 mph
or 20 km/h. This can be beneficial in narrow
streets, for example, or for moving mirrors that
were folded in by hand back out into their cor-
rect positions. Mirrors th at have been folded in
will fold out automatically at a speed of approx.
25 mph or 40 km/h.
Before entering an automatic car wash,
fold in the exterior mirrors manually or
with button 3 to prevent them from being dam-
aged, depending on the width of the vehicle. <
Automatic heating
Depending on the outside temperature, both
exterior mirrors are heated automatically when
the engine is running or the ignition is switched
on.
00320051004F004C00510048000300280047004C0057004C005200510003
Page 64 of 311
59
Transporting children safely
Controls
Keep key pushed in and tu
rn it until reaching the
stop at the position. Pull key out at this stop.
Make sure that the passenger belt is
unlocked; otherwise, the front passenger
may become trapped by the safety belt.<
Installing child restraint
systems
Observe the child restraint system manu-
facturer's instructions when selecting,
installing and using child restraint systems.
Otherwise, the protective effect may be
diminished. <
Standard child restraint systems are designed
to be secured with a lap be lt or with the lap-belt
section of a lap-and-shoulder belt. Incorrectly
or improperly installed child restraint systems
can increase the risk of injury to children.
Always follow the installation instructions for
the system with the greatest care.
On the front passenger seat
After installing a child restraint system on
the front passenger seat, make sure that
the front and side airbags for the front passen-
ger are deactivated; otherwise, there is an
increased risk of injury if the airbags deploy. <
Seat position
Before installing a child restraint system, move
the front passenger seat as far back and up as
possible to obtain the be st possible position for
the belt. Do not change the seat position after
this.
Backrest width
The backrest width of the front passenger
seat must be at its widest possible set-
ting. Do not change the setting after installing
the child seat; otherwise, the child seat's stabil-
ity on the front passenger seat is limited. <1.
Adjust the backrest width to its widest
setting, refer to page 50.
2. Install the child seat.
Child seat security
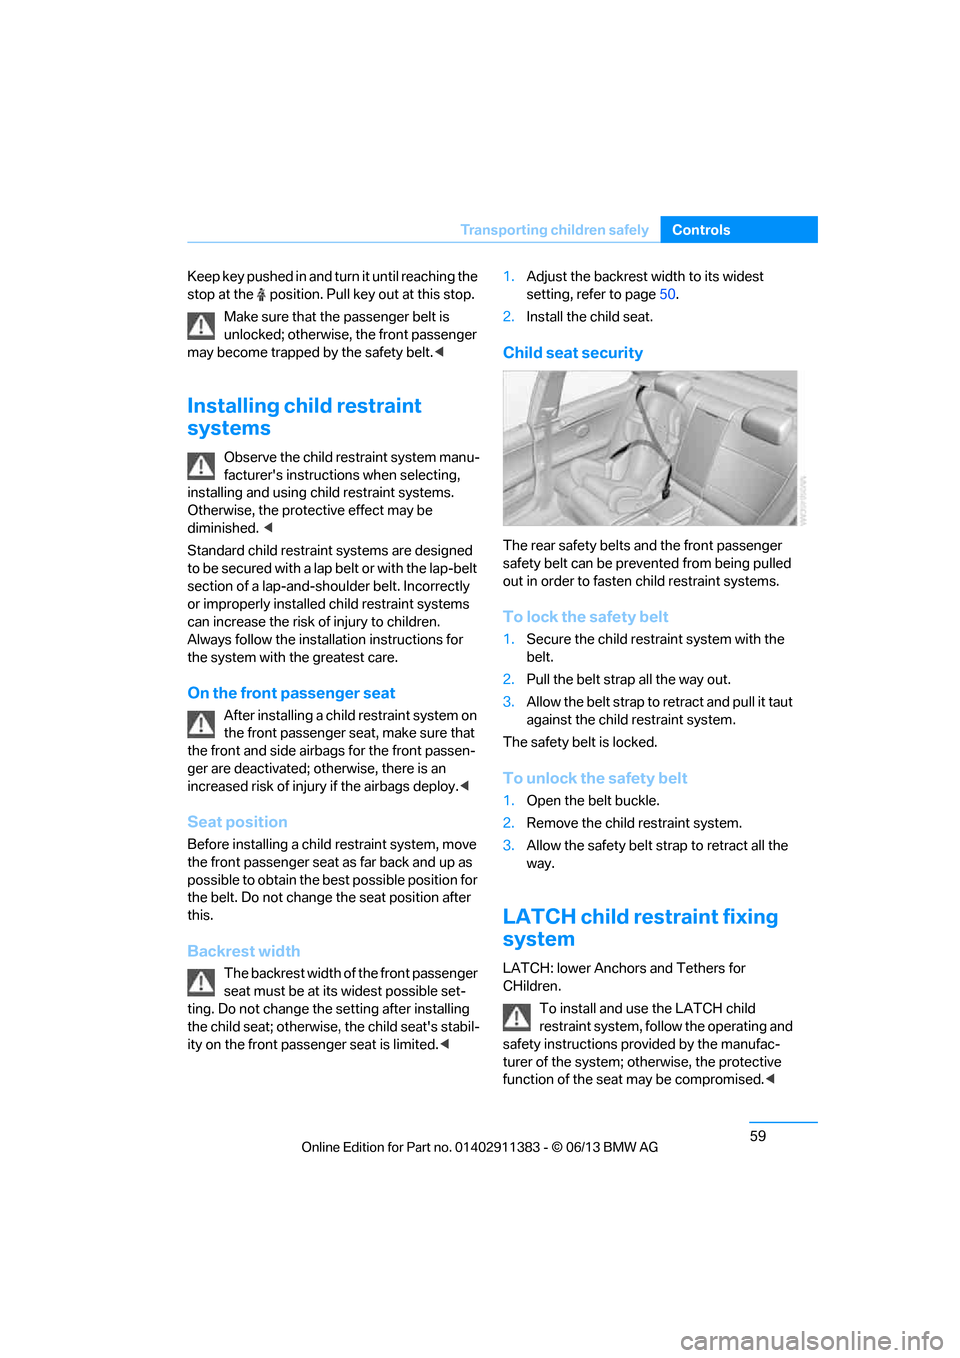
The rear safety belts and the front passenger
safety belt can be prevented from being pulled
out in order to fasten child restraint systems.
To lock the safety belt
1.Secure the child restra int system with the
belt.
2. Pull the belt stra p all the way out.
3. Allow the belt strap to retract and pull it taut
against the child restraint system.
The safety belt is locked.
To unlock the safety belt
1. Open the belt buckle.
2. Remove the child restraint system.
3. Allow the safety belt st rap to retract all the
way.
LATCH child restraint fixing
system
LATCH: lower Anchors and Tethers for
CHildren.
To install and use the LATCH child
restraint system, follo w the operating and
safety instructions pr ovided by the manufac-
turer of the system; othe rwise, the protective
function of the seat may be compromised. <
00320051004F004C00510048000300280047004C0057004C005200510003
Page 255 of 311
250
MobilityWheels and tires
Tire identification marks
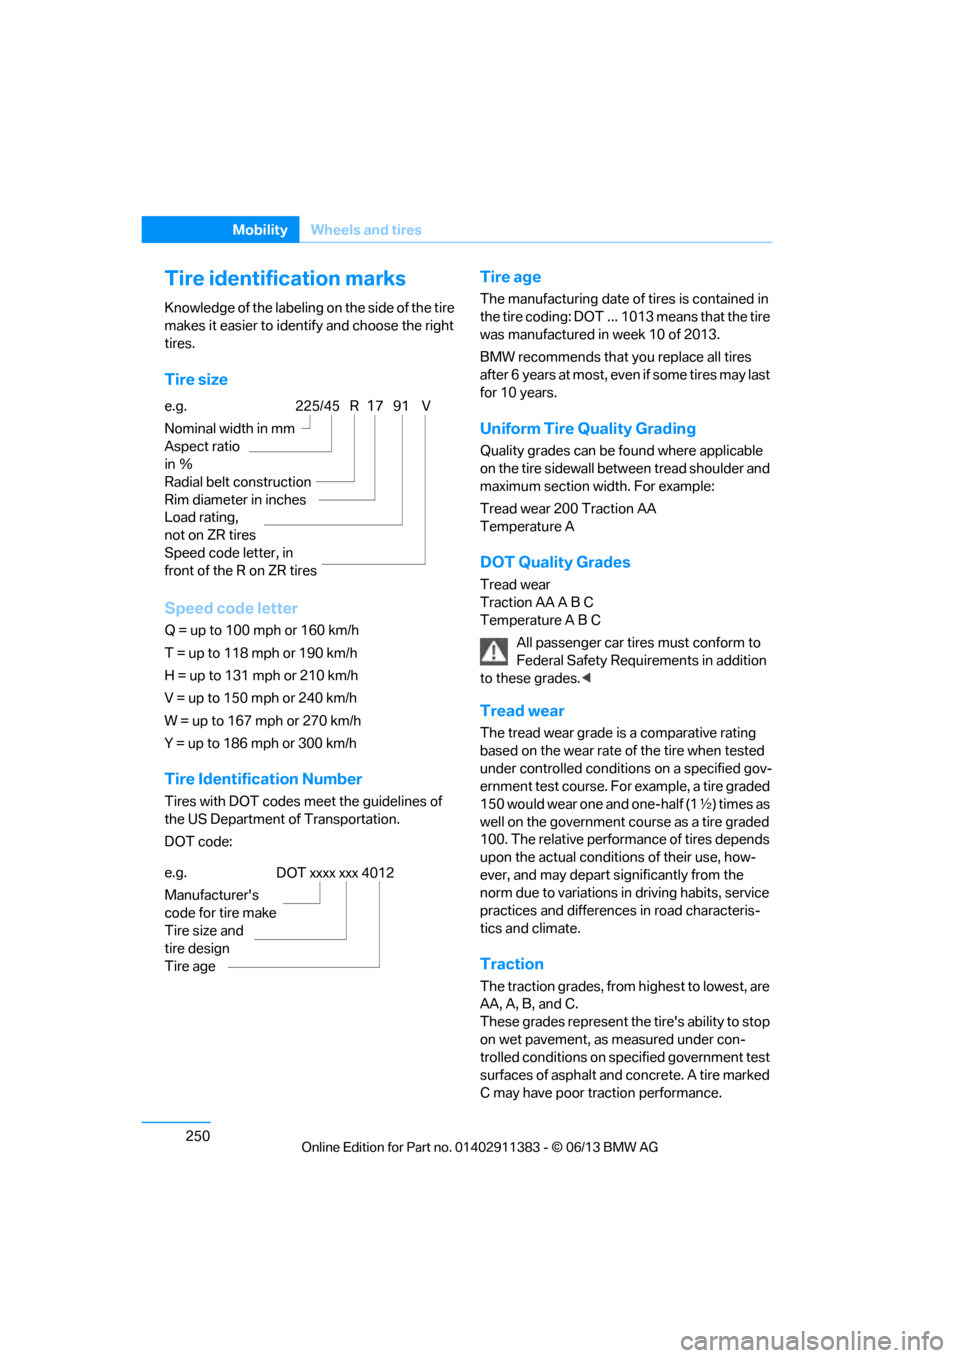
Knowledge of the labeling on the side of the tire
makes it easier to identify and choose the right
tires.
Tire size
Speed code letter
Q = up to 100 mph or 160 km/h
T = up to 118 mph or 190 km/h
H = up to 131 mph or 210 km/h
V = up to 150 mph or 240 km/h
W = up to 167 mph or 270 km/h
Y = up to 186 mph or 300 km/h
Tire Identification Number
Tires with DOT codes meet the guidelines of
the US Department of Transportation.
DOT code:
Tire age
The manufacturing date of tires is contained in
the tire coding: DOT ... 1013 means that the tire
was manufactured in week 10 of 2013.
BMW recommends that you replace all tires
after 6 years at most, even if some tires may last
for 10 years.
Uniform Tire Quality Grading
Quality grades can be found where applicable
on the tire sidewall betw een tread shoulder and
maximum section width. For example:
Tread wear 200 Traction AA
Temperature A
DOT Quality Grades
Tread wear
Traction AA A B C
Temperature A B C
All passenger car tires must conform to
Federal Safety Requir ements in addition
to these grades. <
Tread wear
The tread wear grade is a comparative rating
based on the wear rate of the tire when tested
under controlled conditio ns on a specified gov-
ernment test course. For example, a tire graded
150 would wear one and one-half (1 γ) times as
well on the government course as a tire graded
100. The relative performance of tires depends
upon the actual conditio ns of their use, how-
ever, and may depart significantly from the
norm due to variations in driving habits, service
practices and differences in road characteris-
tics and climate.
Traction
The traction grades, from highest to lowest, are
AA, A, B, and C.
These grades represent the tire's ability to stop
on wet pavement, as measured under con-
trolled conditions on specified government test
surfaces of asphalt and concrete. A tire marked
C may have poor traction performance.
e.g.
Nominal width in mm
Aspect ratio
in
Ξ
Radial belt construction
Rim diameter in inches
Load rating,
not on ZR tires
Speed code letter, in
front of the R on ZR tires
225/45 R1791 V
e.g.
Manufacturer's
code for tire make
Tire size and
tire design
Tire ageDOT xxxx xxx 4012
00320051004F004C00510048000300280047004C0057004C005200510003
Page 267 of 311
262
MobilityCare
Care
Vehicle equipment
In this chapter, all pr oduction, country, and
optional equipment that is offered in the model
range is described. For this reason, descrip-
tions will be given of some equipment that may
not be available in a vehi cle, for example due to
the special options or national-market version
selected. This also app lies to safety related
functions and systems.
Washing the vehicle
Notes
When using steam cleaners or high-pres-
sure cleaning jets, ma ke sure to maintain
a sufficient distance and stay below a maximum
temperature of 140 °F/60 6.
Too close a distance, too high a pressure, or too
high a temperature may cause damage or pre-
liminary damage that can then lead to long-term
damage.
Follow the operating instructions for the steam
jet or high-pressure washer. <
When using high-pressure washers, do
not spray the sensors, e.g. of the Park
Distance Control, for an extended period and
maintain a distance of at least 1 ft/30 cm from
them. <
Regularly remove foreign objects, e.g. leaves, in
the vicinity of the windshield when the hood is
open.
Wash the vehicle more frequently, particularly
in winter.
Heavy soiling and road salt can lead to vehicle
damage.
Automatic car washes
Notes
In car washes with high pressures and
nozzle positions, wate r may drip into the
vehicle around the windows. <
Please note the following:
> Give preference to car washes that use
cloth or soft brushes in order to avoid paint
damage.
> Wheels and tires must not be damaged by
transport devices.
> Fold in exterior mirror, refer to page 55; oth-
erwise, they can be damaged due to the
width of the vehicle.
> Deactivate the rain sensor, refer to page 73,
to prevent undesired wiper operation.
> Remove additional add-on parts, e.g. spoil-
ers or phone antennas, if they could be
damaged.
> Unscrew the rod antenna.
> Leave the remote control in the ignition
lock.
Avoid car washes with guide rail heights
over 4 in/10 cm, otherwise there is
danger of damaging chassis parts. <
Convertible: retractable hardtop
Proceed as you would in a normal car wash.
When you open a wet hardtop, water
drops may run into the trunk. If necessary,
remove items from the trunk beforehand to
avoid water stains or soiling. <
00320051004F004C00510048000300280047004C0057004C005200510003
Page 285 of 311
280
ReferenceTechnical data
Technical data
Vehicle equipment
In this chapter, all pr oduction, country, and
optional equipment that is offered in the model
range is described. For this reason, descrip- tions will be given of some equipment that may
not be available in a vehi
cle, for example due to
the special options or national-market version
selected. This also app lies to safety related
functions and systems.
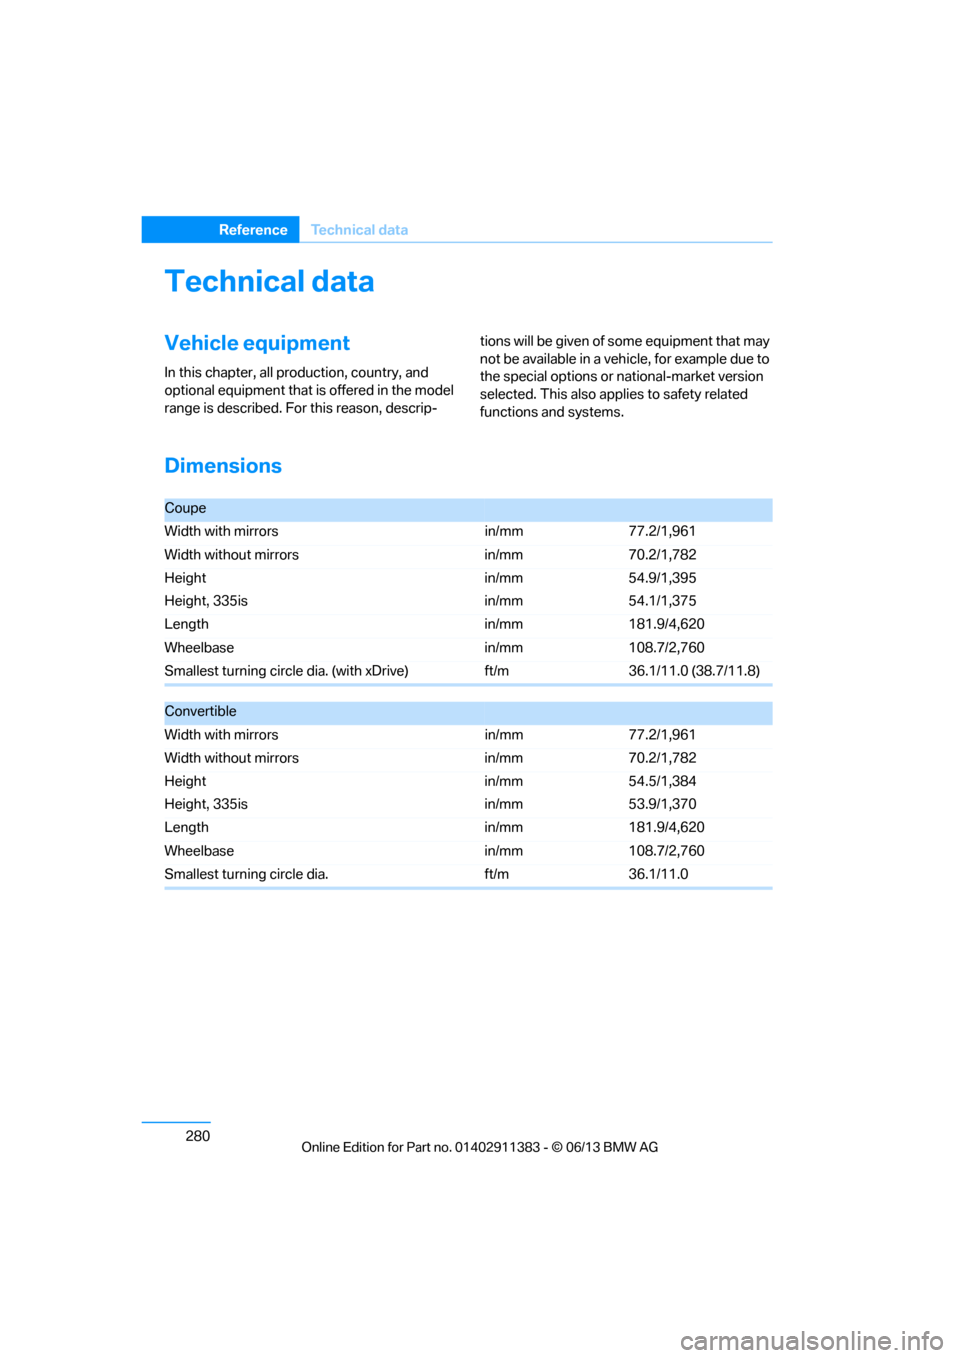
Dimensions
Coupe
Width with mirrors in/mm77.2/1,961
Width without mirrors in/mm70.2/1,782
Height
Height, 335is in/mm
in/mm54.9/1,395
54.1/1,375
Length in/mm181.9/4,620
Wheelbase in/mm108.7/2,760
Smallest turning circle dia. (with xDrive) ft/m36.1/11.0 (38.7/11.8)
Convertible
Width with mirrors in/mm77.2/1,961
Width without mirrors in/mm70.2/1,782
Height
Height, 335is in/mm
in/mm54.5/1,384
53.9/1,370
Length in/mm181.9/4,620
Wheelbase in/mm108.7/2,760
Smallest turning circle dia. ft/m36.1/11.0
00320051004F004C00510048000300280047004C0057004C005200510003
Page 296 of 311
291
Everything from A to Z
Reference
Automatic recirculated air
control AUC 117
Automatic Service Request 227
Automatic transmission with
Steptronic 65
– interlock 65
– overriding selector lever
lock 67
– shiftlock, refer to Changing selector lever position 65
– sport program 66
– towing 275
– tow-starting 275
AUTO program for automatic climate control 116
AUX-In connection 125,189
Available services 228
Average fuel consumption 85
– setting the units 88
Average speed 85
Avoid highways in
navigation 155
Avoiding unintentional alarms 39
Axle loads, refer to Weights 281
B
Backing up the music
collection 188
Backrest contour, refer to Lumbar support 50
Backrests, refer to Seat adjustment 49
Backrest width adjustment 50
Back seats
– refer to Rear seats 52
Bag holder 129
Band-aids, refer to First aid pouch 273
Bar, refer to Towing
methods 276 Base plate for telephone or
mobile phone
– refer to Snap-in adapter 211
– refer to Snap-in adapter in the center armrest storage
compartment 124
Bass, tone control 167
Battery 270
– charging 270
– disposal 41,271
– jump starting 274
– remote control 32
– replacing 270
– temporary power failure 270
Battery renewal
– remote control 41
– remote control for vehicle 41
Being towed 275
Belt hand-over 54
– pinch protection system 55
Belts, refer to Safety belts 54
Belt tensioner, refer to Safety
belts 54
Beverage holders, refer to Cupholders 125
Black ice, refer to Outside temperature warning 83
Blinds, refer to Roller
sunblinds 124
Blower, refer to Air volume 117
Bluetooth, activating/ deactivating 201
Bluetooth audio 192
– disconnecting an audio connection 195
– pairing device 193
– playback 194
– unpairing device 195
– what to do if … 195
BMW Assist 224
– updating 228
BMW Homepage 4
BMW Info 218
BMW Maintenance
System 260
BM
W Online 226 BMW webpage
4
Bottle holders, refer to
Cupholders 125
Brake Assist, refer to Dynamic Brake Control DBC 97
Brake fluid, refer to Service requirements 88
Brake Force Display 106
Brake lights
– brake force display 106
Brake pads 136
– breaking in 136
Brake pedal, refer to Braking safely 138
Brake rotors 139
– brakes 136
– breaking in 136
Brakes
– ABS 97
– BMW Maintenance System 260
– brake force display 106
– breaking in 136
– parking brake 64
– service requirements 88
Brakes, refer to Braking safely 138
Brake system 136
– BMW Maintenance System 260
– breaking in 136
– disc brakes 139
Breakdown services, refer to Roadside Assistance 273
Breaking in the clutch 136
Breaking in the differential, refer to Engine and
differential 136
Break-in period 136
Brightness of the Control
Display 95
Bulb changing, refer to Lamps and bulbs 266
Button for starting the engine, refer to Start/Stop button 62
Buttons on the steering
wheel 13
00320051004F004C00510048000300280047004C0057004C005200510003
Page 310 of 311
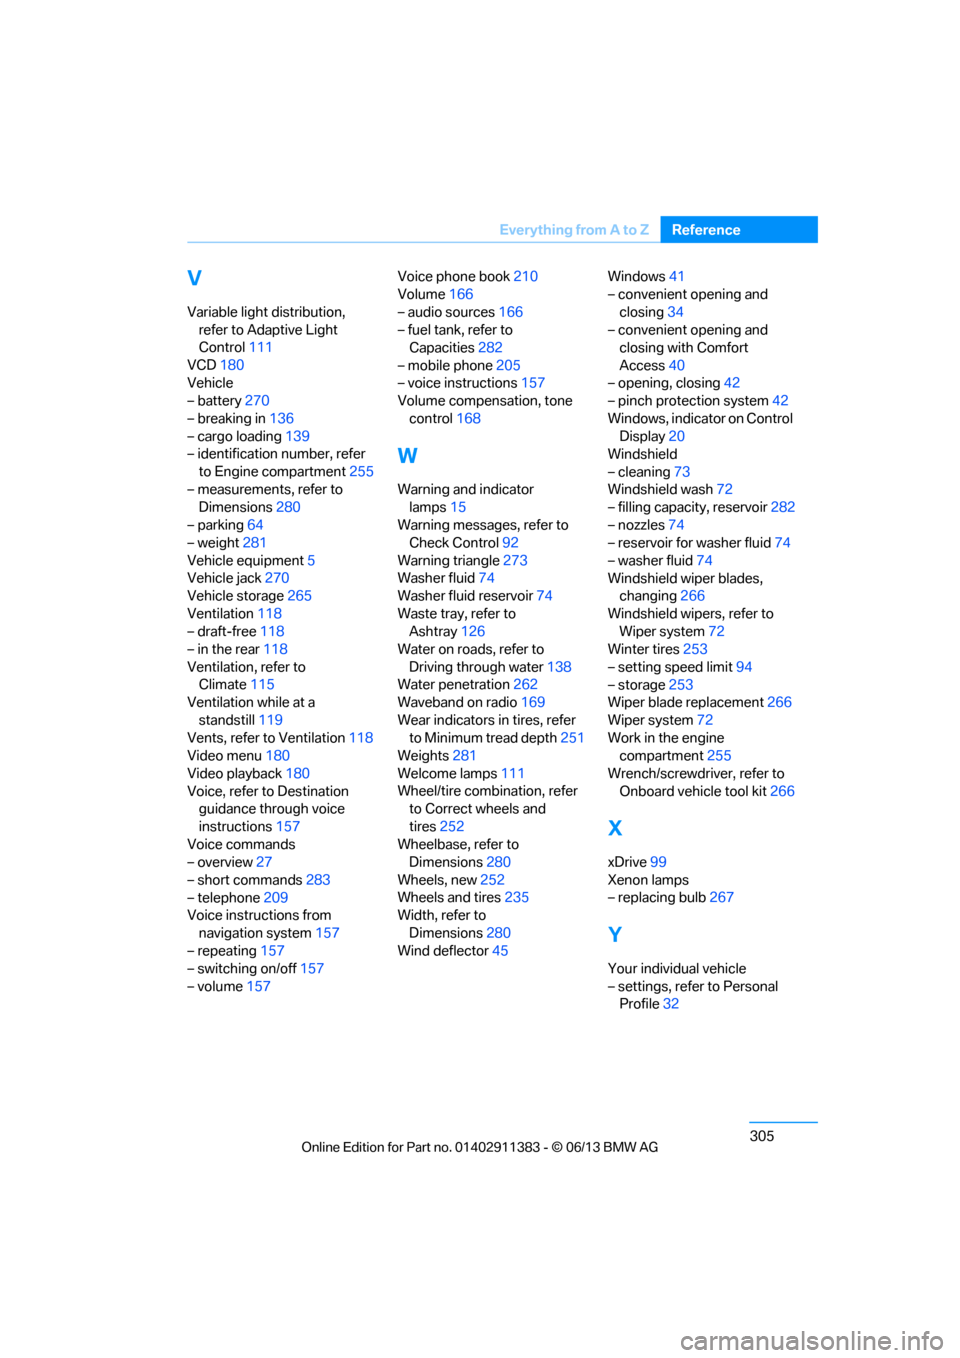
305
Everything from A to Z
Reference
V
Variable light distribution,
refer to Adaptive Light
Control 111
VCD 180
Vehicle
– battery 270
– breaking in 136
– cargo loading 139
– identification number, refer
to Engine compartment 255
– measurements, refer to Dimensions 280
– parking 64
– weight 281
Vehicle equipment 5
Vehicle jack 270
Vehicle storage 265
Ventilation 118
– draft-free 118
– in the rear 118
Ventilation, refer to Climate 115
Ventilation while at a
standstill 119
Vents, refer to Ventilation 118
Video menu 180
Video playback 180
Voice, refer to Destination guidance through voice
instructions 157
Voice commands
– overview 27
– short commands 283
– telephone 209
Voice instructions from
navigation system 157
– repeating 157
– switching on/off 157
– volume 157 Voice phone book
210
Volume 166
– audio sources 166
– fuel tank, refer to Capacities 282
– mobile phone 205
– voice instructions 157
Volume compensation, tone
control 168
W
Warning and indicator
lamps 15
Warning messages, refer to Check Control 92
Warning triangle 273
Washer fluid 74
Washer fluid reservoir 74
Waste tray, refer to Ashtray 126
Water on roads, refer to
Driving through water 138
Water penetration 262
Waveband on radio 169
Wear indicators in tires, refer to Minimum tread depth 251
Weights 281
Welcome lamps 111
Wheel/tire combination, refer to Correct wheels and
tires 252
Wheelbase, refer to Dimensions 280
Wheels, new 252
Wheels and tires 235
Width, refer to
Dimensions 280
Wind deflector 45 Windows
41
– convenient opening and
closing 34
– convenient opening and closing with Comfort
Access 40
– opening, closing 42
– pinch protection system 42
Windows, indicator on Control Display 20
Windshield
– cleaning 73
Windshield wash 72
– filling capacity, reservoir 282
– nozzles 74
– reservoir for washer fluid 74
– washer fluid 74
Windshield wiper blades, changing 266
Windshield wipers, refer to Wiper system 72
Winter tires 253
– setting speed limit 94
– storage 253
Wiper blade replacement 266
Wiper system 72
Work in the engine compartment 255
Wrench/screwdriver, refer to Onboard vehicle tool kit 266
X
xDrive99
Xenon lamps
– replacing bulb 267
Y
Your individual vehicle
– settings, refer to Personal
Profile 32
00320051004F004C00510048000300280047004C0057004C005200510003