wiper BMW 3 SERIES CONVERTIBLE 2013 E93 Owner's Manual
[x] Cancel search | Manufacturer: BMW, Model Year: 2013, Model line: 3 SERIES CONVERTIBLE, Model: BMW 3 SERIES CONVERTIBLE 2013 E93Pages: 311, PDF Size: 7.05 MB
Page 18 of 311
13
Dashboard
At a glance
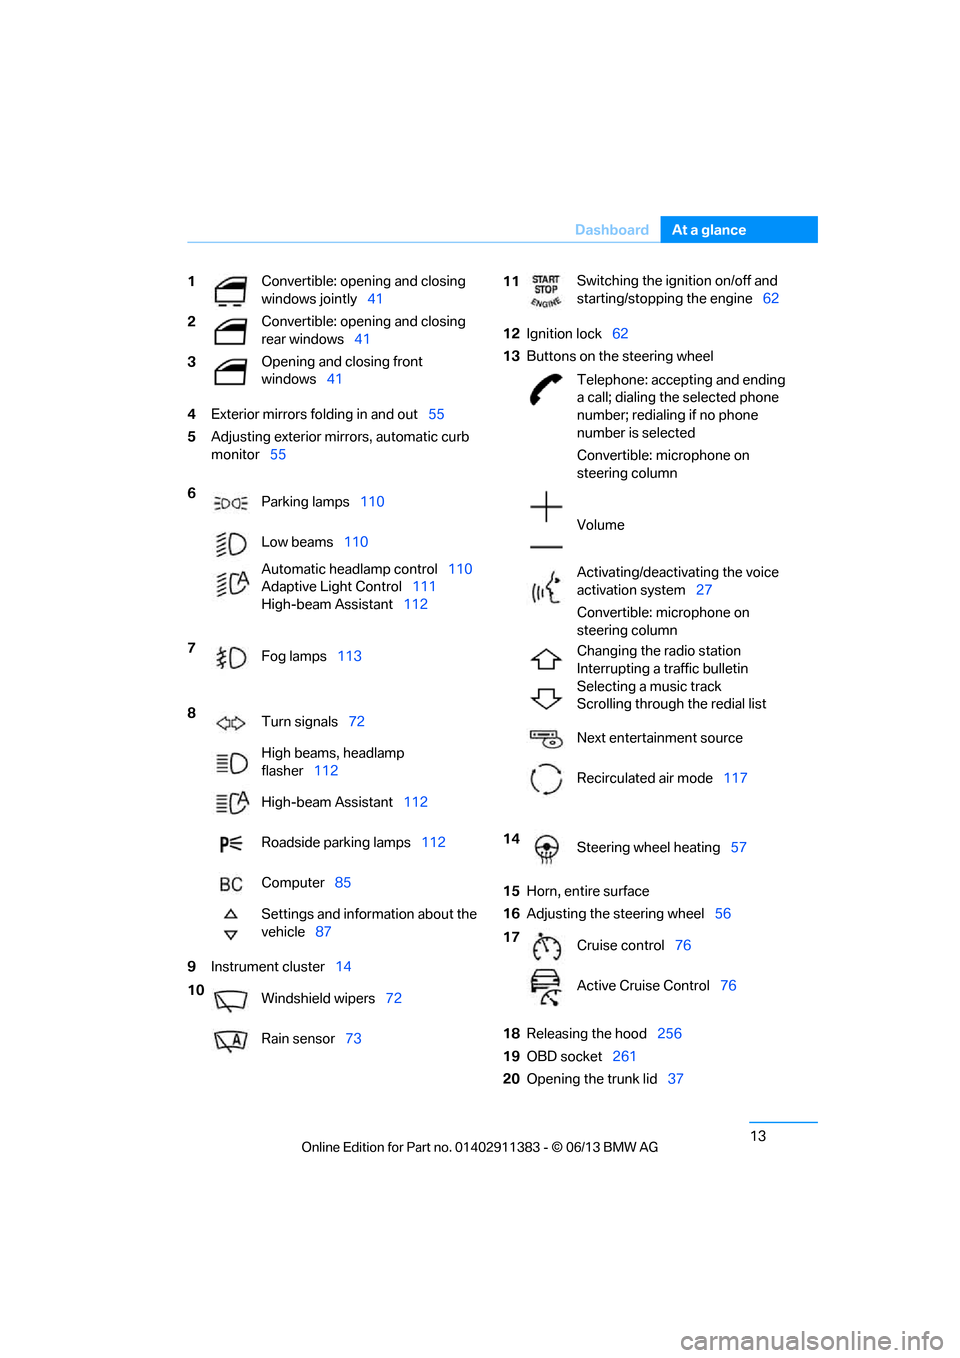
4
Exterior mirrors fo lding in and out55
5 Adjusting exterior mirrors, automatic curb
monitor 55
9 Instrument cluster 14 12
Ignition lock 62
13 Buttons on the steering wheel
15 Horn, entire surface
16 Adjusting the steering wheel 56
18 Releasing the hood 256
19 OBD socket 261
20 Opening the trunk lid 37
1
Convertible: opening and closing
windows jointly
41
2 Convertible: opening and closing
rear windows
41
3 Opening and closing front
windows
41
6 Parking lamps 110
Low beams 110
Automatic head lamp control110
Adaptive Light Control 111
High-beam Assistant 112
7 Fog lamps 113
8 Turn signals 72
High beams, headlamp
flasher 112
High-beam Assistant 112
Roadside parking lamps 112
Computer 85
Settings and information about the
vehicle 87
10 Windshield wipers 72
Rain sensor 73
11Switching the ignition on/off and
starting/stopping the engine
62
Telephone: accepting and ending
a call; dialing the selected phone
number; redialing if no phone
number is selected
Convertible: microphone on
steering column
Volume
Activating/deactivating the voice
activation system 27
Convertible: microphone on
steering column
Changing the radio station
Interrupting a traffic bulletin
Selecting a music track
Scrolling through the redial list
Next entertainment source
Recirculated air mode 117
14 Steering wheel heating 57
17 Cruise control 76
Active Cruise Control 76
00320051004F004C00510048000300280047004C0057004C005200510003
Page 77 of 311
72
ControlsDriving
5.With your right foot, push the accelerator
pedal past the resistance point. The engine
speed for pulling away is adjusted. A flag
symbol appears in the instrument cluster.
6. When you release the brake pedal, the vehi-
cle accelerates. Keep the accelerator pedal
floored.
7. The upshifting occurs automatically as long
as you keep the accelerator pedal pressed
past the resistance point.
Launch Control will be ready for use again after
you drive a certain distance.
Launch Control is not available for use during
the break-in phase, refer to page 136.
To maintain driving stability, keep DSC
activated whenever possible. <
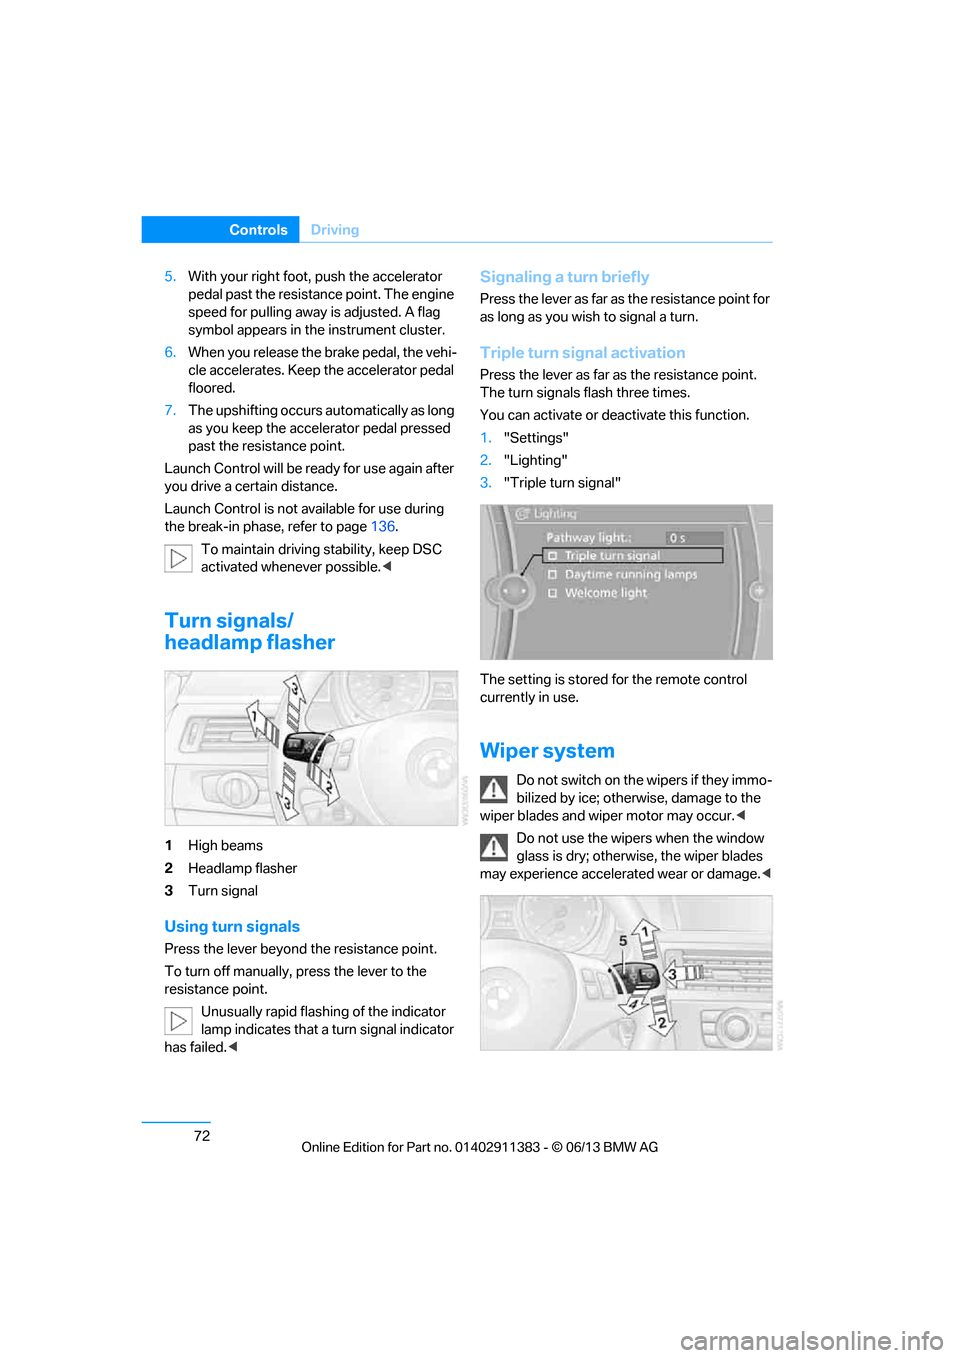
Turn signals/
headlamp flasher
1High beams
2 Headlamp flasher
3 Turn signal
Using turn signals
Press the lever beyond the resistance point.
To turn off manually, press the lever to the
resistance point.
Unusually rapid flashing of the indicator
lamp indicates that a turn signal indicator
has failed. <
Signaling a turn briefly
Press the lever as far as the resistance point for
as long as you wish to signal a turn.
Triple turn signal activation
Press the lever as far as the resistance point.
The turn signals flash three times.
You can activate or deac tivate this function.
1. "Settings"
2. "Lighting"
3. "Triple turn signal"
The setting is stored for the remote control
currently in use.
Wiper system
Do not switch on the wipers if they immo-
bilized by ice; otherwise, damage to the
wiper blades and wiper motor may occur. <
Do not use the wipers when the window
glass is dry; otherwise, the wiper blades
may experience accelerated wear or damage. <
00320051004F004C00510048000300280047004C0057004C005200510003
Page 78 of 311
73
Driving
Controls
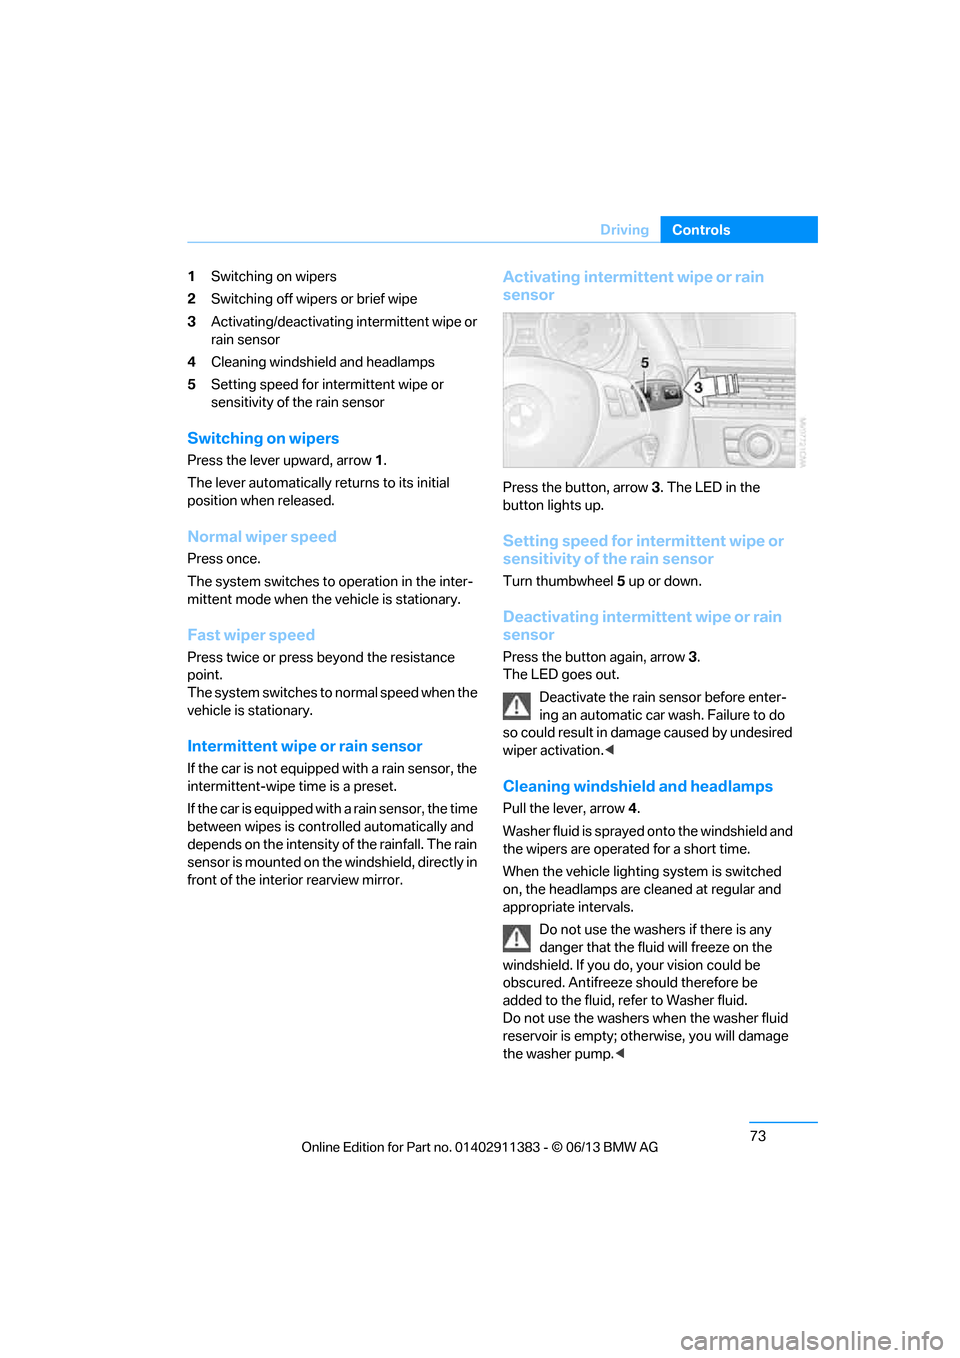
1
Switching on wipers
2 Switching off wipers or brief wipe
3 Activating/deactivating intermittent wipe or
rain sensor
4 Cleaning windshield and headlamps
5 Setting speed for intermittent wipe or
sensitivity of the rain sensor
Switching on wipers
Press the lever upward, arrow 1.
The lever automatically returns to its initial
position when released.
Normal wiper speed
Press once.
The system switches to operation in the inter-
mittent mode when the vehicle is stationary.
Fast wiper speed
Press twice or press beyond the resistance
point.
The system switches to normal speed when the
vehicle is stationary.
Intermittent wipe or rain sensor
If the car is not equipped with a rain sensor, the
intermittent-wipe time is a preset.
If the car is equipped with a rain sensor, the time
between wipes is contro lled automatically and
depends on the intensity of the rainfall. The rain
sensor is mounted on the windshield, directly in
front of the interior rearview mirror.
Activating intermittent wipe or rain
sensor
Press the button, arrow 3. The LED in the
button lights up.
Setting speed for intermittent wipe or
sensitivity of the rain sensor
Turn thumbwheel 5 up or down.
Deactivating intermit tent wipe or rain
sensor
Press the button again, arrow 3.
The LED goes out.
Deactivate the rain sensor before enter-
ing an automatic car wash. Failure to do
so could result in damage caused by undesired
wiper activation. <
Cleaning windshield and headlamps
Pull the lever, arrow 4.
Washer fluid is sprayed onto the windshield and
the wipers are operated for a short time.
When the vehicle lightin g system is switched
on, the headlamps are cleaned at regular and
appropriate intervals.
Do not use the washers if there is any
danger that the fluid will freeze on the
windshield. If you do, your vision could be
obscured. Antifreeze should therefore be
added to the fluid, refer to Washer fluid.
Do not use the washers when the washer fluid
reservoir is empty; othe rwise, you will damage
the washer pump. <
00320051004F004C00510048000300280047004C0057004C005200510003
Page 79 of 311
74
ControlsDriving
Windshield washer nozzles
Both windshield washer nozzles are automati-
cally heated with the engine running or the
ignition switched on.
Washer fluid
Washer fluid antifreeze is flammable.
Therefore, keep it away from ignition
sources and only store it in the closed original
container that is kept out of reach of children;
otherwise, there is a risk of personal injury.
Comply with the instructions on the
container. <
United States: the washer fluid mixture ratio is
regulated by the U.S. EPA and many individual
states; do not exceed the allowable washer fluid
dilution ratio limits that apply. Follow the usage
instructions on the washer fluid container. Use
BMW's Windshield Washer Concentrate or the
equivalent.
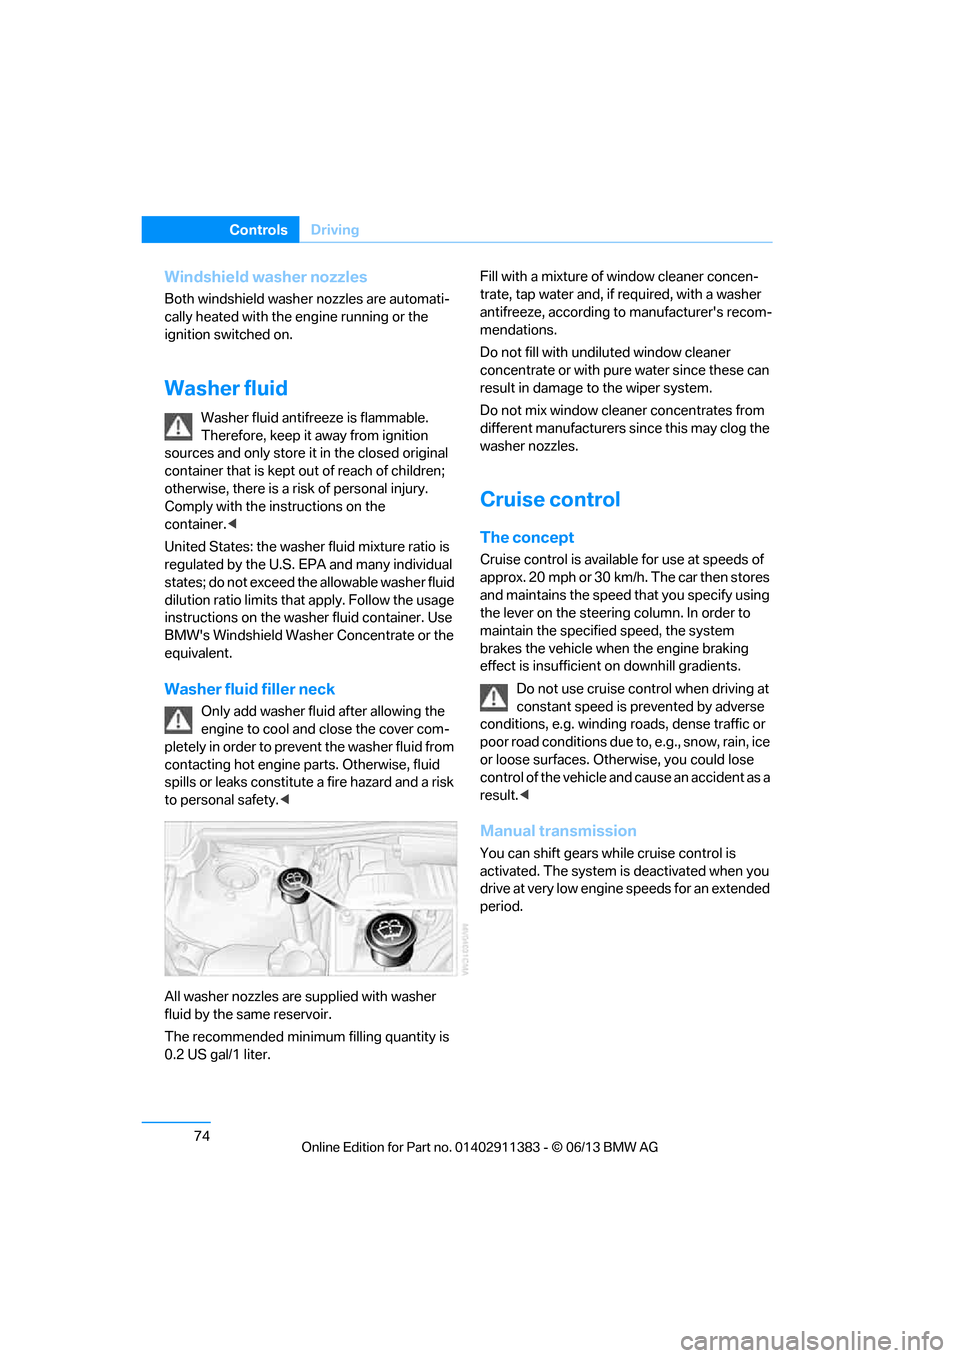
Washer fluid filler neck
Only add washer fluid after allowing the
engine to cool and close the cover com-
pletely in order to prevent the washer fluid from
contacting hot engine parts. Otherwise, fluid
spills or leaks constitute a fire hazard and a risk
to personal safety. <
All washer nozzles are supplied with washer
fluid by the same reservoir.
The recommended minimu m filling quantity is
0.2 US gal/1 liter. Fill with a mixture of window cleaner concen-
trate, tap water and, if required, with a washer
antifreeze, according to
manufacturer's recom-
mendations.
Do not fill with undiluted window cleaner
concentrate or with pure water since these can
result in damage to the wiper system.
Do not mix window cleaner concentrates from
different manufacturers since this may clog the
washer nozzles.
Cruise control
The concept
Cruise control is availa ble for use at speeds of
approx. 20 mph or 30 km/h. The car then stores
and maintains the speed that you specify using
the lever on the steering column. In order to
maintain the specified speed, the system
brakes the vehicle when the engine braking
effect is insufficient on downhill gradients.
Do not use cruise control when driving at
constant speed is prevented by adverse
conditions, e.g. winding roads, dense traffic or
poor road conditions due to, e.g., snow, rain, ice
or loose surfaces. Otherwise, you could lose
control of the vehicle and cause an accident as a
result.<
Manual transmission
You can shift gears while cruise control is
activated. The system is deactivated when you
drive at very low engine speeds for an extended
period.
00320051004F004C00510048000300280047004C0057004C005200510003
Page 261 of 311
256
MobilityEngine compartment
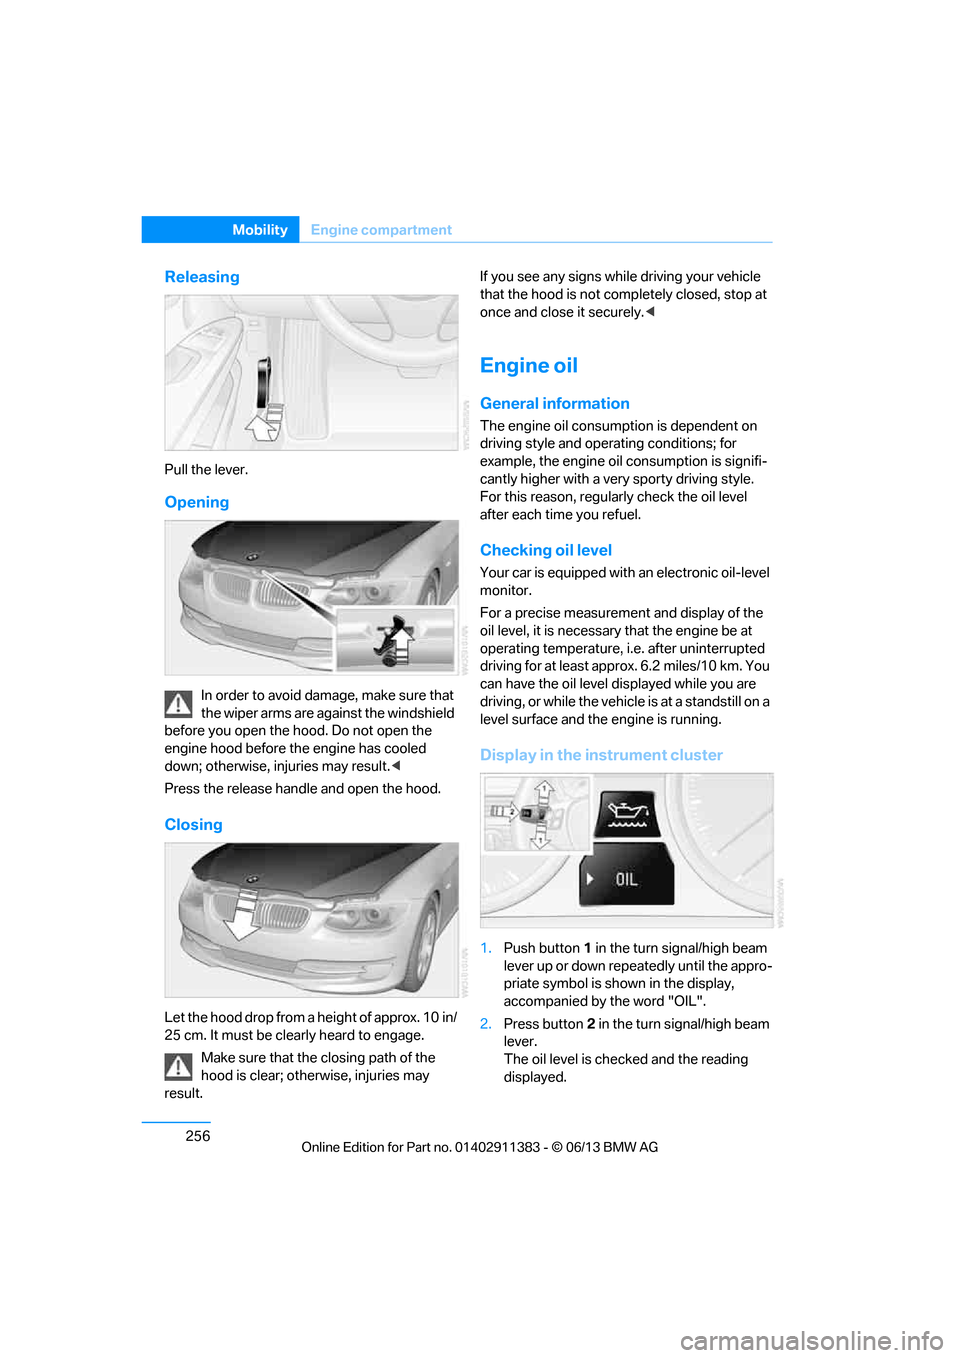
Releasing
Pull the lever.
Opening
In order to avoid damage, make sure that
the wiper arms are against the windshield
before you open the hood. Do not open the
engine hood before the engine has cooled
down; otherwise, injuries may result. <
Press the release handle and open the hood.
Closing
Let the hood drop from a height of approx. 10 in/
25 cm. It must be clearly heard to engage. Make sure that the closing path of the
hood is clear; otherwise, injuries may
result. If you see any signs while driving your vehicle
that the hood is not comp
letely closed, stop at
once and close it securely. <
Engine oil
General information
The engine oil consumption is dependent on
driving style and operating conditions; for
example, the engine oil consumption is signifi-
cantly higher with a very sporty driving style.
For this reason, regularly check the oil level
after each time you refuel.
Checking oil level
Your car is equipped with an electronic oil-level
monitor.
For a precise measurement and display of the
oil level, it is necessar y that the engine be at
operating temperature, i.e. after uninterrupted
driving for at least approx. 6.2 miles/10 km. You
can have the oil level displayed while you are
driving, or while the vehicle is at a standstill on a
level surface and the engine is running.
Display in the instrument cluster
1.Push button 1 in the turn signal/high beam
lever up or down repe atedly until the appro-
priate symbol is shown in the display,
accompanied by the word "OIL".
2. Press button 2 in the turn signal/high beam
lever.
The oil level is chec ked and the reading
displayed.
00320051004F004C00510048000300280047004C0057004C005200510003
Page 267 of 311
262
MobilityCare
Care
Vehicle equipment
In this chapter, all pr oduction, country, and
optional equipment that is offered in the model
range is described. For this reason, descrip-
tions will be given of some equipment that may
not be available in a vehi cle, for example due to
the special options or national-market version
selected. This also app lies to safety related
functions and systems.
Washing the vehicle
Notes
When using steam cleaners or high-pres-
sure cleaning jets, ma ke sure to maintain
a sufficient distance and stay below a maximum
temperature of 140 °F/60 6.
Too close a distance, too high a pressure, or too
high a temperature may cause damage or pre-
liminary damage that can then lead to long-term
damage.
Follow the operating instructions for the steam
jet or high-pressure washer. <
When using high-pressure washers, do
not spray the sensors, e.g. of the Park
Distance Control, for an extended period and
maintain a distance of at least 1 ft/30 cm from
them. <
Regularly remove foreign objects, e.g. leaves, in
the vicinity of the windshield when the hood is
open.
Wash the vehicle more frequently, particularly
in winter.
Heavy soiling and road salt can lead to vehicle
damage.
Automatic car washes
Notes
In car washes with high pressures and
nozzle positions, wate r may drip into the
vehicle around the windows. <
Please note the following:
> Give preference to car washes that use
cloth or soft brushes in order to avoid paint
damage.
> Wheels and tires must not be damaged by
transport devices.
> Fold in exterior mirror, refer to page 55; oth-
erwise, they can be damaged due to the
width of the vehicle.
> Deactivate the rain sensor, refer to page 73,
to prevent undesired wiper operation.
> Remove additional add-on parts, e.g. spoil-
ers or phone antennas, if they could be
damaged.
> Unscrew the rod antenna.
> Leave the remote control in the ignition
lock.
Avoid car washes with guide rail heights
over 4 in/10 cm, otherwise there is
danger of damaging chassis parts. <
Convertible: retractable hardtop
Proceed as you would in a normal car wash.
When you open a wet hardtop, water
drops may run into the trunk. If necessary,
remove items from the trunk beforehand to
avoid water stains or soiling. <
00320051004F004C00510048000300280047004C0057004C005200510003
Page 268 of 311
263
Care
Mobility
Driving into an automatic car wash
Perform the following steps to ensure that the
vehicle can roll:
Manual transmission:
1.
Shift into neutral.
2. Release parking brake, refer to page 64.
3. Switch off the engine.
4. Leave the remote cont rol in the ignition
lock.
Automatic transmission:
1. Insert the remote control into the ignition
lock, even with Comfort Access.
2. Shift selector lever into position N.
3. Release parking brake, refer to page 64.
4. Switch off the engine.
5. Leave the remote cont rol in the ignition
lock.
Sport automatic transmission with double
clutch:
Before driving into an automatic car wash,
perform the following steps to ensure that the
vehicle can roll:
1. Insert the remote control into the ignition
lock, even with Comfort Access.
2. Engage transmission position N.
3. Release parking brake, refer to page 64.
4. Switch off the engine.
5. Leave the remote control in the ignition lock
so that the vehicle can roll.
The transmission is switched into position P:
> Automatically after approx. 30 minutes
> If you remove the infrared remote control
from the ignition lock
Headlamps
After washing the vehicle
After washing the ve hicle, apply the
brakes briefly to dry them; otherwise,
water can reduce braking efficiency over the
short term and the brake discs can corrode.
formation and to reduce wiper noise and wiper
blade wear.
Vehicle care
Care products
BMW recommends using BMW cleaning and
care products since they have been tested and
approved for this purpose.
Follow the instructions on the packaging.
When cleaning inside the vehicle, always
open the doors and windows. Only use prod-
ucts designed for cleaning vehicles. Cleaning
agents can contain substances that are danger-
ous or hazardous to your health. <
Vehicle paintwork
Regular care contributes to driving safety and
value retention. Enviro nmental influences in
regions with elevated leve ls of air pollution or
natural contaminants such as tree sap or pollen
can impact vehicle paintwork. The frequency
and scope of car care should be adapted
accordingly.
Immediately remove particularly corrosive sub-
stances such as spilled fuel , oil, grease, or bird
droppings to prevent damage to the paintwork.
Leather care
Frequently remove dust from the leather using
a cloth or vacuum cleaner.
Otherwise, dust and road grit in the pores and
folds of the leather will otherwise have an abra-
sive effect, resulting in increased wear and
causing the leather surface to become brittle
prematurely.
In order to prevent staining, e.g due to clothing,
clean the leather approximately every two
months.
Clean light-colored leather more frequently as it
shows dust and dirt more noticeably.
00320051004F004C00510048000300280047004C0057004C005200510003
Page 271 of 311
266
MobilityReplacing components
Replacing components
Vehicle equipment
In this chapter, all pr oduction, country, and
optional equipment that is offered in the model
range is described. For this reason, descrip-
tions will be given of some equipment that may
not be available in a vehi cle, for example due to
the special options or national-market version
selected. This also app lies to safety related
functions and systems.
Onboard vehicle tool kit
Coupe
The onboard vehicle tool kit is stored in a com-
partment on the right-ha nd side of the trunk.
Remove the cover.
Convertible
The onboard vehicle tool kit is stored in a pouch
under the trunk floor panel.
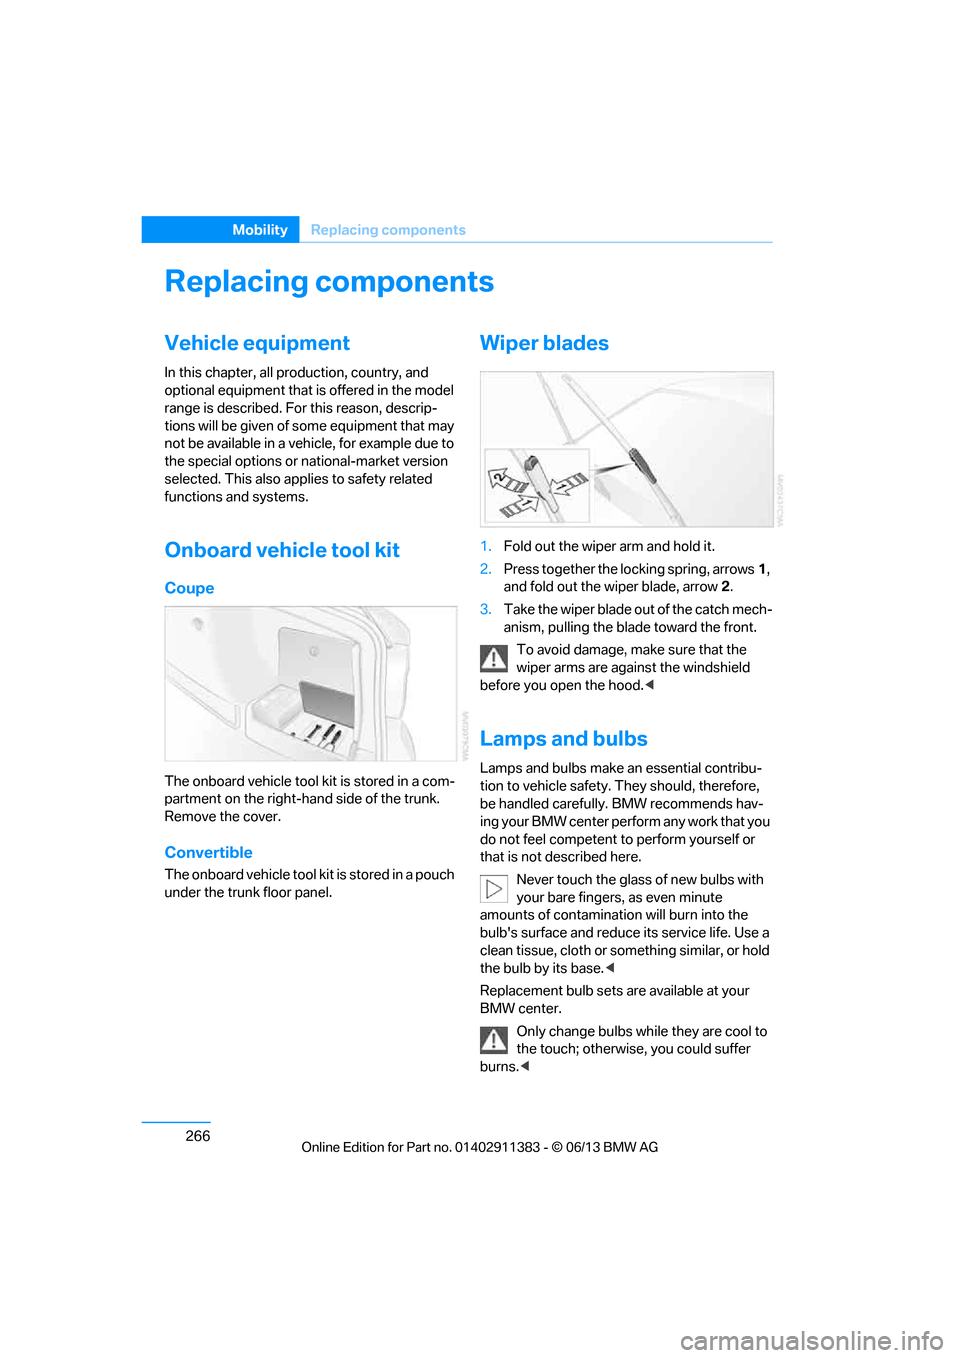
Wiper blades
1. Fold out the wiper arm and hold it.
2. Press together the locking spring, arrows 1,
and fold out the wiper blade, arrow 2.
3. Take the wiper blade ou t of the catch mech-
anism, pulling the blade toward the front.
To avoid damage, make sure that the
wiper arms are against the windshield
before you open the hood. <
Lamps and bulbs
Lamps and bulbs make an essential contribu-
tion to vehicle safety. They should, therefore,
be handled carefully. BMW recommends hav-
ing your BMW center perform any work that you
do not feel competent to perform yourself or
that is not described here.
Never touch the glass of new bulbs with
your bare fingers, as even minute
amounts of contamination will burn into the
bulb's surface and reduce its service life. Use a
clean tissue, cloth or something similar, or hold
the bulb by its base. <
Replacement bulb sets are available at your
BMW center. Only change bulbs while they are cool to
the touch; otherwise, you could suffer
burns. <
00320051004F004C00510048000300280047004C0057004C005200510003
Page 280 of 311
275
Giving and receiving assistance
Mobility
Starting the engine
1.
Start the engine of the donor vehicle and
allow it to run for a fe w minutes at slightly
increased idle speed.
2. Start the engine on the other vehicle in the
usual way.
If the first start attempt is not successful,
wait a few minutes be fore another attempt
in order to allow the discharged battery to
recharge.
3. Let the engines run for a few minutes.
4. Disconnect the jumper cables by reversing
the above connecting sequence.
If necessary, have th e battery checked and
recharged.
Never use spray fluids to start the
engine. <
Tow-starting, towing away
Observe the applicable laws and
regulations for tow-starting and towing
vehicles.<
Do not transport any passengers other
than the driver in a vehicle that is being
towed. <
Using a tow fitting
The screw-in tow fitting must always be carried
in the car. It can be sc rewed in at the front or
rear of the BMW.
Coupe: it is stored in the onboard vehicle tool kit
underneath the cover on the right-hand side of
the trunk, refer to page 266.
Convertible: it is stored in the onboard vehicle
tool kit underneath the trunk floor, refer to
page 266.
Use only the tow fitting provided with the
vehicle and screw it a ll the way in. Use the
tow fitting for towing on paved roads only. Avoid
lateral loading of the tow fitting, e.g. do not lift
the vehicle by the tow fitting. Otherwise, the
tow fitting and the vehicle could be damaged. <
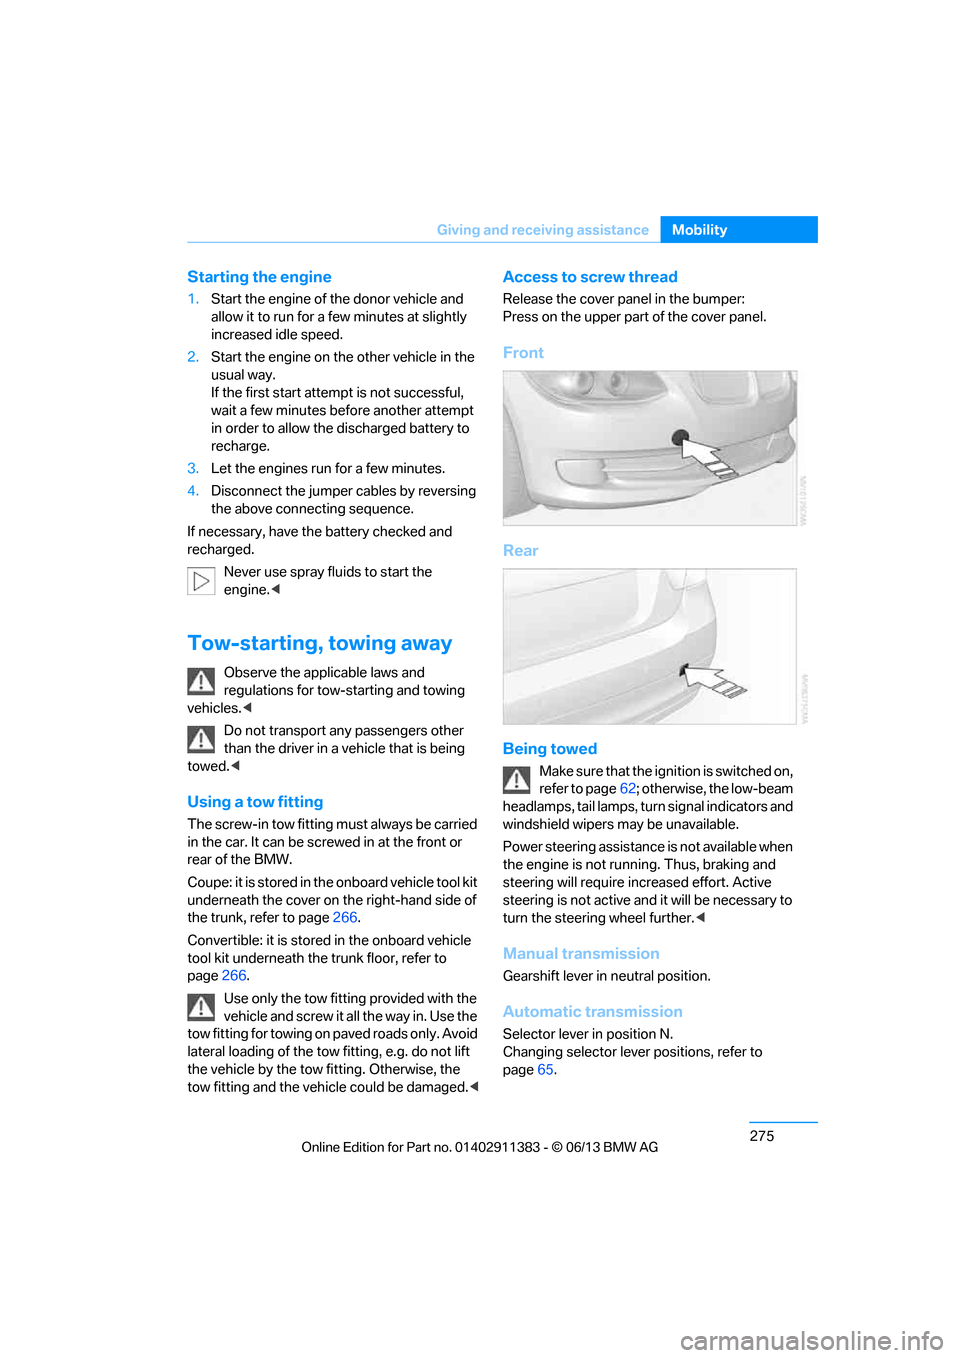
Access to screw thread
Release the cover panel in the bumper:
Press on the upper part of the cover panel.
Front
Rear
Being towed
Make sure that the ignition is switched on,
refer to page62; otherwise, the low-beam
headlamps, tail lamps, turn signal indicators and
windshield wipers may be unavailable.
Power steering assistance is not available when
the engine is not running. Thus, braking and
steering will require in creased effort. Active
steering is not active an d it will be necessary to
turn the steering wheel further. <
Manual transmission
Gearshift lever in neutral position.
Automatic transmission
Selector lever in position N.
Changing selector lever positions, refer to
page65.
00320051004F004C00510048000300280047004C0057004C005200510003
Page 302 of 311
297
Everything from A to Z
Reference
Incoming call
205
Indicator and warning
lamps 15
– tire pressure monitor TPM 103
Inflation pressure, refer to Tire inflation pressure 235
Inflation pressure monitoring,
refer to Tire Pressure
Monitor TPM 102
Initializing
– after power failure 270
– compass, refer to Calibrating 123
– flat tire monitor FTM 100
– glass roof 44
– radio, refer to Storing stations 170
– refer to Setting the time and
date 91
Installation location
– telephone 124
Instructions for navigation system, refer to Voice
instructions 157
Instrument cluster 14
Instrument cluster, refer to Cockpit 12
Instrument combination, refer to Instrument cluster 14
Instrument lighting 114
Instrument panel, see instrument cluster 14
Integrated key 32
Integrated universal remote control 120
Interactive map 151
Interior lamps 114
– remote control 34
Interior motion sensor 39
Interior rearview mirror 56
– automatic dimming feature 56
– compass 122
Interlock, refer to Disengaging the remote control 65Intermittent mode of the
wipers 73
Intersection, entering, navigation 147
J
Jacking points 270
Joystick, refer to iDrive 20
Jumpering, refer to Jump starting 274
Jump starting 274
K
Key, refer to Integrated key/
remote control 32
Keyless go, refer to Comfort Access 40
Keyless opening and closing, refer to Comfort Access 40
Key Memory, refer to Personal
Profile 32
Keypad dialing 207
Kickdown 66
– automatic transmission with Steptronic 66
Knock control 233
L
Lamps
– automatic headlamp
control 110
– parking lamps/low beams 110
Lamps and bulbs, replacing
bulbs 266
Lap-and-shoulder belt, refer
to Safety belts 54
Lashing eyes, refer to Securing cargo 140
Last destinations 149
LATCH child restraint fixing system 59
Launch Control 71 Leather care
263
LED Light-emitting
diodes 267
Length, refer to Dimensions 280
License plate lamp, replacing bulb 269
Light
– high-beam Assistant 112
Light alloy wheels, care 264
Light-emitting diodes
LED 267
Lighter 126
– connecting electrical
appliances 127
Lighting
– instruments 114
– lamps and bulbs 266
– vehicle, refer to Lamps 110
Light switch 110
Limit, refer to Speed limit 94
Load 140
Load securing equipment, refer to Securing cargo 140
Lock buttons, doors, refer to
Locking 37
Locking
– adjusting confirmation
signal 35
– from inside 37
– from outside 34
– without remote control, refer to Comfort Access 40
Locking and unlocking doors
– confirmation signals 35
– from inside 36
– from outside 33
Low beam control, refer to High-beam Assistant 112
Low-beam headlamps 110
– automatic 110
Lower back support, refer to Lumbar support 50
Luggage rack, refer to Roof- mounted luggage rack 141
Lumbar support 50
00320051004F004C00510048000300280047004C0057004C005200510003