battery BMW 318i 1995 E36 Workshop Manual
[x] Cancel search | Manufacturer: BMW, Model Year: 1995, Model line: 318i, Model: BMW 318i 1995 E36Pages: 759
Page 479 of 759
1
.
Disconnect
negative
(-)
cable
from
battery
and
cover
negative
terminal
with
insulating
material
.
CA
UTION-
Prior
to
disconnectiog
the
battery,
read
the
battery
disconnection
cautions
given
at
the
front
of
this
manual
on
page
viii
.
2
.
Remove
driver
sideairbag
from
steering
wheel
.
See
Driver
side
airbag,
removing
and
installing
in
this
repair
group
.
3
.
With
wheels
facing
straight
ahead
and
steering
wheel
centered,
remove
steering
wheel
.
See320
Steering
and
Wheel
Alignment
.
4
.
Remove
contact
ring
cover
(flat
plastic
ring
containing
warning
text)
from
steering
wheel,
íf
applicable
.
5
.
Disconnect
ground
wire,
if
applicable
6
.
Lift
out
plastic
lock
from
steering
wheel,
if
applicable
.
See
Fig
.
2
.
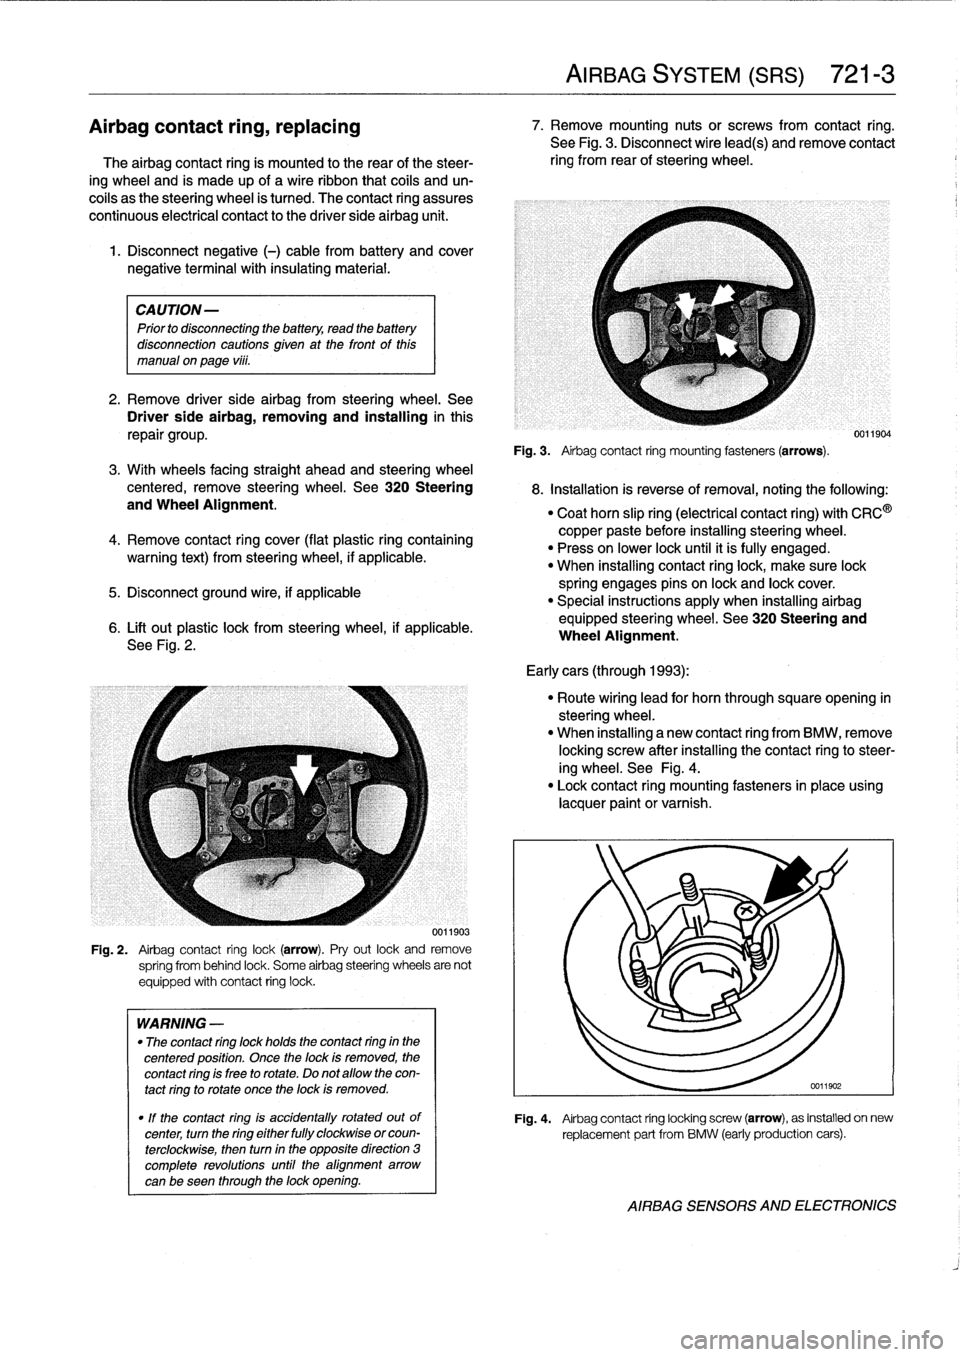
0011903
Fig
.
2
.
Airbag
contact
ring
lock(arrow)
.
Pry
out
lock
and
remove
spríng
from
behind
lock
.
Some
airbag
steering
wheels
are
not
equipped
with
contact
ring
lock
.
WARNING
-
"
The
contact
ring
lock
holds
the
contact
ring
in
the
centered
position
.
Once
the
lock
is
removed,
the
contact
ring
is
free
to
rotate
.
Do
not
allow
the
con-
tact
ring
to
rotate
once
the
lock
is
removed
.
"
If
the
contact
ring
is
accidentally
rotated
outof
center,
turn
the
ring
either
fully
clockwise
orcoun-
terclockwise,
then
turn
in
the
opposite
direction
3
complete
revolutions
until
the
alignment
arrow
canbe
seen
through
the
lock
opening
.
AIRBAG
SYSTEM
(SRS)
721-
3
Airbagcontact
ring,
replacing
7
.
Remove
mounting
nutsor
screws
from
contact
ring
.
See
Fig
.
3
.
Disconnect
wire
lead(s)
andremove
contact
The
airbag
contact
ring
is
mounted
to
the
rear
of
the
steer-
ring
from
rear
of
steering
wheel
.
ing
wheel
and
is
made
up
of
a
wireribbon
that
cofs
and
un-
coils
as
the
steering
wheel
is
tumed
.
The
contact
ring
assures
continuous
electrical
contact
to
the
driver
side
airbag
unit
.
Fig
.
3
.
Airbag
contact
ring
mounting
fasteners(arrows)
.
8
.
Installation
is
reverse
ofremoval,noting
the
following
:
"
Coat
horn
slip
ring
(electrical
contact
ring)
with
CRC
®
copper
paste
before
installing
steering
wheel
.
"
Press
on
lower
lock
until
it
ís
fully
engaged
.
"
When
installing
contact
ringlock,
make
sure
lock
spring
engages
pins
on
lock
and
lock
cover
.
"
Special
instructions
apply
when
installing
airbag
equipped
steering
wheel
.
See320
Steering
and
Wheel
Alignment
.
Early
cars
(through
1993)
:
"
Route
wiring
lead
for
horn
through
squareopening
in
steering
wheel
.
"
When
installing
a
new
contact
ring
from
BMW,
remove
locking
screw
after
installing
the
contact
ringto
steer-
ing
wheel
.
See
Fig
.
4
.
"
Lock
contact
ring
mounting
fasteners
in
place
using
lacquer
paint
or
varnish
.
0011904
Fig
.
4
.
Airbag
contact
ring
locking
screw
(arrow),
as
installed
on
new
replacement
part
from
BMW
(early
production
cars)
.
AIRBAG
SENSORS
AND
ELECTRONICS
Page 480 of 759
721-
4
AIRBAG
SYSTEM
(SRS)
CAUTION-
A
new
contact
ring
is
held
in
center
position
with
a
screw
.
This
locking
device
must
be
removed
after
contact
ring
is
installed
on
steering
wheel
.
See
Fig
.
4
.
Latercars
(1994
on)
:
"
Connect
ground
lead
at
contact
ring
.
"
When
installing
a
new
contact
ring
from
BMW,
remove
locking
pin
after
installing
contact
ring
to
steering
wheel
.
See
Fig
.
5
.
Airbag
crash
sensor,
replacing
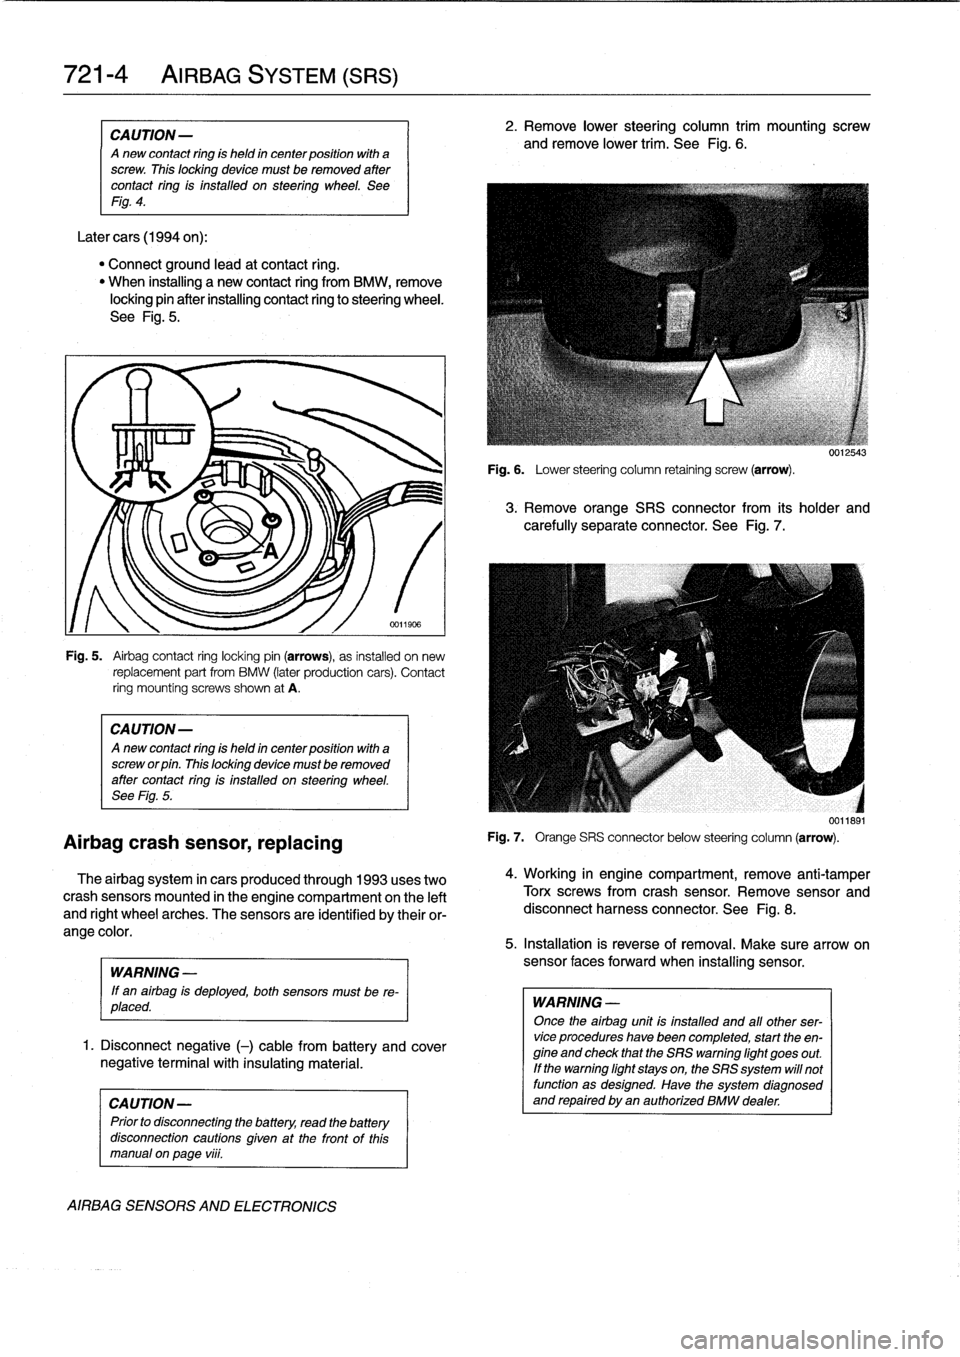
Fig
.
5
.
Airbag
contact
ring
locking
pin
(arrows),
as
installed
on
new
replacement
part
from
BMW
(later
production
cars)
.
Contact
ring
mountíng
screws
shown
at
A
.
CAUTION-
Anew
contact
ring
is
held
in
center
position
with
a
screw
or
pin
.
This
locking
device
mustbe
removed
after
contact
ring
is
installed
on
steering
wheel
.
See
Fig
.
5
.
The
airbag
system
in
cars
produced
through
1993
uses
two
crash
sensors
mounted
in
the
engine
compartment
on
the
left
and
right
wheel
arches
.
The
sensors
are
identified
by
their
or-
ange
color
.
WARNING
-
If
en
airbag
is
deployed,
both
sensors
must
be
re-
placed
.
1
.
Disconnect
negative
(-)
cable
from
battery
and
cover
negative
terminal
with
insulating
material
.
CAUTION-
Prior
to
disconnectiog
the
battery,
read
the
battery
disconnection
cautíons
given
at
the
front
of
thls
manual
on
page
viii
.
AIRBAG
SENSORS
AND
ELECTRONICS
2
.
Remove
lower
steering
column
trim
mounting
screw
and
remove
lower
trim
.
See
Fig
.
6
.
Fig
.
6
.
Lower
steering
column
retaining
screw
(arrow)
.
3
.
Remove
orange
SRS
connector
from
its
holder
and
carefully
separate
connector
.
See
Fig
.
7
.
Fig
.
7
.
Orange
SRS
connector
below
steering
column
(arrow)
.
4
.
Working
in
engine
compartment,
remove
anti-tamper
Torx
screwsfrom
crash
sensor
.
Remove
sensor
and
disconnect
harness
connector
.
See
Fig
.
8
.
5
.
Installation
is
reverse
of
removal
.
Make
sure
arrow
on
sensor
faces
forward
when
installing
sensor
.
WARNING
-
Once
the
airbag
unit
is
installed
and
all
other
ser-vice
procedures
have
been
completed,
start
the
en-
gine
and
check
that
the
SRS
warning
light
goes
out
.
If
the
warning
light
stays
on,the
SRS
system
will
not
function
as
designed
.
Have
the
system
diagnosed
and
repaired
byen
authorized
BMW
dealer
.
0012543
0011891
Page 481 of 759
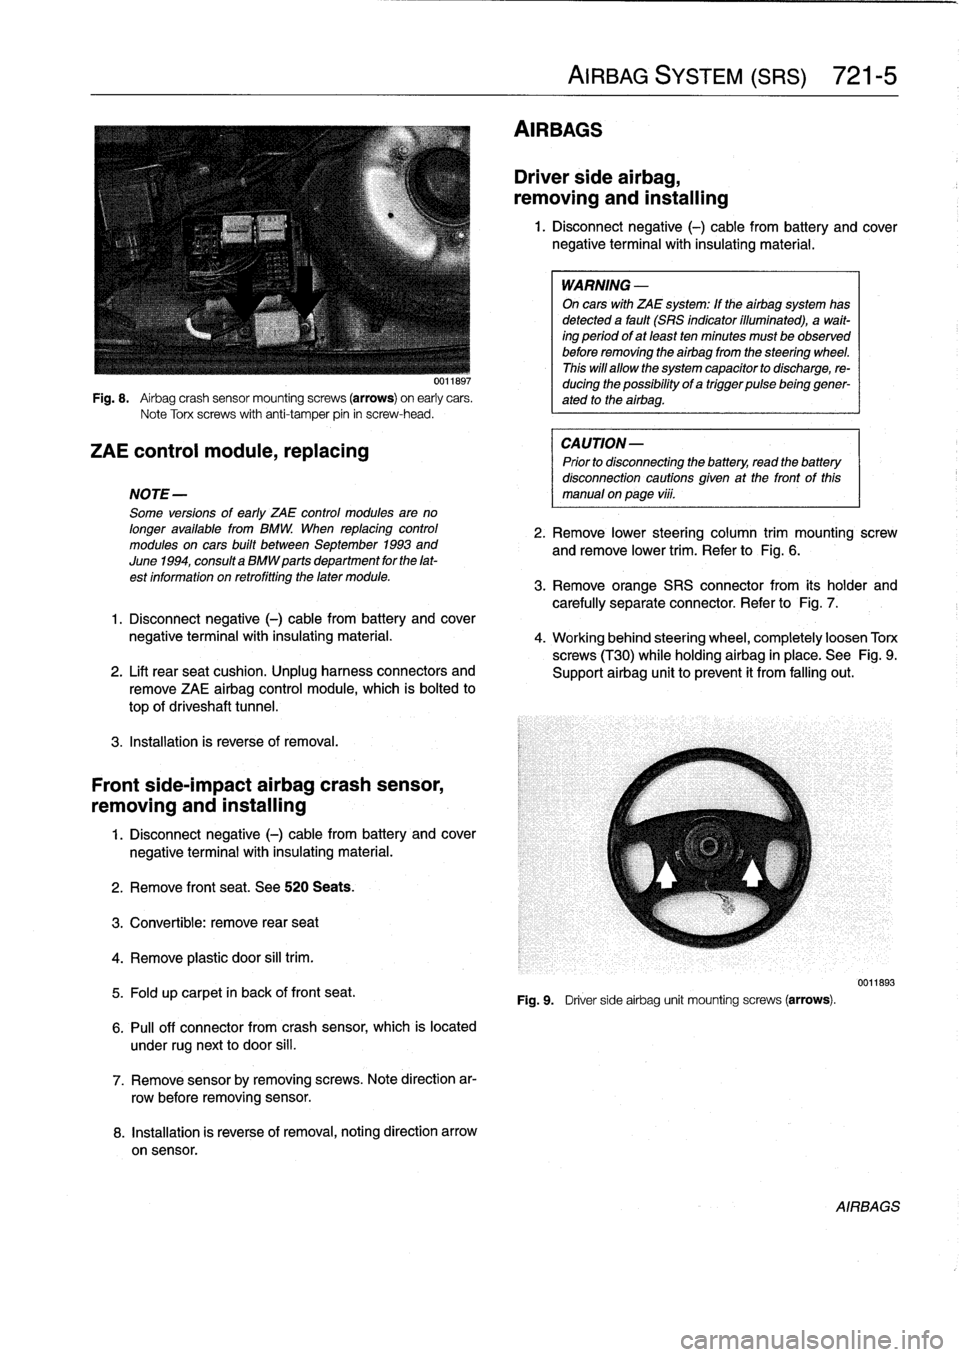
Fig
.
8
.
Airbag
crash
sensor
mountingscrews
(arrows)
on
early
cars
.
Note
Torx
screws
with
anti-tamper
pin
in
screw-head
.
ZAE
control
module,
replacing
NOTE-
Some
versions
of
early
ZAE
control
modules
are
no
longer
available
from
BMW
.
When
replacing
control
modules
on
cars
built
between
September
1993
and
June
1994,
consulta
BMW
parts
department
for
the
lat-
est
information
on
retrofitting
the
later
module
.
3
.
Remove
orange
SRS
connector
from
its
holder
and
carefully
separate
connector
.
Refer
to
Fig
.
7
.
1
.
Disconnect
negative
(-)
cable
from
battery
and
cover
negative
terminalwith
insulating
material
.
4
.
Working
behind
steering
wheel,
completely
loosen
Torx
screws
(T30)
while
holdingairbag
in
place
.
See
Fig
.
9
.
2
.
Lift
rearseat
cushion
.
Unplug
harness
connectors
and
Support
airbag
unit
toprevent
it
from
falling
out
.
remove
ZAE
airbag
control
module,
which
is
bolted
to
top
of
driveshaft
tunnel
.
3
.
Installation
is
reverse
of
removal
.
Front
side-impact
airbag
crash
sensor,
removing
and
installing
1
.
Disconnect
negative
(-)
cable
from
battery
and
cover
negative
terminal
with
insulating
material
.
2
.
Remove
front
seat
.
See520
Seats
.
3
.
Convertible
:
remove
rear
seat
4
.
Remove
plastic
door
sill
trim
.
5
.
Fold
up
carpet
in
back
of
front
seat
.
6
.
Pull
off
connector
from
crash
sensor,
which
is
located
under
rugnext
to
door
si¡¡
.
7
.
Remove
sensorby
removing
screws
.
Note
direction
ar-
row
before
removing
sensor
.
8
.
Installation
is
reverse
of
removal,noting
direction
arrow
on
sensor
.
AIRBAGS
AIRBAG
SYSTEM
(SRS)
721-
5
Driver
side
airbag,
removing
and
installing
1
.
Disconnect
negative
(-)
cable
from
battery
and
cover
negative
terminal
with
insulating
material
.
WARNING
-
On
cars
with
ZAE
system
:
If
theairbag
system
has
detected
a
fault
(SRS
indicator
illuminated),
a
wait-
ing
period
ofat
least
ten
minutes
must
be
observed
before
removing
the
airbag
from
the
steering
wheel
.
This
will
allow
the
system
capacitor
to
discharge,
re-
ducing
the
possibility
of
a
trigger
pulsebeinggener-
ated
to
the
airbag
.
CAUTION-
Prior
to
disconnecting
the
battery,
read
the
battery
disconnection
cautions
given
at
the
front
of
this
manual
on
page
vi¡¡
.
2
.
Remove
lower
steering
column
trim
mounting
screw
andremove
lower
trim
.
Refer
to
Fig
.
6
.
Fig
.
9
.
Driver
sideairbag
unit
mounting
screws
(arrows)
.
0011893
AIRBAGS
Page 482 of 759
721-
6
AIRBAG
SYSTEM
(SRS)
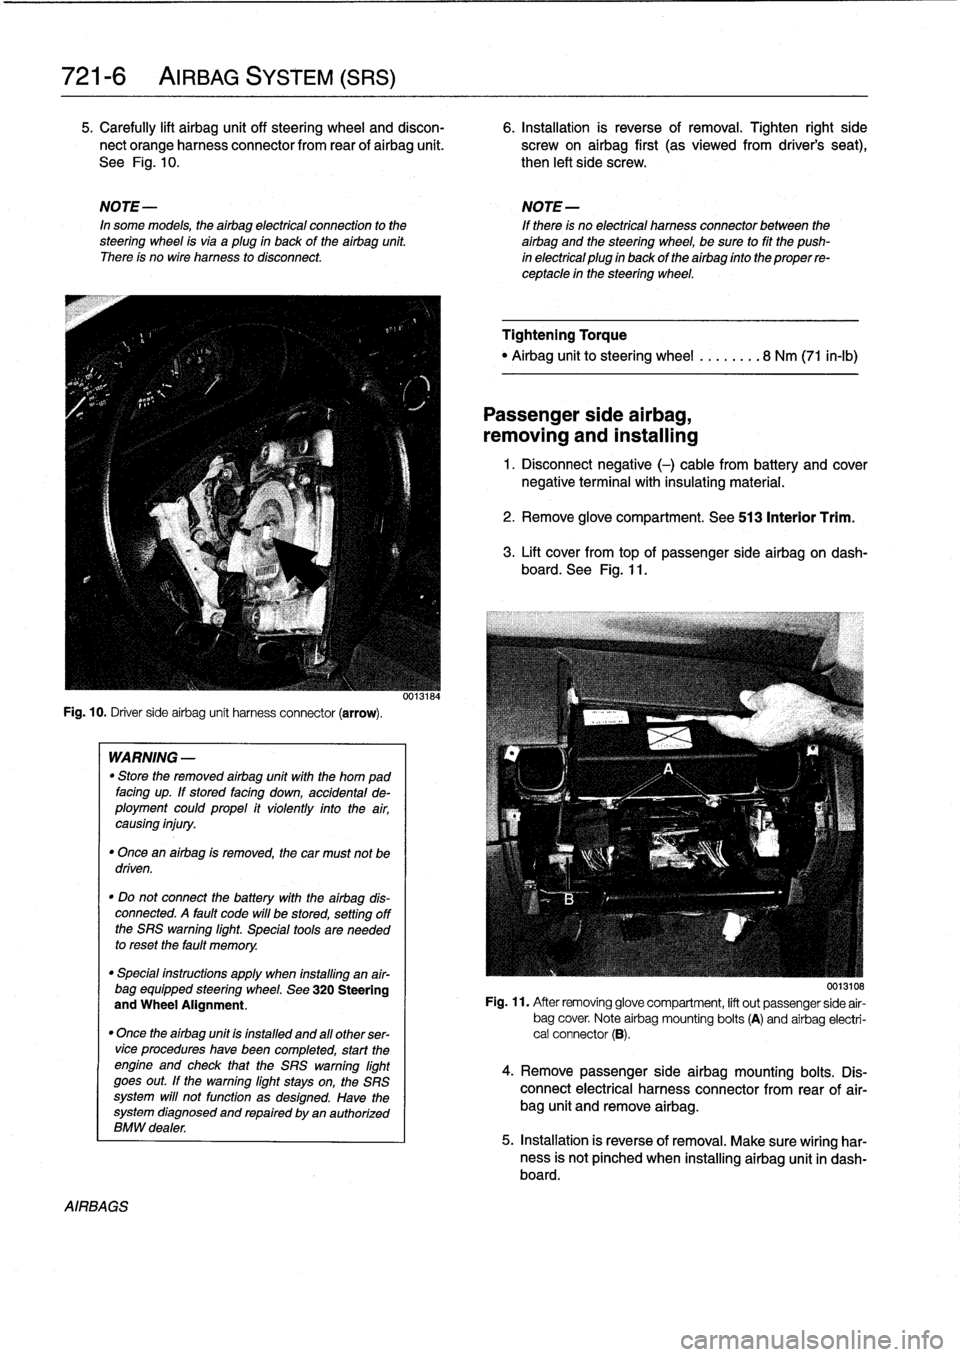
5
.
Carefully
lift
airbag
unit
off
steering
wheel
and
discon-
6
.
Installation
is
reverse
of
removal
.
Tighten
right
side
nect
orange
harness
connector
from
rear
of
airbag
unit
.
screw
on
airbag
first
(as
viewedfrom
driver's
seat),
See
Fig
.
10
.
then
left
side
screw
.
NOTE-
NOTE-
In
some
models,
theairbag
electrical
connection
to
the
If
there
is
no
electrical
harness
connector
between
the
steering
wheel
isvia
aplug
in
back
of
the
airbag
unit
.
airbag
and
the
steering
wheel,
be
sure
to
fit
the
push
There
is
no
wire
harness
to
disconnect
.
in
electrical
plug
in
back
of
the
airbag
finto
the
proper
re-
ceptacle
in
the
steering
wheel
.
Fig
.
10
.
Driver
sideairbag
unit
harness
connector
(arrow)
.
AIRBAGS
WARNING
-
"
Store
the
removed
airbag
unit
with
the
horn
pad
facing
up
.
If
stored
facing
down,
accidental
de-
ployment
couldpropel
it
violently
into
the
air,
causing
injury
.
"
Once
an
airbag
is
removed,
the
car
must
not
be
driven
.
"
Do
not
connect
the
battery
with
the
airbag
dis-
connected
.
A
fault
code
will
be
stored,
setting
off
the
SRS
warning
light
.
Special
tools
are
needed
to
reset
the
fault
memory
.
"
Special
instructions
apply
when
installing
an
air-
bag
equipped
steering
wheel
.
See
320
Steering
and
Wheel
Alignment
.
"
Once
the
airbag
unit
is
installnd
and
all
other
ser-vice
procedureshave
been
completed,
start
the
engíne
and
check
that
the
SRS
warning
light
goes
out
.
If
the
warning
light
stays
on,
the
SRS
system
will
not
function
as
designed
.
Have
the
system
diagnosed
and
repaired
by
an
authorized
BMW
dealer
.
0013184
Tightening
Torque
"
Airbag
unitto
steering
wheel
........
8
Nm
(71
in-lb)
Passenger
side
airbag,
removing
and
installing
1
.
Disconnect
negative
(-)
cable
from
battery
and
cover
negative
terminal
with
insulating
material
.
2
.
Remove
glove
compartment
.
See
513
Interior
Trim
.
3
.
Lift
cover
from
topof
passenger
sideairbag
on
dash-
board
.
See
Fig
.
11
.
0013108
Fig
.
11
.
After
removing
glove
compartment,
lift
out
passenger
side
air-
bag
cover
.
Note
airbag
mounting
bolts
(A)
and
airbag
electri-
cal
connector
(B)
.
4
.
Remove
passenger
sideairbag
mounting
bolts
.
Dis-
connect
electrical
harness
connector
from
rear
of
air-
bag
unit
and
remove
airbag
.
5
.
Installation
is
reverse
of
removal
.
Make
sure
wiring
har-
ness
is
not
pínched
when
installing
airbag
unit
in
dash-board
.
Page 483 of 759
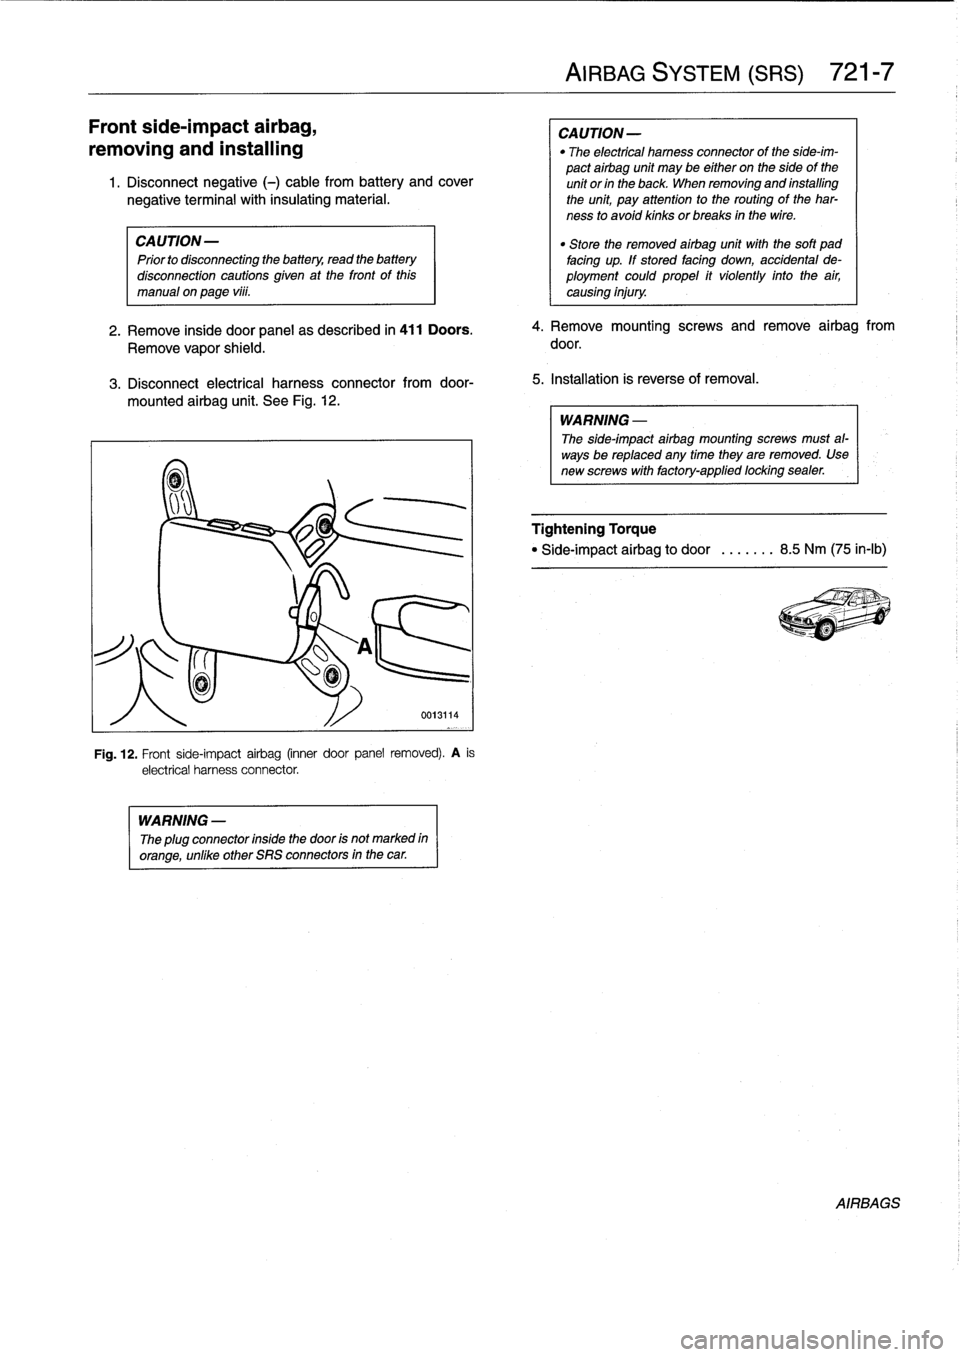
Front
side-impact
airbag,
removing
and
installing
1
.
Disconnect
negative
(-)
cable
from
battery
and
cover
negative
terminal
with
insulating
material
.
CA
UTION-
"
Store
the
removed
airbag
unit
with
the
soft
pad
Prior
to
disconnectiog
the
battery,
read
the
battery
facing
up
.
ff
stored
facíng
down,
accidental
de-
disconnection
cautions
given
at
the
front
of
this
ployment
could
propel
it
violently
into
the
air,
manual
on
page
viii
.
causing
injury
.
2
.
Remove
inside
door
panel
as
described
in
411
Doors
.
Remove
vapor
shield
.
3
.
Disconnect
electrical
harness
connectorfrom
door-
mounted
airbag
unit
.
See
Fig
.
12
.
WARNING
-
The
plug
connector
insidethe
door
is
not
marked
in
orange,
unlike
other
SRS
connectors
in
the
car
.
Fig
.
12
.
Front
side-impact
airbag
(inner
door
panel
removed)
.
A
is
electrical
harness
connector
.
AIRBAG
SYSTEM
(SRS)
721-
7
CAUTION-
"
The
electrical
harness
connector
of
the
side-im-
pact
airbag
unit
may
be
either
on
the
sideof
the
unít
or
in
the
back
When
removing
and
installing
the
unit,
pay
attention
to
the
routing
of
the
har-
ness
to
avoid
kinks
orbreaks
in
the
wire
.
4
.
Remove
mounting
screws
andremove
airbag
from
door
.
5
.
Installation
is
reverse
of
removal
.
WARNING
-
The
side-impact
airbag
mounting
screws
must
al-
ways
be
replaced
any
time
they
are
removed
.
Usenew
screws
with
factory-applied
locking
sealer
.
Tightening
Torque
"
Side-impact
airbag
to
door
..
.....
8
.5
Nm
(75
in-lb)
AIRBAGS
Page 485 of 759
GENERAL
This
section
contains
wiring
diagrams
for
1992
through
1998
BMW
3
Series
models
.
WARNING
-
On
cars
equipped
with
airbags,
special
precautions
apply
to
any
electrical
testing
or
repair
.
The
airbag
unit
is
an
explosive
device
and
must
be
handled
with
exterme
care
.
Before
starting
any
work
onan
airbag
equipped
car,
refer
to
the
warnings
and
cau-
tions
in
720
Seatbelts
and
721
Airbag
Systems
(SRS)
.
NOTE-
The
"
gear
position/neutral
safetyswitch
is
also
some-
timesreferred
to
as
the
automatic
transmission
range
switch
.
"
The
EWS
11
system
is
also
sometimes
referred
to
as
the
Driveaway
Protection
System
or
the
electronic
im-
mobilization
system
.
ELECTRICAL
WIRING
DIAGRAMS
ELE-1
Electrical
Wiring
Diagrams
GENERAL
.
.
.
.
.
.
.
.
.
................
.
.
.
ELE-1
Horns
.....
.
.....
.
.
.
....
.
.
.
.
.
...
.
.
ELE-153
Instrument
Panel
.
.
.
.
.
.
..............
ELE-165
ELECTRICAL
WIRING
DIAGRAMS
...
.
.
.
ELE-2
Interior
Lights/Illumination
.............
ELE-211
ABS
..............
.
.
.
.....
.
.....
ELE-117
Lumbar
Control
.
....................
ELE-247
ABS/AST
.............
.
.
.
...
.
.
.
.....
ELE-120
On-Board
Computer
..................
ELE-173
Airbag
(Supplemental
Restraint
System)
..
ELE-140
Park
Ventilation
.
.
.
...........
.
...
.
..
ELE-139
Air
Conditioning
and
Heating
.
.
.
.
.
.
.....
ELE-129
Power
Distribution
......
.
...
.
.
.
.
.
.
.
...
.
ELE-2
Anti-Theft
(Alpine)
..........
.
.
.
...
.
...
ELE-144
Power
Door
Locks
.
.
......
.
.
.
.
.
.
.
.
.
..
ELE-226
Anti-Theft
(EWS
II)
.
........
.
.
.
...
.
...
ELE-150
Power
Mirrors
...
.
.
.
......
.
.
.
.
.
.
.
.
.
..
ELE-241
Body
Computer
Module
.....
.
.....
.
...
ELE-176
Power
Seats
......
.
......
.
.
.
...
.
.
.
..
ELE-243
Charging
System
.
.
................
.
.
.
ELE-67
Power
Sunroof
.
.
.
.
.
.
.
...............
ELE-248
Convertible
Top
.
.
.
.
................
.
.
ELE-253
Power
Windows
.
.
.
.
.
.
.....
.
.........
ELE-231
Cruise
Control
..
.
.
.
...........
.
....
.
.
ELE-112
Radio/Cassette/CD/Speakers
..........
ELE-255
Data
Link
Connector
................
.
.
.
ELE-86
Rear
Window
Defogger
...............
ELE-160
Engine
Cooling
.......
.
.......
.
....
.
.
.
ELE-94
Shift
Interlock
.
.
.
.
.
.
.
.
...............
ELE-110
Engine
Management
...
.
.......
.
....
.
.
.
ELE-70
Starting
....
.
.
.
.
.
...
.
................
ELE-63
Exterior
Lights
........
.
.
.
.
.
.
.
.
.
......
ELE-194
Transmission
Electronics
.
..............
ELE-96
Ground
Distribution
....
.
.
.
.
.
.
.
.
.
.......
ELE-35
Warning
System
:
Chimes
.............
ELE-178
Headlights/Foglights
...
.
.
.
.
.
.
.
.
.
......
ELE-180
Wiper/Washer
.
.....
.
...............
ELE-155
Heated
Seats
........
.
.
.
.
.
.
.
.
.
......
ELE-245
ELECTRICAL
COMPONENT
LOCATIONS
Relayand
fuse
positions,
ground
locations
...........
.
.
.
.
.
.
.
.
.
................
seeRepair
Group
610
CAUTION-
Always
switchthe
ignition
off
and
disconnect
the
negative
(-)
battery
cablebefore
removing
any
electrical
components
.
"
Prior
to
disconnecting
the
battery,
read
the
bat-tery
disconnection
cautions
given
at
the
front
of
this
manual
on
page
viii
.
"
Connect
and
disconnect
ignition
system
wires,
multiple
connectors
and
ignition
test
equipment
leads
only
while
ignition
is
switched
off
.
-Always
switch
a
test
meter
to
the
appropiate
func-
tion
and
range
before
making
test
connections
.
"
All-Season
Traction
(AST)
is
also
referred
to
as
ASC
or
ASC+T
.
GENERAL
Page 486 of 759
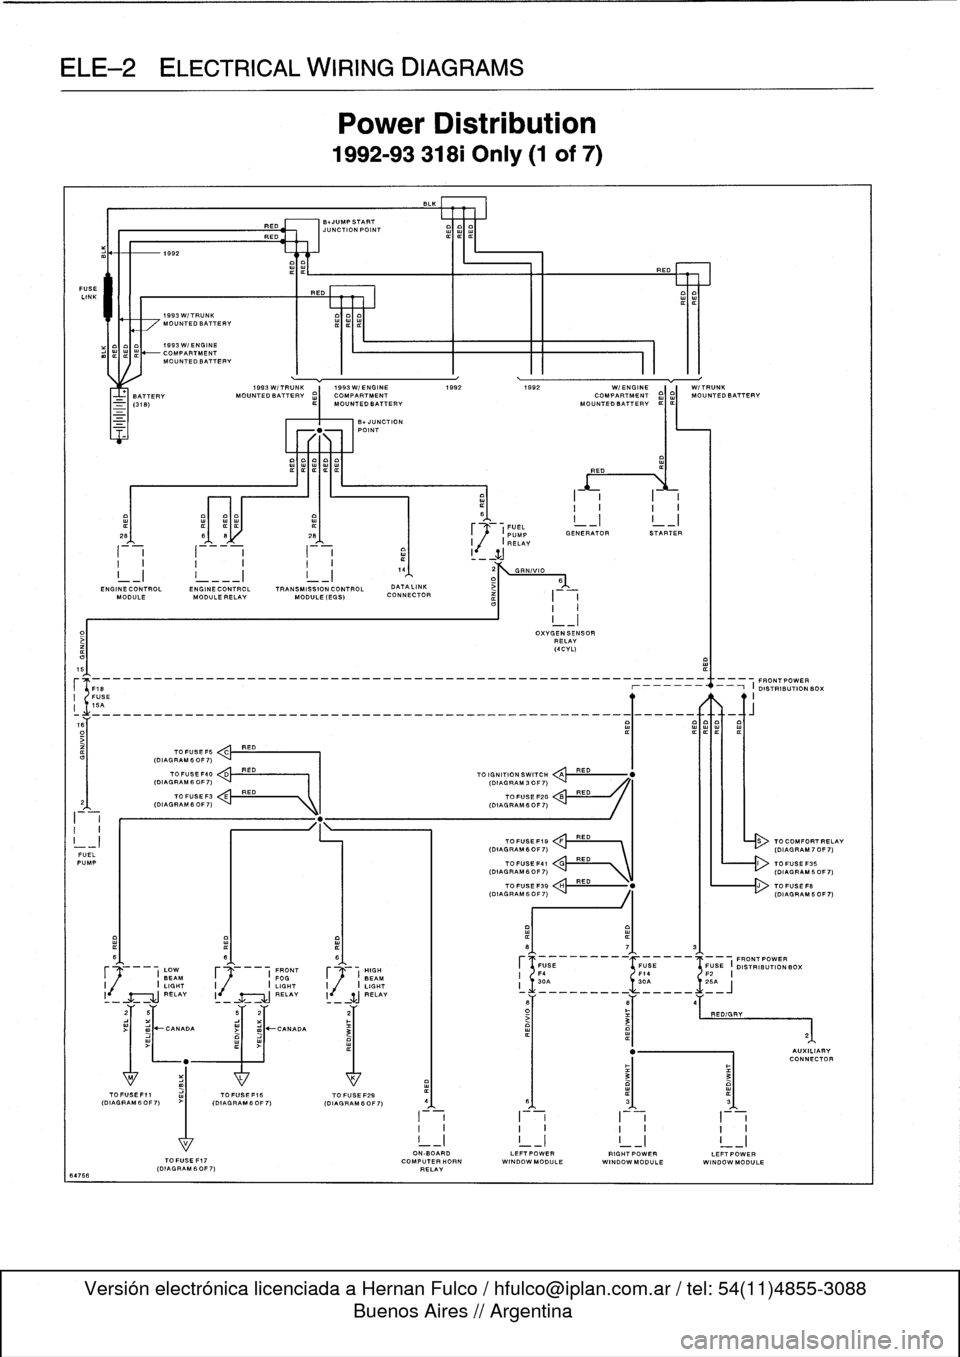
ELE--2
ELECTRICAL
WIRING
DIAGRAMS
FUSE
LINK
64766
I-i
I
-
i
a
1
I
_
ZJ
I
I
I
I
I
I.
4
2
GRN/VIO
I_I
!
___I
I_I
1
D>
6
END
INECONTROL
ENGINECONTROL
TRANSMISSION
CONTROL
DATALINK
MODULE
MODULE
RELAY
MODULE
(EGS)
CONNECTOR
I
I
I
I
5
(F18
--_______________________________________________
O19~
N
RIBUON
BOX
I
FUSE
II
15A
o~___________________________________________________Q~____-aft
TO
FUSE
F5
C
RED
(DIAGRAM
6
OF
7)
FUELPUMP
I
(DIAGRAM60F7)
C'
RED
\
L------r>
(DIAGRAM60F7)
I
LOW
F
I
FRONT
HIGH
BEAM
FOGJ
BEAM
I
I
LIGHT
I
I
LIGHT
I
j
/
I
LIGHT
RELAY
I
RELAY
li
SJ
RELAY
1992
1993W/TRUNK
MOUNTEDBATTERV
1993W/ENGINE
COMPARTMENTMOUNTEDBATTERV
1993W/TRUNK
1993W/ENGINE
1992
1992
WI
ENGINE
W/TRUNK
BATTERY
MOUNTEDBATTERV
¢)
MOUNTED
BATTERY
MOUN
O
TEDBATT
I
ERV
¢I¢I
MOUNTEDBATTERV
TOFUSEF40
<
,.k
RED
(DIAGRAM
6
OF
7)
I
I
(DIAGRAM
3
OF
7)
TO
FUSEF3
E
RED
(DIAGRAMfiOF7)
"
.
1k
I
(DIAGRAM
6OF7)
>I
mJ~CANADA
RED
BNUMPSTART
JUNCTION
POINT
REO
Power
Distribution
1992-93
318i
Only
(1
of
7)
-UNCTION
POINT
TOFUSEF15
TO
FUSE
F29
(DIAGRAM60F7)
(OIAGRAM6OF7)
I
~1
.
FUEL
_I
I
_I
~
(PUMP
GENERATOR
STARTER
I
,(
I
RELAY
TO
IGNITION
SWITCH
QA
TOFUSE
F20
TOFUSEF19
FRED
(DIAGRAM6OF7)
`
I
III
-
(DIAGRAM70F7)
OXVGENSENSOR
RELAY
(4CVL)
RED
RED
RED
ON-BOARD
LEFTPOWERRIGHTPOWERLEFTPOWER
TOFUSEF17
COMPUTERHORN
WINDOWMODULE
WINDOWMODULE
WINDOW
MODULE
(DIAGRAM
60F
7)
RELAY
TO
COMFORTRELAV
Page 487 of 759
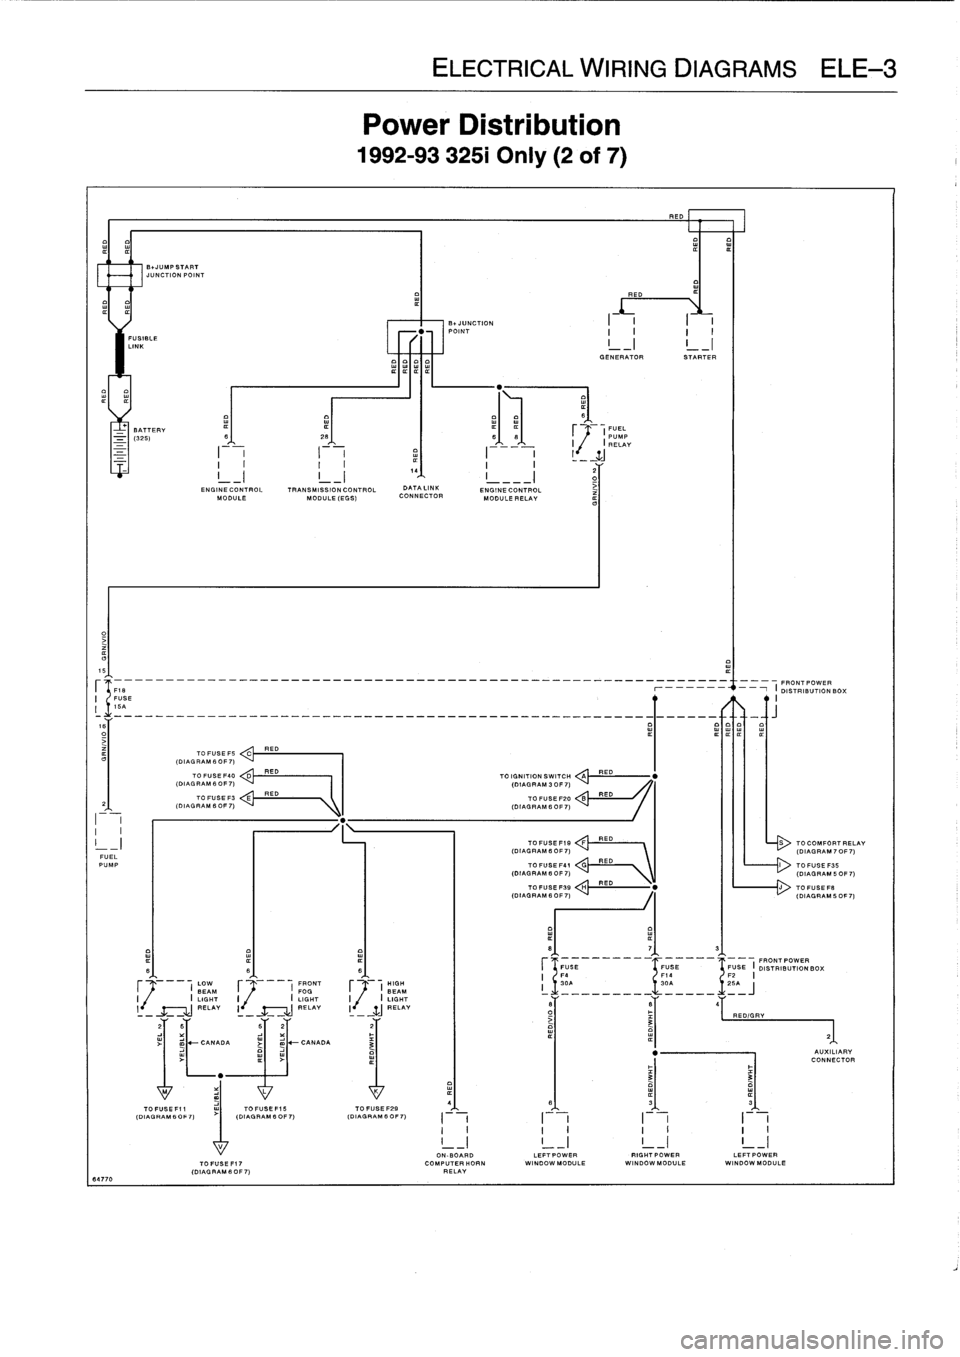
ELE
Power
L
1992-9332
RED
E01
IIIII
FUSIBLE
LINK
I
GENERATOR
STARTER
BATTERY
¢
(FUEL
-
(325)
S
26
66
PUMP
I
I
RELAY
2
G
ENGINE
CONTROL
TRANSMISSION
CONTROL
DATA
LINK
ENGINECONTROL
iMODULE
MODULE
(EGG)
CONNECTOR
MODULE
RELAY
15
--
---
-
-
----
--
FRONT
POWER
FUSE
r
-
i
DISTRIBUTIONBO
;
I
16A
R
ITIT
TO
FUSE
FS
ED
C
(DIAL
RAM
6
OF
7)
TO
FUSE
F40
D
RED
TO
IGNITION
SWITCH
A
RED
(DIAGRAM
6
OF
7)
(DIAGRAM
3
OF
7)
TO
FUSE
F3
E
RED
TO
FUSE
F20
B
RED
2
(DIAGRAM6OF7)
(DIAGRAM
6OF7)
I
I
I
I
-
I
TOFUSEF19
:
:!!RED---
RED
S
TOCOMFORTI
(DIAGRAM
6
OF
7)
(DIAGRAM
70
FUEL
PUMP
TO
FUSE
F41
V\
TOFUGEF35
(DIAGRAM
B
OF
7)
\
(DIAGRAM
50
TOFUSEFSB
H
RED
"
J
TOFUSEF
.
(DIAGRAM
6
0F
7)
(DIAGRAM
50
8
7
3
FUGE
FUSE
FUSE
I
FRONT
POWER
B
6
6
DISTRIBUTION
BOX
F4
F14
F2
I
LOW
FRONT
HIGH
I
30A
30A
~
.1
.
25A
BEAM
F
I
FOG
F
(
BEAM
i
_________
_____
J
I
I
LIGHT
I
I
LIGHT
I
.
I
LIGHT
l
RELAY
I
-
RELAY
I
-
WJ
_RELAY
6
B
4
-
-
-
O
RED/GRY
3
21
2
B
62
2
~
-
CANADA
j
m
-CANADA
3
"
AUXILIAI
CONNECT
"
3
3
M
L
K
4(D
IAGAGR
AM60
F7)
(DIAGRAM
IAGRAM
B
OFOF
7)
(DIAGRAM
6
0
6
3
3G
FO
F
~
7)
I
I
I
I
I
II
I
I
I
I
I
I
I
!
_I
!
_I
!
_I
!
_
17
I
ON-BOARD
LEFTPOWER
RIGHTPOWER
LEFT
POWERTOFUSEFI7
COMPUTERHORN
WINDOW
MODULE
WINDOWMODULE
WI
NDOWMODULE
(DIAGRAMS
OF7)
RELAY
64770
Page 493 of 759
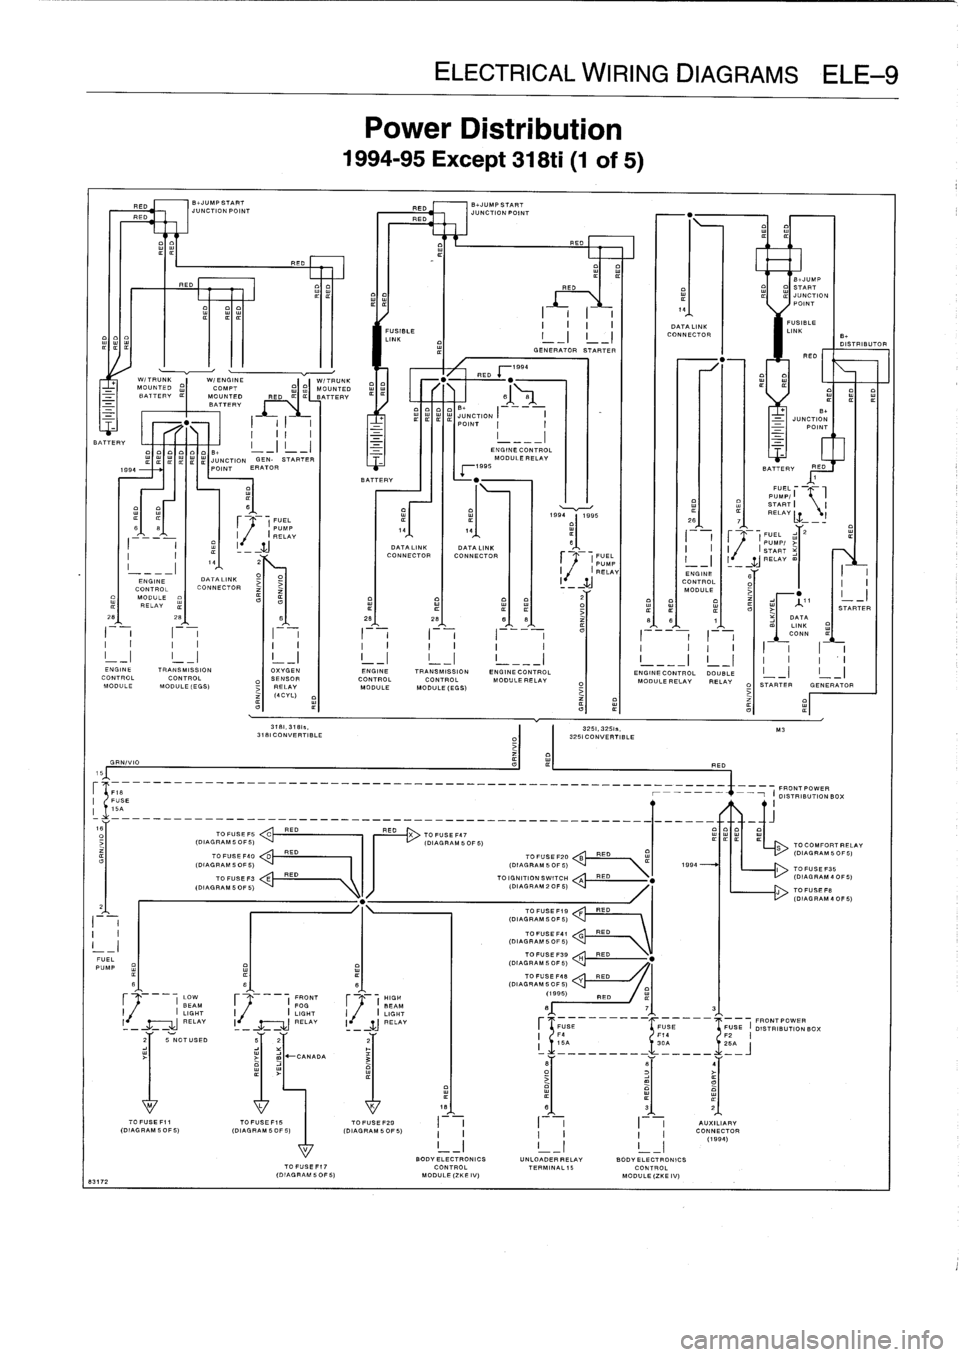
ELE
Power
E
1994-95
Exc
JMPSTART
B+JUMP
START
C710NPOINT
RED
JUNC710NPOIN7
RED
REO
.,
.
..
Fil
-----------
FUSIBLE
I
-
I
I
-I
CONNECTOR
I
LINK
B
LINK
m
D
¢
GENERATOR
STARTER
RED
x1994
W/TRUNK
W/ENGINE
W/TRUNK
RED
+
.
-
MOUNTED
MOUNTED
I~
BATTERY
MOUNTED
RED
BATTERY
61
81
w
_¢
BATTERY
o
B+
.
.'S
.
JS
_
JUONCINT
TION
I
I
B+_
I
I
I
P
I
I
-
JUNCTION
_
POINT
BATTERY
I
II
-
-_-
I
-
0
ENGINECON7ROL
¢
JUNCTION
GEN-
STARTER
MODULERELAY
1994
POINT
ERATOR
x1995
BATTERY
REO
Iffm
BATTERY
+
"
1
o
FUEL'w
PUMP/
I
B
w
w
START
I
I
mm
O
0
~
~
Y
¢¢ww
r'
19941995
RELAY
¢
Lz
(
PUMP
2
2fi
7
¢
¢
I
R
r
ELAY
14
14
r
2
'
8
I
1
(
P/
M
i
II
w
-
yJ
DATA
LINK
DATA
LINK
I
I
I~
SPT
U
ART
I
CONNECTOR
CONNECTOR
FUEL
I
I
14
22
PUMP
-_I
_--
IJRELAYm
_--I
O
I
RELAY
ENGINE
I
ENGINE
DATALINK
CONTROLCONTROL
CONNECTOR
-
MODULEj
MODULE
2
RELAY
-
S'
28
B
28
28
BB
86
1
DATA
LI
NK
II
I2
I
I
I
I
I
I
_
__
__
__
m
C.
NN
I
I
I
I
I
I
I
I
I
I
I
I
I
I
I
¢
I__I
I__I
!
_I
!
_I
!
_I
!
___I
!
___I
!
_I
I
I
ENGINETRANSMISSION
OXYGEN
ENGINE
TRANSMISSION
ENGINECONTROL
ENGINECONTROL
DOUBLE
CONTROL
CONTROL
SENSOR
CONTROL
CONTROL
MODULERELAY
MODULE
BELAY
RELAY
MODULE
MODULE
(EGB)
RELAY
MODULE
MODULE(EGS)
O
STARTER
GENERAT
(4CYL)
3181,37815,
3251,3251
.,
M3
3181
CONVERTIBLE
3251
CONVERTIBLE
GRN/VIO
RED
15
P1B
FRONT
POWER
USE
-1
I
DISTRIBUTION
BOX
-
-
-
---
--
-
---
-
-
-
-
-
-
-
-
-
---
--
-
---
-
---
-
-
-
-
-
-
-
-
-
-
-
-
----
-
-
-
-
-
-
-
-
-----
---
g
TO
FUSE
15
C
RED
RED
X
TO
FUSEF47
-
1.20
(DIAGRAM50F5)
(DIAGRAMSOF5)
S
TOCOMFORTR
TO
FUSEF40
0
RED
TO
TUBEF20
B
RED
(DIAGRAMSOF
(D(AGRAM
5
0F
5)
(DIAGRAM
5
0F
5)
R
1994
I
TO
'
.BE
P
.1
70
FUSE
F3
E
RED
TO
IGNITION
SWITCH
A
RED
"
(DIAGSAM4OF
(DIAGRAM5OF5)
ID
IAGRAM2OF5)
J
70
FUSE
FB
(DIAG
RAM
4
OF
2
TO
FUSEFI9
F
RED
I
I
(DIAGRAMSOF5)
I
I
TO
FUSE-
G
RED
I
-
I
(DIAGRAMSORS)
TOFUSEF39
RED
FUEL
PUMP
(DIAGRAMSOFS)
H
fi
6
g
(DIAGRAMSOFSTOFUSE
'48
I
Y
RED
(1
O
I
FRONT
HIGH
99
5)
RED
¢BEAM
FOG
I
BEAM
8
7
3
(
LIGHT
I
(
LIGHT
I
(
LIGHT
RELAY
I
j~(
RELAY
I~
~j
RELAY
r
FUBE
FUSE
FUSE
I
FRONTPOWER
OISTRIBUTIONBCX
2
I
F4
14
F25
NOTUSED
5
2
2
5
S
2
_
CANADA
3
v
8
B
4
M
L
K
18
8
3
2
TOFUSEF11
TOFUSEFIS
TOFUSEF29
I
I
I
I
AUXILIARY
(OIAGRAMSOFS)
(DIAGRAM
5DF5/
(DIAGRAM
SOBS)
I
I
I
I
I
I
CONNECTOR
V
I
_I
_
I
-I
(19)
BODY
ELECTRONICS
UNLO
I
ADERRELAY
BODY
EI
LCTRDNCS
TOFUSEFI7
CONTROL
TERMINAL15
CONTROL
IDIAGRAM50F5(
MODUL
.(ZKEIV)
MODULE(ZKEIV)
83172
-
Page 498 of 759
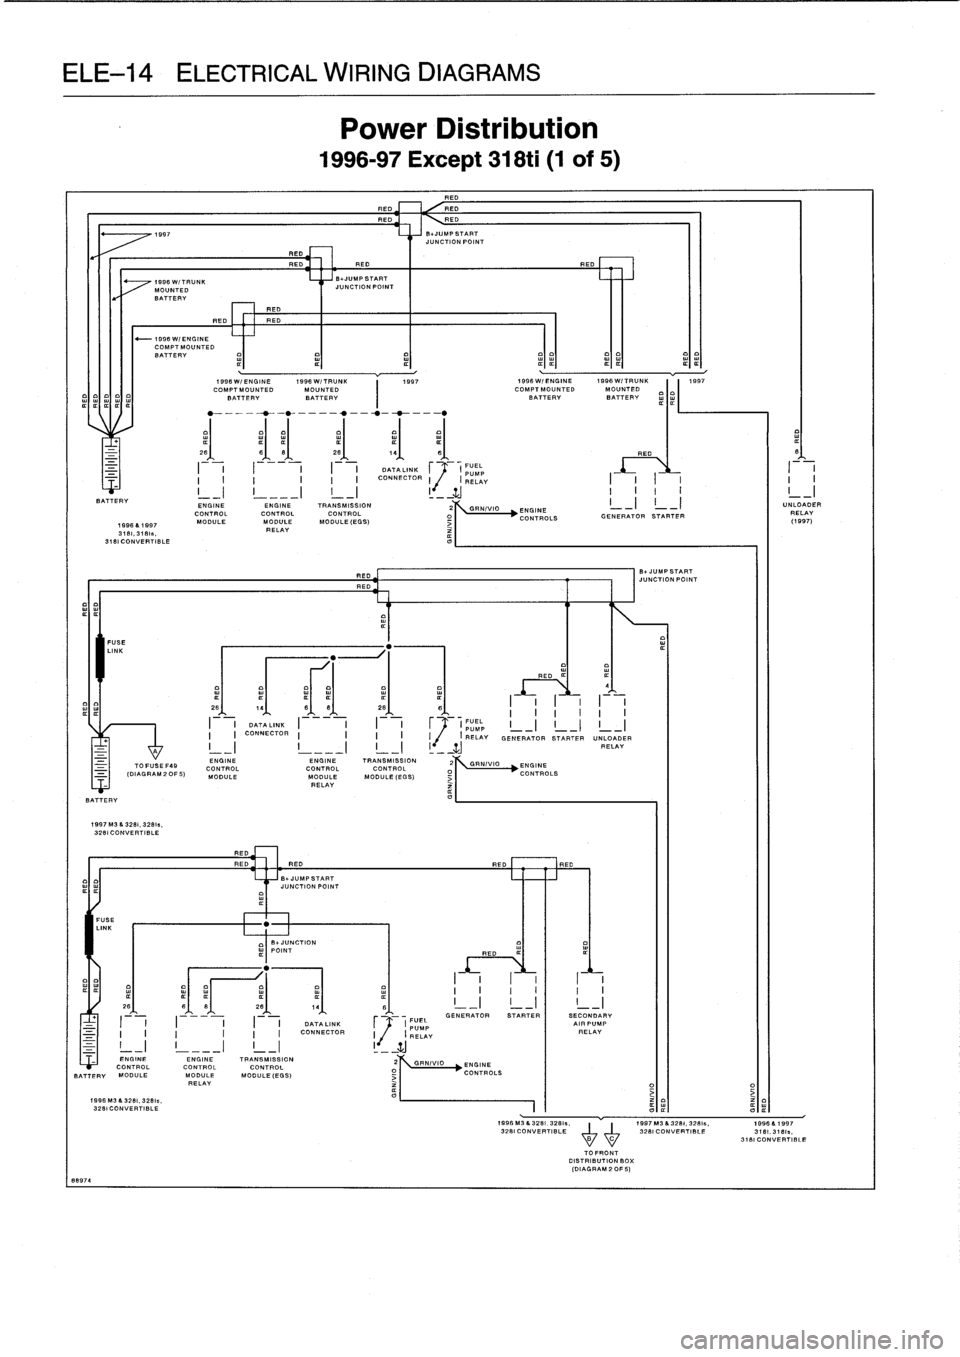
ELE-14
ELECTRICAL
WIRING
DIAGRAMS
BATTERY
FUSE
LINK
REDRED
RED
RED
RED
1997
S
.JUMPSTART
JUNCTION
POINT
1996W/TRUNK
MOUNTED
BATTERY
----
1998W/ENGINE
¢
¢
¢
¢¢COMPTMOUNTED
BATTERY
1996&1997
3181,3181
.,
3181
CONVERTIBLE
b
~
_
I
ENGINETO
FUSE
F49
CONTROL
(DIAGRAM
2OF5)
MODULE
BATTERY
1997M3
&328i.32811,3281
CONVERTIBLE
f
FUSE
LINK
1996
M3
&3281
.
3281
..
3281
CONY
ERTIBLE
1996
W/ENGINE
1996
W/TRUNK
1997
1996
W/ENGINE
1996
WITRUNK
COMPTMOUNTED
MOUNTED
COMPTMOUNTED
MOUNTEDC
BATTERY
BATTERY
BATTERY
BATTERY
REDREDRED
MP
START
JUNCTION
POINT
Power
Distribution
1996-97
Except
318ti
(1
of
5)
RED
RED
RED
I
I
T=
BtJUMPSTART
JU
NCTION
POINT
_RED
RED
0
I
I
I
I
I
I
DATA
LINK
r
(
(FUEL
I
I
I
I
I
I
I
I
CONNECTOR
(
(
Pump
RELAY
I
I
I
I
II
I
I
I
I
I
I
Zj
I
I
I
I
I
I
ENGINE
ENGINETRANSMISSION
I
-I
I
_I
UNLOADER
2//
\\GRN/VI
O
ENGINE
CONTROL
CONTROL
CONTROL
/
~
RELAY
MODULE
MODULE
MODULE(EGS)
I
"
CONTROLS
GENERATOR
STARTER
(1997)
RELAY
W
W
W
RED
8r.1
28
6
1
I
I
I
I
__
____
__
I
IIII
I
I
I
DATALINK
I
I
I
I
r
_~
_I
FUEL
I
-
I
I
-
I
I
-
I
I
CONNECTOR
I
I
I
I
I
I
ENGINE
TRANSMISSION
2
GRNIV
CONTROL
CONTROL
MODULE
MODULE(EGS)RELAY
i
ENGINE
ENGINE
TRANSMISSION
CONTROLCONTROLCONTROL
02
GRN/VIO
BATTERY
MODULE
MODULE
MOD
ULE(EGS)
_
RELAY
ENGINE
CONTROLS
ENGINE
CONTROLS
RED
[EH]RED
2I
POINT
CTION
RED
¢I
I
I
II
I
-
,
I
I
I
I
I
I
261
61
.1
281
1
,
11
61
I
-I
!
_I
I
i
_I
m
FUEL
GENERATOR
STARTER
SECONDARY
I
I
I
I
I
I
DATALINK
r
/y
(
PUMP
I
AI-
PUMP
I
I
I
I
I
I
CONNECTOR
I
f
(RELAY
RELAY
zJ
TOFRONT
DISTRIBUTION
BOX
(DIAGRAM
20F
5)
1997
B+
JUMP
START
JUNCTION
POINT
1996M3&3281,32811
.
1997M3&3281,3281
.,
1898&1997
3281
CONVERTIBLE
3281CONVERTIBLF
3181.3181x,BC
3181CONVERTIBLE