Oil pan BMW 318i 1996 E36 Workshop Manual
[x] Cancel search | Manufacturer: BMW, Model Year: 1996, Model line: 318i, Model: BMW 318i 1996 E36Pages: 759
Page 11 of 759
WARNING
-
"
Never
work
under
a
lifted
car
unless
it
is
solidly
supported
on
jack
stands
that
are
intended
for
that
purpose
.
Do
not
support
a
car
on
cinder
blocks,
bricks,
or
other
objects
that
may
shift
orcrumble
under
continuous
load
.
Never
work
un-
dera
car
that
is
supported
only
by
the
lifting
jack
.
"
Fuel
is
highly
flammable
.
When
working
around
fuel,
do
not
smoke
or
worknear
heaters
or
other
fire
hazards
.
Keepan
approved
fire
extinguisher
handy
.
"
llluminate
the
work
area
adequately
and
safely
.
Use
a
portable
safety
light
for
working
inside
or
under
thecar
.
A
fluorescent
type
lightis
best
be-
cause
it
gives
off
less
heat
.
If
using
a
light
with
anormal
incandescent
butb,
use
rough
service
bulbs
to
avoid
breakage
.
The
hot
filamentof
an
accidentallybroken
bulb
can
ignite
spilled
fuel
or
oil
"
Keep
sparks,
lighted
matches,
and
any
open
llame
away
from
thetop
of
the
battery
.
Hydrogen
gas
emitted
by
the
battery
is
highly
flammable
.
Any
nearby
source
of
ignition
may
cause
the
battery
to
explode
.
"
Never
¡ay
tools
or
parts
in
the
engine
compart-
ment
or
on
top
of
the
battery
.
They
may
fall
into
confined
spaces
and
be
difficult
toretrieve,
be-
come
caught
in
beits
or
other
rotating
parts
when
the
engine
is
started,
or
cause
electrical
shorts
anddamage
to
the
electrical
system
.
"
The
fuel
system
is
designed
to
retain
pressure
even
when
the
ignition
is
off
.
When
working
with
the
fuel
system,
loosen
the
fuel
fines
slowly
to
al-
low
the
residual
pressure
to
dissipate
gradually
.
Take
precautions
to
avoid
spraying
fuel
.
Lifting
the
Car
FUNDAMENTALS
FOR
THE
DO-ITYOURSELF
OWNER
010-
3
For
those
repairs
that
require
raising
the
car,
theproper
jack-
ing
points
should
beused
to
raise
thecar
safely
and
avoid
dam-
age
.
There
are
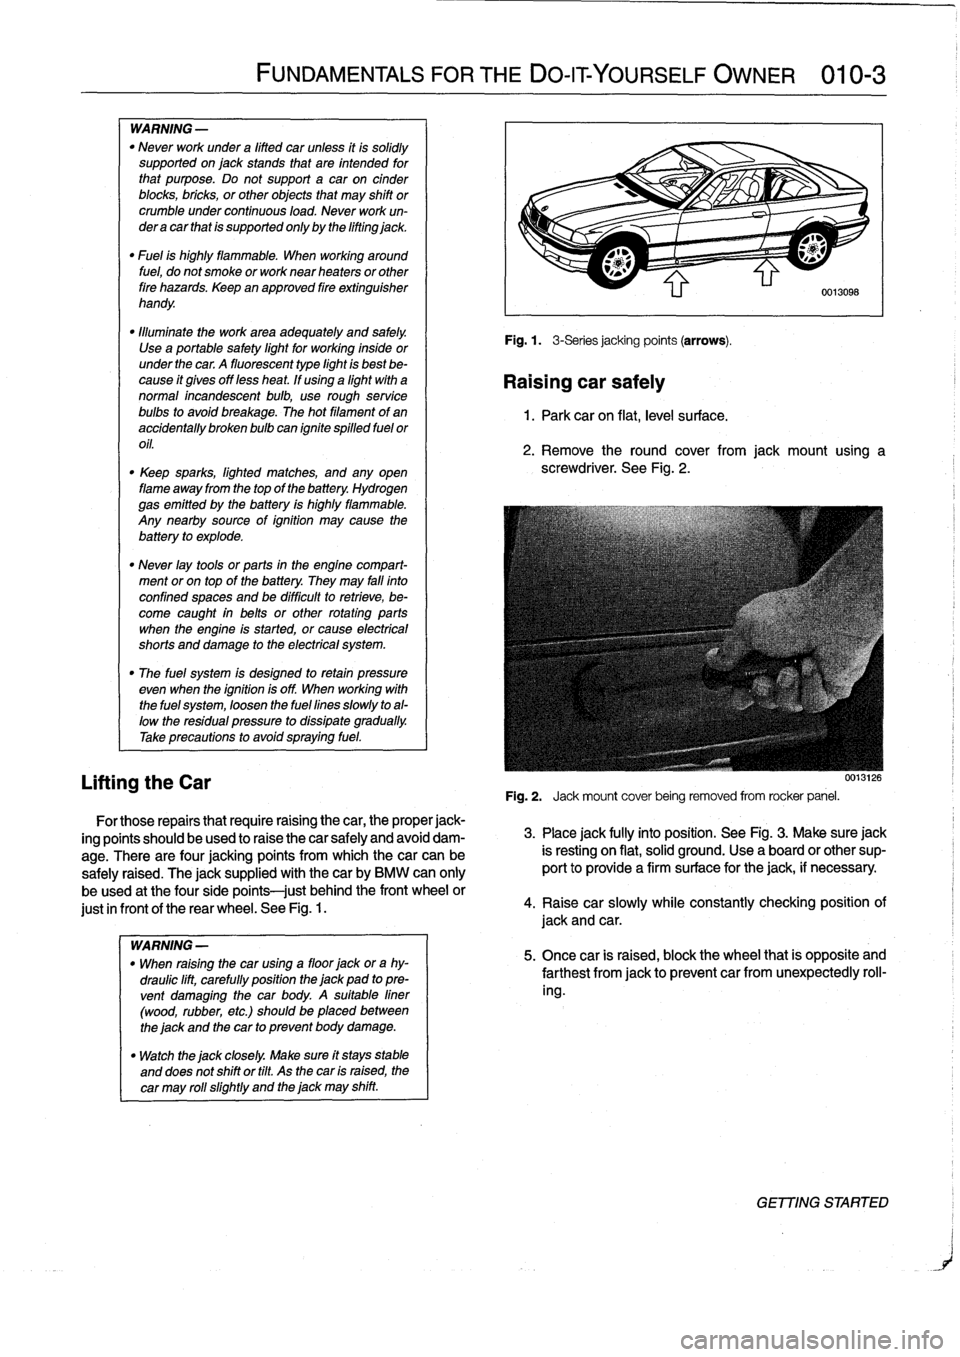
four
jacking
points
from
which
thecar
can
be
safely
raised
.
The
jacksupplied
with
thecar
by
BMW
can
only
be
used
at
the
fourside
points
just
behindthe
front
wheel
or
just
in
frontof
the
rear
wheel
.
See
Fig
.
1.
WARNING
-
"
When
raising
the
car
using
a
floor
jack
ora
hy-
draulic
lift,
carefully
position
the
jack
pad
topre-
vent
damaging
the
car
body
.
A
suitable
liner
(wood,
rubber,
etc
.)
should
be
placed
between
the
jack
and
the
car
to
prevent
body
damage
.
"
Watch
the
jack
closely
.
Make
sure
ft
stays
stable
and
does
not
shift
or
tilt
.
As
the
car
is
raised,
the
car
may
rol¡
slightly
and
the
jack
may
shift
.
Fig
.
1
.
3-Seriesjacking
points
(arrows)
.
Raising
car
safely
1
.
Park
car
on
flat,
leve¡
su
rface
.
2
.
Remove
the
round
cover
from
jack
mount
using
a
screwdriver
.
See
Fig
.
2
.
0013126
Fig
.
2
.
Jack
mount
cover
being
removed
from
rocker
panel
.
3
.
Place
jack
fully
into
position
.
See
Fig
.
3
.
Make
sure
jack
is
resting
on
flat,
solid
ground
.
Use
a
board
or
other
sup-
port
to
provide
a
firm
surface
for
the
jack,
if
necessary
.
4
.
Raisecar
slowly
while
constantly
checking
position
of
jack
and
car
.
5
.
Once
car
is
raised,
block
the
wheel
that
is
opposite
and
farthest
from
jackto
prevent
car
fromunexpectedly
roll-
ing
.
GET77NG
STARTER
Page 17 of 759
Solt
Diameter
and
Wrench
Size
"
M5
.
...
............
....
......
.
.......
8
mm
"
M6
.
.
..............
.
.
...
...........
.10
mm
"
M8
.
.
..............
.
.
..
.....
12mmor13mm
"
M10
..
.............
.
.
...
...........
.17
mm
"
M12
...
...........
..
.
..
............
.19
mm
"
M14
.
..:
.
.........
..
.
..
.............
22
mm
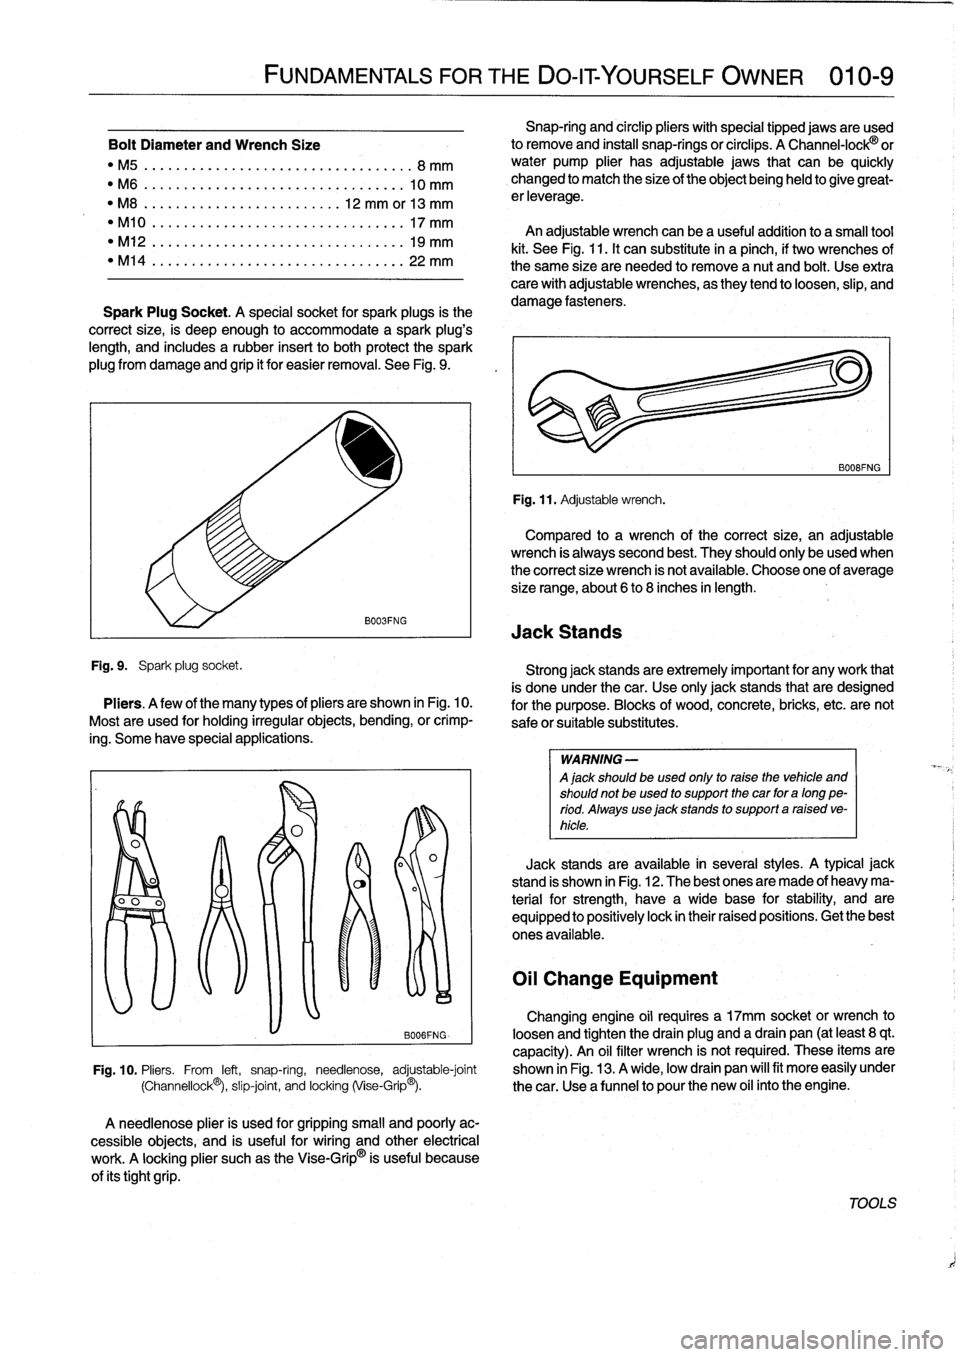
Spark
Plug
Socket
.
A
special
socket
for
spark
plugs
is
the
correct
size,
is
deep
enough
to
accommodate
a
spark
plug's
length,
and
includes
a
rubber
insertto
both
protect
the
spark
plug
from
damage
and
grip
it
for
easier
removal
.
See
Fig
.
9
.
Fig
.
9
.
Spark
plug
socket
.
FUNDAMENTALS
FOR
THEDO-ITYOURSELF
OWNER
010-
9
B003FNG
Pliers
.
A
few
of
the
many
types
ofpliers
are
shown
in
Fig
.
10
.
Mostare
used
for
holding
irregularobjects,
bending,or
crimp-
ing
.
Some
have
special
applications
.
A
needlenose
plier
is
used
for
gripping
small
and
poorly
ac-
cessible
objects,
and
is
useful
for
wiring
and
other
electrical
work
.
A
locking
plier
suchas
theVise-Grip
®
is
useful
because
of
its
tightgrip
.
Snap-ring
and
circlip
pliers
withspecial
tipped
jacas
areused
lo
remove
and
install
snap-ringsor
circlips
.
A
Channel-lock®
or
water
pump
plier
has
adjustable
jacas
that
can
be
quickly
changed
to
match
the
size
of
the
object
being
held
to
give
great-
erleverage
.
An
adjustable
wrench
canbea
useful
addition
to
a
small
tool
kit
.
See
Fig
.
11
.
It
can
substitute
in
a
pinch,
if
two
wrenches
of
the
same
size
are
needed
lo
remove
a
nut
and
bolt
.
Use
extra
care
with
adjustable
wrenches,
as
they
tend
to
loosen,
slip,
and
damage
fasteners
.
Fig
.
11
.
Adjustable
wrench
.
B008FNG
Compared
to
a
wrench
of
the
correct
size,
an
adjustable
wrench
is
always
second
best
.
They
shouldonly
beused
when
the
correct
size
wrench
is
not
available
.
Choose
one
of
average
size
range,
about
6
to
8
inches
in
length
.
Jack
Stands
Strong
jack
stands
are
extremely
important
for
any
work
that
is
done
under
thecar
.
Use
onlyjack
stands
that
are
designed
for
the
purpose
.
Blocks
of
wood,
concrete,
bricks,
etc
.
arenot
safeor
suitable
substitutes
.
WARNING
-
A
jack
should
be
used
only
to
raise
the
vehicle
and
shouldnot
beused
to
support
the
car
for
a
long
pe-
riod
.
Always
use
jack
stands
to
support
a
raised
ve-
hicle
.
Jack
standsare
available
1n
severa¡
styles
.
A
typical
jack
stand
is
shown
in
Fig
.
12
.
The
best
ones
are
made
of
heavy
ma-
terial
for
strength,
have
a
wide
base
for
stability,
and
are
equipped
lo
positively
lock
in
their
raised
positions
.
Get
the
best
ones
available
.
Oil
Change
Equipment
Changing
engine
oil
requires
a
17mm
socket
or
wrench
to
BOO6FNG-
loosen
and
tighten
the
drain
plug
and
a
drain
pan
(at
least
8
qt
.
capacity)
.
An
oil
filter
wrench
is
not
required
.
These
items
are
Fig
.
10
.
Pliers
.
From
left,
snap-ring,
needlenose,
adjustable-joint
shown
in
Fig
.
13
.
A
wide,
loca
drain
pan
wíll
fit
more
easily
under
(Channellock©),
slip-joint,
and
locking(Vise-Grip®)
.
the
car
.
Use
a
funnel
lo
pour
the
new
oil
into
theengine
.
TOOLS
Page 18 of 759
010-10
FUNDAMENTALS
FOR
THE
DO-IT
YOURSELF
OWNER
TOOLS
Torque
Wrench
B021FNG
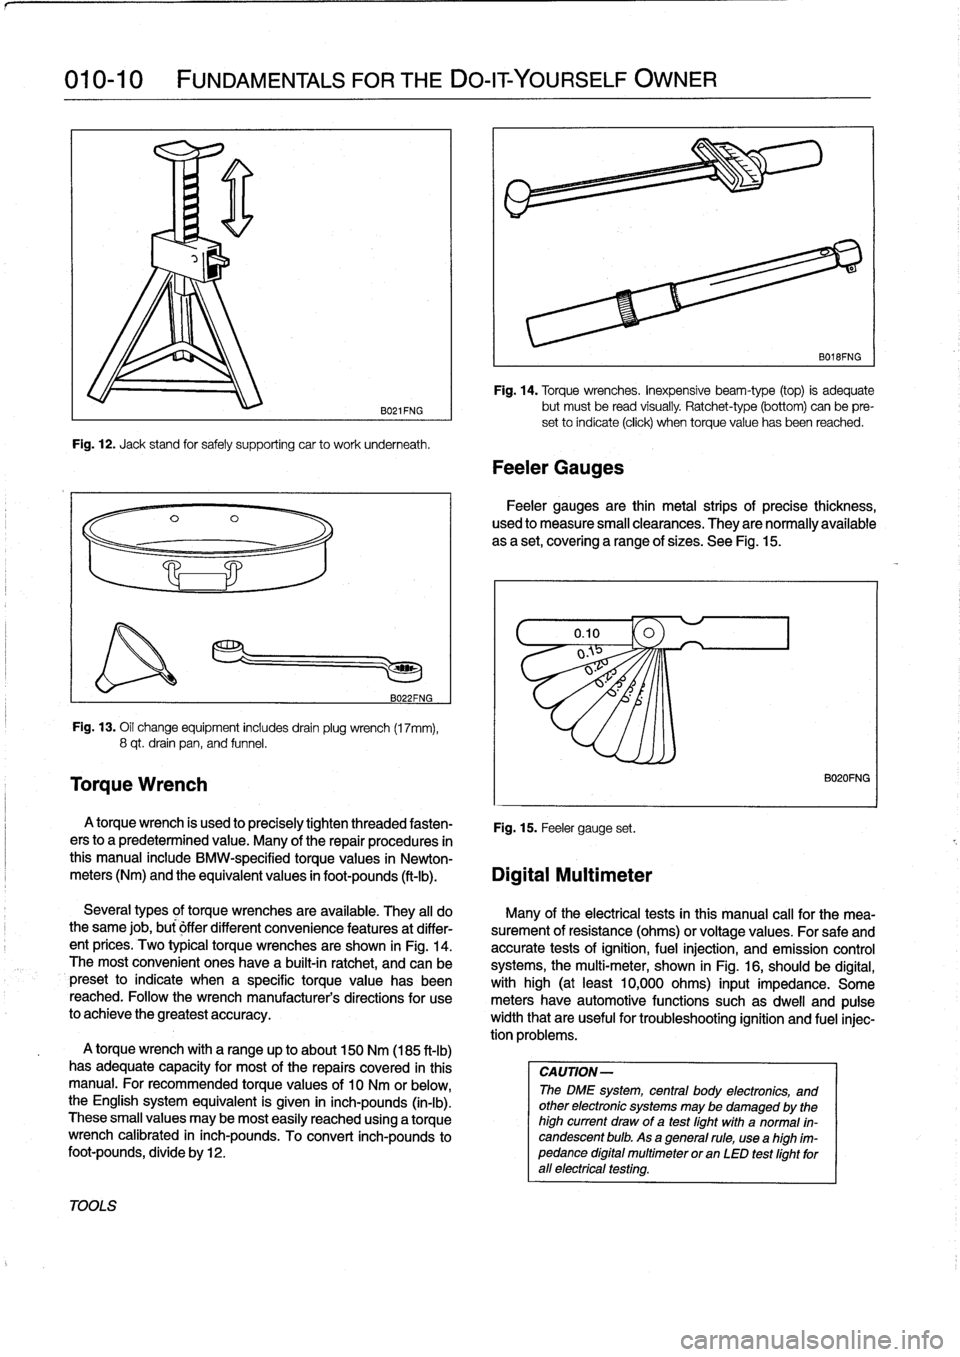
Fig
.
12
.
Jack
stand
for
safely
supporting
car
to
work
underneath
.
B022FNG
Fig
.
13
.
Oil
change
equipment
includesdrainplug
wrench
(17mm),
8
qt
.
drain
pan,
and
funnel
.
A
torque
wrench
is
used
to
precisely
tighten
threaded
fasten-
Fig
.
15
.
Feeler
gauge
set
.
ers
to
a
predetermined
value
.
Many
of
the
repair
procedures
in
this
manual
include
BMW-specified
torquevalues
in
Newton-
meters
(Nm)
and
the
equivalent
values
in
foot-pounds
(ft-Ib)
.
Digital
Multimeter
A
torque
wrench
with
a
range
up
to
about
150
Nm
(185
ft-lb)
has
adequate
capacity
for
most
of
the
repairs
covered
in
this
manual
.
For
recommended
torque
values
of
10
Nm
or
below,the
English
system
equivalent
is
given
in
inch-pounds
(in-lb)
.
These
small
values
may
be
most
easily
reached
using
a
torque
wrench
calibrated
in
inch-pounds
.
To
convert
inch-pounds
to
foot-pounds,
divide
by12
.
Fig
.
14
.
Torque
wrenches
.
Inexpensive
beam-type
(top)
is
adequate
but
must
be
read
visually
.
Ratchet-type
(bottom)
can
be
pre-
set
to
índicate
(click)
when
torquevalue
has
been
reached
.
Feeler
Gauges
B018FNG
Feeler
gauges
are
thin
metal
strips
of
precise
thickness,
used
to
measure
small
clearances
.
They
are
normally
available
as
a
set,
covering
a
range
of
sizes
.
See
Fig
.
15
.
Several
types
of
torque
wrenches
are
available
.
They
al¡
do
Many
of
the
electrical
tests
in
Chis
manual
cal¡
for
the
mea-
the
same
job,
bu¡
óffer
different
convenience
features
at
differ-
surement
of
resistance
(ohms)
or
voltage
values
.
For
safe
and
ent
prices
.
Two
typical
torque
wrenches
are
shown
in
Fig
.
14
.
accurate
tests
of
ignition,
fuel
injection,
and
emission
control
The
most
convenient
ones
have
a
built-in
ratchet,
and
can
be
systems,
the
multi-meter,
shown
in
Fig
.
16,
should
be
digital,
preset
to
indicate
when
a
specific
torque
value
has
been
with
high
(at
least
10,000
ohms)
input
impedance
.
Some
reached
.
Followthe
wrench
manufacturer's
directions
for
use
meters
have
automotive
functions
suchas
dweil
and
pulse
to
achieve
the
greatest
accuracy
.
width
that
are
useful
fortroubleshooting
ignition
and
fuel
injec-
tion
problems
.
CAUTION-
The
DME
system,
central
body
electronics,
and
other
electronic
systems
may
be
damaged
by
the
high
current
draw
of
a
test
fight
with
a
normal
in-
candescent
bulb
.
As
a
general
rule,
usea
high
ím-
pedance
digital
multimeter
or
an
LED
test
fightforall
electrfcal
testfng
.
B020FNG
Page 21 of 759
If
steam
is
coming
from
the
engine
compartment
thenthere
is
With
the
engine
and
ignition
off,
check
for
loose
or
corroded
most
likely
a
burst
coolant
hose
or
a
large
leak
in
the
cooling
battery
cables
or
wires
at
the
battery
or
thealtemator
.
Discon-
system
.
To
find
the
leak,
look
for
signs
of
coolant
leakage
on
necting,
cleaning,
and
reinstalling
corroded
wires
and
connec-
hoses,
at
hose
connections,
or
on
the
radiator
.
Let
theengine
tors
may
solve
the
problem
.
Also
check
drive
belt
tension
as
cool
thoroughly,
then
add
coolant
or
water
to
fill
the
system
and
described
in
020
Maintenance
Program
.
start
the
engine
.
If
a
great
deal
of
water
or
coolant
flows
out
of
the
hole,
then
thecarshouldnot
be
driven
until
repairs
are
made
.
lf
there
is
slight
seepage,
then
it
may
be
possible
to
drive
TOWi
ng
a
short
distance,
adding
coolant
as
needed
.
The
cars
covered
by
this
manual
should
be
towed
witha
tow
truck
using
wheel
lift
or
flat
bed
equipment
.
Do
not
tow
thecar
on
all
four
wheels
except
for
very
short
distances
to
move
it
to
a
safe
place
.
If
thered
engine
oil
pressure
warning
light
illuminates,
imme-
diately
stop
thecar
and
turn
off
the
engine
.
Have
the
vehicle
A
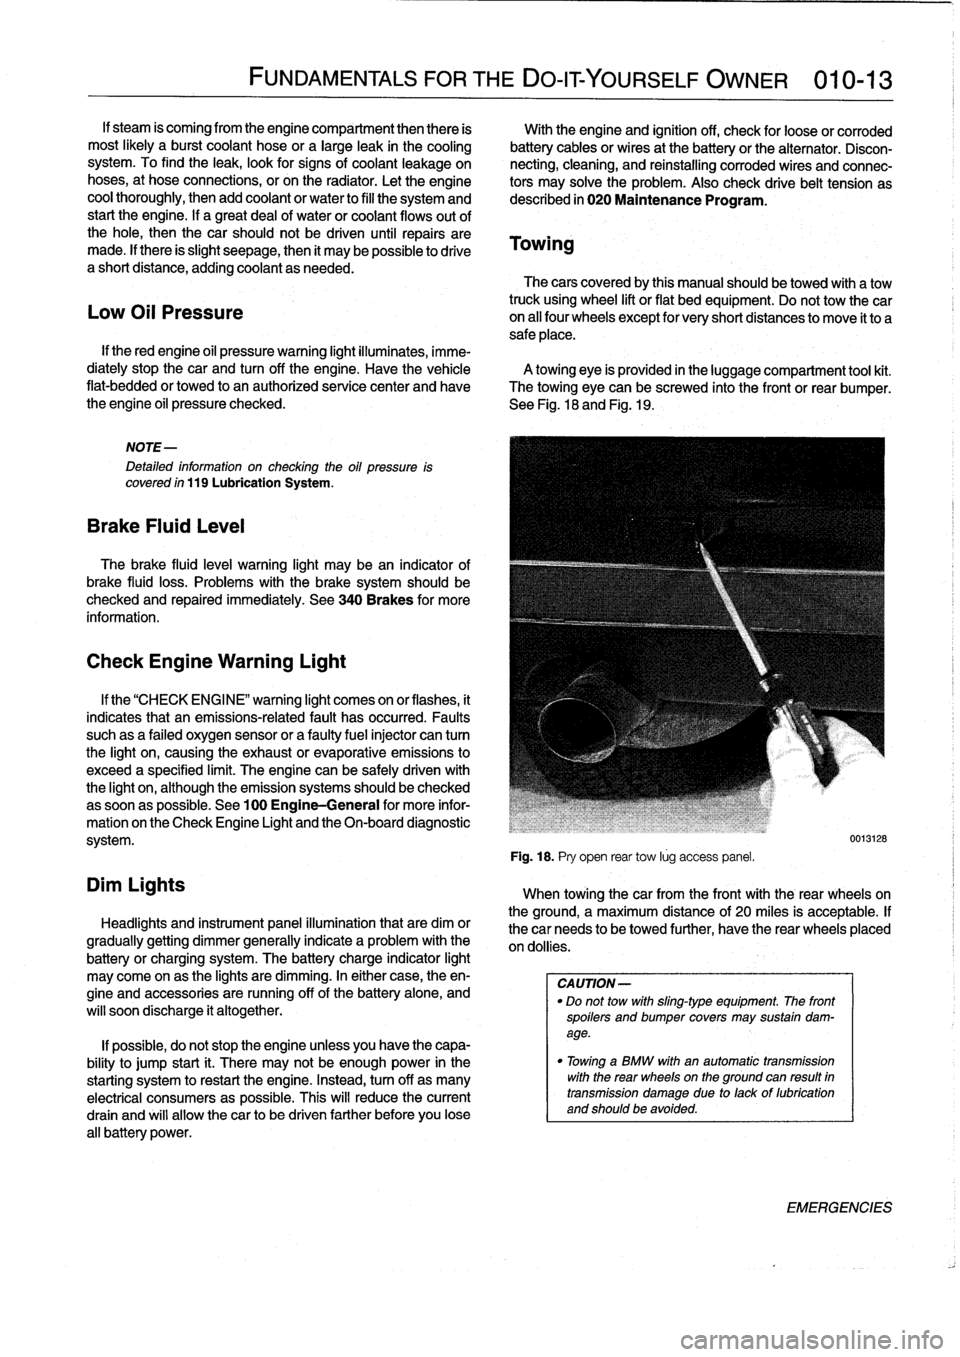
towing
eye
is
provided
in
the
luggage
compartment
tool
kit
.
flat-bedded
or
towed
to
an
authorized
service
center
and
have
The
towing
eye
can
be
screwed
into
the
front
or
rear
bumper
.
the
engine
oil
pressure
checked
.
See
Fig
.
18
and
Fig
.
19
.
Low
Oil
Pressure
NOTE-
Detafed
information
on
checking
the
oil
pressure
is
covered
ín
119
Lubrication
System
.
Brake
Fluid
Leve¡
The
brake
fluid
leve¡
warning
light
may
bean
indicator
of
brake
fluid
loss
.
Problems
with
the
brakesystem
should
be
checked
and
repaired
immediately
.
See
340Brakes
for
more
information
.
Check
Engine
Warning
Light
Dim
Lights
FUNDAMENTALS
FOR
THE
DO-IT
YOURSELF
OWNER
010-13
If
the
"CHECK
ENGI
NE"
warning
light
comes
on
or
flashes,
it
indicates
that
an
emissions-related
fault
has
occurred
.
Faults
suchas
a
failed
oxygen
sensor
or
a
faultyfuelinjector
can
tum
the
light
on,
causing
the
exhaust
or
evaporative
emissions
to
exceed
a
specified
limit
.
The
engine
can
be
safely
driven
with
the
light
on,
although
the
emission
systems
should
be
checked
assoonas
possible
.
See
100
Engine-General
for
more
infor-
mation
on
the
Check
Engine
Light
and
the
On-board
diagnostic
system
.
Headlights
and
instrument
panel
illuminationthat
are
dim
or
gradually
getting
dimmer
generally
indicate
a
problem
with
the
battery
or
charging
system
.
The
battery
charge
indicator
light
may
come
on
as
the
lights
are
dimming
.
In
either
case,
theen-
gine
and
accessories
are
running
off
of
the
battery
alone,
and
will
soon
discharge
it
altogether
.
If
possible,
do
not
stop
the
engine
unless
you
have
the
capa-
bility
to
jump
start
¡t
.
There
may
not
be
enough
power
in
the
starting
system
torestart
the
engine
.
Instead,turn
off
as
many
electrical
consumers
as
possible
.
This
will
reduce
the
current
drain
and
will
allow
thecar
to
be
driven
farther
before
you
lose
all
battery
power
.
Fig
.
18
.
Pry
open
rear
tow
lúg
access
panel
.
When
towingthecar
from
the
front
with
the
rear
wheelson
the
ground,
a
maximum
distance
of
20
miles
is
acceptable
.
If
thecar
needs
to
be
towed
further,
have
the
rear
wheels
placed
on
dollies
.
CA
UTION-
"
Do
not
tow
with
sling-type
equipment
The
front
spoilers
andbumper
covers
may
sustain
dam-
age
.
"
Towínga
BMW
with
an
automatic
transmission
with
the
rear
wheelson
the
ground
can
resuft
in
transmission
damage
due
to
lackof
lubrication
and
should
be
avoided
.
0013128
EMERGENCIES
Page 26 of 759
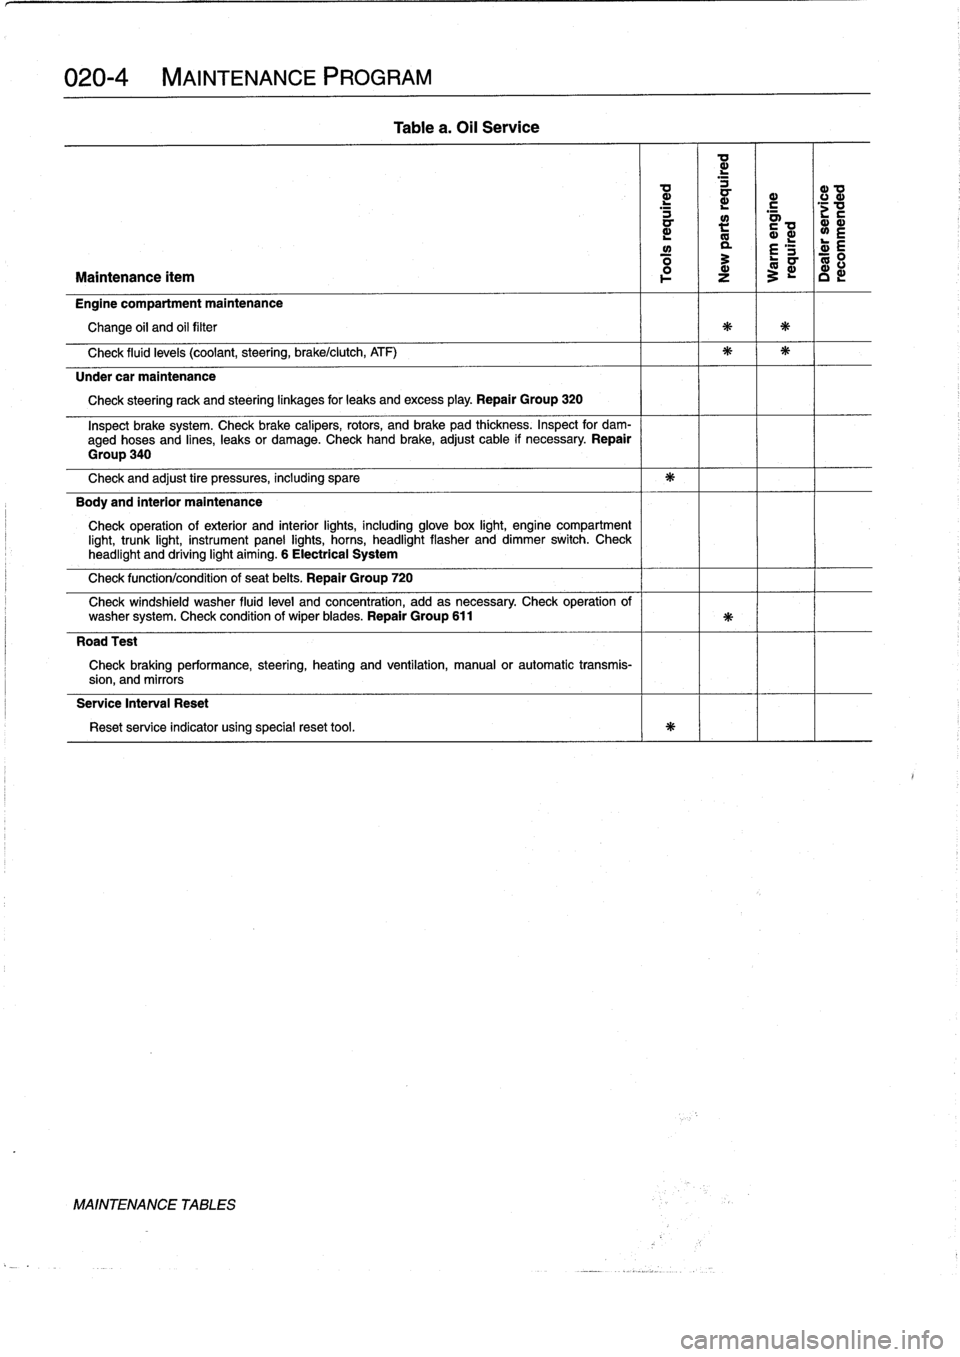
020-
4
MAINTENANCE
PROGRAM
L
~
~
c
.c
a
a>
mL
~
~L
L
w
a
£
'S
d
E
Maintenance
ítem
z
3
c
Engine
compartment
maintenance
Change
oil
and
oil
filter
Check
fluid
levels
(coolant,steering,
brake/clutch,
ATF)
Under
car
maintenance
Check
steeringrack
and
steeringlinkages
for
leaks
andexcess
play
.
Repair
Group
320
Inspect
brake
system
.
Check
brake
calipers,
rotors,
and
brake
pad
thíckness
.
Inspect
for
dam-
aged
hoses
and
lines,
leaks
or
damage
.
Check
hand
brake,adjust
cable
if
necessary
.
Repair
Group
340
Check
and
adjust
tire
pressures,
including
spare
Body
and
interior
maintenance
Check
operation
of
exterior
and
interior
lights,
including
glove
box
light,
engine
compartment
light,
trunk
light,
instrument
panel
lights,
horns,
headlight
flasher
anddimmer
switch
.
Check
headlight
and
driving
light
aiming
.
6
Electrical
System
Check
function/condition
of
seat
belts
.
Repair
Group
720
Check
windshield
washer
fluid
level
and
concentration,
add
as
necessary
.
Check
operation
of
washer
system
.
Check
condition
of
wiper
blades
.
Repair
Group
611
Road
Test
Check
braking
performance,
steering,
heating
and
ventilation,
manual
or
automatic
transmis-
sion,
and
mirrors
Service
Interval
Reset
Reset
service
indicator
using
specialreset
tool
.
MAINTENANCE
TABLES
Table
a
.
Oil
Service
Page 27 of 759
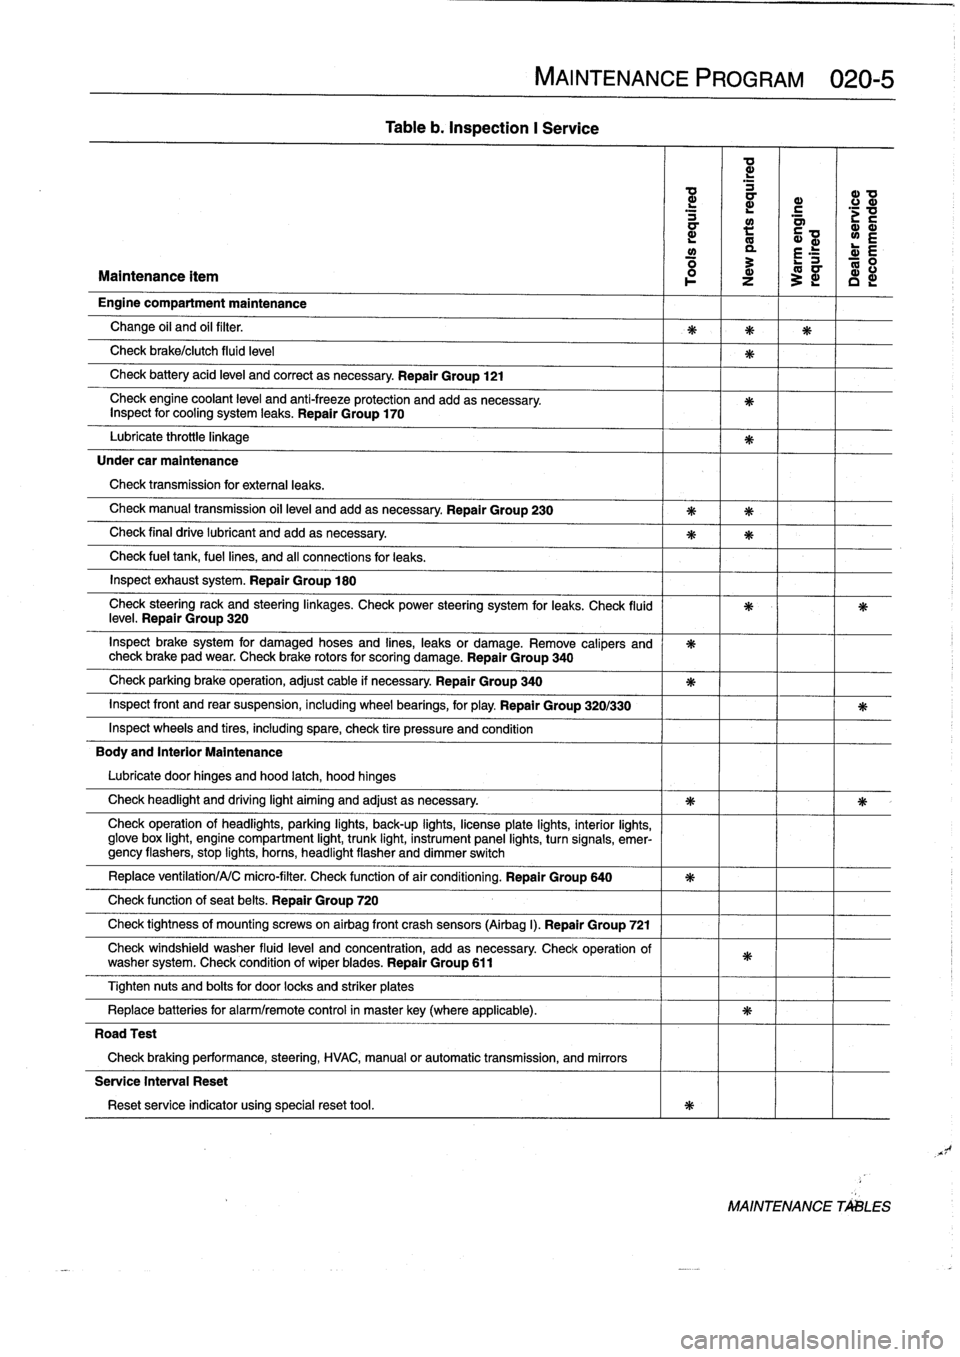
Table
b
.
Inspection
I
Service
MAINTENANCE
PROGRAM
020-5
ad
d
d
ID
a
r
c
d
a~
;v
a
:
Q~
wE
y
a
r
E
R
:
L-
0
Maintenance
ítem
1
z
3
~
c
d
Engine
compartment
maintenance
Change
oil
and
oil
filter
.
Check
brake/clutch
fluid
leve¡
Check
battery
acid
leve¡
and
correct
asnecessary
.
Repair
Group
121
Check
engine
coolant
level
and
anti-freeze
protection
and
addasnecessary
.
Inspect
for
cooling
system
leaks
.
Repair
Group
170
Lubricate
throttie
linkage
Under
car
maintenance
Check
transmission
for
externa¡
leaks
.
Check
manual
transmission
oil
leve¡
andadd
asnecessary
.
Repair
Group
230
Check
final
drive
lubricant
and
addasnecessary
.
Check
fue¡
tank,
fuel
lines,
and
all
connections
for
leaks
.
Inspect
exhaust
system
.
Repair
Group
180
Check
steeringrack
and
steeringlinkages
.
Check
power
steering
system
for
leaks
.
Check
(luid
leve¡
.
Repair
Group
320
Inspect
brake
system
for
damaged
hoses
and
fines,
leaks
or
damage
.
Remove
calipers
and
check
brake
pad
wear
.
Check
brake
rotors
for
scoring
damage
.
Repair
Group
340
Check
parking
brake
operation,
adjust
cable
if
necessary
Repair
Group
340
Inspect
front
and
rear
suspension,
including
wheel
bearings,
for
play
.
Repair
Group
320/330
Inspect
wheelsand
tires,
including
spare,
check
tire
pressure
and
condition
Body
and
Interior
Maintenance
Lubricate
door
hinges
and
hood
latch,
hood
hinges
Check
headlight
and
driving
light
aiming
and
adjust
as
necessary
.
Check
operation
of
headlights,
parking
lights,
back-up
fights,
licenseplate
lights,
interior
lights,
glove
box
light,
engine
compartment
light,
trunk
light,
instrument
panel
lights,
turnsignals,
emer-gency
flashers,
stop
fights,
horas,
headlight
flasher
and
dimmer
switch
Replace
ventilation/A/C
micro-filter
.
Check
functionof
air
conditioning
.
Repair
Group
640
Check
function
of
seat
belts
.
Repair
Group
720
Check
tightness
of
mountfng
screws
on
airbag
front
crash
sensors
(Airbag
I)
.
Repair
Group
721
Check
windshield
washer
fluid
leve¡
and
concentration,
add
as
necessary
Check
operation
of
washer
system
.
Check
condition
of
wiperblades
.
Repair
Group
611
Tighten
nuts
and
bolts
for
door
locks
and
striker
plates
Replace
batteries
for
alarm/remote
control
in
masterkey(where
applicable)
.
Road
Test
Check
braking
performance,
steering,
HVAC,
manual
or
automatic
transmission,
and
mirrors
Service
Interval
Reset
Reset
service
indicator
using
specialreset
tool
.
MAINTENANCE
TALES
Page 28 of 759
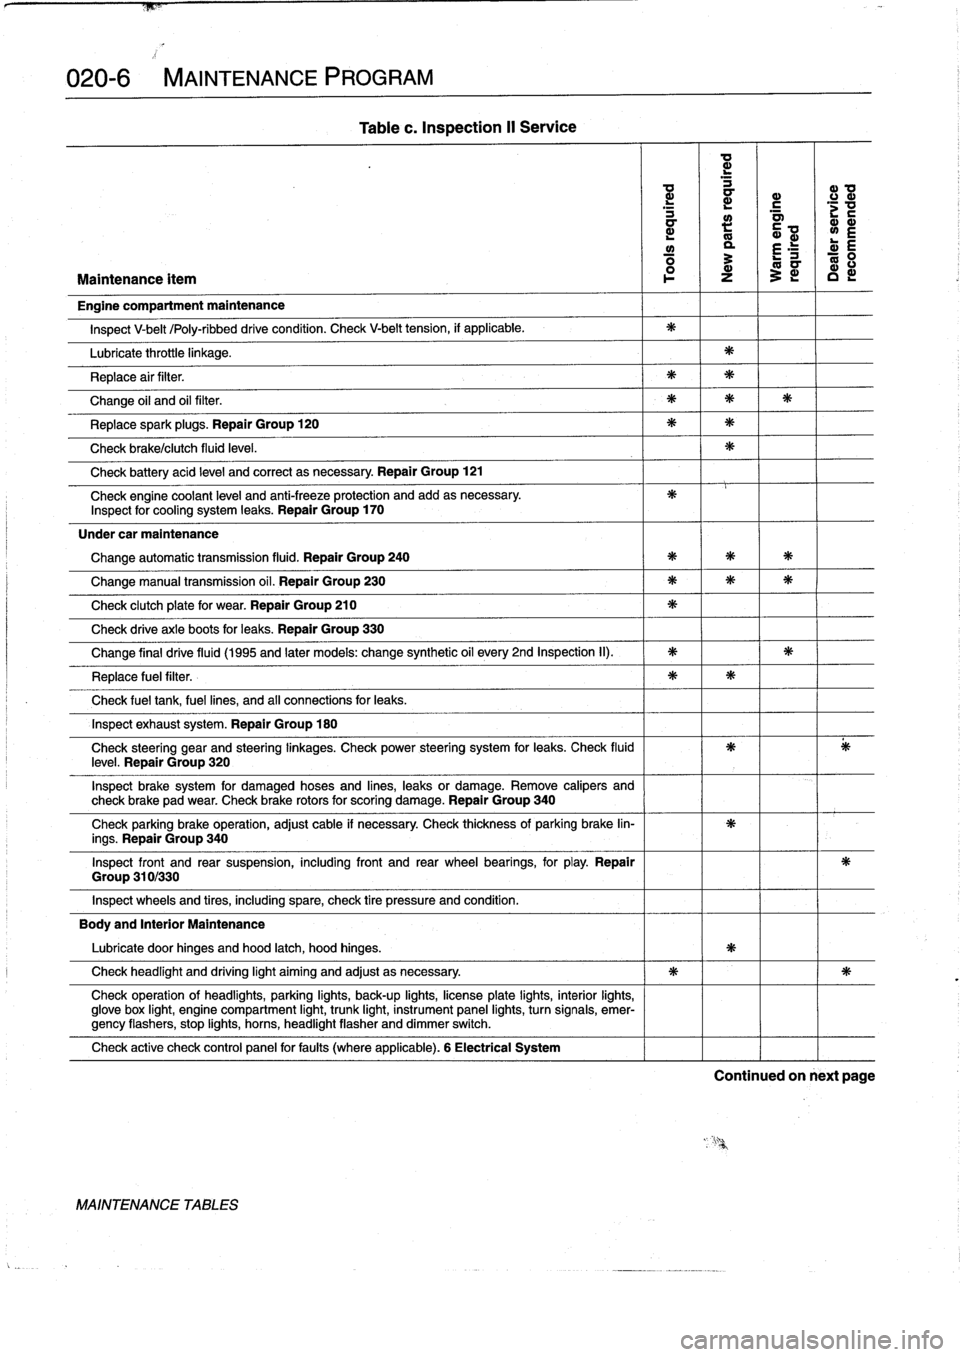
020-6
MAINTENANCE
PROGRAM
Group
310/330
Table
c
.
Inspection
II
Service
a
d
d
a
a>
0
d
a
r
.c
mm
L
m
y
L
E
ó
3
E
ó
Maintenance
ítem
l
o-
z
~
c
Engine
compartment
maintenance
Inspect
V-belt
/Poly-ribbeddrive
condition
.
Check
V-belt
tension,
if
applicable
.
Lubricate
throttle
linkage
.
Replace
air
filter
.
Change
oil
and
oil
filter
.
Replacespark
plugs
.
Repair
Group
120
Check
brake/clutch
fluid
leve¡
.
Check
battery
acid
leve¡
and
correct
asnecessary
.
Repair
Group
121
Check
engine
coolant
leve¡
and
anti-freeze
protection
and
add
asnecessary
.
Inspect
for
cooling
system
leaks
.
Repair
Group
170
Under
car
maintenance
Change
automatic
transmission
fluid
.
Repair
Group
240
Change
manual
transmission
oil
.
Repair
Group
230
Check
clutch
plate
for
wear
.
Repair
Group
210
Check
drive
axle
boots
for
leaks
.
Repair
Group
330
Change
final
drive
fluid
(1995
and
later
models
:
change
synthetic
oil
every
2nd
Inspection
II)
.
Replace
fuel
filter
.
Check
fuel
tank,
fuel
lines,
and
af
connections
for
leaks
.
Inspect
exhaust
system
.
Repair
Group
180
Check
steering
gear
and
steering
¡inkages
.
Check
power
steering
system
for
leaks
.
Check
fluidleve¡
.
Repair
Group
320
Inspect
brake
system
for
damaged
hoses
and
lines,
leaks
or
damage
.
Remove
calipers
and
check
brake
pad
wear
.
Check
brake
rotors
for
scoring
damage
.
Repair
Group
340
Check
parking
brake
operation,
adjust
cable
if
necessary
.
Check
thickness
of
parking
brake
lin-
ings
.
Repair
Group
340
Inspect
front
and
rear
suspension,
including
front
and
rear
wheel
bearings,
for
play
.
Repair
Inspect
wheels
and
tires,
including
spare,
check
tire
pressure
and
condition
.
Body
and
Interior
Maintenance
Lubricate
door
hinges
and
hood
latch,
hood
hinges
.
Check
headlight
and
driving
light
aiming
and
adjust
asnecessary
.
Check
operation
of
headlights,
parking
lights,
back-up
lights,
licenseplate
lights,
interior
lights,
glove
box
light,
engine
compartment
light,
trunk
light,
instrument
panel
lights,
turn
signals,
emer-gency
flashers,
stop
lights,
horns,
headlight
flasher
anddimmer
switch
.
Check
active
check
control
panel
forfauits
(where
applicable)
.
6
Electrical
System
MAINTENANCE
TABLES
Continued
on
next
page
Page 31 of 759
Final
Drive
Gear
Oil
BMW
recommends
using
only
a
specially
formulatedsyn-
thetic
gear
oil
that
is
available
through
an
authorized
BMW
dealer
parts
department
.
For
additional
information
on
this
¡u-
bricant
andany
other
lubricants
that
may
be
compatible,
con-
tact
an
authorized
BMW
dealer
senrice
department
.
See
331
Final
Drive
.
Brake
Fluid
Brake
fluid
absorbs
moisture
easily,
and
moisture
in
the
fluid
affects
brake
performance
and
reliability
.
This
is
why
brake
fluid
should
be
flushed
from
the
system
every
two
years
.
When
re-
placing
or
adding
brake
fluid,
use
only
new
(luid
from
previously
unopened
containers
.
Do
not
use
brake
fluid
that
has
been
bled
from
the
system,
even
ifit
is
brand
new
.
Use
only
DOT
4
brake
fluid
.
See340
Brakes
for
more
information
.
Engine
Coolant
(Anti-freeze)
BMW
recommends
coolant
that
is
a
50/50
mixture
of
distilled
water
and
phosphate/nítrate
freeanti-freeze
containing
ethyl-
ene
glycol
.
Anti-freezeraises
the
boiling
point
and
lowersthe
freezingpoint
of
the
coolant
.
It
alsocontains
additives
that
help
prevent
cooling
system
corrosion
.
Power
Steering
Fluid
The
power
steering
fluid
is
Dexron
II]®
ATF,
or
equivalent
.
The
system
is
permanently
filled
and
does
not
have
a
drain
.
Routinely
adding
ATF
is
not
required
unlessthe
system
is
leak-
i
n
g,
WARNING
-
Be
sure
to
check
the
fluid
specifications
on
the
pow-
er
steering
reservoir
to
confirm
the
fluid
type
in-
stalled
in
the
system
.
In
some
instances,
the
power
steering
system
may
be
filled
with
an
alternative
hy-
draulic
fluid
designated
CHF
7
.1
.
MAINTENANCE
PROGRAM
020-
ENGINE
OIL
SERVICE
Engine
oil
and
fiiter,
changing
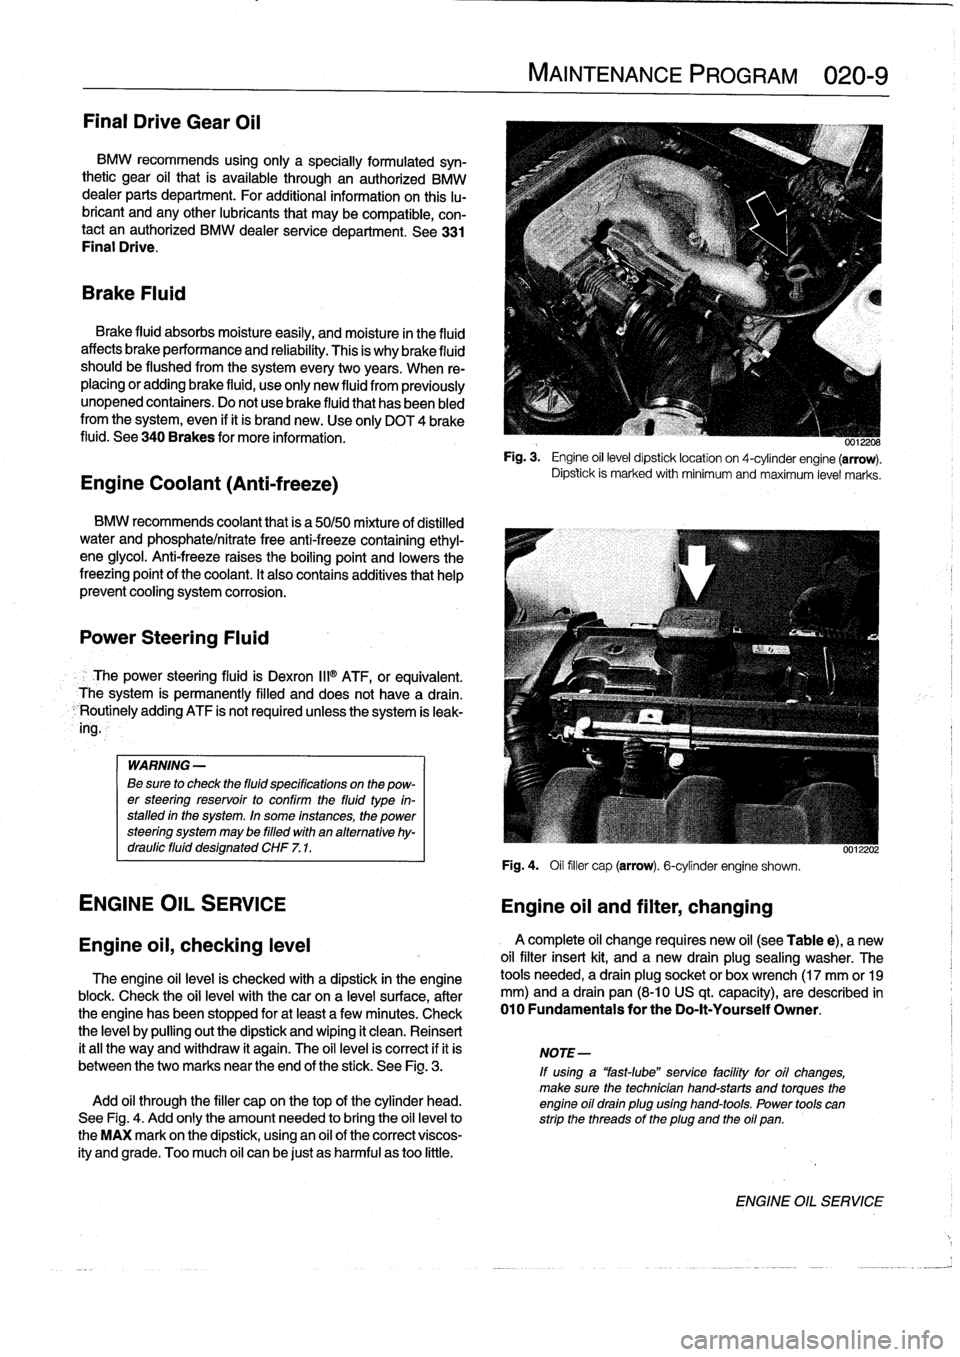
Fig
.
3
.
Engine
oil
level
dipsticklocation
on
4-cylinder
engine
(arrow)
.
Dipsfck
is
marked
with
mínimum
and
maximum
level
marks
.
Fig
.
4
.
Oil
filler
cap
(arrow)
.
6-cylinder
engine
shown
.
0012202
Engine
oii,
checking
leve¡
A
complete
oil
change
requires
new
oil
(see
Table
e),
a
new
oil
filter
insert
kit,
and
a
new
drain
plug
sealing
washer
.
The
The
engine
oil
leve]
is
checked
with
a
dipstick
in
the
engine
tools
needed,
a
drain
plug
socket
or
box
wrench
(17
mm
or19
block
.
Check
the
oii
leve¡
with
the
canon
a
level
surface,
after
mm)
and
a
drain
pan
(8-10
US
qt
.
capacity),
are
described
in
the
engine
has
been
stopped
for
atleast
a
few
minutes
.
Check
010
Fundamentals
for
the
Do-It-Yourself
Owner
.
the
leve¡
by
pulling
outthe
dipstick
and
wiping
it
clean
.
Reinsert
it
all
the
way
and
withdraw
it
again
.
The
oil
leve¡
is
correct
if
it
is
NOTE-
between
the
two
marks
near
the
end
of
the
stick
.
See
Fig
.
3
.
If
using
a
"fast-lube"
service
facility
for
oil
changes,
make
sure
the
technician
hand-starts
and
torques
the
Add
oil
through
the
filler
cap
on
thetop
of
the
cylinder
head
.
engine
oil
drain
plug
using
hand-tools
.
Power
tools
can
See
Fig
.
4
.
Add
only
the
amount
needed
to
bring
the
oil
leve¡to
strip
the
threads
of
the
plug
and
the
oil
pan
.
the
MAX
mark
on
the
dipstick,
using
an
oil
of
the
correctviscos-
ity
andgrade
.
Too
much
oil
canbe
just
as
harmful
as
too
little
.
ENGINE
OIL
SERVICE
Page 32 of 759
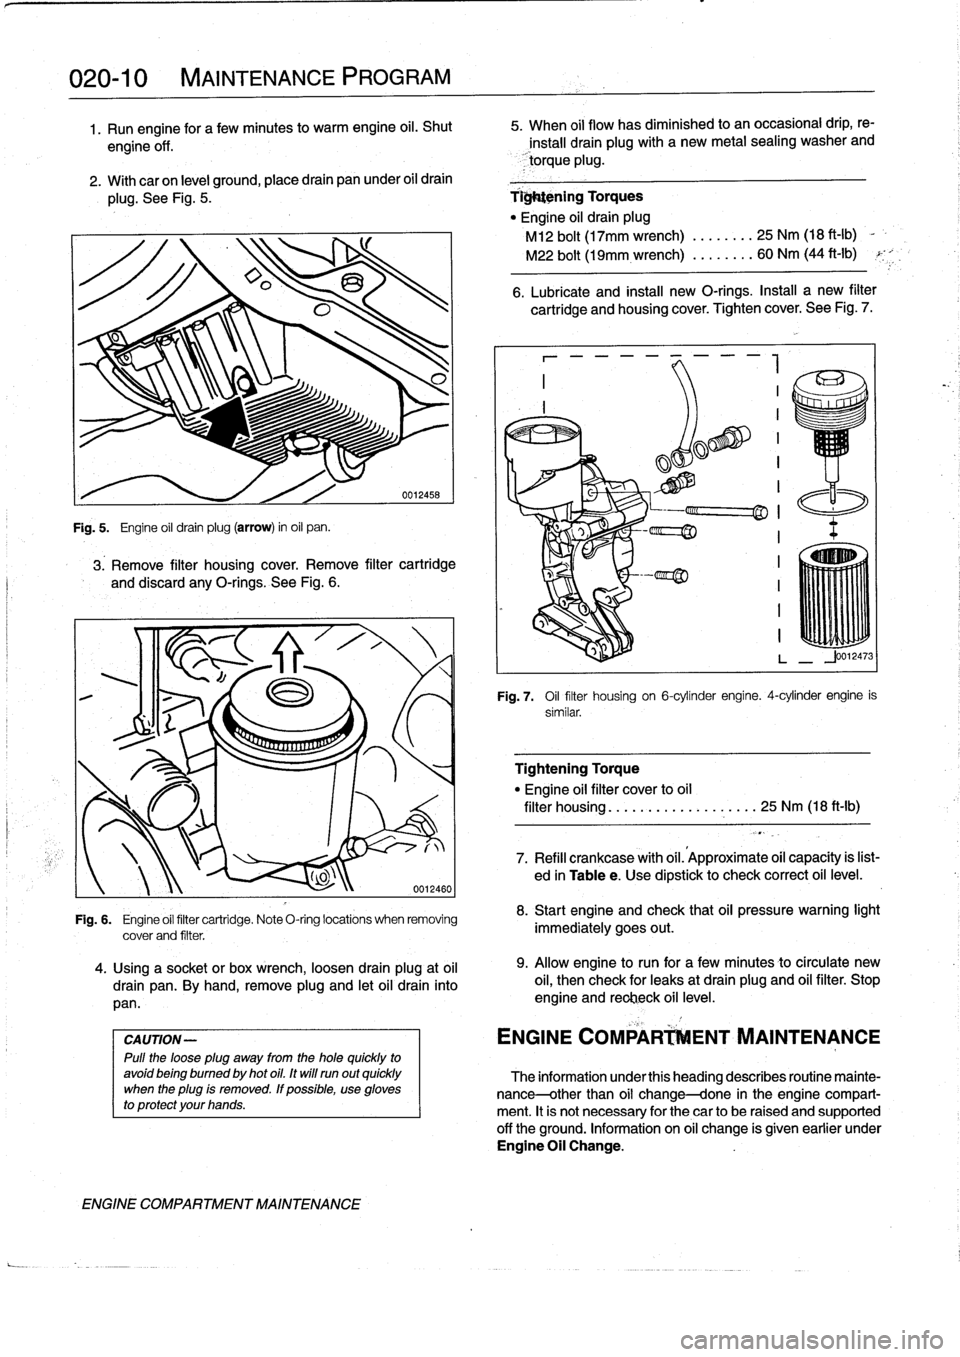
020-
1
0
MAINTENANCE
PROGRAM
1.
Run
engine
for
afewminutes
to
warm
engine
oil
.
Shut
5
.
When
oil
flow
has
diminished
to
an
occasional
drip,
re-
engine
off
.
install
drain
plugwith
a
new
metal
sealing
washerand
torque
plug
.
2
.
With
car
on
level
ground,
place
drain
pan
under
oil
drain
plug
.
See
Fig
.
5
.
Tightening
Torques
"
Engine
oil
drain
plug
M12
bolt
(17mm
wrench)
.
...
.
..
.
25
Nm
(18
ft-Ib)
-
M22
bolt
(19mm
.
wrench)
...
.
...
.
60
Nm
(44
ft-Ib)
Fig
.
5
.
Engine
oil
drain
plug(arrow)
in
oil
pan
.
3
.
Remove
filter
housingcover
.
Remove
filter
cartridge
and
discard
any
O-rings
.
See
Fig
.
6
.
CAUTION-
Pulí
the
loose
plug
away
from
the
hole
quickly
to
avoidbeing
bumed
by
hot
oil
.
It
wíll
runout
quickly
when
the
plug
ís
removed
.
If
possible,
use
gloves
to
protect
your
hands
.
ENGINE
COMPARTMENT
MAINTENANCE
0012460
Fig
.
6
.
Engine
oil
filter
cartridge
.
Note
O-ring
locations
when
removing
cover
and
filter
.
4
.
Using
a
socket
or
box
wrench,
loosen
drain
plug
at
oil
drain
pan
.
By
hand,
remove
plug
and
letoil
drain
into
pan
.
6
.
Lubricate
and
install
new
O-rings
.
Install
a
new
filter
cartridge
and
housingcover
.
Tighten
cover
.
See
Fig
.
7
.
7
«
a~
.~~
fT~
iII~IIIi~
.
Fig
.
7
.
Oil
flter
housing
on
6-cylínder
engine
.
4-cylinder
engine
is
similar
.
Tightening
Torque
"
Engine
oil
filter
cover
to
oil
filter
housing
...................
25
Nm
(18
ft-Ib)
7
.
Refill
crankcase
with
oil
.'Approximate
oil
capacity
is
list-
ed
in
Tablee
.
Use
dipstick
to
check
correct
oil
level
.
8
.
Start
engine
and
check
that
oil
pressure
warning
light
immediately
goes
out
.
9
.
Allow
engine
to
run
for
a
few
minutes
to
círculate
new
oil,
then
check
for
leaks
at
drain
plug
and
oil
filter
.
Stop
engine
and
reclieck
oil
level
.
ENGINE
COMPAR
ENT
MAINTENANCE
The
information
underthis
heading
describes
routine
mainte-
nance-other
than
oil
change-done
in
the
engine
compart-
ment
.
It
is
not
necessary
for
the
car
to
be
raised
and
supported
off
the
ground
.
Information
on
oil
change
is
given
earlier
under
Engine
Oil
Change
.
Page 36 of 759
020-
1
4
MAINTENANCE
PROGRAM
uu11989
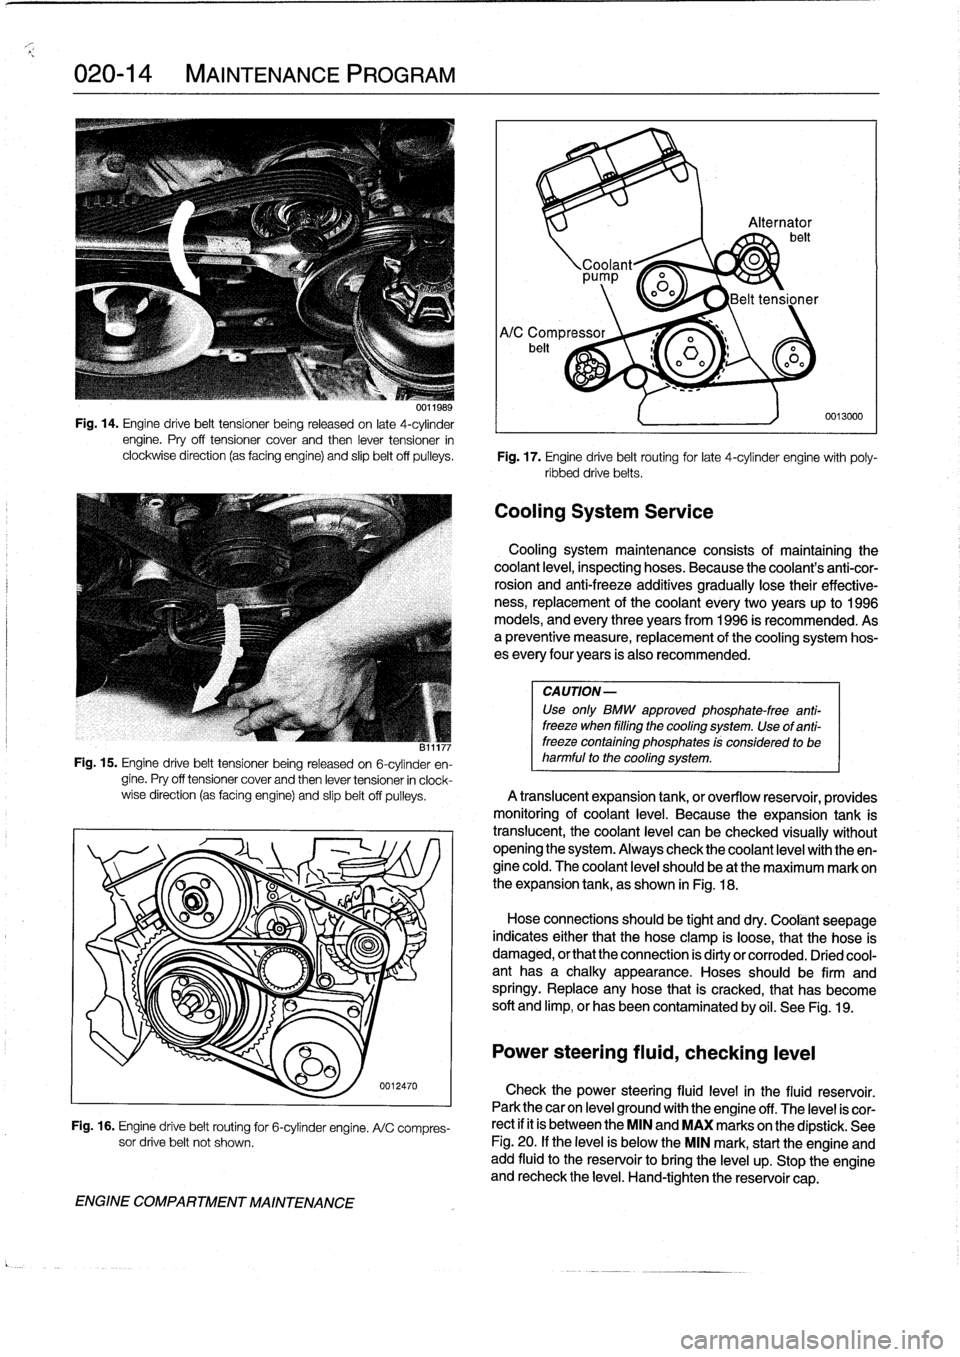
Fig
.
14
.
Engine
drive
belt
tensíoner
being
released
on
late
4-cylinder
engine
.
Pry
off
tensioner
cover
and
then
lever
tensioner
in
clockwise
direction
(as
facing
engine)
and
slip
beltoff
pulleys
.
Fig
.
17
.
Engine
drive
belt
routing
for
late
4-cylinder
engine
with
poly-
ribbed
drivebelts
.
CA
UTION-
Use
only
BMW
approved
phosphate-free
anti-
freeze
when
filling
the
cooling
system
.
Use
of
anti-
B11177
freeze
containing
phosphates
!s
considerad
to
be
Fig
.
15
.
Engine
drive
belt
tensioner
being
released
on
6-cylinder
en-
harmful
to
the
cooling
system
.
gine
.
Pry
off
tensioner
cover
and
then
lever
tensioner
in
clock-
wise
direction
(as
facing
engine)
and
slipbelt
off
pulleys
.
A
translucent
expansion
tank,
or
overflow
resenroir,
providesmonitóring
of
coolant
leve¡
.
Because
the
expansion
tank
is
translucent,
thecoolant
level
can
be
checked
visually
without
opening
the
system
.
Always
check
thecoolant
leve¡
with
theen-gine
cold
.
The
coolant
leve¡
should
be
at
the
maximum
mark
on
O
o
'~
I
the
expansion
tank,
as
shown
in
Fig
.
18
.
OO
Hose
connectionhld
b
tiht
s
soueg
an
ddry
.
Coolánt
seepage
indicates
either
that
the
hose
clamp
is
loose,
that
the
pose
is
ENGINE
COMPARTMENT
MAINTENANCE
0012470
Fig
.
16
.
Engine
drive
belt
routing
for
6-cylinder
engine
.
A/C
compres-
sor
drive
belt
not
shown
.
'92
irá
Alternator
belt
Coolant~
0
pp
o0o
Belt
tensioner
Cooling
System
Service
0013000
Cooling
system
maintenance
consists
of
maíntaining
thecoolant
leve¡,
inspecting
hoses
.
Because
the
coolant's
anti-cor-
rosion
and
anti-freeze
additives
gradually
lose
their
effective-
ness,
replacement
of
thecoolant
every
two
years
up
to
1996
models,
and
every
three
years
from
1996
is
recommended
.
Asa
preventive
measure,
replacement
of
the
cooling
system
hos-
es
every
four
years
is
also
recommended
.
damaged,
or
that
the
connection
is
dirty
or
corroded
.
Dried
cool-
ant
has
a
chalky
appearance
.
Hoses
should
be
firm
and
springy
.
Replace
any
hose
that
is
cracked,
that
has
become
soft
and
limp,
or
has
been
contaminated
by
oil
.
See
Fig
.
19
.
Power
steering
fluid,
checking
leve¡
Check
the
power
steering
fluid
level
in
the
fluid
reservoir
.
Park
thecar
on
leve¡
ground
with
the
engine
off
.
The
level
is
cor-
rect
if
it
is
between
the
MIN
and
MAX
marks
on
the
dipstick
.
See
Fig
.
20
.
If
the
leve¡
is
below
the
MIN
mark,
start
the
engine
andadd
fluid
to
the
reservoir
to
bríng
the
leve¡
up
.
Stop
the
engine
and
recheck
the
leve¡
.
Hand-tighten
the
reservoir
cap
.