cooling BMW 318i 1997 E36 Repair Manual
[x] Cancel search | Manufacturer: BMW, Model Year: 1997, Model line: 318i, Model: BMW 318i 1997 E36Pages: 759
Page 401 of 759
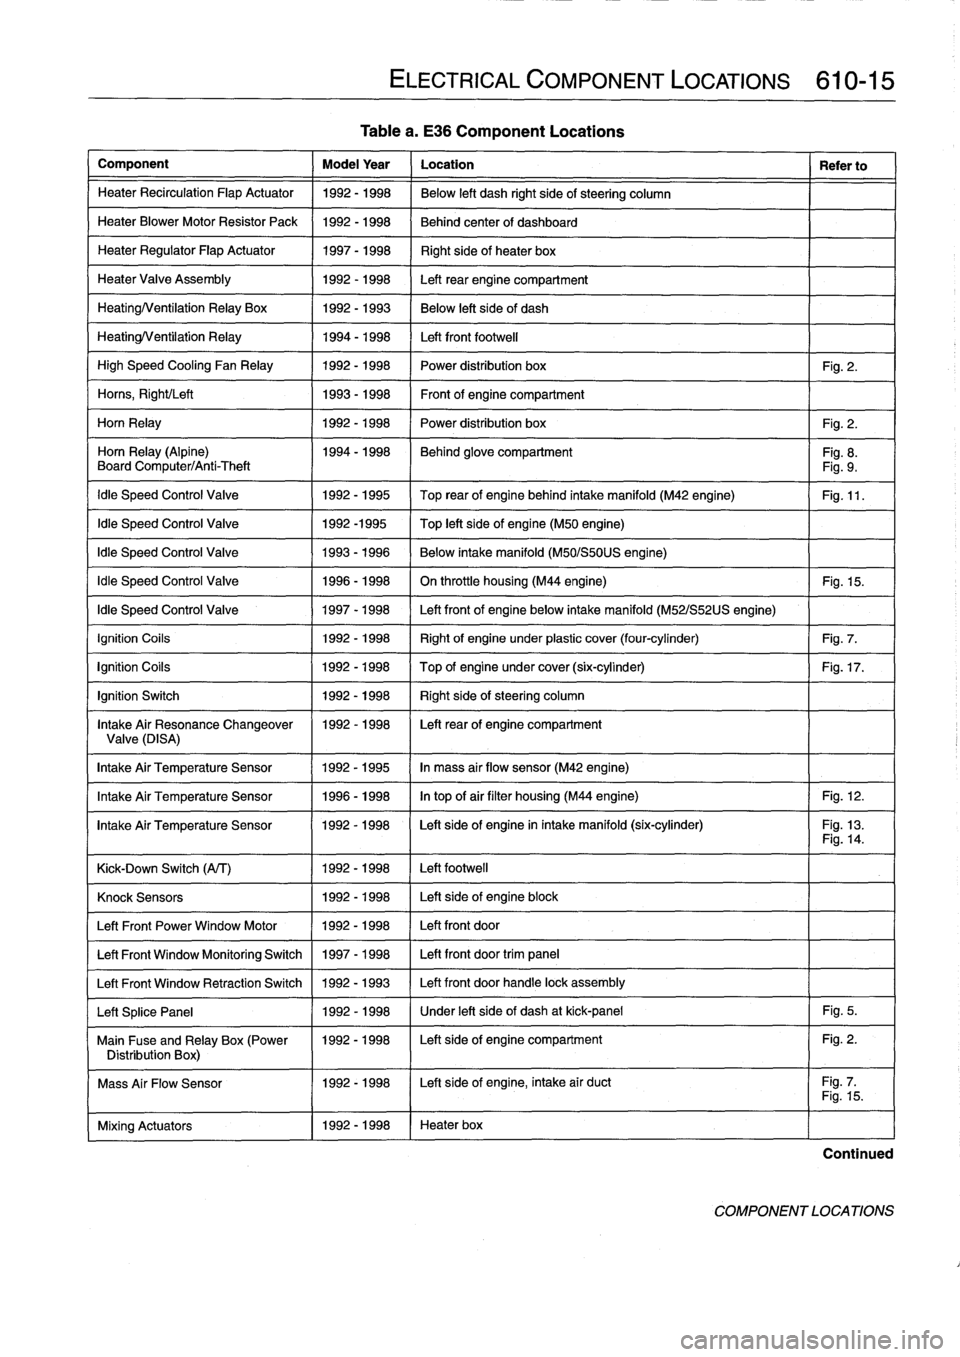
Component
Model
Year
Location
Refer
to
Heater
Recirculation
Flap
Actuator
1992-1998
Below
left
dash
right
side
of
steering
column
HeaterBlowerMotor
Resistor
Pack
1992-1998
Behind
center
of
dashboard
Heater
Regulator
FlapActuator
1997-1998
Right
side
of
heater
box
HeaterValve
Assembly
1992-1998
Left
rear
engine
compartment
HeatingNentilation
Relay
Box
1992-1993
Below
left
side
of
dash
HeatingNentilation
Relay
1994-1998
Left
front
footwell
High
Speed
Cooling
Fan
Relay
1992-1998
Power
distribution
box
Fig
.
2
.
Homs,
Right/Left
1993-1998
Front
of
engine
compartment
Horn
Relay
1992-1998
Power
distribution
box
Fig
.
2
.
Horn
Relay
(Alpine)
1994-1998
Behind
glove
compartment
Fig
.
8
.
Board
Computer/Anti-Theft
Fig
.
9
.
Idle
Speed
Control
Valve
1992-1995
Top
rearof
enginebehind
intake
manifold
(M42
engine)
Fig
.
11
.
Idle
Speed
Control
Valve
1992-1995
Top
left
side
of
engine
(M50
engine)
Idle
Speed
Control
Valve
1993-1996
Below
intake
manifold
(M50/S50US
engine)
Idle
Speed
Control
Valve
1996-1998
On
throttle
housing
(M44
engine)
Fig
.
15
.
Idle
Speed
Control
Valve
1997-1998
Left
front
of
engine
below
intake
manifold
(M52/S52US
engine)
Ignition
Coils
1992-1998
Right
of
engineunder
plastic
cover
(four-cylinder)
Fig
.
7
.
Ignition
Cofs
1992-1998
Top
of
engine
undercover
(six-cylinder)
Fig
.
17
.
Ignition
Switch
1992-1998
Right
sídeofsteering
column
Intake
Air
Resonance
Changeover
1992-1998
Leftrear
of
engine
compartment
Valve(DISA)
Intake
Air
Temperature
Sensor
1992-1995
In
mass
air
flow
sensor
(M42
engine)
Intake
Air
TemperatureSensor
1996-1998
In
top
ofair
filter
housing
(M44
engine)
Fig
.
12
.
Intake
Air
Temperature
Sensor
1992-1998
I
Left
sídeof
engine
in
intake
manifold
(six-cylinder)
-
-
I
Fig
.
13
.
Fig
.
14
.
Kick-Down
Switch
(A/T)
1
1992-1998
1
Left
footwell
Mixing
Actuators
1
1992-1998
1
Heater
box
ELECTRICAL
COMPONENT
LOCATIONS
610-15
Table
a
.
E36
Component
Locations
Knock
Sensors
1
1992-1998
1
Left
side
of
engine
block
Left
Front
Power
Window
Motor
11992-1998
/
Left
front
door
Left
Front
Window
Monitoring
Switch
1
1997-1998
1
Left
front
door
trim
panel
Left
Front
Window
Retraction
Switch
1
1992
-
1993
1
Left
front
door
handle
lock
assembly
Left
Splice
Panel
1
1992-1998
1
Under
left
side
of
dash
at
kick-panel
1
Fig
.
5
.
Main
Fuse
and
Relay
Box
(Power
1992-1998
I
Left
sideof
engine
compartment
Fig
.
2
.
Distribution
Box)
1
I
Mass
Air
Flow
Sensor
1992-1998
I
Left
side
of
engine,
intake
air
duct
Fig
.
7
.1
I
Fig
.
15
.
Continued
COMPONENT
LOCATIONS
Page 402 of 759
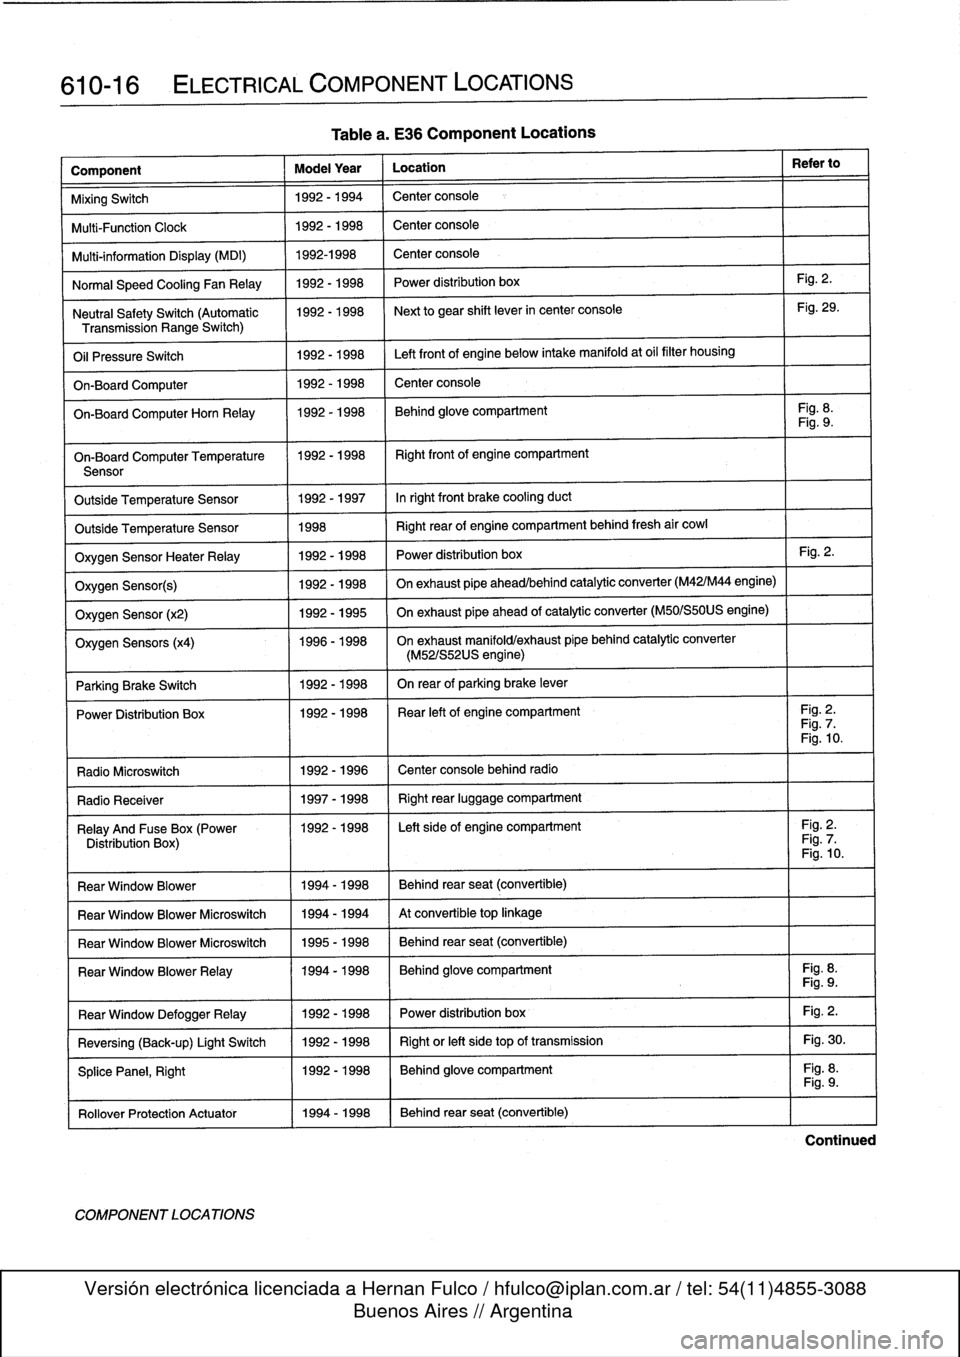
610-16
ELECTRICAL
COMPONENT
LOCATIONS
Component
Model
Year
Location
Refer
to
MixingSwitch
1992-1994
Center
console
Multi-Function
Clock
1992-1998
Center
console
Multi-information
Display
(MDI)
1992-1998
Center
console
Normal
Speed
Cooling
Fan
Relay
1992-1998
Power
distribution
box
Fig
.
2
.
Neutral
SafetySwitch
(Automatic
1992-1998
Next
to
gear
shift
lever
in
center
console
Fig
.
29
.
Transmission
Range
Switch)
Oil
Pressure
Switch
1992-1998
Left
front
of
engine
below
intake
manifold
at
oil
filter
housing
On-Board
Computer
1992-1998
Center
console
On-BoardComputerHorn
Relay
1992-1998
Behind
glove
compartment
Fig
.
8
.
Fig
.
9
.
On-Board
Computer
Temperature
11992-1998
I
Right
front
of
engine
compartment
Sensor
Outside
Temperature
Sensor
1992-1997
Inright
front
brake
cooling
duct
Outside
Temperature
Sensor
1998
Right
rear
of
engine
compartment
behind
fresh
air
cowl
Oxygen
Sensor
HeaterRelay
1992-1998
Power
distribution
box
Fig
.
2
.
Oxygen
Sensor(s)
1992-1998
On
exhaust
pipe
ahead/behind
catalytic
converter
(M42/M44
engine)
Oxygen
Sensor
(x2)
1992-1995
On
exhaust
pipe
ahead
of
catalytic
converter
(M50/S50US
engine)
Oxygen
Sensors
(x4)
1996-1998
On
exhaust
manifold/exhaust
pípe
behind
catalytic
converter
(M52/S52US
engine)
Parking
Brake
Switch
1
1992-1998
I
On
rear
of
parking
brake
lever
Power
Distribution
Box
11992-1998
I
Rear
left
of
engine
compartment
I
Fig
.
2
.
Fig
.
7
.
Fig
.
10
.
Radio
Microswitch
1992
-
1996
Center
console
behind
radio
Radio
Receíver
1
1997-1998
1
Right
rear
luggage
compartment
Relay
And
Fuse
Box
(Power
1992-1998
I
Left
side
of
engine
compartment
I
Fig
.
2
.
Distribution
Box)
Fig
.
7
.
Fig
.
10
.
Rear
Window
Blower
1994-1998
Behind
rear
seat
(convertible)
Rear
Window
Blower
Microswitch
1994-1994
At
convertible
top
linkage
Rear
Window
Blower
Microswitch
1995-1998
Behind
rear
seat
(convertible)
Rear
Window
BlowerRelay
11994-1998
Behind
glove
compartment
Fig
.
8
.
Fig
.
9
.
Fig
.
2
.
Fig
.
30
.
Fig
.
8
.
Rear
Window
DefoggerRelay
Reversing
(Back-up)
Light
Switch
SplicePanel,
Right
Rollover
Protection
Actuator
11994-1998
COMPONENT
LOCATIONS
Table
a
.
E36
Component
Locations
1992-1998
1992-1998
1992-1998
Power
distribution
box
Right
or
left
side
top
of
transmission
Behind
glove
compartment
Behind
rear
seat
(convertible)
Fig
.
9
.
Continued
Page 437 of 759
INSTRUMENT
CLUSTER
....
.
.
.
.
.
...
.
..
620-1
Instrument
cluster,
seif-testing
.
.
.......
.
..
620-1
Instrument
cluster,
removing
and
installing
...
620-1
Instrument
cluster
bulbs,
replacing
.
.
.
.
.
.
...
620-2
GENERAL
This
repair
group
covers
removal
and
installation
of
the
in-
strument
cluster
and
the
Multi-information
Display
(MID)
mod-
ule
.
Bulb
replacement
information
for
these
units
is
also
included
here
.
NOTE
-
A
quick
check
of
the
temperature
gauge
and
its
electri-
cal
circuitis
given
in
170
Radiator
and
Cooling
Sys-
tem
.
Use
this
procedure
to
diagnosea
faulty
temperature
gauge
INSTRUMENT
CLUSTER
When
servicing
the
instrument
cluster,
always
disconnect
the
negative
(-)
cable
from
the
battery
and
insulate
the
cable
end
to
prevent
accidental
re-connection
.
Instrument
cluster,
seif-testing
Severa¡
different
versions
of
the
basic
instrument
cluster
havebeen
fitted
in
E36
cars
.
It
is
possibleto
perform
an
instru-
ment
cluster
test
and
display
system
test
information
.
Some
of
the
information
displayed
by
the
instrument
cluster
during
seif-testing
is
used
for
interna¡
BMW
organizationpur-
poses,
suchasmatching
the
correct
instrument
cluster
com-
ponents
during
parts
replacement
.
Other
functions
test
the
various
instrument
modules
.
Self-test
is
also
used
to
recode
the
instrument
cluster
after
removal
.
In
later
production
vehicles
(1996
and
later)
the
test
results
canbe
downioaded,
via
the
diagnostic
plug,
byan
authorized
BMW
dealertechnician
.
1
.
Turn
ignition
to
"radio"position
.
2
.
Press
and
hold
reset
button
on
trip-odometer
untiltrip-
odometer
display
shows
numerical
codes
.
620
Instruments
4
.
Turn
off
ignition
.
Instrument
cluster,
removing
and
installing
INSTRUMENTS
620-1
GENERAL
.....
.
.
.
.
.
.
.
.
.
.........
.
....
620-1
Odometer
coding
plug,
replacing
.....
.
.
.
.
.
.
620-2
Vehicle
speed
sender,
replacing
...
.
.
.
.
.
.
.
.
620-3
MULTI-INFORMATION
DISPLAY
(MID)
.
.
.
620-4
Multi-Information
Display,
removing
and
installing
..
.
....
.
.........
620-4
3
.
With
each
subsequent
press
of
the
button,
a
different
function
is
tested
.
Some
functions
will
activate
need1e
gauges
.
1
.
Disconnect
negative
(-)
cable
from
battery
and
cover
terminal
with
insulating
material
.
CAUTION-
Prior
to
disconnectiog
the
battery,
read
the
battery
disconnection
cautionsgiven
at
the
front
of
this
manual
on
page
vi¡¡
.
2
.
Remove
airbag
unit
from
steering
wheel
.
See
721
Air-
bag
System
(SRS)
.
Store
unit
in
a
safe
place
.
WARNING
-
The
airbag
is
an
explosive
devfce
and
should
be
treated
with
extreme
caution
.
Improper
handling
of
the
airbag
could
cause
serious
injury
or
death
.
Store
the
airbag
with
the
horn
pad
facing
up
.
If
stored
facing
down,
accidental
deployment
couldpropel
it
vfolently
into
the
air,
causing
injury
.
3
.
With
front
wheels
pointed
straight
ahead,
remove
steer-
ing
wheel
.
See
320
Steering
and
Wheel
Alignment
.
4
.
Remove
instrument
cluster
retaining
screws
.
See
Fig
.
1
.
5
.
Place
a
towel
over
steering
column
.
Carefully
tilt
top
of
cluster
out
of
dash
panel
.
Unlock
and
disconnect
har-
ness
connectors
from
back
of
cluster
.
See
Fig
.
2
.
INSTRUMENT
CLUSTER
Page 449 of 759
9
.
Release
blower
motor
retaining
strap
andremove
blow-
er
motor
and
fans
fromcowl
opening
.
NOTE-
Twist
and
rotate
blowermotor
assembly
to
facilítate
re-
moval
from
opening
.
If
the
blower
motor
is
to
be
rein-stafled,
use
care
not
to
damage
fan
wheels
during
removal
.
ff
the
blower
motor
fs
to
be
replaced,
cut
offfan
wheels
at
center
to
aid
in
removal
.
10
.
Installation
is
reverse
of
removal
.
When
installing
a
re-
placement
blower
motor,
instan
motor
into
cowlarea
before
installing
fan
wheels
.
Blower
motor
test
specifi-
cations
are
listed
in
Table
a
.
NOTE
-
On
replacementblowermotors
from
BMW,
thefan
wheels
come
unattached
to
aid
in
installation
.
Locatearrow
on
blower
motor
and
instan
fan
wheels
atthis
po-
sition
.
Be
sure
color
coolng
matches
.
Retain
fan
wheels
using
the
new
clips
.
See
an
authorized
BMW
parts
de-
partment
for
the
latest
parts
information
.
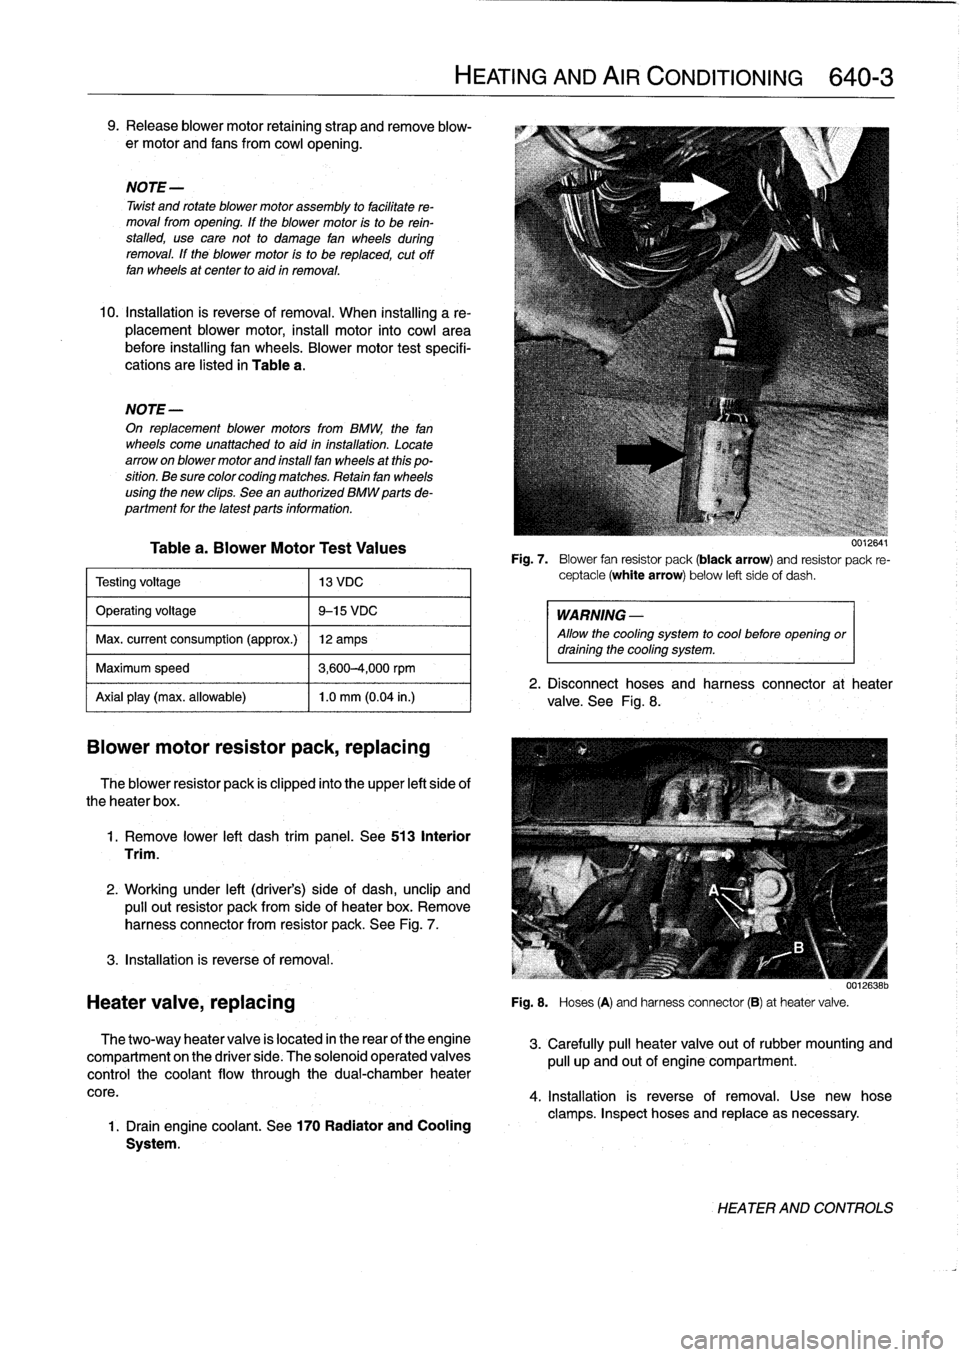
Table
a
.
Blower
Motor
Test
Values
Testingvoltage
13
VDC
Operating
voltage
9-15
VDC
Max
.
current
consumption
(approx
.)
12
amps
Maximum
speed
3,600-4,000rpm
Axialplay
(max
.
allowable)
1
.0
mm
(0
.04
in
.)
Blower
motor
resistor
pack,
replacing
The
blower
resistor
pack
is
clipped
into
the
upper
left
side
of
theheater
box
.
1
.
Remove
lower
left
dash
trim
panel
.
See513
Interior
Trim
.
2
.
Working
under
left
(driver's)
side
of
dash,
unclip
and
pulí
out
resistor
pack
from
sideof
heater
box
.
Remove
harness
connector
from
resistor
pack
.
See
Fig
.
7
.
3
.
Installation
is
reverse
of
removal
.
Heater
valve,
replacing
The
two-way
heater
valve
is
located
in
the
rear
of
the
engine
compartment
on
the
driver
side
.
The
solenoid
operated
valves
control
the
coolant
flow
through
the
dual-chamber
heater
core
.
1
.
Drain
engine
coolant
.
See
170
Radiator
and
Cooling
System
.
HEATING
AND
AIR
CONDITIONING
640-
3
uuiGO4I
Fig
.
7
.
Blower
fan
resistor
pack
(black
arrow)
and
resistor
pack
re-
ceptacle
(white
arrow)
below
left
sideof
dash
.
WARNING
-
Allow
the
cooling
system
to
cool
before
opening
ordraining
the
cooling
system
.
2
.
Disconnect
hoses
and
harness
connector
at
heater
valve
.
See
Fig
.
8
.
001[ó38b
Fig
.
S
.
Hoses
(A)
and
harnessconnector
(B)
at
heatervalve
.
3
.
Carefully
pull
heater
valve
out
of
rubber
mounting
and
pull
up
and
out
of
engine
compartment
.
4
.
Installation
is
reverse
of
removal
.
Use
new
hose
clamps
.
Inspect
hoses
and
replace
asnecessary
.
HEATER
AND
CONTROLS
Page 450 of 759
640-4
HEATING
AND
AIR
CONDITIONING
Heater
box,
removing
and
installing
The
heater
box,
located
underneath
thecenter
of
the
dash-
board,
houses
theheater
core,
the
A/C
evaporator,
and
asso-
ciated
sensors
and
actuators
.
Removal
of
theheater
box
requires
that
the
A/C
refrigerant
be
discharged
.
CAUTION-
"
Removing
the
heater
box
requires
evacuating
the
AIC
system
.
DO
NOT
attempt
this
procedure
without
proper
tools
and
training
.
"
Any
person
who
services
a
motor
vehicle
air
con-
ditioner
must,
by
law,
be
properly
trained
and
cer-
tified,
and
use
approved
refrigerant
recycling
equipment
.
Technicians
must
complete
an
EPA-
approved
recycling
course
to
be
certified
UU12639
Fig
.
10
.
Heater
core
mounting
nuts
at
left
sideof
bulkhead
(arrow)
.
1
.
Drain
engine
coolant
.
See
170
Radiator
and
Cooling
wiper
assembly
shown
removed
for
clarity
.
System
.
2
.
Remove
complete
dashboard
.
See513
Interior
Trim
.
3
.
Remove
blower
motoras
described
earlier
.
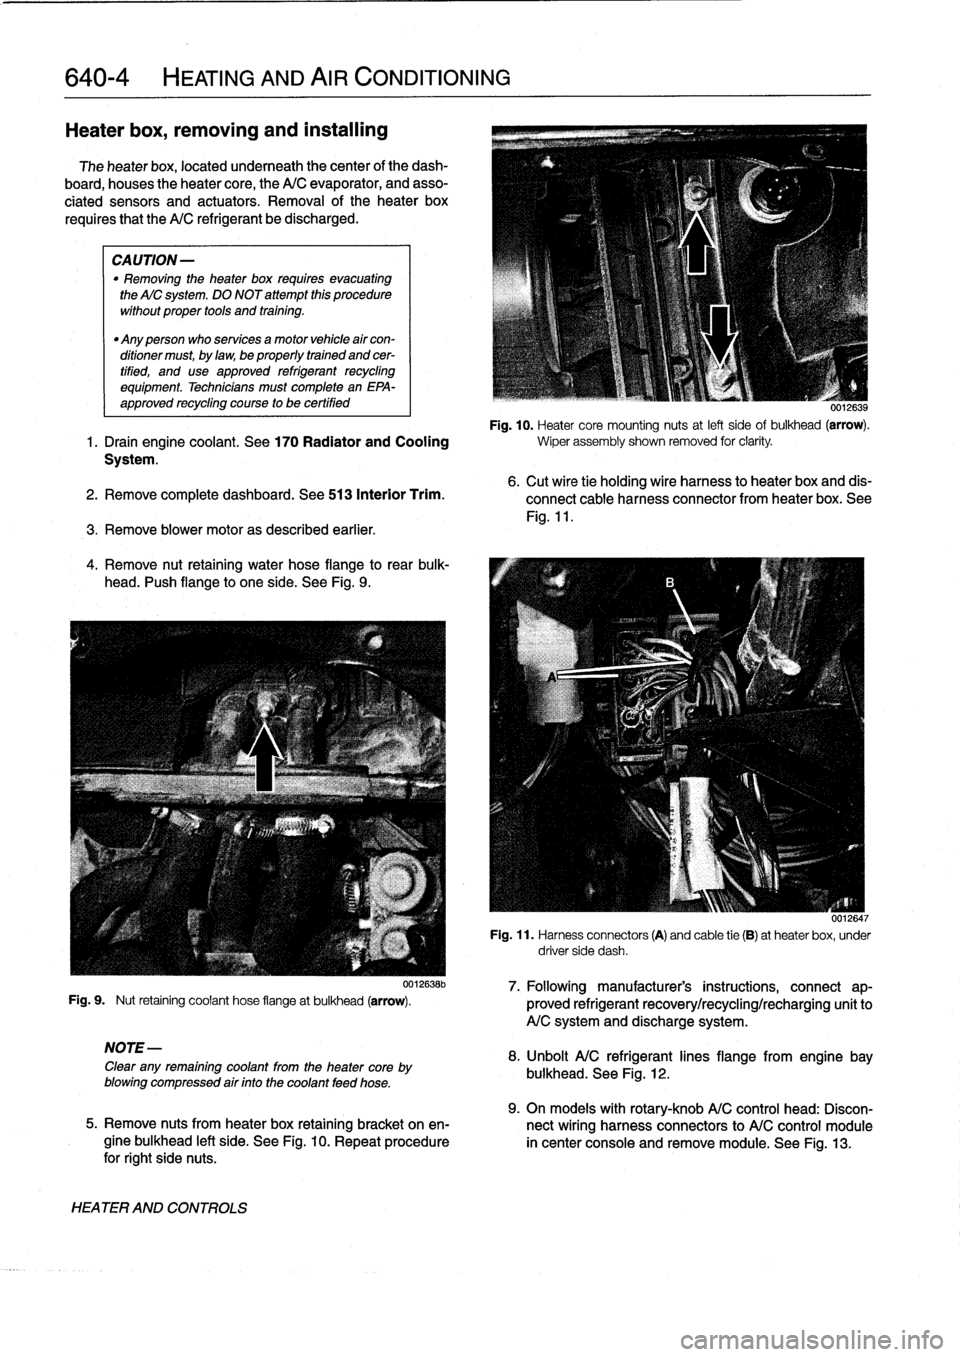
4
.
Remove
nut
retaining
water
hose
flange
to
rear
bulk-
head
.
I'ush
flange
to
one
side
.
See
Fig
.
9
.
Fig
.
9
.
Nut
retaining
coolant
hose
flangeat
bulkhead
(arrow)
.
NOTE-
Clear
any
remaining
coolant
from
the
heater
core
by
blowing
compressed
air
finto
the
coolant
feed
hose
.
HEATER
AND
CONTROLS
0012638b
6
.
Cut
wire
tie
holding
wire
harness
to
heater
box
and
dis-
connect
cable
harness
connector
from
heater
box
.
See
Fig
.
11
.
0012647
Fig
.
11
.
Harness
connectors
(A)
and
cable
tie
(B)
at
heaterbox,
under
driver
side
dash
.
7
.
Followingmanufacturer's
instructions,
connect
ap-
proved
refrigerant
recovery/recycling/recharging
unitto
A/C
system
and
discharge
system
.
8
.
Unbolt
A/C
refrigerantlines
flange
from
engine
bay
bulkhead
.
See
Fig
.
12
.
9
.
On
models
with
rotary-knob
A/C
control
head
:
Discon-
5
.
Remove
nuts
from
heater
box
retaining
bracket
on
en-
nect
wiring
harness
connectors
to
A/C
control
module
gine
bulkhead
left
side
.
See
Fig
.
10
.
Repeat
procedure
in
center
console
and
remove
module
.
See
Fig
.
13
.
for
right
side
nuts
.
Page 451 of 759
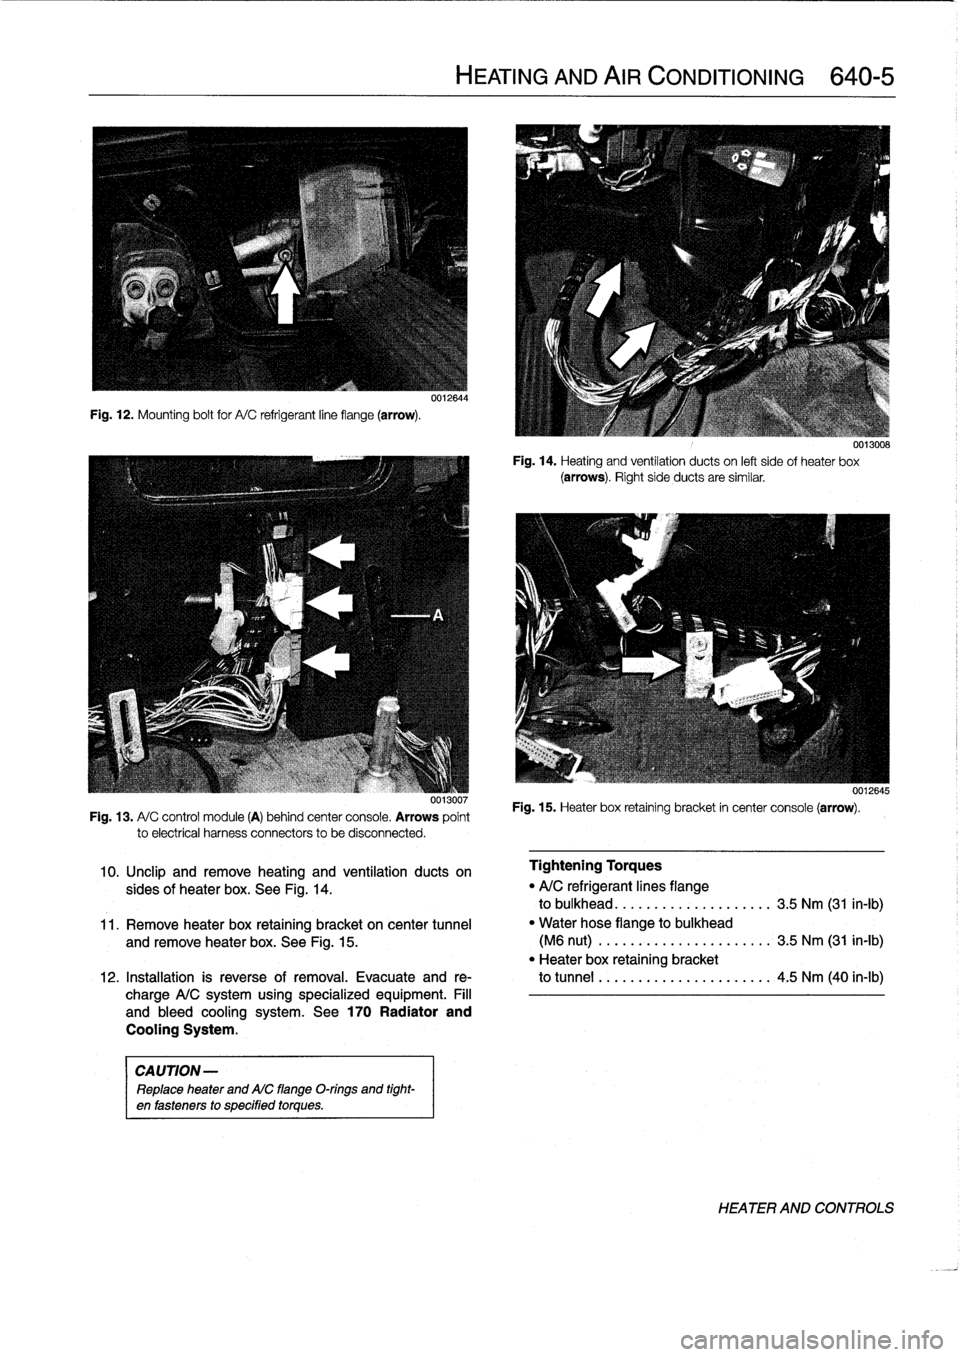
Fig
.
12
.
Mounting
bolt
for
A/C
refrigerant
line
flange
(arrow)
.
001Suu7
Fig
.
13
.
A/
C
control
module
(A)
behind
center
console
.
Arrows
pointto
electrical
harness
connectors
to
be
disconnected
.
CAUTION
-
Replace
heater
and
AIC
flange
O-rings
and
tight-
en
fasteners
to
specified
torques
.
0012644
HEATING
AND
AIR
CONDITIONING
640-5
Fig
.
14
.
Heating
and
ventilation
ducts
on
left
side
of
heater
box
(arrows)
.
Right
side
ducts
are
similar
.
Fig
.
15
.
Heater
box
retaining
bracket
in
center
console
(arrow)
.
0012645
10
.
Unclip
andremove
heating
and
ventilation
ducts
on
Tightening
Torques
sides
of
heater
box
.
See
Fig
.
14
.
"
A/C
refrigerant
lines
flange
to
bulkhead
..............
.
..
..
.
3
.5
Nm
(31
in-lb)
11
.
Remove
heater
box
retaining
bracket
on
center
tunnel
"
Water
hose
flange
to
bulkhead
and
remove
heater
box
.
See
Fig
.
15
.
(M6
nut)
................
.
...
..
3
.5
Nm
(31
in-lb)
"
Heater
box
retaining
bracket
12
.
Installation
is
reverse
of
removal
.
Evacuate
and
re-
to
tunnel
................
.
..
..
.
4
.5
Nm
(40
in-lb)
charge
A/C
system
using
specialized
equipment
.
Fill
and
bleed
cooling
system
.
See
170
Radiator
and
Cooling
System
.
HEATER
AND
CONTROLS
Page 452 of 759
640-6
HEATING
AND
AIRCONDITIONING
Heater
core,replacing
1.
Drain
engíne
coolant
.
See170
Radiator
and
Cooling
System
.
WARNING
-
Allow
the
cooling
system
to
cool
before
opening
or
drainíng
the
cooling
system
.
2
.
Remove
center
console
.
See
513
Interior
Trim
.
3
.
Remove
Multi-Information
Display
(MID)
module
.
See
620
Instruments
.
4
.
Remove
lower
dash
panel
and
knee
bolster
on
driver
side
.
See
513
Interior
Trim
.
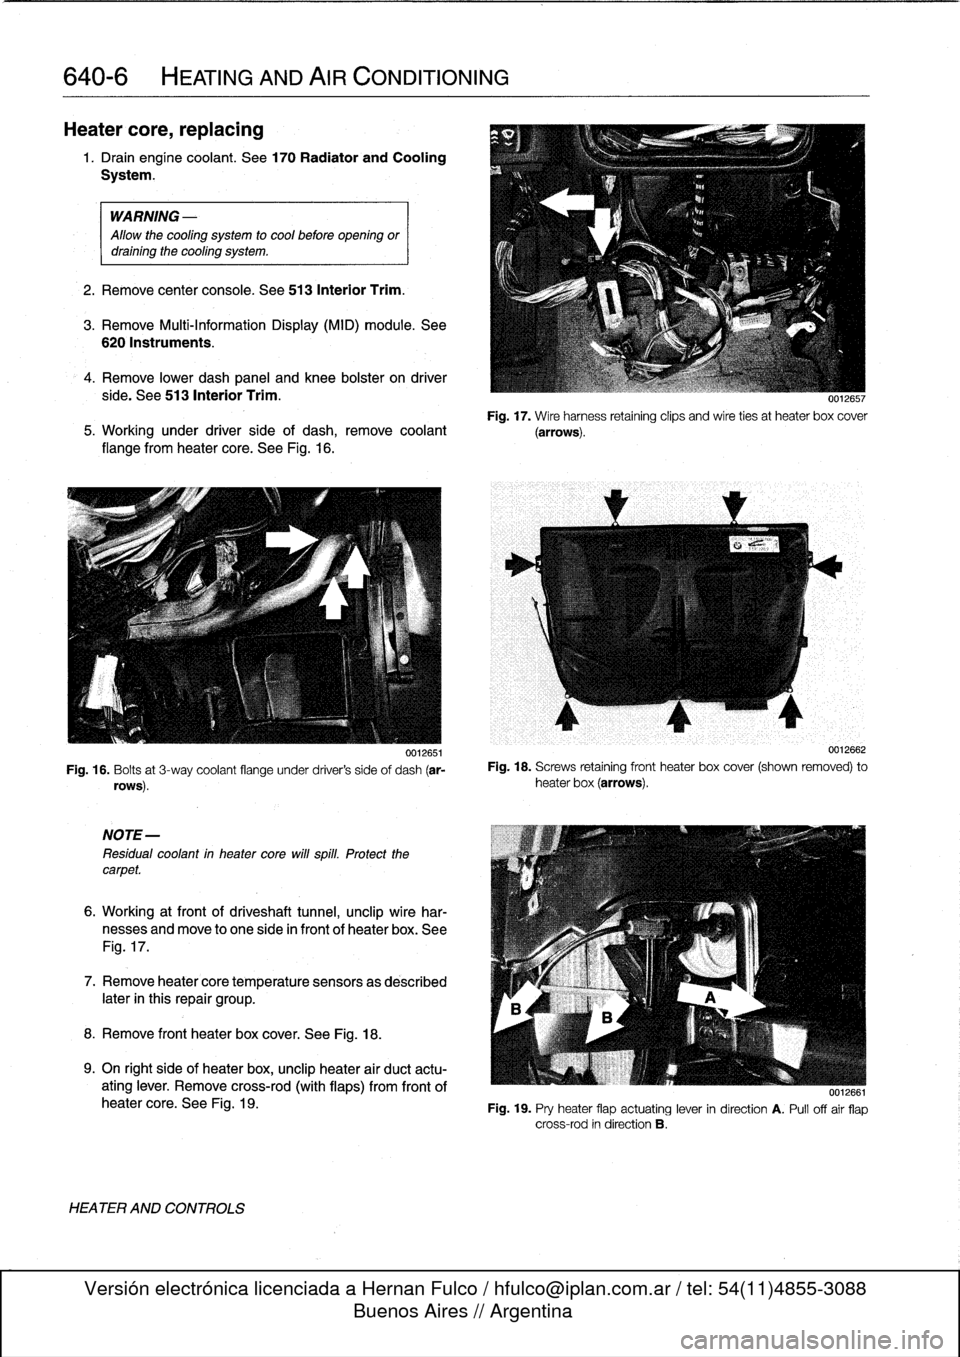
Fig
.
17
.
Wire
harness
retaining
clips
and
wire
ties
at
heater
box
cover
5
.
Working
under
driver
side
of
dash,
remove
coolant
(arrows)
.
flange
from
heater
core
.
See
Fig
.
16
.
0012651
Fig
.
16
.
Bolts
at
3-way
coolant
flange
under
driver's
side
of
dash
(ar-
rows)
.
NOTE-
Residual
coolant
in
heater
core
will
spill
.
Protect
thecarpet
.
6
.
Working
at
front
of
driveshaft
tunnel,
unclip
wire
har-
nesses
and
move
to
one
side
in
front
of
heater
box
.
See
Fig
.
17
.
7
.
Remove
heatercore
temperature
sensorsas
described
later
in
this
repair
group
.
8
.
Remove
front
heater
box
cover
.
See
Fig
.
18
.
9
.
On
right
side
of
heater
box,
unclip
heater
air
duct
actu-
ating
lever
.
Remove
cross-rod
(with
flaps)
from
frontof
heater
core
.
See
Fig
.
19
.
HEATER
AND
CONTROLS
0012662
Fig
.
18
.
Screws
retaining
front
heater
box
cover
(shown
removed)
to
heater
box
(arrows)
.
0012661
Fig
.
19
.
Pry
heater
flap
actuating
lever
in
direction
A
.
Pull
offair
flap
cross-rod
in
direction
B
.
Page 453 of 759
10
.
Pul¡
heater
core
up
and
backward,
away
from
heater
box
.
If
necessary,
remove
left
and
right
reinforcing
bracket
bolts
.
See
Fig
.
20
.
CAUTION-
Replace
coolant
flange
O-rings
and
tighten
fas-
teners
to
specified
torques
.
Tightening
Torques
1
.
Remove
center
console
.
See
513
Interior
trim
.
0012660
Fig
.
20
.
PA
heater
core
upand
towardback
of
car
.
Lower
mounting
bolts
for
steering
column
brace
and
glove
compartment
sup-
port
frame
may
have
to
be
removed
(arrows)
.
11
.
Installation
is
reverse
of
removal
.
Fill
and
bleed
cooling
system
.
See
170
Radiator
and
Cooling
System
.
"
Coolant
flange
to
heater
core
.
..
....
3
Nm
(27
in-lb)
Heater
andA/C
Control
Head
Heatercore
temperature
sensor,
replacing
The
automatic
heating
and
air
conditioning
systemuses
severa¡
sensors
to
control
interior
air
temperature
.
Use
the
fol-
lowing
procedure
and
the
data
in
Table
b
to
pinpoint
problems
with
theheater
core
sensors
.
2
.
Remove
Multi-Information
Display
(MID)
module
.
See
6201nstruments
.
HEATING
AND
AIR
CONDITIONING
640-7
0012648
Fig
.
21
.
Remove
heatercore
temperaturesensors
in
direction
shown
(arrow)
.
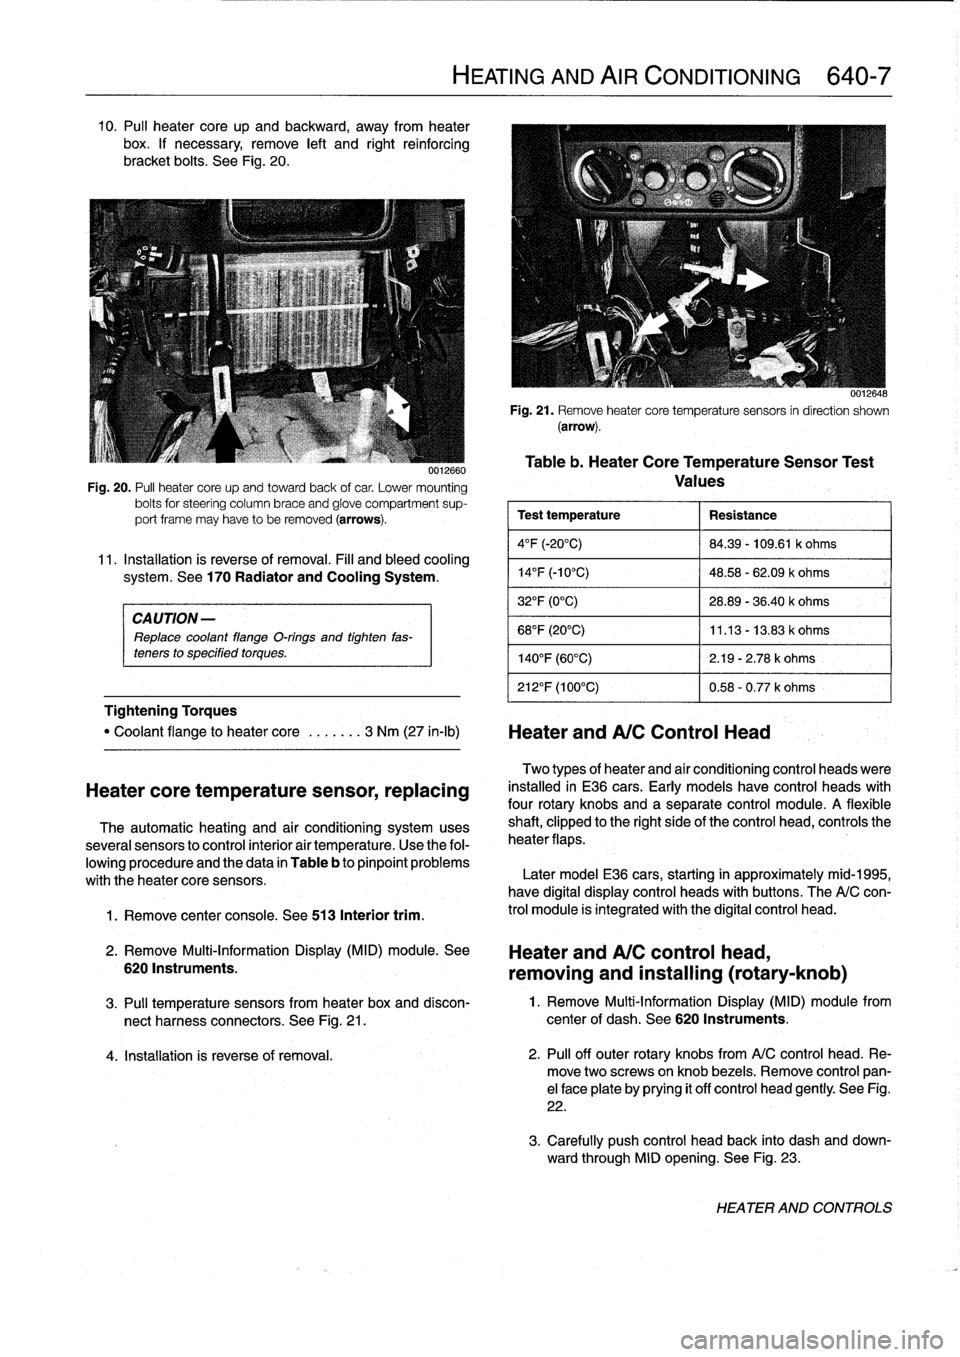
Table
b
.
Heater
CoreTemperatureSensor
Test
Values
Test
temperature
Resistance
4°F
(-20°C)
84
.39
-
109
.61
k
ohms
14
°
F
(-10°C)
48
.58
-
62
.09
k
ohms
32°F
(0°C)
28
.89
-
36
.40
k
ohms
68°F
(20°C)
11
.13
-
13
.83
k
ohms
140°F
(60°C)
2
.19
-
2
.78
k
ohms
212°F
(100°C)
0
.58
-
0
.77
k
ohms
Two
types
of
heater
and
aír
conditioning
control
heads
viere
installed
in
E36
cars
.
Early
models
have
control
heads
with
four
rotary
knobs
and
a
separate
control
module
.
A
flexible
shaft,
clipped
to
the
right
sideof
the
control
head,
controls
the
heater
flaps
.
Later
model
E36
cars,
starting
in
approximately
mid-1995,
have
digital
display
control
heads
with
buttons
.
The
A/C
con-
trol
module
is
integrated
with
the
digital
control
head
.
Heater
and
A/C
control
head,
removing
and
installing
(rotary-knob)
3
.
Pul¡
temperature
sensors
from
heater
box
and
discon-
1
.
Remove
Multi-Information
Display
(MID)
module
from
nect
harness
connectors
.
See
Fig
.
21
.
center
of
dash
.
See
620
Instruments
.
4
.
Installation
is
reverse
of
removal
.
2
.
Pul¡
off
outer
rotary
knobs
from
A/C
control
head
.
Re-
move
two
screwsonknob
bezels
.
Remove
control
pan-
el
face
plate
by
prying
it
off
control
head
gently
.
See
Fig
.
22
.
3
.
Carefully
push
control
head
back
into
dash
and
down-
ward
through
MID
opening
.
See
Fig
.
23
.
HEATER
AND
CONTROLS
Page 461 of 759
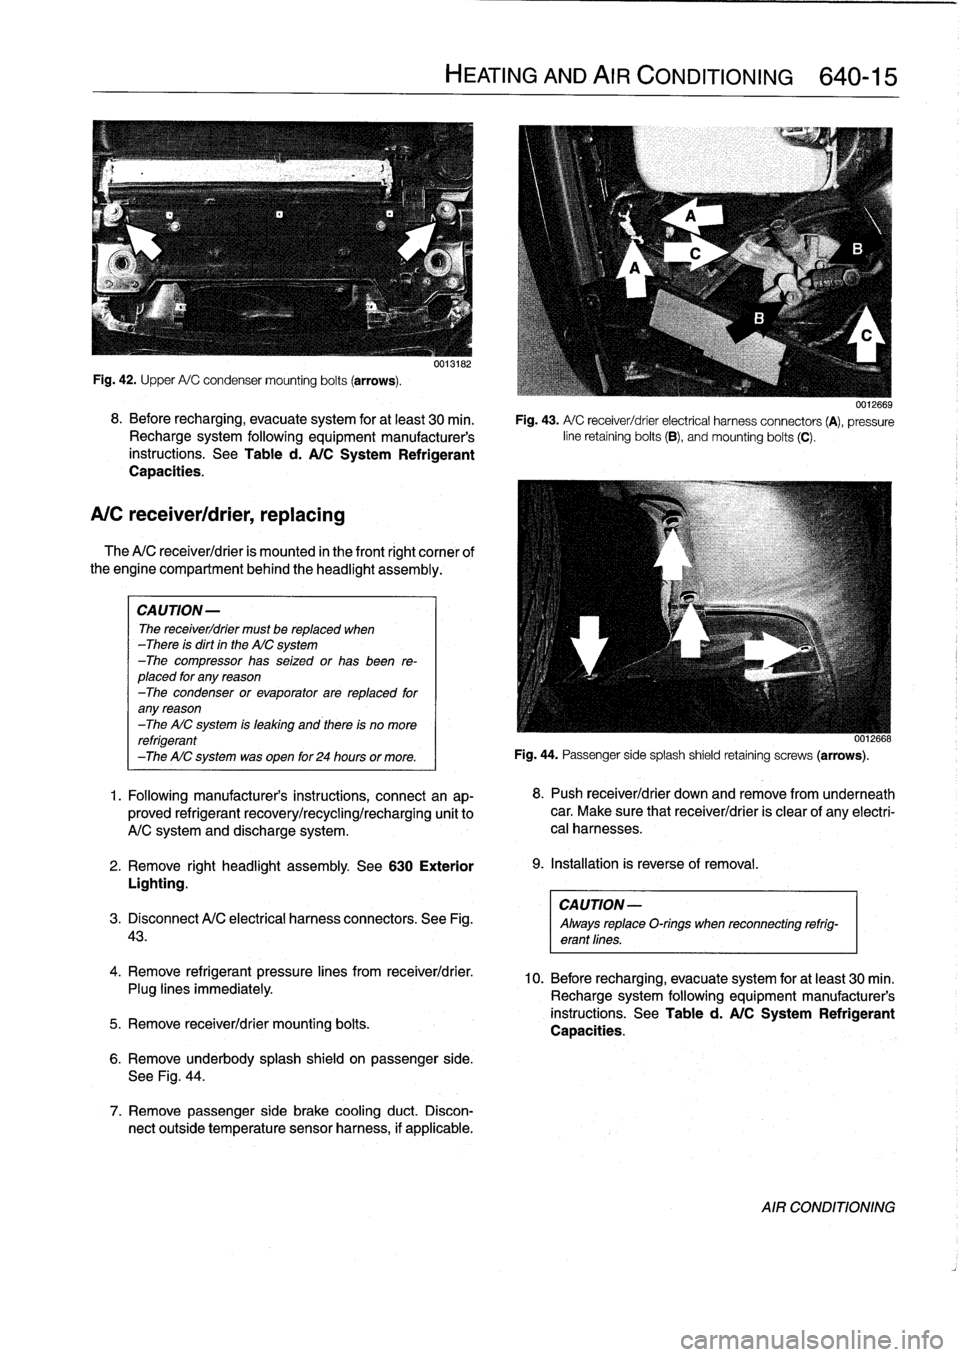
Fig
.
42
.
Upper
A/C
condensermounting
bolts
(arrows)
.
8
.
Before
recharging,
evacuate
system
for
at
least
30
min
.
Recharge
system
following
equipment
manufacturer's
instructions
.
See
Table
d
.
A/C
System
Refrigerant
Capacities
.
A/C
receiver/drier,
replacing
The
A/C
receiver/drier
is
mounted
in
the
front
right
cornee
of
the
engine
compartment
behind
the
headlight
assembly
.
CAUTION-
The
receiver/drier
must
be
replaced
when
-There
is
dirt
in
the
AIC
system
-The
compressor
has
seized
or
has
been
re-
placed
for
any
reason
-The
condenser
or
evaporator
are
replaced
for
any
reason
-The
AIC
system
is
leaking
and
there
is
no
more
refrigerant
-The
AIC
system
was
open
for
24
hours
or
more
.
1
.
Following
manufacturer's
instructions,
connectan
ap-
proved
refrigerant
recovery/recycling/recharging
unit
to
A/C
system
and
discharge
system
.
2
.
Remove
right
headlight
assembly
.
See
630
Exterior
Lighting
.
CAUTION-
3
.
Disconnect
A/C
electrical
harness
connectors
.
See
Fig
.
Always
replaceO-rings
when
reconnecting
refrig-
43
.
erant
lines
.
4
.
Remove
refrigerant
pressure
lines
from
receiver/drier
.
Plug
lines
immediately
.
5
.
Remove
receiver/drier
mounting
bolts
.
0013182
6
.
Remove
underbody
splash
shield
on
passenger
side
.
See
Fig
.
44
.
7
.
Remove
passenger
side
brake
cooling
duct
.
Discon-
nect
outside
temperature
sensor
harness,
if
applicable
.
HEATING
AND
AIR
CONDITIONING
640-15
0012669
Fig
.
43
.
A/
C
receiver/drier
electrical
harness
connectors
(A),
pressure
line
retaining
bolts
(B),
andmounting
bolts
(C)
.
0012668
Fig
.
44
.
Passenger
sidesplash
shield
retaining
screws
(arrows)
.
8
.
Push
receiver/drier
down
andremove
from
underneath
car
.
Make
sure
that
receiver/drier
is
clear
of
any
electri-
cal
harnesses
.
9
.
Installation
is
reverse
of
removal
.
10
.
Before
recharging,
evacuate
system
for
at
least
30
min
.
Recharge
system
following
equipment
manufacturer's
instructions
.
See
Table
d
.
A/C
System
Refrigerant
Capacities
.
AIR
CONDITIONING
Page 485 of 759
GENERAL
This
section
contains
wiring
diagrams
for
1992
through
1998
BMW
3
Series
models
.
WARNING
-
On
cars
equipped
with
airbags,
special
precautions
apply
to
any
electrical
testing
or
repair
.
The
airbag
unit
is
an
explosive
device
and
must
be
handled
with
exterme
care
.
Before
starting
any
work
onan
airbag
equipped
car,
refer
to
the
warnings
and
cau-
tions
in
720
Seatbelts
and
721
Airbag
Systems
(SRS)
.
NOTE-
The
"
gear
position/neutral
safetyswitch
is
also
some-
timesreferred
to
as
the
automatic
transmission
range
switch
.
"
The
EWS
11
system
is
also
sometimes
referred
to
as
the
Driveaway
Protection
System
or
the
electronic
im-
mobilization
system
.
ELECTRICAL
WIRING
DIAGRAMS
ELE-1
Electrical
Wiring
Diagrams
GENERAL
.
.
.
.
.
.
.
.
.
................
.
.
.
ELE-1
Horns
.....
.
.....
.
.
.
....
.
.
.
.
.
...
.
.
ELE-153
Instrument
Panel
.
.
.
.
.
.
..............
ELE-165
ELECTRICAL
WIRING
DIAGRAMS
...
.
.
.
ELE-2
Interior
Lights/Illumination
.............
ELE-211
ABS
..............
.
.
.
.....
.
.....
ELE-117
Lumbar
Control
.
....................
ELE-247
ABS/AST
.............
.
.
.
...
.
.
.
.....
ELE-120
On-Board
Computer
..................
ELE-173
Airbag
(Supplemental
Restraint
System)
..
ELE-140
Park
Ventilation
.
.
.
...........
.
...
.
..
ELE-139
Air
Conditioning
and
Heating
.
.
.
.
.
.
.....
ELE-129
Power
Distribution
......
.
...
.
.
.
.
.
.
.
...
.
ELE-2
Anti-Theft
(Alpine)
..........
.
.
.
...
.
...
ELE-144
Power
Door
Locks
.
.
......
.
.
.
.
.
.
.
.
.
..
ELE-226
Anti-Theft
(EWS
II)
.
........
.
.
.
...
.
...
ELE-150
Power
Mirrors
...
.
.
.
......
.
.
.
.
.
.
.
.
.
..
ELE-241
Body
Computer
Module
.....
.
.....
.
...
ELE-176
Power
Seats
......
.
......
.
.
.
...
.
.
.
..
ELE-243
Charging
System
.
.
................
.
.
.
ELE-67
Power
Sunroof
.
.
.
.
.
.
.
...............
ELE-248
Convertible
Top
.
.
.
.
................
.
.
ELE-253
Power
Windows
.
.
.
.
.
.
.....
.
.........
ELE-231
Cruise
Control
..
.
.
.
...........
.
....
.
.
ELE-112
Radio/Cassette/CD/Speakers
..........
ELE-255
Data
Link
Connector
................
.
.
.
ELE-86
Rear
Window
Defogger
...............
ELE-160
Engine
Cooling
.......
.
.......
.
....
.
.
.
ELE-94
Shift
Interlock
.
.
.
.
.
.
.
.
...............
ELE-110
Engine
Management
...
.
.......
.
....
.
.
.
ELE-70
Starting
....
.
.
.
.
.
...
.
................
ELE-63
Exterior
Lights
........
.
.
.
.
.
.
.
.
.
......
ELE-194
Transmission
Electronics
.
..............
ELE-96
Ground
Distribution
....
.
.
.
.
.
.
.
.
.
.......
ELE-35
Warning
System
:
Chimes
.............
ELE-178
Headlights/Foglights
...
.
.
.
.
.
.
.
.
.
......
ELE-180
Wiper/Washer
.
.....
.
...............
ELE-155
Heated
Seats
........
.
.
.
.
.
.
.
.
.
......
ELE-245
ELECTRICAL
COMPONENT
LOCATIONS
Relayand
fuse
positions,
ground
locations
...........
.
.
.
.
.
.
.
.
.
................
seeRepair
Group
610
CAUTION-
Always
switchthe
ignition
off
and
disconnect
the
negative
(-)
battery
cablebefore
removing
any
electrical
components
.
"
Prior
to
disconnecting
the
battery,
read
the
bat-tery
disconnection
cautions
given
at
the
front
of
this
manual
on
page
viii
.
"
Connect
and
disconnect
ignition
system
wires,
multiple
connectors
and
ignition
test
equipment
leads
only
while
ignition
is
switched
off
.
-Always
switch
a
test
meter
to
the
appropiate
func-
tion
and
range
before
making
test
connections
.
"
All-Season
Traction
(AST)
is
also
referred
to
as
ASC
or
ASC+T
.
GENERAL