maintenance BMW 318i 1997 E36 Repair Manual
[x] Cancel search | Manufacturer: BMW, Model Year: 1997, Model line: 318i, Model: BMW 318i 1997 E36Pages: 759
Page 253 of 759
NOTE-
The
traction
control
system
referred
to
as
AST
(all
sea-
son
traction)
may
also
be
referred
to
as
ASC
(Automat-
ic
Stability
Control)
and
ASC+T
(Automatic
Stability
Control+Traction)
.
The
AST
system
improves
traction
by
electronically
apply-
ing
the
rear
brakes
when
therear
drive
wheels
are
spinning
at
a
faster
rate
than
the
front
wheels
.
The
combined
ABS/AST
control
module,
operating
through
the
ABS
hydraulic
control
unit,
modulates
braking
force
at
therear
wheels
.
In
addition,
AST
uses
retarded
ignition
timing
and
an
auxil-iary
engine
throttle
plate
to
reduceengine
torque
and
maintain
vehicle
stability
.
The
auxiliary
throttle
plate
is
held
open
by
spring
pressure
.
The
AST
system
actívates
the
auxiliary
throttie
position
motor
(ADS)
to
cose
the
AST
throttle
as
needed
.
This
reduces
the
volume
of
engine
intake
air
.
Due
to
the
throttle
closing
very
rapidly
during
AST
operationthe
driver
cannot
increase
theengine
power
output
regardless
of
how
far
theaccelerator
pedal
is
pushed
to
the
floor
.
The
auxiliary
throttle
plate
is
placed
ahead
of
the
conven-
tional
throttle
plate
in
the
throttle
body
.
Traction
control
also
comes
into
operationduringdecelera-
tion
.
Decelerating
on
snowy
or
icy
road
surfaces
can
lead
to
rear
wheel
slip
.
If
a
rear
wheel
startsto
drag
or
lock
up
when
the
throttle
is
closed
rapidly
orduringdownshifting,the
AST
system
can
limit
the
problem
by
advancing
the
ignition
timing
.
A
switch
on
the
center
console
is
used
to
togglethe
AST
on
or
off
.
The
AST
system
is
designed
to
be
maintenance
free
.
There
are
no
adjustments
that
can
be
made
.
Repair
and
trouble-
shooting
of
the
AST
system
requires
special
test
equipment
andknowledgeand
should
be
performed
only
by
an
autho-
rized
BMW
dealer
.
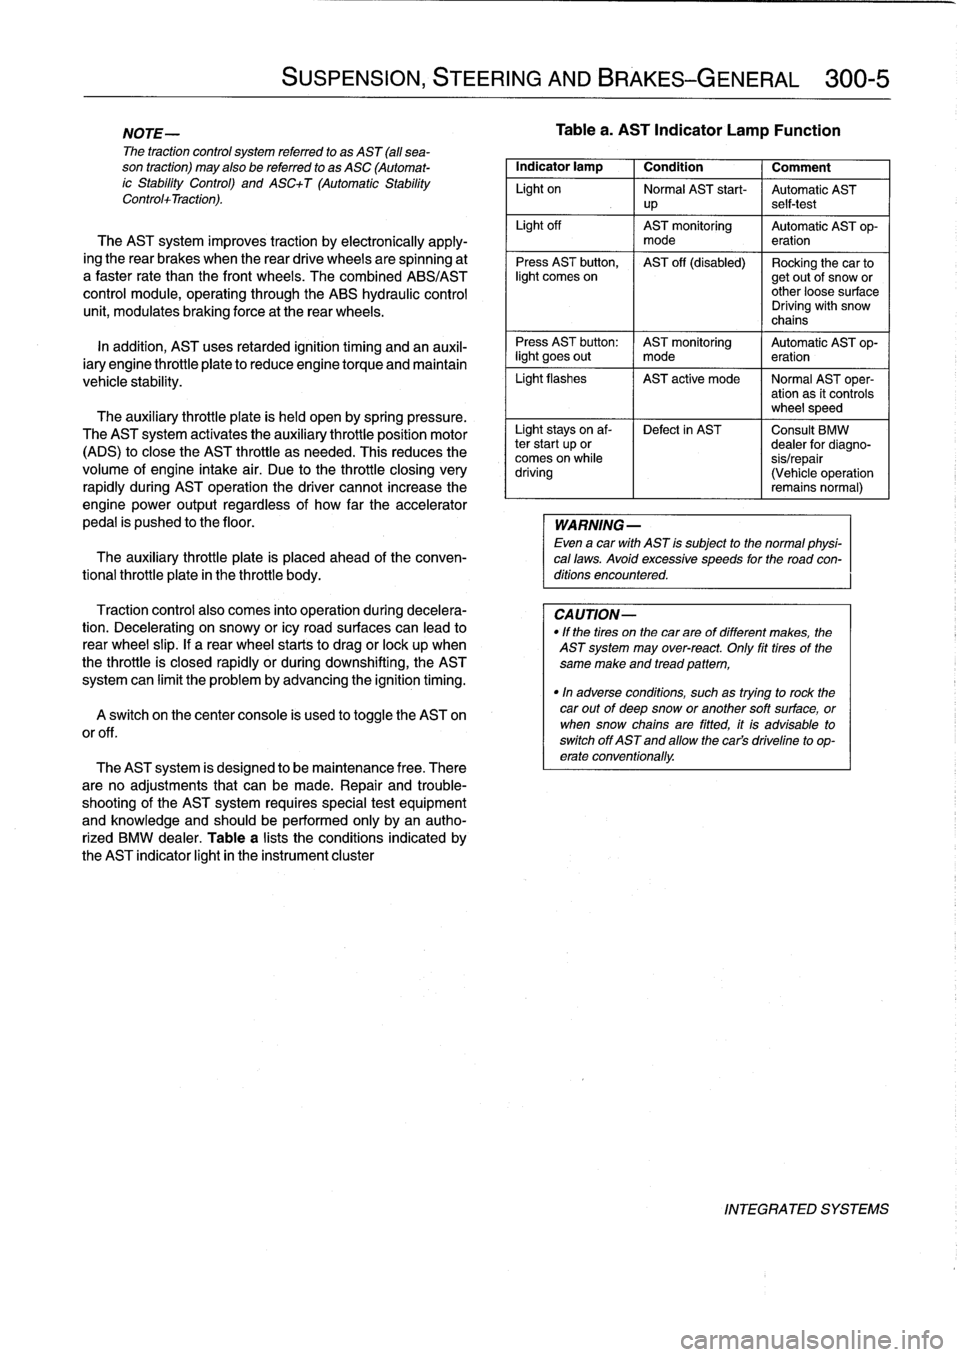
Table
a
lists
theconditions
indicated
by
the
AST
indicator
light
in
the
instrument
cluster
SUSPENSION,
STEERING
AND
BRAKES-GENERAL
300-5
Tablea
.
AST
Indicator
Lamp
Function
Indicator
lamp
1
Condition
1
Comment
Light
on
Normal
AST
start-
Automatic
AST
up
self-test
Light
off
AST
monitoring
Automatic
AST
op-
mode
eration
Press
AST
button,
AST
off
(disabled)
Rocking
the
car
tolight
comes
on
getout
of
snow
or
other
loose
surface
Driving
with
snow
chains
Press
AST
button
:
AST
monitoring
Automatic
AST
op-
light
goes
out
I
mode
eration
Light
flashes
AST
active
mode
I
Normal
AST
oper-
ation
as
it
controls
wheel
speed
Light
stays
on
af-
Defect
in
AST
Consult
BMW
ter
start
up
or
dealer
for
diagno-
comes
on
while
sis/repair
driving
(Vehicle
operation
remains
normal)
WARNING
-
Even
a
car
with
AST
is
subject
to
the
normal
physi-
cal
laws
.
Avoid
excessive
speeds
for
the
road
con-
ditions
encountered
.
CAUTION-
"
If
the
tires
on
the
carare
of
different
makes,
the
AST
system
may
over-react
.
Only
fit
tires
of
the
same
make
and
tread
pattem,
"In
adverse
conditions,
such
as
trying
to
rock
the
car
outof
deep
snow
or
another
soft
surface,
or
when
snow
chainsare
fitted,
it
is
advisable
to
switch
off
AST
and
allow
the
cars
driveline
to
op-
erate
conventionally
.
INTEGRATED
SYSTEMS
Page 264 of 759
310-
8
FRONT
SUSPENSION
FRONT
WHEEL
BEARINGS
The
front
wheel
bearings
are
permanently
sealed
and
re-
quire
no
maintenance
.
The
bearing
is
integral
with
the
wheel
hub
and
pressed
onto
the
steering
arm
stub
axle
.
Special
press
tools
are
requiredto
replace
the
front
wheel
bearings
.
Read
the
procedure
through
before
beginning
the
job
.
Front
wheel
bearing,
replacing
1
.
Raise
car
and
remove
wheel
.
WARNING-
Make
sure
that
the
car
is
firmly
supportedon
jack
stands
designed
for
the
purpose
.
Place
the
jack
stands
beneatha
structural
chassis
point
.
Do
not
place
jack
stands
under
suspension
parts
.
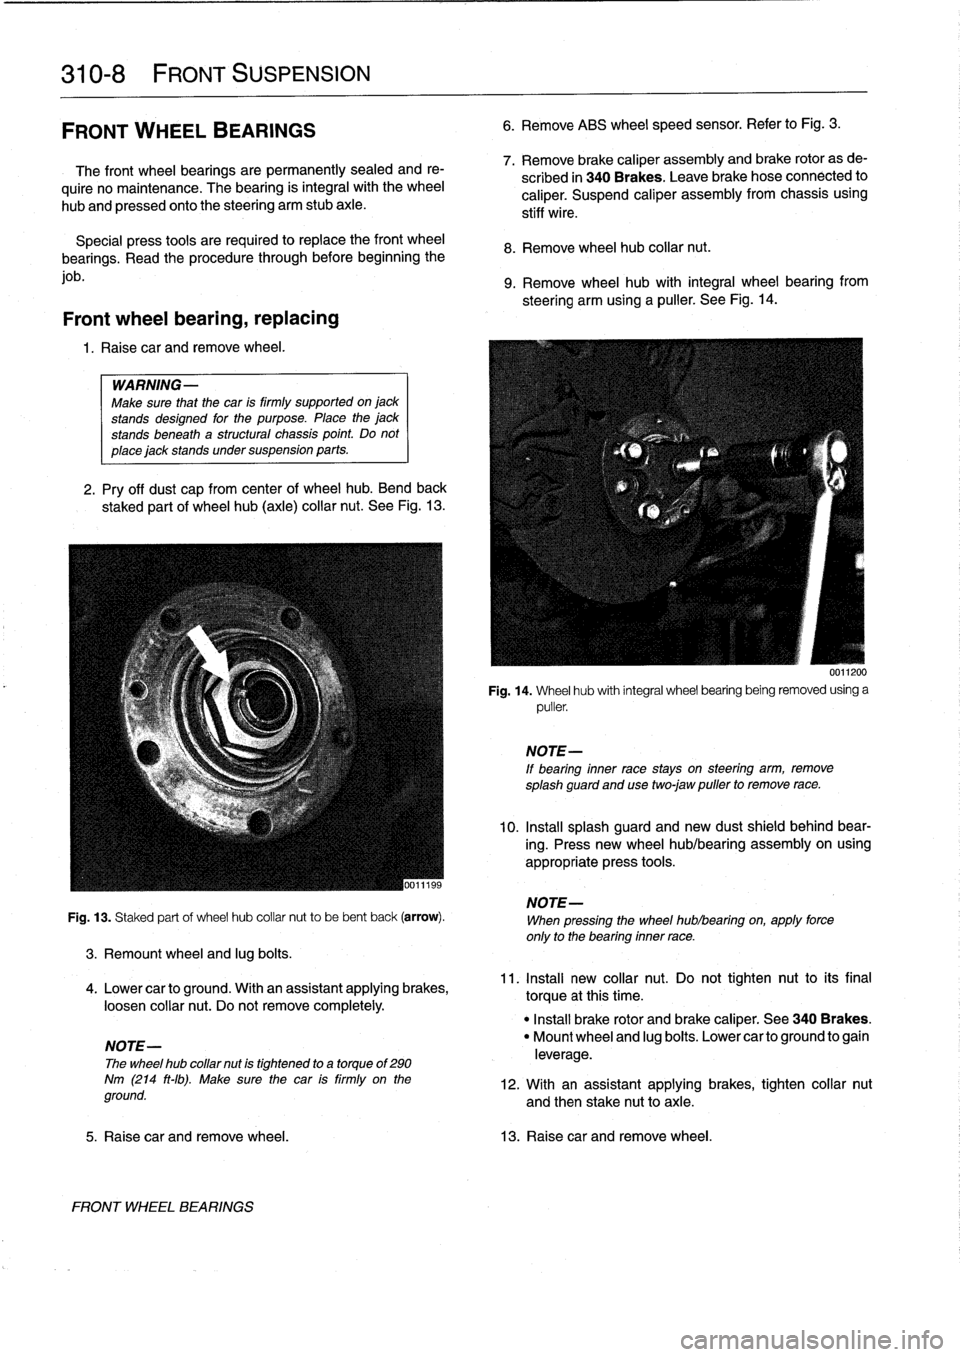
2
.
Pry
off
dust
cap
from
centerof
wheel
hub
.
Bend
back
staked
part
of
wheel
hub
(axle)
collar
nut
.
See
Fig
.
13
.
Fig
.
13
.
Staked
part
of
wheel
hub
collar
nut
to
be
bent
back
(arrow)
.
3
.
Remount
wheel
and
lug
bolts
.
4
.
Lower
canto
ground
.
With
an
assistant
applying
brakes,
loosen
collar
nut
.
Do
not
remove
completely
.
NOTE-
The
wheel
hub
collar
nut
is
tightened
to
a
torque
of
290
Nm
(214
ft-Ib)
.
Make
sure
the
car
is
firmly
on
the
ground
.
FRONT
WHEEL
BEARINGS
6
.
Remove
ABS
wheel
speed
sensor
.
Refer
to
Fig
.
3
.
7
.
Remove
brake
caliper
assembly
and
brake
rotor
as
de-
scribed
in
340
Brakes
.
Leave
brakehose
connected
to
caliper
.
Suspend
caliper
assembly
from
chassis
using
stiff
wire
.
8
.
Remove
wheel
hub
collar
nut
.
9
.
Remove
wheel
hub
with
integral
wheel
bearing
from
steering
arm
using
a
puller
.
See
Fig
.
14
.
0011200
Fig
.
14
.
Wheel
hub
with
integral
wheel
bearing
being
removed
using
a
puller
.
NOTE-
If
bearing
inner
race
stays
on
steering
arm,
remove
splash
guard
and
usetwo
jaw
puller
to
remove
race
.
10
.
Insta¡¡
splash
guard
and
new
dust
shield
behind
bear-
ing
.
Press
new
wheel
hub/bearing
assembly
on
using
appropriate
press
tools
.
NOTE-
When
pressing
the
wheel
hublbearing
on,
apply
force
only
to
the
bearing
inner
race
.
11
.
Install
new
collar
nut
.
Do
not
tighten
nut
to
its
final
torque
atthis
time
.
"
Install
brake
rotor
and
brake
caliper
.
See
340
Brakes
.
"
Mount
wheel
and
lug
boits
.
Lower
canto
ground
to
gain
leverage
.
12
.
With
an
assistant
applying
brakes,
tighten
collar
nut
and
then
stake
nut
toaxle
.
5
.
Raise
car
and
remove
wheel
.
13
.
Raisecar
and
remove
wheel
.
Page 268 of 759
320-2
STEERING
AND
WHEEL
ALIGNMENT
3
.
Carefully
remove
airbag
from
front
of
steering
wheel
.
See
721
Airbag
System
(SRS)
.
Store
airbag
unit
in
a
safe
place
.
WARNING-
Improper
handling
of
theaírbag
could
cause
seri-
ous
ínjury
.
Store
theaírbag
with
the
horn
pad
facing
up
.
If
stored
facing
down,
accidental
deployment
could
propel
it
vlolently
into
the
air,
causíng
ínjury
.
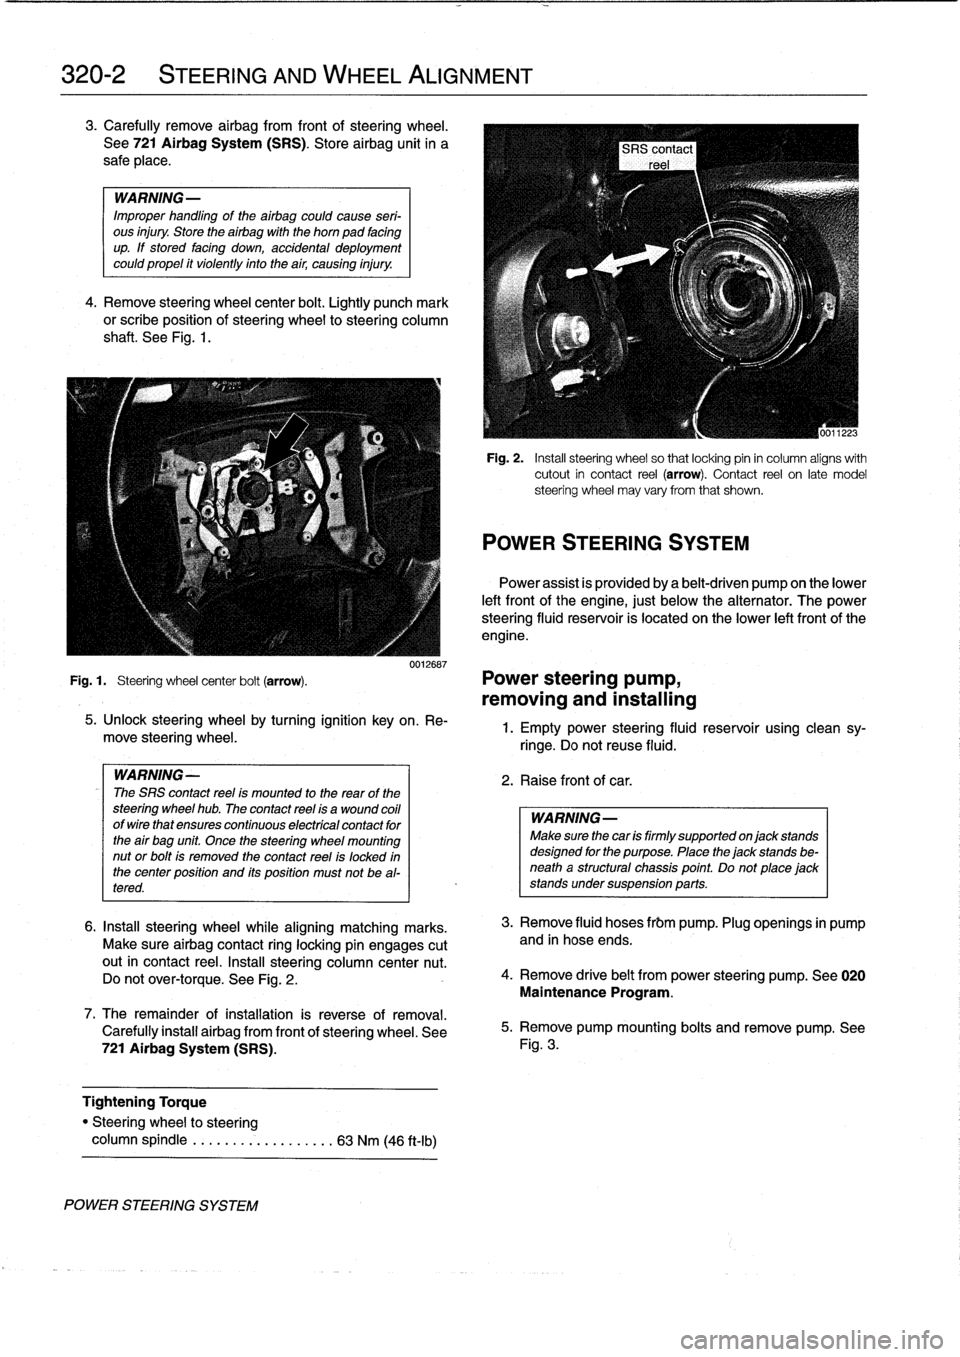
4
.
Remove
steering
wheel
center
bolt
.
Lightly
punch
mark
or
scribe
position
of
steering
wheel
to
steering
column
shaft
.
See
Fig
.
1
.
0012687
Fig
.
1
.
Steering
wheel
center
bolt
(arrow)
.
Power
steering
pump,
removing
and
installing
POWER
STEERING
SYSTEM
5
.
Unlock
steering
wheel
by
turning
ignition
key
on
.
Re-
move
steering
wheel
.
WARNING-
The
SRS
contact
reel
ís
mounted
to
the
rear
of
the
steering
wheel
hub
.
The
contact
reel
ís
a
wound
coil
ofwirethat
ensures
continuous
electrícal
contact
for
the
air
bag
unit
Once
the
steering
wheel
mounting
nut
or
bolt
is
removed
the
contact
reel
is
locked
in
the
center
position
and
its
position
must
not
be
al-
tered
.
6
.
Insta¡¡
steering
wheel
while
aligning
matching
marks
.
Make
sure
airbag
contact
ring
locking
pin
engages
cutout
in
contact
reel
.
Insta¡¡
steering
column
center
nut
.
Do
not
over-torque
.
See
Fig
.
2
.
7
.
The
remainder
ofinstallation
is
reverse
of
removal
.
Carefully
install
airbag
from
front
of
steering
wheel
.
See
721
Airbag
System
(SRS)
.
Tightening
Torque
"
Steering
wheel
to
steering
column
spindle
...
..
..
.
..........
63
Nm
(46
ft-Ib)
Fig
.
2
.
Insta¡¡
steering
wheel
so
that
locking
pin
in
column
aligns
with
cutout
in
contact
reel
(arrow)
.
Contact
reel
on
late
model
steering
wheel
may
vary
from
that
shown
.
POWER
STEERING
SYSTEM
Power
assist
is
províded
by
a
belt-driven
pump
on
the
lower
left
front
of
the
engine,
just
below
the
alternator
.
The
power
steering
fluid
resenroir
is
located
on
the
lower
left
front
of
the
engine
.
1
.
Empty
power
steering
fluid
reservoir
usingclean
sy-
ringe
.
Do
not
reuse
fluid
.
2
.
Raise
front
of
car
.
WARNING
Make
sure
thecar
is
firmly
supportedon
jack
stands
designed
for
the
purpose
.
Place
the
jack
stands
be-
neatha
structural
chassis
point
.
Do
not
place
jack
stands
undersuspension
parts
.
3
.
Remove
fluid
hoses
frbm
pump
.
Plug
openings
in
pump
and
in
hose
ends
.
4
.
Remove
drive
belt
from
power
steering
pump
.
See
020
Maintenance
Program
.
5
.
Remove
pump
mounting
bolts
and
remove
pump
.
See
Fig
.
3
.
Page 269 of 759
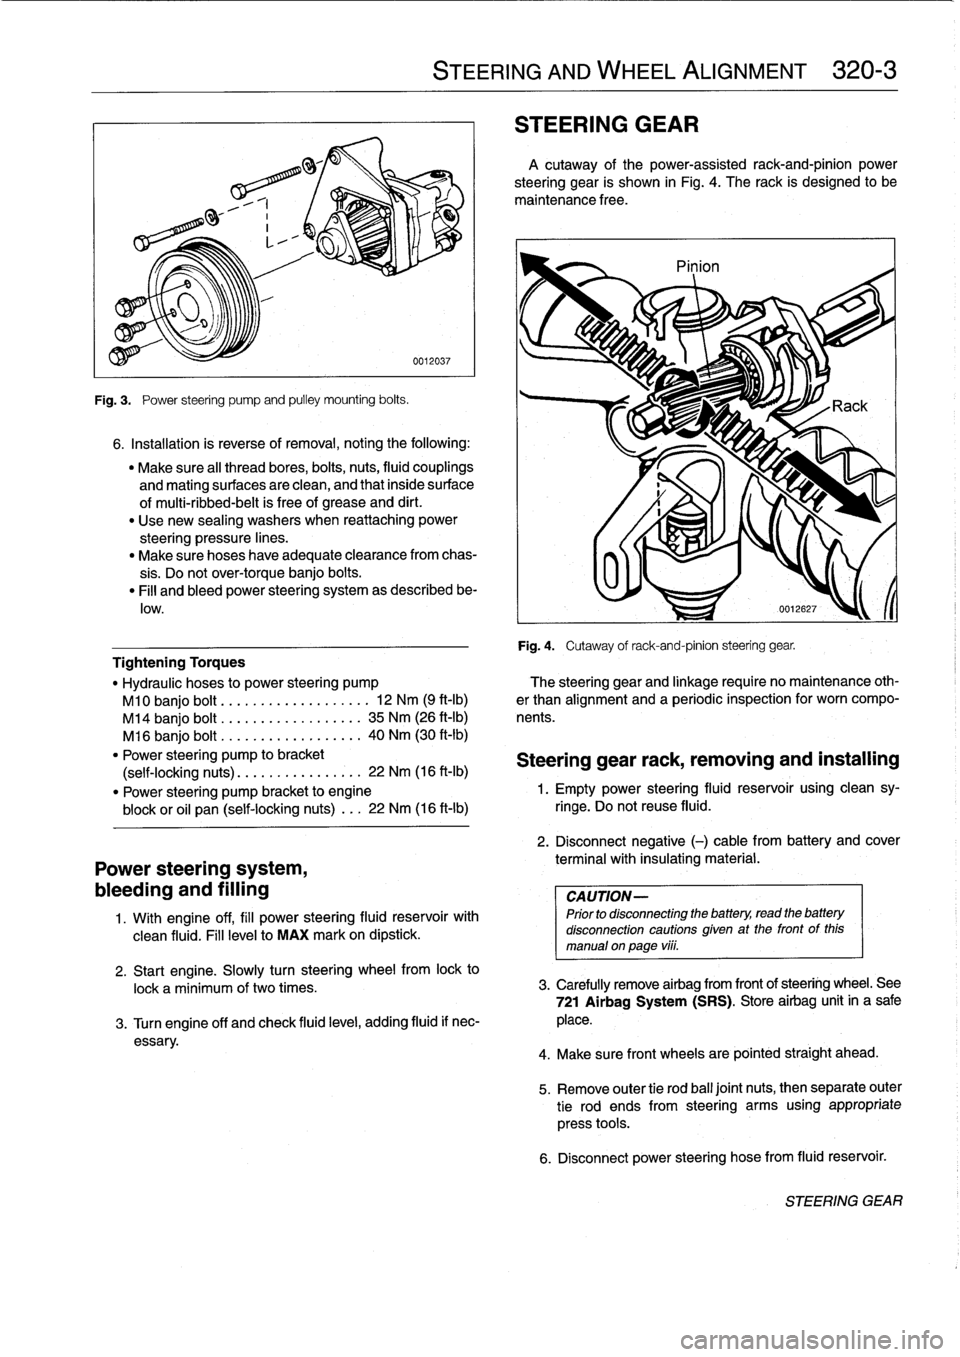
Fig
.
3
.
Power
steering
pump
and
pulley
mounting
bolts
.
6
.
Installation
is
reverse
of
removal,
noting
the
following
:
"
Make
sure
al¡
thread
bores,
bolts,
nuts,
fluid
couplings
and
mating
surfaces
are
clean,
and
that
inside
surface
of
multi-ribbed-belt
is
free
of
grease
and
dirt
.
"
Use
new
sealing
washers
when
reattaching
power
steering
pressure
lines
.
"
Make
sure
hoses
have
adequate
clearance
from
chas-
sis
.
Do
not
over-torque
banjo
bolts
.
"
Fill
and
bleed
power
steering
system
as
described
be-
low
.
Power
steering
system,
bleeding
and
filling
1
.
Wíth
engine
off,
fill
power
steering
fluid
reservoir
with
clean
fluid
.
Fill
levelto
MAX
mark
on
dipstick
.
STEERING
AND
WHEEL
ALIGNMENT
320-
3
STEERING
GEAR
A
cutaway
of
the
power-assisted
rack-and-pinion
power
steering
gear
is
shown
in
Fig
.
4
.
The
rack
is
designed
to
be
maintenance
free
.
Pinion
Fig
.
4
.
Cutaway
of
rack-and-pinion
steering
gear
.
Tightening
Torques
"
Hydraulic
hoses
to
power
steering
pump
?he
steering
gear
and
linkage
require
no
maintenance
oth-
M10
banjo
bolt
.........
..
.
...
...
.
12
Nm
(9
ft-Ib)
er
than
alignment
and
a
periodic
inspection
for
worn
compo
M14
banjo
bolt
..............
..
..
35
Nm
(26
ft-Ib)
nents
.
M16
banjo
bolt
..............
...
.
40
Nm
(30
ft-Ib)
"
Power
steering
pump
to
bracket
Steering
gear
rack,
removing
and
installing
(self-locking
nuts)
.............
..
.
22
Nm
(16
ft-Ib)
"
Power
steering
pump
bracket
to
engine
1
.
Empty
power
steering
fluid
reservoir
using
clean
sy-
block
or
oil
pan
(self-locking
nuts)
...
22
Nm
(16
ft-lb)
ringe
.
Do
not
reuse
fluid
.
2
.
Disconnect
negative
(-)
cable
from
battery
and
cover
terminal
with
insulating
material
.
CAUTION-
Prior
to
disconnectiog
the
battery,
read
the
battery
disconnection
cautions
given
at
the
front
of
this
manual
on
page
viii
.
2
.
Start
engine
.
Slowly
turn
steering
wheelfrom
lock
to
lock
a
minimum
of
two
times
.
3
.
Carefully
remove
airbag
from
frontof
steering
wheel
.
See
721
Airbag
System
(SRS)
.
Store
airbag
unit
in
a
sale
3
.
Turn
engine
off
and
check
fluid
leve¡,
adding
fluid
if
nec-
place
.
essary
.
4
.
Make
sure
front
wheelsare
pointed
straight
ahead
.
5
.
Remove
outer
tie
rod
ball
joínt
nuts,
thenseparate
outer
tie
rod
ends
from
steering
arms
using
appropriate
press
tools
.
6
.
Disconnect
power
steering
hose
from
fluid
reservoir
.
STEERING
GEAR
Page 292 of 759
340-2
BRAKES
When
troubleshooting,
keep
in
mind
that
tire
inflation,
wear
and
temperature
can
affect
braking
and
suspension
.
See310
Front
Suspension
for
more
information
on
front
suspension
parts
inspection
.
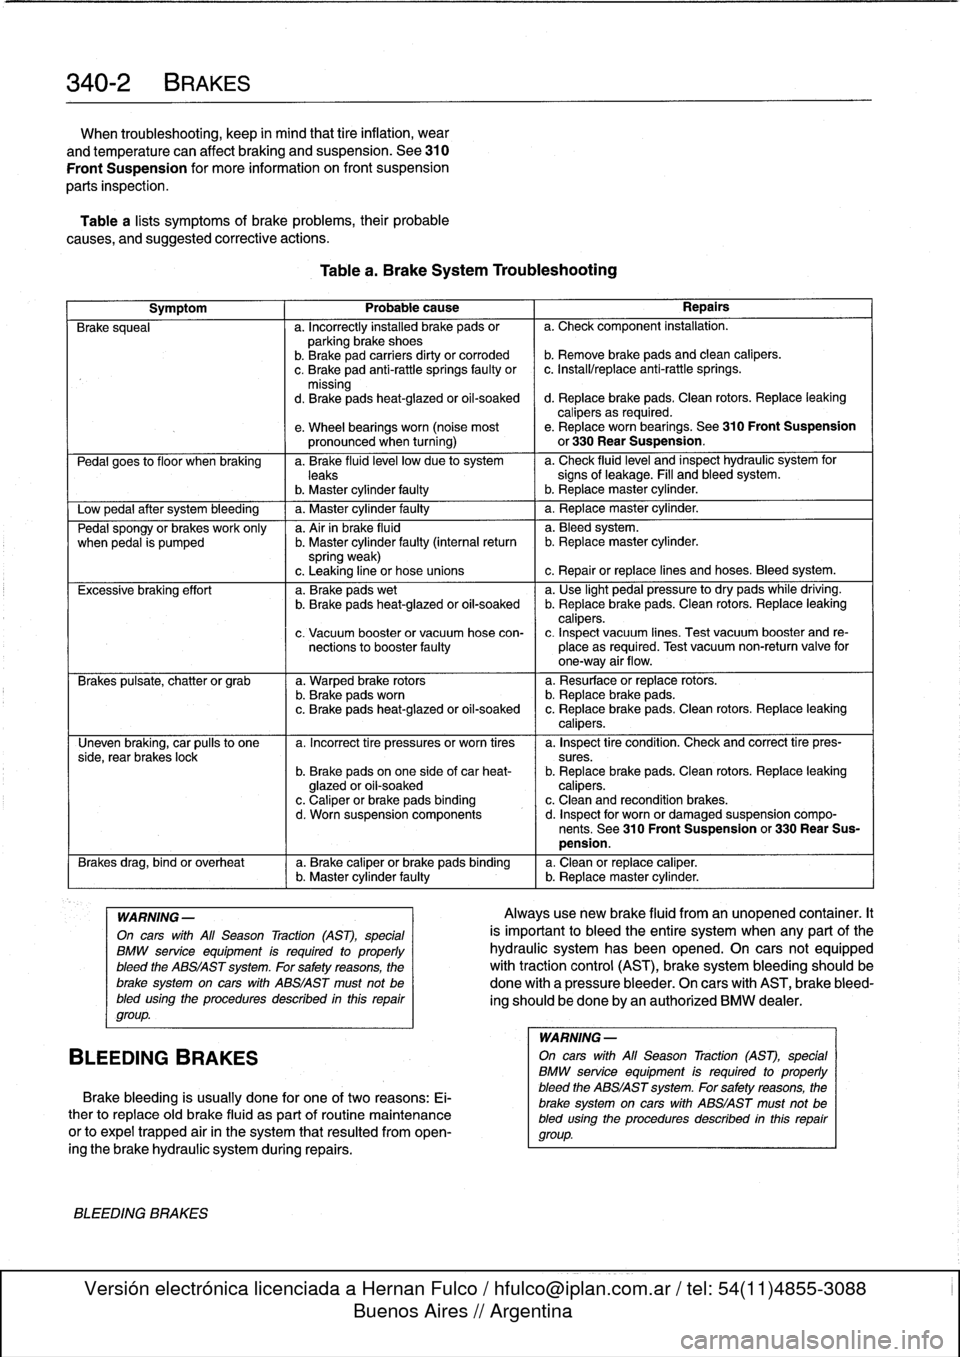
Table
a
lists
symptoms
of
brake
problems,
their
probable
causes,
and
suggested
corrective
actions
.
Table
a
.
Brake
System
Troubleshooting
Symptom
1
Probable
cause
1
Repairs
Brake
squeal
a
.
Incorrectly
installed
brake
pads
or
a
.
Check
component
installation
.
parking
brake
shoes
b
.
Brakepad
carriers
dirty
or
corroded
b
.
Remove
brake
pads
and
clean
calipers
.
c
.
Brake
pad
anti-rattle
springs
faulty
or
c
.
Install/replace
anti-rattle
springs
.
missing
d
.
Brakepads
heat-glazed
or
oil-soaked
d
.
Replace
brake
pads
.
Clean
rotors
.
Replace
leaking
calipers
as
required
.
e
.
Wheel
bearings
worn
(noise
most
e
.
Replace
worn
bearings
.
See310
Front
Suspension
pronounced
when
turning)
or
330
Rear
Suspension
.
Pedal
goes
to
f
loor
when
braking
a
.
Brake
fluid
leve¡
low
due
to
system
a
.
Check
fluidlevel
and
inspect
hydraulic
system
for
leaks
signs
of
leakage
.
Fill
and
bleed
system
.
b
.
Master
cylinder
faulty
I
b
.
Replacemaster
cylinder
.
Low
pedal
after
system
bleeding
1
a
.
Master
cylinder
faulty
1
a
.
Replace
master
cylinder
.
Pedal
spongy
or
brakes
work
only
a
.
Air
in
brake
fluid
a
.
Bleedsystem
.
when
pedal
is
pumped
b
.
Master
cylinder
faulty
(interna¡
return
b
.
Replacemaster
cylinder
.
spring
weak)
c
.
Leaking
line
or
hose
unions
c
.
Repair
or
replace
lines
and
hoses
.
Bleed
system
.
Excessive
braking
effort
a
.
Brake
pads
wet
a
.
Use
light
pedal
pressure
to
dry
pads
while
driving
.
b
.
Brake
pads
heat-glazed
oroil-soaked
b
.
Replace
brake
pads
.
Clean
rotors
.
Replace
leaking
calipers
.
c
.
Vacuum
booster
or
vacuum
hose
con-
c
.
Inspect
vacuum
lines
.
Test
vacuum
booster
and
re
nections
to
booster
faulty
place
as
required
.
Test
vacuum
non-return
valve
for
one-way
air
flow
.
Brakes
pulsate,
chatter
or
grab
a
.
Warped
brake
rotors
a
.
Resurface
or
replace
rotors
.
b
.
Brake
padsworn
b
.
Replace
brake
pads
.
c
.
Brake
pads
heat-glazed
or
oil-soaked
c
.
Replace
brake
pads
.
Clean
rotors
.
Replace
leaking
calipers
.
Uneven
braking,
car
pulís
to
one
a
.
Incorrect
tire
pressures
or
worn
tires
a
.
Inspect
tire
condition
.
Check
and
correct
tire
pres-
side,
rear
brakes
lock
sures
.
b
.
Brake
pads
on
one
side
of
car
heat-
b
.
Replace
brake
pads
.
Clean
rotors
.
Replace
leaking
glazed
or
oil-soaked
calipers
.
c
.
Caliper
or
brake
pads
binding
c
.
Clean
and
recondition
brakes
.
d
.
Worn
suspension
components
d
.
Inspect
for
worn
or
damaged
suspension
compo-
nents
.
See
310
Front
Suspension
or
330
Rear
Sus-
pension
.
Brakes
drag,
bind
or
overheat
a
.
Brake
caliper
or
brake
pads
binding
a
.
Clean
or
replace
caliper
.(
b
.
Master
cylinder
faulty
b
.
Replacemaster
cylinder
.
WARNING
-
On
cars
with
All
Season
Traction
(AST),
special
BMW
service
equipment
is
required
to
properly
bleed
the
ABS/AST
system
.
For
safety
reasons,
the
brake
system
on
carswith
ABS/AST
must
not
be
bled
using
the
procedures
described
inthis
repair
group
.
BLEEDING
BRAKES
Brake
bleeding
is
usually
done
for
one
of
two
reasons
:
Ei-
ther
to
replace
oíd
brake
fluid
as
part
of
routine
maintenance
or
to
expel
trapped
air
in
the
system
that
resulted
from
open-
ingthe
brake
hydraulic
system
during
repairs
.
BLEEDING
BRAKES
Alwaysuse
new
brake
fluid
from
an
unopened
container
.It
is
important
to
bleed
the
entire
system
when
any
part
of
the
hydraulic
system
has
been
opened
.
On
cars
not
equipped
with
traction
control
(AST),
brake
system
bleeding
should
be
done
with
a
pressure
bleeder
.
On
cars
with
AST,
brake
bleed-
ing
should
be
done
by
an
authorized
BMW
dealer
.
WARNING
-
On
cars
with
All
Season
Traction
(AST),
special
BMW
service
equipment
is
requíred
to
properly
bleed
the
ABS/AST
system
.
For
safetyreasons,
the
brake
system
on
carswith
ABS/AST
must
not
be
bled
using
the
procedures
described
inthís
repair
group
.
Page 301 of 759
7
.
Turn
on
ignition
.
Check
that
light
comes
on
as
soonas
4
.
Remove
parkíng
brake
shoes
as
described
above
.
lever
is
pulled
up
.
5
.
Disconnect
cable
from
parking
brake
actuator
and
then
8
.
Install
parking
brake
lever
boot
.
Install
road
wheel
lug
remove
parking
brakecable
from
cable
holder
on
trail-
bolts
.
ing
arm
.
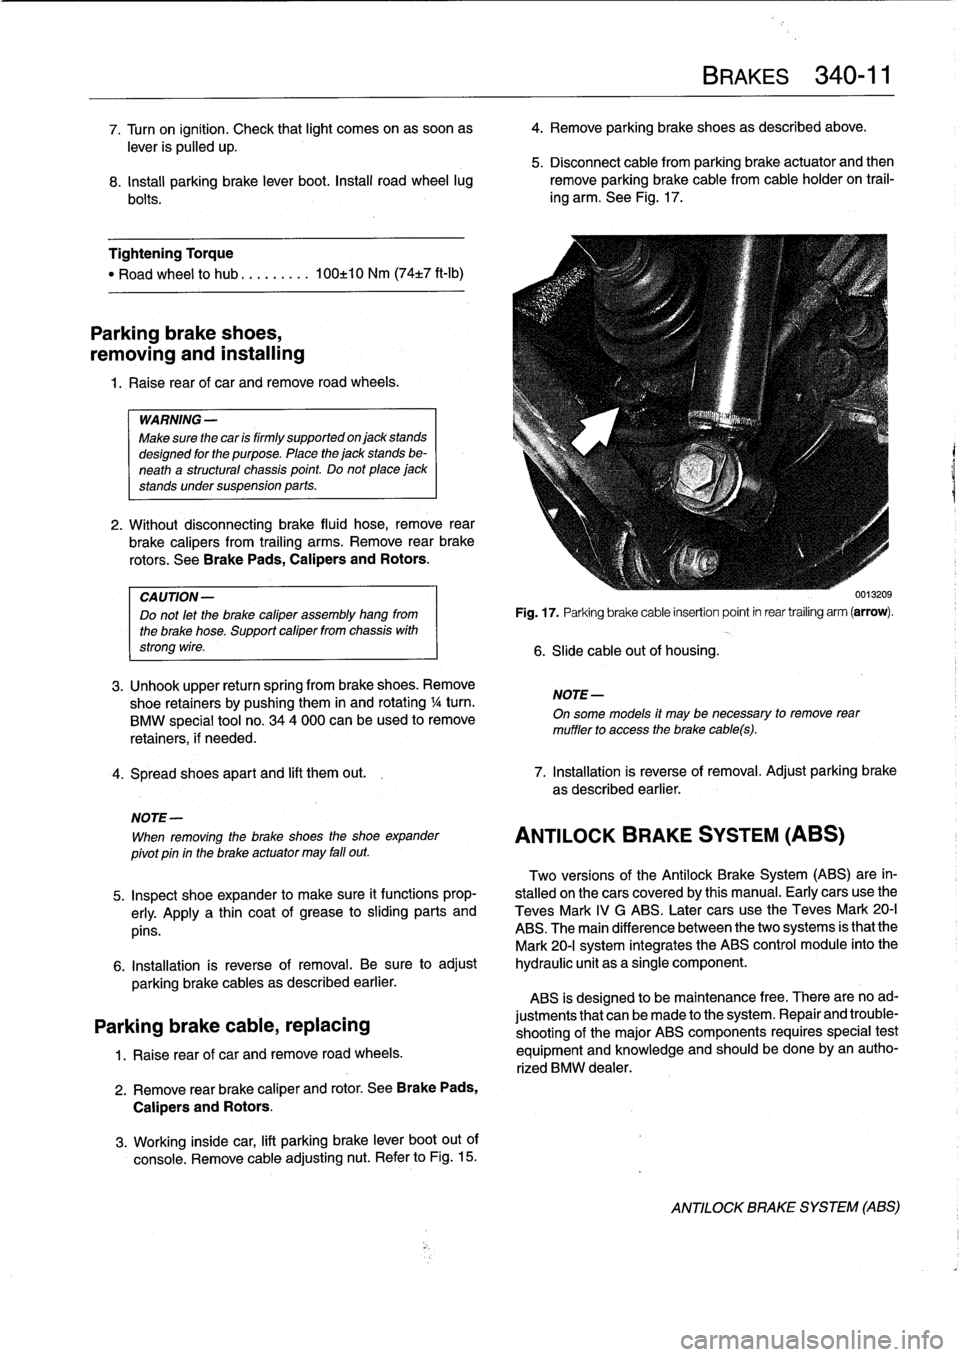
See
Fig
.
17
.
Tightening
Torque
"
Road
wheel
to
hub
.
..
......
100±10
Nm
(74±7
ft-Ib)
Parking
brake
shoes,
removing
and
installing
1.
Raise
rear
of
car
andremove
road
wheels
.
WARNING
-
Make
sure
the
car
is
firmly
supportedon
jack
stands
designed
for
the
purpose
.
Place
the
jack
stands
be-
neath
a
structural
chassis
point
.
Do
not
place
jack
stands
undersuspension
parts
.
2
.
Without
disconnecting
brake
fluid
hose,
remove
rear
brake
calipers
from
trailing
arms
.
Remove
rear
brake
rotors
.
See
Brake
Pads,
Calipers
and
Rotors
.
CA
UTION-
Do
not
let
the
brake
caliper
assembly
hang
from
the
brake
hose
.
Support
caliper
from
chassis
with
strong
wire
.
3
.
Unhook
upper
return
spring
from
brake
shoes
.
Remove
shoe
retainers
bypushing
them
in
and
rotating
1
/4turn
.
BMW
special
tool
no
.
344
000
can
beused
to
remove
retainers,
if
needed
.
4
.
Spread
shoes
apart
and
lift
them
out
.
7
.
Installation
is
reverse
of
removal
.
Adjust
parking
brake
as
described
earlier
.
NOTE-
When
removing
the
brake
shoes
the
shoe
expander
pivot
pin
in
the
brake
actuator
may
fall
out
.
Two
versions
of
the
Antilock
Brake
System
(ABS)
are
in-
5
.
Inspect
shoe
expander
to
make
sure
it
functions
prop-
stalled
onthe
cars
coveredby
this
manual
.
Early
cars
use
the
erly
.
Apply
a
thin
coat
of
grease
tosliding
parts
and
Teves
Mark
IV
G
ABS
.
Later
cars
use
the
Teves
Mark
20-I
pins
.
ABS
.
The
main
difference
between
the
two
systems
is
that
the
Mark
20-I
system
integrates
the
ABS
control
module
into
the
6
.
Installation
is
reverse
of
removal
.
Be
sure
to
adjust
hydraulic
unit
as
a
single
component
.
parking
brake
cables
as
described
earlier
.
ABS
is
designed
to
be
maintenance
free
.
There
are
noad
Parking
brake
cable,
replacing
justments
that
canbe
made
to
the
system
.
Repair
and
trouble-
shooting
of
the
major
ABS
components
requires
special
test
1
.
Raise
rear
of
car
and
remove
road
wheels
.
equipment
and
knowiedge
and
should
be
done
by
an
autho-
rized
BMW
dealer
.
2
.
Remove
rear
brake
caliper
and
rotor
.
See
Brake
Pads,
Calipers
and
Rotors
.
3
.
Working
inside
car,
lift
parking
brake
lever
boot
out
of
console
.
Remove
cable
adjusting
nut
.
Refer
to
Fig
.
15
.
Fig
.
17
.
Parking
brake
cable
insertion
point
in
rear
trailing
arm
(arrow)
.
6
.
Slide
cable
out
of
housing
.
NOTE
-
BRAKES
340-
1
1
On
some
models
it
may
be
necessary
to
remove
rear
muffler
to
access
the
brake
cabes)
.
ANTILOCK
BRAKE
SYSTEM
(ABS)
0013209
ANTILOCK
BRAKE
SYSTEM
(ABS)
Page 458 of 759
640-12
HEATING
AND
AIR
CONDITIONING
A/C
Compressor,
replacing
1
.
Followingmanufacturer's
instructions,
connectanap-
proved
refrigerant
recovery/recycling/recharging
unit
to
A/C
system
and
discharge
system
.
WARNING
-
Do
notdischarge%harge
the
AIC
system
without
proper
equipment
and
training
.
Damage
to
the
vehi-
cle
and
personal
injury
may
result
.
2
.
Remove
splash
shield
fromunder
engine
.
3
.
Mark
A/C
drive
belt
with
direction
ofrotation
.
Remove
A/C
belt
tensioner
trim
cap
.
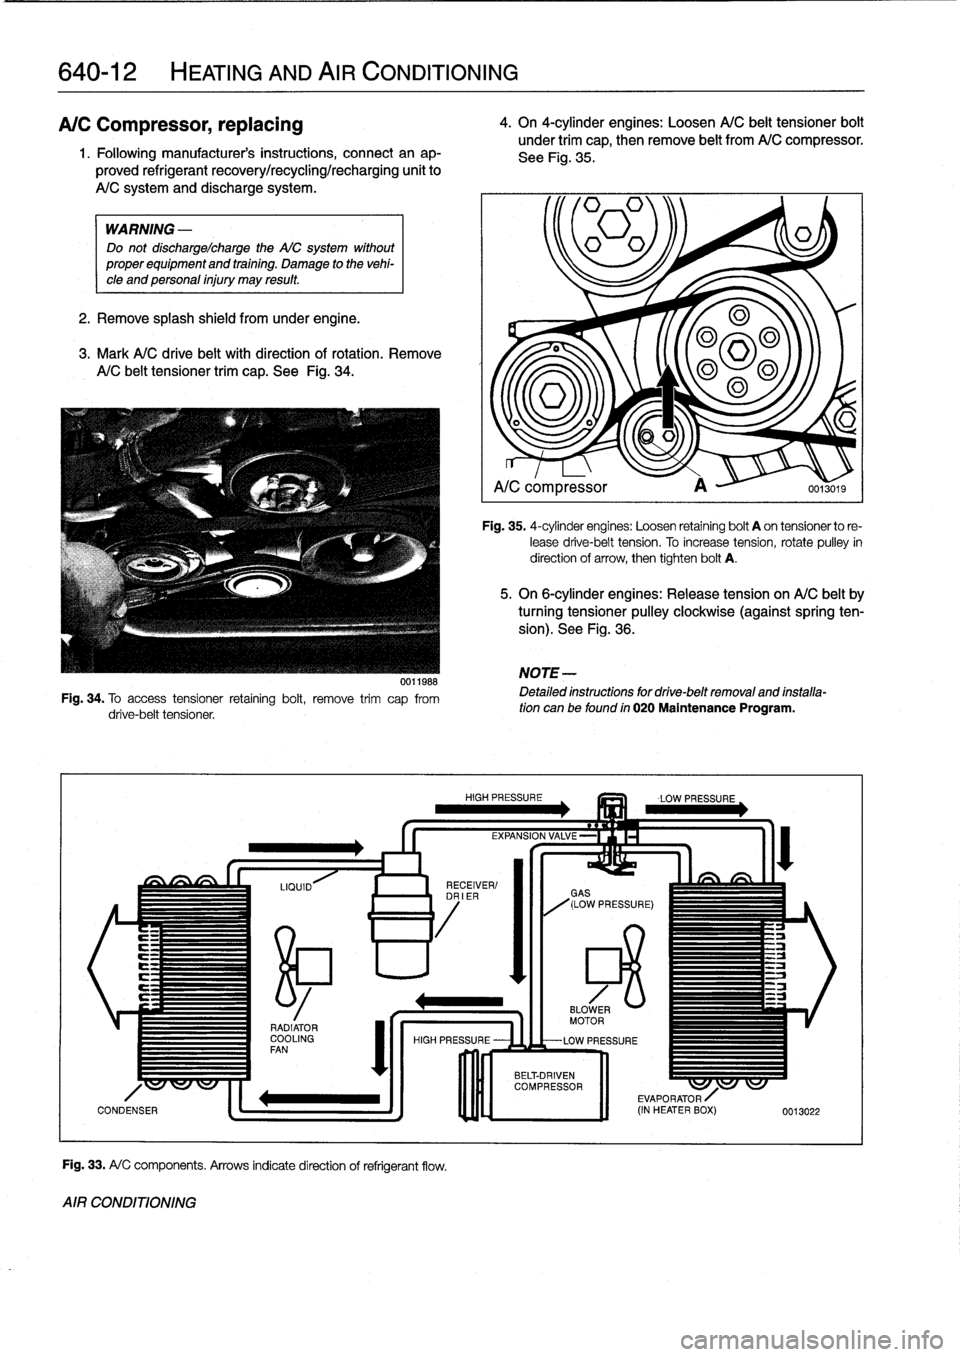
See
Fig
.
34
.
0011988
Fig
.
34
.
To
access
tensioner
retaining
bolt,
remove
trim
cap
from
drive-belt
tensioner
.
Fig
.
33
.
A/
C
components
.
Arrows
indicatedirection
of
refrigerant
flow
.
AIR
CONDITIONING
4
.
On
4-cylinder
engines
:
Loosen
A/C
belt
tensioner
bolt
under
trim
cap,
then
remove
belt
from
A/C
compressor
.
See
Fig
.
35
.
~=1
A/C
compressor
A
0013019
Fig
.
35
.
4-cylinder
engines
:
Loosen
retaining
bolt
A
on
tensionerto
re-
lease
drive-belt
tension
.
To
increase
tension,
rotate
pulley
in
direction
of
arrow,
then
tighten
bolt
A
.
5
.
On
6-cylinder
engines
:
Release
tension
on
A/C
belt
by
turning
tensioner
pulley
clockwíse
(againstspring
ten-
sion)
.
See
Fig
.
36
.
NOTE
-
Detailed
instructions
for
drive-belt
removal
and
installa-tion
can
be
found
in
020
Maintenance
Program
.
Page 750 of 759
WARNING
Your
common
sense,
good
judge-
ment,
and
general
alertness
are
cru-
cial
to
safe
and
successful
service
work
.
Before
attempting
any
work
on
your
BMW,
read
the
warnings
and
cautions
on
page
vi¡
and
the
copyright
page
at
the
front
of
the
manual
.
Review
these
warnings
and
cautions
each
time
youprepare
to
work
on
your
BMW
.
Please
also
read
any
warnings
and
cautions
that
accom-
pany
the
procedures
in
the
manual
.
A
ABS
(anti-lock
brakes)
See
Brakes
Accelerator
and
throttle
linkage
See
Maintenance
program
Air
conditioning
general
information
640-1
air
distribution
motor,
replacing
(rotary
knob)
640-10
air
distribution
motors
640-9
blower
motor,
removing/installing
640-1blower
motor
resistor
pack,
replacing
640-3
compressor,
replacing
640-12
compressor
clutch
640-13
condenser,
replacing
640-14
control
head
640-7
removing/installing
(digital
-display)
640-8
removing/installing
(rotary
knob)
640-7
control
module
removing/installing
(digital-display)
640-8
removing/installing
(rotary
knob)
640-8
evaporator,
removinglinstalling
640-17
evaporator
temperature
sensor,
replacing
640-17
expansion
valve,
removing/installing
640-16
microfilter,
replacing
640-18
receiverldrier,
replacing
640-15
sensor
fan
forinterior
temperature,
replacing
640-9
warnings
and
cautions
640-11
Air
distribution
(flap)
motor
See
Air
conditioning
See
also
Heating
Air
filter
See
Maintenanceprogram
Airbag
system
(SRS)
general
information
721-1
contact
ring,
replacing
721-3
driver
side
airbag,removing/installing
721-5
front
crash
sensor,
replacing
721-4
front
side-impact
airbag,
removing/
installing
721-7
front
side-impact
airbag
crash
sensor,
removing/installing
721-5
passenger
side
airbag,
removing/
installing
721-6
sensors
and
electronics
721-1
SRS
warning
light
and
fault
display
721-2
systems
721-1
ZAE
control
module,
replacing
721-5
Alarm
system
See
Central
locking
and
anti-theft
Alternator
See
Battery,
starter,
alternator
Anti-freeze
(Engine
coolant)
See
Maintenance
program
Anti-theft
See
Central
lockíng
and
anti-theft
AST
(Al¡
season
traction)
300-4
ATF
(Automatic
transmission
fluid)
See
Automatic
transmission
Automatic
transmission
See
alsoTransmission-general
general
information
240-1
ATF,draining
and
filling
240-2
ATF
leve¡,
checking
240-1
transmission
removaland
ínstallation
240-4
transmission,
removinglinstalling
240-4
transmission
service
240-1
Auxiliary
fan
See
Cooling
system
Axle
joint
See
Maintenance
program
B
Back-up
light
switch
See
Manual
transmission
Balljoint
See
Front
suspension
Battery
See
Battery,
starter,
alternator
Battery,
starter,
alternator
See
also
Maintenance
program
general
information
121-1
alternator,
removing/installing
(4-
cylinder
engine)
121-5
alternator,
removinglinstalling
(6-
cylinder
engine)
121-6
alternator
brushes,
inspecting/
replacing
121-7
alternator
service
121-4
batterycharging
121-4
battery
load
voltage
test
121-4
batteryopen-circuit
voltage
test
121-4
battery
service
121-3
INDEX
1
Battery,
starter,
alternator
(cont
.)
battery
testing
121-3
charging
system
quick
check121-2
charging
system
troubleshooting
121-
2
hydrometer
testing
121-3
solenoid
switch,
removinglinstalling
121-10
starter
service
121-7
starter
troubleshooting
121-7
starter,
removing/installing(4-cylinder
engine)
121-8
starter,
removing/installing(6-cylinder
engine
with
automatic
transmission)
121-9
starter,
removing/installing
(6-cylinder
engine
with
manual
transmission)
121-8
static
current
draw,
checking
121-2
voltage
regulator,
removing/installing
121-6
Bearing,
wheel
See
Front
suspension
or
Rear
suspension
Blowermotor
See
Air
conditioning
See
also
Heatíng
BMW
emblem
See
Exterior
trim,
bumpers
Body-general
general
information
400-1
body
assembly
400-1
central
body
electronics
400-4
convertible
models
400-2
coupe
models
400-2
electronic
immobilizatíon
system
400-
4
exterior
and
aerodynamics
400-2
heating
afhdair
conditioning
400-5
instruments
and
controls
400-4
interior
equipment
400-3
seats
and
seatbelts
400-3
Body
side
molding
See
Exterior
trim,
bumpers
Brake
fluid
See
Maintenance
program
Brakes
general
information
340-1
antilock
brake
system
(ABS)
340-11
inspection
340-12
wheelspeed
sensors,
replacing
340-12
bleeding
brakes
340-3
brake
booster,
removinglinstalling
340-8
brake
caliper,
removing/installing
340-6
brake
pads,
calipers,
and
rotors
340-3
brake
pads,
replacing
340-4
brake
rotor,
removing/installing
340-7
master
cylinder,
removing/installing
340-7
parking
brake
340-10
adjusting
340-10
.
cable,
replacing
340-11
shoes,
removinglinstalling
340-11
Page 751 of 759
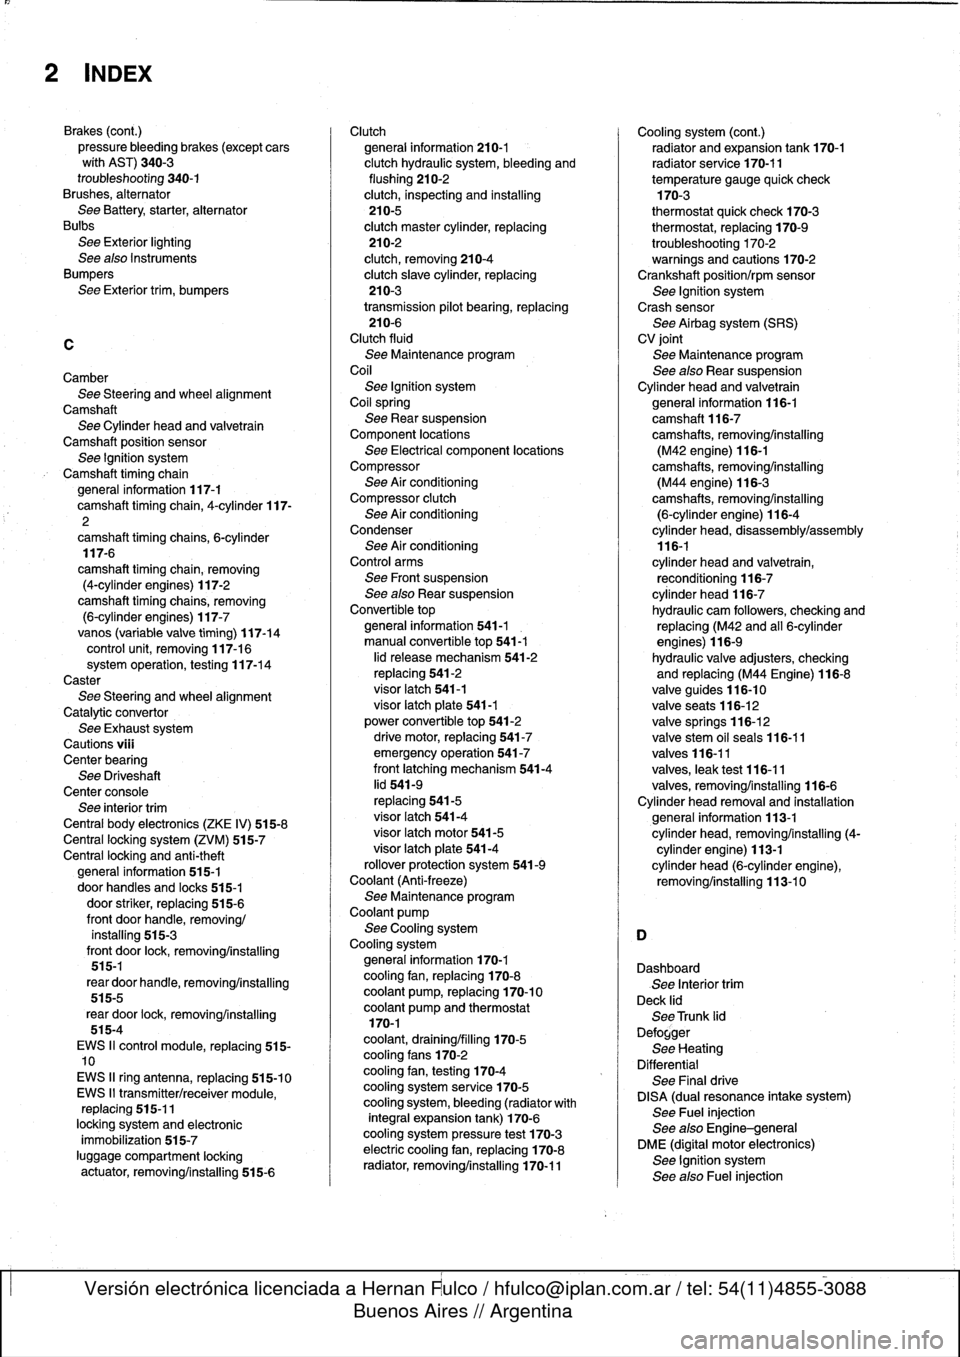
2
INDEX
Brakes
(cont
.)
pressure
bleeding
brakes
(except
cars
wíth
AST)
340-3
troubleshooting
340-1
Brushes,
alternator
See
Battery,
starter,
alternator
Bulbs
See
Exterior
lighting
See
also
Instruments
Bumpers
See
Exterior
trim,
bumpers
C
CamberSee
Steering
and
wheel
alignment
Camshaft
See
Cylinder
head
and
valvetrain
Camshaft
position
sensor
See
Ignition
system
Camshaft
timing
chain
general
information
117-1
camshaft
timingchain,
4-cylinder
117-
2
camshaft
timing
chains,6-cylinder
117-6
camshaft
timing
chain,
removing
(4-cylinder
engines)
117-2
camshaft
timing
chains,
removing
(6-cylinder
engines)
117-7vanos
(variable
valve
timing)
117-14
control
unit,
removing
117-16system
operation,
testing
117-14
Caster
See
Steering
andwheel
alignment
Catalytic
convertor
See
Exhaustsystem
Cautions
viü
Center
bearing
See
Driveshaft
Center
console
See
interior
trim
Central
body
electronics
(ZKE
IV)
515-8
Central
locking
system
(ZVM)
515-7
Centrallocking
and
anti-theft
general
information
515-1
door
handles
and
Iocks
515-1
door
striker,
replacing
515-6
front
door
handle,
removing/
installing
515-3
front
door
lock,
removing/installing
515-1
rear
door
handle,
removing/installing
515-5
rear
door
lock,
removing/installing
515-4
EWS
II
control
module,
replacing
515-10
EWS
II
ring
antenna,
replacing
515-10
EWS
II
transmitter/receiver
module,
replacing
515-11
locking
system
and
electronic
immobilization
515-7
luggage
compartment
locking
actuator,
removing/installing
515-6
Clutch
general
information210-1
clutch
hydraulic
system,
bleeding
and
flushing
210-2
clutch,
inspecting
and
installing
210-5
clutch
master
cylinder,
replacing
210-2
clutch,
removing
210-4
clutch
slave
cylinder,
replacing
210-3
transmission
pilot
bearing,
replacing
210-6
Clutch
fluid
See
Maintenance
program
Coil
See
Ignition
system
Coilspring
See
Rear
suspension
Component
locations
See
Electrical
component
locations
Compressor
See
Air
conditioning
Compressor
clutch
See
Air
conditioning
Condenser
See
Air
conditioningControl
arms
See
Front
suspension
See
also
Rear
suspension
Convertible
top
general
information
541-1
manual
convertible
top
541-1
lid
release
mechanism
541-2
replacing
541-2
visor
latch
541-1
visor
latch
píate
541-1
power
convertible
top
541-2
drive
motor,
replacing
541-7
emergency
operation
541-7
front
latching
mechanism
541-4
lid
541-9
replacing
541-5
visor
latch
541-4
visor
latch
motor541-5
visor
latch
plate
541-4
rollover
protection
system
541-9
Coolant
(Anti-freeze)
See
Maintenance
program
Coolant
pump
See
Cooling
system
Cooling
system
general
information
170-1
cooling
fan,
replacing
170-8
coolant
pump,
replacing
170-10
coolant
pump
and
thermostat170-1
coolant,
draining/filling
170-5
cooling
fans
170-2
cooling
fan,
testing
170-4
cooling
system
service
170-5
cooling
system,
bleeding
(radiator
with
integral
expansion
tank)
170-6
cooling
system
pressure
test
170-3
electric
cooling
fan,
replacing
170-8
radiator,
removing/installing
170-11
Cooling
system
(cont
.)
radiator
and
expansion
tank
170-1
radiator
service
170-11
temperature
gauge
quick
check170-3
thermostat
quick
check
170-3
thermostat,
replacing
170-9
troubleshooting
170-2
warnings
and
cautions
170-2Crankshaft
position/rpm
sensor
See
Ignition
system
Crash
sensor
See
Airbag
system
(SRS)
CV
joint
See
Maintenance
program
See
also
Rear
suspension
Cylinder
head
and
valvetrain
general
information
116-1
camshaft116-7
camshafts,
removing/installing
(M42
engine)
116-1camshafts,
removing/installing
(M44
engine)
116-3
camshafts,
removing/installing
(6-cylinder
engine)
116-4
cylinder
head,
disassembly/assembly
116-1
cylinder
head
and
valvetrain,
reconditioning
116-7
cylinder
head
116-7
hydraulic
cam
followers,
checking
and
replacing
(M42
and
al]
6-cylinder
engines)
116-9
hydraulic
valve
adjusters,
checking
and
replacing
(M44
Engine)
116-8
valve
guides
116-10
valveseats
116-12
valve
springs
116-12
valve
stem
oil
seals
116-11
valves
116-11
valves,
leak
test
116-11
valves,removing/installing
116-6
Cylinder
head
removal
and
installation
general
information
113-1
cylinder
head,
removing/installing
(4-
cylinder
engine)
113-1
cylinder
head
(6-cylinder
engine),
removing/installing
113-10
Dashboard
See
Interior
trim
Deck
lid
See
Trunk
lid
Defogger
See
Heating
Differential
See
Final
drive
DISA
(dual
resonance
intake
system)
See
Fuel
injection
See
also
Engine-general
DME
(digital
motor
electronics)
See
Ignition
system
See
alsoFuel
injection
Page 752 of 759
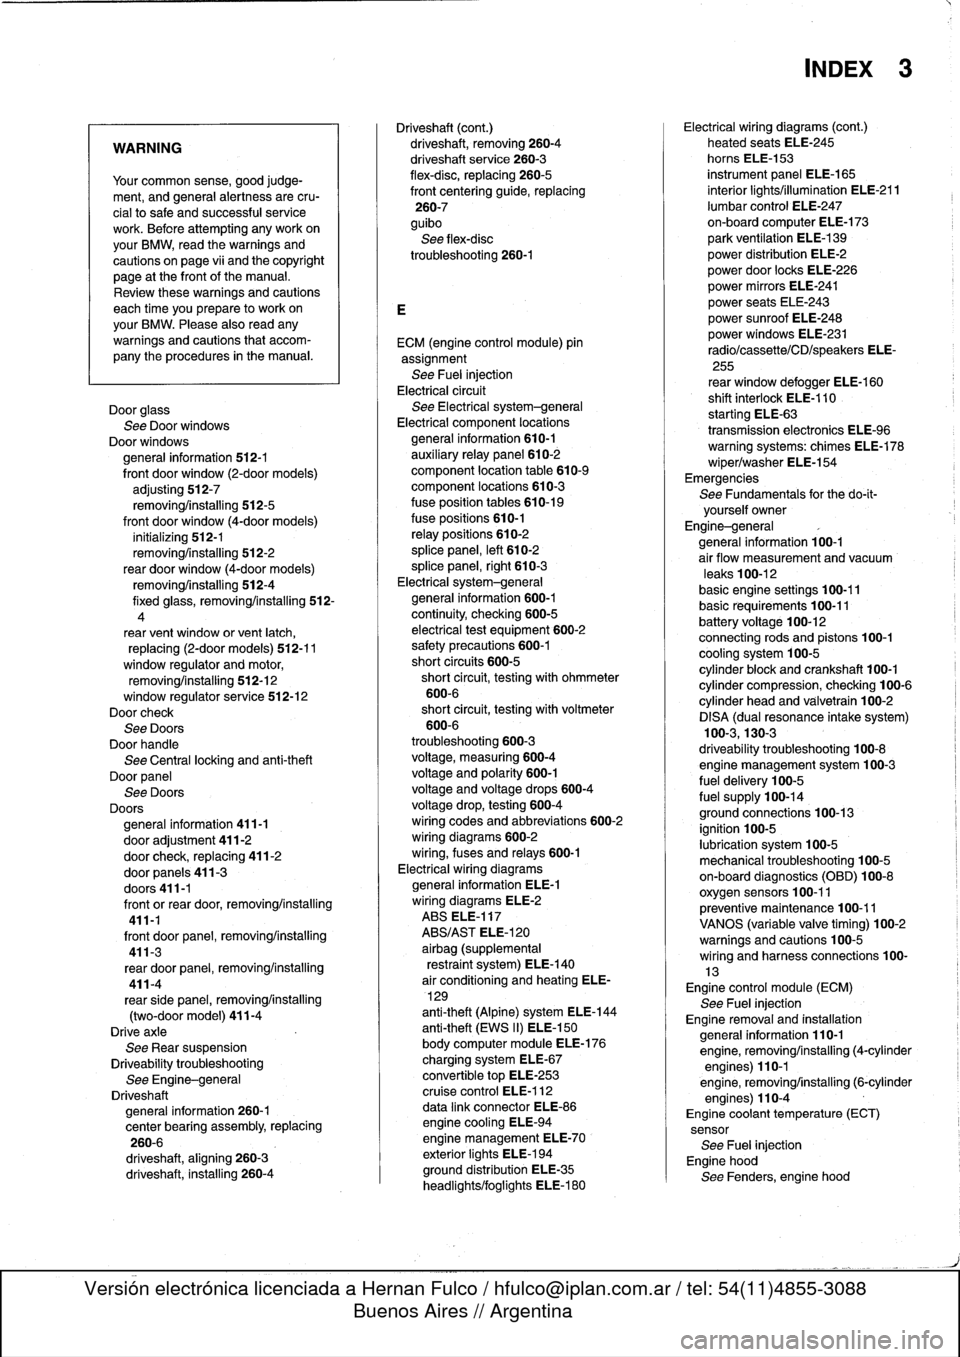
WARNING
Your
common
sense,
good
judge-
ment,
and
general
alertness
are
cru-
cial
to
safe
and
successful
service
work
.
Befcre
attempting
any
work
on
your
BMW,
read
the
warnings
and
cautions
on
page
vi¡
and
the
copyright
page
at
the
frontof
the
manual
.
Review
these
warnings
and
cautions
each
time
you
prepare
to
workon
your
BMW
.
Please
also
read
any
warnings
and
cautions
that
accom-
pany
the
procedures
in
the
manual
.
Door
glass
See
Door
windows
Door
windows
general
information
512-1
front
door
window
(2-door
models)
adjusting
512-7
removing/installing
512-5
front
door
window
(4-door
models)
initíalizing
512-1
removing/installing
512-2
rear
door
window
(4-door
models)
removing/installing
512-4
fixed
glass,
removing/installing
512-
4
rear
vent
window
or
vent
latch,
replacing
(2-door
models)
512-11
window
regulator
and
motor,
removing/installing
512-12
window
regulator
service
512-12Doorcheck
See
DoorsDoor
handle
See
Centrallocking
and
anti-theft
Door
panel
See
Doors
Doors
general
information
411-1
door
adjustment
411-2door
check,
replacing
411-2
door
panels
411-3
doors411-1
front
orrear
door,removing/installing
411-1
front
door
panel,
removing/installing
411-3
rear
door
panel,
removing/installing
411-4
rearsidepanel,
removing/installing
(two-door
model)
411-4
Drive
axle
See
Rear
suspension
Driveability
troubleshooting
See
Engine-general
Driveshaft
general
information
260-1
center
bearing
assembly,
replacing
260-6
driveshaft,
aligning
260-3
driveshaft,
installing
260-4
Driveshaft
(cont
.)
driveshaft,
removing260-4
driveshaftservice
260-3
flex-disc,
replacing
260-5
front
centering
guide,
replacing
260-7
guibo
See
flex-disc
troubleshooting260-1
ECM
(engine
control
module)
pin
assignment
See
Fuel
injection
Electrical
circuit
See
Electrical
system-general
Electrical
component
locations
general
information
610-1
auxíliary
relay
panel
610-2
component
location
table
610-9
component
locations
610-3
fuse
position
tables
610-19
fuse
positions
610-1
relay
positions
610-2
splice
panel,
left
610-2
splice
panel,
right
610-3
Electrical
system-general
general
information
600-1
continuity,
checking
600-5
electrical
test
equipment
600-2
safety
precautions
600-1
short
circuits
600-5
short
circuit,
testing
with
ohmmeter
600-6
short
circuit,
testing
with
voltmeter
600-6
troubleshooting
600-3
voltage,
measuring600-4
voltage
and
polarity
600-1
voltage
and
voltage
drops
600-4
voltage
drop,
testing
600-4
wiring
codes
and
abbreviations
600-2
wiring
diagrams
600-2
wiring,
fuses
and
relays
600-1
Electrical
wiring
diagrams
general
information
ELE-1
wiring
diagrams
ELE-2
ABS
ELE-117
ABS/AST
ELE-120
airbag
(supplemental
restraint
system)
ELE-140
air
conditioning
and
heating
ELE-
129
anti-theft
(Alpine)
system
ELE-144
anti-theft
(EWS
II)
ELE-150
body
computer
module
ELE-176
charging
system
ELE-67
convertible
top
ELE-253
cruise
control
ELE-112
data
link
connector
ELE-86
engine
cooling
ELE-94
engine
management
ELE-70
exterior
lights
ELE-194
ground
distribution
ELE-35
headlights/foglights
ELE-180
INDEX
3
Electrical
wiring
diagrams
(cont
.)
heated
seats
ELE-245
horns
ELE-153
instrument
panel
ELE-165
interior
lights/illumination
ELE-211
lumbar
control
ELE-247
on-board
computer
ELE-173
park
ventilation
ELE-139
power
distribution
ELE-2
power
door
locks
ELE-226
power
mirrors
ELE-241
power
seats
ELE-243
power
sunroof
ELE-248
power
windows
ELE-231
radio/cassette/CD/speakers
ELE-
255
rear
window
defogger
ELE-160
shift
interlock
ELE-110
starting
ELE-63
transmission
electronics
ELE-96
warning
systems`
.
chimes
ELE-178
wiper/washer
ELE-154
Emergencies
See
Fundamentals
for
the
do-it-
yourself
owner
Engine-general
general
information
100-1
air
flow
measurement
and
vacuum
leaks
100-12
basic
engine
settings
100-11
basic
requirements
100-11
battery
voltage
100-12connecting
rods
and
pistons
100-1
cooling
system
100-5
cylinder
block
and
crankshaft100-1
cylinder
compression,
checking
100-6
cylinder
head
and
valvetrain
100-2
DISA
(dual
resonance
intake
system)
100-3,130-3
driveability
troubleshooting
100-8
engine
management
system
100-3
fuel
delivery
100-5
fuel
supply
100-14ground
connections
100-13
ignition
100-5
lubrication
system100-5
mechanical
troubleshooting
100-5
on-board
diagnostics
(OBD)
100-8
oxygen
sensors
100-11
preventive
maintenance
100-11
VANOS
(variable
valve
timing)
100-2warningsand
cautions
100-5
wiring
andharness
connections100-
13Engine
control
module
(ECM)
See
Fuel
injection
Engine
removal
and
installation
general
information
110-1
engine,
removing/installing(4-cylinder
engines)
110-1
engine,
removing/installing
(6-cylinder
engines)
110-4
Engine
coolant
temperature
(ECT)
sensor
See
Fuel
injection
Engine
hood
See
Fenders,
enginehood