Electrical System-General BMW 325i 1992 E36 Workshop Manual
[x] Cancel search | Manufacturer: BMW, Model Year: 1992, Model line: 325i, Model: BMW 325i 1992 E36Pages: 759
Page 3 of 759
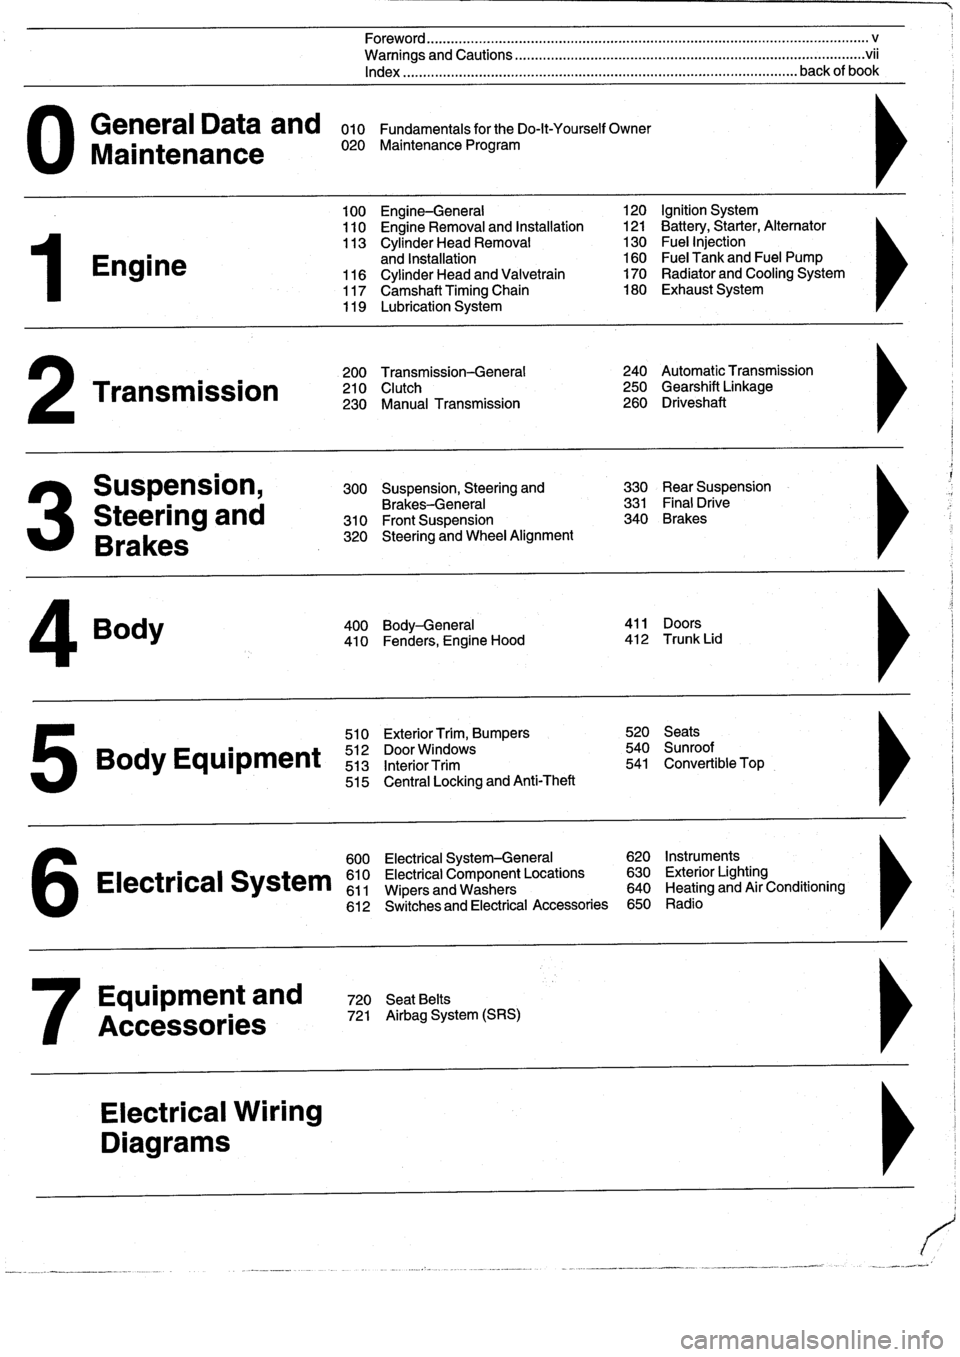
General
Data
and
010
FundamentalsfortheDo-lt-YourselfOwner
Maintenance
020
Maintenance
Program
Engine
Transmission
Suspension,
Steering
and
Brakes
4
Body
100
Engine-General
110
Engine
Removal
and
Installation
113
Cylinder
Head
Removal
and
Installation
116
Cylinder
Head
and
Valvetrain
117
Camshaft
Timing
Chain
119
Lubrication
System
200
Transmission-General
210
Clutch
230
Manual
Transmission
510
Exterior
Trim,
Bumpers
520
Seats
Bo
y
Equipment
512
DoorWTdws
540
nr
t
513
InteriorTrim
541
Convertible
Top
515
Central
Locking
and
Anti-Theft
600
Electrical
System-General
620
Instruments
Electrical
S
stem
610
Electrical
Component
Locations
630
Exterior
Lighting
611
Wipers
and
Washers
640
Heating
and
Air
Conditioning
6
612
Switches
and
Electrical
Accessories
650
Radio
Equipment
and
720
SeatBelts
Accessories
721
Airbag
System
(SRS)
Electrical
Wiring
Diagrams
Foreword
.
...
.
.
.
..................
.
.
.
.....
.
............
.
...
.
.
.
.
.
................
.
.
.
.....
.
......
.
................
.
.
.
.....
v
Warnings
and
Cautions
.....
.
...
.
.
.
.
.
..........
.
...
.
.
.
.
.
......
.
.........
.
.
.
...
.
.
.
......
.
.
.
.
.
............
.
.
.
.
.
.
.vii
Index
..............
.
.
.
.....
.
............
.
...
.
.
.
.
.
........
.
...
.
.
.
.
.
.......
.
......
.
...
.
.
.
.
.
.
.
........
.
.
.
..
back
of
book
300
Suspension,
Steering
and
330
RearSuspension
Brakes-General
331
Final
Drive
310
Front
Suspension
340
Brakes
320
Steering
and
Wheel
Alignment
400
Body-General
411
Doors
410
Fenders,
Engine
Hood
412
Trunk
Lid
120
Ignition
System
121
Battery,Starter,
Alternator
130
Fue¡
Injection
160
Fuel
Tank
and
Fuel
Pump
170
Radiator
and
Cooling
System180
Exhaust
System
240
Automatic
Transmission
250
Gearshift
Linkage
260
Driveshaft
Page 55 of 759
If
a
battery
cableconnection
hasno
visible
faults,
but
is
still
suspect,
measure
the
voltage
drop
across
the
connection
.
A
large
drop
indicates
excessive
resistance,
meaning
the
con-
nection
is
corroded,
dirty,
or
damaged
.
Clean
or
repair
the
connection
and
retest
.
NOTE-
For
instructions
on
conducting
a
voltage
drop
test,
and
other
general
electrical
troubleshooting
information,
see600
Electrical
System-General
.
Wiring
and
Harness
Connections
The
electronic
fuel
injection
and
ignition
systems
operate
at
low
voltage
and
current
values,
making
them
sensitive
to
small
increases
in
resistance
.
The
electrical
system
is
routine-
ly
subjected
to
corrosion,
vibration
and
wear,
so
faults
or
cor-
rosion
in
the
wiring
harness
and
connectors
are
common
causes
of
driveability
problems
.
Visually
inspect
all
wiring,
connectors,
switches
and
fuses
in
the
system
.
Loose
or
damaged
connectors
can
cause
inter-
mittent
problems,
especially
the
smallterminals
in
the
ECM
connectors
.
Disconnect
the
wiring
harness
connectors
to
check
for
corrosion
;
and
use
electrical
cleaning
spray
to
re-
move
contaminants
.
Often,
simply
disconnecting
and
recon-
necting
a
dirty
connector
several
times
will
clean
the
terminals
and
help
to
reestablish
good
electrical
contact
.
If
a
wiring
harnessconnectorhasno
visible
faults,
but
is
still
suspect,
measure
the
voltage
drop
across
the
connector
.
A
large
drop
indicates
excessive
resistance,
meaning
the
con-
nector
is
corroded,
dirty
or
damaged
.
Clean
or
repair
the
con-
nector
and
retest
.
Ground
Connections
For
any
electrical
circuit
to
work,
it
must
make
acomplete
path,
beginning
at
the
positive
(+)
battery
terminal
and
ending
at
the
negative
(-)
terminal
.
The
negative
(-)
battery
cable
is
attached
to
the
car's
chassis
.
Therefore,
any
wireor
metal
part
attached
to
the
chassis
provides
a
good
ground
path
back
to
the
negative
(-)
battery
terminal
.
Poorground
connections
are
amajor
source
of
driveabílity
problems
.
If
any
of
themainground
connections
for
the
igni-
tion
system
or
the
fuelinjection
system
are
faulty,
the
in-
creased
resistance
in
that
circuit
will
cause
problems
.
Visually
inspect
al¡
ground
wires
and
connections
for
breaks,
looseness
or
corrosion
.
Be
careful
because
wires
sometimes
break
internally
or
in
areas
not
easily
visible
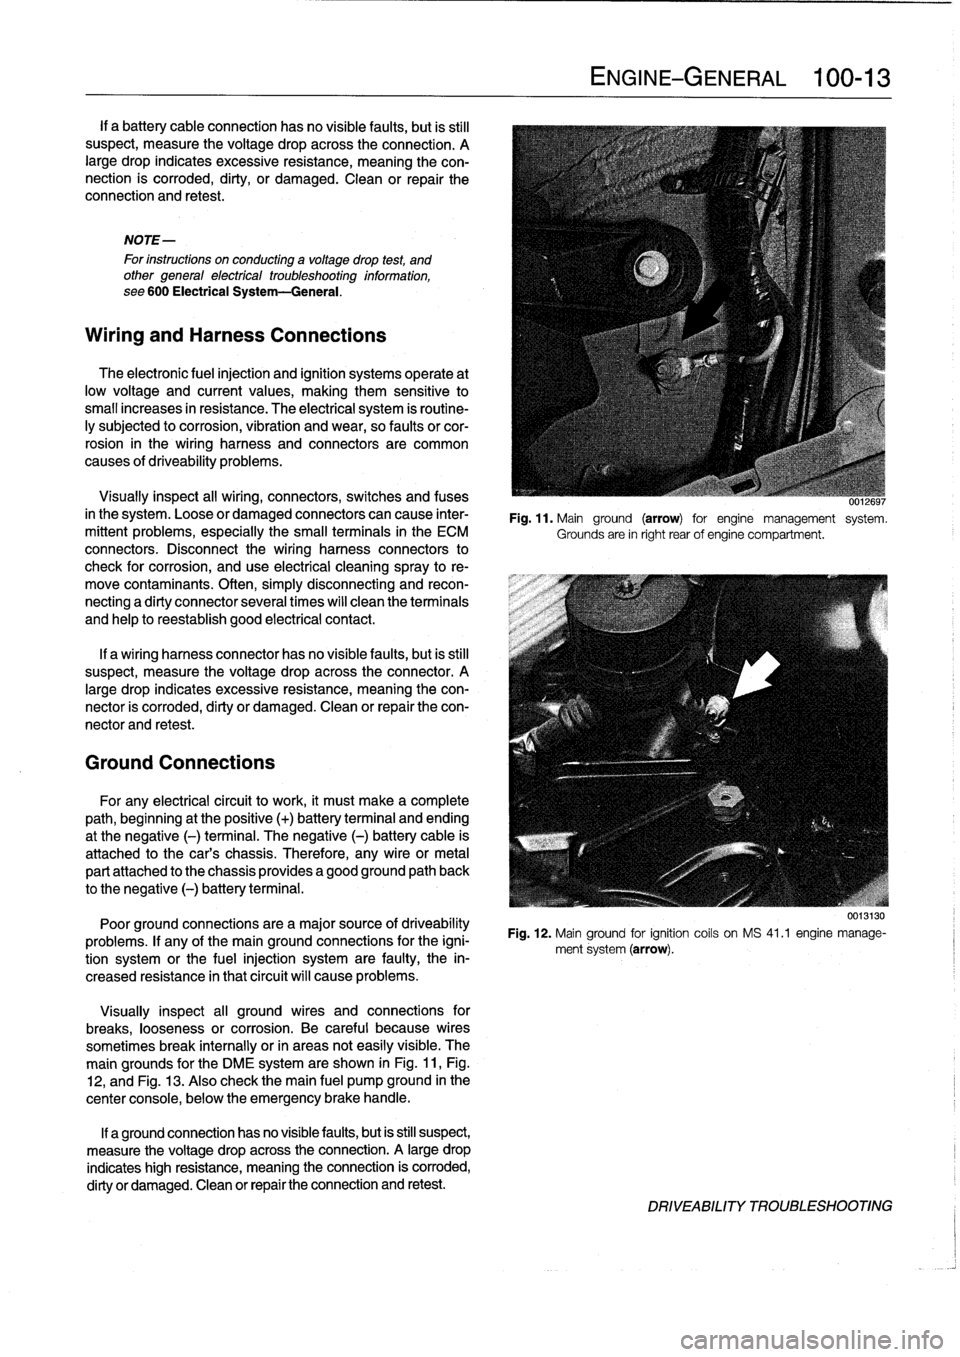
.
The
main
grounds
for
the
DME
system
are
shown
in
Fig
.
11,Fig
.
12,
and
Fig
.
13
.
Also
check
the
main
fuel
pump
ground
in
the
center
console,
below
the
emergency
brake
handle
.
If
a
ground
connection
has
no
visiblefaults,
but
is
still
suspect,
measure
the
voltage
drop
acrossthe
connection
.
A
large
drop
indicates
high
resistance,
meaning
the
connection
is
corroded,
dirty
or
damaged
.
Clean
or
repair
the
connection
and
retest
.
ENGINE-GENERAL
100-
1
3
UU,~uyi
Fig
.
11
.
Mainground
(arrow)
for
engine
management
system
.
Grounds
are
in
right
rear
of
engine
compartment
.
Fig
.
12
.
Mainground
for
ignition
coils
on
MS
41
.1
engine
manage-
ment
system
(arrow)
.
DRIVEABILITY
TROLIBLESHOOTING
Page 143 of 759
Alternator
brushes,
STARTER
SERVICE
inspecting
and
replacing
Regulator
brushesarenot
available
as
replacement
parts
from
BMW
.
Replacement
brushes
may
be
available
from
af-
termarket
sources,
however
.
1
.
Remove
voltage
regulator
as
described
above
.
2
.
Clean
brush
contact
sürfaces
and
measure
brush
pro-trusion
.
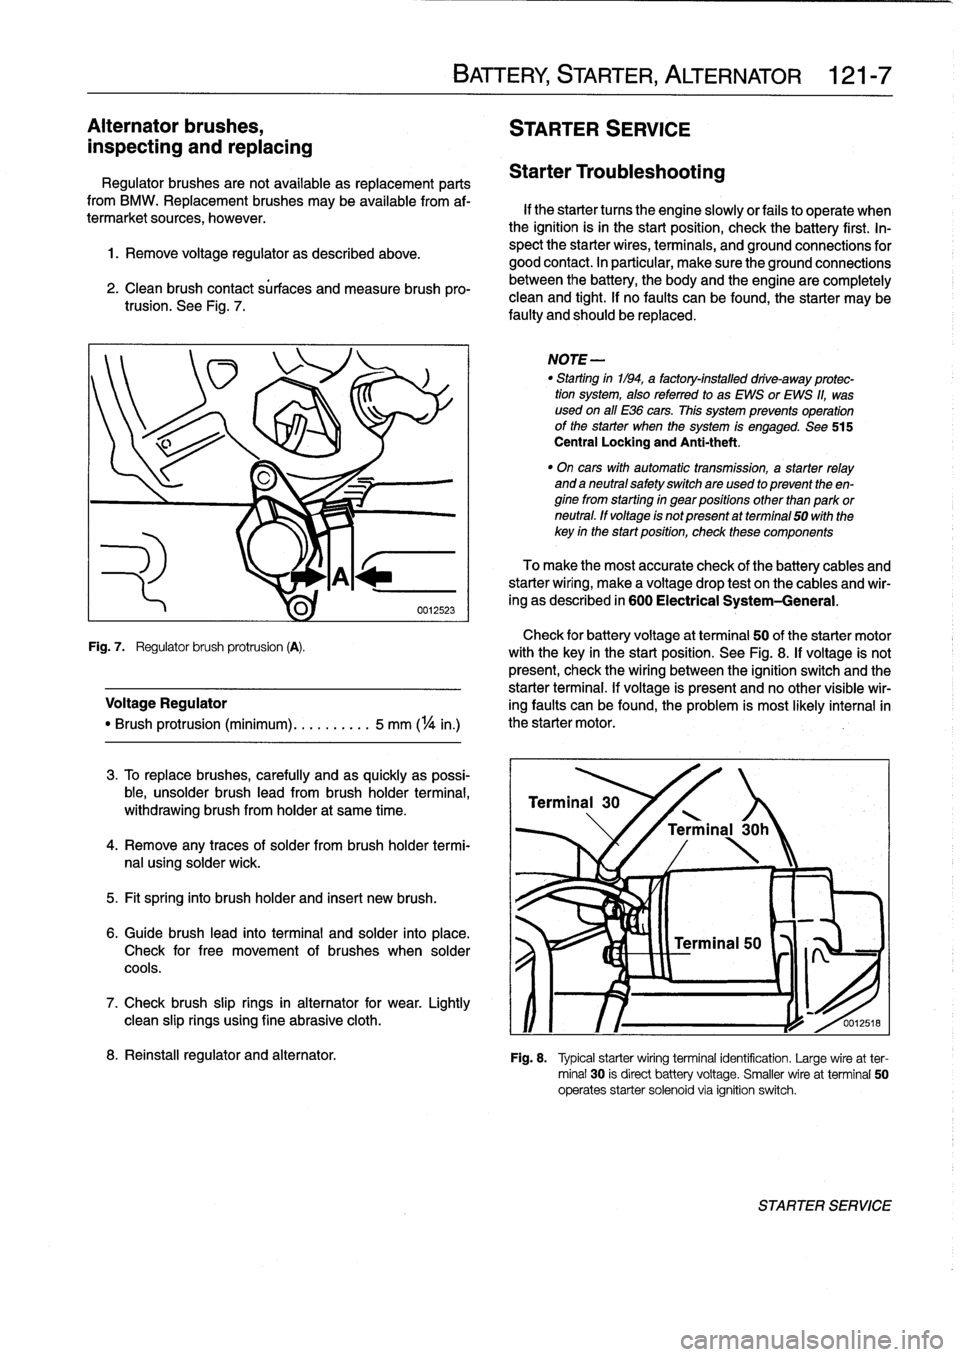
See
Fig
.
7
.
Check
for
battery
voltage
at
terminal
50
of
the
starter
motor
Fig
.
7
.
Regulator
brush
protrusion
(A)
.
with
the
key
in
the
start
position
.
See
Fig
.
8
.
If
voltage
is
not
present,
check
the
wiring
between
the
ignition
switch
and
the
starter
terminal
.
If
voltage
is
present
and
no
other
visible
wir
Voltage
Regulator
ing
faults
can
be
found,
the
problem
is
most
likely
interna¡in
"
Brush
protrusion
(minimum)
.......
.
..
5
mm
(
1
/4
in
.)
the
starter
motor
.
3
.
To
replace
brushes,
carefully
and
as
quickly
as
possi-
ble,
unsolder
brush
lead
from
brush
holder
termina¡,
withdrawing
brush
from
holder
at
same
time
.
4
.
Remove
any
traces
of
solder
frombrush
holder
termi-
nal
using
solder
wick
.
5
.
Fit
spring
into
brush
holder
and
inserí
new
brush
.
6
.
Guide
brush
lead
into
terminal
and
solder
into
place
.
Check
for
free
movement
of
brushes
when
solder
cools
.
7
.
Check
brush
slip
rings
in
alternator
for
wear
.
Lightly
clean
slip
rings
using
fine
abrasive
cloth
.
BATTERY,
STARTER,
ALTERNATOR
121-
7
Starter
Troubleshooting
If
the
starter
tucos
the
engine
slowlyor
fails
to
operate
when
the
ignition
isin
the
start
position,
check
the
battery
first
.
In-
spect
the
starter
wires,
terminals,
and
ground
connections
for
good
contact
.
In
particular,
make
sure
the
ground
connections
between
the
battery,
the
body
and
the
engine
are
completely
clean
and
tight
.
If
no
faults
can
be
found,
the
starter
may
be
faulty
and
should
be
replaced
.
NOTE
-
"
Starting
in1194,
a
factory-installed
drive-away
protec-
tion
system,
alsoreferred
to
as
EWS
or
EWS
11,
was
used
on
all
E36
cars
.
This
system
prevenís
operation
of
the
starter
when
the
system
is
engaged
.
See
515
Central
Locking
and
Anti-theft
.
"
On
cars
with
automatic
transmission,
a
starter
relay
and
a
neutral
safetyswitchare
used
to
present
theen-
ginefrom
starting
in
gear
positions
other
than
park
or
neutral
.
ff
voltage
is
not
present
atterminal
50
with
the
key
in
the
startposition,
check
these
components
To
make
the
most
accurate
check
of
the
battery
cables
and
starterwiring,
make
a
voltage
drop
test
on
the
cables
and
wir-
ing
as
described
in
600
Electrical
System-General
.
Terminal
30
'
\
/
Terminal
30h
0012518
8
.
Reinstall
regulator
and
alternator
.
Fig
.
8
.
Typical
starterwiring
terminal
identification
.
Large
wireat
ter-
minal
30
is
direct
battery
voltage
.
Smaller
wire
at
terminal
50
operates
starter
solenoid
via
ignition
switch
.
STARTER
SERVICE
Page 192 of 759
160-
8
FUEL
TANK
AND
FUEL
PUMP
UU131
tst5
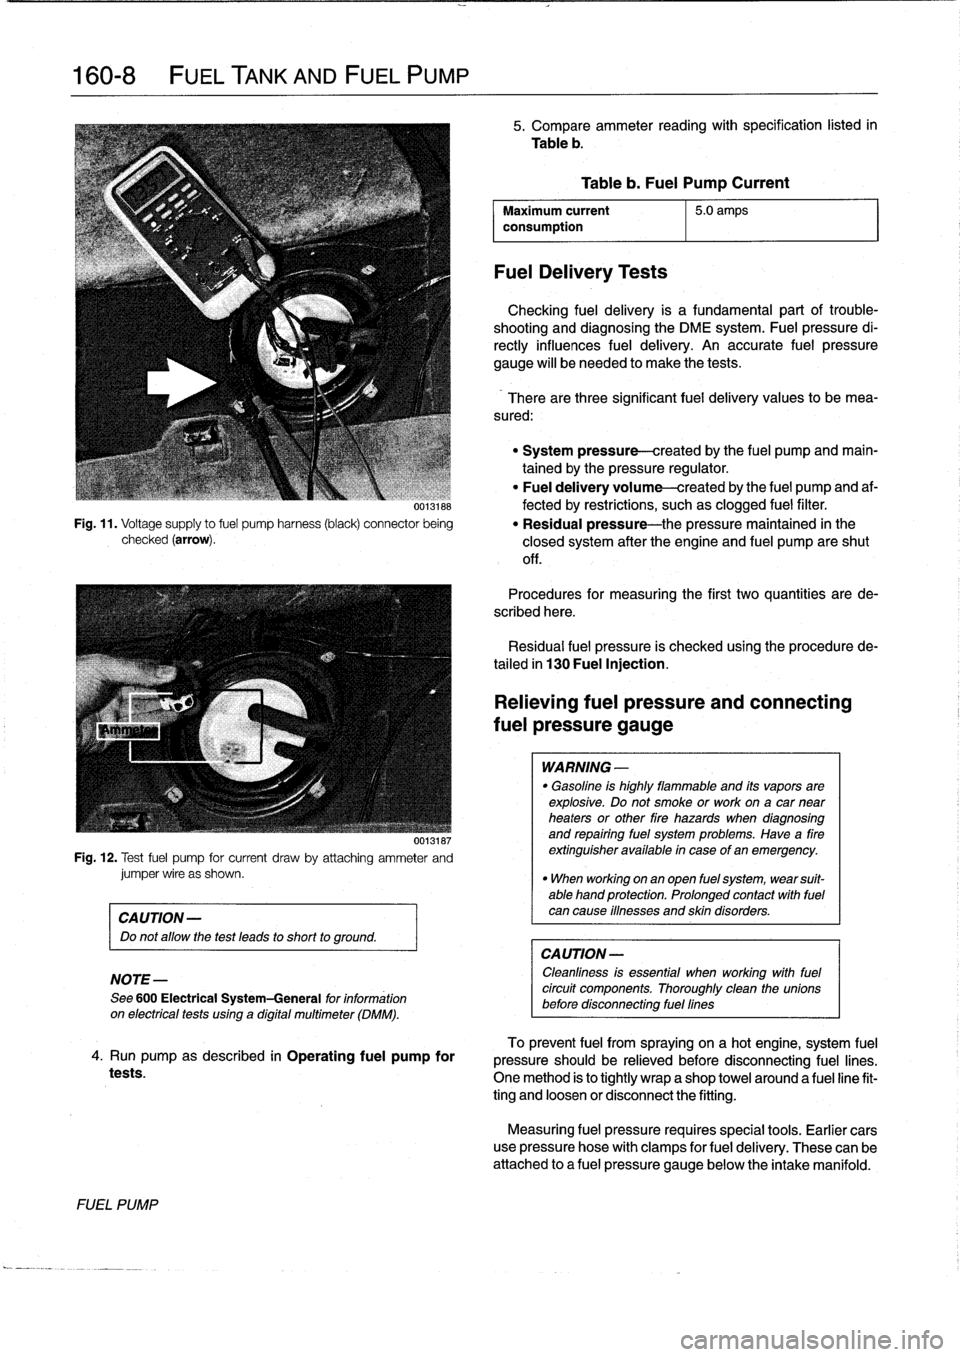
Fig
.
11
.
Voltage
supply
to
fuel
pump
harness
(black)
connector
being
checked
(arrow)
.
00131ts7
Fig
.
12
.
Test
fuel
pump
for
current
draw
by
attadhing
ammeter
andjumper
wire
as
shown
.
CAUTION-
Do
not
allow
the
test
leads
to
short
to
ground
.
NOTE-
See
600
Electrical
System-General
for
information
on
electricaltests
using
a
digital
multimeter
(DMM)
.
4
.
Run
pump
as
described
in
Operating
fuel
pump
for
tests
.
FUEL
PUMP
5
.
Compare
ammeter
reading
with
specification
listed
in
Table
b
.
Maximum
current
5
.0
amps
consumption
FuelDelivery
Tests
Table
b
.
Fuel
Pump
Current
Checking
fuel
delivery
is
a
fundamental
part
of
trouble-
shooting
and
diagnosing
the
DME
system
.
Fuelpressure
di-
rectly
influences
fuel
delivery
.
An
accurate
fuel
pressure
gauge
will
be
needed
to
make
the
tests
.
There
arethree
significant
fuel
delivery
values
to
bemea-
sured
:
"
System
pressure-created
by
the
fuel
pump
and
main-
tained
by
the
pressure
regulator
.
"
Fuel
delivery
volume-created
by
the
fuel
pump
and
af-
fected
by
restrictions,
suchas
clogged
fuel
filter
.
"
Residual
pressure-the
pressure
maintained
in
the
closed
system
after
the
engine
and
fuel
pump
areshut
off
.
Procedures
for
measuring
the
first
two
quantities
arede-
scribed
here
.
Residual
fuel
pressure
is
checked
using
the
procedurede-
tailed
in
130
Fuel
Injection
.
Relieving
fuel
pressure
and
connecting
fuel
pressure
gauge
WARNING
-
"
Gasoline
is
highly
flammable
and
its
vaporsare
explosive
.
Do
not
smoke
or
work
ona
car
near
heaters
or
other
fire
hazards
when
diagnosing
and
repairing
fuel
system
problems
.
Have
a
fire
extinguisher
available
in
case
of
an
emergency
.
"
When
working
onan
open
fuel
system,
wear
suit-
able
hand
protection
.
Prolonged
contact
with
fuel
can
cause
iflnesses
and
skin
disorders
.
CA
UTION-
Cleanliness
is
essential
when
working
withfuel
circuit
components
.
Thoroughly
clean
the
unionsbefore
disconnecting
fuel
fines
To
prevent
fuel
from
spraying
on
a
hotengine,
system
fuel
pressure
should
be
relieved
before
disconnecting
fuel
lines
.
One
method
is
to
tightly
wrap
a
shop
towel
around
a
fuel
line
fit-
ting
and
loosen
or
disconnect
the
fitting
.
Measuring
fuel
pressure
requires
special
tools
.
Earlier
cars
use
pressure
hose
with
clamps
for
fuel
delivery
.
These
can
be
attached
to
a
fuel
pressure
gauge
below
the
intake
manifold
.
Page 381 of 759
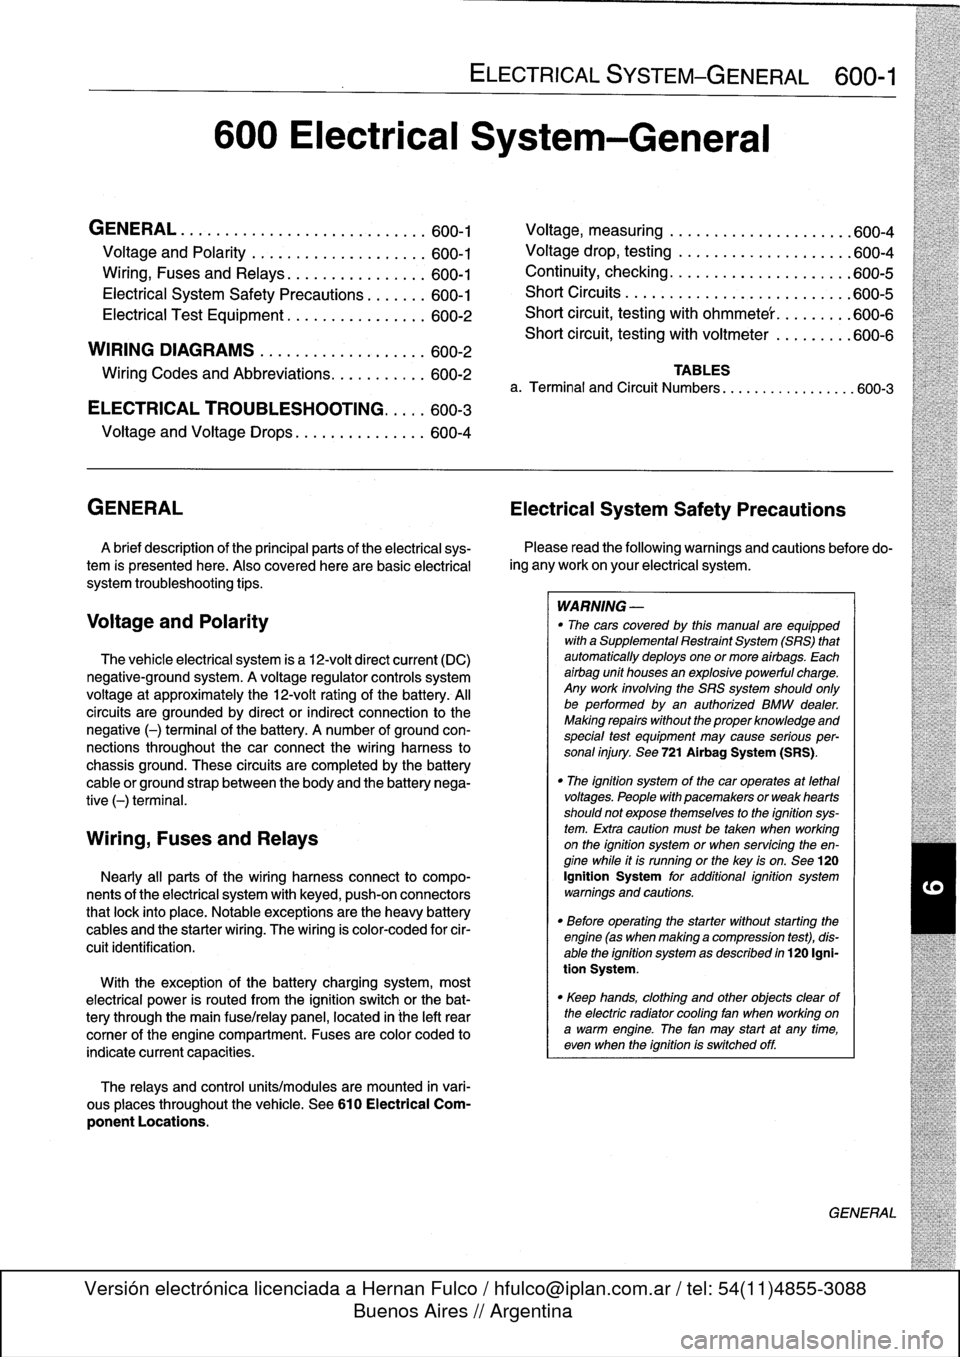
600
Electrical
System-General
GENERAL
.
...........
.
.
.
.
.
.
.
.
.
...
.
...
600-1
Voltage
and
Polarity
........
.
.
.
.
.
.
.
.....
600-1
Ming,
Fuses
and
Relays
............
.
.
.
.
600-1
Electrical
System
Safety
Precautions
...
.
.
.
.
600-1
Electrical
Test
Equipment
.....
.
.
.
....
.
.
.
.
600-2
WIRING
DIAGRAMS
..
.
.
.
.
.
.
.
.
.
........
600-2
Ming
Codes
and
Abbreviations
..
.
...
.
....
600-2
ELECTRICAL
TROUBLESHOOTING
..
.
..
600-3
Voltage
and
Voltage
Drops
..........
.
.
.
.
.
600-4
GENERAL
Electrical
System
Safety
Precautions
A
brief
description
of
the
principal
parts
of
the
electrical
sys-
tem
is
presented
here
.
Also
covered
here
are
basic
electrical
system
troubleshooting
tips
.
Voltage
and
Polarity
The
vehicle
electrical
system
is
a
12-volt
direct
current
(DC)
negative-ground
system
.
A
voltage
regulator
controls
system
voltage
at
approximately
the
12-volt
rating
of
the
battery
.
Al¡
circuits
are
grounded
by
direct
or
indirect
connection
to
the
negative
(-)
terminal
of
the
battery
.
A
number
of
ground
con-
nections
throughout
the
car
connect
the
wiring
harness
to
chassis
ground
.
These
circuits
are
completedby
the
battery
cable
or
ground
strap
between
the
body
and
the
battery
nega-
tive
(-)
terminal
.
Wiring,
Fuses
and
Relays
Nearly
all
parts
of
the
wiring
harnessconnect
to
compo-
nents
of
the
electrical
system
with
keyed,
push-on
connectors
that
lock
into
place
.
Notable
exceptions
arethe
heavy
battery
cables
and
the
starter
wiring
.
The
wiring
is
color-coded
for
cir-
cuitidentification
.
With
theexception
of
the
battery
charging
system,
most
electrical
power
is
routed
from
the
ignition
switch
or
the
bat-
tery
through
the
main
fuse/relay
panel,
located
in
¡he
left
rear
comer
of
the
engine
compartment
.
Fuses
are
color
coded
to
indicate
current
capacities
.
The
relays
and
control
units/modules
are
mounted
in
vari-
ous
places
throughout
the
vehicle
.
See610
Electrical
Com-
ponent
Locations
.
ELECTRICAL
SYSTEM-GENERAL
600-1
Voltage,
measuring
.
.
.
................
.
.
600-4
Voltage
drop,
testing
.
.
.....
.
.....
.
......
600-4
Continuity,
checking
..
.
...
.
.
.
.
.
.
.
.
.
.
.
.
.
.
.
600-5
Short
Circuits
.
.
.
.
.
.
.
.
.....
.
...
.
.
.
.
.
.
.
.
.
600-5
Short
circuit,
testing
with
ohmmete'r
.
.
.
.
.
.
.
.
.
600-6
Short
circuit,
testing
with
voitmeter
.
.
.
.
.
.
.
.
.
600-6
TABLES
a
.
Terminal
and
Circuit
Numbers
..............
..
.600-3
Please
read
the
following
warnings
and
cautions
before
do-
ing
any
work
on
your
electrical
system
.
WARNING
-
"
The
cars
covered
by
this
manual
are
equipped
with
aSupplemental
Restraint
System
(SRS)
that
automatically
deploys
one
or
more
airbags
.
Each
airbag
unit
houses
an
explosive
powerful
charge
.
Any
work
involving
the
SRS
system
should
only
be
performed
byan
authorized
BMW
dealer
.
Making
repairs
without
the
proper
knowledge
and
special
test
equipment
may
cause
serious
per-
sonal
injury
.
See
721
Airbag
System
(SRS)
.
"
The
ignition
system
of
the
car
operates
at
lethal
voltages
.
People
with
pacemakers
or
weak
hearts
should
not
expose
themselves
to
the
ignition
sys-
tem
.
Extra
caution
mustbe
taken
when
working
on
the
ignition
system
or
when
servicing
theen-
gine
while
it
is
runningor
the
key
is
on
.
See
120
Ignition
System
for
additional
ignition
system
warnings
and
cautions
.
"
Before
operating
the
starter
without
starting
the
engine
(as
when
making
a
compressfon
test),
dis-
able
the
ignition
system
as
described
in
120
Igni-
tion
System
.
"
Keep
hands,
clothing
and
other
objects
clear
of
the
electric
radiator
coollng
fan
when
working
on
a
warm
engine
.
The
fan
may
start
at
any
tíme,
even
when
the
ignition
is
switched
off
.
GENERAL
Page 382 of 759
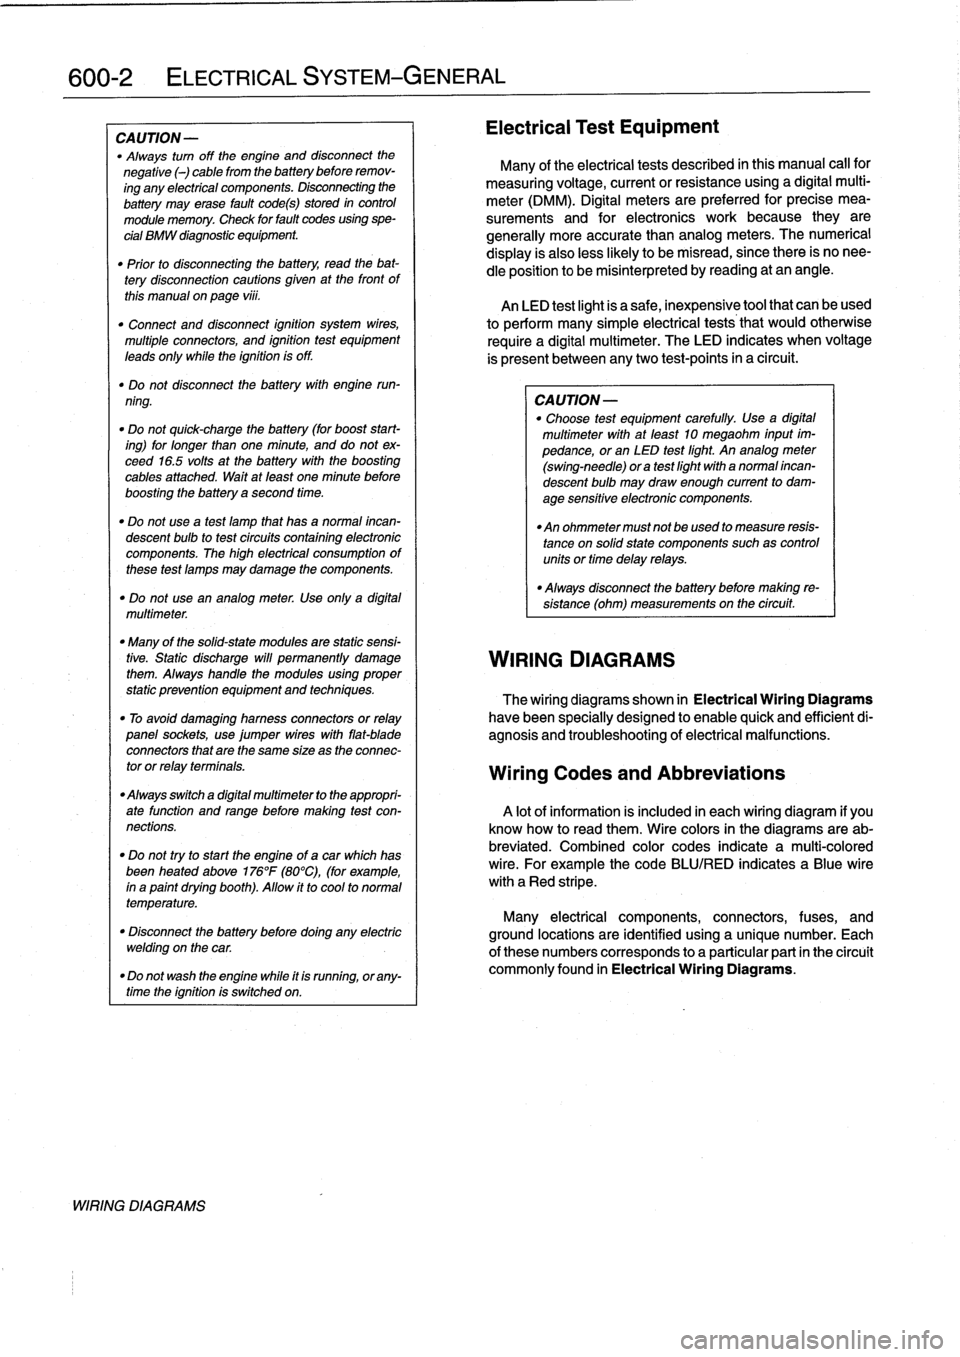
600-2
ELECTRICAL
SYSTEM-GENERAL
CAUTION
-
"
Always
turn
off
the
engine
and
disconnect
the
negative
()
cable
from
the
batterybefore
remov-
ing
any
electrical
components
.
Disconnecting
the
battery
may
erase
fault
code(s)
stored
in
control
module
memory
.
Check
for
fault
codes
using
spe-
cial
BMW
diagnostic
equipment
.
"
Prior
to
disconnecting
the
battery,
read
the
bat-
tery
disconnection
cautions
given
at
the
front
of
this
manual
onpage
viii
.
"
Connect
and
disconnect
ignition
system
wires,
multiple
connectors,
and
ignition
test
equipment
leads
only
while
the
ignition
is
off
.
"
Do
not
disconnect
the
battery
with
engine
run-
ning
.
"
Do
not
quick-charge
the
battery
(for
boost
start-
ing)
for
longer
than
one
minute,
and
do
not
ex-
ceed
16
.5
volts
at
the
battery
with
the
boosting
cables
attached
.
Wait
at
feast
one
minute
before
boosting
the
battery
a
second
time
.
"
Do
not
usea
test
famp
that
has
a
normal
incan-
descent
bulb
to
test
circuits
contafning
electronic
components
.
The
high
electrical
consumptionof
these
test
lamps
may
damage
the
components
.
"
Do
not
use
an
analog
meter
.
Use
onfy
a
digital
multimeter
.
"
Many
of
the
solid-state
modules
are
static
sensi-
tive
.
Static
discharge
will
permanently
damage
them
.
Always
handle
the
modules
using
proper
static
prevention
equipment
and
techniques
.
"
To
avoid
damaging
harness
connectors
or
relay
panel
sockets,
use
jumper
wires
with
flat-blade
connectors
that
are
the
same
size
as
the
connec-
tor
or
relay
terminals
.
"
Always
switch
a
digital
multimeter
to
the
appropri-
ate
function
and
range
before
making
test
con-
nections
.
"
Do
not
tryto
start
the
engine
of
a
carwhich
has
been
heated
above176°F
(80°C),
(for
example,
in
a
paint
dryingbooth)
.
Allow
it
to
cool
to
normal
temperature
.
"
Disconnect
the
battery
before
dolng
any
electric
welding
on
the
car
.
"
Do
not
wash
the
engine
while
it
is
runnfng,
or
any-
time
the
ignition
is
switched
on
.
WIRING
DIAGRAMS
Electrical
Test
Equipment
Many
of
the
electrical
tests
described
in
this
manual
call
for
measuring
voltage,
currentorresistanceusing
a
digital
multi-
meter
(DMM)
.
Digital
meters
are
preferred
for
precise
mea-
surements
and
for
electronics
work
because
they
are
generally
more
accuratethan
analog
meters
.
The
numerical
display
is
alsoless
likely
to
be
misread,
since
there
is
no
nee-
dle
position
to
be
misinterpreted
by
reading
at
an
angle
.
An
LED
test
light
is
a
safe,
inexpensive
tool
that
can
be
used
to
perform
many
simple
electrical
tests
that
would
otherwise
require
a
digital
multimeter
.
The
LED
indicates
when
voltage
is
present
between
anytwo
test-points
in
a
circuit
.
CA
UTION-
"
Choose
test
equipment
carefully
.
Use
a
digital
multimeter
with
at
leadt
10
megaohm
input
im-
pedance,or
an
LED
test
light
.
An
analog
meter
(swing-need1e)
ora
test
light
with
a
normal
incan-
descent
bulb
may
draw
enough
current
to
dam-
age
sensitive
electronic
components
.
"
An
ohmmeter
must
not
beused
to
measure
resis-
tance
on
solidstate
components
suchas
controlunits
or
time
delay
relays
.
"
Always
disconnect
the
battery
before
making
re-
sístance
(ohm)
measurements
on
the
circuit
.
WIRING
DIAGRAMS
The
wiring
diagrams
shown
in
Electrical
Wiring
Diagrams
have
been
specially
designed
to
enable
quick
and
efficientdi-
agnosis
and
troubleshooting
of
electrical
malfunctions
.
Wiring
Codes
and
Abbreviations
A
lot
of
information
is
included
in
each
wiring
diagram
if
you
know
how
to
read
them
.
Wire
colors
in
the
diagrams
are
ab-
breviated
.
Combined
color
codes
indicate
a
multi-colored
wire
.
For
example
the
code
BLU/RED
indicates
a
Blue
wire
with
a
Red
stripe
.
Many
electrical
components,
connectors,
fuses,
and
ground
locations
are
identified
using
a
unique
number
.
Each
of
there
numbers
corresponds
to
a
particular
part
in
the
circuit
commonly
found
in
Electrical
Wiring
Diagrams
.
Page 383 of 759
NOTE
-
Sometimes
the
color
of
en
installed
wire
may
be
differ-
ent
than
the
one
on
the
wiring
diagram
.
Don't
be
con-
cerned
.
Just
be
sure
lo
confirm
that
the
wire
connects
lo
the
proper
terminals
.
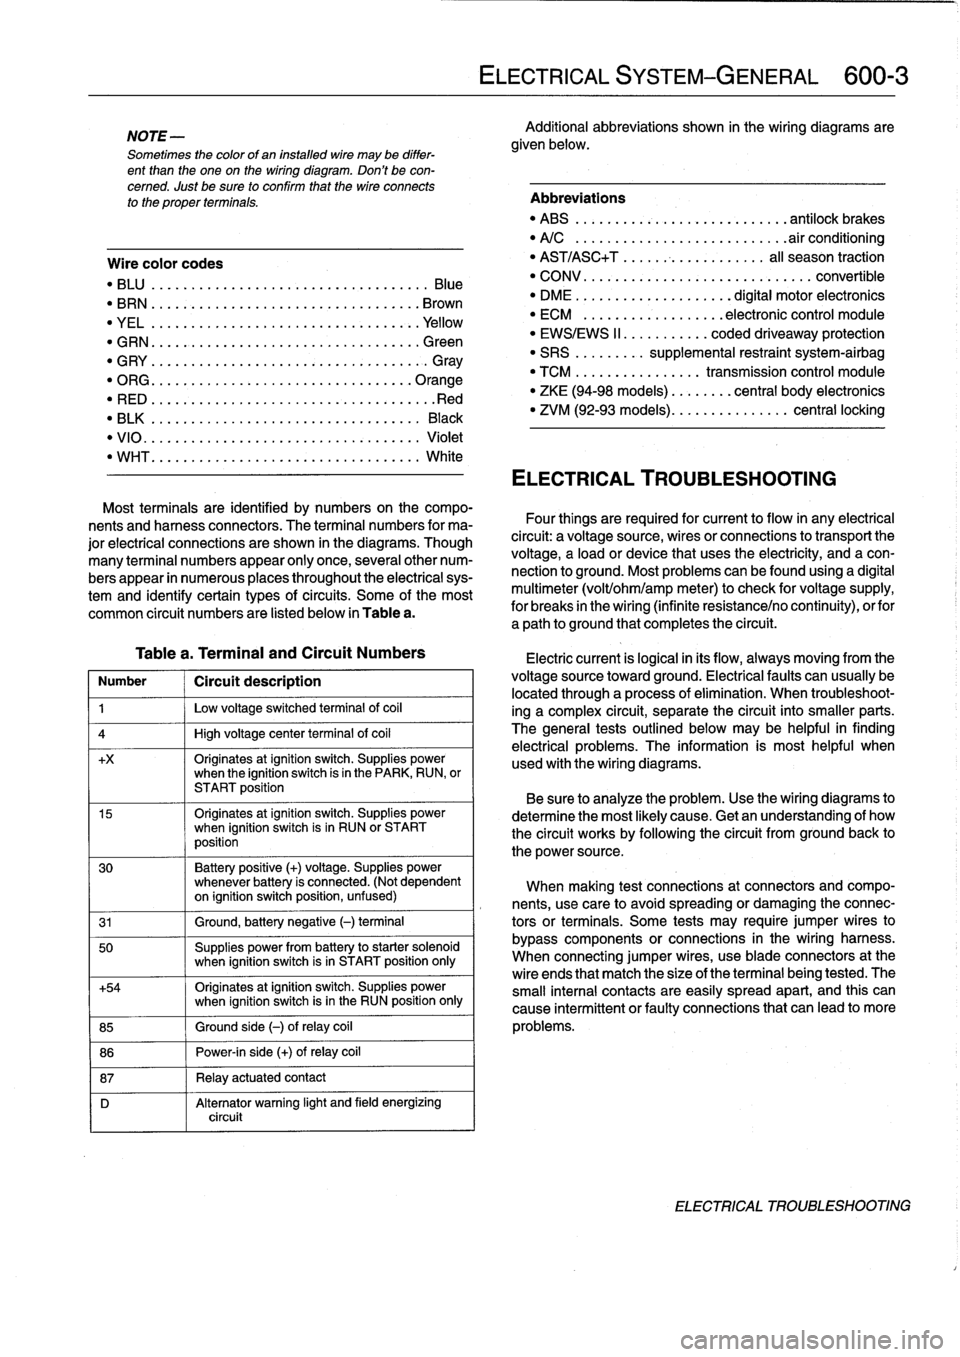
Wire
color
codes
"
BLU
.........
.
..
..
...
.
.................
Blue
"
BRN
....:....
.
..
..
...
..
...............
Brown
"
YEL
.........
.
..
..
...................
.Yellow
"
GRN
.........
.
..
..
...
.
................
creen
"
G
RY
.......
.
.
.
..
..
.....................
G
ray
"
ORG
.........
.
..
..
...
.
..............
.Orange
"
RED
......
...
.
.
..
.....................
.Red
"
BLK
.........
.
..
..
...
.
................
Black
"
VIO
..........
.
..
...
..
..
.......
.
.......
Violet
"
WHT
.........
.
.
....
.
...
:..............
White
Table
a
.
Terminal
and
Circuit
Numbers
Number
1
Circuít
description
1
j
Low
voltage
switched
terminal
of
coi¡
4
1
High
voltage
center
termina¡
of
coi¡
+x
Originates
atignition
switch
.
Supplies
powerwhen
the
ignition
switch
is
in
the
PARK,
RUN,
or
START
position
15
Originates
atignition
switch
.
Supplies
powerwhen
ignition
switch
is
in
RUN
or
START
position
30
Battery
positive
(+)
voltage
.
Supplies
power
whenever
battery
is
connected
.
(Not
dependent
on
ignition
switch
position,
unfused)
31
1
Ground,
battery
negative
(-)
terminal
50
Supplies
power
from
battery
to
starter
solenoid
when
ignition
switch
isin
START
position
only
+54
Originates
atignition
switch
.
Supplies
power
when
ignition
switch
isin
the
RUN
position
only
85
1
Ground
side
(-)
ofrelay
coil
86
1
Power-in
side
(+)
ofrelay
coil
87
1
Relay
actuatedcontact
D
Alternator
warning
light
and
field
energizing
circuit
ELECTRICAL
SYSTEM-GENERAL
600-
3
Additional
abbreviations
shown
in
the
wiring
diagrams
are
given
below
.
Abbreviations
"
ABS
........
.
...
.
...
.
..........
antilock
brakes
"
A/C
........
.
...
..
..
.
.........
.airconditioning
"
AST/ASC+T
.......
...
.
.
.......
al¡
season
traction
"
CONV
.......
.
.
...
.................
convertible
"
DME
........
.
.
...
.......
digital
motor
electronics
"
ECM
.......
.
...
..
..
.
..
electronic
control
module
"
EWS/EWS
II
......
...
.
.
coded
driveaway
protection
"
SRS
........
.
supplemental
restraint
system-airbag
"
TCM
........
.
..
....
.
transmission
control
module
"
ZKE
(94-98
models)
..
..
.
...
central
body
electronics
"
ZVM
(92-93
models)
...
.
.
..
.
.......
central
locking
ELECTRICAL
TROUBLESHOOTING
Most
terminals
are
identified
by
numbers
on
the
compo-
nents
and
harness
connectors
.
The
terminal
numbers
for
ma-
Four
things
are
required
for
current
toflow
in
any
electrical
jor
electrical
connections
are
shown
in
the
diagrams
.
Though
circuit
:
a
voltagesource,
wires
or
connections
to
transport
the
many
terminal
numbers
appear
only
once,
severa¡other
num-
voltage,
a
load
or
device
that
uses
the
electricity,
and
a
con-
bers
appear
in
numerous
places
throughout
the
electrical
sys-
nection
to
ground
.
Most
problemscanbefound
using
a
digital
tem
and
identify
certain
types
ofcircuits
.
Some
of
the
most
multimeter
(volt/ohm/amp
meter)to
check
for
voltage
supply,
common
circuit
numbers
are
listed
below
in
Table
a
.
for
breaks
in
the
wiring
(infinite
resistance/no
continuity),
orfor
a
path
to
ground
that
completesthe
circuit
.
Electric
current
is
logical
in
its
flow,
always
moving
from
the
voltage
sourcetoward
ground
.
Electricalfaults
can
usually
be
located
through
a
process
of
elimination
.
When
troubleshoot-
ing
a
complex
circuit,
separate
the
circuit
into
smaller
parts
.
The
general
testsoutlined
below
may
be
helpful
in
finding
electrical
problems
.
The
information
is
most
helpful
when
used
with
the
wiring
diagrams
.
Be
sure
to
analyze
the
problem
.
Use
the
wiring
diagrams
to
determine
the
most
likely
cause
.
Getan
understanding
of
how
the
circuit
works
by
following
the
circuit
from
groundback
to
the
power
source
.
When
making
test
connections
at
connectors
andcompo-
nents,
use
care
to
avoidspreading
or
damaging
the
connec-
tors
or
terminals
.
Some
tests
may
require
jumper
wires
to
bypass
components
or
connections
in
the
wiring
harness
.
When
connecting
jumper
wires,
use
bladeconnectors
at
the
wire
ends
that
match
the
size
of
the
terminal
being
tested
.
The
small
interna¡
contacts
are
easily
spread
apart,
and
this
can
cause
intermittent
or
faultyconnections
that
can
leadto
more
problems
.
ELECTRICAL
TROUBLESHOOTING
Page 384 of 759
600-
4
ELECTRICAL
SYSTEM-GENERAL
Voltage
and
Voltage
Drops
The
wires,
connectors,
and
switches
that
carry
current
are
designed
with
very
low
resistance
so
that
current
flows
with
a
minimum
loss
of
voltage
.
A
voltage
drop
is
caused
by
higher
than
normal
resistance
in
a
circuit
.
This
additional
resistance
actually
decreases
or
stops
the
flow
of
current
.
A
voltage
drop
can
be
noticed
byproblems
ranging
fromdim
headlights
to
sluggish
wipers
.
Some
common
sources
of
voltage
drops
are
corroded
or
dirty
switches,
dirty
or
corroded
connections
or
contacts,
and
loose
or
corroded
ground
wires
and
ground
con-
nections
.
A
voltage
drop
test
is
a
good
test
to
make
if
current
is
flowing
through
the
circuit,
butthe
circuit
is
not
operating
correctly
.
A
voltage
drop
test
will
help
to
pinpoint
a
corroded
ground
strap
or
a
faulty
switch
.
Normally,
there
should
be
less
than
1
volt
drop
across
most
wires
or
closed
switches
.
A
voltage
drop
across
a
connector
or
short
cable
shouldnot
exceed
0
.5
volts
.
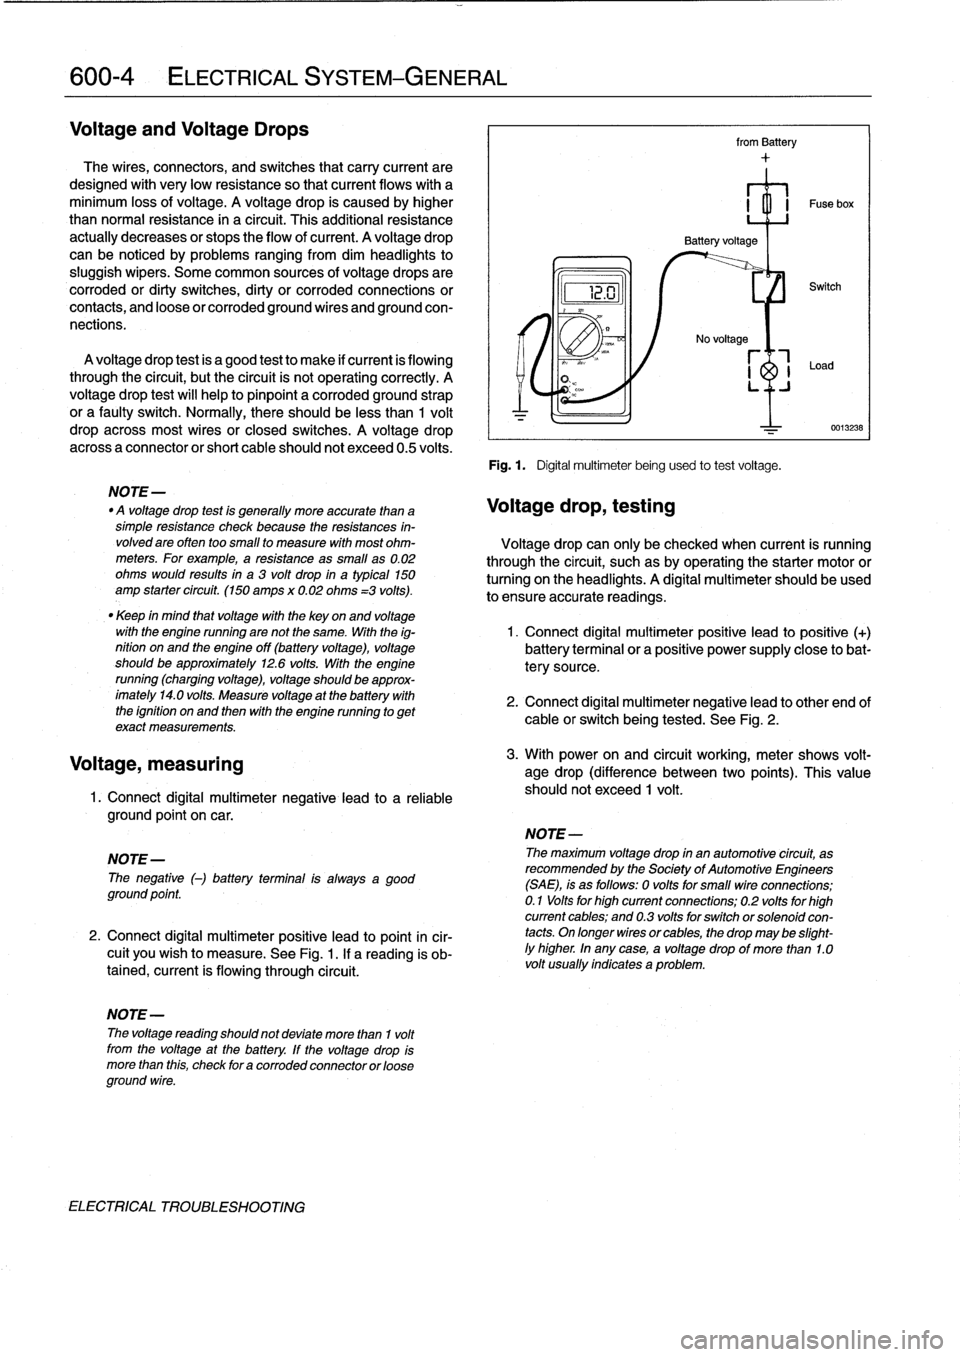
Voltage,
measuring
1
.
Connect
digital
multimeternegative
lead
to
a
reliable
ground
point
oncar
.
NOTE-
The
negative
(-)
battery
terminal
is
alwaysa
good
ground
point
.
2
.
Connect
digital
multimeter
positive
lead
to
point
incir-
cuit
you
wish
to
measure
.
See
Fig
.
1
.
If
a
reading
is
ob-
tained,
current
is
flowing
through
circuit
.
NOTE-
The
voltage
reading
shouldnot
deviate
more
than
1
volt
from
the
voltage
at
the
battery
.
If
the
voltage
drop
is
more
than
this,
check
for
acorroded
connector
or
cose
ground
wire
.
ELECTRICAL
TROLIBLESHOOTING
from
Battery
Fig
.
1
.
Digital
multimeterbeing
used
to
test
voltage
.
No
voltage
r_l
-1
Load
LJ
Switch
NOTE-
The
maximum
voltage
drop
in
an
automotive
circuit,
as
recommended
by
the
Society
of
AutomotiveEngineers
(SAE),
is
as
follows
:
0
voltsfor
small
vire
connections
;
0
.1
Volts
for
high
current
connections
;
0
.2
volts
for
high
current
cables
;
and
0
.3volts
for
switch
or
solenoidcon-
tacts
.
On
longer
wires
or
cables,
the
drop
may
be
slight-ly
higher
.
In
any
case,
a
voltage
drop
of
more
than
1.0volt
usually
indicates
a
problem
.
0013238
NOTE-
"
A
voltage
drop
test
is
generally
more
accuratethan
a
Voltage
drop,
testing
simple
resistance
check
because
the
resistances
in-
volvedare
often
too
small
to
measure
with
most
ohm-
Voltage
drop
can
only
be
checked
when
current
is
running
meters
.
For
example,
a
resistance
as
small
as0
.02
through
the
circuit,
suchasby
operating
the
starter
motor
or
ohms
would
results
in
a
3
volt
drop
in
a
typical
150
turning
onthe
headlights
.
A
digital
multimeter
should
beused
amp
starter
circuit
.
(150
amps
x
0
.02
ohms
=3
volts)
.
lo
ensure
accurate
readings
.
"
Keep
in
mind
that
voltage
with
the
key
on
and
voltage
with
the
engine
running
arenotthe
same
.
With
the
ig-
1
.
Connect
digital
multimeter
positive
lead
to
positive
(+)
nition
on
and
the
engine
off
(battery
voltage),
voltage
battery
terminalor
a
positive
power
supply
close
lo
bat
should
be
approximately
12
.6volts
.
With
the
engine
tery
source
.
running
(charging
voltage),
voltage
should
be
approx-
imately
14
.0
volts
.
Measure
voltage
at
the
battery
with
2
.
Connect
digital
multimeter
negativelead
to
other
end
of
the
ignition
on
and
then
with
the
engine
running
to
get
cable
orswitch
being
tested
.
See
Fig
.
2
.
exact
measurements
.
3
.
With
power
on
and
circuit
working,
meter
shows
volt-
age
drop
(difference
between
two
points)
.
This
value
should
not
exceed
1
volt
.
Page 386 of 759
00-
6
ELECTRICAL
SYSTEM-GENERAL
Short
circuit,
testing
with
ohmmeter
Short
circuit,
testing
with
voltmeter
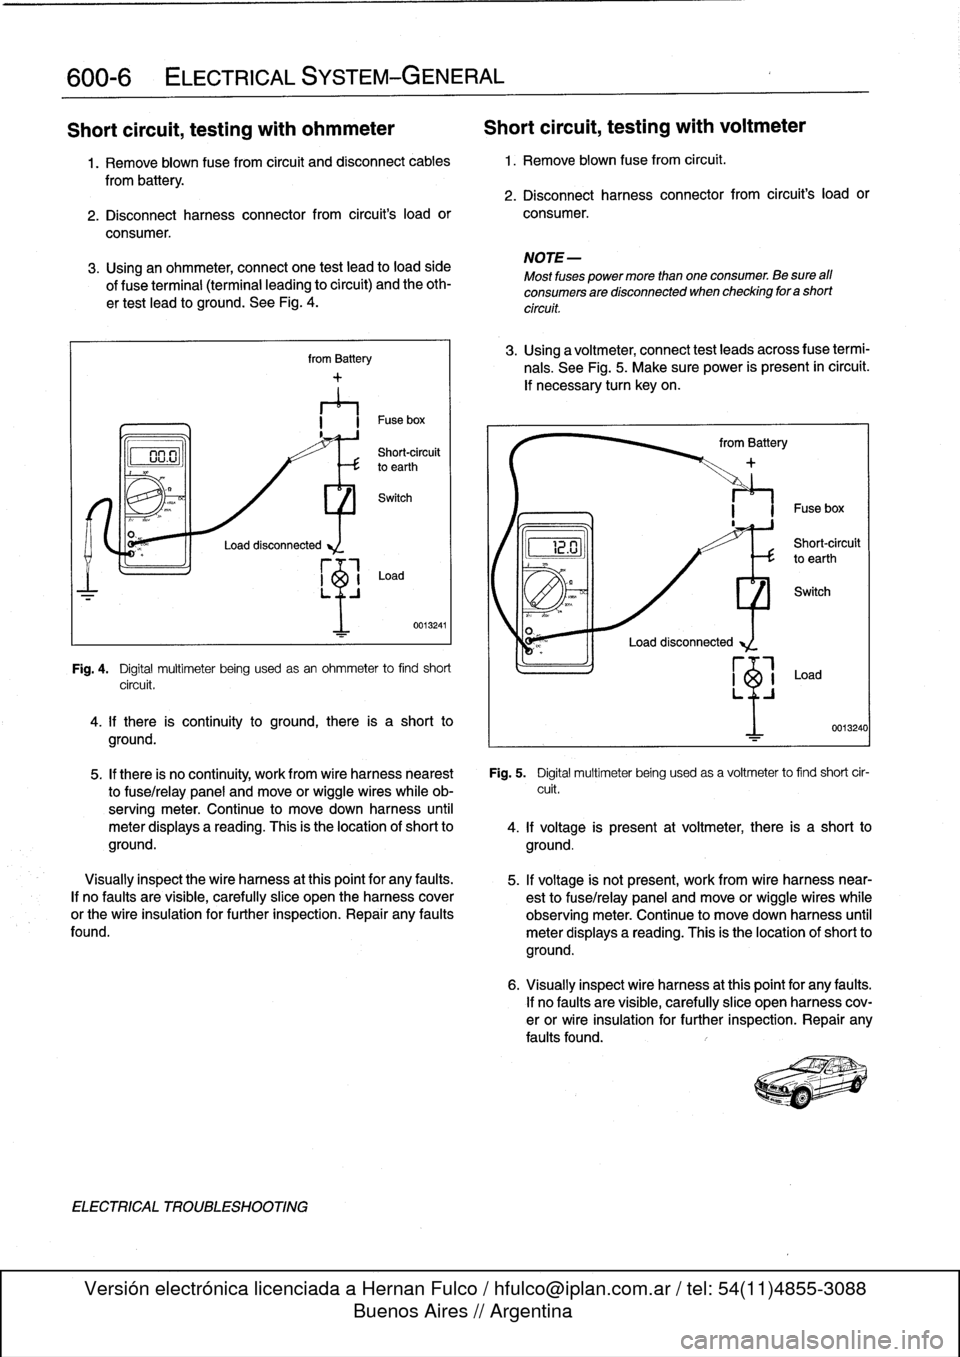
1
.
Remove
blown
fuse
from
circuit
and
disconnect
cables
1
.
Remove
blown
fusefrom
circuit
.
from
battery
.
2
.
Disconnect
harness
connector
from
circuifs
loador
2
.
Disconnect
harness
connector
from
circuit's
loador
consumer
.
consumer
.
3
.
Using
an
ohmmeter,
connect
one
test
lead
to
loadside
of
f
use
terminal
(terminal
leading
to
circuit)
and
the
oth-
ertest
lead
to
ground
.
See
Fig
.
4
.
Load
disconnected
from
Battery
LO
n
I
~
Shotrouit
vu
.uto
earthth
Switch
Load
0013241
Fig
.
4
.
Digital
multimeter
being
usedasan
ohmmeter
to
find
short
circuit
.
4
.
lf
there
is
continuity
to
ground,
there
is
a
short
to
ground
.
ELECTRICAL
TROUBLESHOOTING
NOTE-
Most
fuses
power
more
than
one
consumer
.
Be
sure
aff
consumers
are
disconnected
when
checking
for
a
short
circuit
.
3
.
Using
a
voltmeter,
connect
test
leads
across
f
use
termi-
nals
.
See
Fig
.
5
.
Make
sure
power
is
present
ín
circuit
.
lf
necessary
turn
keyon
.
~2
.U
from
Battery
Load
disconnected
Short-circuit
to
earth
I
Fuse
box
0013240
5
.
If
there
is
no
continuity,
work
from
wire
harness
hearest
Fig
.
5
.
Digital
multimeter
being
usedas
a
voltmeter
to
find
short
cir
to
fuse/relay
panel
and
move
or
wiggle
wireswhile
ob-
cuit
.
serving
meter
.
Continue
to
movedown
harness
until
meter
displays
a
reading
.
This
is
the
location
of
short
to
4
.
lf
voltage
is
present
at
voltmeter,
there
is
a
short
to
ground
.
ground
.
Visually
inspect
the
wire
harness
at
this
point
for
any
faults
.
5
.
lf
voltage
is
not
present,
work
from
wire
harness
near-
If
no
faults
are
visible,
carefully
slice
open
the
harnesscover
est
to
fuse/relay
panel
and
move
orwiggle
wireswhile
or
the
wire
insulation
for
further
inspection
.
Repair
any
faults
observing
meter
.
Continue
to
move
down
harness
until
found
.
meter
displays
a
reading
.
This
is
the
location
of
short
to
ground
.
6
.
Visually
inspect
wire
harness
atthis
point
for
any
faults
.
lf
no
faults
are
visible,
carefully
slice
open
harness
cov-
erorwire
insulation
for
further
inspection
.
Repair
any
faults
found
.
Page 752 of 759
WARNING
Your
common
sense,
good
judge-
ment,
and
general
alertness
are
cru-
cial
to
safe
and
successful
service
work
.
Befcre
attempting
any
work
on
your
BMW,
read
the
warnings
and
cautions
on
page
vi¡
and
the
copyright
page
at
the
frontof
the
manual
.
Review
these
warnings
and
cautions
each
time
you
prepare
to
workon
your
BMW
.
Please
also
read
any
warnings
and
cautions
that
accom-
pany
the
procedures
in
the
manual
.
Door
glass
See
Door
windows
Door
windows
general
information
512-1
front
door
window
(2-door
models)
adjusting
512-7
removing/installing
512-5
front
door
window
(4-door
models)
initíalizing
512-1
removing/installing
512-2
rear
door
window
(4-door
models)
removing/installing
512-4
fixed
glass,
removing/installing
512-
4
rear
vent
window
or
vent
latch,
replacing
(2-door
models)
512-11
window
regulator
and
motor,
removing/installing
512-12
window
regulator
service
512-12Doorcheck
See
DoorsDoor
handle
See
Centrallocking
and
anti-theft
Door
panel
See
Doors
Doors
general
information
411-1
door
adjustment
411-2door
check,
replacing
411-2
door
panels
411-3
doors411-1
front
orrear
door,removing/installing
411-1
front
door
panel,
removing/installing
411-3
rear
door
panel,
removing/installing
411-4
rearsidepanel,
removing/installing
(two-door
model)
411-4
Drive
axle
See
Rear
suspension
Driveability
troubleshooting
See
Engine-general
Driveshaft
general
information
260-1
center
bearing
assembly,
replacing
260-6
driveshaft,
aligning
260-3
driveshaft,
installing
260-4
Driveshaft
(cont
.)
driveshaft,
removing260-4
driveshaftservice
260-3
flex-disc,
replacing
260-5
front
centering
guide,
replacing
260-7
guibo
See
flex-disc
troubleshooting260-1
ECM
(engine
control
module)
pin
assignment
See
Fuel
injection
Electrical
circuit
See
Electrical
system-general
Electrical
component
locations
general
information
610-1
auxíliary
relay
panel
610-2
component
location
table
610-9
component
locations
610-3
fuse
position
tables
610-19
fuse
positions
610-1
relay
positions
610-2
splice
panel,
left
610-2
splice
panel,
right
610-3
Electrical
system-general
general
information
600-1
continuity,
checking
600-5
electrical
test
equipment
600-2
safety
precautions
600-1
short
circuits
600-5
short
circuit,
testing
with
ohmmeter
600-6
short
circuit,
testing
with
voltmeter
600-6
troubleshooting
600-3
voltage,
measuring600-4
voltage
and
polarity
600-1
voltage
and
voltage
drops
600-4
voltage
drop,
testing
600-4
wiring
codes
and
abbreviations
600-2
wiring
diagrams
600-2
wiring,
fuses
and
relays
600-1
Electrical
wiring
diagrams
general
information
ELE-1
wiring
diagrams
ELE-2
ABS
ELE-117
ABS/AST
ELE-120
airbag
(supplemental
restraint
system)
ELE-140
air
conditioning
and
heating
ELE-
129
anti-theft
(Alpine)
system
ELE-144
anti-theft
(EWS
II)
ELE-150
body
computer
module
ELE-176
charging
system
ELE-67
convertible
top
ELE-253
cruise
control
ELE-112
data
link
connector
ELE-86
engine
cooling
ELE-94
engine
management
ELE-70
exterior
lights
ELE-194
ground
distribution
ELE-35
headlights/foglights
ELE-180
INDEX
3
Electrical
wiring
diagrams
(cont
.)
heated
seats
ELE-245
horns
ELE-153
instrument
panel
ELE-165
interior
lights/illumination
ELE-211
lumbar
control
ELE-247
on-board
computer
ELE-173
park
ventilation
ELE-139
power
distribution
ELE-2
power
door
locks
ELE-226
power
mirrors
ELE-241
power
seats
ELE-243
power
sunroof
ELE-248
power
windows
ELE-231
radio/cassette/CD/speakers
ELE-
255
rear
window
defogger
ELE-160
shift
interlock
ELE-110
starting
ELE-63
transmission
electronics
ELE-96
warning
systems`
.
chimes
ELE-178
wiper/washer
ELE-154
Emergencies
See
Fundamentals
for
the
do-it-
yourself
owner
Engine-general
general
information
100-1
air
flow
measurement
and
vacuum
leaks
100-12
basic
engine
settings
100-11
basic
requirements
100-11
battery
voltage
100-12connecting
rods
and
pistons
100-1
cooling
system
100-5
cylinder
block
and
crankshaft100-1
cylinder
compression,
checking
100-6
cylinder
head
and
valvetrain
100-2
DISA
(dual
resonance
intake
system)
100-3,130-3
driveability
troubleshooting
100-8
engine
management
system
100-3
fuel
delivery
100-5
fuel
supply
100-14ground
connections
100-13
ignition
100-5
lubrication
system100-5
mechanical
troubleshooting
100-5
on-board
diagnostics
(OBD)
100-8
oxygen
sensors
100-11
preventive
maintenance
100-11
VANOS
(variable
valve
timing)
100-2warningsand
cautions
100-5
wiring
andharness
connections100-
13Engine
control
module
(ECM)
See
Fuel
injection
Engine
removal
and
installation
general
information
110-1
engine,
removing/installing(4-cylinder
engines)
110-1
engine,
removing/installing
(6-cylinder
engines)
110-4
Engine
coolant
temperature
(ECT)
sensor
See
Fuel
injection
Engine
hood
See
Fenders,
enginehood