navigation system BMW 325I 2006 User Guide
[x] Cancel search | Manufacturer: BMW, Model Year: 2006, Model line: 325I, Model: BMW 325I 2006Pages: 246, PDF Size: 8.43 MB
Page 39 of 246
Controls
37Reference
At a glance
Driving tips
Communications
Navigation
Entertainment
Mobility
The indicator lamp in the instrument
cluster comes on and a message
appears on the Control Display:
replace the battery in the remote control.
Replacing the battery
The remote control for convenient access con-
tains a battery that will need to be replaced from
time to time.
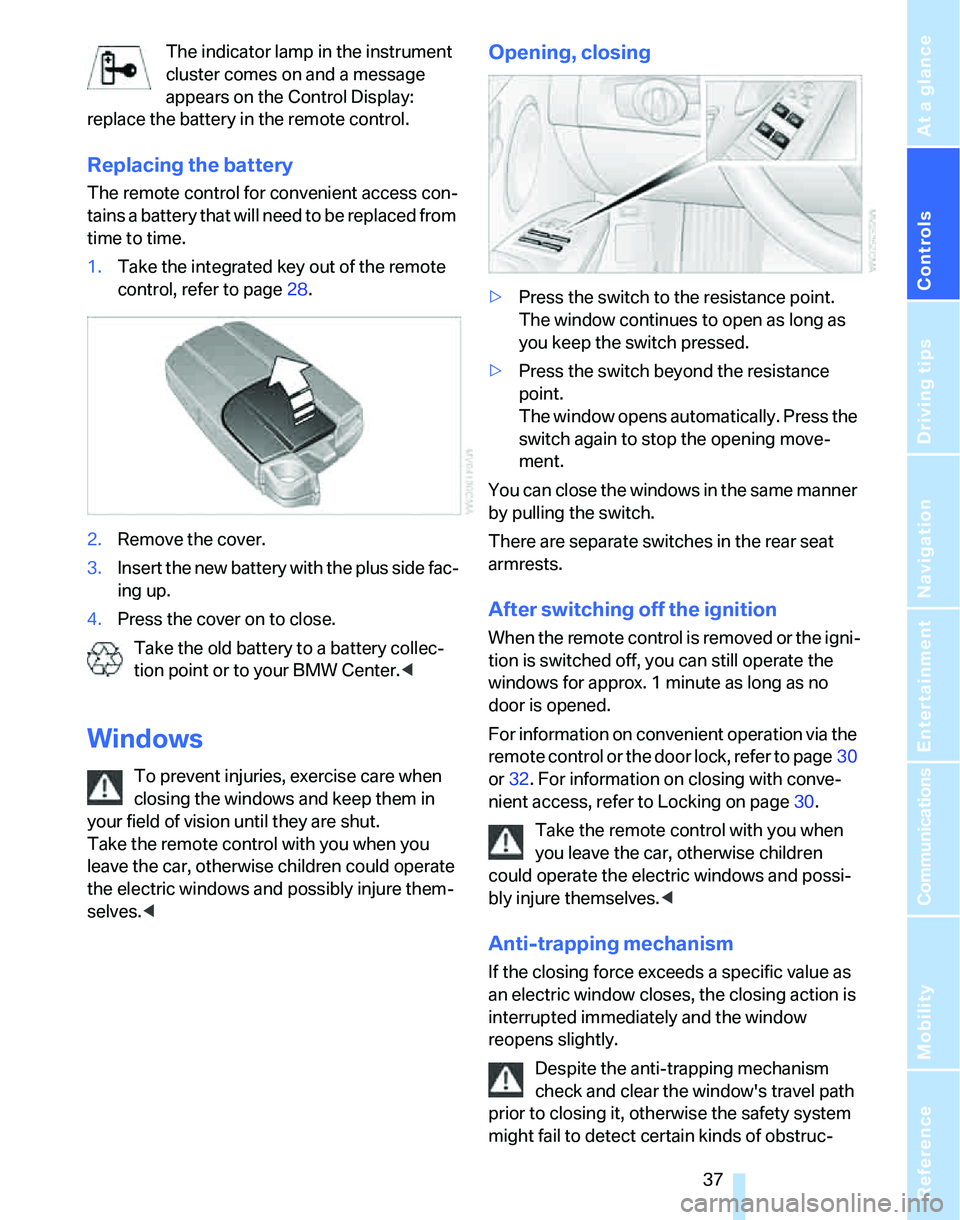
1.Take the integrated key out of the remote
control, refer to page28.
2.Remove the cover.
3.Insert the new battery with the plus side fac-
ing up.
4.Press the cover on to close.
Take the old battery to a battery collec-
tion point or to your BMW Center.<
Windows
To prevent injuries, exercise care when
closing the windows and keep them in
your field of vision until they are shut.
Take the remote control with you when you
leave the car, otherwise children could operate
the electric windows and possibly injure them-
selves.<
Opening, closing
>Press the switch to the resistance point.
The window continues to open as long as
you keep the switch pressed.
>Press the switch beyond the resistance
point.
The window opens automatically. Press the
switch again to stop the opening move-
ment.
You can close the windows in the same manner
by pulling the switch.
There are separate switches in the rear seat
armrests.
After switching off the ignition
When the remote control is removed or the igni-
tion is switched off, you can still operate the
windows for approx. 1 minute as long as no
door is opened.
For information on convenient operation via the
remote control or the door lock, refer to page30
or32. For information on closing with conve-
nient access, refer to Locking on page30.
Take the remote control with you when
you leave the car, otherwise children
could operate the electric windows and possi-
bly injure themselves.<
Anti-trapping mechanism
If the closing force exceeds a specific value as
an electric window closes, the closing action is
interrupted immediately and the window
reopens slightly.
Despite the anti-trapping mechanism
check and clear the window's travel path
prior to closing it, otherwise the safety system
might fail to detect certain kinds of obstruc-
Page 41 of 246
Controls
39Reference
At a glance
Driving tips
Communications
Navigation
Entertainment
Mobility
the glass sunroof for approx. 1 minute as long
as no door is opened.
Anti-trapping mechanism
If the glass sunroof encounters an obstruction
during closing from approximately the middle of
the opening in the roof, or during closing from
the raised position, the closing movement is
interrupted and the glass sunroof is opened
again slightly.
Despite the anti-trapping mechanism
check and clear the sunroof's travel path
prior to closing it, otherwise the safety system
might fail to detect certain kinds of obstruc-
tions, such as very thin objects, and the sunroof
would continue closing.
Pressing the switch beyond the resistance
point and holding it there deactivates the anti-
trapping mechanism.<
Following interruptions in electrical
power supply
After a power failure, there is a possibility that
the sunroof can only be raised. The system
must be initialized. BMW recommends having
this work done by your BMW Center.
Closing manually
In the event of an electrical malfunction, you can
move the glass sunroof manually:
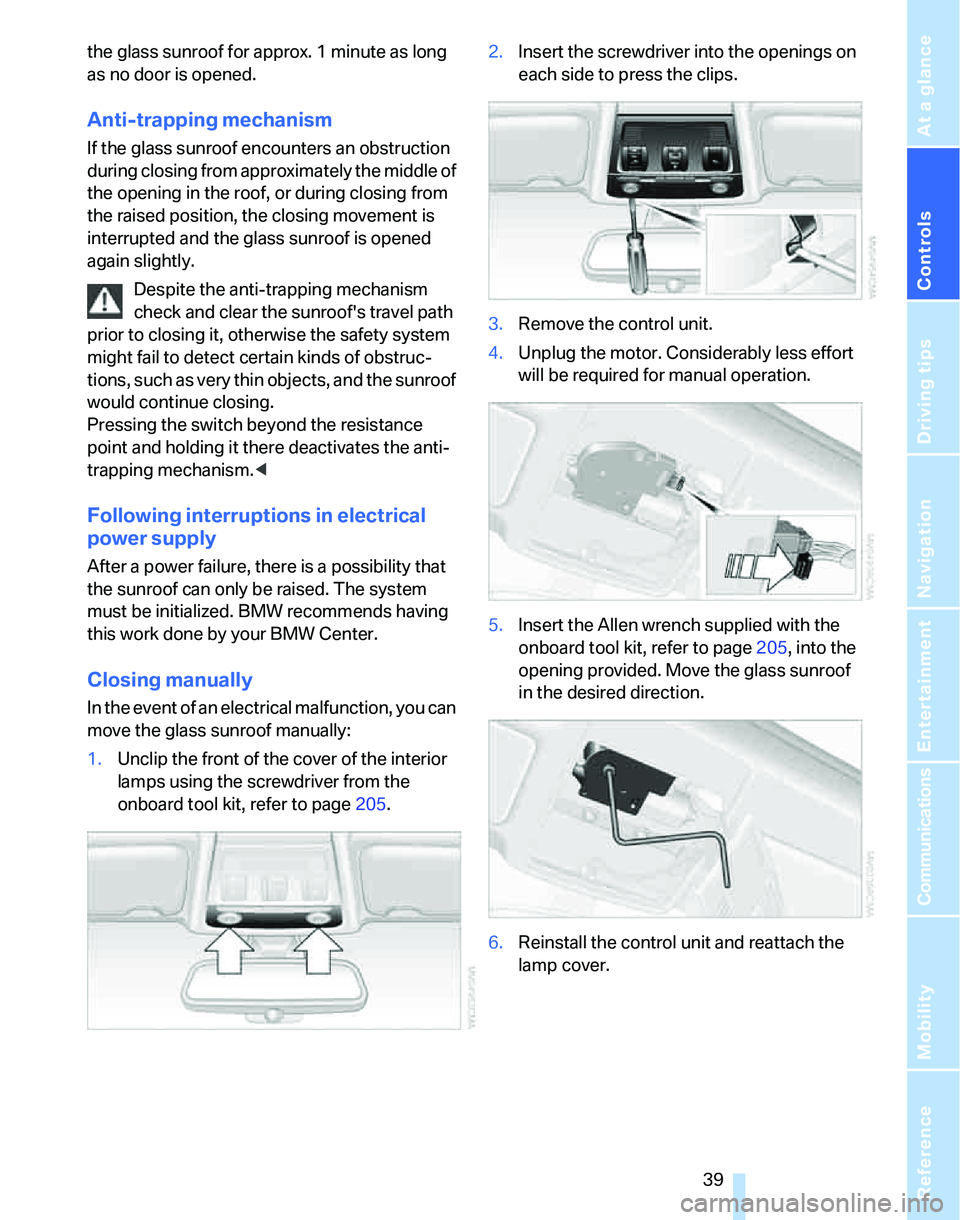
1.Unclip the front of the cover of the interior
lamps using the screwdriver from the
onboard tool kit, refer to page205.2.Insert the screwdriver into the openings on
each side to press the clips.
3.Remove the control unit.
4.Unplug the motor. Considerably less effort
will be required for manual operation.
5.Insert the Allen wrench supplied with the
onboard tool kit, refer to page205, into the
opening provided. Move the glass sunroof
in the desired direction.
6.Reinstall the control unit and reattach the
lamp cover.
Page 45 of 246
Controls
43Reference
At a glance
Driving tips
Communications
Navigation
Entertainment
Mobility
Front seats
Height adjustment
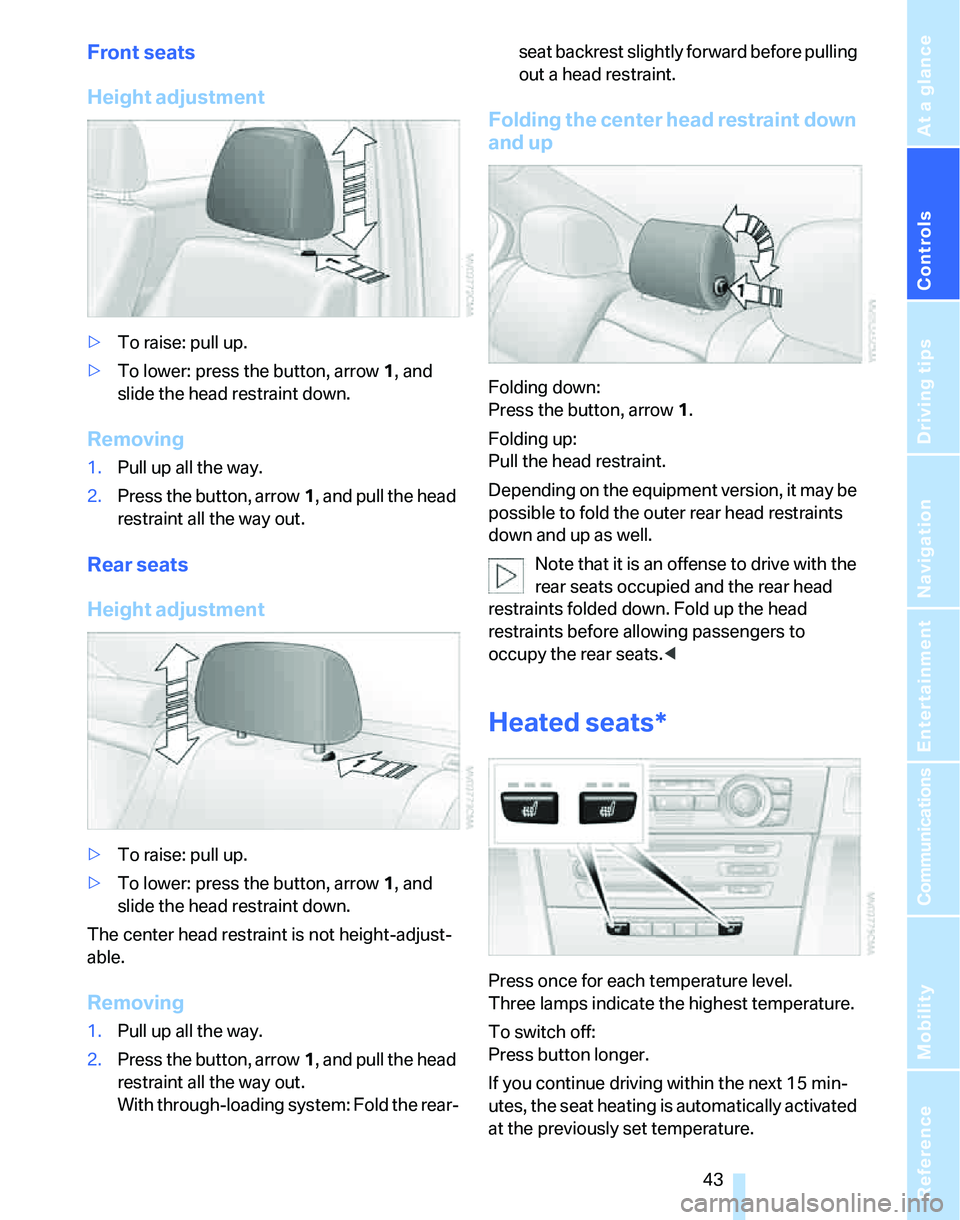
>To raise: pull up.
>To lower: press the button, arrow1, and
slide the head restraint down.
Removing
1.Pull up all the way.
2.Press the button, arrow1, and pull the head
restraint all the way out.
Rear seats
Height adjustment
>To raise: pull up.
>To lower: press the button, arrow1, and
slide the head restraint down.
The center head restraint is not height-adjust-
able.
Removing
1.Pull up all the way.
2.Press the button, arrow1, and pull the head
restraint all the way out.
With through-loading system: Fold the rear-seat backrest slightly forward before pulling
out a head restraint.
Folding the center head restraint down
and up
Folding down:
Press the button, arrow1.
Folding up:
Pull the head restraint.
Depending on the equipment version, it may be
possible to fold the outer rear head restraints
down and up as well.
Note that it is an offense to drive with the
rear seats occupied and the rear head
restraints folded down. Fold up the head
restraints before allowing passengers to
occupy the rear seats.<
Heated seats*
Press once for each temperature level.
Three lamps indicate the highest temperature.
To switch off:
Press button longer.
If you continue driving within the next 15 min-
utes, the seat heating is automatically activated
at the previously set temperature.
Page 49 of 246
Controls
47Reference
At a glance
Driving tips
Communications
Navigation
Entertainment
Mobility
Steering wheel
Adjustments
Do not adjust the steering wheel position
while the car is in motion, or an accident
may result from any unexpected movement.<
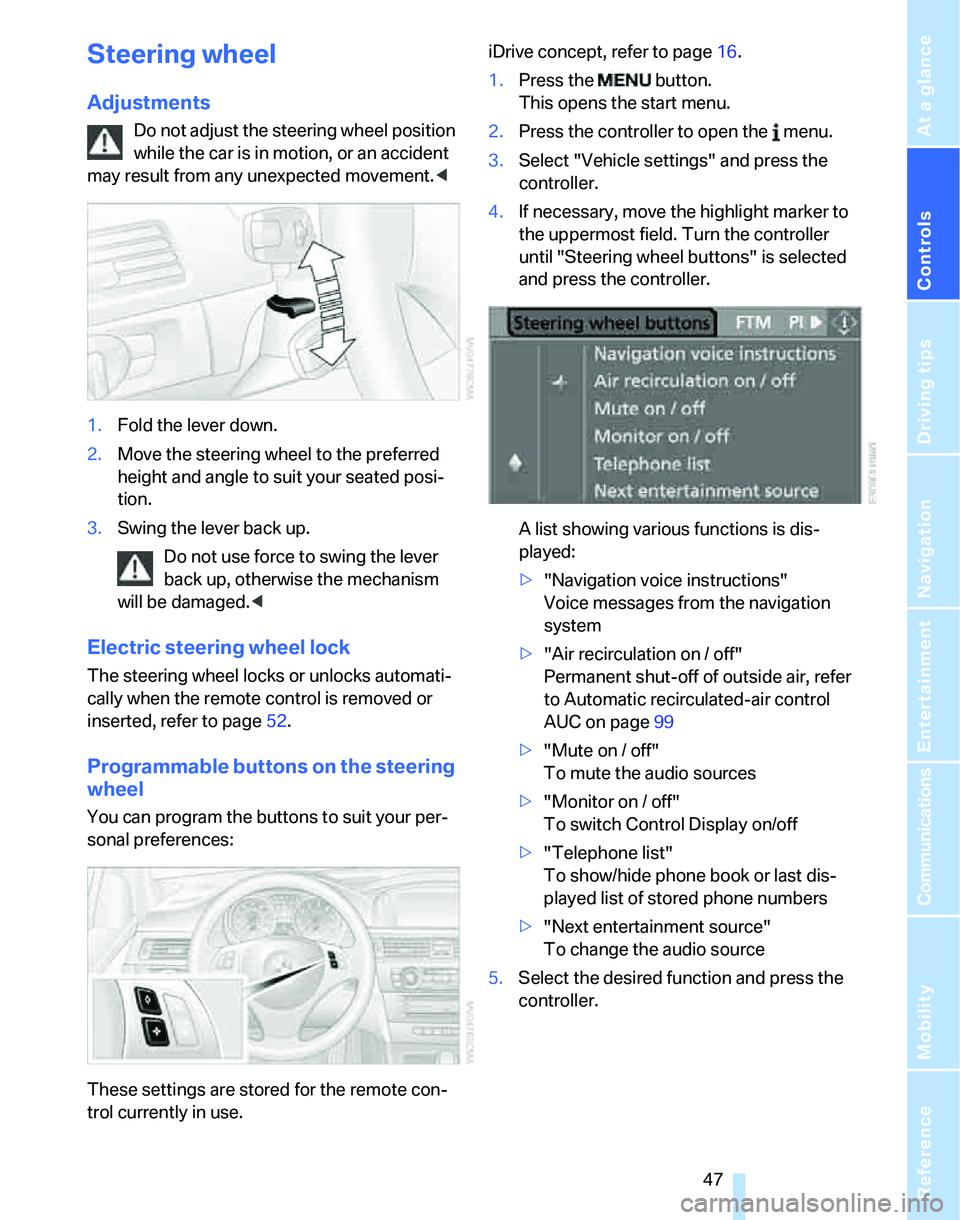
1.Fold the lever down.
2.Move the steering wheel to the preferred
height and angle to suit your seated posi-
tion.
3.Swing the lever back up.
Do not use force to swing the lever
back up, otherwise the mechanism
will be damaged.<
Electric steering wheel lock
The steering wheel locks or unlocks automati-
cally when the remote control is removed or
inserted, refer to page52.
Programmable buttons on the steering
wheel
You can program the buttons to suit your per-
sonal preferences:
These settings are stored for the remote con-
trol currently in use.iDrive concept, refer to page16.
1.Press the button.
This opens the start menu.
2.Press the controller to open the menu.
3.Select "Vehicle settings" and press the
controller.
4.If necessary, move the highlight marker to
the uppermost field. Turn the controller
until "Steering wheel buttons" is selected
and press the controller.
A list showing various functions is dis-
played:
>"Navigation voice instructions"
Voice messages from the navigation
system
>"Air recirculation on / off"
Permanent shut-off of outside air, refer
to Automatic recirculated-air control
AUC on page99
>"Mute on / off"
To mute the audio sources
>"Monitor on / off"
To switch Control Display on/off
>"Telephone list"
To show/hide phone book or last dis-
played list of stored phone numbers
>"Next entertainment source"
To change the audio source
5.Select the desired function and press the
controller.
Page 51 of 246
Controls
49Reference
At a glance
Driving tips
Communications
Navigation
Entertainment
Mobility
Transporting children safely
The right place for children
Do not leave children unattended in the
vehicle, otherwise they could endanger
themselves and/or other persons by opening
the doors, for example.<
The rear center seat is not suitable for installing
universal child-restraint systems for all age
groups, approved for the age group in question.
Children always in the rear
Accident research has shown that the safest
place for children is on the rear seats.
Children under the age of 13 or smaller
than 5 ft/150 cm may be transported only
in the rear in suitable child-restraint systems
appropriate for their age, weight and size. Oth-
erwise there is an increased risk of injury in the
event of an accident.<
Children 13 years of age or older must be buck-
led in with a safety belt as soon as there no
longer is any child-restraint system that is
appropriate for their age, size and weight.
All rear seats in your vehicle meet the recom-
mendations of the SAE J1819 standard for
safely mounting child-restraint systems in
motor vehicles.
Exception for front passenger seat
Should it be necessary to use a child-
restraint system on the front passenger
seat, the front and side airbags must be deacti-
vated. Otherwise, a child traveling on that seat
will be at an increased risk of injury if the airbags
are triggered off, even with a child-restraint sys-
tem. Your BMW Center will be glad to advise
you.<
For more information on automatic deactivation
of the front passenger airbags refer to page91.
Installing child-restraint
systems
Observe the child-restraint system man-
ufacturer's instructions for selecting,
installing and using child-restraint systems.
Otherwise the protective effect may be dimin-
ished.<
Standard child-restraint systems are designed
to be secured with a lap belt or with the lap-belt
section of a lap-and-shoulder belt. Incorrectly
or improperly installed child-restraint systems
can increase the risk of injury to children.
Always follow the installation instructions for
the system with the greatest care.
On the front passenger's seat
Before installing a child-restraint system
on the front passenger's seat, make sure
that the front and side airbags for the front pas-
senger are deactivated, otherwise there is an
increased risk of injury if the airbags deploy.<
Seat height
Before installing a universal child-restraint sys-
tem, move the front passenger's seat up as far
as it will go to ensure that the safety belt will be
ideally positioned. Do not change the seat
height afterward.
Backrest width
The backrest width of the front passenger
seat must be adjusted to its widest set-
ting, otherwise the stability of the child seat on
the front passenger seat is limited.<
1.Adjust the backrest width to its widest set-
ting, refer to page42.
2.Install the child seat.
Page 53 of 246
Controls
51Reference
At a glance
Driving tips
Communications
Navigation
Entertainment
Mobility
Rear seats without through-loading
system
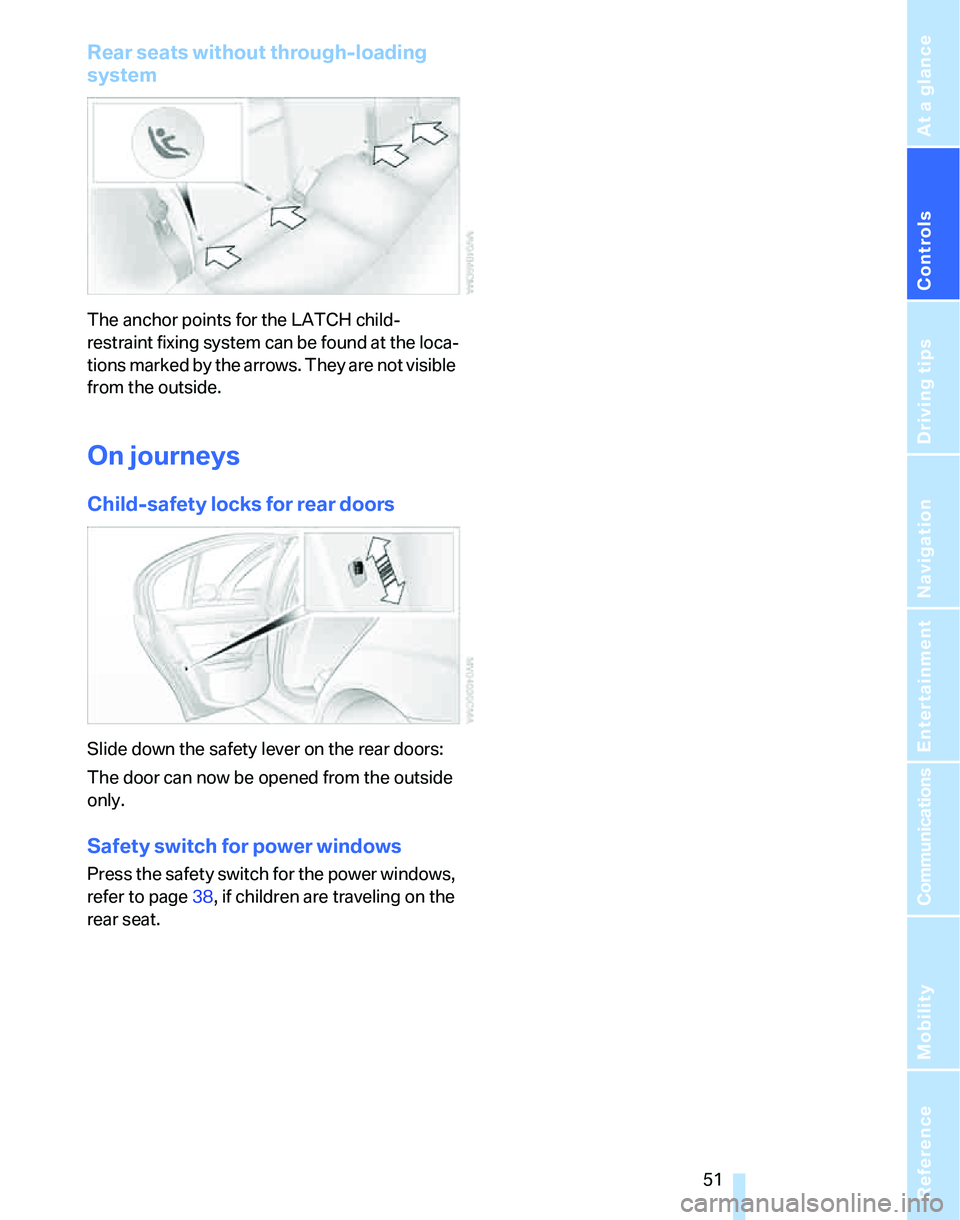
The anchor points for the LATCH child-
restraint fixing system can be found at the loca-
tions marked by the arrows. They are not visible
from the outside.
On journeys
Child-safety locks for rear doors
Slide down the safety lever on the rear doors:
The door can now be opened from the outside
only.
Safety switch for power windows
Press the safety switch for the power windows,
refer to page38, if children are traveling on the
rear seat.
Page 57 of 246
Controls
55Reference
At a glance
Driving tips
Communications
Navigation
Entertainment
Mobility
Reverse gear
Select only when the vehicle is stationary.
When the gearshift lever is pressed to the left, a
slight resistance has to be overcome.
Sequential manual gearbox
SMG*
The concept
The sequential manual gearbox SMG is an
automated transmission in which operation of
the clutch and gearshifts are performed by an
electro-hydraulic system.
SMG is operated via the selector lever in the
center console and two shift paddles on the
steering wheel.
It offers you the following functions:
>Choice of manual or automatic operation:
sequential mode or Drive mode
>Choice of two driving programs: Normal or
Sport, refer to Dynamic Driving Control,
page56
>Automatic downshifting and prevention of
misshifting in sequential mode as well
>Acceleration assistant, refer to page57
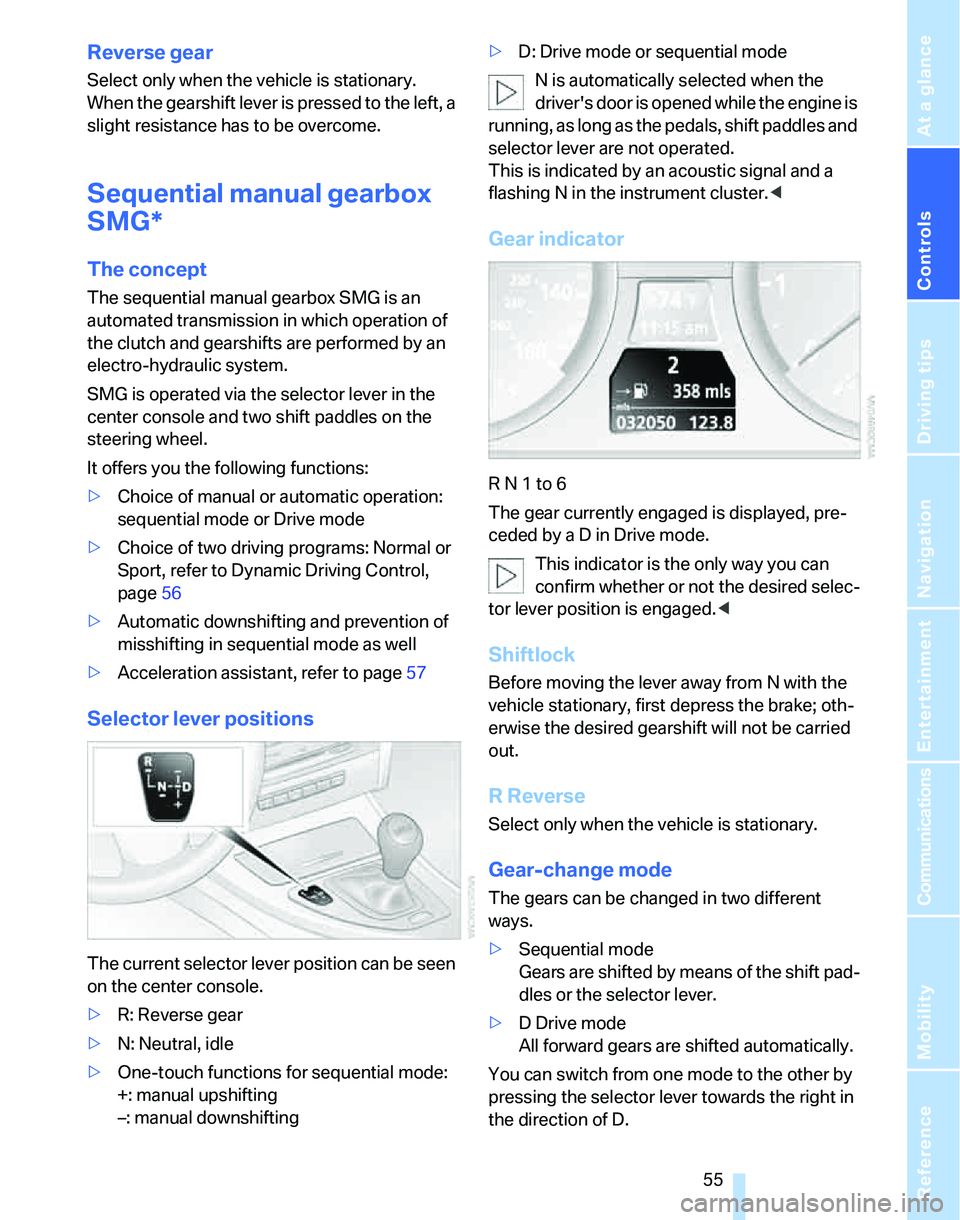
Selector lever positions
The current selector lever position can be seen
on the center console.
>R: Reverse gear
>N: Neutral, idle
>One-touch functions for sequential mode:
+: manual upshifting
–: manual downshifting>D: Drive mode or sequential mode
N is automatically selected when the
driver's door is opened while the engine is
running, as long as the pedals, shift paddles and
selector lever are not operated.
This is indicated by an acoustic signal and a
flashing N in the instrument cluster.<
Gear indicator
R N 1 to 6
The gear currently engaged is displayed, pre-
ceded by a D in Drive mode.
This indicator is the only way you can
confirm whether or not the desired selec-
tor lever position is engaged.<
Shiftlock
Before moving the lever away from N with the
vehicle stationary, first depress the brake; oth-
erwise the desired gearshift will not be carried
out.
R Reverse
Select only when the vehicle is stationary.
Gear-change mode
The gears can be changed in two different
ways.
>Sequential mode
Gears are shifted by means of the shift pad-
dles or the selector lever.
>D Drive mode
All forward gears are shifted automatically.
You can switch from one mode to the other by
pressing the selector lever towards the right in
the direction of D.
Page 61 of 246
Controls
59Reference
At a glance
Driving tips
Communications
Navigation
Entertainment
Mobility
Using turn signals
Press the lever beyond the resistance point.
To turn off manually, press the lever to the
resistance point.
Unusually rapid flashing of the indicator
lamp indicates that a turn signal indicator
has failed.
After switching off the ignition, make sure that
the roadside parking lamps are not switched
on.<
Indicating a turn briefly
Press the lever as far as the resistance point for
as long as you wish to indicate a turn.
Triple turn signal activation
Press the lever as far as the resistance point.
The turn signals flash three times.
You can activate or deactivate this function.
iDrive concept, refer to page16.
1.Open the start menu.
2.Press the controller to open the menu.
3.Select "Vehicle settings" and press the
controller.
4.Select "Lighting" and press the controller.
5.Select "Triple turn signal activation" and
press the controller.
Triple turn signaling is activated.
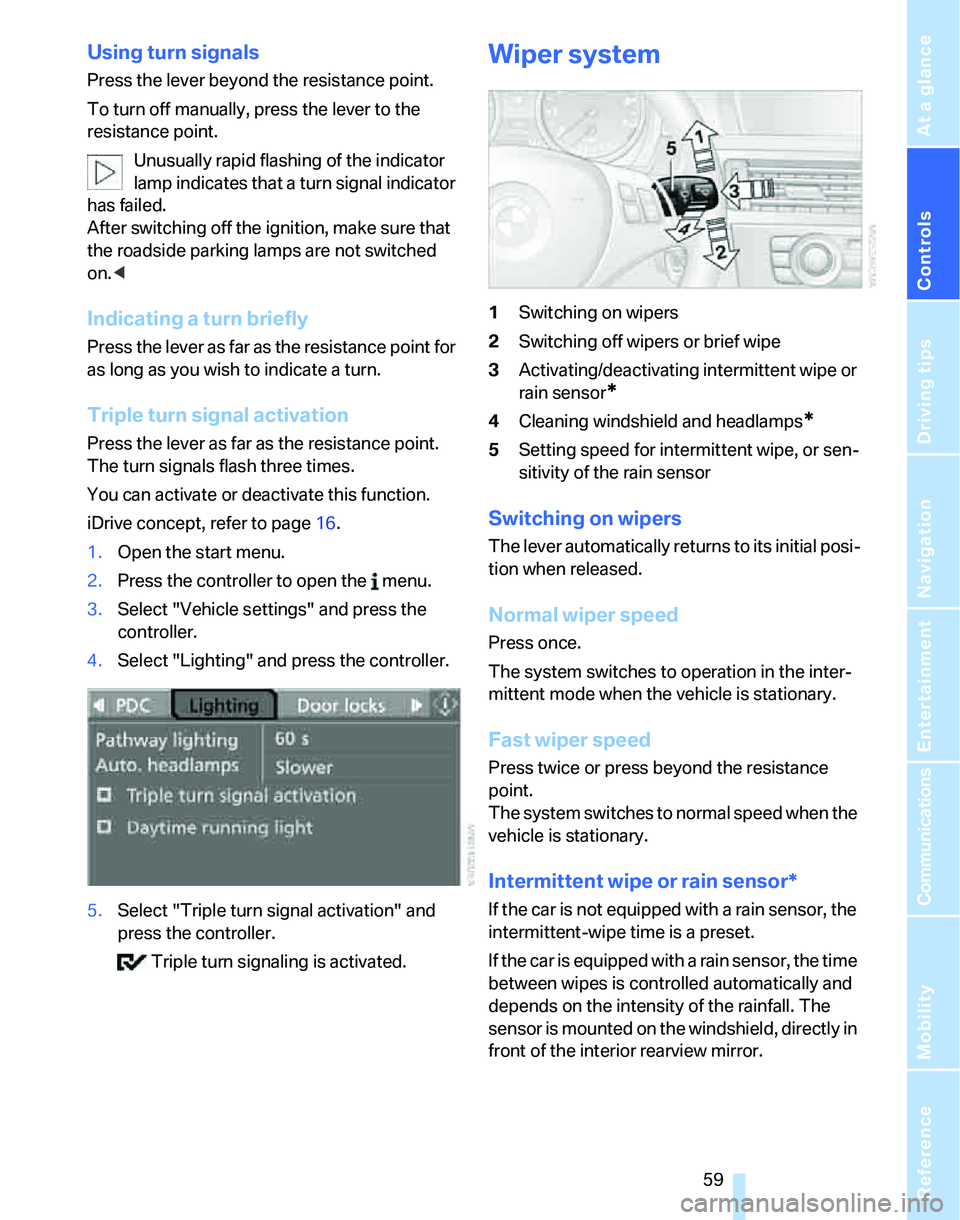
Wiper system
1Switching on wipers
2Switching off wipers or brief wipe
3Activating/deactivating intermittent wipe or
rain sensor
*
4Cleaning windshield and headlamps*
5Setting speed for intermittent wipe, or sen-
sitivity of the rain sensor
Switching on wipers
The lever automatically returns to its initial posi-
tion when released.
Normal wiper speed
Press once.
The system switches to operation in the inter-
mittent mode when the vehicle is stationary.
Fast wiper speed
Press twice or press beyond the resistance
point.
The system switches to normal speed when the
vehicle is stationary.
Intermittent wipe or rain sensor*
If the car is not equipped with a rain sensor, the
intermittent-wipe time is a preset.
If the car is equipped with a rain sensor, the time
between wipes is controlled automatically and
depends on the intensity of the rainfall. The
sensor is mounted on the windshield, directly in
front of the interior rearview mirror.
Page 63 of 246
Controls
61Reference
At a glance
Driving tips
Communications
Navigation
Entertainment
Mobility
poor road surface, e.g. snow, rain, ice or loose
material.<
Manual transmission/SMG
You can shift gears while cruise control is acti-
vated. An indicator lamp notifies you that you
should shift gears when you drive for an
extended period at very high or very low engine
speeds, or the system is deactivated.
In Drive mode, the SMG acts similarly to an
automatic transmission in position D.
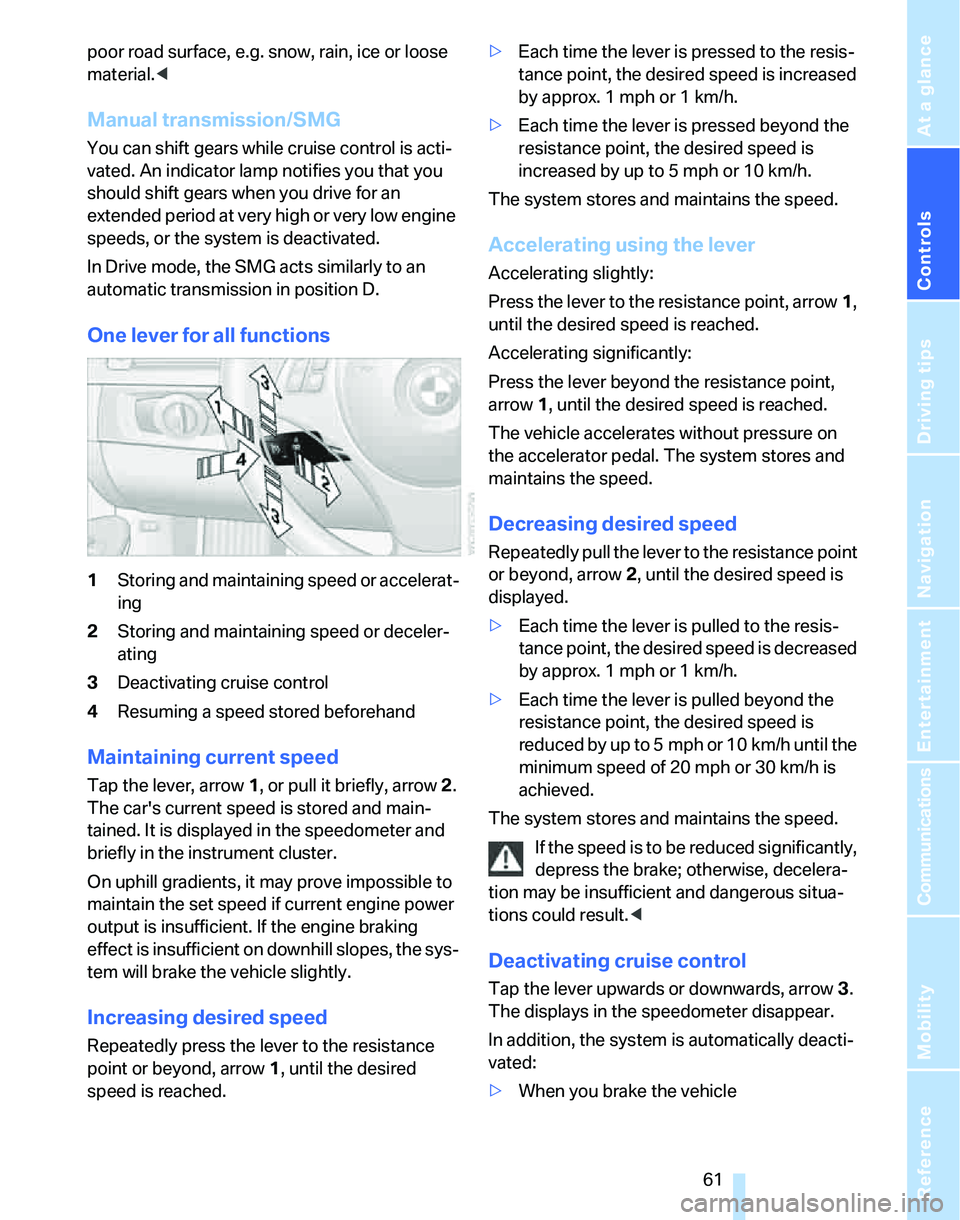
One lever for all functions
1Storing and maintaining speed or accelerat-
ing
2Storing and maintaining speed or deceler-
ating
3Deactivating cruise control
4Resuming a speed stored beforehand
Maintaining current speed
Tap the lever, arrow 1, or pull it briefly, arrow 2.
The car's current speed is stored and main-
tained. It is displayed in the speedometer and
briefly in the instrument cluster.
On uphill gradients, it may prove impossible to
maintain the set speed if current engine power
output is insufficient. If the engine braking
effect is insufficient on downhill slopes, the sys-
tem will brake the vehicle slightly.
Increasing desired speed
Repeatedly press the lever to the resistance
point or beyond, arrow1, until the desired
speed is reached.>Each time the lever is pressed to the resis-
tance point, the desired speed is increased
by approx. 1 mph or 1 km/h.
>Each time the lever is pressed beyond the
resistance point, the desired speed is
increased by up to 5 mph or 10 km/h.
The system stores and maintains the speed.
Accelerating using the lever
Accelerating slightly:
Press the lever to the resistance point, arrow 1,
until the desired speed is reached.
Accelerating significantly:
Press the lever beyond the resistance point,
arrow 1, until the desired speed is reached.
The vehicle accelerates without pressure on
the accelerator pedal. The system stores and
maintains the speed.
Decreasing desired speed
Repeatedly pull the lever to the resistance point
or beyond, arrow 2, until the desired speed is
displayed.
>Each time the lever is pulled to the resis-
tance point, the desired speed is decreased
by approx. 1 mph or 1 km/h.
>Each time the lever is pulled beyond the
resistance point, the desired speed is
reduced by up to 5 mph or 10 km/h until the
minimum speed of 20 mph or 30 km/h is
achieved.
The system stores and maintains the speed.
If the speed is to be reduced significantly,
depress the brake; otherwise, decelera-
tion may be insufficient and dangerous situa-
tions could result.<
Deactivating cruise control
Tap the lever upwards or downwards, arrow3.
The displays in the speedometer disappear.
In addition, the system is automatically deacti-
vated:
>When you brake the vehicle
Page 65 of 246
Controls
63Reference
At a glance
Driving tips
Communications
Navigation
Entertainment
Mobility
becomes clear, your vehicle will accelerate to
the speed you have selected by increasing the
throttle setting and shifting gears automatically
or by the driver as needed. Your selected speed
will be held when driving downhill, too.
Since this active cruise control system is a new
technology and operates differently from con-
ventional cruise control systems which you may
be accustomed to, you are strongly urged to
read all of the pages relating to this system
before use. Pay special attention to the System
limitations section beginning on page66.
Braking sensation
The system's automatic brake operation results
in a braking sensation that is slightly different
from what you feel when you brake the vehicle
yourself in a similar situation. Possible noises
during automatic deceleration are normal.
Manual transmission/SMG
You can shift gears while cruise control is acti-
vated. An indicator lamp notifies you that you
should shift gears when you drive for an
extended period at very high or very low engine
speeds, or the system is deactivated.
In Drive mode, the SMG acts similarly to an
automatic transmission in position D.
Range of applications
The minimum desired speed is 20 mph or
30 km/h, and the maximum desired speed is
110 mph or 180 km/h.
As with conventional cruise control sys-
tems, active cruise control in no way
diminishes or substitutes for the driver’s own
personal responsibility, alertness and aware-
ness in adjusting speed, braking or otherwise
controlling the vehicle. The driver should
decide when to use the system on the basis of
road, traffic, visibility, and weather conditions.
Active cruise control is intended for use on
highway-type roadways where traffic is moving
relatively smoothly. Do not use this system in
city driving; heavy traffic such as during rush
hour; on curvy, winding roads, slippery roads or
roads with sharp curves such as highway off-ramps; during inclement weather such as snow,
strong rain or fog; or when entering inter-
changes, service/parking areas or toll booths.
It is also important to regulate your vehicle's
speed and distance setting within applicable
legal limits. Always be ready to take action or
apply the brakes if necessary, especially when
the system is actively following a vehicle in front
of you. Otherwise, driving conditions could
result which violate the law or pose a risk of
accident.<
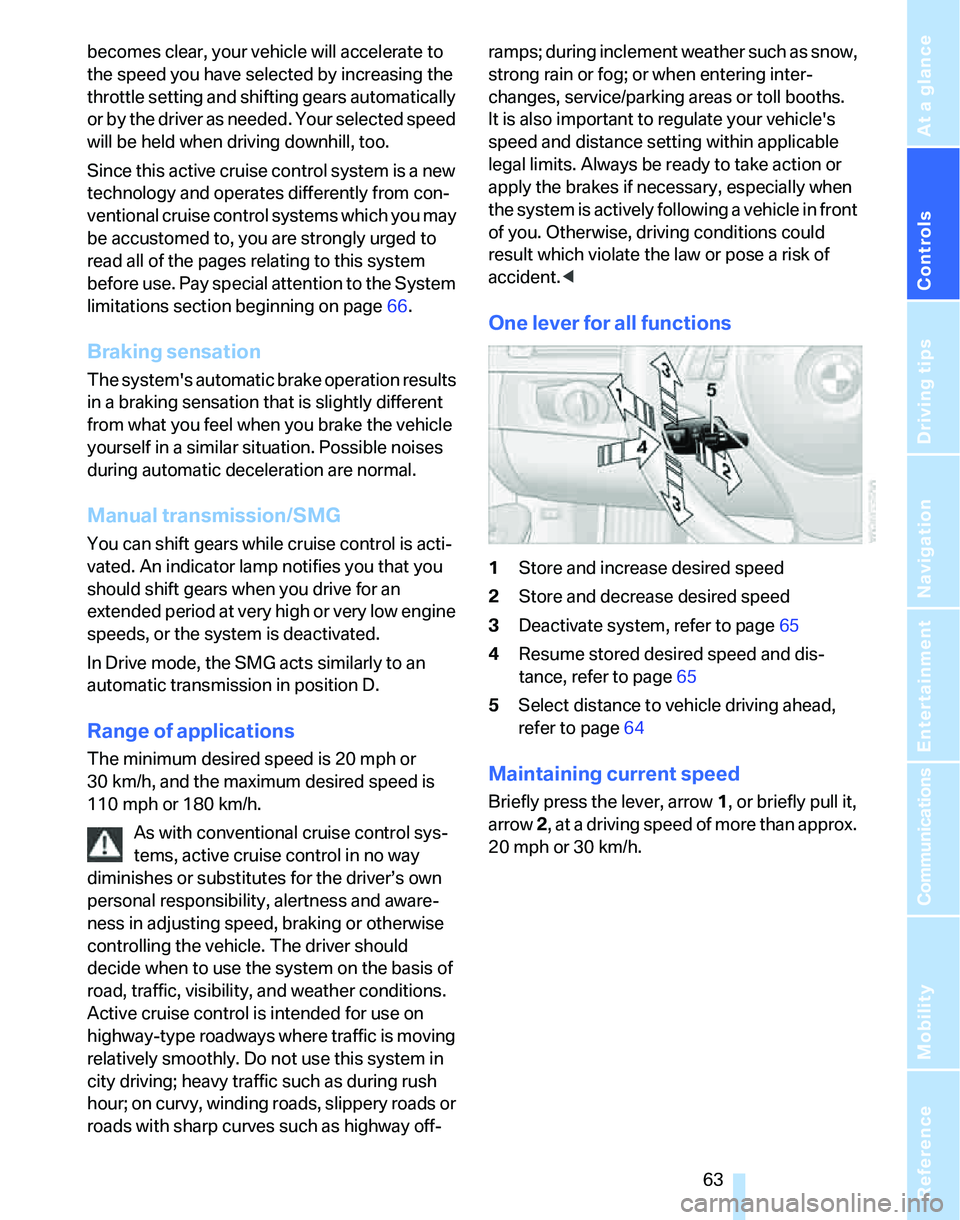
One lever for all functions
1Store and increase desired speed
2Store and decrease desired speed
3Deactivate system, refer to page65
4Resume stored desired speed and dis-
tance, refer to page65
5Select distance to vehicle driving ahead,
refer to page64
Maintaining current speed
Briefly press the lever, arrow 1, or briefly pull it,
arrow 2, at a driving speed of more than approx.
20 mph or 30 km/h.