door lock BMW 325I SEDAN 2006 E90 User Guide
[x] Cancel search | Manufacturer: BMW, Model Year: 2006, Model line: 325I SEDAN, Model: BMW 325I SEDAN 2006 E90Pages: 245, PDF Size: 8.24 MB
Page 40 of 245
Opening and closing
38 tions, such as thin objects, and the window
would continue closing.
Pulling the switch beyond the resistance point
and holding it limits the response of the anti-
trapping mechanism. In this case, if the closing
force exceeds a defined threshold, the window
will only open a few fractions of an inch/a few
millimeters.
If the switch is pulled past the resistance point
again within approx. 4 seconds, the anti-trap-
ping mechanism will be deactivated.<
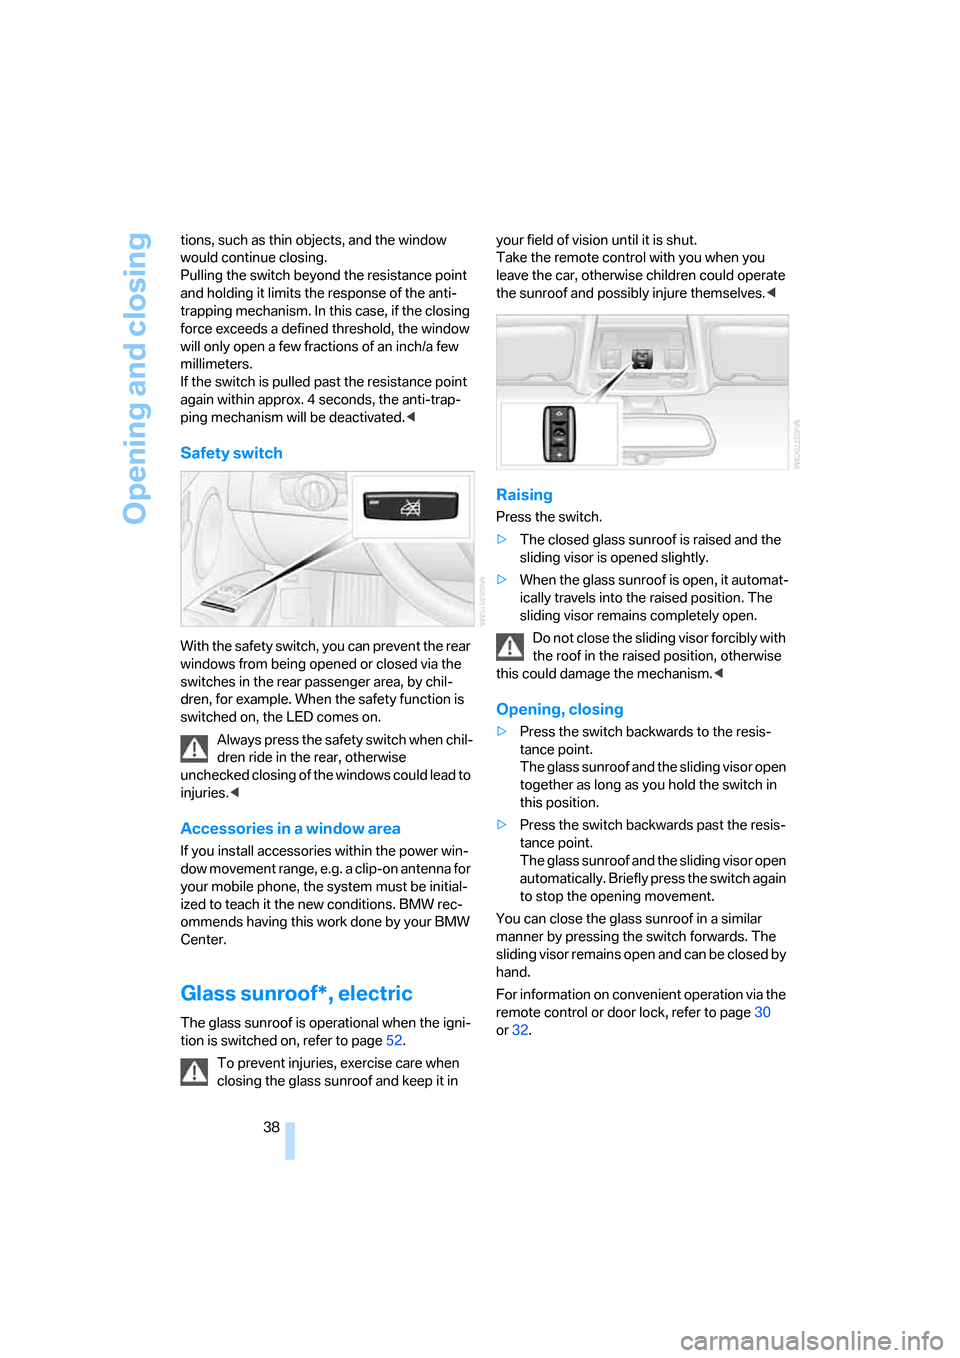
Safety switch
With the safety switch, you can prevent the rear
windows from being opened or closed via the
switches in the rear passenger area, by chil-
dren, for example. When the safety function is
switched on, the LED comes on.
Always press the safety switch when chil-
dren ride in the rear, otherwise
unchecked closing of the windows could lead to
injuries.<
Accessories in a window area
If you install accessories within the power win-
dow movement range, e.g. a clip-on antenna for
your mobile phone, the system must be initial-
ized to teach it the new conditions. BMW rec-
ommends having this work done by your BMW
Center.
Glass sunroof*, electric
The glass sunroof is operational when the igni-
tion is switched on, refer to page52.
To prevent injuries, exercise care when
closing the glass sunroof and keep it in your field of vision until it is shut.
Take the remote control with you when you
leave the car, otherwise children could operate
the sunroof and possibly injure themselves.<
Raising
Press the switch.
>The closed glass sunroof is raised and the
sliding visor is opened slightly.
>When the glass sunroof is open, it automat-
ically travels into the raised position. The
sliding visor remains completely open.
Do not close the sliding visor forcibly with
the roof in the raised position, otherwise
this could damage the mechanism.<
Opening, closing
>Press the switch backwards to the resis-
tance point.
The glass sunroof and the sliding visor open
together as long as you hold the switch in
this position.
>Press the switch backwards past the resis-
tance point.
The glass sunroof and the sliding visor open
automatically. Briefly press the switch again
to stop the opening movement.
You can close the glass sunroof in a similar
manner by pressing the switch forwards. The
sliding visor remains open and can be closed by
hand.
For information on convenient operation via the
remote control or door lock, refer to page30
or32.
Page 46 of 245
Adjustments
44
Seat and mirror memory*
You can store and call up two different combi-
nations of driver's-seat and exterior-mirror
positions.
Settings for the seat back width and lumbar
support are not stored in memory.
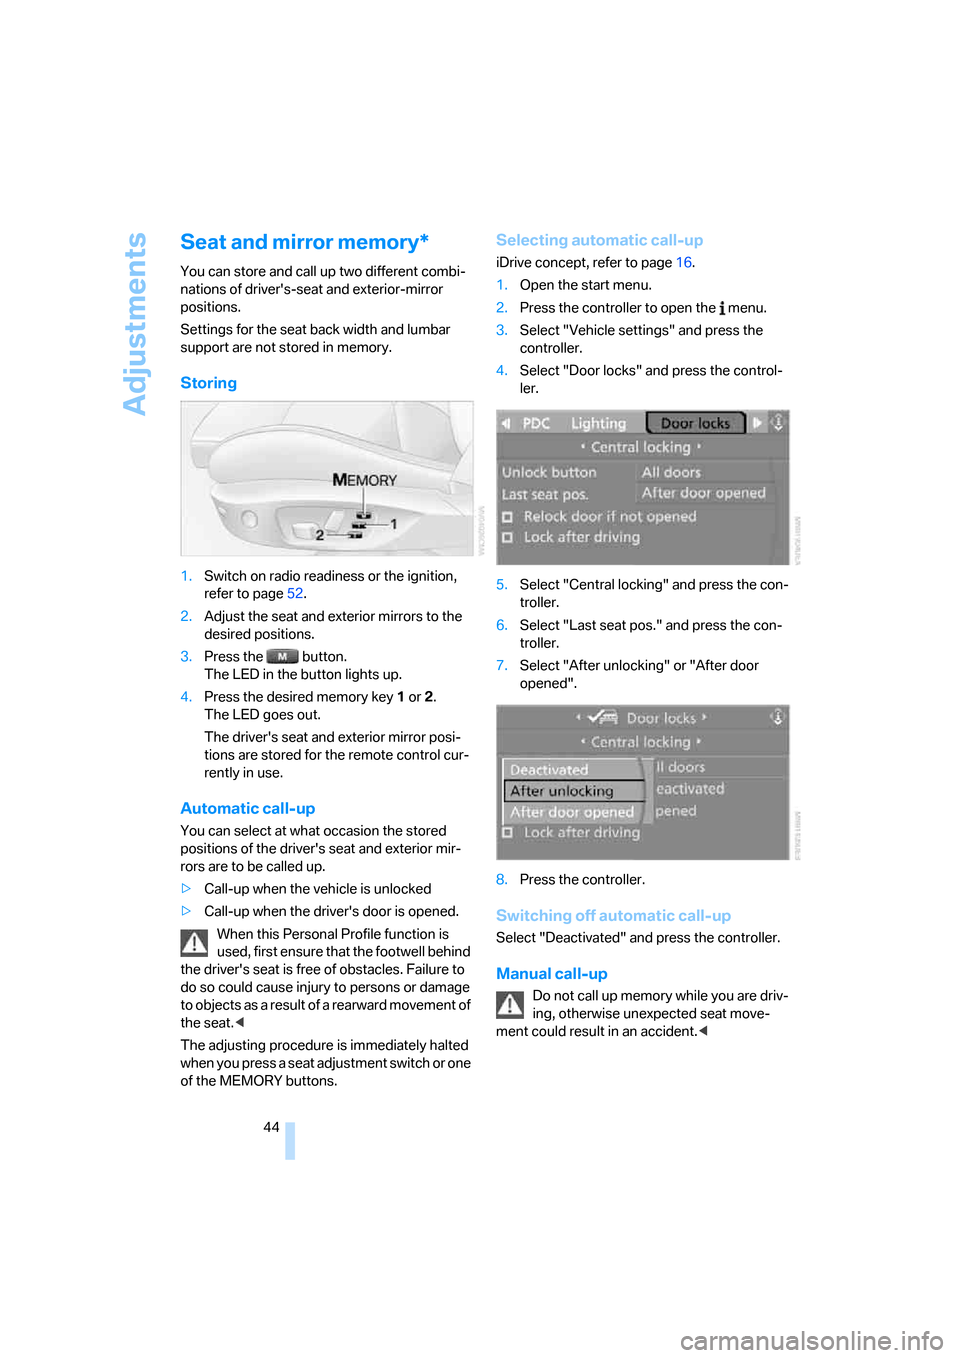
Storing
1.Switch on radio readiness or the ignition,
refer to page52.
2.Adjust the seat and exterior mirrors to the
desired positions.
3.Press the button.
The LED in the button lights up.
4.Press the desired memory key 1 or 2.
The LED goes out.
The driver's seat and exterior mirror posi-
tions are stored for the remote control cur-
rently in use.
Automatic call-up
You can select at what occasion the stored
positions of the driver's seat and exterior mir-
rors are to be called up.
>Call-up when the vehicle is unlocked
>Call-up when the driver's door is opened.
When this Personal Profile function is
used, first ensure that the footwell behind
the driver's seat is free of obstacles. Failure to
do so could cause injury to persons or damage
to objects as a result of a rearward movement of
the seat.<
The adjusting procedure is immediately halted
when you press a seat adjustment switch or one
of the MEMORY buttons.
Selecting automatic call-up
iDrive concept, refer to page16.
1.Open the start menu.
2.Press the controller to open the menu.
3.Select "Vehicle settings" and press the
controller.
4.Select "Door locks" and press the control-
ler.
5.Select "Central locking" and press the con-
troller.
6.Select "Last seat pos." and press the con-
troller.
7.Select "After unlocking" or "After door
opened".
8.Press the controller.
Switching off automatic call-up
Select "Deactivated" and press the controller.
Manual call-up
Do not call up memory while you are driv-
ing, otherwise unexpected seat move-
ment could result in an accident.<
Page 47 of 245
Controls
45Reference
At a glance
Driving tips
Communications
Navigation
Entertainment
Mobility
Convenience mode
1.Unlock and open the driver's door or switch
on radio readiness, refer to page52.
2.Briefly press the desired memory button1
or 2.
The adjusting procedure is immediately halted
when you touch a seat adjustment switch or
one of the MEMORY buttons.
Safety feature
1.Close the driver's door and switch the igni-
tion on or off, refer to page52.
2.Press the desired memory button1 or2
and maintain pressure until the adjustment
process has been completed.
If the button was pressed accidentally:
press the button again; the LED goes out.
Safety belts
Observe the adjustment instructions on
page40 to ensure the best possible per-
sonal protection.<
Before every drive, make sure that all occupants
wear their safety belts. Airbags complement the
safety belt as an additional safety device, but
they do not represent a substitute.
On the rear seats, the center belt buckle marked
with the letters CENTER is solely intended for
the center passenger.
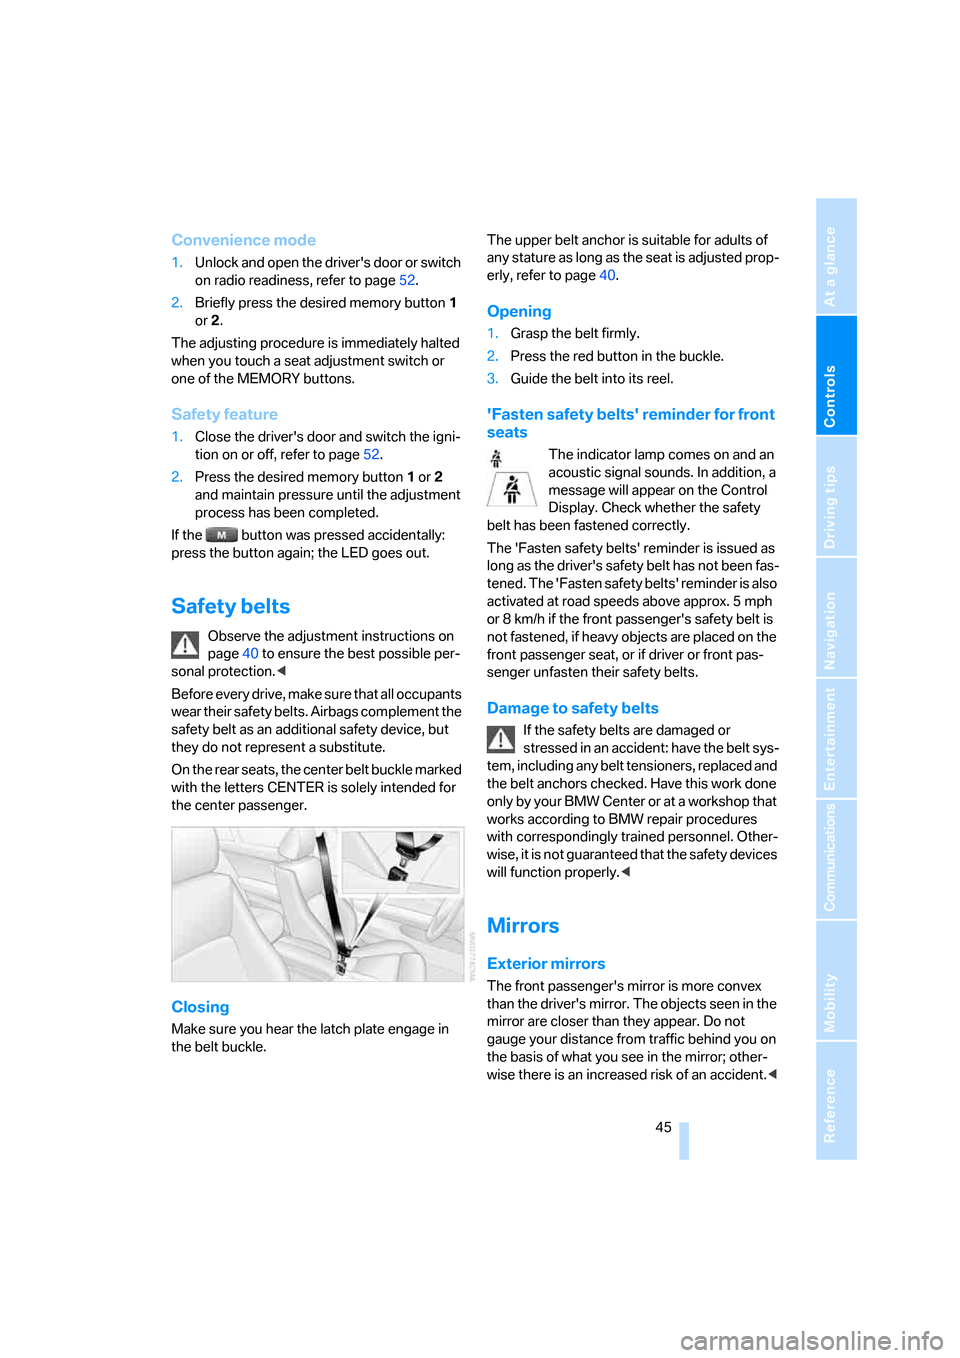
Closing
Make sure you hear the latch plate engage in
the belt buckle.The upper belt anchor is suitable for adults of
any stature as long as the seat is adjusted prop-
erly, refer to page40.
Opening
1.Grasp the belt firmly.
2.Press the red button in the buckle.
3.Guide the belt into its reel.
'Fasten safety belts' reminder for front
seats
The indicator lamp comes on and an
acoustic signal sounds. In addition, a
message will appear on the Control
Display. Check whether the safety
belt has been fastened correctly.
The 'Fasten safety belts' reminder is issued as
long as the driver's safety belt has not been fas-
tened. The 'Fasten safety belts' reminder is also
activated at road speeds above approx. 5 mph
or 8 km/h if the front passenger's safety belt is
not fastened, if heavy objects are placed on the
front passenger seat, or if driver or front pas-
senger unfasten their safety belts.
Damage to safety belts
If the safety belts are damaged or
stressed in an accident: have the belt sys-
tem, including any belt tensioners, replaced and
the belt anchors checked. Have this work done
only by your BMW Center or at a workshop that
works according to BMW repair procedures
with correspondingly trained personnel. Other-
wise, it is not guaranteed that the safety devices
will function properly.<
Mirrors
Exterior mirrors
The front passenger's mirror is more convex
than the driver's mirror. The objects seen in the
mirror are closer than they appear. Do not
gauge your distance from traffic behind you on
the basis of what you see in the mirror; other-
wise there is an increased risk of an accident.<
Page 53 of 245
Controls
51Reference
At a glance
Driving tips
Communications
Navigation
Entertainment
Mobility
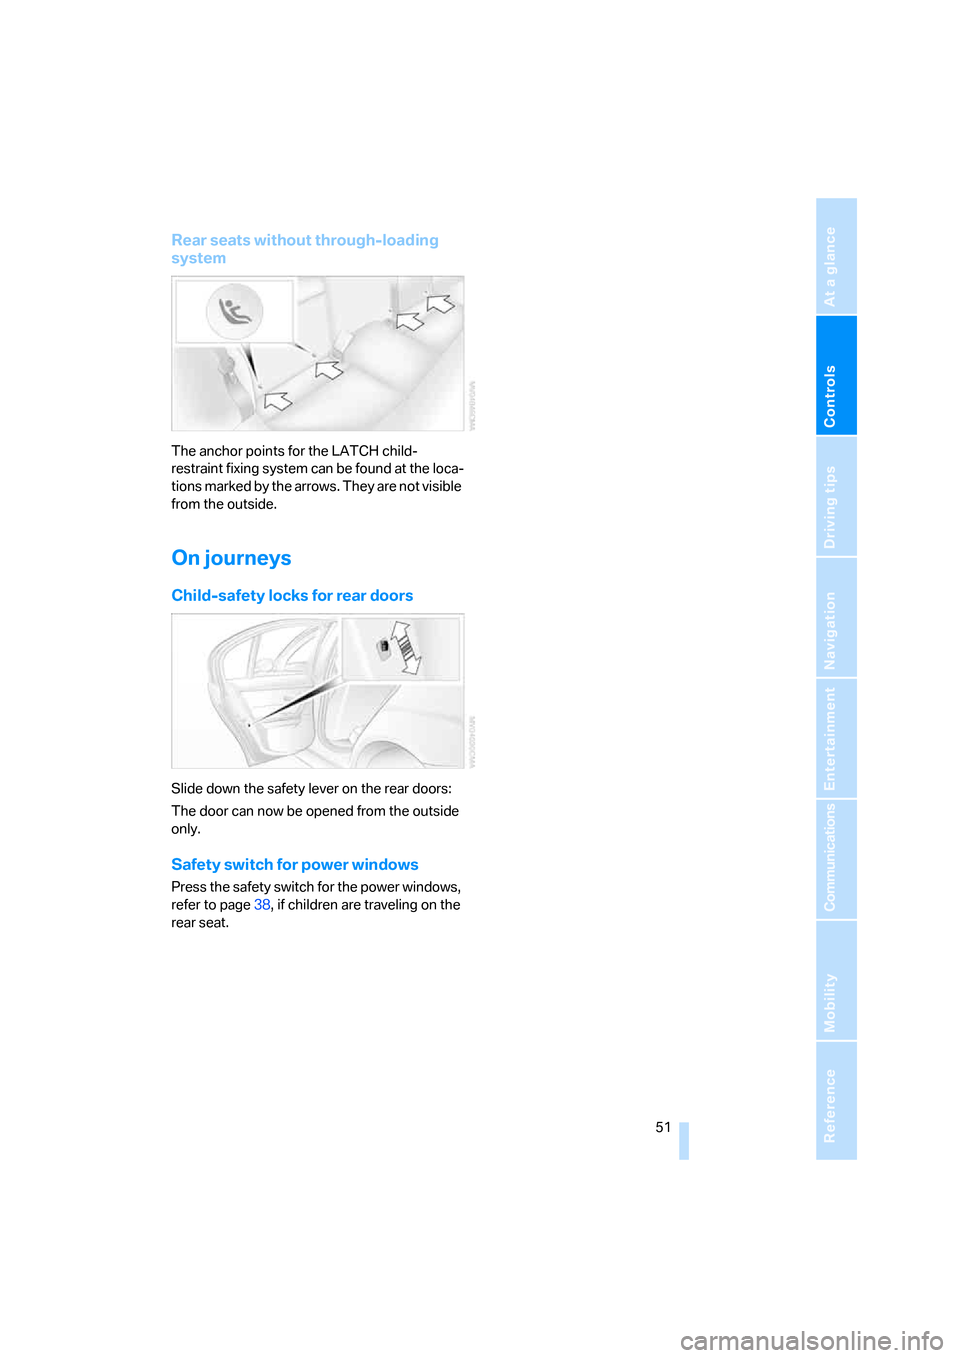
Rear seats without through-loading
system
The anchor points for the LATCH child-
restraint fixing system can be found at the loca-
tions marked by the arrows. They are not visible
from the outside.
On journeys
Child-safety locks for rear doors
Slide down the safety lever on the rear doors:
The door can now be opened from the outside
only.
Safety switch for power windows
Press the safety switch for the power windows,
refer to page38, if children are traveling on the
rear seat.
Page 54 of 245
Driving
52
Driving
Ignition lock
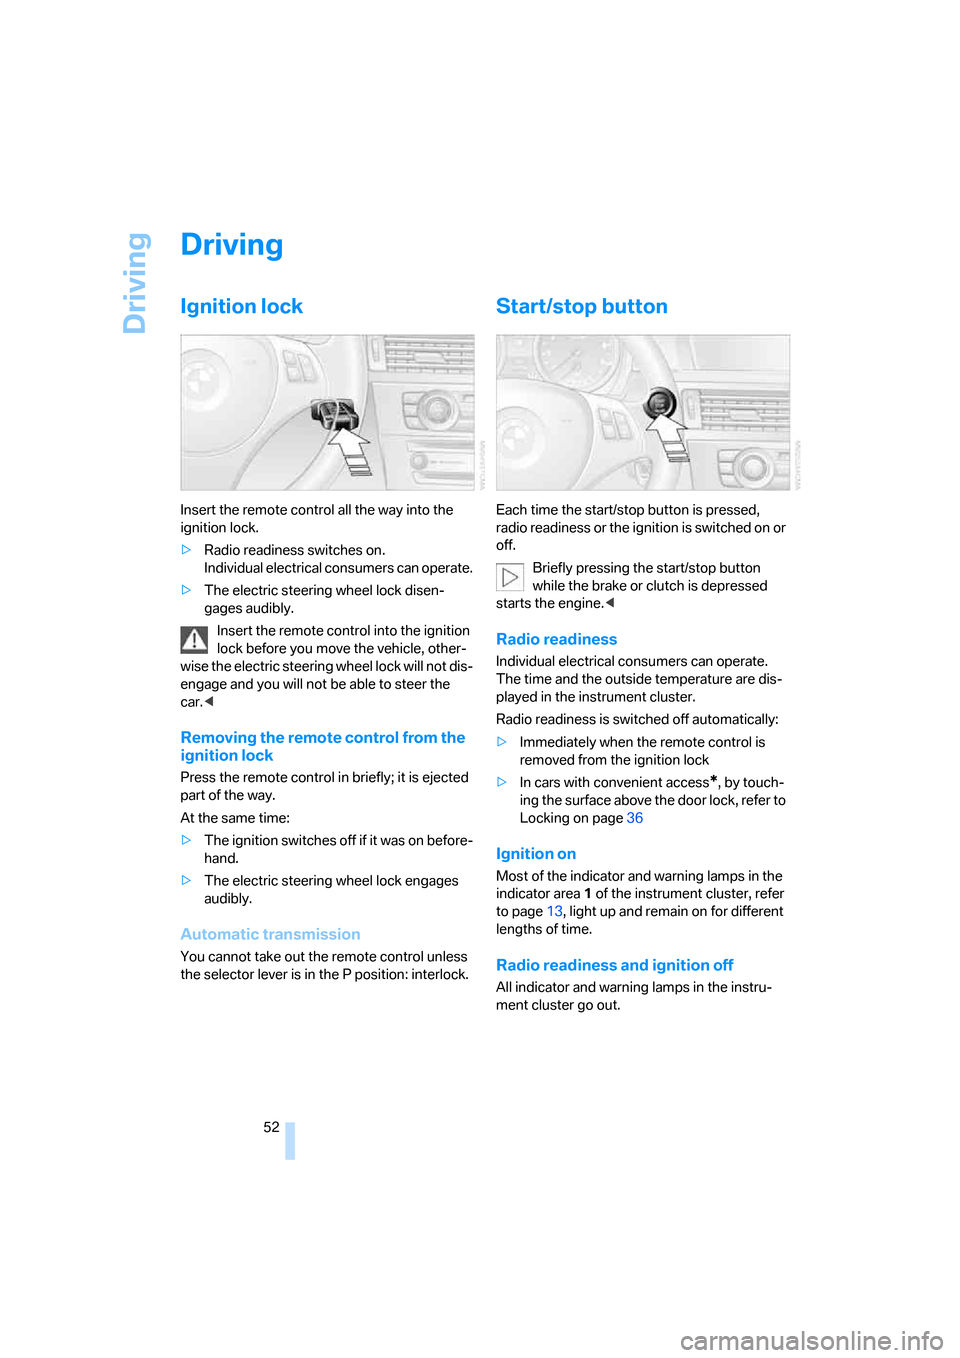
Insert the remote control all the way into the
ignition lock.
>Radio readiness switches on.
Individual electrical consumers can operate.
>The electric steering wheel lock disen-
gages audibly.
Insert the remote control into the ignition
lock before you move the vehicle, other-
wise the electric steering wheel lock will not dis-
engage and you will not be able to steer the
car.<
Removing the remote control from the
ignition lock
Press the remote control in briefly; it is ejected
part of the way.
At the same time:
>The ignition switches off if it was on before-
hand.
>The electric steering wheel lock engages
audibly.
Automatic transmission
You cannot take out the remote control unless
the selector lever is in the P position: interlock.
Start/stop button
Each time the start/stop button is pressed,
radio readiness or the ignition is switched on or
off.
Briefly pressing the start/stop button
while the brake or clutch is depressed
starts the engine.<
Radio readiness
Individual electrical consumers can operate.
The time and the outside temperature are dis-
played in the instrument cluster.
Radio readiness is switched off automatically:
>Immediately when the remote control is
removed from the ignition lock
>In cars with convenient access
*, by touch-
ing the surface above the door lock, refer to
Locking on page36
Ignition on
Most of the indicator and warning lamps in the
indicator area1 of the instrument cluster, refer
to page13, light up and remain on for different
lengths of time.
Radio readiness and ignition off
All indicator and warning lamps in the instru-
ment cluster go out.
Page 57 of 245
Controls
55Reference
At a glance
Driving tips
Communications
Navigation
Entertainment
Mobility
Reverse gear
Select only when the vehicle is stationary.
When the gearshift lever is pressed to the left, a
slight resistance has to be overcome.
Sequential manual gearbox
SMG*
The concept
The sequential manual gearbox SMG is an
automated transmission in which operation of
the clutch and gearshifts are performed by an
electro-hydraulic system.
SMG is operated via the selector lever in the
center console and two shift paddles on the
steering wheel.
It offers you the following functions:
>Choice of manual or automatic operation:
sequential mode or Drive mode
>Choice of two driving programs: Normal or
Sport, refer to Dynamic Driving Control,
page56
>Automatic downshifting and prevention of
misshifting in sequential mode as well
>Acceleration assistant, refer to page57
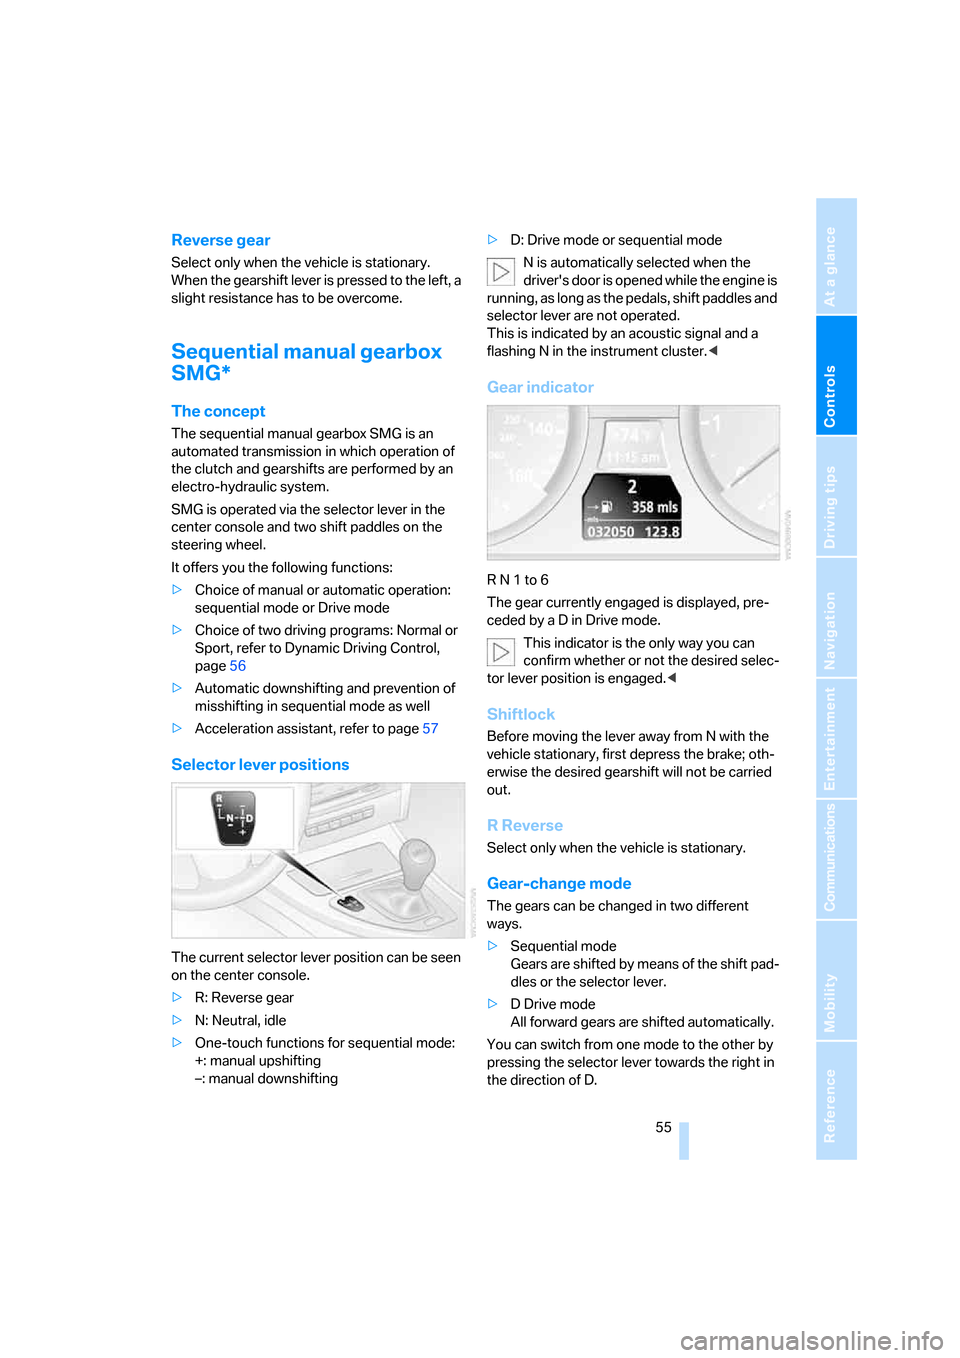
Selector lever positions
The current selector lever position can be seen
on the center console.
>R: Reverse gear
>N: Neutral, idle
>One-touch functions for sequential mode:
+: manual upshifting
–: manual downshifting>D: Drive mode or sequential mode
N is automatically selected when the
driver's door is opened while the engine is
running, as long as the pedals, shift paddles and
selector lever are not operated.
This is indicated by an acoustic signal and a
flashing N in the instrument cluster.<
Gear indicator
R N 1 to 6
The gear currently engaged is displayed, pre-
ceded by a D in Drive mode.
This indicator is the only way you can
confirm whether or not the desired selec-
tor lever position is engaged.<
Shiftlock
Before moving the lever away from N with the
vehicle stationary, first depress the brake; oth-
erwise the desired gearshift will not be carried
out.
R Reverse
Select only when the vehicle is stationary.
Gear-change mode
The gears can be changed in two different
ways.
>Sequential mode
Gears are shifted by means of the shift pad-
dles or the selector lever.
>D Drive mode
All forward gears are shifted automatically.
You can switch from one mode to the other by
pressing the selector lever towards the right in
the direction of D.
Page 188 of 245
Refueling
186
Refueling
Always switch off the engine before refu-
eling, otherwise, fuel cannot be added to
the tank and a message will be displayed.<
Take all precautionary measures and
observe all applicable regulations when
handling fuel. Do not carry any spare fuel con-
tainers in your vehicle. They can develop a leak
and cause an explosion or cause a fire in the
event of an accident.<
Gas cap
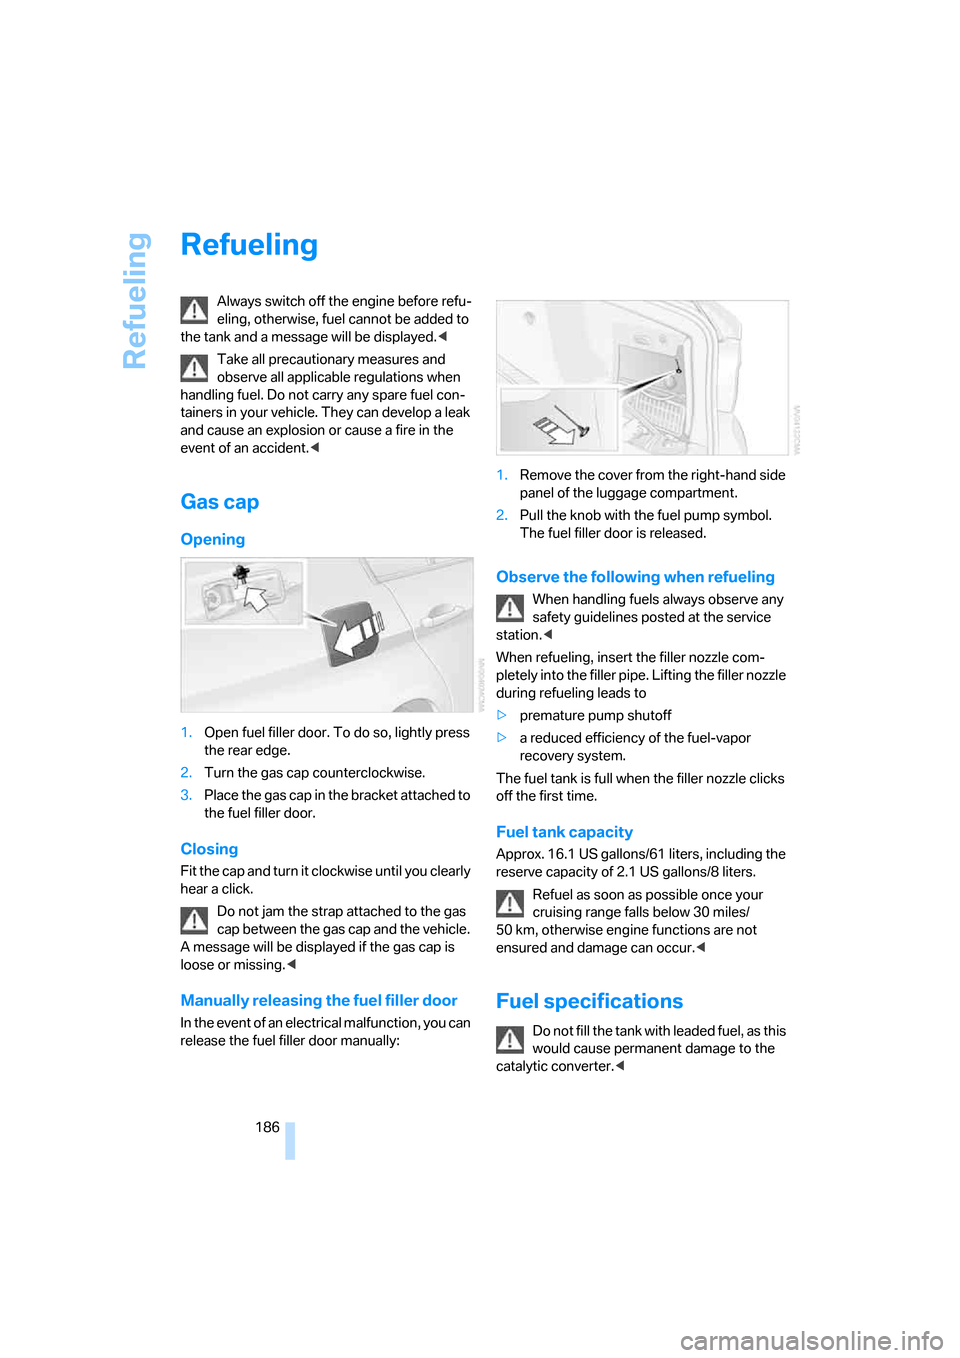
Opening
1.Open fuel filler door. To do so, lightly press
the rear edge.
2.Turn the gas cap counterclockwise.
3.Place the gas cap in the bracket attached to
the fuel filler door.
Closing
Fit the cap and turn it clockwise until you clearly
hear a click.
Do not jam the strap attached to the gas
cap between the gas cap and the vehicle.
A message will be displayed if the gas cap is
loose or missing.<
Manually releasing the fuel filler door
In the event of an electrical malfunction, you can
release the fuel filler door manually:1.Remove the cover from the right-hand side
panel of the luggage compartment.
2.Pull the knob with the fuel pump symbol.
The fuel filler door is released.
Observe the following when refueling
When handling fuels always observe any
safety guidelines posted at the service
station.<
When refueling, insert the filler nozzle com-
pletely into the filler pipe. Lifting the filler nozzle
during refueling leads to
>premature pump shutoff
>a reduced efficiency of the fuel-vapor
recovery system.
The fuel tank is full when the filler nozzle clicks
off the first time.
Fuel tank capacity
Approx. 16.1 US gallons/61 liters, including the
reserve capacity of 2.1 US gallons/8 liters.
Refuel as soon as possible once your
cruising range falls below 30 miles/
50 km, otherwise engine functions are not
ensured and damage can occur.<
Fuel specifications
Do not fill the tank with leaded fuel, as this
would cause permanent damage to the
catalytic converter.<
Page 227 of 245
Reference 225
At a glance
Controls
Driving tips
Communications
Navigation
Entertainment
Mobility
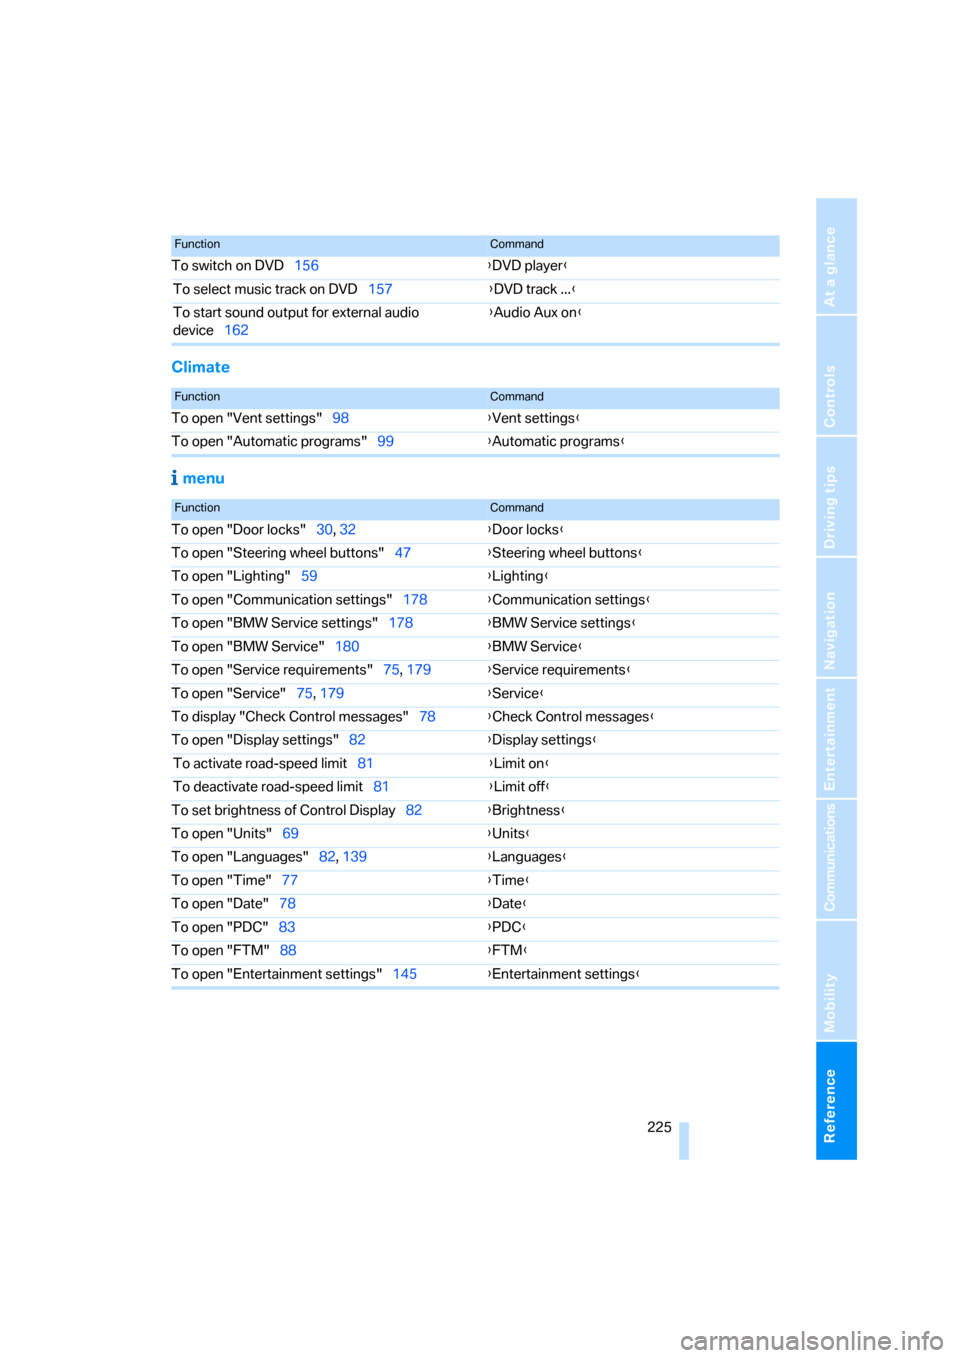
Climate
menu
To switch on DVD156{DVD player}
To select music track on DVD157{DVD track ...}
To start sound output for external audio
device162{Audio Aux on}
FunctionCommand
FunctionCommand
To open "Vent settings"98{Vent settings}
To open "Automatic programs"99{Automatic programs}
FunctionCommand
To open "Door locks"30, 32{Door locks}
To open "Steering wheel buttons"47{Steering wheel buttons}
To open "Lighting"59{Lighting}
To open "Communication settings"178{Communication settings}
To open "BMW Service settings"178{BMW Service settings}
To open "BMW Service"180{BMW Service}
To open "Service requirements"75, 179{Service requirements}
To open "Service"75, 179{Service}
To display "Check Control messages"78{Check Control messages}
To open "Display settings"82{Display settings}
To activate road-speed limit81{Limit on}
To deactivate road-speed limit81{Limit off}
To set brightness of Control Display82{Brightness}
To open "Units"69{Units}
To open "Languages"82, 139{Languages}
To open "Time"77{Time}
To open "Date"78{Date}
To open "PDC"83{PDC}
To open "FTM"88{
FTM}
To open "Entertainment settings"145{Entertainment settings}
Page 231 of 245
Reference 229
At a glance
Controls
Driving tips
Communications
Navigation
Entertainment
Mobility
Cleaning, refer to Caring for
your vehicle brochure
Cleaning headlamps60
– washer fluid60
"Climate"98
Clock69
– 12h/24h mode78
– setting time77
Closing
– from inside32
– from outside30
Clothes hooks107
Cockpit10
Cold start, refer to Starting the
engine53
Combined instrument, refer to
Instrument cluster12
Comfort Access, refer to
Convenient access35
Comfort area, refer to Around
the center console14
"Communication"170
"Communication
settings"179
Compact disc, refer to
– CD changer156
– CD player156
Compartment for remote
control, refer to Ignition
lock52
Compass104
Computer70
– displays on Control
Display71
– hour signal78
Computer, refer to iDrive16
"Concert hall" tone
settings146
Condensation, refer to When
the vehicle is parked118
Configuring settings, refer to
Personal Profile29
Confirmation signals for
locking/unlocking of the
vehicle31
Connecting vacuum cleaner,
refer to Connecting
electrical appliances108Consumption display
– average consumption71
Consumption indicator
– Energy Control70
"Continue guidance to
destination?"137
Control Center, refer to
iDrive16
Control Display
– settings73
– switching on/off21
Control Display, refer to
iDrive16
Controller, refer to iDrive16
Controls and displays10
Control unit, refer to iDrive16
Convenience operation
– windows30
Convenience start, refer to
Starting the engine53
Convenient access35
– replacing the battery37
– what to observe before
entering a car wash36
Convenient operation
– windows with convenient
access36
– with convenient access36
Coolant201
– adding201
– checking level201
Coolant temperature69
Cooling, maximum98
Cooling fluid, refer to
Coolant201
Cornering lamps, refer to
Adaptive Head Light95
Country of destination for
navigation126
Courtesy lamps96
Cross-hairs in navigation129
Cruise control60
– active62
– malfunction62
Cruising range70
Cup holders107
Curb weight, refer to
Weights220Current consumption, refer to
Energy Control70
"Current position"140
Current position
– displaying140
– entering132
– storing132
"Customer
Relations"180,182
D
Dashboard, refer to
Cockpit10
Dashboard, refer to
Instrument cluster12
Dashboard lighting, refer to
Instrument lighting96
Data218
– capacities221
– dimensions219
– engine218
– weights220
"Date"79
Date
– setting78
– setting format79
"Date format"79
Daytime driving lamps94
"Daytime running light"95
DBC Dynamic Brake
Control84
DCC, refer to Cruise
control60
"Deactivated"44
Deactivating front passenger
airbags91
Deadlocking, refer to
Locking30
Decommissioning the vehicle
– refer to Caring for your
vehicle brochure
Defect
– door lock32
– fuel filler door186
– glass sunroof39
Defogging windows100
Defrosting windows100
Page 232 of 245
Everything from A - Z
230 Defrosting windows and
removing condensation
– automatic climate
control100
Defrosting windshield, refer to
Defrosting windows100
Defrost position, refer to
Defrosting windows100
"Delete address book" in
navigation134
"Delete all numbers" on the
mobile phone173
"Delete data" in
navigation134
"Delete" for mobile
phone173
Destination address
– deleting133
– entering125,128
Destination for navigation
– entry125
– navigation list131
– selecting from address
book133
– selecting using
information130
– storing132
Destination guidance136
– bypassing route
sections140
– canceling voice
instructions48
– changing specified
route134
– displaying route137
– displaying routes137
– distance and arrival136
– interrupting136
– starting136
– terminating/continuing136
– voice instructions139
– volume of voice
instructions139
Destination list for navigation
system131
Destinations recently driven
to131
"Dial" for mobile phone171
"Dial number"171Digital clock69
Digital compass104
Digital radio151
Dimensions219
Directional indicators, refer to
Turn signals58
Direction instructions, refer to
Voice instructions139
Directory for navigation, refer
to Address book132
Displacement, refer to Engine
data
218
Display, refer to iDrive
controls16
Display lighting, refer to
Instrument lighting96
"Display off"21
Displays
– instrument cluster12
– on the Control Display16
Displays and controls10
"Display settings"77
Disposal
– coolant201
– remote control battery37
– vehicle battery209
Distance control, refer to
Active cruise control62
Distance remaining to service,
refer to Service
requirements74
"Distance to dest."71
Distance warning, refer to
PDC Park Distance
Control83
Door key, refer to Integrated
key/remote control28
Door lock32
Door locking, confirmation
signals31
"Door locks"30
Doors, emergency
operation32
DOT Quality Grades194
Draft-free ventilation100
Drinks holders, refer to Cup
holders107
Drive mode56
Drive-off assistant87Driving lamps, refer to Parking
lamps/low beams93
Driving notes116
Driving route, refer to
Displaying route137
Driving stability control
systems84
Driving through water117
Driving tips, refer to Driving
notes116
Dry air, refer to Cooling
function100
DSC Dynamic Stability
Control84
DTC Dynamic Traction
Control85
– indicator lamps85
DVD for navigation124
Dynamic Driving Control56
Dynamic Traction Control
DTC
– indicator lamps85
E
EBV Electronic brake-force
distribution84
Eject button, refer to Buttons
on the CD player144
Electrical malfunction
– door lock32
– fuel filler door186
– glass sunroof39
– panorama glass roof39
Electric seat adjustment41
Electronic brake-force
distribution84
Electronic oil level check199
Emergency call211
Emergency operation, refer to
Closing manually
– glass sunroof39
– panorama glass roof39
Emergency operation, refer to
Manual operation
– door lock32
– fuel filler door186
– transmission lock, automatic
transmission58