BMW 325XI SEDAN 2006 E90 Manual PDF
Manufacturer: BMW, Model Year: 2006, Model line: 325XI SEDAN, Model: BMW 325XI SEDAN 2006 E90Pages: 245, PDF Size: 8.24 MB
Page 71 of 245
Controls
69Reference
At a glance
Driving tips
Communications
Navigation
Entertainment
Mobility
Everything under control
Odometer, outside
temperature display, clock
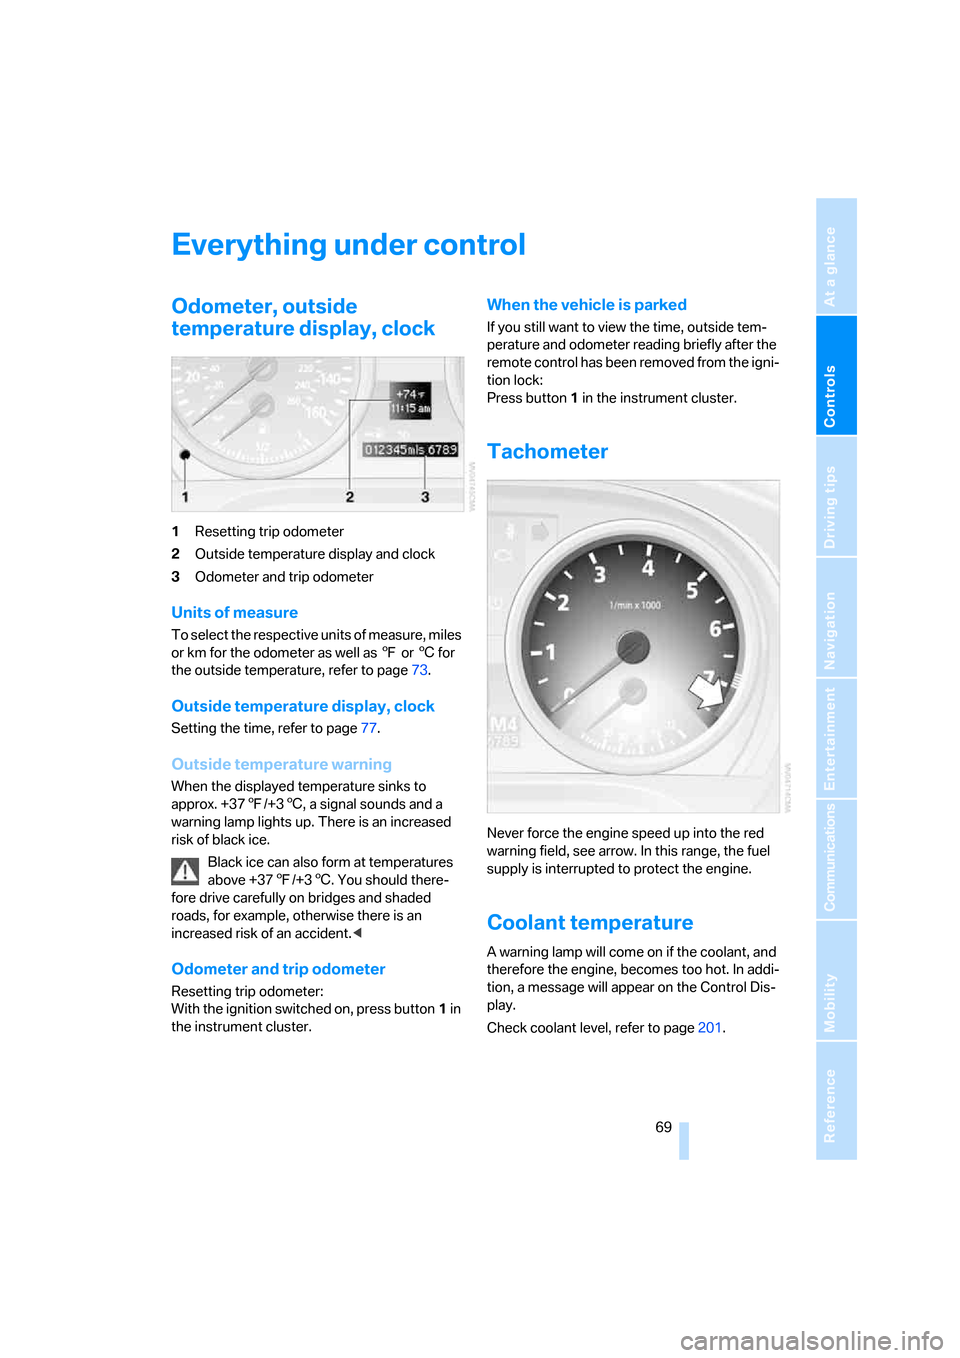
1Resetting trip odometer
2Outside temperature display and clock
3Odometer and trip odometer
Units of measure
To select the respective units of measure, miles
or km for the odometer as well as 7 or 6 for
the outside temperature, refer to page73.
Outside temperature display, clock
Setting the time, refer to page77.
Outside temperature warning
When the displayed temperature sinks to
approx. +377/+36, a signal sounds and a
warning lamp lights up. There is an increased
risk of black ice.
Black ice can also form at temperatures
above +377/+36. You should there-
fore drive carefully on bridges and shaded
roads, for example, otherwise there is an
increased risk of an accident.<
Odometer and trip odometer
Resetting trip odometer:
With the ignition switched on, press button1 in
the instrument cluster.
When the vehicle is parked
If you still want to view the time, outside tem-
perature and odometer reading briefly after the
remote control has been removed from the igni-
tion lock:
Press button 1 in the instrument cluster.
Tachometer
Never force the engine speed up into the red
warning field, see arrow. In this range, the fuel
supply is interrupted to protect the engine.
Coolant temperature
A warning lamp will come on if the coolant, and
therefore the engine, becomes too hot. In addi-
tion, a message will appear on the Control Dis-
play.
Check coolant level, refer to page201.
Page 72 of 245
Everything under control
70
Energy Control
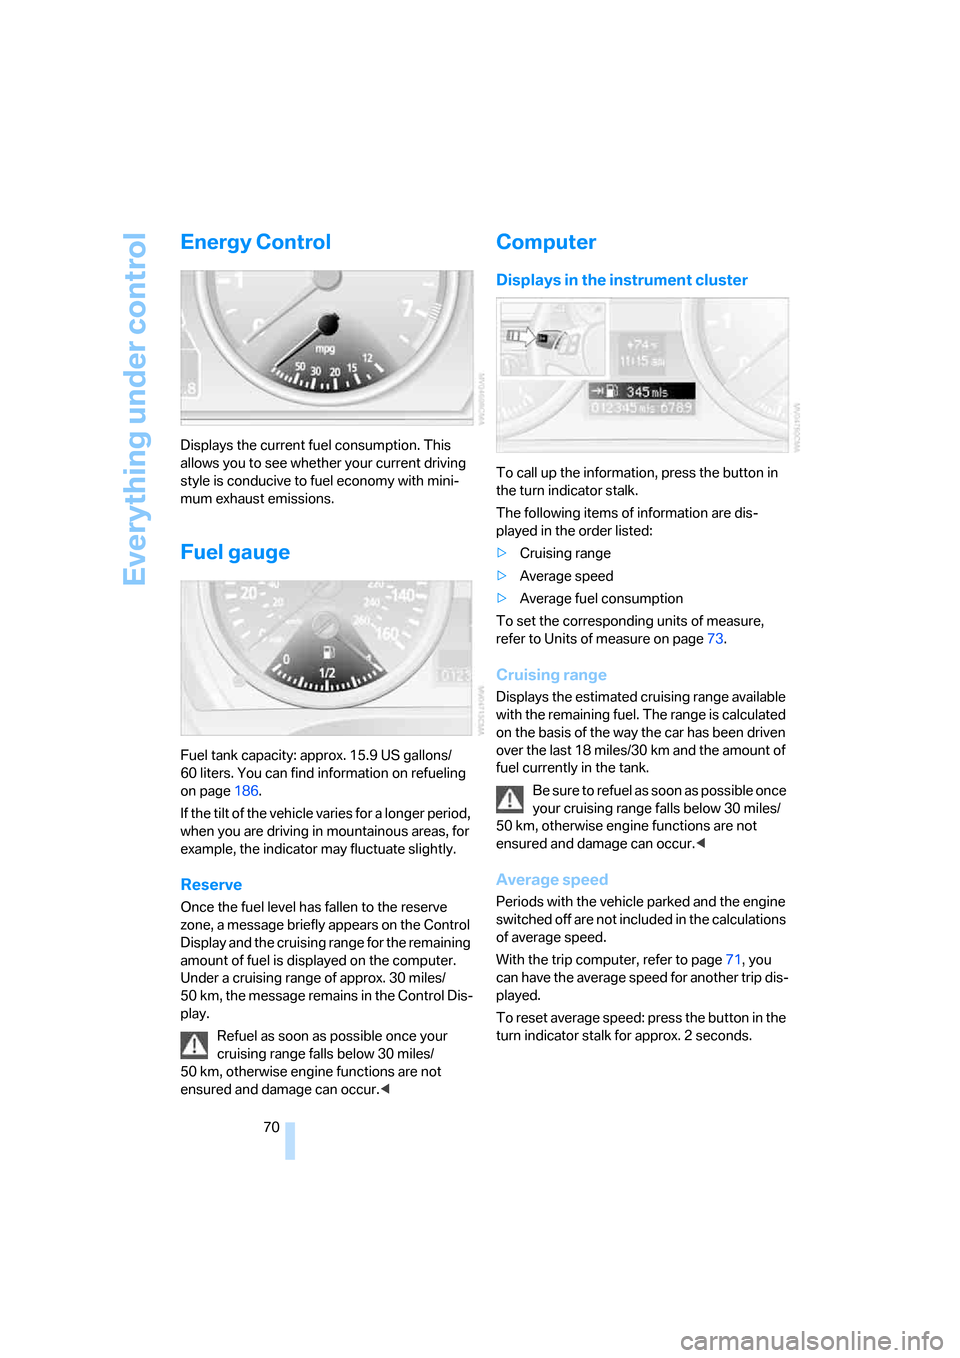
Displays the current fuel consumption. This
allows you to see whether your current driving
style is conducive to fuel economy with mini-
mum exhaust emissions.
Fuel gauge
Fuel tank capacity: approx. 15.9 US gallons/
60 liters. You can find information on refueling
on page186.
If the tilt of the vehicle varies for a longer period,
when you are driving in mountainous areas, for
example, the indicator may fluctuate slightly.
Reserve
Once the fuel level has fallen to the reserve
zone, a message briefly appears on the Control
Display and the cruising range for the remaining
amount of fuel is displayed on the computer.
Under a cruising range of approx. 30 miles/
50 km, the message remains in the Control Dis-
play.
Refuel as soon as possible once your
cruising range falls below 30 miles/
50 km, otherwise engine functions are not
ensured and damage can occur.<
Computer
Displays in the instrument cluster
To call up the information, press the button in
the turn indicator stalk.
The following items of information are dis-
played in the order listed:
>Cruising range
>Average speed
>Average fuel consumption
To set the corresponding units of measure,
refer to Units of measure on page73.
Cruising range
Displays the estimated cruising range available
with the remaining fuel. The range is calculated
on the basis of the way the car has been driven
over the last 18 miles/30 km and the amount of
fuel currently in the tank.
B e s u r e t o r e f u e l a s s o o n a s p o s s i b l e o n c e
your cruising range falls below 30 miles/
50 km, otherwise engine functions are not
ensured and damage can occur.<
Average speed
Periods with the vehicle parked and the engine
switched off are not included in the calculations
of average speed.
With the trip computer, refer to page71, you
can have the average speed for another trip dis-
played.
To reset average speed: press the button in the
turn indicator stalk for approx. 2 seconds.
Page 73 of 245
Controls
71Reference
At a glance
Driving tips
Communications
Navigation
Entertainment
Mobility
Average fuel consumption
The average fuel consumption is calculated for
the time during which the engine is running.
With the trip computer, refer to page71, you
can have the average consumption for another
trip displayed.
To reset average fuel consumption: press the
button in the turn indicator stalk for approx.
2seconds.
Displays on the Control Display
You can also call up the computer via iDrive;
concept, refer to page16.
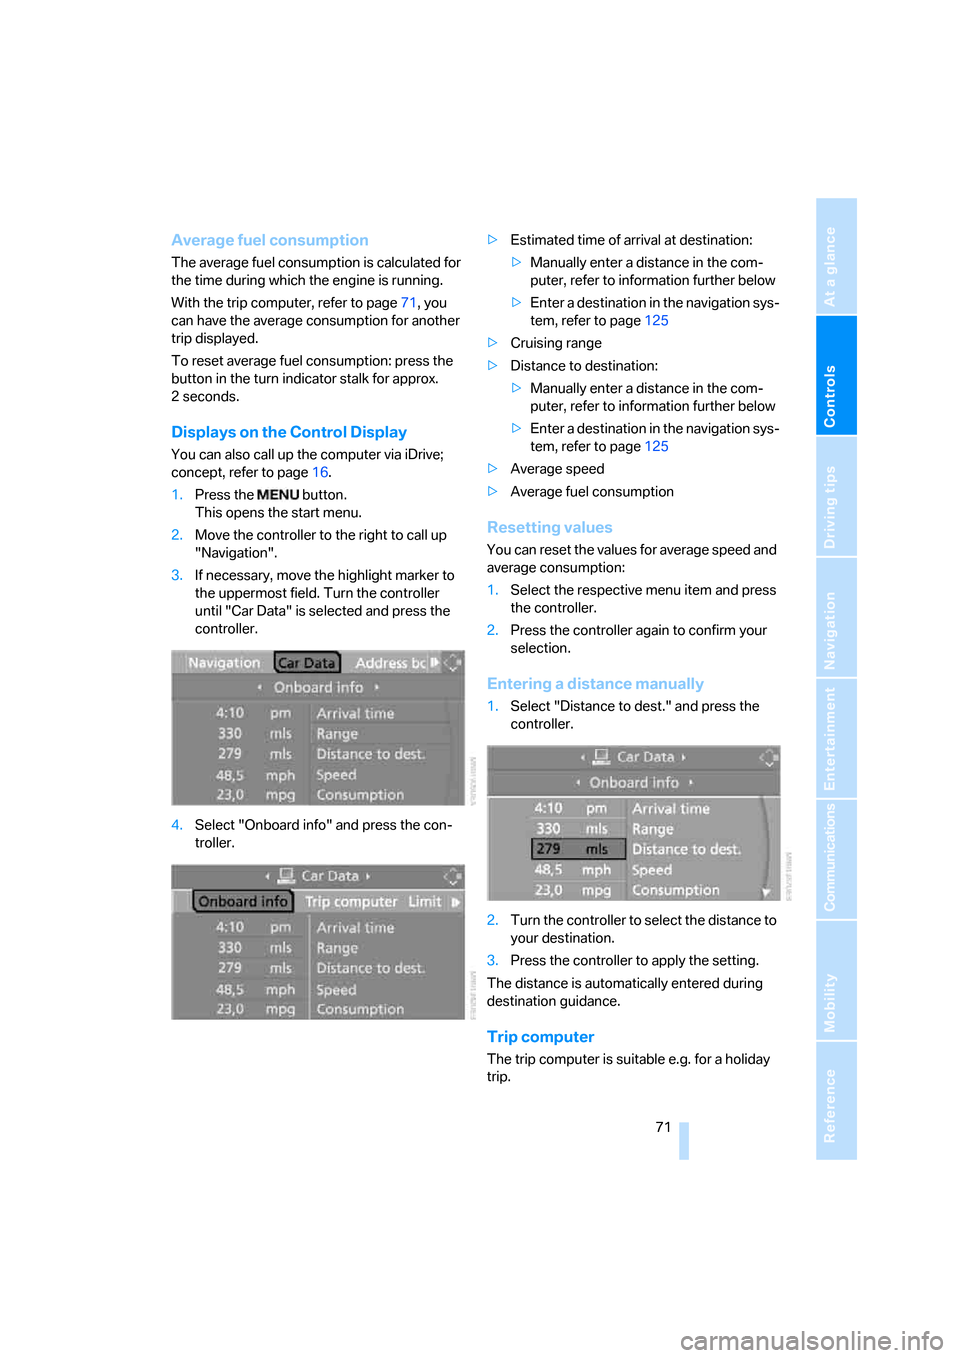
1.Press the button.
This opens the start menu.
2.Move the controller to the right to call up
"Navigation".
3.If necessary, move the highlight marker to
the uppermost field. Turn the controller
until "Car Data" is selected and press the
controller.
4.Select "Onboard info" and press the con-
troller.>Estimated time of arrival at destination:
>Manually enter a distance in the com-
puter, refer to information further below
>Enter a destination in the navigation sys-
tem, refer to page125
>Cruising range
>Distance to destination:
>Manually enter a distance in the com-
puter, refer to information further below
>Enter a destination in the navigation sys-
tem, refer to page125
>Average speed
>Average fuel consumption
Resetting values
You can reset the values for average speed and
average consumption:
1.Select the respective menu item and press
the controller.
2.Press the controller again to confirm your
selection.
Entering a distance manually
1.Select "Distance to dest." and press the
controller.
2.Turn the controller to select the distance to
your destination.
3.Press the controller to apply the setting.
The distance is automatically entered during
destination guidance.
Trip computer
The trip computer is suitable e.g. for a holiday
trip.
Page 74 of 245
Everything under control
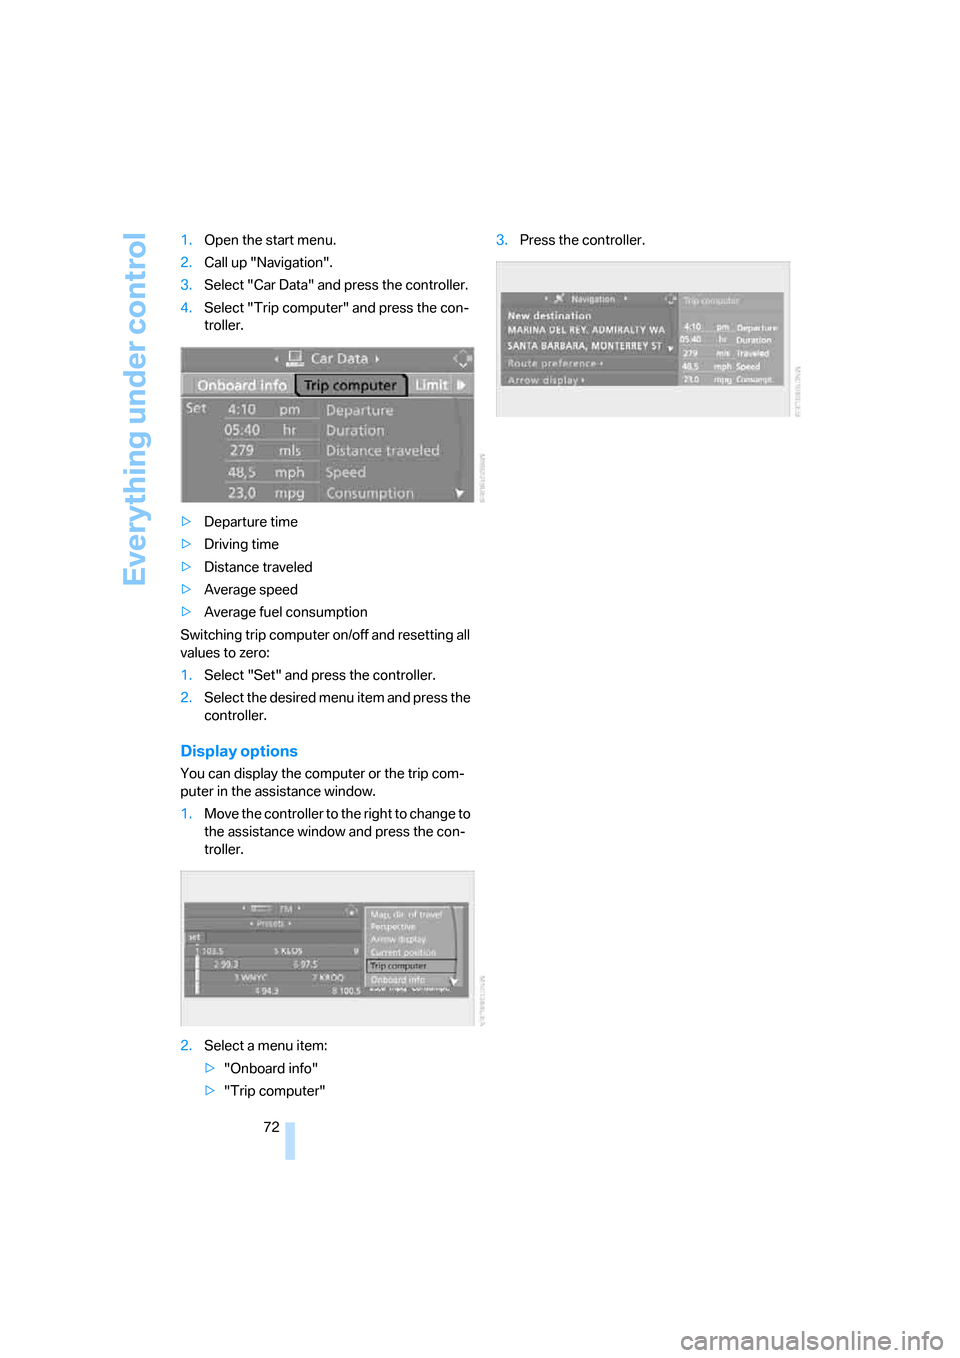
72 1.Open the start menu.
2.Call up "Navigation".
3.Select "Car Data" and press the controller.
4.Select "Trip computer" and press the con-
troller.
>Departure time
>Driving time
>Distance traveled
>Average speed
>Average fuel consumption
Switching trip computer on/off and resetting all
values to zero:
1.Select "Set" and press the controller.
2.Select the desired menu item and press the
controller.
Display options
You can display the computer or the trip com-
puter in the assistance window.
1.Move the controller to the right to change to
the assistance window and press the con-
troller.
2.Select a menu item:
>"Onboard info"
>"Trip computer"3.Press the controller.
Page 75 of 245
Controls
73Reference
At a glance
Driving tips
Communications
Navigation
Entertainment
Mobility
Settings and information
Operating principle
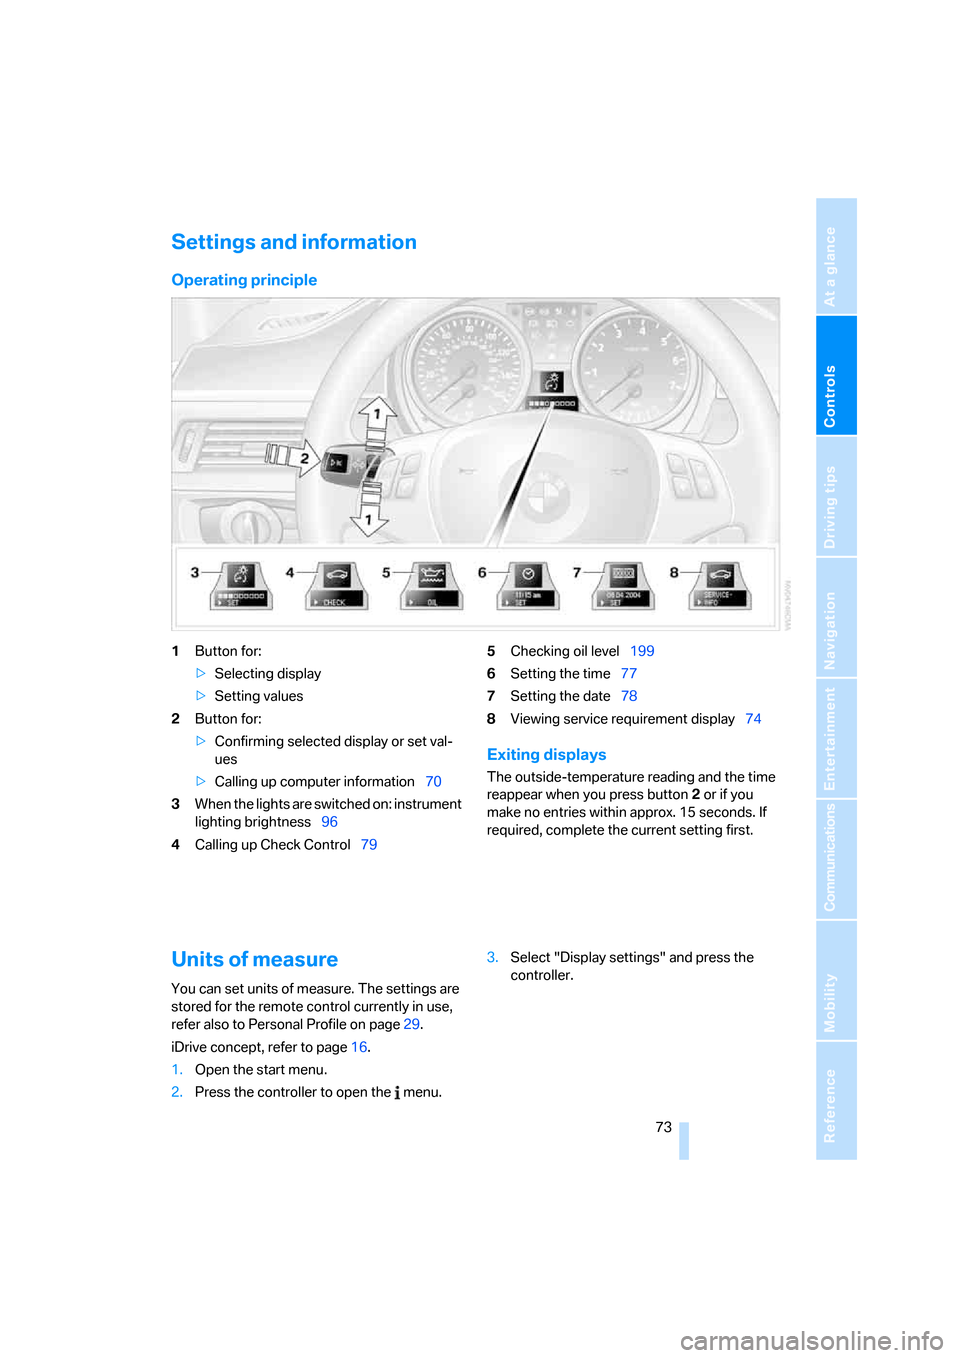
1Button for:
>Selecting display
>Setting values
2Button for:
>Confirming selected display or set val-
ues
>Calling up computer information70
3When the lights are switched on: instrument
lighting brightness96
4Calling up Check Control795Checking oil level199
6Setting the time77
7Setting the date78
8Viewing service requirement display74
Exiting displays
The outside-temperature reading and the time
reappear when you press button2 or if you
make no entries within approx. 15 seconds. If
required, complete the current setting first.
Units of measure
You can set units of measure. The settings are
stored for the remote control currently in use,
refer also to Personal Profile on page29.
iDrive concept, refer to page16.
1.Open the start menu.
2.Press the controller to open the menu.3.Select "Display settings" and press the
controller.
Page 76 of 245
Everything under control
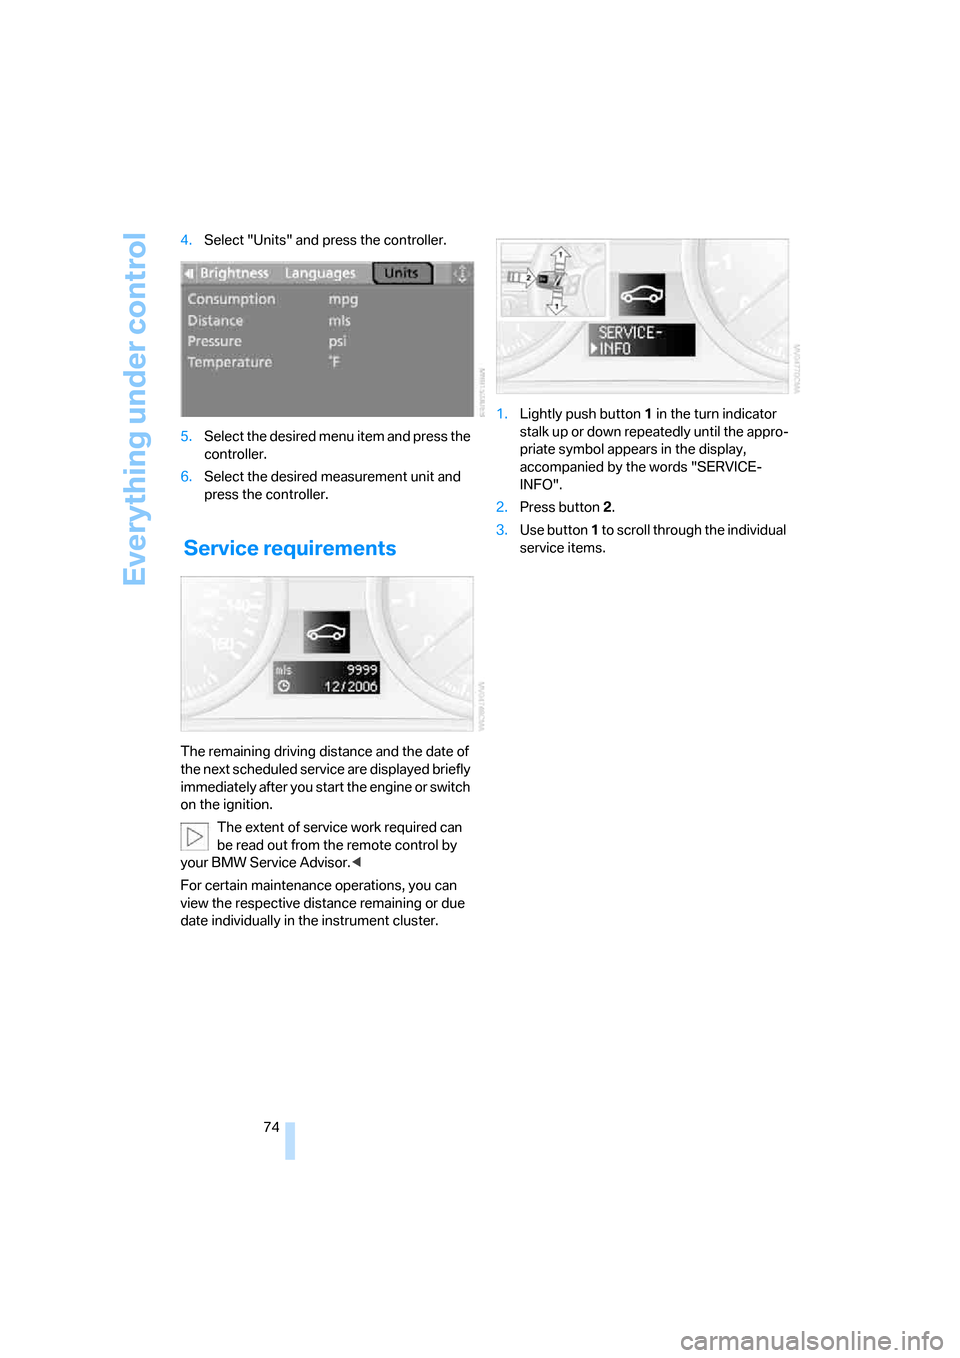
74 4.Select "Units" and press the controller.
5.Select the desired menu item and press the
controller.
6.Select the desired measurement unit and
press the controller.
Service requirements
The remaining driving distance and the date of
the next scheduled service are displayed briefly
immediately after you start the engine or switch
on the ignition.
The extent of service work required can
be read out from the remote control by
your BMW Service Advisor.<
For certain maintenance operations, you can
view the respective distance remaining or due
date individually in the instrument cluster.1.Lightly push button 1 in the turn indicator
stalk up or down repeatedly until the appro-
priate symbol appears in the display,
accompanied by the words "SERVICE-
INFO".
2.Press button 2.
3.Use button 1 to scroll through the individual
service items.
Page 77 of 245
Controls
75Reference
At a glance
Driving tips
Communications
Navigation
Entertainment
Mobility
Possible displays
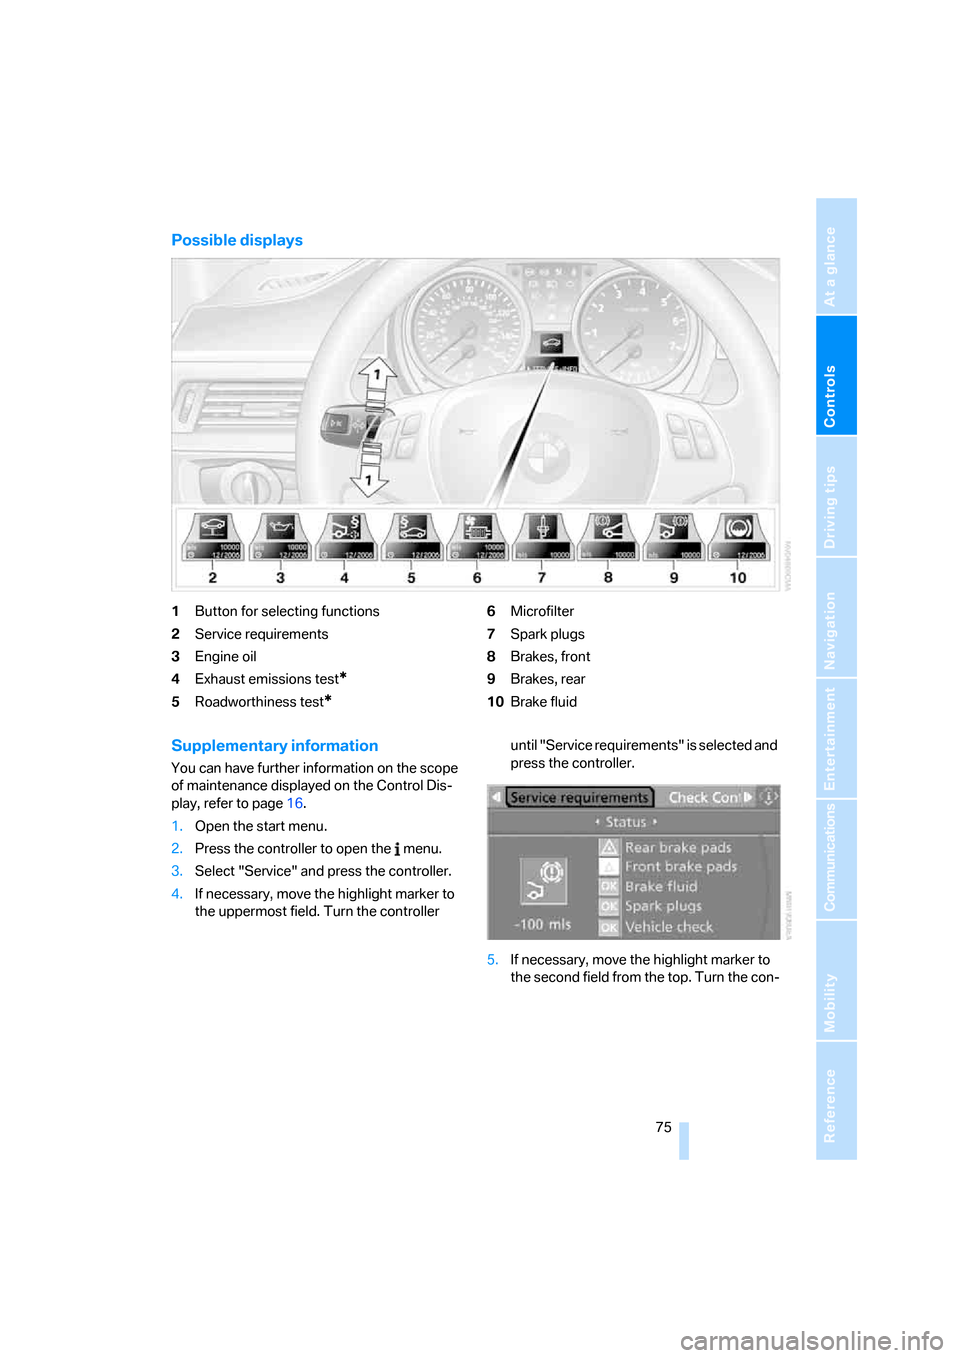
1Button for selecting functions
2Service requirements
3Engine oil
4Exhaust emissions test
*
5Roadworthiness test*
6Microfilter
7Spark plugs
8Brakes, front
9Brakes, rear
10Brake fluid
Supplementary information
You can have further information on the scope
of maintenance displayed on the Control Dis-
play, refer to page16.
1.Open the start menu.
2.Press the controller to open the menu.
3.Select "Service" and press the controller.
4.If necessary, move the highlight marker to
the uppermost field. Turn the controller until "Service requirements" is selected and
press the controller.
5.If necessary, move the highlight marker to
the second field from the top. Turn the con-
Page 78 of 245
Everything under control
76 troller until "Status" is selected and press
the controller.
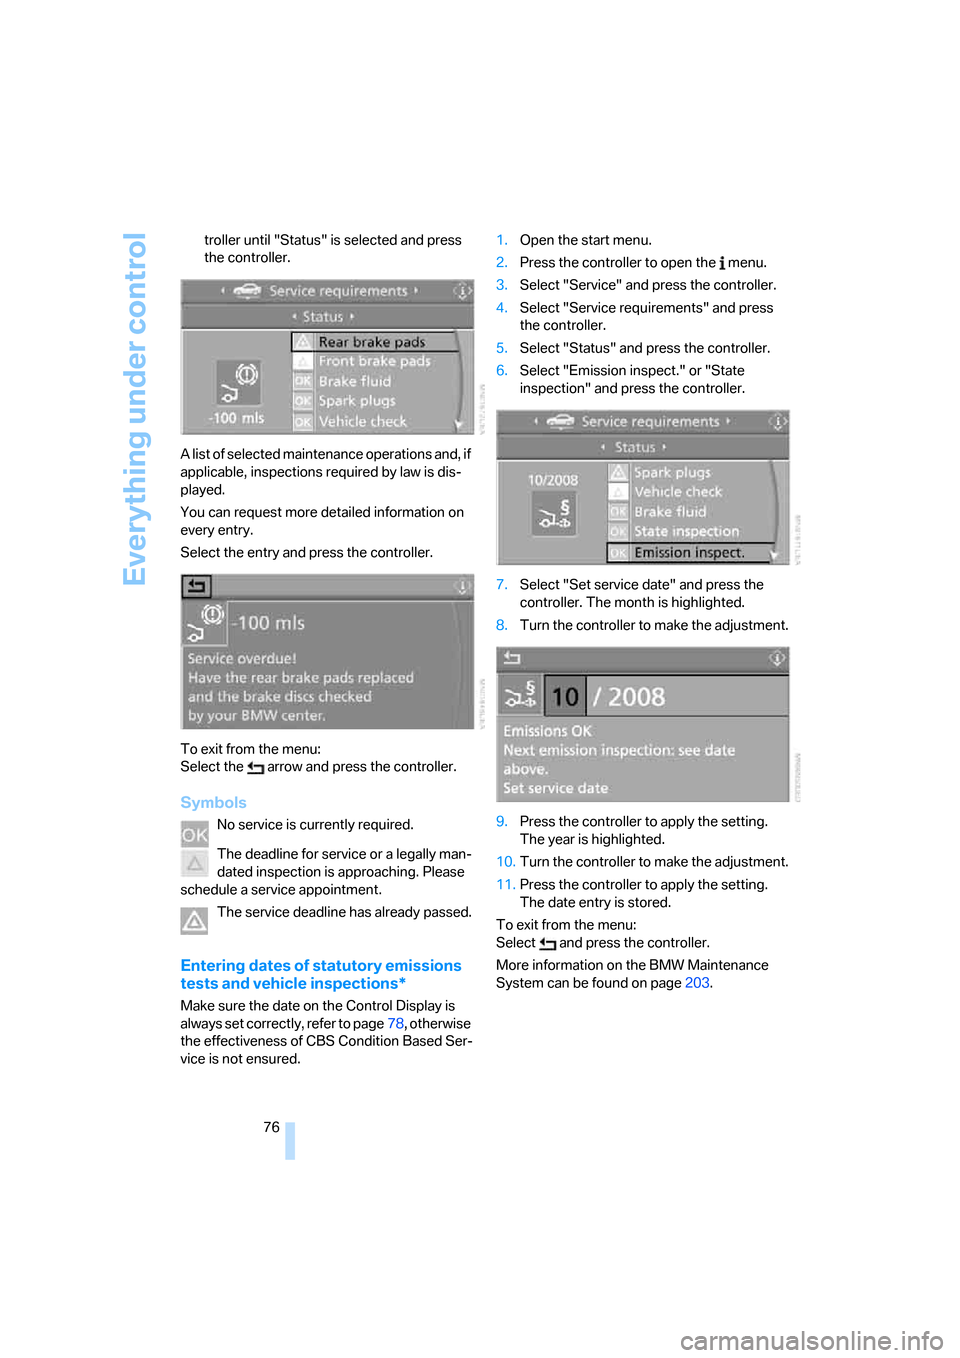
A list of selected maintenance operations and, if
applicable, inspections required by law is dis-
played.
You can request more detailed information on
every entry.
Select the entry and press the controller.
To exit from the menu:
Select the arrow and press the controller.
Symbols
No service is currently required.
The deadline for service or a legally man-
dated inspection is approaching. Please
schedule a service appointment.
The service deadline has already passed.
Entering dates of statutory emissions
tests and vehicle inspections*
Make sure the date on the Control Display is
always set correctly, refer to page78, otherwise
the effectiveness of CBS Condition Based Ser-
vice is not ensured.1.Open the start menu.
2.Press the controller to open the menu.
3.Select "Service" and press the controller.
4.Select "Service requirements" and press
the controller.
5.Select "Status" and press the controller.
6.Select "Emission inspect." or "State
inspection" and press the controller.
7.Select "Set service date" and press the
controller. The month is highlighted.
8.Turn the controller to make the adjustment.
9.Press the controller to apply the setting.
The year is highlighted.
10.Turn the controller to make the adjustment.
11.Press the controller to apply the setting.
The date entry is stored.
To exit from the menu:
Select and press the controller.
More information on the BMW Maintenance
System can be found on page203.
Page 79 of 245
Controls
77Reference
At a glance
Driving tips
Communications
Navigation
Entertainment
Mobility
Clock
The settings are stored for the remote control
currently in use, refer also to Personal Profile on
page29.
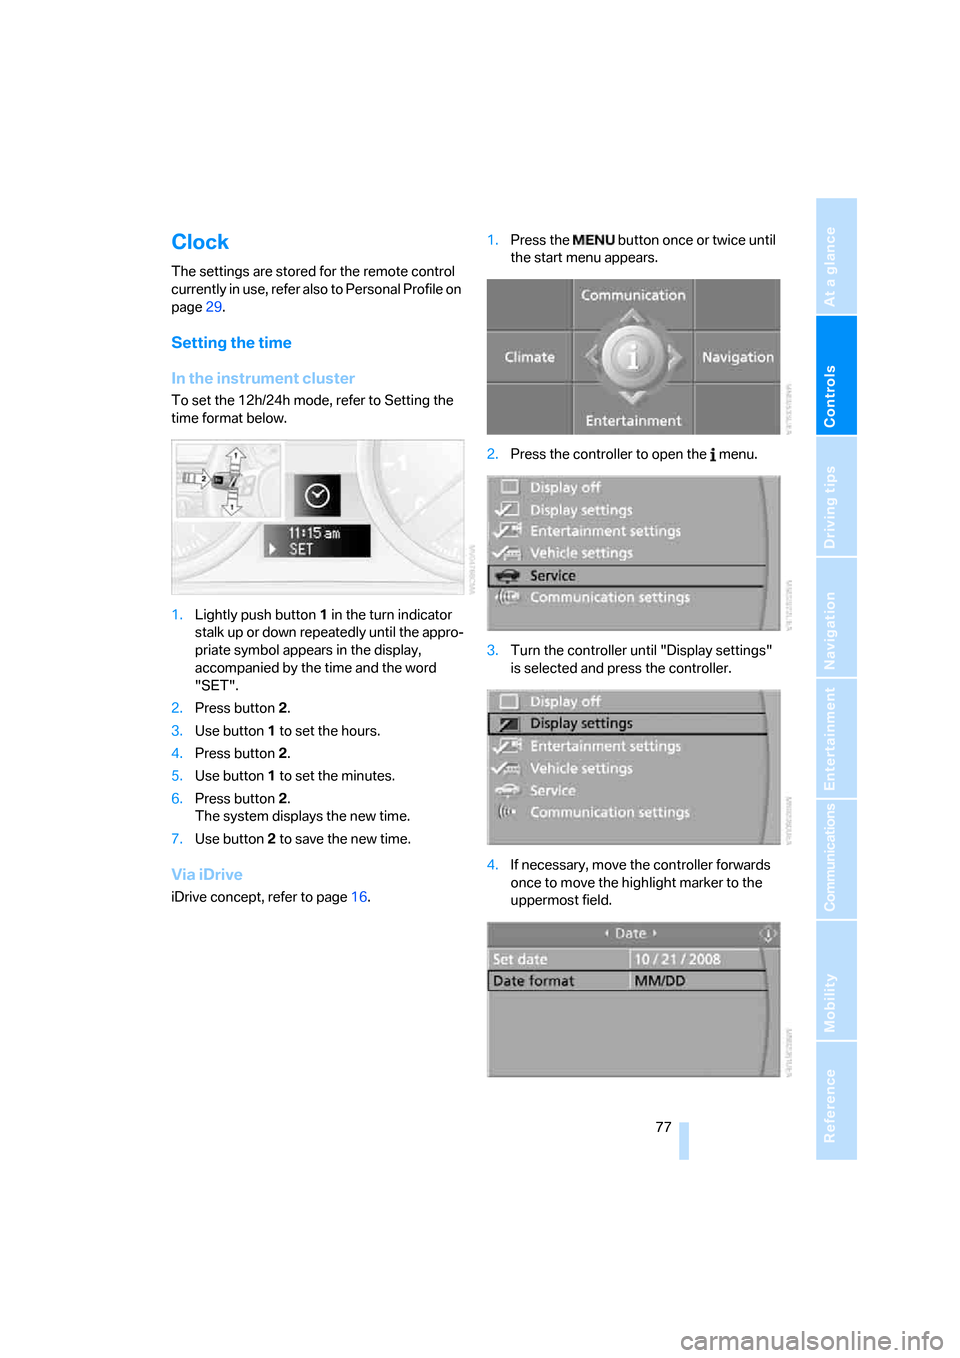
Setting the time
In the instrument cluster
To set the 12h/24h mode, refer to Setting the
time format below.
1.Lightly push button 1 in the turn indicator
stalk up or down repeatedly until the appro-
priate symbol appears in the display,
accompanied by the time and the word
"SET".
2.Press button 2.
3.Use button 1 to set the hours.
4.Press button 2.
5.Use button 1 to set the minutes.
6.Press button 2.
The system displays the new time.
7.Use button 2 to save the new time.
Via iDrive
iDrive concept, refer to page16.1.Press the button once or twice until
the start menu appears.
2.Press the controller to open the menu.
3.Turn the controller until "Display settings"
is selected and press the controller.
4.If necessary, move the controller forwards
once to move the highlight marker to the
uppermost field.
Page 80 of 245
Everything under control
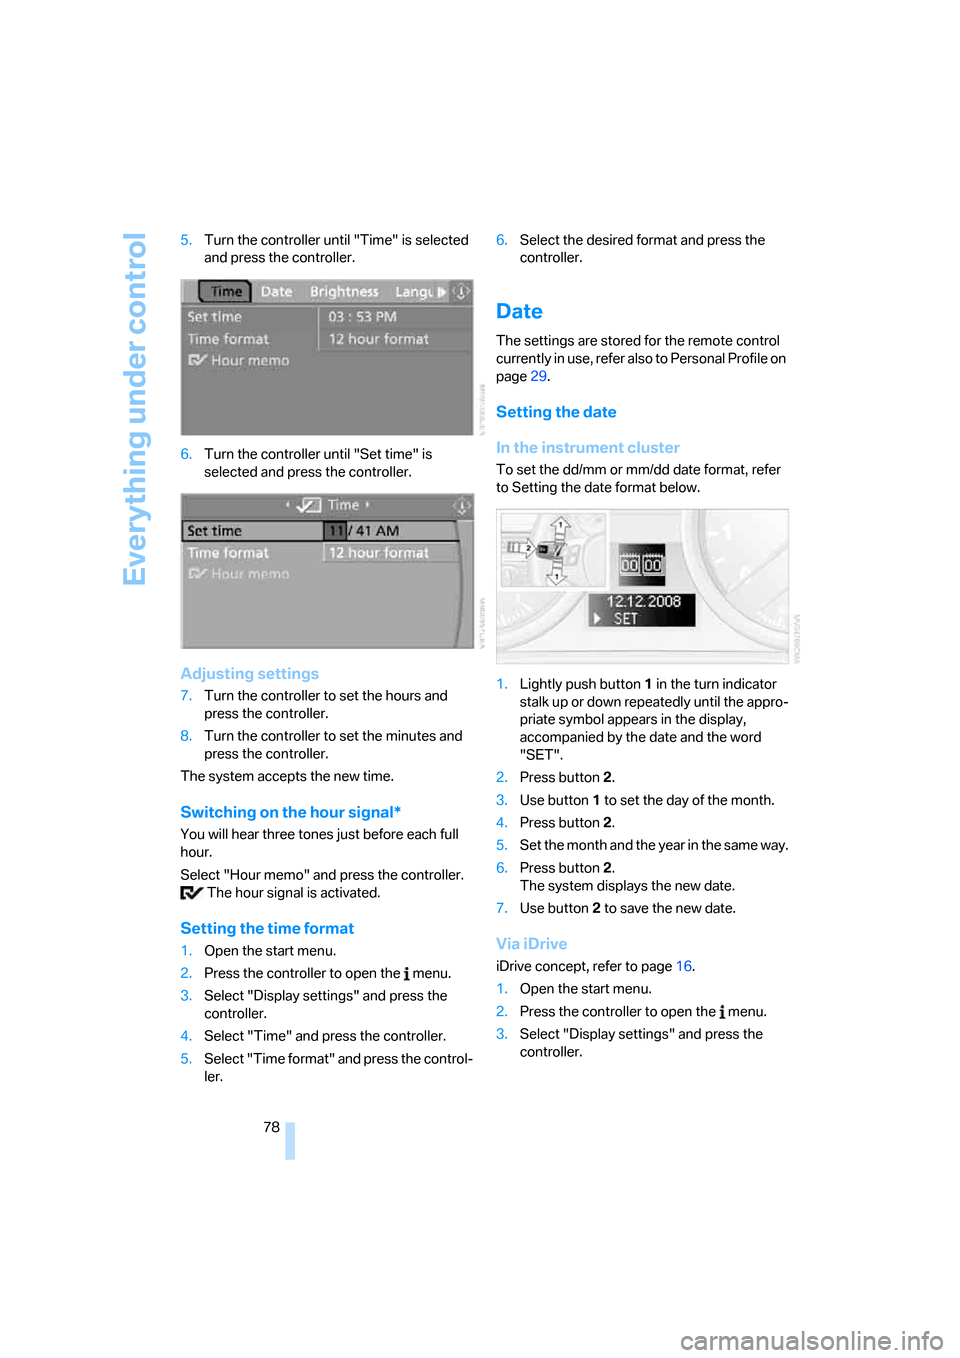
78 5.Turn the controller until "Time" is selected
and press the controller.
6.Turn the controller until "Set time" is
selected and press the controller.
Adjusting settings
7.Turn the controller to set the hours and
press the controller.
8.Turn the controller to set the minutes and
press the controller.
The system accepts the new time.
Switching on the hour signal*
You will hear three tones just before each full
hour.
Select "Hour memo" and press the controller.
The hour signal is activated.
Setting the time format
1.Open the start menu.
2.Press the controller to open the menu.
3.Select "Display settings" and press the
controller.
4.Select "Time" and press the controller.
5.Select "Time format" and press the control-
ler.6.Select the desired format and press the
controller.
Date
The settings are stored for the remote control
currently in use, refer also to Personal Profile on
page29.
Setting the date
In the instrument cluster
To set the dd/mm or mm/dd date format, refer
to Setting the date format below.
1.Lightly push button 1 in the turn indicator
stalk up or down repeatedly until the appro-
priate symbol appears in the display,
accompanied by the date and the word
"SET".
2.Press button 2.
3.Use button 1 to set the day of the month.
4.Press button 2.
5.Set the month and the yea r i n t he s a m e w a y .
6.Press button 2.
The system displays the new date.
7.Use button 2 to save the new date.
Via iDrive
iDrive concept, refer to page16.
1.Open the start menu.
2.Press the controller to open the menu.
3.Select "Display settings" and press the
controller.